配置ssh免密登陆,能够通过客户端主机通过redhat用户和服务端主机基于公钥验证方式进行远程连接
[root@456 ~]# hostname host
[root@456 ~]# bash                                                      \\更改名称


[root@host ~]# su redhat                                         \\登陆普通用户redhat

[redhat@host root]$ ssh-keygen -t rsa                          \\在客户端主机下创建密钥对
Generating public/private rsa key pair.
Enter file in which to save the key (/home/redhat/.ssh/id_rsa):
/home/redhat/.ssh/id_rsa already exists.
Overwrite (y/n)? y
Enter passphrase (empty for no passphrase):
Enter same passphrase again:
Your identification has been saved in /home/redhat/.ssh/id_rsa.
Your public key has been saved in /home/redhat/.ssh/id_rsa.pub.
The key fingerprint is:
SHA256:BdGX5lOjocQVDaAKc5MvT9aKE4gpmpE90QQ4fq1m9HM redhat@host
The key's randomart image is:
+---[RSA 3072]----+
| ....   o+.o+=   |
|o  o   . o+ = +  |
|... = + ...= + . |
| + * * + o. +    |
|+ B + + S .  .   |
|.+ = o E .       |
|o o   = o        |
|       .         |
|                 |
+----[SHA256]-----+
之后将此密钥对中的公钥发送至服务端
[redhat@host root]$ ssh-copy-id -i /home/redhat/.ssh/id_rsa.pub root@192.168.40.132
/usr/bin/ssh-copy-id: INFO: Source of key(s) to be installed: "/home/redhat/.ssh/id_rsa.pub"
The authenticity of host '192.168.40.132 (192.168.40.132)' can't be established.
ECDSA key fingerprint is SHA256:T7/sEALD9Zt772x20p8C6TgbsH+/J4RjD5lDASQ/aVE.
Are you sure you want to continue connecting (yes/no/[fingerprint])? yes
/usr/bin/ssh-copy-id: INFO: attempting to log in with the new key(s), to filter out any that are already installed
/usr/bin/ssh-copy-id: INFO: 1 key(s) remain to be installed -- if you are prompted now it is to install the new keys
password:

Number of key(s) added: 1

Now try logging into the machine, with:   "ssh 'root@192.168.40.132'"
and check to make sure that only the key(s) you wanted were added.

在服务端的/root/.ssh/目录下查看是否接收到此公钥
[root@sever ~]# cd .ssh/
[root@sever .ssh]# ll
total 4
-rw-------. 1 root root 565 Aug 28 07:20 authorized_keys

尝试基于公钥的远程免密码登录
[redhat@host root]$ ssh redhat@192.168.40.132
Activate the web console with: systemctl enable --now cockpit.socket

This system is not registered to Red Hat Insights. See https://cloud.redhat.com/
To register this system, run: insights-client --register

Last failed login: Sun Aug 28 07:20:22 PDT 2022 from 192.168.40.128 on ssh:notty
There was 1 failed login attempt since the last successful login.
Last login: Sun Aug 28 07:14:11 2022 from 192.168.40.1
[redhat@sever ~]#                                                  \\出现sever即为完成
配置ntp时间服务器,确保客户端主机能和服务主机同步时间
1、NTP是网络时间同步协议,就是用来同步网络中各个计算机的时间的协议。
2、NTP服务端配置
(1)检查系统是否安装了NTP包(Linux一般自带NTP4.2),没有安装我们直接使用yum命令在线安装: yum install ntp
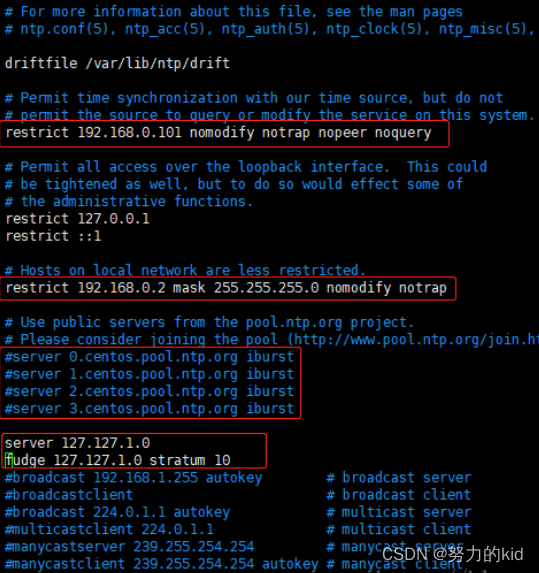
(2)NTP服务端配置文件编辑: vim /etc/ntp.conf
3、服务端配置(192.168.1.210)
vim /etc/ntp.conf
restrict 192.168.1.210 nomodify notrap nopeer noquery //当前节点IP地址
restrict 192.168.1.210 mask 255.255.255.0 nomodify notrap //集群所在网段的网关(Gateway),子网掩码(Genmask)
# 在server部分添加以下部分,并注释掉server 0 ~ n
server 127.127.1.0
fudge 127.127.1.0 stratum 10
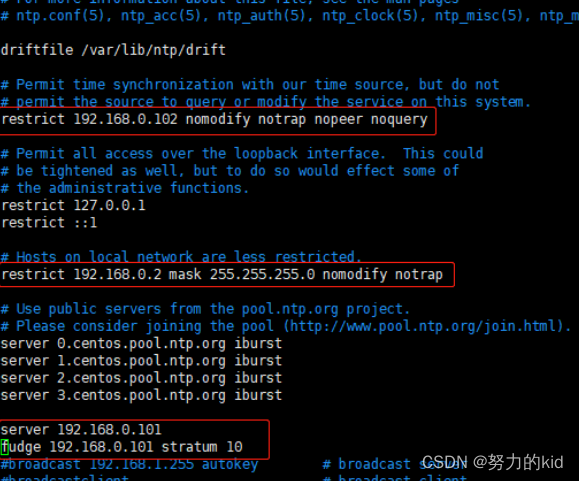
4、客户端配置(192.168.1.211)
vim /etc/ntp.conf
restrict 192.168.1.211 nomodify notrap nopeer noquery //当前节点IP地址
restrict 192.168.1.211 mask 255.255.255.0 nomodify notrap //集群所在网段的网关(Gateway),子网掩码(Genmask)
# 在server部分添加如下语句,将server指向主节点。
server 192.168.1.210
fudge 192.168.1.210 stratum 10
5、验证并配置定时任务
验证
分开开启服务端及客户端的ntp服务,并配置开机自启
service ntpd startchkconfig ntpd on
客户端运行如下命令,与服务端实现同步
ntpdate -u 192.168.0.101

