目录
一:Spring对事务的支持
1. 事务概述
2. 引入事务场景
3. Spring对事务的支持
3.1 Spring实现事务的两种方式
3.2 Spring事务管理API
3.3 声明式事务之注解实现方式
3.4 事务属性
3.5 事务传播行为propagation
3.6 事务的隔离级别isolation
3.7 事务超时
3.8 只读事务
3.9 设置哪些异常回滚事务
3.10 设置哪些异常不回滚事务
3.11 事务的全注解式开发
3.12 声明式事务之XML实现方式
一:Spring对事务的支持
1. 事务概述
(1)什么是事务?
①在一个业务流程当中,通常需要多条DML(insert delete update)语句共同联合才能完成,这多条DML语句必须同时成功,或者同时失败,这样才能保证数据的安全。
②多条DML要么同时成功,要么同时失败,这叫做事务!
③事务:Transaction(tx)
(2)事务的四个处理过程:
①第一步:开启事务 (start transaction)。
②第二步:执行核心业务代码。
③第三步:提交事务(如果核心业务处理过程中没有出现异常)(commit transaction)。
④第四步:回滚事务(如果核心业务处理过程中出现异常)(rollback transaction)。
(3)事务的四个特性:
①A 原子性:事务是最小的工作单元,不可再分。
②C 一致性:事务要求要么同时成功,要么同时失败。事务前和事务后的总量不变。
③I 隔离性:事务和事务之间因为有隔离性,才可以保证互不干扰。
④D 持久性:持久性是事务结束的标志(持久化到硬盘里)。
2. 引入事务场景
(1)以银行账户转账为例学习事务;两个账户act-001和act-002,act-001账户向act-002账户转账10000,必须同时成功,或者同时失败。(一个减成功,一个加成功, 这两条update语句必须同时成功,或同时失败)
(2)连接数据库的技术这里先采用Spring框架的JdbcTemplate,不集成Mybatis框架。
(3)采用三层架构搭建:

pom.xml中引入依赖
<?xml version="1.0" encoding="UTF-8"?>
<project xmlns="http://maven.apache.org/POM/4.0.0"
         xmlns:xsi="http://www.w3.org/2001/XMLSchema-instance"
         xsi:schemaLocation="http://maven.apache.org/POM/4.0.0 http://maven.apache.org/xsd/maven-4.0.0.xsd">
    <modelVersion>4.0.0</modelVersion>

    <groupId>com.bjpowernode</groupId>
    <artifactId>spring6-012-tx-bank</artifactId>
    <version>1.0-SNAPSHOT</version>
    <packaging>jar</packaging>

    <!--仓库-->
    <repositories>
        <!--spring里程碑版本的仓库-->
        <repository>
            <id>repository.spring.milestone</id>
            <name>Spring Milestone Repository</name>
            <url>https://repo.spring.io/milestone</url>
        </repository>
    </repositories>

    <!--依赖-->
    <dependencies>
        <!--spring context-->
        <dependency>
            <groupId>org.springframework</groupId>
            <artifactId>spring-context</artifactId>
            <version>6.0.0-M2</version>
        </dependency>
        <!--spring jdbc-->
        <dependency>
            <groupId>org.springframework</groupId>
            <artifactId>spring-jdbc</artifactId>
            <version>6.0.0-M2</version>
        </dependency>
        <!--mysql驱动-->
        <dependency>
            <groupId>mysql</groupId>
            <artifactId>mysql-connector-java</artifactId>
            <version>8.0.30</version>
        </dependency>
        <!--德鲁伊连接池-->
        <dependency>
            <groupId>com.alibaba</groupId>
            <artifactId>druid</artifactId>
            <version>1.2.13</version>
        </dependency>
        <!--@Resource注解-->
        <dependency>
            <groupId>jakarta.annotation</groupId>
            <artifactId>jakarta.annotation-api</artifactId>
            <version>2.1.1</version>
        </dependency>
        <!--junit-->
        <dependency>
            <groupId>junit</groupId>
            <artifactId>junit</artifactId>
            <version>4.13.2</version>
            <scope>test</scope>
        </dependency>
    </dependencies>

    <properties>
        <maven.compiler.source>17</maven.compiler.source>
        <maven.compiler.target>17</maven.compiler.target>
    </properties>

</project>
第一步:准备数据库表
表结构:

表数据:

第二步:创建包结构
com.powernode.bank.pojo
com.powernode.bank.service
com.powernode.bank.service.impl
com.powernode.bank.dao
com.powernode.bank.dao.impl
第三步:准备POJO类
package com.powernode.bank.pojo;

public class Account {
    private String actno;
    private Double balance;

    public Account() {
    }
    public Account(String actno, Double balance) {
        this.actno = actno;
        this.balance = balance;
    }

    @Override
    public String toString() {
        return "Account{" +
                "actno='" + actno + '\'' +
                ", balance=" + balance +
                '}';
    }

    public String getActno() {
        return actno;
    }

    public void setActno(String actno) {
        this.actno = actno;
    }

    public Double getBalance() {
        return balance;
    }

    public void setBalance(Double balance) {
        this.balance = balance;
    }
}
第四步:编写持久层
编写接口AccountDao
package com.powernode.bank.dao;

import com.powernode.bank.pojo.Account;

public interface AccountDao {
    // 根据账号查询余额
    Account selectById(String actno);
    // 更新账户
    int update(Account act);
}
编写接口的实现类AccountDaoImpl
需要一个JdbcTemplate引用,去调用方法执行sql语句!
package com.powernode.bank.dao.impl;

import com.powernode.bank.dao.AccountDao;
import com.powernode.bank.pojo.Account;
import jakarta.annotation.Resource;
import org.springframework.jdbc.core.BeanPropertyRowMapper;
import org.springframework.jdbc.core.JdbcTemplate;
import org.springframework.stereotype.Repository;

@Repository("accountDao")
public class AccountDaoImpl implements AccountDao {

    @Resource(name = "jdbcTemplate")
    private JdbcTemplate jdbcTemplate;

    @Override
    public Account selectByActno(String actno) {
        String sql = "select actno, balance from t_act where actno = ?";
        Account account = jdbcTemplate.queryForObject(sql, new BeanPropertyRowMapper<>(Account.class), actno);
        return account;
    }

    @Override
    public int update(Account act) {
        String sql = "update t_act set balance = ? where actno = ?";
        int count = jdbcTemplate.update(sql, act.getBalance(), act.getActno());
        return count;
    }
}
第五步:编写业务层
编写接口AccountService
package com.powernode.bank.service;

public interface AccountService {
    // 转账的方法---逻辑业务
    void transfer(String fromActno,String toActno,double money);
}
编写接口的实现类AccountServiceImpl
package com.powernode.bank.service.impl;

import com.powernode.bank.dao.AccountDao;
import com.powernode.bank.pojo.Account;
import com.powernode.bank.service.AccountService;
import jakarta.annotation.Resource;

@Service("accountService")
public class AccountServiceImpl implements AccountService {
    @Resource(name = "accountDao")
    private AccountDao accountDao;

    @Override
    public void transfer(String fromActno, String toActno, double money) {
        // 查询账户余额是否充足
        Account fromAccount = accountDao.selectById(fromActno);
        if (fromAccount.getBalance()<money) {
            throw new RuntimeException("账户余额不足");
        }
        // 余额充足,开始转账
        Account toAccount = accountDao.selectById(toActno);
        // 修改内存中的数字
        fromAccount.setBalance(fromAccount.getBalance()-money);
        toAccount.setBalance(toAccount.getBalance()+money);
        // 更新数据库中的数据
        int count = accountDao.update(fromAccount);
        count += accountDao.update(toAccount);
        if (count != 2){
            throw new RuntimeException("转账失败,请联系银行");
        }
    }
}
第六步:编写Spring配置文件
①因为使用了@Repository注解,所以要使用组件扫描compoent-scan;
②因为JdbcTemplate需要一个数据源,所以要配置一个德鲁伊连接池;
③配置JdbcTemplate,把上面配置好的数据源,以属性的方式引入;
<?xml version="1.0" encoding="UTF-8"?>
<beans xmlns="http://www.springframework.org/schema/beans"
       xmlns:xsi="http://www.w3.org/2001/XMLSchema-instance"
       xmlns:context="http://www.springframework.org/schema/context"
       xsi:schemaLocation="http://www.springframework.org/schema/beans http://www.springframework.org/schema/beans/spring-beans.xsd
                           http://www.springframework.org/schema/context http://www.springframework.org/schema/context/spring-context.xsd">

    <!--组件扫描-->
    <context:component-scan base-package="com.powernode.bank"/>
    <!--配置数据源-->
    <bean id="dataSource" class="com.alibaba.druid.pool.DruidDataSource">
        <property name="driverClassName" value="com.mysql.cj.jdbc.Driver"/>
        <property name="url" value="jdbc:mysql://localhost:3306/spring"/>
        <property name="username" value="root"/>
        <property name="password" value="123" />
    </bean>
    <!--配置jdbcTemplate-->
    <bean id="jdbcTemplate" class="org.springframework.jdbc.core.JdbcTemplate">
        <property name="dataSource" ref="dataSource"/>
    </bean>
</beans>
第七步:编写表示层(测试程序)
package com.powernode.bank.test;

import com.powernode.bank.service.AccountService;
import org.junit.Test;
import org.springframework.context.ApplicationContext;
import org.springframework.context.support.ClassPathXmlApplicationContext;

public class BankTest {
    @Test
    public void testTransfer(){
        ApplicationContext applicationContext = new ClassPathXmlApplicationContext("spring.xml");
        AccountService accountService = applicationContext.getBean("accountService", AccountService.class);
        try {
            accountService.transfer("act-001","act-002",10000);
            System.out.println("转账成功");
        }catch (Exception e){
            e.printStackTrace();
        }
    }
}
执行结果:

成功转账:

模拟异常:在两个数据更新之间,模拟一个异常

执行结果:act-001账户钱少了,act-002账户钱多了

3. Spring对事务的支持
3.1 Spring实现事务的两种方式
(1)编程式事务(基本不用)
①通过编写代码的方式来实现事务的管理。
(2)声明式事务(常用)
①基于注解方式
②基于XML配置方式
3.2 Spring事务管理API
(1)Spring对事务的管理底层实现方式是基于AOP实现的,采用AOP的方式进行了进一步的封装;所以Spring专门针对事务开发了一套API,API的核心接口如下:
(2)PlatformTransactionManager接口:spring事务管理器的核心接口。在Spring6中它有两个实现:
①DataSourceTransactionManager:支持JdbcTemplate、MyBatis、Hibernate等事务管理。
②JtaTransactionManager:支持分布式事务管理。
ctl+h查看继承结构如下:

(3)如果要在Spring6中使用JdbcTemplate,就要使用DataSourceTransactionManager来管理事务。(Spring内置写好了,可以直接用)
3.3 声明式事务之注解实现方式
第一步:在spring配置文件中配置事务管理器
对于事务的控制,肯定需要Connection对象;所以就需要数据源,所以属性就需要配置上数据源dataSource!
<!--配置事务管理器-->
<bean id="transactionManager" class="org.springframework.jdbc.datasource.DataSourceTransactionManager">
    <property name="dataSource" ref="dataSource"/>
</bean>
第二步: 在spring配置文件中引入tx命名空间
tx命名空间是来引入事务注解驱动器的!
<?xml version="1.0" encoding="UTF-8"?>
<beans xmlns="http://www.springframework.org/schema/beans"
       xmlns:xsi="http://www.w3.org/2001/XMLSchema-instance"
       xmlns:context="http://www.springframework.org/schema/context"
       xmlns:tx="http://www.springframework.org/schema/tx"
       xsi:schemaLocation="http://www.springframework.org/schema/beans http://www.springframework.org/schema/beans/spring-beans.xsd
                           http://www.springframework.org/schema/context http://www.springframework.org/schema/context/spring-context.xsd
                           http://www.springframework.org/schema/tx http://www.springframework.org/schema/tx/spring-tx.xsd">
第三步: 在spring配置文件中配置“事务注解驱动器”,开始注解的方式控制事务
<!--开启事务注解驱动器,告诉spring采用注解的方式控制事务-->
<tx:annotation-driven transaction-manager="transactionManager"/>
完整的spring.xml配置
<?xml version="1.0" encoding="UTF-8"?>
<beans xmlns="http://www.springframework.org/schema/beans"
       xmlns:xsi="http://www.w3.org/2001/XMLSchema-instance"
       xmlns:context="http://www.springframework.org/schema/context"
       xmlns:tx="http://www.springframework.org/schema/tx"
       xsi:schemaLocation="http://www.springframework.org/schema/beans http://www.springframework.org/schema/beans/spring-beans.xsd
                           http://www.springframework.org/schema/context http://www.springframework.org/schema/context/spring-context.xsd
                           http://www.springframework.org/schema/tx http://www.springframework.org/schema/tx/spring-tx.xsd">

    <!--组件扫描-->
    <context:component-scan base-package="com.powernode.bank"/>
    <!--配置数据源-->
    <bean id="dataSource" class="com.alibaba.druid.pool.DruidDataSource">
        <property name="driverClassName" value="com.mysql.cj.jdbc.Driver"/>
        <property name="url" value="jdbc:mysql://localhost:3306/spring"/>
        <property name="username" value="root"/>
        <property name="password" value="123"/>
    </bean>
    <!--配置jdbcTemplate-->
    <bean id="jdbcTemplate" class="org.springframework.jdbc.core.JdbcTemplate">
        <property name="dataSource" ref="dataSource"/>
    </bean>

    <!--配置事务管理器-->
    <bean id="transactionManager" class="org.springframework.jdbc.datasource.DataSourceTransactionManager">
        <property name="dataSource" ref="dataSource"/>
    </bean>
    <!--配置事务注解驱动器-->
    <tx:annotation-driven transaction-manager="transactionManager"/>
</beans>
第四步:在service类上或方法上添加@Transactional注解
注:在类上添加@Transactional注解,该类中所有的方法都有事务;在某个方法上添加该注解,表示只有这个方法使用事务!

再次模拟异常:发现数据库中两个账户的数据都没有发生改变,完美的控制了事务

3.4 事务属性
通过Transactional注解,可以查看源码,了解事务的属性包括哪些;重点掌握以下属性:
①事务传播行为;
②事务隔离级别;
③事务超时,-1表示超时时间没有限制,不限时;
④只读事务;
⑤设置出现哪些异常回滚事务;
⑥设置出现哪些异常不回滚事务;

3.5 事务传播行为属性propagation
(1)什么是事务的传播行为?
在service类中有a()方法和b()方法,a()方法上有事务,b()方法上也有事务,当a()方法执行过程中调用了b()方法,事务是如何传递的?合并到一个事务里?还是开启一个新的事务?这就是事务传播行为。
(2)事务传播行为在spring框架中被定义为枚举类型:
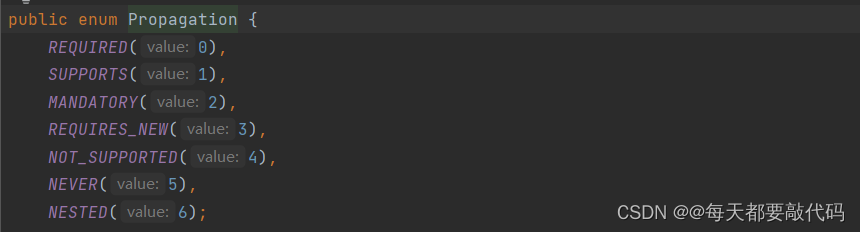
(3)一共有七种传播行为:
①REQUIRED(必须的):支持当前事务,如果有就用原来的,如果不存在就新建一个(默认);事务必须存在!【有就直接加入,没有就新建】
②SUPPORTS(支持):支持当前事务,如果当前没有事务,就以非事务方式执行【有就加入,没有就不管了】
③MANDATORY(强制性):必须运行在一个事务中,如果当前没有事务正在发生,将抛出一个异常【有就加入,没有就抛异常】
④REQUIRES_NEW:开启一个新的事务,如果一个事务已经存在,则将这个存在的事务挂起【不管有没有,直接开启一个新事务,开启的新事务和之前的事务不存在嵌套关系,之前事务被挂起】
⑤NOT_SUPPORTED:以非事务方式运行,如果有事务存在,挂起当前事务【不支持事务,存在就挂起】
⑥NEVER:以非事务方式运行,如果有事务存在,抛出异常【不支持事务,存在就抛异常】
⑦NESTED(嵌套):如果当前正有一个事务在进行中,则该方法应当运行在一个嵌套式事务中。被嵌套的事务可以独立于外层事务进行提交或回滚。如果外层事务不存在,行为就像REQUIRED一样。【有事务的话,就在这个事务里再嵌套一个完全独立的事务,嵌套的事务可以独立的提交和回滚。没有事务就和REQUIRED一样】
(4)如何使用,直接在Transactional注解当中使用即可,例如:
@Transactional(propagation = Propagation.REQUIRED)(5)简单理解一下REQUIRED和REQUIRES_NEW
例如:a()方法上有事务,b()方法上也有事务,当a()方法执行过程中调用了b()方法:
①假设是REQUIRED传播行为,最终使用的就是a()方法上的事务;对于b()方法如果出现异常(a方法上是调用b方法的),我们在a()方法上进行捕捉;那么a()方法和b()方法都会回滚,因为它们是共用同一个事务。
②假设是REQUIRES_NEW传播行为,无论原来有没有事务都会创建一个新的事务,并且原来的事务会被挂起;当b()方法发生异常时(a方法上是调用b方法的),我们在a()方法上进行捕捉,能成功捕捉到b()方法的异常,捕捉成功后,能继续执行a()方法接下来的逻辑代码;那么只有b()方法会回滚,a()方法不会回滚。
3.6 事务的隔离级别isolation
(1)事务隔离级别类似于教室A和教室B之间的那道墙,隔离级别越高表示墙体越厚,隔音效果越好。
(2)数据库中读取数据存在的三大问题:(三大读问题)
①脏读:读取到没有提交到数据库的数据,叫做脏读(读缓存中的数据)。
②不可重复读:在同一个事务当中,第一次和第二次读取的数据不一样。
③幻读:读到的数据是假的。
(3)事务隔离级别包括四个级别:
①读未提交:READ_UNCOMMITTED;这种隔离级别,存在脏读问题,所谓的脏读(dirty read)表示能够读取到其它事务未提交的数据。
②读已提交:READ_COMMITTED;解决了脏读问题,其它事务提交之后才能读到,但存在不可重复读问题。Orcal的默认隔离级别
③可重复读:REPEATABLE_READ;解决了不可重复读,可以达到可重复读效果,只要当前事务不结束,读取到的数据一直都是一样的,但存在幻读问题。MySQL的默认隔离级别
④序列化:SERIALIZABLE;解决了幻读问题,事务排队执行,不支持并发。
| 隔离级别 | 脏读 | 不可重复读 | 幻读 |
| 读未提交 | 有 | 有 | 有 |
| 读提交 | 无 | 有 | 有 |
| 可重复读 | 无 | 无 | 有 |
| 序列化 | 无 | 无 | 无 |
(4)在Spring代码中如何设置隔离级别?隔离级别在spring中以枚举类型存在:

@Transactional(isolation = Isolation.READ_COMMITTED)3.7 事务超时
代码如下:
@Transactional(timeout = 10)代码表示设置事务的超时时间为10秒;默认值-1,表示没有时间限制!
表示超过10秒如果该事务中所有的DML语句还没有执行完毕的话,最终结果会选择回滚。
这里有个坑,事务的超时时间指的是哪段时间?(最后一条DML语句执行的时间)
在当前事务当中,最后一条DML语句执行之前的时间。如果最后一条DML语句后面很有很多业务逻辑,这些业务代码执行的时间不被计入超时时间。
①以下捕捉异常的代码,超时不会被计入超时时间,会提交。
@Transactional(timeout = 10) // 设置事务超时时间为10秒。
public void save(Account act) {
    accountDao.insert(act);
    // 睡眠一会
    try {
        Thread.sleep(1000 * 15);
    } catch (InterruptedException e) {
        e.printStackTrace();
    }
}
②以下捕捉异常的代码超时,时间会被计入超时时间,会回滚。
@Transactional(timeout = 10) // 设置事务超时时间为10秒。
public void save(Account act) {
    // 睡眠一会
    try {
        Thread.sleep(1000 * 15);
    } catch (InterruptedException e) {
        e.printStackTrace();
    }
    accountDao.insert(act);
}
注:如果想让整个方法的所有代码都计入超时时间的话,可以在方法最后一行添加一行无关紧要的DML语句!
3.8 只读事务
代码如下:
@Transactional(readOnly = true)①将当前事务设置为只读事务,在该事务执行过程中只允许查询select语句执行,delete、insert 、update均不可执行!
②疑问:既然只允许select语句执行,又没有安全问题,根本不需要事务问题!那么为什么还需要设置只读事务呢?该特性的作用是:启动spring的优化策略,提高select语句执行效率。
③如果该事务中确实没有增删改操作,建议设置为只读事务!
3.9 设置哪些异常回滚事务
代码如下:
@Transactional(rollbackFor = RuntimeException.class)表示只有发生RuntimeException异常或该异常的子类异常才回滚。
3.10 设置哪些异常不回滚事务
代码如下:
@Transactional(noRollbackFor = NullPointerException.class)表示发生NullPointerException或该异常的子类异常不回滚,其他异常则都会回滚。
3.11 事务的全注解式开发
我们再看一下spring.xml配置文件,把这些配置写成注解的方式:
<?xml version="1.0" encoding="UTF-8"?>
<beans xmlns="http://www.springframework.org/schema/beans"
       xmlns:xsi="http://www.w3.org/2001/XMLSchema-instance"
       xmlns:context="http://www.springframework.org/schema/context"
       xmlns:tx="http://www.springframework.org/schema/tx"
       xsi:schemaLocation="http://www.springframework.org/schema/beans http://www.springframework.org/schema/beans/spring-beans.xsd
                           http://www.springframework.org/schema/context http://www.springframework.org/schema/context/spring-context.xsd
                           http://www.springframework.org/schema/tx http://www.springframework.org/schema/tx/spring-tx.xsd">

    <!--组件扫描-->
    <context:component-scan base-package="com.powernode.bank"/>
    <!--配置数据源-->
    <bean id="dataSource" class="com.alibaba.druid.pool.DruidDataSource">
        <property name="driverClassName" value="com.mysql.cj.jdbc.Driver"/>
        <property name="url" value="jdbc:mysql://localhost:3306/spring"/>
        <property name="username" value="root"/>
        <property name="password" value="123"/>
    </bean>
    <!--配置jdbcTemplate-->
    <bean id="jdbcTemplate" class="org.springframework.jdbc.core.JdbcTemplate">
        <property name="dataSource" ref="dataSource"/>
    </bean>
    <!--配置事务管理器-->
    <bean id="transactionManager" class="org.springframework.jdbc.datasource.DataSourceTransactionManager">
        <property name="dataSource" ref="dataSource"/>
    </bean>
    <!--开启事务注解驱动器,告诉spring采用注解的方式控制事务-->
    <tx:annotation-driven transaction-manager="transactionManager"/>
</beans>
编写一个类来代替配置文件,代码如下:
使用Bean注解:Spring框架看到这个@Bean注解后,会调用这个被标注的方法,这个方法的返回值是一个java对象,这个java对象会自动纳入IoC容器管理,返回的对象就是Spring容器当中的一个Bean了;这个bean的名字就是注解中name属性的值!
package com.powernode.bank;

import com.alibaba.druid.pool.DruidDataSource;
import org.springframework.context.annotation.Bean;
import org.springframework.context.annotation.ComponentScan;
import org.springframework.context.annotation.Configuration;
import org.springframework.jdbc.core.JdbcTemplate;
import org.springframework.jdbc.datasource.DataSourceTransactionManager;
import org.springframework.transaction.annotation.EnableTransactionManagement;

import javax.sql.DataSource;

@Configuration // 代替spring.xml配置文件,在这个类当中完成配置
@ComponentScan("com.powernode.bank") // 组件扫描
@EnableTransactionManagement // 开始事务注解
public class Spring6Config {
    // ----------------现在就剩下三个bean的配置
    // 配置数据源
    @Bean(name = "dataSource")
    public DruidDataSource getDataSource(){
        DruidDataSource dataSource = new DruidDataSource();
        dataSource.setDriverClassName("com.mysql.cj.jdbc.Driver");
        dataSource.setUrl("jdbc:mysql://localhost:3306/spring");
        dataSource.setUsername("root");
        dataSource.setPassword("123");
        return dataSource;
    }

    // 配置jdbcTemplate
    @Bean(name = "jdbcTemplate")
    public JdbcTemplate getJdbcTemplate(DataSource dataSource){
        JdbcTemplate jdbcTemplate = new JdbcTemplate();
        // 这个dataSource可以直接调用getDataSource方法
        // 也可以使用getJdbcTemplate方法传参的方式DataSource dataSource
        jdbcTemplate.setDataSource(dataSource);
        return jdbcTemplate;
    }
    // 配置事务管理器
    @Bean(name = "transactionManager")
    public DataSourceTransactionManager getDataSourceTransactionManager(DataSource dataSource){
        DataSourceTransactionManager dataSourceTransactionManager = new DataSourceTransactionManager();
        dataSourceTransactionManager.setDataSource(dataSource);
        return dataSourceTransactionManager;
    }
}
测试程序如下:
    @Test
    public void testNoXML(){
        ApplicationContext applicationContext = new AnnotationConfigApplicationContext(Spring6Config.class);
        AccountService accountService = applicationContext.getBean("accountService", AccountService.class);
        try {
            accountService.transfer("act-001","act-002",10000);
            System.out.println("转账成功");
        }catch (Exception e){
            e.printStackTrace();
        }

    }
执行结果:正常转账

3.12 声明式事务之XML实现方式
配置步骤:先把原来AccountServiceImpl类的@Transactional去掉
第一步:配置事务管理器(原先已经配置好了)
第二步:配置通知
第三步:配置切面
添加aspectj的依赖:
<!--aspectj依赖-->
<dependency>
  <groupId>org.springframework</groupId>
  <artifactId>spring-aspects</artifactId>
  <version>6.0.0-M2</version>
</dependency>
配置通知:在通知中要关联事务管理器
    <!--配置通知,这里要引用上面的事务管理器-->
    <tx:advice id="txAdvice" transaction-manager="transactionManager">
        <!--配置通知的相关属性-->
        <tx:attributes>
            <!--name是方法名,之前所有的事务属性都可以在这里进行配置-->
            <tx:method name="transfer" propagation="REQUIRED" rollback-for="java.lang.Throwable"/>
        </tx:attributes>
    </tx:advice>
注意:对于方法很少明确的写死,一般都是使用模糊匹配的方式
    <!--配置通知-->
    <tx:advice id="txAdvice" transaction-manager="txManager">
        <tx:attributes>
            <tx:method name="save*" propagation="REQUIRED" rollback-for="java.lang.Throwable"/>
            <tx:method name="del*" propagation="REQUIRED" rollback-for="java.lang.Throwable"/>
            <tx:method name="update*" propagation="REQUIRED" rollback-for="java.lang.Throwable"/>
            <tx:method name="transfer*" propagation="REQUIRED" rollback-for="java.lang.Throwable"/>
        </tx:attributes>
    </tx:advice>
配置切面:通知+切点
    <!--配置切面-->
    <aop:config>
        <!--切点-->
        <aop:pointcut id="txPointCut" expression="execution(* com.bjpowernode.bank.service..*(..))"/>
        <!--切面=通知+切点-->
        <aop:advisor advice-ref="txAdvice" pointcut-ref="txPointCut"/>
    </aop:config>
所有Spring配置文件如下:记得添加aop的命名空间
<?xml version="1.0" encoding="UTF-8"?>
<beans xmlns="http://www.springframework.org/schema/beans"
       xmlns:xsi="http://www.w3.org/2001/XMLSchema-instance"
       xmlns:context="http://www.springframework.org/schema/context"
       xmlns:tx="http://www.springframework.org/schema/tx"
       xmlns:aop="http://www.springframework.org/schema/aop"
       xsi:schemaLocation="http://www.springframework.org/schema/beans http://www.springframework.org/schema/beans/spring-beans.xsd
                           http://www.springframework.org/schema/context http://www.springframework.org/schema/context/spring-context.xsd
                           http://www.springframework.org/schema/tx http://www.springframework.org/schema/tx/spring-tx.xsd
                           http://www.springframework.org/schema/aop http://www.springframework.org/schema/aop/spring-aop.xsd">
    <!--组件扫描-->
    <context:component-scan base-package="com.bjpowernode.bank"/>
    <!--配置数据源-->
    <bean id="dataSource" class="com.alibaba.druid.pool.DruidDataSource">
        <property name="driverClassName" value="com.mysql.cj.jdbc.Driver"/>
        <property name="url" value="jdbc:mysql://localhost:3306/spring"/>
        <property name="username" value="root"/>
        <property name="password" value="123"/>
    </bean>
    <!--配置jdbcTemplate-->
    <bean id="jdbcTemplate" class="org.springframework.jdbc.core.JdbcTemplate">
        <property name="dataSource" ref="dataSource"/>
    </bean>
    <!--配置事务管理器-->
    <bean id="transactionManager" class="org.springframework.jdbc.datasource.DataSourceTransactionManager">
        <property name="dataSource" ref="dataSource"/>
    </bean>

    <!--配置通知,这里要引用上面的事务管理器-->
    <tx:advice id="txAdvice" transaction-manager="transactionManager">
        <!--配置通知的相关属性-->
        <tx:attributes>
            <!--name是方法名,之前所有的事务属性都可以在这里进行配置-->
            <tx:method name="transfer" propagation="REQUIRED" rollback-for="java.lang.Throwable"/>
        </tx:attributes>
    </tx:advice>
    <!--配置切面-->
    <aop:config>
        <!--切点:虽然这里配的是所有service包下的所有类,但上面配置的是只有transfer方法才走事务-->
        <aop:pointcut id="txPointCut" expression="execution(* com.bjpowernode.bank.service..*(..))"/>
        <!--切面=通知+切点-->
        <aop:advisor advice-ref="txAdvice" pointcut-ref="txPointCut"/>
    </aop:config>

</beans>
编写测试
package com.bjpowernode.bank.test;

import com.bjpowernode.bank.service.AccountService;
import org.junit.Test;
import org.springframework.context.ApplicationContext;
import org.springframework.context.support.ClassPathXmlApplicationContext;

public class BankTxTest {
    @Test
    public void testNoAnnotation(){
        ApplicationContext applicationContext = new ClassPathXmlApplicationContext("spring.xml");
        AccountService accountService = applicationContext.getBean("accountService", AccountService.class);
        try {
            accountService.transfer("act-001","act-002",1000);
            System.out.println("转账成功");
        }catch (Exception e){
            e.printStackTrace();
        }
    }
}
执行结果:成功转账


![Linux学习[6]文件权限深入1](https://img-blog.csdnimg.cn/97a9616361d840f78e6c0f4ab5c1495c.png)