系统信息与安全机制
- 系统信息获取
- /system/build.prop
- /proc
- android.os.build
- SystemProperty
- PackageManager
- ActivityManager
- packages.xml
- permissions标签
- package标签
- perms标签
- 安全机制
- Apk反编译
- apktool
- dex2jar
- jd-gui
- Apk加密
系统信息获取
/system/build.prop
存放一些配置信息(需要Google apis的模拟器才能运行su)
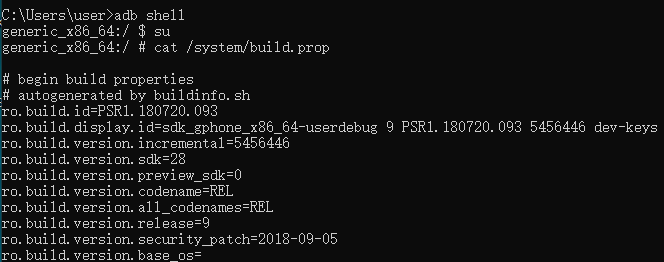
此外,还可以通过 getprop 获取上面的信息

/proc
存储系统运行时各个程序的相关信息

android.os.build
包含了系统编译时的设备、配置信息
Log.d(TAG, "主板: " + Build.BOARD);
Log.d(TAG, "Android系统定制商: " + Build.BRAND);
for (int i = 0; i < Build.SUPPORTED_ABIS.length; i++) {
    Log.d(TAG, "CPU指令集" + "[" + i + "]" + Build.SUPPORTED_ABIS[i]);
}
Log.d(TAG, "设备参数: " + Build.DEVICE);
Log.d(TAG, "显示屏参数: " + Build.DISPLAY);
Log.d(TAG, "唯一编号: " + Build.FINGERPRINT);
Log.d(TAG, "硬件序列号: " + Build.SERIAL);
Log.d(TAG, "修订版本列表: " + Build.ID);
Log.d(TAG, "硬件制造商: " + Build.MANUFACTURER);
Log.d(TAG, "版本: " + Build.MODEL);
Log.d(TAG, "硬件名: " + Build.HARDWARE);
Log.d(TAG, "手机产品名: " + Build.PRODUCT);
Log.d(TAG, "描述Build的标签: " + Build.TAGS);
Log.d(TAG, "Builder类型: " + Build.TYPE);
Log.d(TAG, "当前开发代号: " + Build.VERSION.CODENAME);
Log.d(TAG, "源码控制版本号: " + Build.VERSION.INCREMENTAL);
Log.d(TAG, "版本字符串: " + Build.VERSION.RELEASE);
Log.d(TAG, "版本号: " + Build.VERSION.SDK_INT);
Log.d(TAG, "host值: " + Build.HOST);
Log.d(TAG, "User名: " + Build.USER);
Log.d(TAG, "编译时间: " + Build.TIME);
模拟器打印如下
主板: goldfish_x86_64
Android系统定制商: google
CPU指令集[0]: x86_64
CPU指令集[1]: x86
设备参数: generic_x86_64
显示屏参数: sdk_gphone_x86_64-userdebug 9 PSR1.180720.093 5456446 dev-keys
唯一编号: google/sdk_gphone_x86_64/generic_x86_64:9/PSR1.180720.093/5456446:userdebug/dev-keys
硬件序列号: unknown
修订版本列表: PSR1.180720.093
硬件制造商: Google
版本: Android SDK built for x86_64
硬件名: ranchu
手机产品名: sdk_gphone_x86_64
描述Build的标签: dev-keys
Builder类型: userdebug
当前开发代号: REL
源码控制版本号: 5456446
版本字符串: 9
版本号: 28
host值: xpce4.ams.corp.google.com
User名: android-build
编译时间: 1554935165000
SystemProperty
包含了许多系统配置属性值和参数
Log.d(TAG, "OS版本: " + System.getProperty("os.version"));
Log.d(TAG, "OS名称: " + System.getProperty("os.name"));
Log.d(TAG, "OS架构: " + System.getProperty("os.arch"));
Log.d(TAG, "Home属性: " + System.getProperty("user.home"));
Log.d(TAG, "Name属性: " + System.getProperty("user.name"));
Log.d(TAG, "Dir属性: " + System.getProperty("user.dir"));
Log.d(TAG, "时区: " + System.getProperty("user.timezone"));
Log.d(TAG, "路径分隔符: " + System.getProperty("path.separator"));
Log.d(TAG, "行分隔符: " + System.getProperty("line.separator"));
Log.d(TAG, "文件分隔符: " + System.getProperty("file.separator"));
Log.d(TAG, "Java vender Url属性: " + System.getProperty("java.vendor.url"));
Log.d(TAG, "Java Class路径: " + System.getProperty("java.class.path"));
Log.d(TAG, "Java Class版本: " + System.getProperty("java.class.version"));
Log.d(TAG, "Java Vender属性: " + System.getProperty("java.vendor"));
Log.d(TAG, "Java版本: " + System.getProperty("java.version"));
Log.d(TAG, "Java Home属性: " + System.getProperty("java.home"));
模拟器打印如下
OS版本: 4.4.124+
OS名称: Linux
OS架构: x86_64
Home属性:
Name属性: root
Dir属性: /
时区: null
路径分隔符: :
行分隔符:
文件分隔符: /
Java vender Url属性: http://www.android.com/
Java Class路径: .
Java Class版本: 50.0
Java Vender属性: The Android Project
Java版本: 0
Java Home属性: /system
PackageManager
用于获取应用的包信息,如
- ActivityInfo:Mainifest中<activity>和<receiver>标签之间的信息
- ServiceInfo:Mainifest中<service>标签之间的信息
- ApplicationInfo:Mainifest中<Application>标签之间的信息
- PackageInfo:所有的Activity和Service信息
- ResolveInfo:<intent>的上一级信息,如ActivityInfo、ServiceInfo,通常用于查找包含特定Intent的信息
如下创建bean类存储App的标签、图标和包名
public class PMAppInfo {

    private String appLabel;
    private Drawable appIcon;
    private String pkgName;

    public PMAppInfo() {
    }

    public String getAppLabel() {
        return appLabel;
    }

    public void setAppLabel(String appLabel) {
        this.appLabel = appLabel;
    }

    public Drawable getAppIcon() {
        return appIcon;
    }

    public void setAppIcon(Drawable appIcon) {
        this.appIcon = appIcon;
    }

    public String getPkgName() {
        return pkgName;
    }

    public void setPkgName(String pkgName) {
        this.pkgName = pkgName;
    }
}
创建适配布局list_item.xml
<?xml version="1.0" encoding="utf-8"?>
<LinearLayout xmlns:android="http://schemas.android.com/apk/res/android"
    android:id="@+id/empty"
    android:layout_width="match_parent"
    android:layout_height="match_parent"
    android:gravity="center_vertical"
    android:orientation="horizontal">

    <ImageView
        android:id="@+id/iv_icon"
        android:layout_width="wrap_content"
        android:layout_height="wrap_content" />

    <LinearLayout
        android:layout_width="wrap_content"
        android:layout_height="match_parent"
        android:layout_marginLeft="15dp"
        android:orientation="vertical">

        <TextView
            android:id="@+id/tv_label"
            android:layout_width="wrap_content"
            android:layout_height="wrap_content" />

        <TextView
            android:id="@+id/tv_pkg_name"
            android:layout_width="wrap_content"
            android:layout_height="wrap_content" />
    </LinearLayout>

</LinearLayout>
创建适配器
public class PkgAdapter extends BaseAdapter {
    private Context mContext;
    private List<PMAppInfo> mList;

    public PkgAdapter(Context context) {
        mContext = context;
        mList = new ArrayList<>();
    }

    public void setData(List<PMAppInfo> list) {
        mList.clear();
        mList.addAll(list);
    }

    @Override
    public int getCount() {
        return mList.size();
    }

    @Override
    public PMAppInfo getItem(int position) {
        return mList.get(position);
    }

    @Override
    public long getItemId(int position) {
        return position;
    }

    @Override
    public View getView(int position, View convertView, ViewGroup parent) {
        ViewHolder holder;
        PMAppInfo item = getItem(position);
        if (convertView == null) {
            holder = new ViewHolder();
            convertView = LayoutInflater.from(mContext).inflate(R.layout.list_item, parent, false);
            holder.mIcon = (ImageView) convertView.findViewById(R.id.iv_icon);
            holder.mLabel = (TextView) convertView.findViewById(R.id.tv_label);
            holder.mPkgName = (TextView) convertView.findViewById(R.id.tv_pkg_name);
            convertView.setTag(holder);
        } else {
            holder = (ViewHolder) convertView.getTag();
        }
        holder.mIcon.setImageDrawable(item.getAppIcon());
        holder.mLabel.setText(item.getAppLabel());
        holder.mPkgName.setText(item.getPkgName());
        return convertView;
    }

    static class ViewHolder {
        ImageView mIcon;
        TextView mLabel;
        TextView mPkgName;
    }
}
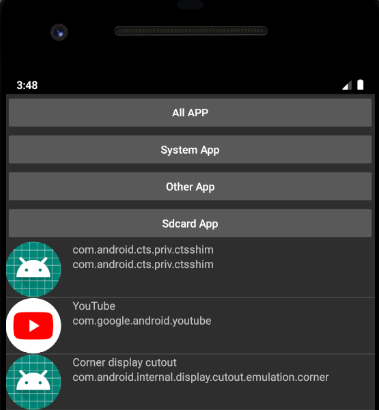
activity_main.xml布局如下,根据点击的按钮加载ListView
<?xml version="1.0" encoding="utf-8"?>
<LinearLayout xmlns:android="http://schemas.android.com/apk/res/android"
    android:layout_width="match_parent"
    android:layout_height="match_parent"
    android:orientation="vertical">

    <Button
        android:id="@+id/btn_all"
        android:layout_width="match_parent"
        android:layout_height="wrap_content"
        android:text="All APP"
        android:textAllCaps="false" />

    <Button
        android:id="@+id/btn_system"
        android:layout_width="match_parent"
        android:layout_height="wrap_content"
        android:text="System App"
        android:textAllCaps="false" />

    <Button
        android:id="@+id/btn_third"
        android:layout_width="match_parent"
        android:layout_height="wrap_content"
        android:text="Other App"
        android:textAllCaps="false" />

    <Button
        android:id="@+id/btn_sdcard"
        android:layout_width="match_parent"
        android:layout_height="wrap_content"
        android:text="Sdcard App"
        android:textAllCaps="false" />

    <ListView
        android:id="@+id/app_info"
        android:layout_width="match_parent"
        android:layout_height="match_parent" />

</LinearLayout>
根据PackageManager获取所有App,利用ApplicationInfo的flag判断应用类型
public class MainActivity extends AppCompatActivity implements View.OnClickListener {

    private static final String TAG = "MainActivity";
    private PackageManager pm;
    private ListView mListView;
    private PkgAdapter mAdapter;

    protected void onCreate(Bundle savedInstanceState) {
        super.onCreate(savedInstanceState);
        setContentView(R.layout.activity_main);
        pm = getPackageManager();
        mListView = (ListView) findViewById(R.id.app_info);
        mAdapter = new PkgAdapter(this);
        mListView.setAdapter(mAdapter);
        findViewById(R.id.btn_all).setOnClickListener(this);
        findViewById(R.id.btn_third).setOnClickListener(this);
        findViewById(R.id.btn_system).setOnClickListener(this);
        findViewById(R.id.btn_sdcard).setOnClickListener(this);
    }

    @Override
    public void onClick(View v) {
        mAdapter.setData(getAppInfo(v.getId()));
        mAdapter.notifyDataSetChanged();
    }

    private List<PMAppInfo> getAppInfo(int flag) {
        List<ApplicationInfo> applicationInfoList = pm.getInstalledApplications(
                PackageManager.GET_UNINSTALLED_PACKAGES);
        List<PMAppInfo> pmAppInfoList = new ArrayList<>();
        switch (flag) {
            case R.id.btn_all:
                pmAppInfoList.clear();
                for (ApplicationInfo info : applicationInfoList) {
                    pmAppInfoList.add(makeAppInfo(info));
                }
                break;
            case R.id.btn_system:
                pmAppInfoList.clear();
                for (ApplicationInfo appInfo : applicationInfoList) {
                    if ((appInfo.flags & ApplicationInfo.FLAG_SYSTEM) != 0) {   //系统预装应用
                        pmAppInfoList.add(makeAppInfo(appInfo));
                    }
                }
                break;
            case R.id.btn_third:
                pmAppInfoList.clear();
                for (ApplicationInfo appInfo : applicationInfoList) {
                    if ((appInfo.flags & ApplicationInfo.FLAG_SYSTEM) <= 0) {   //第三方应用
                        pmAppInfoList.add(makeAppInfo(appInfo));
                    } else if ((appInfo.flags & ApplicationInfo.FLAG_UPDATED_SYSTEM_APP) != 0) {//系统预装应用升级后变成第三方应用
                        pmAppInfoList.add(makeAppInfo(appInfo));
                    }
                }
                break;
            case R.id.btn_sdcard:
                pmAppInfoList.clear();
                for (ApplicationInfo appInfo : applicationInfoList) {
                    if ((appInfo.flags & ApplicationInfo.FLAG_EXTERNAL_STORAGE) != 0) { //安装在Sdcard的应用
                        pmAppInfoList.add(makeAppInfo(appInfo));
                    }
                }
                break;
        }
        return pmAppInfoList;
    }

    private PMAppInfo makeAppInfo(ApplicationInfo applicationInfo) {
        PMAppInfo appInfo = new PMAppInfo();
        appInfo.setAppLabel(applicationInfo.loadLabel(pm).toString());
        appInfo.setAppIcon(applicationInfo.loadIcon(pm));
        appInfo.setPkgName(applicationInfo.packageName);
        return appInfo;
    }
}
效果如下
ActivityManager
用于获取运行时的应用程序信息,如
- ActivityManager.MemoryInfo:全局内存信息(可用内存、总内存、是否处于低内存)
- Debug.MemoryInfo:进程下内存信息
- RunningAppProcessInfo:运行时进程信息(进程名、pid、uid)
- RunningServiceInfo:运行时服务信息(服务是否在后台执行)
private void getRunningProcessInfo() {
    ActivityManager mActivityManager = (ActivityManager) getSystemService(ACTIVITY_SERVICE);
    List<ActivityManager.RunningAppProcessInfo> appProcessList = mActivityManager.getRunningAppProcesses();
    for (int i = 0; i < appProcessList.size(); i++) {
        ActivityManager.RunningAppProcessInfo info = appProcessList.get(i);
        Log.d(TAG, "getRunningProcessInfo: pid = " + info.pid);
        Log.d(TAG, "getRunningProcessInfo: uid = " + info.uid);
        Log.d(TAG, "getRunningProcessInfo: processName = " + info.processName);
        Debug.MemoryInfo[] memoryInfo = mActivityManager.getProcessMemoryInfo(new int[]{info.uid});
        int memorySize = memoryInfo[0].getTotalPss();
        Log.d(TAG, "getRunningProcessInfo: memorySize = " + memorySize);
    }
}
如上打印
pid = 5593
uid = 10091
processName = com.demo.demo0
memorySize = 0
packages.xml
Apk安装、删除、升级等状态,会记录到/data/system/packages.xml中
permissions标签
定义系统中的所有权限,根据package属性分为2类
- 为android的是系统定义权限
- 为包名的是Apk定义权限
package标签
- name:包名
- codePath:安装路径,/system/app存放预装应用,/data/app存放第三方应用
- userId:用户ID
- version:版本号
perms标签
对应Apk的AndroidManifest中的<uses-permission>标签,记录权限信息
安全机制
- 代码安全机制:代码混淆可使代码无法阅读,同时也可压缩代码,优化字节码
- 权限控制:App使用系统受限资源时,都需要在AndroidMainifest声明权限,并接受系统检查
- 数字证书:即App的签名,未签名的App无法安装,相同数字签名的App在升级时才会被认为是同一App
- Linux内核安全机制:文件系统权限控制,如文件的rwx或selinux权限
- Android虚拟机沙箱机制:沙箱可以让应用之间互相隔离,互不影响
Apk反编译
Apk本质是一个压缩文件,可通过解压缩软件获取里面的内容,如下

但解压后的文件无源码文件src,同时xml文件乱码,只能查看res目录下的图片资源
apktool
apktool 用于反编译apk中的xml文件,运行下面命令,会生成一个对应名字的文件夹,可正常查看里面的xml文件(多用于汉化)

利用参数b可重新打包,会生成build和dist文件夹,Apk位于dist文件夹内

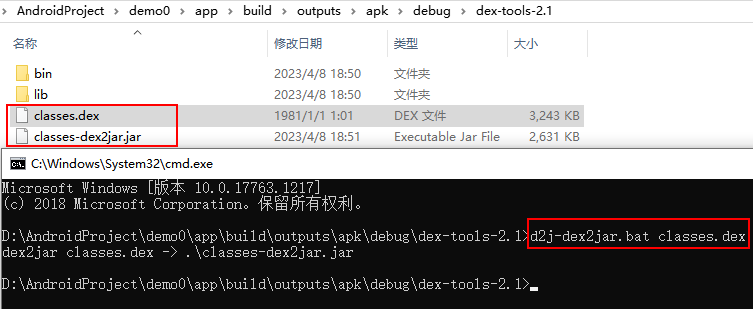
dex2jar
dex2jar 用于将apk中的.dex文件反编译成.jar文件,将.dex放到根目录运行如下命令,生成对应名字的.jar文件
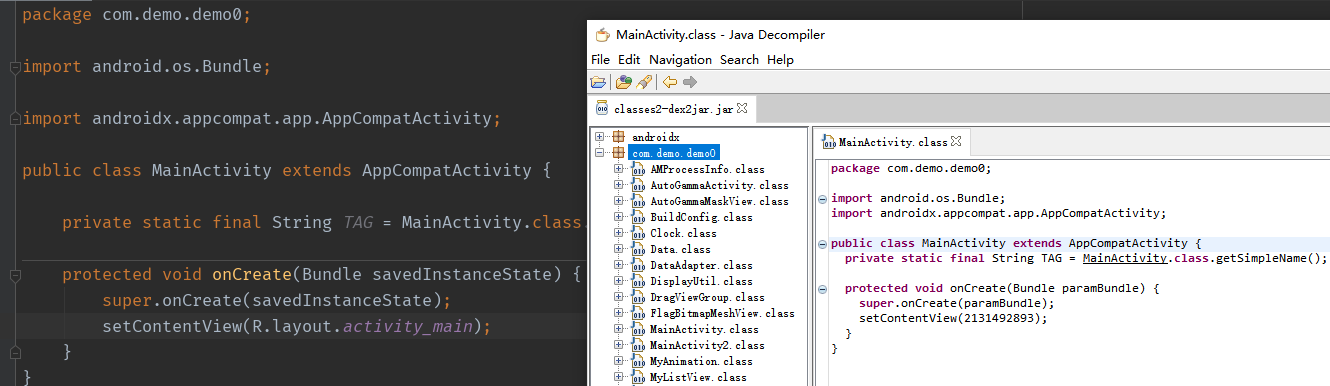
jd-gui
jd-gui 用于查看.jar文件,如下打开上面反编译的.jar文件,查看MainAcitivity,内容一模一样
Apk加密
ProGuard可对Apk进行混淆处理
- 用无意义的字母来重命名类、字段、方法和属性
- 此外还可以删除无用的类、字段、方法和属性、注释等以优化字节码
在Gradle Scripts / build.gradle(Module: app)文件中
- minifyEnabled:是否启用ProGuard
- proguardFiles:配置混淆文件,一个是系统默认混淆文件(位于SDK/tool/proguard/),一个是自定义混淆文件
buildTypes {
    release {
        minifyEnabled false
        proguardFiles getDefaultProguardFile('proguard-android-optimize.txt'), 'proguard-rules.pro'
    }
}