实现效果截图:
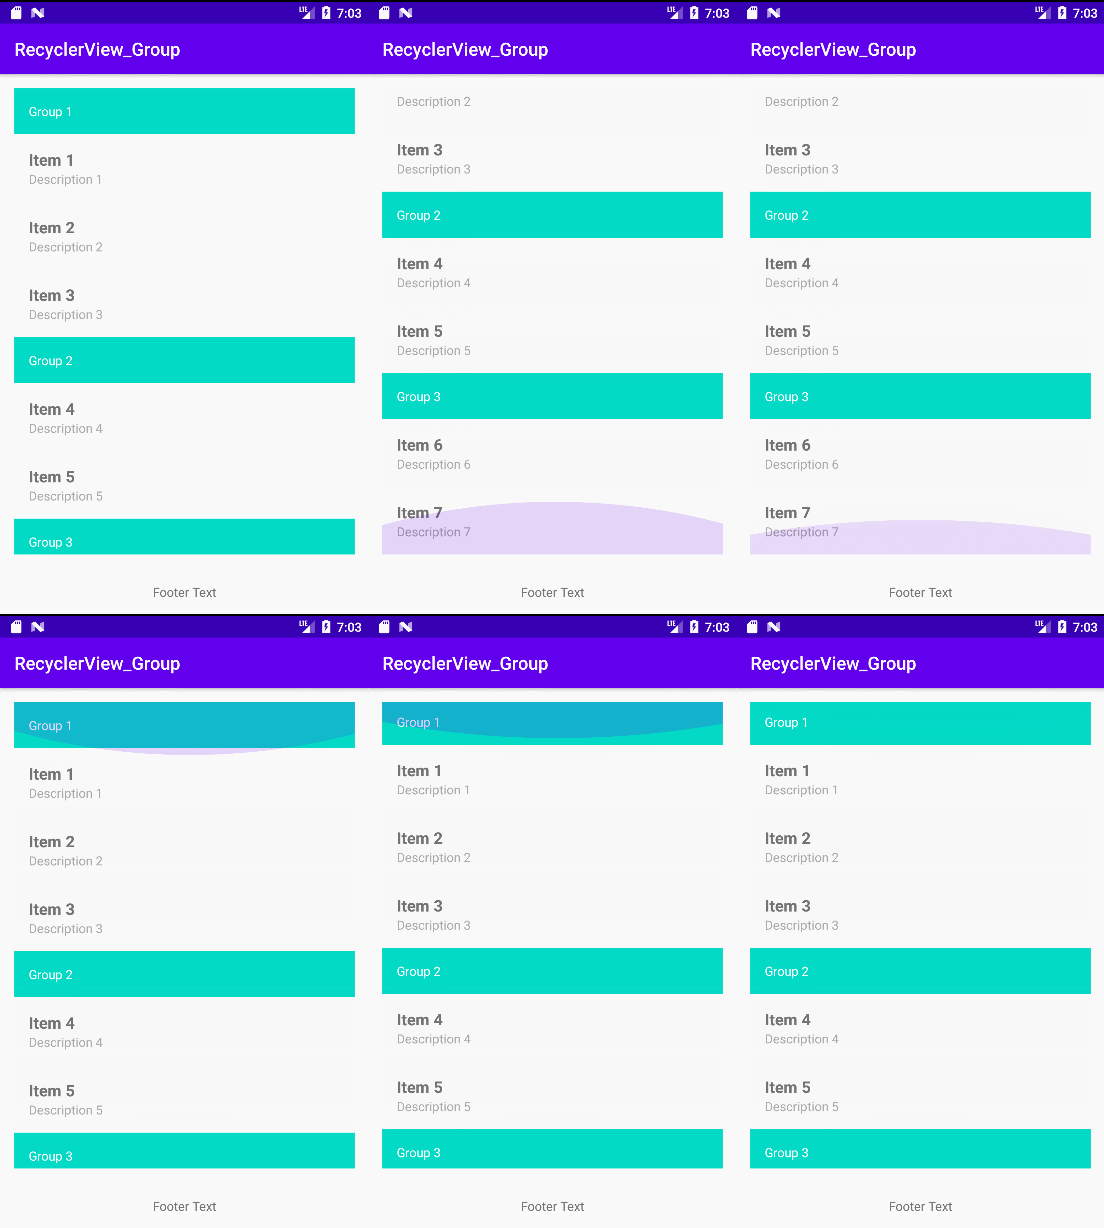
首先,我们需要为RecyclerView添加一个分组的概念,我们可以创建一个Group类来表示分组,包括分组名称和分组中的数据项列表。代码如下:
public class Group {
    private String name;
    private List<Item> items;

    public Group(String name, List<Item> items) {
        this.name = name;
        this.items = items;
    }

    public String getName() {
        return name;
    }

    public List<Item> getItems() {
        return items;
    }


    public static class Item {
        private String name;
        private String description;

        public Item(String name, String description) {
            this.name = name;
            this.description = description;
        }

        public String getName() {
            return name;
        }

        public String getDescription() {
            return description;
        }
    }
}
然后,我们需要修改RecyclerView的Adapter,使其能够支持分组。我们需要重写getItemCount()方法来返回所有分组中的数据项总数,而不是所有数据项的总数。我们还需要重写getItemViewType()方法来返回不同的视图类型,以便我们能够为每个分组显示一个标题视图。代码如下:
package com.example.recyclerview_group;

import android.view.LayoutInflater;
import android.view.View;
import android.view.ViewGroup;
import android.widget.TextView;
import androidx.recyclerview.widget.RecyclerView;

import java.util.List;

/**
 * @author wh445306
 * @version 1.0
 * @Description GroupAdapter
 * @Date 2023-04-07 14:37
 */
public class GroupAdapter extends RecyclerView.Adapter<RecyclerView.ViewHolder> {
    private List<Group> groups;

    public GroupAdapter(List<Group> groups) {
        this.groups = groups;
    }

    @Override
    public int getItemCount() {
        int count = 0;
        for (Group group : groups) {
            count += group.getItems().size() + 1;
        }
        return count;
    }

    @Override
    public int getItemViewType(int position) {
        int count = 0;
        for (Group group : groups) {
            int size = group.getItems().size() + 1;
            if (position < count + size) {
                return position == count ? 0 : 1;
            }
            count += size;
        }
        throw new IllegalArgumentException("Invalid position");
    }

    @Override
    public RecyclerView.ViewHolder onCreateViewHolder(ViewGroup parent, int viewType) {
        if (viewType == 0) {
            View view = LayoutInflater.from(parent.getContext()).inflate(R.layout.item_group, parent, false);
            return new GroupViewHolder(view);
        } else {
            View view = LayoutInflater.from(parent.getContext()).inflate(R.layout.item_item, parent, false);
            return new ItemViewHolder(view);
        }
    }

    @Override
    public void onBindViewHolder(RecyclerView.ViewHolder holder, int position) {
        int count = 0;
        for (Group group : groups) {
            int size = group.getItems().size() + 1;
            if (position < count + size) {
                if (position == count) {
                    GroupViewHolder groupViewHolder = (GroupViewHolder) holder;
                    groupViewHolder.nameTextView.setText(group.getName());
                } else {
                    ItemViewHolder itemViewHolder = (ItemViewHolder) holder;
                    Group.Item item = group.getItems().get(position - count - 1);
                    itemViewHolder.nameTextView.setText(item.getName());
                    itemViewHolder.descriptionTextView.setText(item.getDescription());
                }
                return;
            }
            count += size;
        }
        throw new IllegalArgumentException("Invalid position");
    }

    private static class GroupViewHolder extends RecyclerView.ViewHolder {
        private TextView nameTextView;

        public GroupViewHolder(View itemView) {
            super(itemView);
            nameTextView = itemView.findViewById(R.id.GroupName);
        }
    }

    private static class ItemViewHolder extends RecyclerView.ViewHolder {
        private TextView nameTextView;
        private TextView descriptionTextView;

        public ItemViewHolder(View itemView) {
            super(itemView);
            nameTextView = itemView.findViewById(R.id.ItemName);
            descriptionTextView = itemView.findViewById(R.id.ItemDescription);
        }
    }
}
最后,我们需要在Activity或Fragment中创建RecyclerView和GroupAdapter,并将其设置为RecyclerView的Adapter。代码如下:
package com.example.recyclerview_group;

import androidx.appcompat.app.AppCompatActivity;
import android.os.Bundle;
import androidx.recyclerview.widget.LinearLayoutManager;
import androidx.recyclerview.widget.RecyclerView;

import java.util.ArrayList;
import java.util.List;

public class MainActivity extends AppCompatActivity {
    private RecyclerView recyclerView;

    @Override
    protected void onCreate(Bundle savedInstanceState) {
        super.onCreate(savedInstanceState);
        setContentView(R.layout.activity_main);

        List<Group> groups= new ArrayList<>();
        List<Group.Item> items1 = new ArrayList<>();
        items1.add(new Group.Item("Item 1", "Description 1"));
        items1.add(new Group.Item("Item 2", "Description 2"));
        items1.add(new Group.Item("Item 3", "Description 3"));
        groups.add(new Group("Group 1", items1));
        List<Group.Item> items2 = new ArrayList<>();
        items2.add(new Group.Item("Item 4", "Description 4"));
        items2.add(new Group.Item("Item 5", "Description 5"));
        groups.add(new Group("Group 2", items2));
        List<Group.Item> items3 = new ArrayList<>();
        items3.add(new Group.Item("Item 6", "Description 6"));
        items3.add(new Group.Item("Item 7", "Description 7"));
        groups.add(new Group("Group 3", items3));

        recyclerView = findViewById(R.id.recyclerView);
        recyclerView.setLayoutManager(new LinearLayoutManager(this));
        recyclerView.setAdapter(new GroupAdapter(groups));
    }
}
activity_main
<?xml version="1.0" encoding="utf-8"?>
<RelativeLayout xmlns:android="http://schemas.android.com/apk/res/android"
                android:layout_width="match_parent"
                android:layout_height="match_parent">

    <!-- RecyclerView控件 -->
    <androidx.recyclerview.widget.RecyclerView
            android:id="@+id/recyclerView"
            android:layout_width="match_parent"
            android:layout_height="match_parent"
            android:layout_above="@+id/footerTextView"
            android:padding="16dp" />

    <!-- TextView控件 -->
    <TextView
            android:id="@+id/footerTextView"
            android:layout_width="match_parent"
            android:layout_height="wrap_content"
            android:layout_alignParentBottom="true"
            android:gravity="center"
            android:padding="16dp"
            android:text="Footer Text" />

</RelativeLayout>
item_group定义
item_group用于指定RecyclerView的分组标题视图的布局文件。
在这个示例中,我们使用了一个TextView控件来显示分组标题,使用了
android:background属性来设置标题背景颜色,使用了android:textColor属性来设置标题文本颜色。这个布局文件可以根据实际需求来进行修改和定制。下面是一个简单的
item_group.xml示例代码,包含一个TextView控件,用于显示分组标题:
<?xml version="1.0" encoding="utf-8"?>
<TextView xmlns:android="http://schemas.android.com/apk/res/android"
          android:id="@+id/GroupName"
          android:layout_width="match_parent"
          android:layout_height="wrap_content"
          android:background="@color/colorAccent"
          android:padding="16dp"
          android:textColor="@android:color/white" />
item_item定义
`R.layout.item_item用于指定 RecyclerView 的数据项视图的布局文件。
在这个示例中,我们使用了两个 TextView 控件来显示 RecyclerView 的数据项的名称和描述,使用了
android:textSize属性来设置文本大小,使用了android:textStyle属性来设置文本样式,使用了android:textColor属性来设置文本颜色。这个布局文件可以根据实际需求来进行修改和定制。下面是一个简单的
item_item.xml示例代码,包含两个 TextView 控件,用于显示 RecyclerView 的数据项的名称和描述:
<?xml version="1.0" encoding="utf-8"?>
<LinearLayout xmlns:android="http://schemas.android.com/apk/res/android"
              android:layout_width="match_parent"
              android:layout_height="wrap_content"
              android:orientation="vertical"
              android:padding="16dp">

    <TextView
            android:id="@+id/ItemName"
            android:layout_width="match_parent"
            android:layout_height="wrap_content"
            android:textSize="18sp"
            android:textStyle="bold" />

    <TextView
            android:id="@+id/ItemDescription"
            android:layout_width="match_parent"
            android:layout_height="wrap_content"
            android:textSize="14sp"
            android:textColor="@android:color/darker_gray" />

</LinearLayout>
这样,我们就实现了RecyclerView的分组功能。在GroupAdapter中,我们重写了getItemCount()、getItemViewType()、onCreateViewHolder()和onBindViewHolder()方法,使其能够支持分组。在Activity或Fragment中,我们创建了RecyclerView和GroupAdapter,并将其设置为RecyclerView的Adapter,从而实现了分组功能。
在这个示例中,我们使用了RelativeLayout布局来包含RecyclerView和TextView控件。RecyclerView控件的高度设置为match_parent,以便占据整个布局。TextView控件的高度设置为wrap_content,以便根据文本内容自适应高度。RecyclerView控件的底部与TextView控件的顶部相对齐,使用了
android:layout_above="@+id/footerTextView"属性来实现。


