spring-boot-demo-session
pom.xml
<?xml version="1.0" encoding="UTF-8"?>
<project xmlns="http://maven.apache.org/POM/4.0.0" xmlns:xsi="http://www.w3.org/2001/XMLSchema-instance"
         xsi:schemaLocation="http://maven.apache.org/POM/4.0.0 http://maven.apache.org/xsd/maven-4.0.0.xsd">
    <modelVersion>4.0.0</modelVersion>
    <artifactId>spring-boot-demo-session</artifactId>
    <version>1.0.0-SNAPSHOT</version>
    <parent>
        <groupId>com.xkcoding</groupId>
        <artifactId>spring-boot-demo</artifactId>
        <version>1.0.0-SNAPSHOT</version>
    </parent>
    <properties>
        <project.build.sourceEncoding>UTF-8</project.build.sourceEncoding>
        <project.reporting.outputEncoding>UTF-8</project.reporting.outputEncoding>
        <java.version>1.8</java.version>
    </properties>
    <dependencies>
        <dependency>
            <groupId>org.springframework.boot</groupId>
            <artifactId>spring-boot-starter-web</artifactId>
        </dependency>
        <dependency>
            <groupId>org.springframework.session</groupId>
            <artifactId>spring-session-data-redis</artifactId>
        </dependency>
        <dependency>
            <groupId>org.springframework.boot</groupId>
            <artifactId>spring-boot-starter-data-redis</artifactId>
        </dependency>
        <!-- 对象池,使用redis时必须引入 -->
        <dependency>
            <groupId>org.apache.commons</groupId>
            <artifactId>commons-pool2</artifactId>
        </dependency>
        <dependency>
            <groupId>org.springframework.boot</groupId>
            <artifactId>spring-boot-starter-thymeleaf</artifactId>
        </dependency>
        <dependency>
            <groupId>org.springframework.boot</groupId>
            <artifactId>spring-boot-starter-test</artifactId>
            <scope>test</scope>
        </dependency>
        <dependency>
            <groupId>cn.hutool</groupId>
            <artifactId>hutool-all</artifactId>
        </dependency>
    </dependencies>
    <build>
        <finalName>spring-boot-demo-session</finalName>
        <plugins>
            <plugin>
                <groupId>org.springframework.boot</groupId>
                <artifactId>spring-boot-maven-plugin</artifactId>
            </plugin>
        </plugins>
    </build>
</project>
application.yml
server:
  port: 8080
  servlet:
    context-path: /demo
spring:
  session:
    store-type: redis
    redis:
      flush-mode: immediate
      namespace: "spring:session"
  redis:
    host: localhost
    port: 6379
    # 连接超时时间(记得添加单位,Duration)
    timeout: 10000ms
    # Redis默认情况下有16个分片,这里配置具体使用的分片
    # database: 0
    lettuce:
      pool:
        # 连接池最大连接数(使用负值表示没有限制) 默认 8
        max-active: 8
        # 连接池最大阻塞等待时间(使用负值表示没有限制) 默认 -1
        max-wait: -1ms
        # 连接池中的最大空闲连接 默认 8
        max-idle: 8
        # 连接池中的最小空闲连接 默认 0
        min-idle: 0
SessionInterceptor
@Component
public class SessionInterceptor extends HandlerInterceptorAdapter {
    @Override
    public boolean preHandle(HttpServletRequest request, HttpServletResponse response, Object handler) throws Exception {
        HttpSession session = request.getSession();
        if (session.getAttribute(Consts.SESSION_KEY) != null) {
            return true;
        }
        // 跳转到登录页
        String url = "/page/login?redirect=true";
        response.sendRedirect(request.getContextPath() + url);
        return false;
    }
}
@Configuration
public class WebMvcConfig implements WebMvcConfigurer {
    @Autowired
    private SessionInterceptor sessionInterceptor;
    @Override
    public void addInterceptors(InterceptorRegistry registry) {
        InterceptorRegistration sessionInterceptorRegistry = registry.addInterceptor(sessionInterceptor);
        // 排除不需要拦截的路径
        sessionInterceptorRegistry.excludePathPatterns("/page/login");
        sessionInterceptorRegistry.excludePathPatterns("/page/doLogin");
        sessionInterceptorRegistry.excludePathPatterns("/error");

        // 需要拦截的路径
        sessionInterceptorRegistry.addPathPatterns("/**");
    }
@Controller
@RequestMapping("/page")
public class PageController {
    /**
     * 跳转到 首页
     *
     * @param request 请求
     */
    @GetMapping("/index")
    public ModelAndView index(HttpServletRequest request) {
        ModelAndView mv = new ModelAndView();
        String token = (String) request.getSession().getAttribute(Consts.SESSION_KEY);
        mv.setViewName("index");
        mv.addObject("token", token);
        return mv;
    }

    /**
     * 跳转到 登录页
     *
     * @param redirect 是否是跳转回来的
     */
    @GetMapping("/login")
    public ModelAndView login(Boolean redirect) {
        ModelAndView mv = new ModelAndView();
        if (ObjectUtil.isNotNull(redirect) && ObjectUtil.equal(true, redirect)) {
            mv.addObject("message", "请先登录!");
        }
        mv.setViewName("login");
        return mv;
    }
    @GetMapping("/doLogin")
    public String doLogin(HttpSession session) {
        session.setAttribute(Consts.SESSION_KEY, IdUtil.fastUUID());
        return "redirect:/page/index";
    }
}
测试
测试 重启程序,Session 不失效的场景
- 打开浏览器,访问首页:http://localhost:8080/demo/page/index
- 最开始未登录,所以会跳转到登录页:http://localhost:8080/demo/page/login?redirect=true 然后点击登录按钮
- 登录之后,跳转回首页,此时可以看到首页显示token信息。
- 重启程序。不关闭浏览器,直接刷新首页,此时不跳转到登录页。测试成功!
参考
- Spring Session 官方文档:https://docs.spring.io/spring-session/docs/current/reference/html5/guides/boot-redis.html#updating-dependencies
spring-boot-demo-zookeeper
Zookeeper 结合AOP实现分布式锁
pom.xml
<?xml version="1.0" encoding="UTF-8"?>
<project xmlns="http://maven.apache.org/POM/4.0.0" xmlns:xsi="http://www.w3.org/2001/XMLSchema-instance"
         xsi:schemaLocation="http://maven.apache.org/POM/4.0.0 http://maven.apache.org/xsd/maven-4.0.0.xsd">
    <modelVersion>4.0.0</modelVersion>
    <artifactId>spring-boot-demo-zookeeper</artifactId>
    <version>1.0.0-SNAPSHOT</version>
    <packaging>jar</packaging>
    <parent>
        <groupId>com.xkcoding</groupId>
        <artifactId>spring-boot-demo</artifactId>
        <version>1.0.0-SNAPSHOT</version>
    </parent>
    <properties>
        <project.build.sourceEncoding>UTF-8</project.build.sourceEncoding>
        <project.reporting.outputEncoding>UTF-8</project.reporting.outputEncoding>
        <java.version>1.8</java.version>
    </properties>
    <dependencies>
        <dependency>
            <groupId>org.springframework.boot</groupId>
            <artifactId>spring-boot-starter-web</artifactId>
        </dependency>
        <dependency>
            <groupId>org.springframework.boot</groupId>
            <artifactId>spring-boot-configuration-processor</artifactId>
            <optional>true</optional>
        </dependency>
        <dependency>
            <groupId>org.springframework.boot</groupId>
            <artifactId>spring-boot-starter-aop</artifactId>
        </dependency>
        <!-- curator 版本4.1.0 对应 zookeeper 版本 3.5.x -->
        <!-- curator 与 zookeeper 版本对应关系:https://curator.apache.org/zk-compatibility.html -->
        <dependency>
            <groupId>org.apache.curator</groupId>
            <artifactId>curator-recipes</artifactId>
            <version>4.1.0</version>
        </dependency>
        <dependency>
            <groupId>cn.hutool</groupId>
            <artifactId>hutool-all</artifactId>
        </dependency>
        <dependency>
            <groupId>org.springframework.boot</groupId>
            <artifactId>spring-boot-starter-test</artifactId>
            <scope>test</scope>
        </dependency>
        <dependency>
            <groupId>org.projectlombok</groupId>
            <artifactId>lombok</artifactId>
            <optional>true</optional>
        </dependency>
    </dependencies>
    <build>
        <finalName>spring-boot-demo-zookeeper</finalName>
        <plugins>
            <plugin>
                <groupId>org.springframework.boot</groupId>
                <artifactId>spring-boot-maven-plugin</artifactId>
            </plugin>
        </plugins>
    </build>

</project>
ZkProps.java
@Data
@ConfigurationProperties(prefix = "zk")
public class ZkProps {
    /**
     * 连接地址
     */
    private String url;

    /**
     * 超时时间(毫秒),默认1000
     */
    private int timeout = 1000;

    /**
     * 重试次数,默认3
     */
    private int retry = 3;
}
application.yml
server:
  port: 8080
  servlet:
    context-path: /demo
zk:
  url: 127.0.0.1:2181
  timeout: 1000
  retry: 3
ZkConfig.java
@Configuration
@EnableConfigurationProperties(ZkProps.class)
public class ZkConfig {
    private final ZkProps zkProps;
    @Autowired
    public ZkConfig(ZkProps zkProps) {
        this.zkProps = zkProps;
    }
    @Bean
    public CuratorFramework curatorFramework() {
        RetryPolicy retryPolicy = new ExponentialBackoffRetry(zkProps.getTimeout(), zkProps.getRetry());
        CuratorFramework client = CuratorFrameworkFactory.newClient(zkProps.getUrl(), retryPolicy);
        client.start();
        return client;
    }
}
ZooLock.java
分布式锁的关键注解
@Target({ElementType.METHOD})
@Retention(RetentionPolicy.RUNTIME)
@Documented
@Inherited
public @interface ZooLock {
    /**
     * 分布式锁的键
     */
    String key();

    /**
     * 锁释放时间,默认五秒
     */
    long timeout() default 5 * 1000;

    /**
     * 时间格式,默认:毫秒
     */
    TimeUnit timeUnit() default TimeUnit.MILLISECONDS;
}
LockKeyParam.java
分布式锁动态key的关键注解
@Target({ElementType.PARAMETER})
@Retention(RetentionPolicy.RUNTIME)
@Documented
@Inherited
public @interface LockKeyParam {
    /**
     * 如果动态key在user对象中,那么就需要设置fields的值为user对象中的属性名可以为多个,基本类型则不需要设置该值
     * <p>例1:public void count(@LockKeyParam({"id"}) User user)
     * <p>例2:public void count(@LockKeyParam({"id","userName"}) User user)
     * <p>例3:public void count(@LockKeyParam String userId)
     */
    String[] fields() default {};
}
ZooLockAspect.java
分布式锁的关键部分
@Aspect
@Component
@Slf4j
public class ZooLockAspect {
    private final CuratorFramework zkClient;
    private static final String KEY_PREFIX = "DISTRIBUTED_LOCK_";
    private static final String KEY_SEPARATOR = "/";
    @Autowired
    public ZooLockAspect(CuratorFramework zkClient) {
        this.zkClient = zkClient;
    }

    /**
     * 切入点
     */
    @Pointcut("@annotation(com.xkcoding.zookeeper.annotation.ZooLock)")
    public void doLock() {

    }

    /**
     * 环绕操作
     *
     * @param point 切入点
     * @return 原方法返回值
     * @throws Throwable 异常信息
     */
    @Around("doLock()")
    public Object around(ProceedingJoinPoint point) throws Throwable {
        MethodSignature signature = (MethodSignature) point.getSignature();
        Method method = signature.getMethod();
        Object[] args = point.getArgs();
        ZooLock zooLock = method.getAnnotation(ZooLock.class);
        if (StrUtil.isBlank(zooLock.key())) {
            throw new RuntimeException("分布式锁键不能为空");
        }
        String lockKey = buildLockKey(zooLock, method, args);
        InterProcessMutex lock = new InterProcessMutex(zkClient, lockKey);
        try {
            // 假设上锁成功,以后拿到的都是 false
            if (lock.acquire(zooLock.timeout(), zooLock.timeUnit())) {
                return point.proceed();
            } else {
                throw new RuntimeException("请勿重复提交");
            }
        } finally {
            lock.release();
        }
    }

    /**
     * 构造分布式锁的键
     *
     * @param lock   注解
     * @param method 注解标记的方法
     * @param args   方法上的参数
     * @return
     * @throws NoSuchFieldException
     * @throws IllegalAccessException
     */
    private String buildLockKey(ZooLock lock, Method method, Object[] args) throws NoSuchFieldException, IllegalAccessException {
        StringBuilder key = new StringBuilder(KEY_SEPARATOR + KEY_PREFIX + lock.key());

        // 迭代全部参数的注解,根据使用LockKeyParam的注解的参数所在的下标,来获取args中对应下标的参数值拼接到前半部分key上
        Annotation[][] parameterAnnotations = method.getParameterAnnotations();

        for (int i = 0; i < parameterAnnotations.length; i++) {
            // 循环该参数全部注解
            for (Annotation annotation : parameterAnnotations[i]) {
                // 注解不是 @LockKeyParam
                if (!annotation.annotationType().isInstance(LockKeyParam.class)) {
                    continue;
                }

                // 获取所有fields
                String[] fields = ((LockKeyParam) annotation).fields();
                if (ArrayUtil.isEmpty(fields)) {
                    // 普通数据类型直接拼接
                    if (ObjectUtil.isNull(args[i])) {
                        throw new RuntimeException("动态参数不能为null");
                    }
                    key.append(KEY_SEPARATOR).append(args[i]);
                } else {
                    // @LockKeyParam的fields值不为null,所以当前参数应该是对象类型
                    for (String field : fields) {
                        Class<?> clazz = args[i].getClass();
                        Field declaredField = clazz.getDeclaredField(field);
                        declaredField.setAccessible(true);
                        Object value = declaredField.get(clazz);
                        key.append(KEY_SEPARATOR).append(value);
                    }
                }
            }
        }
        return key.toString();
    }

}
SpringBootDemoZookeeperApplicationTests.java
测试分布式锁
@RunWith(SpringRunner.class)
@SpringBootTest
@Slf4j
public class SpringBootDemoZookeeperApplicationTests {

    public Integer getCount() {
        return count;
    }

    private Integer count = 10000;
    private ExecutorService executorService = Executors.newFixedThreadPool(1000);

    @Autowired
    private CuratorFramework zkClient;

    /**
     * 不使用分布式锁,程序结束查看count的值是否为0
     */
    @Test
    public void test() throws InterruptedException {
        IntStream.range(0, 10000).forEach(i -> executorService.execute(this::doBuy));
        TimeUnit.MINUTES.sleep(1);
        log.error("count值为{}", count);
    }

    /**
     * 测试AOP分布式锁
     */
    @Test
    public void testAopLock() throws InterruptedException {
        // 测试类中使用AOP需要手动代理
        SpringBootDemoZookeeperApplicationTests target = new SpringBootDemoZookeeperApplicationTests();
        AspectJProxyFactory factory = new AspectJProxyFactory(target);
        ZooLockAspect aspect = new ZooLockAspect(zkClient);
        factory.addAspect(aspect);
        SpringBootDemoZookeeperApplicationTests proxy = factory.getProxy();
        IntStream.range(0, 10000).forEach(i -> executorService.execute(() -> proxy.aopBuy(i)));
        TimeUnit.MINUTES.sleep(1);
        log.error("count值为{}", proxy.getCount());
    }

    /**
     * 测试手动加锁
     */
    @Test
    public void testManualLock() throws InterruptedException {
        IntStream.range(0, 10000).forEach(i -> executorService.execute(this::manualBuy));
        TimeUnit.MINUTES.sleep(1);
        log.error("count值为{}", count);
    }

    @ZooLock(key = "buy", timeout = 1, timeUnit = TimeUnit.MINUTES)
    public void aopBuy(int userId) {
        log.info("{} 正在出库。。。", userId);
        doBuy();
        log.info("{} 扣库存成功。。。", userId);
    }

    public void manualBuy() {
        String lockPath = "/buy";
        log.info("try to buy sth.");
        try {
            InterProcessMutex lock = new InterProcessMutex(zkClient, lockPath);
            try {
                if (lock.acquire(1, TimeUnit.MINUTES)) {
                    doBuy();
                    log.info("buy successfully!");
                }
            } finally {
                lock.release();
            }
        } catch (Exception e) {
            log.error("zk error");
        }
    }

    public void doBuy() {
        count--;
        log.info("count值为{}", count);
    }

}
参考
- 如何在测试类中使用 AOP
- zookeeper 实现分布式锁:《Spring Boot 2精髓 从构建小系统到架构分布式大系统》李家智 - 第16章 - Spring Boot 和 Zoo Keeper - 16.3 实现分布式锁
spring-boot-demo-mq-rabbitmq
Spring Boot如何集成 RabbitMQ,并且演示了基于
直接队列模式、分列模式、主题模式、延迟队列 的消息发送和接收。
pom.xml
<?xml version="1.0" encoding="UTF-8"?>
<project xmlns="http://maven.apache.org/POM/4.0.0" xmlns:xsi="http://www.w3.org/2001/XMLSchema-instance"
         xsi:schemaLocation="http://maven.apache.org/POM/4.0.0 http://maven.apache.org/xsd/maven-4.0.0.xsd">
    <modelVersion>4.0.0</modelVersion>
    <artifactId>spring-boot-demo-mq-rabbitmq</artifactId>
    <version>1.0.0-SNAPSHOT</version>
    <packaging>jar</packaging>
    <parent>
        <groupId>com.xkcoding</groupId>
        <artifactId>spring-boot-demo</artifactId>
        <version>1.0.0-SNAPSHOT</version>
    </parent>
    <properties>
        <project.build.sourceEncoding>UTF-8</project.build.sourceEncoding>
        <project.reporting.outputEncoding>UTF-8</project.reporting.outputEncoding>
        <java.version>1.8</java.version>
    </properties>
    <dependencies>
        <dependency>
            <groupId>org.springframework.boot</groupId>
            <artifactId>spring-boot-starter-web</artifactId>
        </dependency>
        <dependency>
            <groupId>org.springframework.boot</groupId>
            <artifactId>spring-boot-starter-amqp</artifactId>
        </dependency>
        <dependency>
            <groupId>org.springframework.boot</groupId>
            <artifactId>spring-boot-starter-test</artifactId>
            <scope>test</scope>
        </dependency>
        <dependency>
            <groupId>org.projectlombok</groupId>
            <artifactId>lombok</artifactId>
            <optional>true</optional>
        </dependency>
        <dependency>
            <groupId>cn.hutool</groupId>
            <artifactId>hutool-all</artifactId>
        </dependency>
        <dependency>
            <groupId>com.google.guava</groupId>
            <artifactId>guava</artifactId>
        </dependency>
    </dependencies>
    <build>
        <finalName>spring-boot-demo-mq-rabbitmq</finalName>
        <plugins>
            <plugin>
                <groupId>org.springframework.boot</groupId>
                <artifactId>spring-boot-maven-plugin</artifactId>
            </plugin>
        </plugins>
    </build>
</project>
application.yml
server:
  port: 8080
  servlet:
    context-path: /demo
spring:
  rabbitmq:
    host: localhost
    port: 5672
    username: guest
    password: guest
    virtual-host: /
    # 手动提交消息
    listener:
      simple:
        acknowledge-mode: manual
      direct:
        acknowledge-mode: manual
RabbitConsts.java
public interface RabbitConsts {
    /**
     * 直接模式1
     */
    String DIRECT_MODE_QUEUE_ONE = "queue.direct.1";

    /**
     * 队列2
     */
    String QUEUE_TWO = "queue.2";

    /**
     * 队列3
     */
    String QUEUE_THREE = "3.queue";

    /**
     * 分列模式
     */
    String FANOUT_MODE_QUEUE = "fanout.mode";

    /**
     * 主题模式
     */
    String TOPIC_MODE_QUEUE = "topic.mode";

    /**
     * 路由1
     */
    String TOPIC_ROUTING_KEY_ONE = "queue.#";

    /**
     * 路由2
     */
    String TOPIC_ROUTING_KEY_TWO = "*.queue";

    /**
     * 路由3
     */
    String TOPIC_ROUTING_KEY_THREE = "3.queue";

    /**
     * 延迟队列
     */
    String DELAY_QUEUE = "delay.queue";

    /**
     * 延迟队列交换器
     */
    String DELAY_MODE_QUEUE = "delay.mode";
}
RabbitMqConfig.java
RoutingKey规则
- 路由格式必须以
.分隔,比如user.email或者user.aaa.email- 通配符
*,代表一个占位符,或者说一个单词,比如路由为user.*,那么user.email可以匹配,但是user.aaa.email就匹配不了- 通配符
#,代表一个或多个占位符,或者说一个或多个单词,比如路由为user.#,那么user.email可以匹配,user.aaa.email也可以匹配
/**
 * <p>
 * RabbitMQ配置,主要是配置队列,如果提前存在该队列,可以省略本配置类
 * </p>
 *
 * @author yangkai.shen
 * @date Created in 2018-12-29 17:03
 */
@Slf4j
@Configuration
public class RabbitMqConfig {
    @Bean
    public RabbitTemplate rabbitTemplate(CachingConnectionFactory connectionFactory) {
        connectionFactory.setPublisherConfirms(true);
        connectionFactory.setPublisherReturns(true);
        RabbitTemplate rabbitTemplate = new RabbitTemplate(connectionFactory);
        rabbitTemplate.setMandatory(true);
        rabbitTemplate.setConfirmCallback((correlationData, ack, cause) -> log.info("消息发送成功:correlationData({}),ack({}),cause({})", correlationData, ack, cause));
        rabbitTemplate.setReturnCallback((message, replyCode, replyText, exchange, routingKey) -> log.info("消息丢失:exchange({}),route({}),replyCode({}),replyText({}),message:{}", exchange, routingKey, replyCode, replyText, message));
        return rabbitTemplate;
    }

    /**
     * 直接模式队列1
     */
    @Bean
    public Queue directOneQueue() {
        return new Queue(RabbitConsts.DIRECT_MODE_QUEUE_ONE);
    }

    /**
     * 队列2
     */
    @Bean
    public Queue queueTwo() {
        return new Queue(RabbitConsts.QUEUE_TWO);
    }

    /**
     * 队列3
     */
    @Bean
    public Queue queueThree() {
        return new Queue(RabbitConsts.QUEUE_THREE);
    }

    /**
     * 分列模式队列
     */
    @Bean
    public FanoutExchange fanoutExchange() {
        return new FanoutExchange(RabbitConsts.FANOUT_MODE_QUEUE);
    }

    /**
     * 分列模式绑定队列1
     *
     * @param directOneQueue 绑定队列1
     * @param fanoutExchange 分列模式交换器
     */
    @Bean
    public Binding fanoutBinding1(Queue directOneQueue, FanoutExchange fanoutExchange) {
        return BindingBuilder.bind(directOneQueue).to(fanoutExchange);
    }

    /**
     * 分列模式绑定队列2
     *
     * @param queueTwo       绑定队列2
     * @param fanoutExchange 分列模式交换器
     */
    @Bean
    public Binding fanoutBinding2(Queue queueTwo, FanoutExchange fanoutExchange) {
        return BindingBuilder.bind(queueTwo).to(fanoutExchange);
    }

    /**
     * 主题模式队列
     * <li>路由格式必须以 . 分隔,比如 user.email 或者 user.aaa.email</li>
     * <li>通配符 * ,代表一个占位符,或者说一个单词,比如路由为 user.*,那么 user.email 可以匹配,但是 user.aaa.email 就匹配不了</li>
     * <li>通配符 # ,代表一个或多个占位符,或者说一个或多个单词,比如路由为 user.#,那么 user.email 可以匹配,user.aaa.email 也可以匹配</li>
     */
    @Bean
    public TopicExchange topicExchange() {
        return new TopicExchange(RabbitConsts.TOPIC_MODE_QUEUE);
    }


    /**
     * 主题模式绑定分列模式
     *
     * @param fanoutExchange 分列模式交换器
     * @param topicExchange  主题模式交换器
     */
    @Bean
    public Binding topicBinding1(FanoutExchange fanoutExchange, TopicExchange topicExchange) {
        return BindingBuilder.bind(fanoutExchange).to(topicExchange).with(RabbitConsts.TOPIC_ROUTING_KEY_ONE);
    }

    /**
     * 主题模式绑定队列2
     *
     * @param queueTwo      队列2
     * @param topicExchange 主题模式交换器
     */
    @Bean
    public Binding topicBinding2(Queue queueTwo, TopicExchange topicExchange) {
        return BindingBuilder.bind(queueTwo).to(topicExchange).with(RabbitConsts.TOPIC_ROUTING_KEY_TWO);
    }

    /**
     * 主题模式绑定队列3
     *
     * @param queueThree    队列3
     * @param topicExchange 主题模式交换器
     */
    @Bean
    public Binding topicBinding3(Queue queueThree, TopicExchange topicExchange) {
        return BindingBuilder.bind(queueThree).to(topicExchange).with(RabbitConsts.TOPIC_ROUTING_KEY_THREE);
    }

    /**
     * 延迟队列
     */
    @Bean
    public Queue delayQueue() {
        return new Queue(RabbitConsts.DELAY_QUEUE, true);
    }

    /**
     * 延迟队列交换器, x-delayed-type 和 x-delayed-message 固定
     */
    @Bean
    public CustomExchange delayExchange() {
        Map<String, Object> args = Maps.newHashMap();
        args.put("x-delayed-type", "direct");
        return new CustomExchange(RabbitConsts.DELAY_MODE_QUEUE, "x-delayed-message", true, false, args);
    }

    /**
     * 延迟队列绑定自定义交换器
     *
     * @param delayQueue    队列
     * @param delayExchange 延迟交换器
     */
    @Bean
    public Binding delayBinding(Queue delayQueue, CustomExchange delayExchange) {
        return BindingBuilder.bind(delayQueue).to(delayExchange).with(RabbitConsts.DELAY_QUEUE).noargs();
    }

}
消息处理器
需要注意:如果
spring.rabbitmq.listener.direct.acknowledge-mode: auto,则会自动Ack,否则需要手动Ack
DirectQueueOneHandler.java
/**
 * <p>
 * 直接队列1 处理器
 * </p>
 *
 * @author yangkai.shen
 * @date Created in 2019-01-04 15:42
 */
@Slf4j
@RabbitListener(queues = RabbitConsts.DIRECT_MODE_QUEUE_ONE)
@Component
public class DirectQueueOneHandler {

    /**
     * 如果 spring.rabbitmq.listener.direct.acknowledge-mode: auto,则可以用这个方式,会自动ack
     */
    // @RabbitHandler
    public void directHandlerAutoAck(MessageStruct message) {
        log.info("直接队列处理器,接收消息:{}", JSONUtil.toJsonStr(message));
    }

    @RabbitHandler
    public void directHandlerManualAck(MessageStruct messageStruct, Message message, Channel channel) {
        //  如果手动ACK,消息会被监听消费,但是消息在队列中依旧存在,如果 未配置 acknowledge-mode 默认是会在消费完毕后自动ACK掉
        final long deliveryTag = message.getMessageProperties().getDeliveryTag();
        try {
            log.info("直接队列1,手动ACK,接收消息:{}", JSONUtil.toJsonStr(messageStruct));
            // 通知 MQ 消息已被成功消费,可以ACK了
            channel.basicAck(deliveryTag, false);
        } catch (IOException e) {
            try {
                // 处理失败,重新压入MQ
                channel.basicRecover();
            } catch (IOException e1) {
                e1.printStackTrace();
            }
        }
    }
}
DirectQueueOneHandler.java
@Slf4j
@RabbitListener(queues = RabbitConsts.DIRECT_MODE_QUEUE_ONE)
@Component
public class DirectQueueOneHandler {

    /**
     * 如果 spring.rabbitmq.listener.direct.acknowledge-mode: auto,则可以用这个方式,会自动ack
     */
    // @RabbitHandler
    public void directHandlerAutoAck(MessageStruct message) {
        log.info("直接队列处理器,接收消息:{}", JSONUtil.toJsonStr(message));
    }

    @RabbitHandler
    public void directHandlerManualAck(MessageStruct messageStruct, Message message, Channel channel) {
        //  如果手动ACK,消息会被监听消费,但是消息在队列中依旧存在,如果 未配置 acknowledge-mode 默认是会在消费完毕后自动ACK掉
        final long deliveryTag = message.getMessageProperties().getDeliveryTag();
        try {
            log.info("直接队列1,手动ACK,接收消息:{}", JSONUtil.toJsonStr(messageStruct));
            // 通知 MQ 消息已被成功消费,可以ACK了
            channel.basicAck(deliveryTag, false);
        } catch (IOException e) {
            try {
                // 处理失败,重新压入MQ
                channel.basicRecover();
            } catch (IOException e1) {
                e1.printStackTrace();
            }
        }
    }
}
QueueThreeHandler.java
@Slf4j
@RabbitListener(queues = RabbitConsts.QUEUE_THREE)
@Component
public class QueueThreeHandler {

    @RabbitHandler
    public void directHandlerManualAck(MessageStruct messageStruct, Message message, Channel channel) {
        //  如果手动ACK,消息会被监听消费,但是消息在队列中依旧存在,如果 未配置 acknowledge-mode 默认是会在消费完毕后自动ACK掉
        final long deliveryTag = message.getMessageProperties().getDeliveryTag();
        try {
            log.info("队列3,手动ACK,接收消息:{}", JSONUtil.toJsonStr(messageStruct));
            // 通知 MQ 消息已被成功消费,可以ACK了
            channel.basicAck(deliveryTag, false);
        } catch (IOException e) {
            try {
                // 处理失败,重新压入MQ
                channel.basicRecover();
            } catch (IOException e1) {
                e1.printStackTrace();
            }
        }
    }
}
QueueTwoHandler.java
@Slf4j
@RabbitListener(queues = RabbitConsts.QUEUE_TWO)
@Component
public class QueueTwoHandler {

    @RabbitHandler
    public void directHandlerManualAck(MessageStruct messageStruct, Message message, Channel channel) {
        //  如果手动ACK,消息会被监听消费,但是消息在队列中依旧存在,如果 未配置 acknowledge-mode 默认是会在消费完毕后自动ACK掉
        final long deliveryTag = message.getMessageProperties().getDeliveryTag();
        try {
            log.info("队列2,手动ACK,接收消息:{}", JSONUtil.toJsonStr(messageStruct));
            // 通知 MQ 消息已被成功消费,可以ACK了
            channel.basicAck(deliveryTag, false);
        } catch (IOException e) {
            try {
                // 处理失败,重新压入MQ
                channel.basicRecover();
            } catch (IOException e1) {
                e1.printStackTrace();
            }
        }
    }
}
SpringBootDemoMqRabbitmqApplicationTests.java
@RunWith(SpringRunner.class)
@SpringBootTest
public class SpringBootDemoMqRabbitmqApplicationTests {
    @Autowired
    private RabbitTemplate rabbitTemplate;

    /**
     * 测试直接模式发送
     */
    @Test
    public void sendDirect() {
        rabbitTemplate.convertAndSend(RabbitConsts.DIRECT_MODE_QUEUE_ONE, new MessageStruct("direct message"));
    }

    /**
     * 测试分列模式发送
     */
    @Test
    public void sendFanout() {
        rabbitTemplate.convertAndSend(RabbitConsts.FANOUT_MODE_QUEUE, "", new MessageStruct("fanout message"));
    }

    /**
     * 测试主题模式发送1
     */
    @Test
    public void sendTopic1() {
        rabbitTemplate.convertAndSend(RabbitConsts.TOPIC_MODE_QUEUE, "queue.aaa.bbb", new MessageStruct("topic message"));
    }

    /**
     * 测试主题模式发送2
     */
    @Test
    public void sendTopic2() {
        rabbitTemplate.convertAndSend(RabbitConsts.TOPIC_MODE_QUEUE, "ccc.queue", new MessageStruct("topic message"));
    }

    /**
     * 测试主题模式发送3
     */
    @Test
    public void sendTopic3() {
        rabbitTemplate.convertAndSend(RabbitConsts.TOPIC_MODE_QUEUE, "3.queue", new MessageStruct("topic message"));
    }

    /**
     * 测试延迟队列发送
     */
    @Test
    public void sendDelay() {
        rabbitTemplate.convertAndSend(RabbitConsts.DELAY_MODE_QUEUE, RabbitConsts.DELAY_QUEUE, new MessageStruct("delay message, delay 5s, " + DateUtil
                .date()), message -> {
            message.getMessageProperties().setHeader("x-delay", 5000);
            return message;
        });
        rabbitTemplate.convertAndSend(RabbitConsts.DELAY_MODE_QUEUE, RabbitConsts.DELAY_QUEUE, new MessageStruct("delay message,  delay 2s, " + DateUtil
                .date()), message -> {
            message.getMessageProperties().setHeader("x-delay", 2000);
            return message;
        });
        rabbitTemplate.convertAndSend(RabbitConsts.DELAY_MODE_QUEUE, RabbitConsts.DELAY_QUEUE, new MessageStruct("delay message,  delay 8s, " + DateUtil
                .date()), message -> {
            message.getMessageProperties().setHeader("x-delay", 8000);
            return message;
        });
    }

}
运行效果
直接模式

分列模式

主题模式
RoutingKey:queue.#

RoutingKey:*.queue

RoutingKey:3.queue

延迟队列

参考
- SpringQP 官方文档:https://docs.spring.io/spring-amqp/docs/2.1.0.RELEASE/reference/html/
- RabbitMQ 官网:http://www.rabbitmq.com/
- RabbitMQ延迟队列:https://www.cnblogs.com/vipstone/p/9967649.html
spring-boot-demo-mq-kafka
集成kafka实现消息的发送和接收。
环境准备
创建一个名为 test 的Topic
./bin/kafka-topics.sh --create --zookeeper localhost:2181 --replication-factor 1 --partitions 1 --topic test
pom.xml
<?xml version="1.0" encoding="UTF-8"?>
<project xmlns="http://maven.apache.org/POM/4.0.0" xmlns:xsi="http://www.w3.org/2001/XMLSchema-instance"
         xsi:schemaLocation="http://maven.apache.org/POM/4.0.0 http://maven.apache.org/xsd/maven-4.0.0.xsd">
    <modelVersion>4.0.0</modelVersion>
    <artifactId>spring-boot-demo-mq-kafka</artifactId>
    <version>1.0.0-SNAPSHOT</version>
    <packaging>jar</packaging>
    <parent>
        <groupId>com.xkcoding</groupId>
        <artifactId>spring-boot-demo</artifactId>
        <version>1.0.0-SNAPSHOT</version>
    </parent>
    <properties>
        <project.build.sourceEncoding>UTF-8</project.build.sourceEncoding>
        <project.reporting.outputEncoding>UTF-8</project.reporting.outputEncoding>
        <java.version>1.8</java.version>
    </properties>
    <dependencies>
        <dependency>
            <groupId>org.springframework.boot</groupId>
            <artifactId>spring-boot-starter</artifactId>
        </dependency>
        <dependency>
            <groupId>org.springframework.kafka</groupId>
            <artifactId>spring-kafka</artifactId>
        </dependency>
        <dependency>
            <groupId>org.springframework.boot</groupId>
            <artifactId>spring-boot-starter-test</artifactId>
            <scope>test</scope>
        </dependency>
        <dependency>
            <groupId>org.projectlombok</groupId>
            <artifactId>lombok</artifactId>
            <optional>true</optional>
        </dependency>
        <dependency>
            <groupId>cn.hutool</groupId>
            <artifactId>hutool-all</artifactId>
        </dependency>
        <dependency>
            <groupId>com.google.guava</groupId>
            <artifactId>guava</artifactId>
        </dependency>
    </dependencies>
    <build>
        <finalName>spring-boot-demo-mq-kafka</finalName>
        <plugins>
            <plugin>
                <groupId>org.springframework.boot</groupId>
                <artifactId>spring-boot-maven-plugin</artifactId>
            </plugin>
        </plugins>
    </build>
</project>
application.yml
server:
  port: 8080
  servlet:
    context-path: /demo
spring:
  kafka:
    bootstrap-servers: localhost:9092
    producer:
      retries: 0
      batch-size: 16384
      buffer-memory: 33554432
      key-serializer: org.apache.kafka.common.serialization.StringSerializer
      value-serializer: org.apache.kafka.common.serialization.StringSerializer
    consumer:
      group-id: spring-boot-demo
      # 手动提交
      enable-auto-commit: false
      auto-offset-reset: latest
      key-deserializer: org.apache.kafka.common.serialization.StringDeserializer
      value-deserializer: org.apache.kafka.common.serialization.StringDeserializer
      properties:
        session.timeout.ms: 60000
    listener:
      log-container-config: false
      concurrency: 5
      # 手动提交
      ack-mode: manual_immediate
KafkaConfig.java
@Configuration
@EnableConfigurationProperties({KafkaProperties.class})
@EnableKafka
@AllArgsConstructor
public class KafkaConfig {
    private final KafkaProperties kafkaProperties;

    @Bean
    public KafkaTemplate<String, String> kafkaTemplate() {
        return new KafkaTemplate<>(producerFactory());
    }
    @Bean
    public ProducerFactory<String, String> producerFactory() {
        return new DefaultKafkaProducerFactory<>(kafkaProperties.buildProducerProperties());
    }
    @Bean
    public ConcurrentKafkaListenerContainerFactory<String, String> kafkaListenerContainerFactory() {
        ConcurrentKafkaListenerContainerFactory<String, String> factory = new ConcurrentKafkaListenerContainerFactory<>();
        factory.setConsumerFactory(consumerFactory());
        factory.setConcurrency(KafkaConsts.DEFAULT_PARTITION_NUM);
        factory.setBatchListener(true);
        factory.getContainerProperties().setPollTimeout(3000);
        return factory;
    }
    @Bean
    public ConsumerFactory<String, String> consumerFactory() {
        return new DefaultKafkaConsumerFactory<>(kafkaProperties.buildConsumerProperties());
    }
    @Bean("ackContainerFactory")
    public ConcurrentKafkaListenerContainerFactory<String, String> ackContainerFactory() {
        ConcurrentKafkaListenerContainerFactory<String, String> factory = new ConcurrentKafkaListenerContainerFactory<>();
        factory.setConsumerFactory(consumerFactory());
        factory.getContainerProperties().setAckMode(ContainerProperties.AckMode.MANUAL_IMMEDIATE);
        factory.setConcurrency(KafkaConsts.DEFAULT_PARTITION_NUM);
        return factory;
    }

}

public interface KafkaConsts {
    /**
     * 默认分区大小
     */
    Integer DEFAULT_PARTITION_NUM = 3;

    /**
     * Topic 名称
     */
    String TOPIC_TEST = "test";
}
MessageHandler.java
/**
 * <p>
 * 消息处理器
 * </p>
 *
 * @author yangkai.shen
 * @date Created in 2019-01-07 14:58
 */
@Component
@Slf4j
public class MessageHandler {
    @KafkaListener(topics = KafkaConsts.TOPIC_TEST, containerFactory = "ackContainerFactory")
    public void handleMessage(ConsumerRecord record, Acknowledgment acknowledgment) {
        try {
            String message = (String) record.value();
            log.info("收到消息: {}", message);
        } catch (Exception e) {
            log.error(e.getMessage(), e);
        } finally {
            // 手动提交 offset
            acknowledgment.acknowledge();
        }
    }
}
SpringBootDemoMqKafkaApplicationTests.java
@RunWith(SpringRunner.class)
@SpringBootTest
public class SpringBootDemoMqKafkaApplicationTests {
    @Autowired
    private KafkaTemplate<String, String> kafkaTemplate;

    /**
     * 测试发送消息
     */
    @Test
    public void testSend() {
        kafkaTemplate.send(KafkaConsts.TOPIC_TEST, "hello,kafka...");
    }

}
参考
- Spring Boot 版本和 Spring-Kafka 的版本对应关系:https://spring.io/projects/spring-kafka
- Spring-Kafka 官方文档:https://docs.spring.io/spring-kafka/docs/2.2.0.RELEASE/reference/html/
spring-boot-demo-websocket
1. 代码
pom.xml
<?xml version="1.0" encoding="UTF-8"?>
<project xmlns="http://maven.apache.org/POM/4.0.0" xmlns:xsi="http://www.w3.org/2001/XMLSchema-instance"
         xsi:schemaLocation="http://maven.apache.org/POM/4.0.0 http://maven.apache.org/xsd/maven-4.0.0.xsd">
    <modelVersion>4.0.0</modelVersion>
    <artifactId>spring-boot-demo-websocket</artifactId>
    <version>1.0.0-SNAPSHOT</version>
    <parent>
        <groupId>com.xkcoding</groupId>
        <artifactId>spring-boot-demo</artifactId>
        <version>1.0.0-SNAPSHOT</version>
    </parent>
    <properties>
        <project.build.sourceEncoding>UTF-8</project.build.sourceEncoding>
        <project.reporting.outputEncoding>UTF-8</project.reporting.outputEncoding>
        <java.version>1.8</java.version>
        <oshi.version>3.9.1</oshi.version>
    </properties>
    <dependencies>
        <dependency>
            <groupId>org.springframework.boot</groupId>
            <artifactId>spring-boot-starter-web</artifactId>
        </dependency>
        <dependency>
            <groupId>org.springframework.boot</groupId>
            <artifactId>spring-boot-starter-websocket</artifactId>
        </dependency>
        <dependency>
            <groupId>org.springframework.boot</groupId>
            <artifactId>spring-boot-starter-test</artifactId>
            <scope>test</scope>
        </dependency>
        <dependency>
            <groupId>com.github.oshi</groupId>
            <artifactId>oshi-core</artifactId>
            <version>${oshi.version}</version>
        </dependency>
        <dependency>
            <groupId>cn.hutool</groupId>
            <artifactId>hutool-all</artifactId>
        </dependency>
        <dependency>
            <groupId>com.google.guava</groupId>
            <artifactId>guava</artifactId>
        </dependency>
        <dependency>
            <groupId>org.projectlombok</groupId>
            <artifactId>lombok</artifactId>
            <optional>true</optional>
        </dependency>
    </dependencies>
    <build>
        <finalName>spring-boot-demo-websocket</finalName>
        <plugins>
            <plugin>
                <groupId>org.springframework.boot</groupId>
                <artifactId>spring-boot-maven-plugin</artifactId>
            </plugin>
        </plugins>
    </build>
</project>
1.2. WebSocketConfig.java
@Configuration
@EnableWebSocket
@EnableWebSocketMessageBroker
public class WebSocketConfig implements WebSocketMessageBrokerConfigurer {
    @Override
    public void registerStompEndpoints(StompEndpointRegistry registry) {
        // 注册一个 /notification 端点,前端通过这个端点进行连接
        registry.addEndpoint("/notification")
                //解决跨域问题
                .setAllowedOrigins("*")
                .withSockJS();
    }
    @Override
    public void configureMessageBroker(MessageBrokerRegistry registry) {
        //定义了一个客户端订阅地址的前缀信息,也就是客户端接收服务端发送消息的前缀信息
        registry.enableSimpleBroker("/topic");
    }
}
1.3. 服务器相关实体
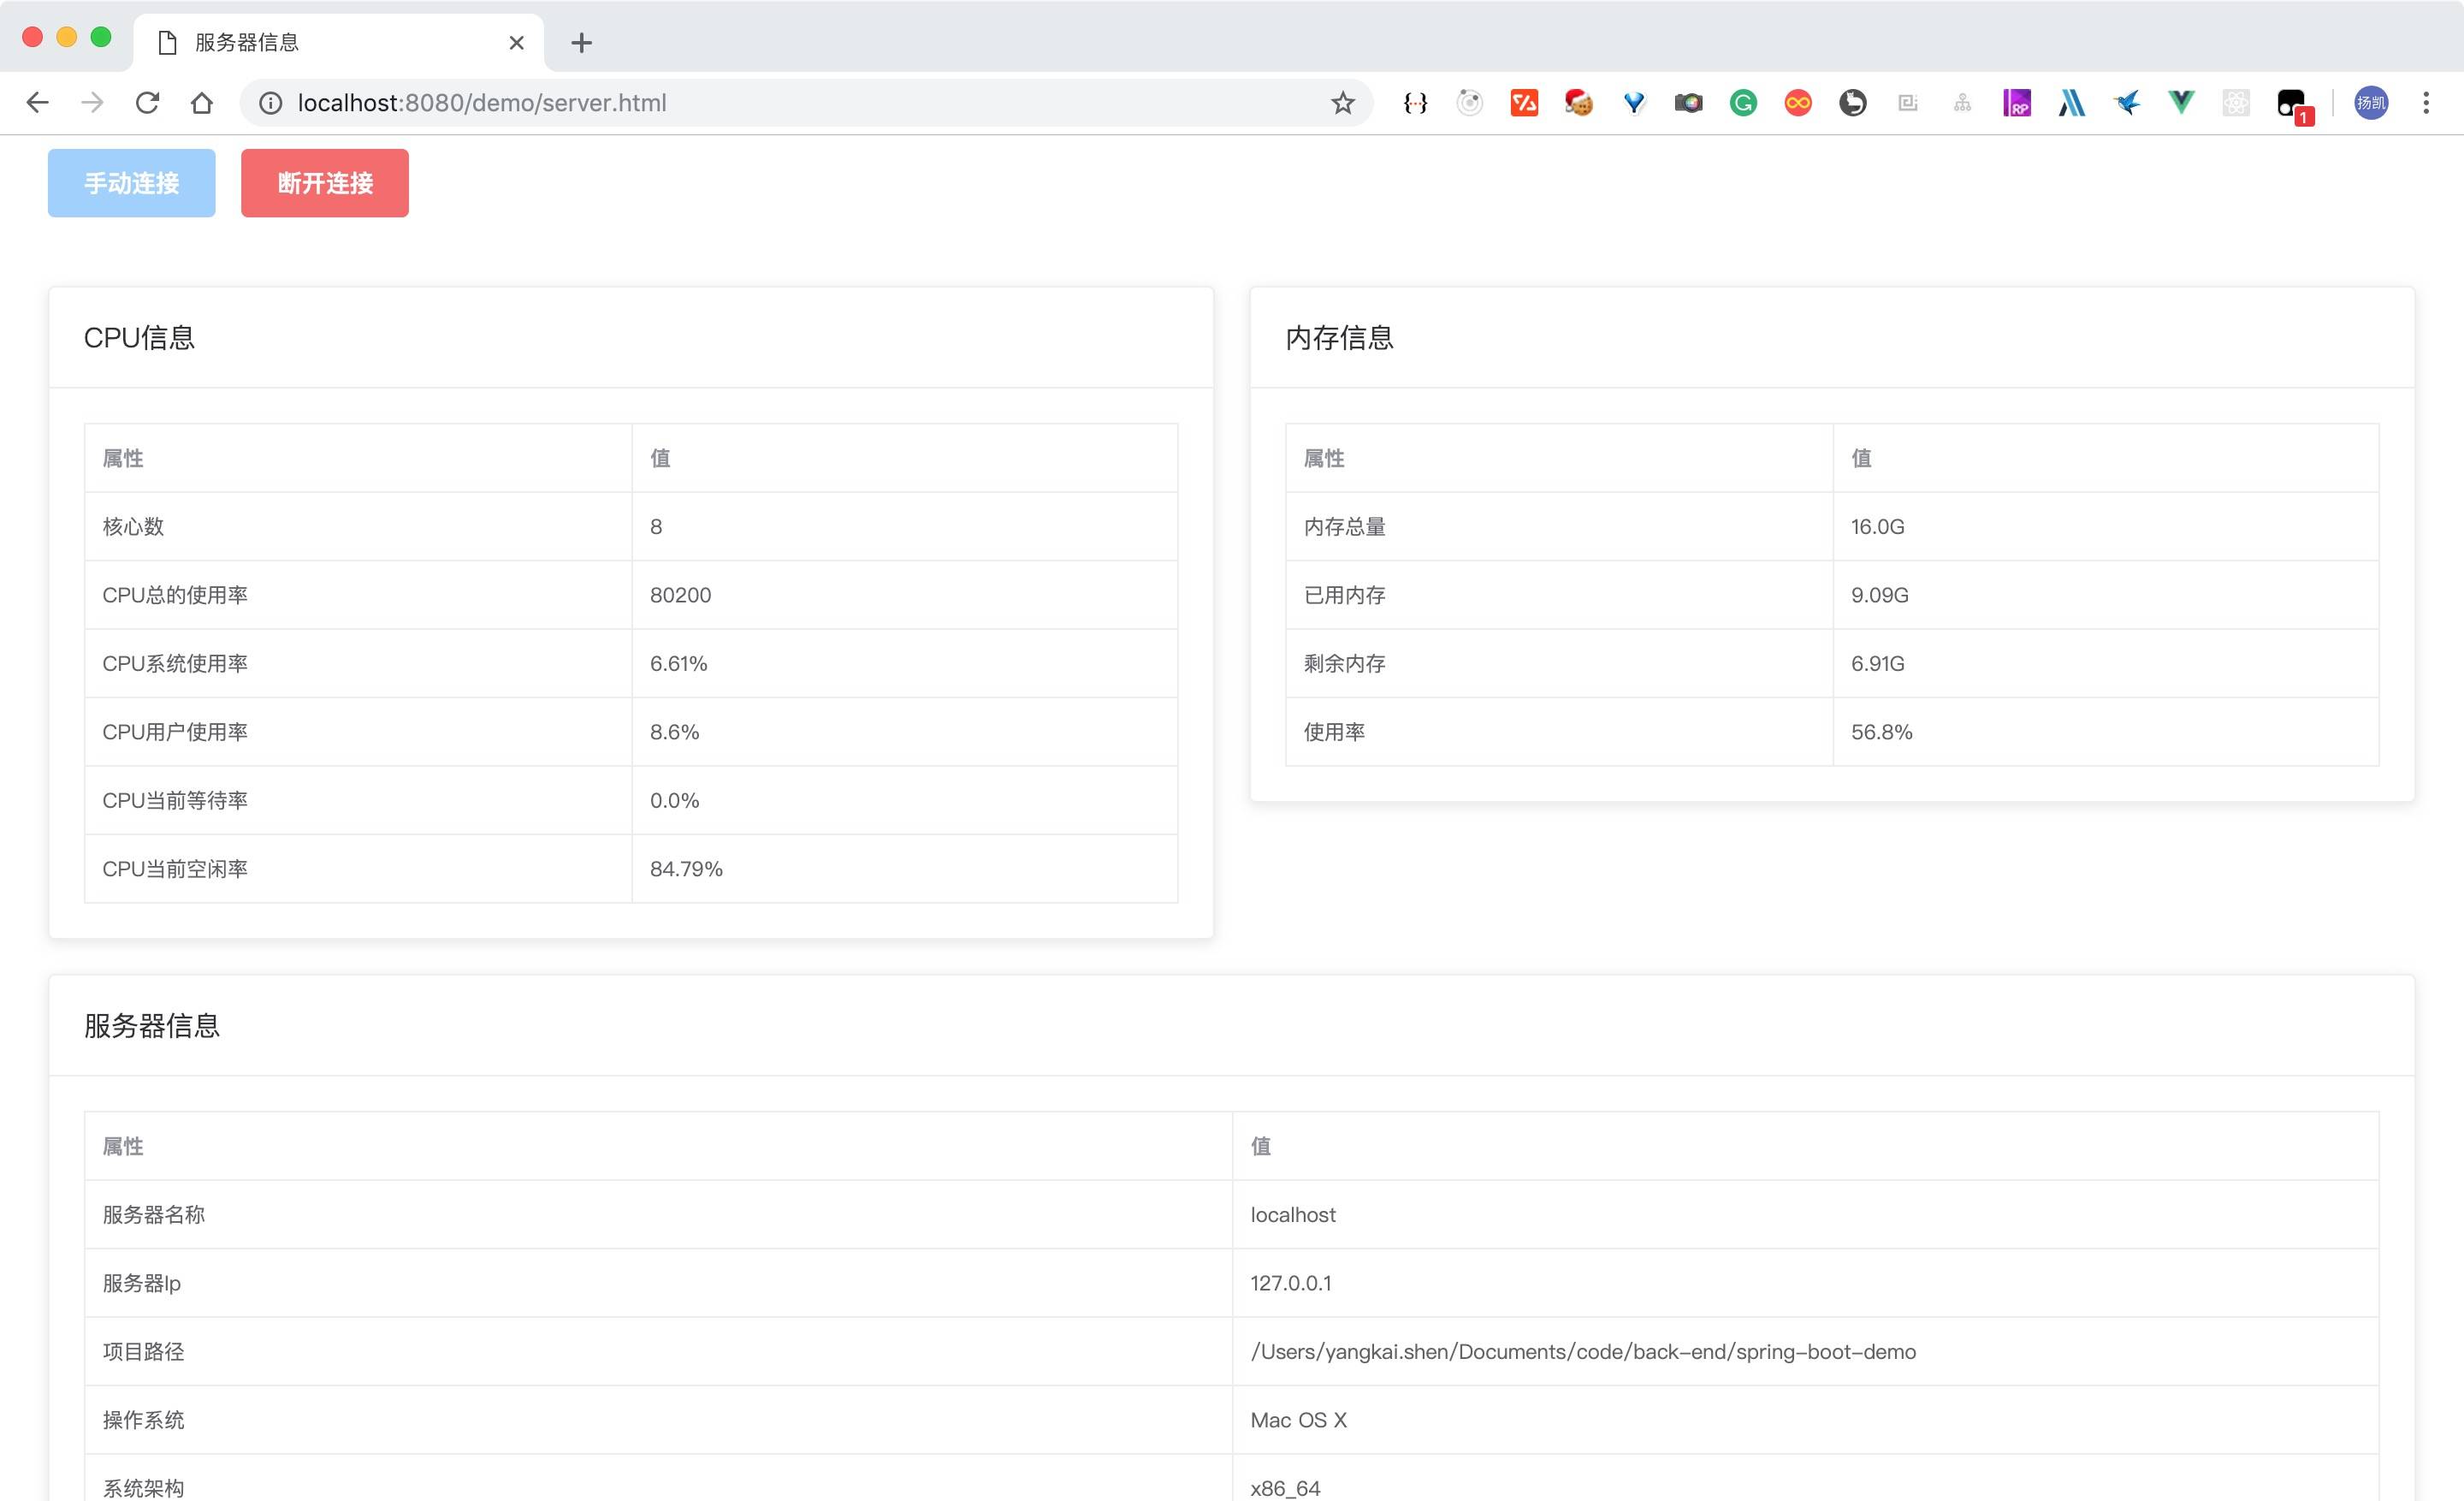
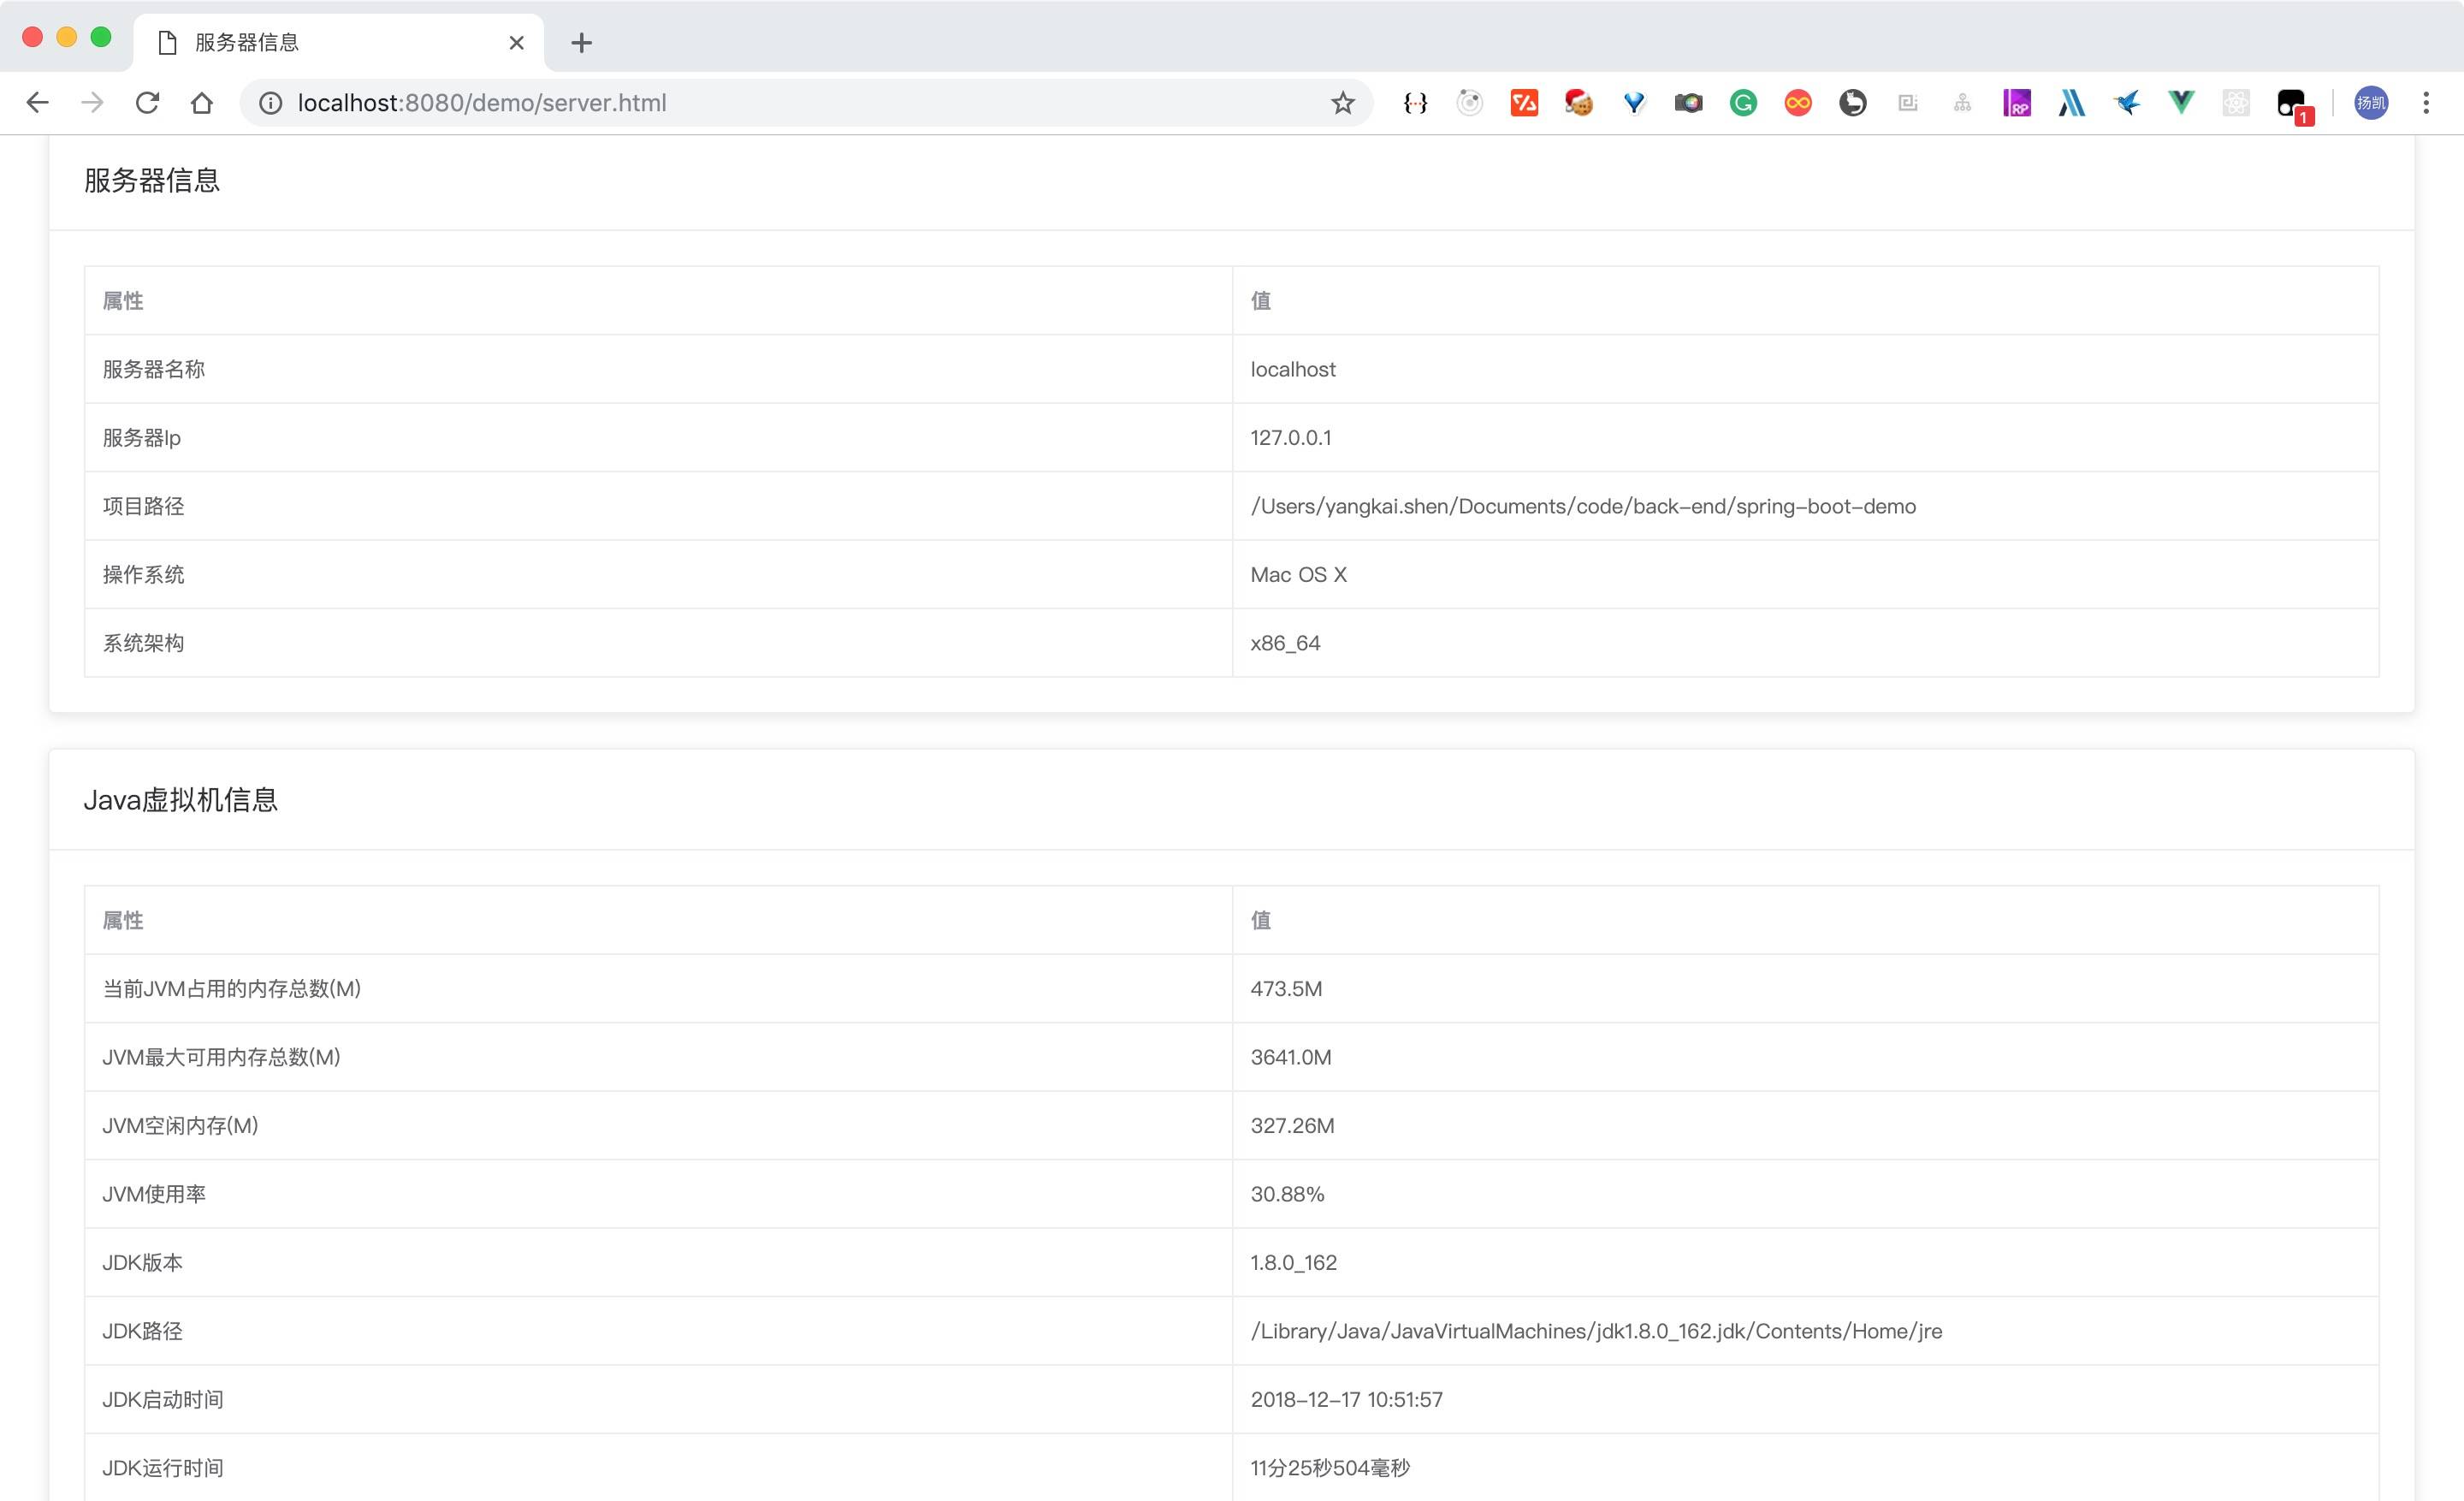
1.4. ServerTask.java
@Slf4j
@Component
public class ServerTask {
    @Autowired
    private SimpMessagingTemplate wsTemplate;

    /**
     * 按照标准时间来算,每隔 2s 执行一次
     */
    @Scheduled(cron = "0/2 * * * * ?")
    public void websocket() throws Exception {
        log.info("【推送消息】开始执行:{}", DateUtil.formatDateTime(new Date()));
        // 查询服务器状态
        Server server = new Server();
        server.copyTo();
        ServerVO serverVO = ServerUtil.wrapServerVO(server);
        Dict dict = ServerUtil.wrapServerDict(serverVO);
        wsTemplate.convertAndSend(WebSocketConsts.PUSH_SERVER, JSONUtil.toJsonStr(dict));
        log.info("【推送消息】执行结束:{}", DateUtil.formatDateTime(new Date()));
    }
}
2. 运行方式
- 启动
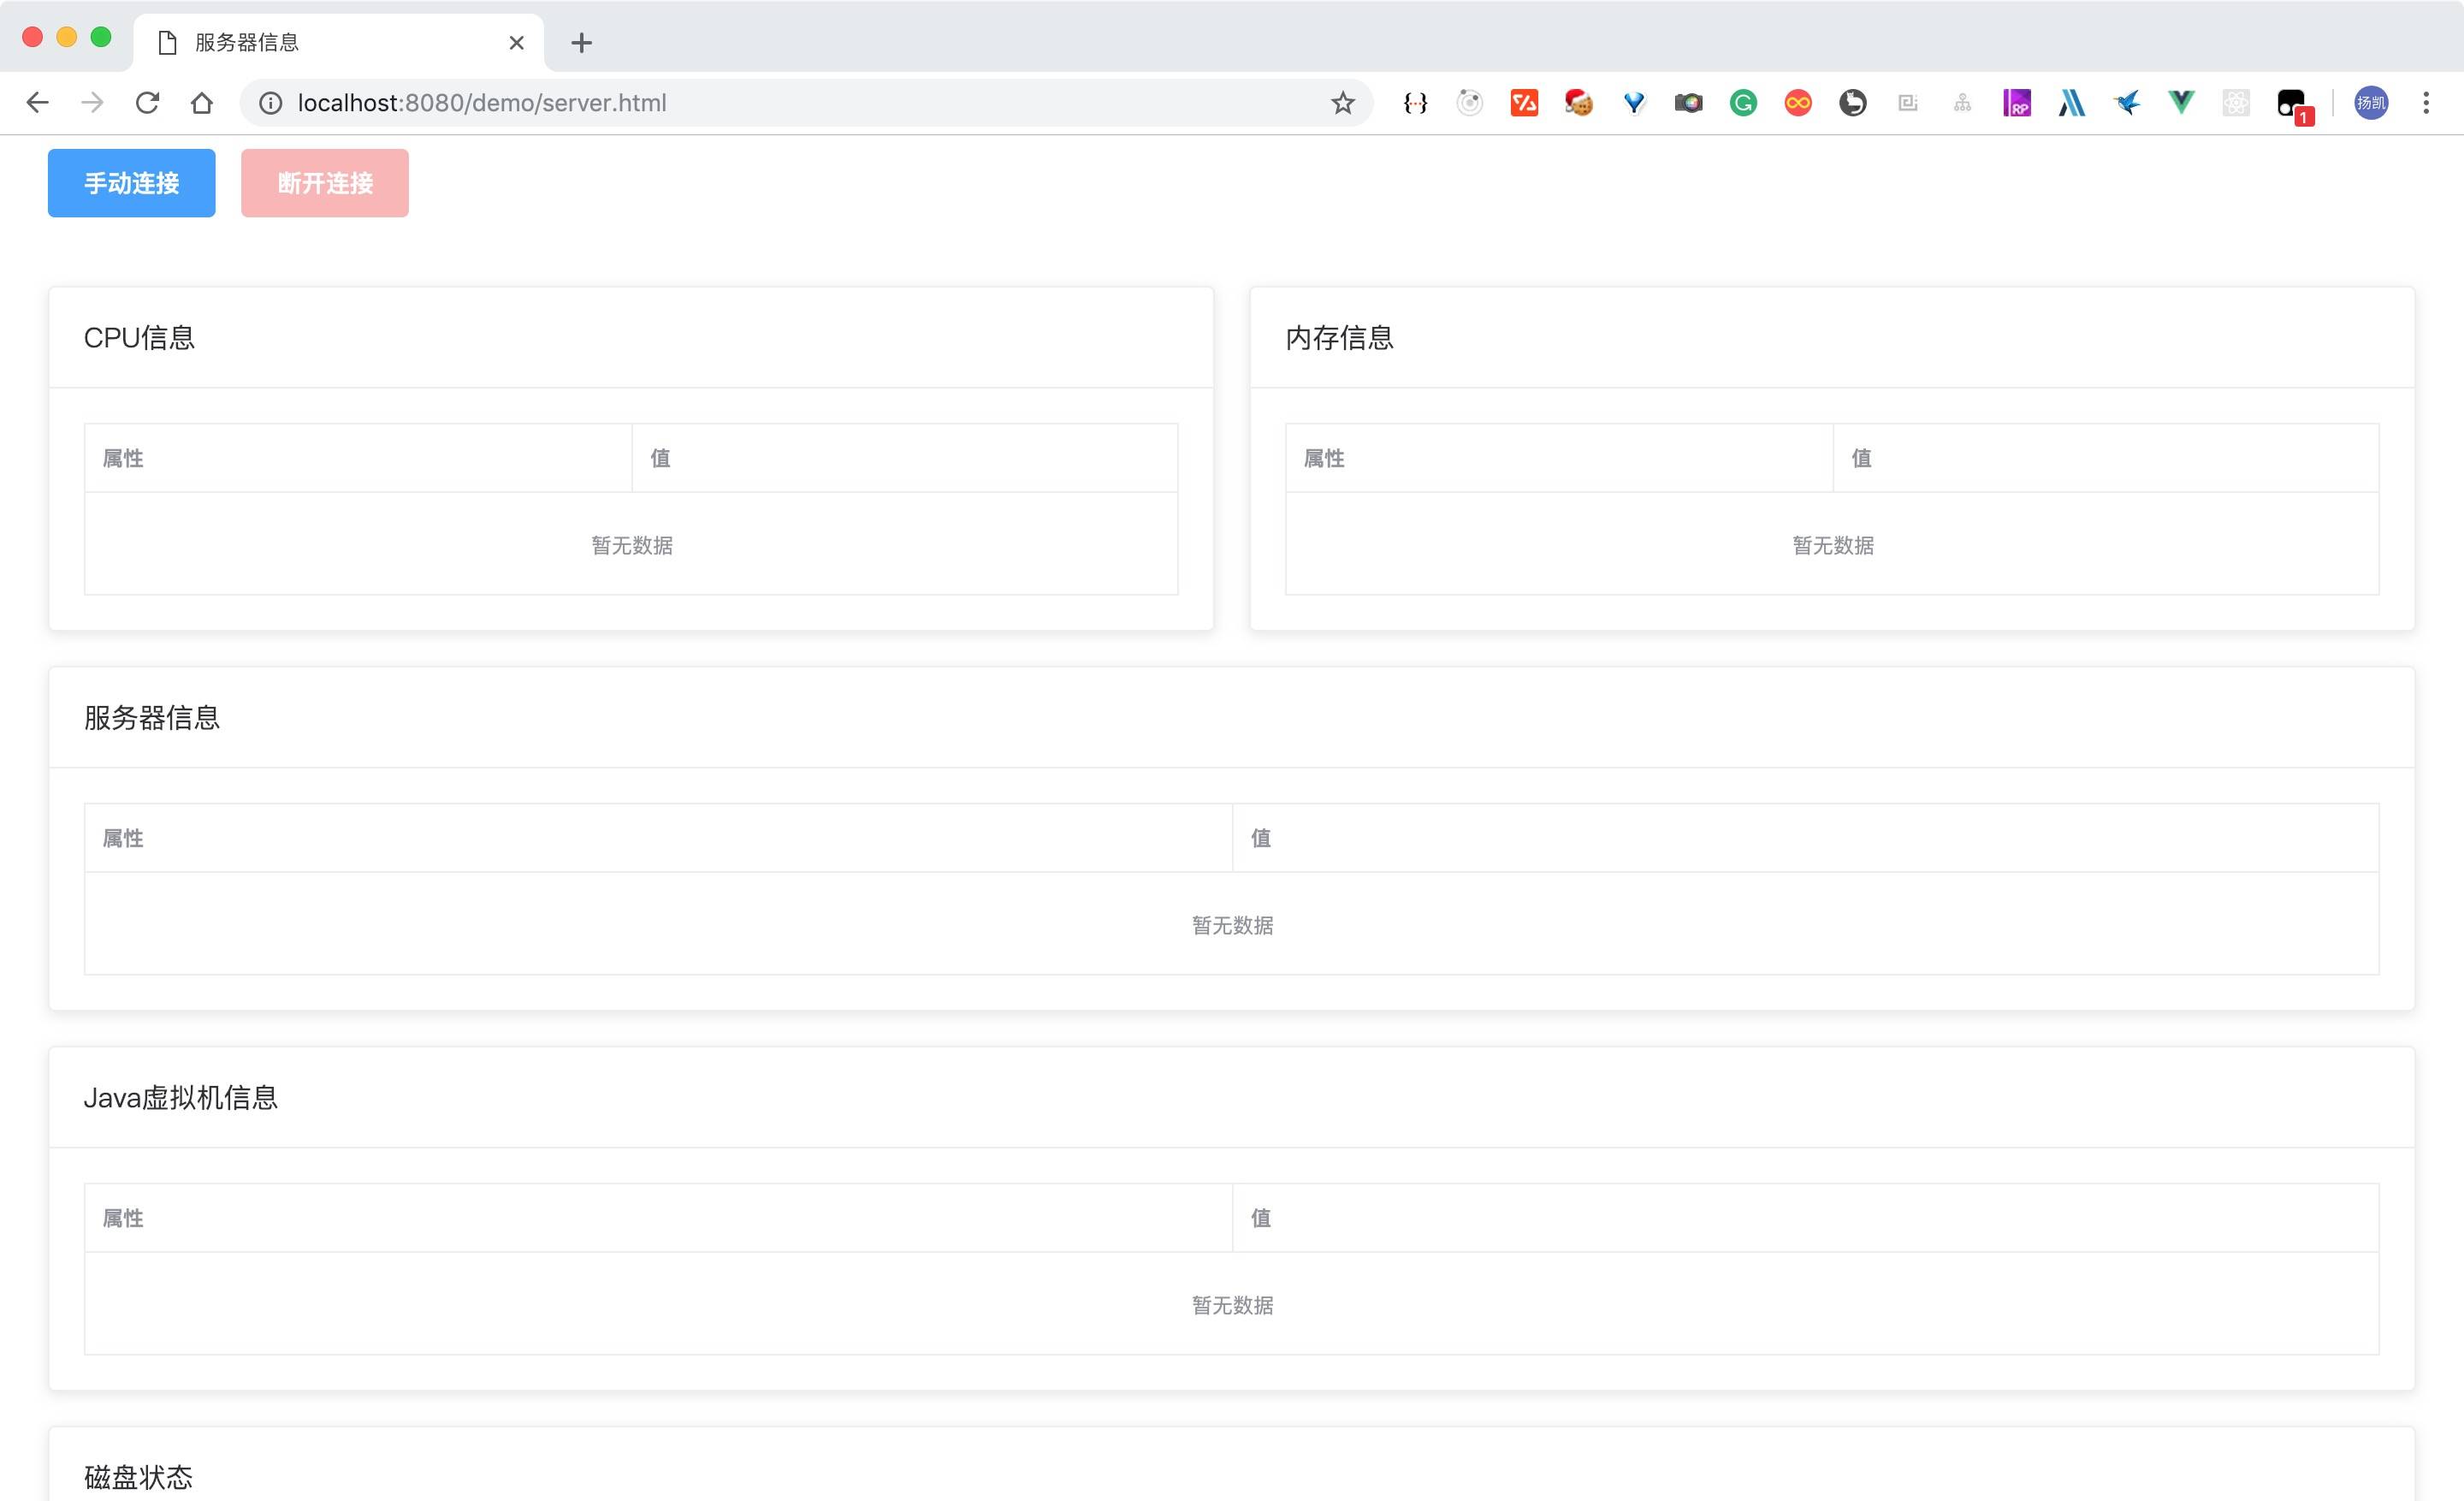
SpringBootDemoWebsocketApplication.java - 访问 http://localhost:8080/demo/server.html
3. 运行效果

4. 参考
4.1. 后端
- Spring Boot 整合 Websocket 官方文档:https://docs.spring.io/spring/docs/5.1.2.RELEASE/spring-framework-reference/web.html#websocket
- 服务器信息采集 oshi 使用:https://github.com/oshi/oshi
4.2. 前端
- vue.js 语法:https://cn.vuejs.org/v2/guide/
- element-ui 用法:http://element-cn.eleme.io/#/zh-CN
- stomp.js 用法:https://github.com/jmesnil/stomp-websocket
- sockjs 用法:https://github.com/sockjs/sockjs-client
- axios.js 用法:https://github.com/axios/axios#example