大家好,日常工作中,无论你是数据工程师、数据挖掘工程师,甚至数据分析人员,都不可避免的与他人进行数据交互,API接口提供数据是最常见的形式。
今天我给大家分享 Python Flask Web 框架教程,共计10个部分,后续内容会更新,内容较长,喜欢记得收藏、点赞、关注。
目录
- 源码分享
- 1、Python Flask: 安装 Flask
- 安装 Python 3
- 安装 Falsk
- 2、Python Flask: 从 Hello Wolrd 开始
- Hello World
- 修改Flask的配置
- 调试模式
- 绑定IP和端口
- 3、Python Flask: 获取 URL 参数
- 建立Flask项目
- 列出所有的url参数
- 获取某个指定的参数
- 如何处理多值
- 4、Python Flask: 获取 POST 方法传送的数据
- 建立Flask项目
- 查看POST数据内容
- 解析POST数据
- 5、Python Flask: 处理和响应 JSON 数据
- 建立Flask项目
- 处理JSON格式的请求数据
- 响应JSON-方案1
- 响应JSON-方案2
- 6、Python Flask: 上传文件
- 建立Flask项目
- 上传文件
- 7、Python Flask: Restful URL
- 建立Flask项目
- 编写代码
- 转换类型
- 一个有趣的用法
- 编写转换器
- 8、Python Flask: 使用 url_for 生成链接
- 建立Flask项目
- 编写代码
- 9、Python Flask: 使用 redirect 重定向网址
- 建立Flask项目
- 编写代码
- 10、Python Flask: 使用 Jinja2 模板引擎
- 建立Flask项目
- 创建并编辑HelloWorld/templates/default.html
- 创建并编辑HelloWorld/templates/user\_info.html
- 编辑HelloWorld/server.py
- 运行与测试
源码分享
按照如下方式
目前群友已超过3000人,添加时最好的备注方式为:来源+兴趣方向,方便找到志同道合的朋友
方式①、添加微信号:dkl88191,备注:来自CSDN+flask
方式②、微信搜索公众号:Python学习与数据挖掘,后台回复:flask
1、Python Flask: 安装 Flask
本文讲述学习 Python Flask Web 框架之前需要安装什么。
安装 Python 3
自行百度/谷歌即可。
在Linux/MacOS安装后,可以使用python3命令执行Python程序,使用pip3安装Python库。 在Windows系统,仍然是python和pip。
安装 Falsk
通过pip3安装Flask即可:
方式1 - 全局安装:
$ sudo pip3 install Flask
方式2 - 针对当前用户安装:
$ pip3 install --user Flask
确认安装成功:
进入python交互模式看下Flask的介绍和版本:
$ python3

>>> import flask
>>> print(flask.__doc__)

    flask
    ~~~~~

    A microframework based on Werkzeug.  It's extensively documented
    and follows best practice patterns.

    :copyright: © 2010 by the Pallets team.
    :license: BSD, see LICENSE for more details.

>>> print(flask.__version__)
1.0.2
2、Python Flask: 从 Hello Wolrd 开始
本文讲述如何使用 Python Flask Web 框架构建一个显示"Hello World!"的web程序,以及如何配置、调试 Flask。
Hello World
按照以下命令建立Flask项目HelloWorld:
mkdir HelloWorld
mkdir HelloWorld/static
mkdir HelloWorld/templates
touch HelloWorld/server.py
static和templates目录是默认配置,其中static用来存放静态资源,例如图片、js、css文件等。templates存放模板文件。 我们的网站逻辑基本在server.py文件中,当然,也可以给这个文件起其他的名字。
在server.py中加入以下内容:
from flask import Flask

app = Flask(__name__)

@app.route('/')
def hello_world():
    return 'Hello World!'

if __name__ == '__main__':
    app.run()
运行server.py:
$ python3 server.py
 * Running on http://127.0.0.1:5000/
打开浏览器访问http://127.0.0.1:5000/,浏览页面上将出现Hello World!。 终端里会显示下面的信息:
127.0.0.1 - - [16/May/2014 10:29:08] "GET / HTTP/1.1" 200 -
变量app是一个Flask实例,通过下面的方式:
@app.route('/')
def hello_world():
    return 'Hello World!'
当客户端访问/时,将响应hello_world()函数返回的内容。注意,这不是返回Hello World!这么简单,Hello World!只是HTTP响应报文的实体部分,状态码等信息既可以由Flask自动处理,也可以通过编程来制定。
修改Flask的配置
app = Flask(__name__)
上面的代码中,python内置变量__name__的值是字符串__main__ 。Flask类将这个参数作为程序名称。当然这个是可以自定义的,比如app = Flask("my-app")。
Flask默认使用static目录存放静态资源,templates目录存放模板,这是可以通过设置参数更改的:
app = Flask("my-app", static_folder="path1", template_folder="path2")
更多参数请参考__doc__:
from flask import Flask
print(Flask.__doc__)
调试模式
上面的server.py中以app.run()方式运行,这种方式下,如果服务器端出现错误是不会在客户端显示的。但是在开发环境中,显示错误信息是很有必要的,要显示错误信息,应该以下面的方式运行Flask:
app.run(debug=True)
将debug设置为True的另一个好处是,程序启动后,会自动检测源码是否发生变化,若有变化则自动重启程序。这可以帮我们省下很多时间。
绑定IP和端口
默认情况下,Flask绑定IP为127.0.0.1,端口为5000。我们也可以通过下面的方式自定义:
app.run(host='0.0.0.0', port=80, debug=True)
0.0.0.0代表电脑所有的IP。80是HTTP网站服务的默认端口。什么是默认?比如,我们访问网站http://www.example.com,其实是访问的http://www.example.com:80,只不过:80可以省略不写。
由于绑定了80端口,需要使用root权限运行server.py。也就是:
$ sudo python3 server.py
3、Python Flask: 获取 URL 参数
本文讲述在 Python Flask Web 框架中如何获取 URL 参数。
URL参数是出现在url中的键值对,例如http://127.0.0.1:5000/?disp=3中的url参数是{'disp':3}。
建立Flask项目
按照以下命令建立Flask项目HelloWorld:
mkdir HelloWorld
mkdir HelloWorld/static
mkdir HelloWorld/templates
touch HelloWorld/server.py
列出所有的url参数
在server.py中添加以下内容:
from flask import Flask, request

app = Flask(__name__)


@app.route('/')
def hello_world():
    return request.args.__str__()


if __name__ == '__main__':
    app.run(port=5000, debug=True)
在浏览器中访问http://127.0.0.1:5000/?user=Flask&time&p=7&p=8,将显示:
ImmutableMultiDict([('user', 'Flask'), ('time', ''), ('p', '7'), ('p', '8')])
较新的浏览器也支持直接在url中输入中文(最新的火狐浏览器内部会帮忙将中文转换成符合URL规范的数据),在浏览器中访问http://127.0.0.1:5000/?info=这是爱,,将显示:
ImmutableMultiDict([('info', '这是爱,')])
浏览器传给我们的Flask服务的数据长什么样子呢?可以通过request.full_path和request.path来看一下:
from flask import Flask, request

app = Flask(__name__)


@app.route('/')
def hello_world():
    print(request.path)
    print(request.full_path)
    return request.args.__str__()


if __name__ == '__main__':
    app.run(port=5000, debug=True)
浏览器访问http://127.0.0.1:5000/?info=这是爱,,运行server.py的终端会输出:
/
/?info=%E8%BF%99%E6%98%AF%E7%88%B1%EF%BC%8C
获取某个指定的参数
例如,要获取键info对应的值,如下修改server.py:
from flask import Flask, request

app = Flask(__name__)

@app.route('/')
def hello_world():
    return request.args.get('info')

if __name__ == '__main__':
    app.run(port=5000)
运行server.py,在浏览器中访问http://127.0.0.1:5000/?info=hello,浏览器将显示:
hello
不过,当我们访问http://127.0.0.1:5000/时候却出现了500错误,浏览器显示:
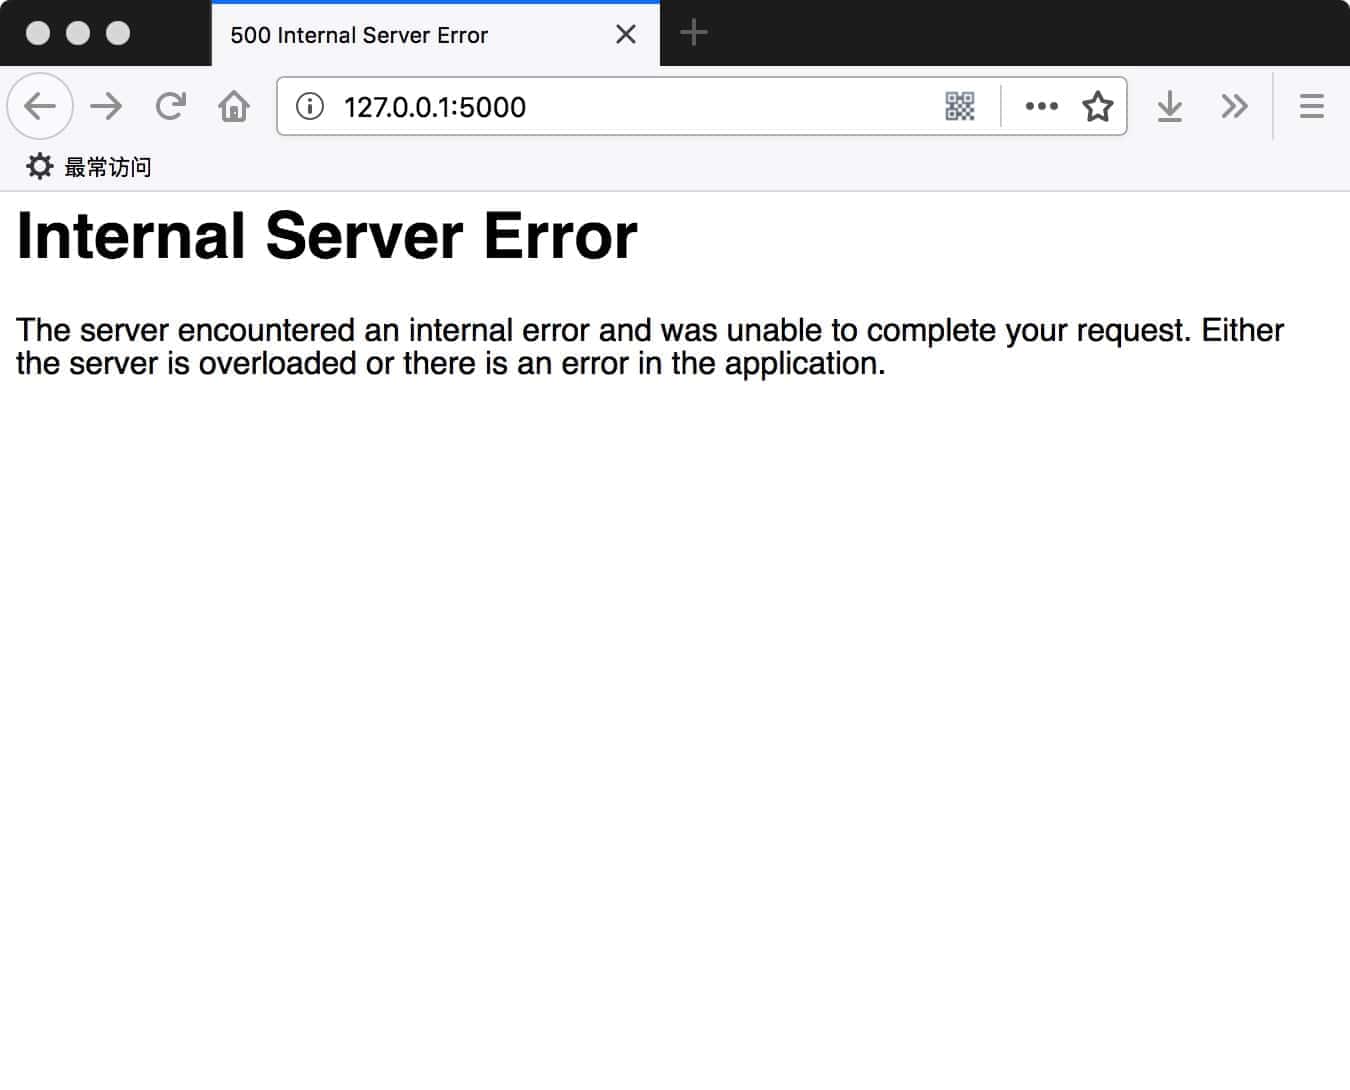
如果开启了Debug模式,会显示:

为什么为这样?
这是因为没有在URL参数中找到info。所以request.args.get('info')返回Python内置的None,而Flask不允许返回None。
解决方法很简单,我们先判断下它是不是None:
from flask import Flask, request

app = Flask(__name__)

@app.route('/')
def hello_world():
    r = request.args.get('info')
    if r==None:
        # do something
        return ''
    return r

if __name__ == '__main__':
    app.run(port=5000, debug=True)
另外一个方法是,设置默认值,也就是取不到数据时用这个值:
from flask import Flask, request

app = Flask(__name__)

@app.route('/')
def hello_world():
    r = request.args.get('info', 'hi')
    return r

if __name__ == '__main__':
    app.run(port=5000, debug=True)
函数request.args.get的第二个参数用来设置默认值。此时在浏览器访问http://127.0.0.1:5000/,将显示:
hi
如何处理多值
还记得上面有一次请求是这样的吗? http://127.0.0.1:5000/?user=Flask&time&p=7&p=8,仔细看下,p有两个值。
如果我们的代码是:
from flask import Flask, request

app = Flask(__name__)

@app.route('/')
def hello_world():
    r = request.args.get('p')
    return r

if __name__ == '__main__':
    app.run(port=5000, debug=True)
在浏览器中请求时,我们只会看到7。如果我们需要把p的所有值都获取到,该怎么办?
不用get,用getlist:
from flask import Flask, request

app = Flask(__name__)


@app.route('/')
def hello_world():
    r = request.args.getlist('p')  # 返回一个list
    return str(r)


if __name__ == '__main__':
    app.run(port=5000, debug=True)
浏览器输入 http://127.0.0.1:5000/?user=Flask&time&p=7&p=8,我们会看到['7', '8']。
4、Python Flask: 获取 POST 方法传送的数据
本文讲述在 Python Flask Web 框架中如何获取 POST 方法传送的数据。
作为一种HTTP请求方法,POST用于向指定的资源提交要被处理的数据。我们在某网站注册用户、写文章等时候,需要将数据传递到网站服务器中。并不适合将数据放到URL参数中,密码放到URL参数中容易被看到,文章数据又太多,浏览器不一定支持太长长度的URL。这时,一般使用POST方法。
本文使用python的requests库模拟浏览器。
安装方法:
$ sudo pip3 install requests
建立Flask项目
按照以下命令建立Flask项目HelloWorld:
mkdir HelloWorld
mkdir HelloWorld/static
mkdir HelloWorld/templates
touch HelloWorld/server.py
查看POST数据内容
以用户注册为例子,我们需要向服务器/register传送用户名name和密码xxpassword。如下编写HelloWorld/server.py。
from flask import Flask, request

app = Flask(__name__)


@app.route('/')
def hello_world():
    return 'hello world'


@app.route('/register', methods=['POST'])
def register():
    print(request.headers)
    print(request.stream.read())
    return 'welcome'


if __name__ == '__main__':
    app.run(port=5000, debug=True)
@app.route('/register', methods=['POST'])是指url/register只接受POST方法。可以根据需要修改methods参数,例如如果想要让它同时支持GET和POST,这样写:
@app.route('/register', methods=['GET', 'POST'])
浏览器模拟工具client.py内容如下:
import requests

user_info = {'name': 'letian', 'xxpassword': '123'}
r = requests.post("http://127.0.0.1:5000/register", data=user_info)

print(r.text)
运行HelloWorld/server.py,然后运行client.py。client.py将输出:
welcome
而HelloWorld/server.py在终端中输出以下调试信息(通过print输出):
Host: 127.0.0.1:5000
User-Agent: python-requests/2.19.1
Accept-Encoding: gzip, deflate
Accept: */*
Connection: keep-alive
Content-Length: 24
Content-Type: application/x-www-form-urlencoded


b'name=letian&xxpassword=123'
前6行是client.py生成的HTTP请求头,由print(request.headers)输出。
请求体的数据,我们通过print(request.stream.read())输出,结果是:
b'name=letian&xxpassword=123'
解析POST数据
上面,我们看到post的数据内容是:
b'name=letian&xxpassword=123'
我们要想办法把我们要的name、xxpassword提取出来,怎么做呢?自己写?不用,Flask已经内置了解析器request.form。
我们将服务代码改成:
from flask import Flask, request

app = Flask(__name__)

@app.route('/')
def hello_world():
    return 'hello world'


@app.route('/register', methods=['POST'])
def register():
    print(request.headers)
    # print(request.stream.read()) # 不要用,否则下面的form取不到数据
    print(request.form)
    print(request.form['name'])
    print(request.form.get('name'))
    print(request.form.getlist('name'))
    print(request.form.get('nickname', default='little apple'))
    return 'welcome'


if __name__ == '__main__':
    app.run(port=5000, debug=True)
执行client.py请求数据,服务器代码会在终端输出:
Host: 127.0.0.1:5000
User-Agent: python-requests/2.19.1
Accept-Encoding: gzip, deflate
Accept: */*
Connection: keep-alive
Content-Length: 24
Content-Type: application/x-www-form-urlencoded


ImmutableMultiDict([('name', 'letian'), ('xxpassword', '123')])
letian
letian
['letian']
little apple
request.form会自动解析数据。
request.form['name']和request.form.get('name')都可以获取name对应的值。对于request.form.get()可以为参数default指定值以作为默认值。所以:
print(request.form.get('nickname', default='little apple'))
输出的是默认值
little apple
如果name有多个值,可以使用request.form.getlist('name'),该方法将返回一个列表。我们将client.py改一下:
import requests

user_info = {'name': ['letian', 'letian2'], 'xxpassword': '123'}
r = requests.post("http://127.0.0.1:5000/register", data=user_info)

print(r.text)
此时运行client.py,print(request.form.getlist('name'))将输出:
[u'letian', u'letian2']
5、Python Flask: 处理和响应 JSON 数据
本文讲述在 Python Flask Web 框架中如何处理和响应 JSON 数据。
使用 HTTP POST 方法传到网站服务器的数据格式可以有很多种,比如「5. 获取POST方法传送的数据」讲到的name=letian&password=123这种用过&符号分割的key-value键值对格式。我们也可以用JSON格式、XML格式。相比XML的重量、规范繁琐,JSON显得非常小巧和易用。
建立Flask项目
按照以下命令建立Flask项目HelloWorld:
mkdir HelloWorld
mkdir HelloWorld/static
mkdir HelloWorld/templates
touch HelloWorld/server.py
处理JSON格式的请求数据
如果POST的数据是JSON格式,request.json会自动将json数据转换成Python类型(字典或者列表)。
编写server.py:
from flask import Flask, request

app = Flask("my-app")


@app.route('/')
def hello_world():
    return 'Hello World!'


@app.route('/add', methods=['POST'])
def add():
    print(request.headers)
    print(type(request.json))
    print(request.json)
    result = request.json['a'] + request.json['b']
    return str(result)


if __name__ == '__main__':
    app.run(host='127.0.0.1', port=5000, debug=True)
编写client.py模拟浏览器请求:
import requests

json_data = {'a': 1, 'b': 2}

r = requests.post("http://127.0.0.1:5000/add", json=json_data)

print(r.text)
运行server.py,然后运行client.py,client.py 会在终端输出:
3
server.py 会在终端输出:
Host: 127.0.0.1:5000
User-Agent: python-requests/2.19.1
Accept-Encoding: gzip, deflate
Accept: */*
Connection: keep-alive
Content-Length: 16
Content-Type: application/json


<class 'dict'>
{'a': 1, 'b': 2}
注意,请求头中Content-Type的值是application/json。
响应JSON-方案1
响应JSON时,除了要把响应体改成JSON格式,响应头的Content-Type也要设置为application/json。
编写server2.py:
from flask import Flask, request, Response
import json

app = Flask("my-app")


@app.route('/')
def hello_world():
    return 'Hello World!'


@app.route('/add', methods=['POST'])
def add():
    result = {'sum': request.json['a'] + request.json['b']}
    return Response(json.dumps(result),  mimetype='application/json')


if __name__ == '__main__':
    app.run(host='127.0.0.1', port=5000, debug=True)
修改后运行。
编写client2.py:
import requests

json_data = {'a': 1, 'b': 2}

r = requests.post("http://127.0.0.1:5000/add", json=json_data)

print(r.headers)
print(r.text)
运行client.py,将显示:
{'Content-Type': 'application/json', 'Content-Length': '10', 'Server': 'Werkzeug/0.14.1 Python/3.6.4', 'Date': 'Sat, 07 Jul 2018 05:23:00 GMT'}
{"sum": 3}
上面第一段内容是服务器的响应头,第二段内容是响应体,也就是服务器返回的JSON格式数据。
另外,如果需要服务器的HTTP响应头具有更好的可定制性,比如自定义Server,可以如下修改add()函数:
@app.route('/add', methods=['POST'])
def add():
    result = {'sum': request.json['a'] + request.json['b']}
    resp = Response(json.dumps(result),  mimetype='application/json')
    resp.headers.add('Server', 'python flask')
    return resp
client2.py运行后会输出:
{'Content-Type': 'application/json', 'Content-Length': '10', 'Server': 'python flask', 'Date': 'Sat, 07 Jul 2018 05:26:40 GMT'}
{"sum": 3}
响应JSON-方案2
使用 jsonify 工具函数即可。
from flask import Flask, request, jsonify

app = Flask("my-app")


@app.route('/')
def hello_world():
    return 'Hello World!'


@app.route('/add', methods=['POST'])
def add():
    result = {'sum': request.json['a'] + request.json['b']}
    return jsonify(result)


if __name__ == '__main__':
    app.run(host='127.0.0.1', port=5000, debug=True)
6、Python Flask: 上传文件
本文讲述在 Python Flask Web 框架中如何上传文件。
上传文件,一般也是用POST方法。
建立Flask项目
按照以下命令建立Flask项目HelloWorld:
mkdir HelloWorld
mkdir HelloWorld/static
mkdir HelloWorld/templates
touch HelloWorld/server.py
上传文件
我们以上传图片为例: 假设将上传的图片只允许’png’、‘jpg’、‘jpeg’、'gif’这四种格式,通过url/upload使用POST上传,上传的图片存放在服务器端的static/uploads目录下。
首先在项目HelloWorld中创建目录static/uploads:
mkdir HelloWorld/static/uploads
werkzeug库可以判断文件名是否安全,例如防止文件名是../../../a.png,安装这个库:
$ sudo pip3 install werkzeug
server.py代码:
from flask import Flask, request

from werkzeug.utils import secure_filename
import os

app = Flask(__name__)

# 文件上传目录
app.config['UPLOAD_FOLDER'] = 'static/uploads/'
# 支持的文件格式
app.config['ALLOWED_EXTENSIONS'] = {'png', 'jpg', 'jpeg', 'gif'}  # 集合类型


# 判断文件名是否是我们支持的格式
def allowed_file(filename):
    return '.' in filename and \
           filename.rsplit('.', 1)[1] in app.config['ALLOWED_EXTENSIONS']


@app.route('/')
def hello_world():
    return 'hello world'


@app.route('/upload', methods=['POST'])
def upload():
    upload_file = request.files['image']
    if upload_file and allowed_file(upload_file.filename):
        filename = secure_filename(upload_file.filename)
        # 将文件保存到 static/uploads 目录,文件名同上传时使用的文件名
        upload_file.save(os.path.join(app.root_path, app.config['UPLOAD_FOLDER'], filename))
        return 'info is '+request.form.get('info', '')+'. success'
    else:
        return 'failed'


if __name__ == '__main__':
    app.run(port=5000, debug=True)
app.config中的config是字典的子类,可以用来设置自有的配置信息,也可以设置自己的配置信息。函数allowed_file(filename)用来判断filename是否有后缀以及后缀是否在app.config['ALLOWED_EXTENSIONS']中。
客户端上传的图片必须以image01标识。upload_file是上传文件对应的对象。app.root_path获取server.py所在目录在文件系统中的绝对路径。upload_file.save(path)用来将upload_file保存在服务器的文件系统中,参数最好是绝对路径,否则会报错(网上很多代码都是使用相对路径,但是笔者在使用相对路径时总是报错,说找不到路径)。函数os.path.join()用来将使用合适的路径分隔符将路径组合起来。
好了,定制客户端client.py:
import requests

file_data = {'image': open('Lenna.jpg', 'rb')}

user_info = {'info': 'Lenna'}

r = requests.post("http://127.0.0.1:5000/upload", data=user_info, files=file_data)

print(r.text)
运行client.py,当前目录下的Lenna.jpg将上传到服务器。
然后,我们可以在static/uploads中看到文件Lenna.jpg。
要控制上产文件的大小,可以设置请求实体的大小,例如:
app.config['MAX_CONTENT_LENGTH'] = 16 * 1024 * 1024 #16MB
不过,在处理上传文件时候,需要使用try:...except:...。
如果要获取上传文件的内容可以:
file_content = request.files['image'].stream.read()
7、Python Flask: Restful URL
本文讲述如何使用 Python Flask Web 框架构建支持 Restful URL 的 Web 应用。
简单来说,Restful URL可以看做是对 URL 参数的替代。
建立Flask项目
按照以下命令建立Flask项目HelloWorld:
mkdir HelloWorld
mkdir HelloWorld/static
mkdir HelloWorld/templates
touch HelloWorld/server.py
编写代码
编辑server.py:
from flask import Flask

app = Flask(__name__)


@app.route('/')
def hello_world():
    return 'hello world'


@app.route('/user/<username>')
def user(username):
    print(username)
    print(type(username))
    return 'hello ' + username


@app.route('/user/<username>/friends')
def user_friends(username):
    print(username)
    print(type(username))
    return 'hello ' + username


if __name__ == '__main__':
    app.run(port=5000, debug=True)
运行HelloWorld/server.py。使用浏览器访问http://127.0.0.1:5000/user/letian,HelloWorld/server.py将输出:
letian
<class 'str'>
而访问http://127.0.0.1:5000/user/letian/,响应为404 Not Found。
浏览器访问http://127.0.0.1:5000/user/letian/friends,可以看到:
Hello letian. They are your friends.
HelloWorld/server.py输出:
letian
<class 'str'>
转换类型
由上面的示例可以看出,使用 Restful URL 得到的变量默认为str对象。如果我们需要通过分页显示查询结果,那么需要在url中有数字来指定页数。按照上面方法,可以在获取str类型页数变量后,将其转换为int类型。不过,还有更方便的方法,就是用flask内置的转换机制,即在route中指定该如何转换。
新的服务器代码:
from flask import Flask

app = Flask(__name__)


@app.route('/')
def hello_world():
    return 'hello world'


@app.route('/page/<int:num>')
def page(num):
    print(num)
    print(type(num))
    return 'hello world'


if __name__ == '__main__':
    app.run(port=5000, debug=True)
@app.route('/page/<int:num>')会将num变量自动转换成int类型。
运行上面的程序,在浏览器中访问http://127.0.0.1:5000/page/1,HelloWorld/server.py将输出如下内容:
1
<class 'int'>
如果访问的是http://127.0.0.1:5000/page/asd,我们会得到404响应。
在官方资料中,说是有3个默认的转换器:
int     accepts integers
float   like int but for floating point values
path    like the default but also accepts slashes
看起来够用了。
一个有趣的用法
如下编写服务器代码:
from flask import Flask

app = Flask(__name__)


@app.route('/')
def hello_world():
    return 'hello world'


@app.route('/page/<int:num1>-<int:num2>')
def page(num1, num2):
    print(num1)
    print(num2)
    return 'hello world'


if __name__ == '__main__':
    app.run(port=5000, debug=True)
在浏览器中访问http://127.0.0.1:5000/page/11-22,HelloWorld/server.py会输出:
11
22
编写转换器
自定义的转换器是一个继承werkzeug.routing.BaseConverter的类,修改to_python和to_url方法即可。to_python方法用于将url中的变量转换后供被@app.route包装的函数使用,to_url方法用于flask.url_for中的参数转换。
下面是一个示例,将HelloWorld/server.py修改如下:
from flask import Flask, url_for

from werkzeug.routing import BaseConverter


class MyIntConverter(BaseConverter):

    def __init__(self, url_map):
        super(MyIntConverter, self).__init__(url_map)

    def to_python(self, value):
        return int(value)

    def to_url(self, value):
        return value * 2


app = Flask(__name__)
app.url_map.converters['my_int'] = MyIntConverter


@app.route('/')
def hello_world():
    return 'hello world'


@app.route('/page/<my_int:num>')
def page(num):
    print(num)
    print(url_for('page', num=123))   # page 对应的是 page函数 ,num 对应对应`/page/<my_int:num>`中的num,必须是str
    return 'hello world'


if __name__ == '__main__':
    app.run(port=5000, debug=True)
浏览器访问http://127.0.0.1:5000/page/123后,HelloWorld/server.py的输出信息是:
123
/page/123123
8、Python Flask: 使用 url_for 生成链接
本文讲述在 Python Flask Web 框架中如何使用 url_for 函数生成链接。
工具函数url_for可以让你以软编码的形式生成url,提供开发效率。
建立Flask项目
按照以下命令建立Flask项目HelloWorld:
mkdir HelloWorld
mkdir HelloWorld/static
mkdir HelloWorld/templates
touch HelloWorld/server.py
编写代码
编辑HelloWorld/server.py:
from flask import Flask, url_for

app = Flask(__name__)

@app.route('/')
def hello_world():
    pass

@app.route('/user/<name>')
def user(name):
    pass

@app.route('/page/<int:num>')
def page(num):
    pass

@app.route('/test')
def test():
    print(url_for('hello_world'))
    print(url_for('user', name='letian'))
    print(url_for('page', num=1, q='hadoop mapreduce 10%3'))
    print(url_for('static', filename='uploads/01.jpg'))
    return 'Hello'

if __name__ == '__main__':
    app.run(debug=True)
运行HelloWorld/server.py。然后在浏览器中访问http://127.0.0.1:5000/test,HelloWorld/server.py将输出以下信息:
/
/user/letian
/page/1?q=hadoop+mapreduce+10%253
/static/uploads/01.jpg
9、Python Flask: 使用 redirect 重定向网址
本文讲述在 Python Flask Web 框架中如何重定向网址。
redirect函数用于重定向,实现机制很简单,就是向客户端(浏览器)发送一个重定向的HTTP报文,浏览器会去访问报文中指定的url。
建立Flask项目
按照以下命令建立Flask项目HelloWorld:
mkdir HelloWorld
mkdir HelloWorld/static
mkdir HelloWorld/templates
touch HelloWorld/server.py
编写代码
使用redirect时,给它一个字符串类型的参数就行了。
编辑HelloWorld/server.py:
from flask import Flask, url_for, redirect

app = Flask(__name__)

@app.route('/')
def hello_world():
    return 'hello world'

@app.route('/test1')
def test1():
    print('this is test1')
    return redirect(url_for('test2'))

@app.route('/test2')
def test2():
    print('this is test2')
    return 'this is test2'

if __name__ == '__main__':
    app.run(debug=True)
运行HelloWorld/server.py,在浏览器中访问http://127.0.0.1:5000/test1,浏览器的url会变成http://127.0.0.1:5000/test2,并显示:
this is test2
10、Python Flask: 使用 Jinja2 模板引擎
本文讲述在 Python Flask Web 框架中如何使用 Jinja2 模板引擎渲染html。
模板引擎负责MVC中的V(view,视图)这一部分。Flask默认使用Jinja2模板引擎。
Flask与模板相关的函数有:
- flask.render_template(template_name_or_list, **context) Renders a template from the template folder with the given context.
- flask.render_template_string(source, **context) Renders a template from the given template source string with the given context.
- flask.get_template_attribute(template_name, attribute) Loads a macro (or variable) a template exports. This can be used to invoke a macro from within Python code.
这其中常用的就是前两个函数。
这个实例中使用了模板继承、if判断、for循环。
建立Flask项目
按照以下命令建立Flask项目HelloWorld:
mkdir HelloWorld
mkdir HelloWorld/static
mkdir HelloWorld/templates
touch HelloWorld/server.py
创建并编辑HelloWorld/templates/default.html
内容如下:
<html>
<head>
    <title>
        {% if page_title %}
            {{ page_title }}
        {% endif %}
    </title>
</head>

<body>
    {% block body %}{% endblock %}
</body>
</html>
可以看到,在<head>标签中使用了if判断,如果给模板传递了page_title变量,显示之,否则,不显示。
<body>标签中定义了一个名为body的block,用来被其他模板文件继承。
创建并编辑HelloWorld/templates/user_info.html
内容如下:
{% extends "default.html" %}

{% block body %}
    {% for key in user_info %}

        {{ key }}: {{ user_info[key] }} <br/>

    {% endfor %}
{% endblock %}
变量user_info应该是一个字典,for循环用来循环输出键值对。
编辑HelloWorld/server.py
内容如下:
from flask import Flask, render_template

app = Flask(__name__)


@app.route('/')
def hello_world():
    return 'hello world'


@app.route('/user')
def user():
    user_info = {
        'name': 'letian',
        'email': '123@aa.com',
        'age':0,
        'github': 'https://github.com/letiantian'
    }
    return render_template('user_info.html', page_title='letian\'s info', user_info=user_info)


if __name__ == '__main__':
    app.run(port=5000, debug=True)
render_template()函数的第一个参数指定模板文件,后面的参数是要传递的数据。
运行与测试
运行HelloWorld/server.py:
$ python3 HelloWorld/server.py
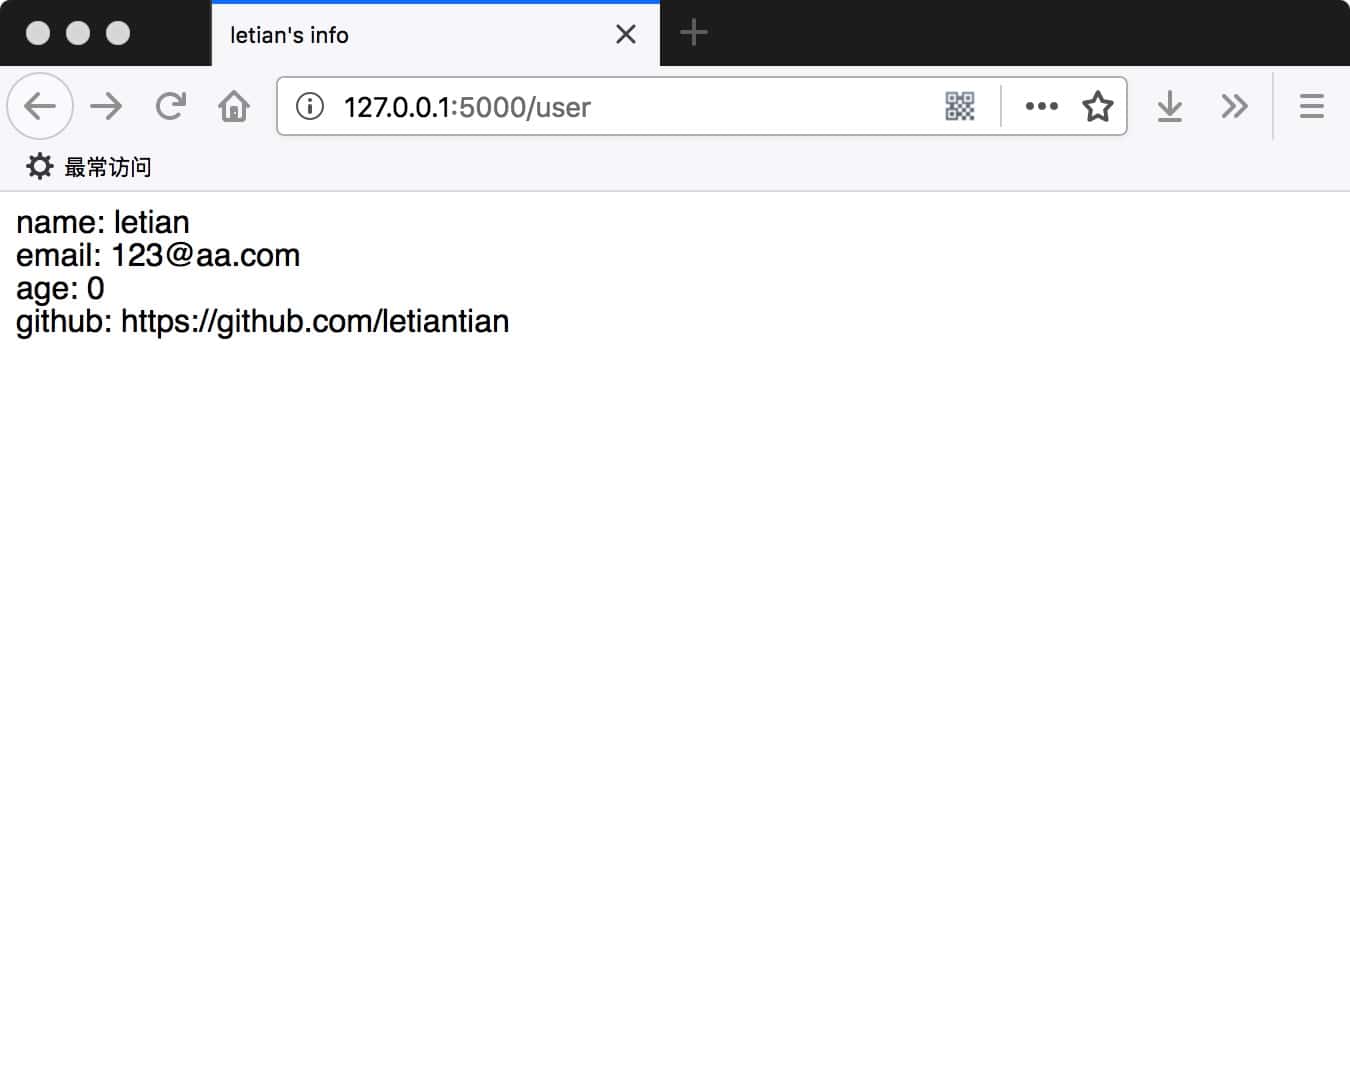
在浏览器中访问http://127.0.0.1:5000/user,效果图如下:
查看网页源码:
<html>
<head>
<title>
letian's info
</title>
</head>
<body>
name: letian <br/>
email: 123@aa.com <br/>
age: 0 <br/>
github: https://github.com/letiantian <br/>
</body>
</html>