概述
在Android系统中,所有的应用程序进程以及系统服务进程SystemServer都是由Zygote进程孕育(fork)出来的,这也许就是为什么要把它称为Zygote(受精卵)的原因吧。由于Zygote进程在Android系统中有着如此重要的地位,本文将详细分析它的启动过程
总体时序
先概述一下总体运行流程,当按电源键,首先是加载系统引导程序BootLoader,然后启动linux内核,再启动init进程,最后Zygote进程启动完成。理论上Android系统中的所有应用程序理论上都是由Zygote启动的。Zygote前期启动启动服务,后期主要fork程序。

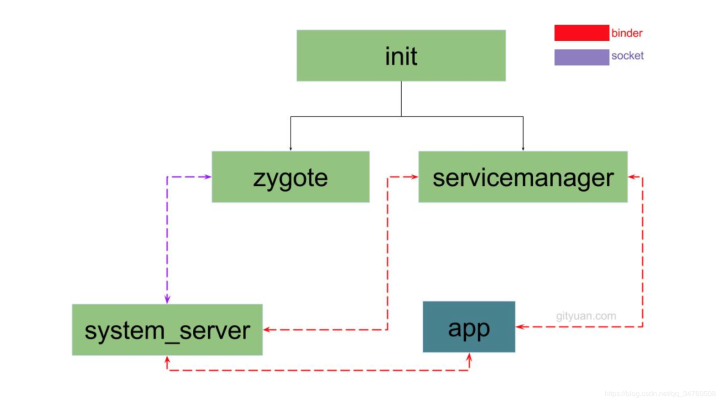
init启动流程
- 用户空间的第一个进程,进程号为1(在《深入理解安卓内核思想》的257页里面写的是0,在这记录一下)
- 职责
- 创建Zygote
- 初始化属性服务
- init文件位于源码目录system/core/init中
init进程的启动三个阶段
- 启动电源以及系统的启动,加载引导程序BootLoader。
- 启动Linux内核
- 启动init进程。
- 启动Zygote进程
- 初始化启动属性服务。
Zygote进程
- 所有App的父进程,ZygoteInit.main
- Zygote进程,是由init进程通过解析init.rc文件后fork生成的,Zygote进程主要包括
- 加载Zygoteinit类,注册Zygote Socket服务端套接字
- 加载虚拟机
- 提前加载类PreloadClasses
- 提前加载资源PreLoadResouces
- system_server进程,是由Zygote fork而来,System Server是Zygote孵化出的第一个进程,System Server 负责启动和管理整个Java FrameWork,包含ActivityManagerService, WorkManagerService,PagerManagerService,PowerManagerService等服务
system_server进程
系统各大服务的载体, SystemServer.main system_server进程从源码角度来看可以分为,引导服务,核心服务和其他服务
- 引导服务(7个):ActivityManagerService、PowerManagerService、LightsService、DisplayManagerService、PackageManagerService、UserManagerService、SensorService;
- 核心服务(3个):BatteryService、UsageStatsService、WebViewUpdateService;
- 其他服务(70个+):AlarmManagerService、VibratorService等。
ServiceManger进程
bInder服务的大管家
ServiceManager 是Binder IPC通信过程中的守护进程,本身也是一个Binder,但是并没有采用多线程模型来跟Binder通信,而是自行编写了binder.c直接和Binder驱动来通信,并且只有一个binder_loop来读取和处理事务,这样做的好处是简单和高效 ServiceManager本身工作相对简单,其工能查询和注册服务
流程图
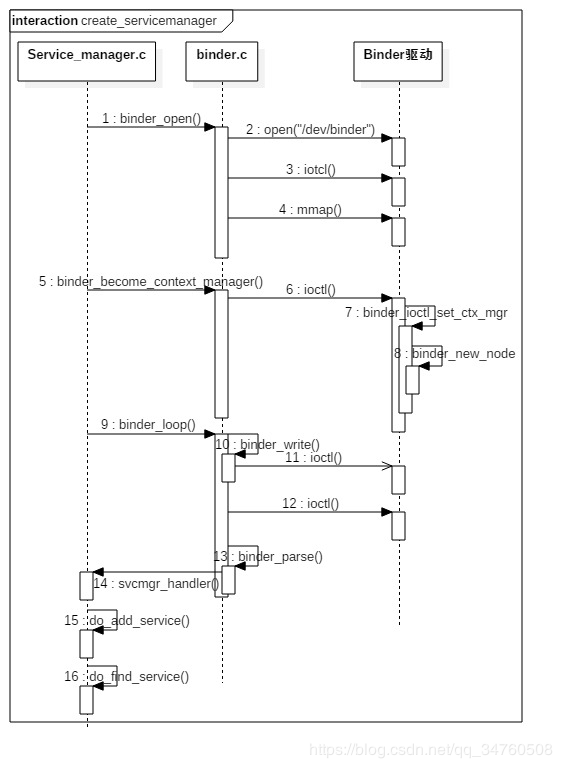
ServiceManager 集中管理系统内的所有服务,通能过权限控制进程是否有权注册服务,通过字符串来查找是否有对应的Service,由于ServiceManager进程注册了Service的死亡通知,那么服务所在的进程死亡后,只需告诉ServiceManager,每个Client通过查询ServiceManager可以获取Service的情况
启动主要包括以下几个阶段
- 打开Binder驱动,并调用mmap()方法分配128k的内存映射空间,binder_open
- 注册成为Binder服务的大管家binder_become_context_manager
- 验证selinux权限,判断进程是否有权注册查看指定服务
- 进入无限循环,处理Client发来的请求 binder_loop
- 根据服务的名称注册服务,重复注册会移除之前的注册信息
- 死亡通知,当所在进程死亡后,调用binder_release方法,然后调用binder_node_release,这个过程发出死亡通知回调
App进程
- 通过Process.start启动的App进程ActivityThread.main
- Zygote 孵化出的第一个App进程是Launcher,这是用户看到的桌面App
- Zygote 还会创建出Browser,Phone,Email等App进程,每个App至少运行在一个进程上
- 所有的App进程都是由Zygote fork而成
3)Zygote进程的启动
Zygote进程, 一个在Android系统中扮演重要角色的进程. 我们知道Android系统中的两个重要服务PackageManagerService和ActivityManagerService, 都是由SystemServer进程启动的, 而这个SystemServer进程本身是Zygote进程在启动的过程中fork出来的. 这样一来, 想必我们就知道Zygote进程在Android系统中的重要地位了.
从图中可得知Android系统中各个进程的先后顺序为:
init进程 –-> Zygote进程 –> SystemServer进程 –>应用进程
链接
- 在init启动Zygote时主要是调用app_main.cpp的main函数中的AppRuntime.start()方法来启动Zygote进程的;
- 接着到AndroidRuntime的start函数:使用JNI调用ZygoteInit的main函数,之所以这里要使用JNI,是因为ZygoteInit是java代码。最终,Zygote就从Native层进入了Java FrameWork层。在此之前,并没有任何代码进入Java FrameWork层面,因此可以认为,Zygote开创了java FrameWork层。
- /frameworks/base/core/java/com/android/internal/os/ZygoteInit.java
    @UnsupportedAppUsagepublic static void main(String argv[]) {
    ZygoteServer zygoteServer = null;
    // Mark zygote start. This ensures that thread creation will throw
    // an error.ZygoteHooks.startZygoteNoThreadCreation();
    // Zygote goes into its own process group.try {Os.setpgid(0, 0);}
    catch (ErrnoException ex) {
    throw new RuntimeException("Failed to setpgid(0,0)", ex);
    }Runnable caller;try {
    // Report Zygote start time to tron unless it is a runtime restartif (!"1".equals(SystemProperties.get("sys.boot_completed"))) {
    MetricsLogger.histogram(null, "boot_zygote_init",(int) SystemClock.elapsedRealtime());}
    String bootTimeTag = Process.is64Bit() ? "Zygote64Timing" : "Zygote32Timing";
    TimingsTraceLog bootTimingsTraceLog = new TimingsTraceLog(bootTimeTag,Trace.TRACE_TAG_DALVIK);
    bootTimingsTraceLog.traceBegin("ZygoteInit");
    RuntimeInit.enableDdms();
    boolean startSystemServer = false;
    String zygoteSocketName = "zygote";
    String abiList = null;
    boolean enableLazyPreload = false;
    for (int i = 1; i < argv.length; i++) {
    if ("start-system-server".equals(argv[i])) {
    startSystemServer = true;}
    else if ("--enable-lazy-preload".equals(argv[i])) {enableLazyPreload = true;
    }
    else if (argv[i].startsWith(ABI_LIST_ARG)) {
    abiList = argv[i].substring(ABI_LIST_ARG.length());
    }
    else if (argv[i].startsWith(SOCKET_NAME_ARG)) {zygoteSocketName = argv[i].substring(SOCKET_NAME_ARG.length());
    }
    else {throw new RuntimeException("Unknown command line argument: " + argv[i]);
    }
    }
    final boolean isPrimaryZygote = zygoteSocketName.equals(Zygote.PRIMARY_SOCKET_NAME);
    if (abiList == null)
   {
   throw new RuntimeException("No ABI list supplied.");
   }
   // In some configurations, we avoid preloading resources and classes eagerly.
   // In such cases, we will preload things prior to our first fork.if (!enableLazyPreload) {bootTimingsTraceLog.traceBegin("ZygotePreload");EventLog.writeEvent(LOG_BOOT_PROGRESS_PRELOAD_START,SystemClock.uptimeMillis());preload(bootTimingsTraceLog);EventLog.writeEvent(LOG_BOOT_PROGRESS_PRELOAD_END,SystemClock.uptimeMillis());bootTimingsTraceLog.traceEnd();
   // ZygotePreload} else {Zygote.resetNicePriority();}
   // Do an initial gc to clean up after startupbootTimingsTraceLog.traceBegin("PostZygoteInitGC");gcAndFinalize();bootTimingsTraceLog.traceEnd();
   // PostZygoteInitGCbootTimingsTraceLog.traceEnd();
   // ZygoteInit// Disable tracing so that forked processes do not inherit stale tracing tags from
   // Zygote.Trace.setTracingEnabled(false, 0);Zygote.initNativeState(isPrimaryZygote);
   ZygoteHooks.stopZygoteNoThreadCreation();
   zygoteServer = new ZygoteServer(isPrimaryZygote);
   if (startSystemServer) {
// 使用了forkSystemServer()方法去创建SystemServer进程Runnable r = forkSystemServer(abiList, zygoteSocketName, zygoteServer);
// {@code r == null} in the parent (zygote) process, and {@code r != null} in the
// child (system_server) process.if (r != null) {r.run();return;
}
}
Log.i(TAG, "Accepting command socket connections");
// The select loop returns early in the child process after a fork and
// 这里调用了ZygoteServer的runSelectLoop方法来等等ActivityManagerService来请求创建新的应用程序进程
// loops forever in the zygote.caller = zygoteServer.runSelectLoop(abiList);}
catch (Throwable ex) {
Log.e(TAG, "System zygote died with exception", ex);
throw ex;}
finally
{
if (zygoteServer != null) {zygoteServer.closeServerSocket();
}
}
// We're in the child process and have exited the select loop. Proceed to execute the
// command.if (caller != null) {caller.run();
}
}
其中, 在ZygoteInit的forkSystemServer()方法中启动了SystemServer进程,forkSystemServer()方法核心代码 :
private static Runnable forkSystemServer(String abiList, String socketName,ZygoteServer zygoteServer)
{
// 一系统创建SystemServer进程所需参数的准备工作try {...
/* Request to fork the system server process
*/// 3.1pid = Zygote.forkSystemServer(parsedArgs.uid, parsedArgs.gid,parsedArgs.gids,parsedArgs.runtimeFlags,null,parsedArgs.permittedCapabilities,parsedArgs.effectiveCapabilities);
}
catch (IllegalArgumentException ex)
{throw new RuntimeException(ex);}
/* For child process
*/if (pid == 0) {
if (hasSecondZygote(abiList)) {waitForSecondaryZygote(socketName);}
zygoteServer.closeServerSocket();
// 3.2return handleSystemServerProcess(parsedArgs);
}return null;
}
可以看到,forkSystemServer()方法中,注释3.1调用了Zygote的forkSystemServer()方法去创建SystemServer进程,其内部会执行nativeForkSystemServer这个Native方法,它最终会使用fork函数在当前进程创建一个SystemServer进程。如果pid等于0,即当前是处于新创建的子进程ServerServer进程中,则在注释3.2处使用handleSystemServerProcess()方法处理SystemServer进程的一些处理工作。
从以上的分析可以得知,Zygote进程启动中承担的主要职责如下:
- 1、创建AppRuntime,执行其start方法,启动Zygote进程。。
- 2、创建JVM并为JVM注册JNI方法。
- 3、使用JNI调用ZygoteInit的main函数进入Zygote的Java FrameWork层。
- 4、使用registerZygoteSocket方法创建服务器端Socket,并通过runSelectLoop方法等等AMS的请求去创建新的应用进程。
- 5、启动SystemServer进程。
- 调用了handleSystemServerprocess()方法来启动SystemServer进程。handleSystemServerProcess()方法如下所示:
/*** Finish remaining work for the newly forked system server process.
*/
private static Runnable handleSystemServerProcess(ZygoteConnection.Arguments parsedArgs) {...
if (parsedArgs.invokeWith != null) {...}
else {ClassLoader cl = null;
if (systemServerClasspath != null) {
// 1cl = createPathClassLoader(systemServerClasspath, parsedArgs.targetSdkVersion);
Thread.currentThread().setContextClassLoader(cl);}
/** Pass the remaining arguments to SystemServer.
*/// 2return ZygoteInit.zygoteInit(parsedArgs.targetSdkVersion, parsedArgs.remainingArgs, cl);
}
}
在注释1处,使用了systemServerClassPath和targetSdkVersion创建了一个PathClassLoader。接着,在注释2处,执行了ZygoteInit的zygoteInit()方法,该方法如下所示:
public static final Runnable zygoteInit(int targetSdkVersion, String[] argv, ClassLoader classLoader)
{
if (RuntimeInit.DEBUG) {
Slog.d(RuntimeInit.TAG, "RuntimeInit: Starting application from zygote");
}
Trace.traceBegin(Trace.TRACE_TAG_ACTIVITY_MANAGER, "ZygoteInit");
RuntimeInit.redirectLogStreams();
RuntimeInit.commonInit();
// 1ZygoteInit.nativeZygoteInit();
// 2return RuntimeInit.applicationInit(targetSdkVersion, argv, classLoader);
}
- zygoteInit()方法的注释2处,这里调用了RuntimeInit 的 applicationInit() 方法,代码如下所示:
/frameworks/base/core/java/com/android/internal/os/RuntimeInit.java
protected static Runnable applicationInit(int targetSdkVersion, String[] argv,ClassLoader classLoader) {...
// Remaining arguments are passed to the start class's static mainreturn findStaticMain(args.startClass, args.startArgs, classLoader);
}
在applicationInit()方法中最后调用了findStaticMain()方法:
protected static Runnable findStaticMain(String className, String[] argv,ClassLoader classLoader) {
Class<?> cl;
try {
// 1cl = Class.forName(className, true, classLoader);
}
catch (ClassNotFoundException ex) {
throw new RuntimeException("Missing class when invoking static main " + className,ex);
}
Method m;try {
// 2m = cl.getMethod("main", new Class[] { String[].class });
}
catch (NoSuchMethodException ex) {
throw new RuntimeException("Missing static main on " + className, ex);}
catch (SecurityException ex) {throw new RuntimeException("Problem getting static main on " + className, ex);}
int modifiers = m.getModifiers();
if (! (Modifier.isStatic(modifiers) && Modifier.isPublic(modifiers))) {
throw new RuntimeException("Main method is not public and static on " + className);}
/** This throw gets caught in ZygoteInit.main(), which responds
* by invoking the exception's run() method. This arrangement
* clears up all the stack frames that were required in setting
* up the process.
*/// 3return new MethodAndArgsCaller(m, argv);
}
首先,在注释1处,通过发射得到了SystemServer类。接着,在注释2处,找到了SystemServer中的main()方法。最后,在注释3处,会将main()方法传入MethodAndArgsCaller()方法中,这里的MethodAndArgsCaller()方法是一个Runnable实例,它最终会一直返回出去,直到在ZygoteInit的main()方法中被使用,如下所示:
if (startSystemServer) {
Runnable r = forkSystemServer(abiList, socketName, zygoteServer);
// {@code r == null}
in the parent (zygote) process, and {
@code r != null}
in the
// child (system_server) process.
if (r != null) {
r.run();
return;
}
}
可以看到,最终直接调用了这个Runnable实例的run()方法,代码如下所示:
/*** Helper class which holds a method and arguments and can call them. This is used as part of
* a trampoline to get rid of the initial process setup stack frames.
*/
static class MethodAndArgsCaller implements Runnable {
/** method to call
*/private final Method mMethod;
/** argument array
*/private final String[] mArgs;public MethodAndArgsCaller(Method method, String[] args) {
mMethod = method;mArgs = args;}
public void run() {try {
// 1mMethod.invoke(null, new Object[] {
mArgs });}
catch (IllegalAccessException ex) {throw new RuntimeException(ex);}
catch (InvocationTargetException ex) {
Throwable cause = ex.getCause();
if (cause instanceof RuntimeException) {
throw (RuntimeException) cause;
}
else if (cause instanceof Error) {
throw (Error) cause;}
throw new RuntimeException(ex);
}
}
}
在注释1处,这个mMethod就是指的SystemServer的main()方法,这里动态调用了SystemServer的main()方法,最终,SystemServer进程就进入了SystemServer的main()方法中了。这里还有个遗留问题,为什么不直接在findStaticMain()方法中直接动态调用SystemServer的main()方法呢?原因就是这种递归返回后再执行入口方法的方式会让SystemServer的main()方法看起来像是SystemServer的入口方法,而且,这样也会清除之前所有SystemServer相关设置过程中需要的堆栈帧。
--------走到 SystemService 进程
- /frameworks/base/services/java/com/android/server/SystemServer.java
接下来我们看看SystemServer的main()方法:
/**
* The main entry point from zygote.
*/
public static void main(String[] args)
{
new SystemServer().run();
}
main()方法中调用了SystemServer的run()方法,如下所示:
private void run() {try {...
// 1Looper.prepareMainLooper();...
// Initialize native services.
// 2System.loadLibrary("android_servers");
// Check whether we failed to shut down last time we tried.
// This call may not return.performPendingShutdown();
// Initialize the system context.createSystemContext();
// Create the system service manager.
// 3mSystemServiceManager = new SystemServiceManager(mSystemContext);
mSystemServiceManager.setStartInfo(mRuntimeRestart,mRuntimeStartElapsedTime, mRuntimeStartUptime);
LocalServices.addService(SystemServiceManager.class, mSystemServiceManager);
// Prepare the thread pool for init tasks that can be parallelizedSystemServerInitThreadPool.get();}
finally {traceEnd();
// InitBeforeStartServices}
// Start services.try {
traceBeginAndSlog("StartServices");
// 4startBootstrapServices();
// 5startCoreServices();
//6startOtherServices();
SystemServerInitThreadPool.shutdown();}
catch (Throwable ex) {Slog.e("System", "******************************************");
Slog.e("System", "************ Failure starting system services", ex);
throw ex;}
finally {
traceEnd();
}...
// Loop forever.
// 7Looper.loop();
throw new RuntimeException("Main thread loop unexpectedly exited");
}
在注释1处,创建了消息Looper。
在注释2处,加载了动态库libandroid_servers.so。
在注释3处,创建了SystemServerManager,它的作用是对系统服务进行创建、启动和生命周期管理。
在注释4处的startBootstarpServices()方法中使用SystemServiceManager启动了ActivityManagerService、PackageManagerService、PowerManagerService等引导服务。
在注释5处的startCoreServices()方法中则启动了BatteryService、WebViewUpdateService、DropBoxManagerService、UsageStatsService4个核心服务。
在注释6处的startOtherServices()方法中启动了WindowManagerService、InputManagerService、CameraService等其它服务。这些服务的父类都是SystemService。
可以看到,上面把系统服务分成了三种类型:引导服务、核心服务、其它服务。这些系统服务共有100多个,其中对于我们来说比较关键的有:
- 引导服务:ActivityManagerService,负责四大组件的启动、切换、调度。
- 引导服务:PackageManagerService,负责对APK进行安装、解析、删除、卸载等操作。
- 引导服务:PowerManagerService,负责计算系统中与Power相关的计算,然后决定系统该如何反应。
- 核心服务:BatteryService,管理电池相关的服务。
- 其它服务:WindowManagerService,窗口管理服务。
- 其它服务:InputManagerService,管理输入事件。
很多系统服务的启动逻辑都是类似的,这里我以启动ActivityManagerService服务来进行举例,代码如下所示:
mActivityManagerService = mSystemServiceManager.startService(ActivityManagerService.Lifecycle.class).getService();
SystemServiceManager 的 startService() 方法启动了ActivityManagerService,该启动方法如下所示:
@SuppressWarnings("unchecked")
public <T extends SystemService> T startService(Class<T> serviceClass) {
try {final String name = serviceClass.getName();
...try {Constructor<T> constructor = serviceClass.getConstructor(Context.class);
// 1service = constructor.newInstance(mContext);
}
catch (InstantiationException ex) {...
// 2startService(service);return service;
}
finally {Trace.traceEnd(Trace.TRACE_TAG_SYSTEM_SERVER);
}
}
在注释1处使用反射创建了ActivityManagerService实例,并在注释2处调用了另一个startService()重载方法,如下所示:
public void startService(@NonNull final SystemService service) {
// Register it.
// 1mServices.add(service);
// Start it.long time = SystemClock.elapsedRealtime();
try {
// 2service.onStart();
}
catch (RuntimeException ex)
{
throw new RuntimeException("Failed to start service " + service.getClass().getName()+ ": onStart threw an exception", ex);
}
warnIfTooLong(SystemClock.elapsedRealtime() - time, service, "onStart");
}
在注释1处,首先会将ActivityManagerService添加在mServices中,它是一个存储SystemService类型的ArrayList,这样就完成了ActivityManagerService的注册。
在注释2处,调用了ActivityManagerService的onStart()方法完成了启动ActivityManagerService服务。
除了使用SystemServiceManager的startService()方法来启动系统服务外,也可以直接调用服务的main()方法来启动系统服务,如PackageManagerService:
mPackageManagerService = PackageManagerService.main(mSystemContext, installer,mFactoryTestMode != FactoryTest.FACTORY_TEST_OFF, mOnlyCore);
这里直接调用了PackageManagerService的main()方法:
public static PackageManagerService main(Context context, Installer installer,boolean factoryTest, boolean onlyCore) {
// Self-check for initial settings.PackageManagerServiceCompilerMapping.checkProperties();
// 1PackageManagerService m = new PackageManagerService(context, installer,factoryTest, onlyCore);
m.enableSystemUserPackages();
// 2ServiceManager.addService("package", m);
// 3final PackageManagerNative pmn = m.new PackageManagerNative();
ServiceManager.addService("package_native", pmn);
return m;
}
在注释1处,直接新建了一个PackageManagerService实例,
注释2处将PackageManagerService注册到服务大管家ServiceManager中,ServiceManager用于管理系统中的各种Service,用于系统C/S架构中的Binder进程间通信,即如果Client端需要使用某个Servcie,首先应该到ServiceManager查询Service的相关信息,然后使用这些信息和该Service所在的Server进程建立通信通道,这样Client端就可以服务端进程的Service进行通信了。
7. SystemService 进程总结
SystemService的启动流程分析至此已经完结,经过以上的分析可知,SystemService进程被创建后,主要的处理如下:
- 1、启动Binder线程池,这样就可以与其他进程进行Binder跨进程通信。
- 2、创建SystemServiceManager,它用来对系统服务进行创建、启动和生命周期管理。
- 3、启动各种系统服务:引导服务、核心服务、其他服务,共100多种。应用开发主要关注引导服务ActivityManagerService、PackageManagerService和其他服务WindowManagerService、InputManagerService即可。


