内核链表
文章目录
- 内核链表
- list_head
- 创建链表
- 添加节点
- 1. list_add
- 2. list_add_tail 接口
- 删除节点
- 宿主结构
- 1.找出宿主结构 list_entry(ptr, type, member)
- 2 container_of
- 3. 宿主结构的遍历
list_head
在 Linux 内核中,提供了一个用来创建双向循环链表的结构 list_head。虽然linux 内核是用 C 语言写的,但是 list_head 的引入,使得内核数据结构也可以拥有面向对象的特性,通过使用操作 list_head 的通用接口很容易实现代码的重用。
list_head 结构体定义, kernel/inclue/linux/types.h 如下:
/**
 * The linkage struct for list nodes. This struct must be part of your
 * to-be-linked struct. struct list_head is required for both the head of the
 * list and for each list node.
 *
 * Position and name of the struct list_head field is irrelevant.
 * There are no requirements that elements of a list are of the same type.
 * There are no requirements for a list head, any struct list_head can be a list
 * head.
 */
struct list_head {
    struct list_head *next, *prev;
};

/**
 * Initialize the list as an empty list.
 *
 * Example:
 * INIT_LIST_HEAD(&bar->list_of_foos);
 *
 * @param The list to initialized.
 */
#define LIST_HEAD_INIT(name) { &(name), &(name) }
//用于初始化一个空的链表头部,参数为链表头部的名字。

#define LIST_HEAD(name) \
    struct list_head name = LIST_HEAD_INIT(name)
//用于定义并初始化一个链表头部,参数为链表头部的名字。
头结点 head 是不使用的!!!!
list_head 组织的链表的结构:
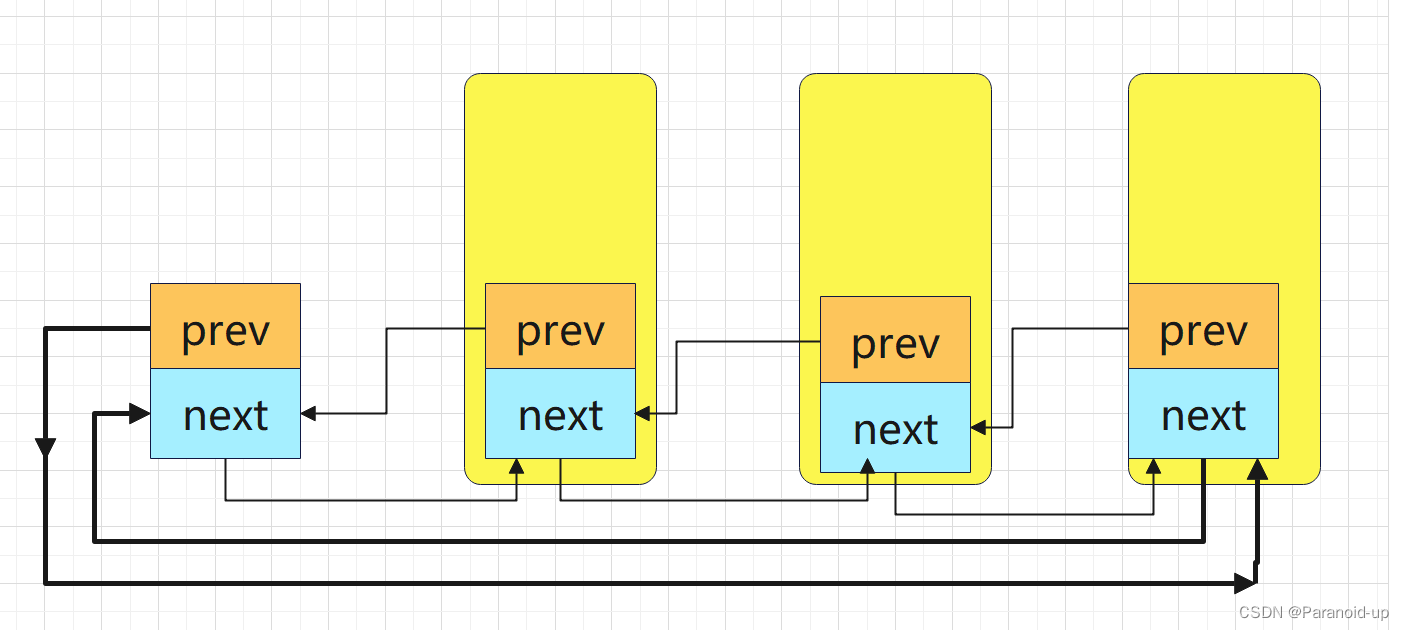
然后就开始围绕这个结构开始构建链表,然后插入、删除节点 ,遍历整个链表等等,其实内核已经提供好了现成的接口。kernel/include/linux/list.h 中:
创建链表
内核提供了下面的这些接口来初始化链表:
#define LIST_HEAD_INIT(name) { &(name), &(name) }
//用于初始化一个空的链表头部,参数为链表头部的名字。

#define LIST_HEAD(name) \
    struct list_head name = LIST_HEAD_INIT(name)
//用于定义并初始化一个链表头部,参数为链表头部的名字。


static inline void
INIT_LIST_HEAD(struct list_head *list)
{
    list->next = list->prev = list;
}
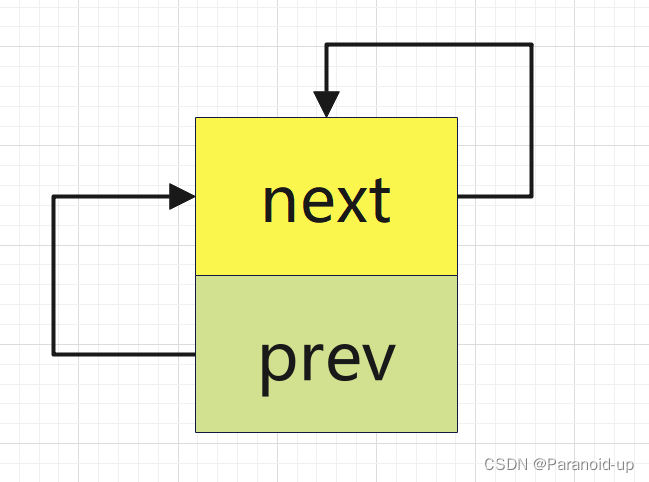
可以通过 LIST_HEAD(mylist) 进行初始化一个链表, mylist 的 prev 和next 指针都是指向自己。
struct list_head mylist = {&mylist, &mylist} ;
但是如果只是利用 mylist 这样的结构体实现链表就没有什么实际意义了,因为正常的链表都是为了遍历结构体中的其它有意义的字段而创建的,而我们mylist 中只有 prev 和 next 指针,却没有实际有意义的字段数据,所以毫无意义。
综上,我们可以创建一个宿主结构,然后在此结构中再嵌套 mylist 字段,宿主结构又有其它的字段(进程描述符 task_struct,页面管理的 page 结构,等就是采用这种方法创建链表的)。
如:
①
struct mylist{
    int type;
    char name[MAX_NAME_LEN];
    struct list_head list;
}
创建链表,并初始化
②
struct list_head myhead;
INIT_LIST_HEAD(&myhead);
这样我们的链表就初始化完毕,链表头的 myhead 就 prev 和 next 指针分别指向 myhead 自己了,如下图:
添加节点
内核已经提供了添加节点的接口了
1. list_add
static inline void
__list_add(struct list_head *entry,
struct list_head *prev, struct list_head *next)
{
next->prev = entry;
entry->next = next;
entry->prev = prev;
prev->next = entry;
}
/**
Insert a new element after the given list head. The new element does not
need to be initialised as empty list.
The list changes from:
 head → some element → ...


to
 head → new element → older element → ...


Example:
struct foo *newfoo = malloc(...);
list_add(&newfoo->entry, &bar->list_of_foos);

@param entry The new element to prepend to the list.
@param head The existing list.
*/
static inline void
list_add(struct list_head *entry, struct list_head *head)
{
__list_add(entry, head, head->next);
}
根据注释可知,是在链表头 head 后方插入一个新节点 new。
其实就是在 myhead 链表头后和链表头后第一个节点之间插入一个新节点。然后这个新的节点就变成了链表头后的第一个节点了。
接着上面步骤创建 1 个节点然后插入到 myhead 之后
③
struct mylist node1;
node1.type = I2C_TYPE;
strcpy(node1.name,"lfp1");
list_add(&node1.list,&myhead);
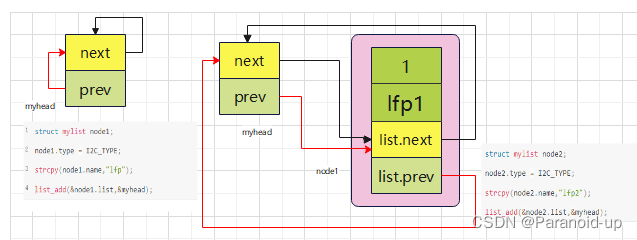
然后在创建第二个节点,同样把它插入到 header_task 之后
④
struct mylist node2;
node2.type = I2C_TYPE;
strcpy(node2.name,"lfp2");
list_add(&node2.list,&myhead);


以此类推,每次插入一个新节点,都是紧靠着 header 节点,而之前插入的节点依次排序靠后,那最后一个节点则是第一次插入 header 后的那个节点。最终可得出:先来的节点靠后,而后来的节点靠前, “先进后出,后进先出” 。所以此种结构类似于 stack“堆栈” , 而 header_task 就类似于内核 stack 中的栈顶指针 esp,它都是紧靠着最后 push 到栈的元素。
2. list_add_tail 接口
上面所讲的 list_add 接口是从链表头 header 后添加的节点。同样,内核也提供了从链表尾处向前添加节点的接口 list_add_tail.让我们来看一下它的具体实现。
/**
 * Append a new element to the end of the list given with this list head.
 *
 * The list changes from:
 *      head → some element → ... → lastelement
 * to
 *      head → some element → ... → lastelement → new element
 *
 * Example:
 * struct foo *newfoo = malloc(...);
 * list_add_tail(&newfoo->entry, &bar->list_of_foos);
 *
 * @param entry The new element to prepend to the list.
 * @param head The existing list.
 */
static inline void
list_add_tail(struct list_head *entry, struct list_head *head)
{
    __list_add(entry, head->prev, head);
}
从注释可得出: (1)在一个特定的链表头前面插入一个节点
(2)这个方法很适用于队列的实现
进一步把__list_add()展开如下:
static inline void
__list_add(struct list_head *entry,
                struct list_head *prev, struct list_head *next)
{
    next->prev = entry;
    entry->next = next;
    entry->prev = prev;
    prev->next = entry;
}
list_add_tail 就相当于在链表头前方依次插入新的节点(也可理解为在链表尾部开始插入节点,此时, header 节点既是为节点,保持不变)利用上面分析 list_add 接口的方法可画出数据结构图形如下。
①创建一个链表头(实际上应该是表尾)代码参考第一节;
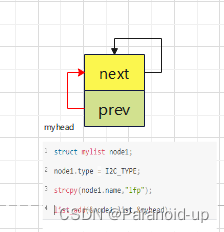
②插入第一个节点 node1.list , 调用
struct mylist node1;
node1.type = I2C_TYPE;
strcpy(node1.name,"lfp1");
list_add_tail(&node1.list,&myhead);
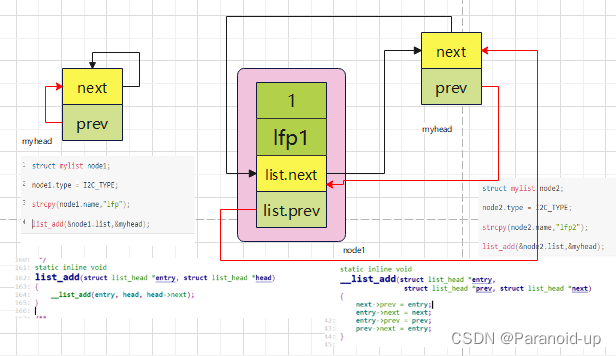
③插入第二个节点 node2.list,调用
struct mylist node1;
node1.type = I2C_TYPE;
strcpy(node1.name,"lfp2");
list_add_tail(&node1.list,&myhead);
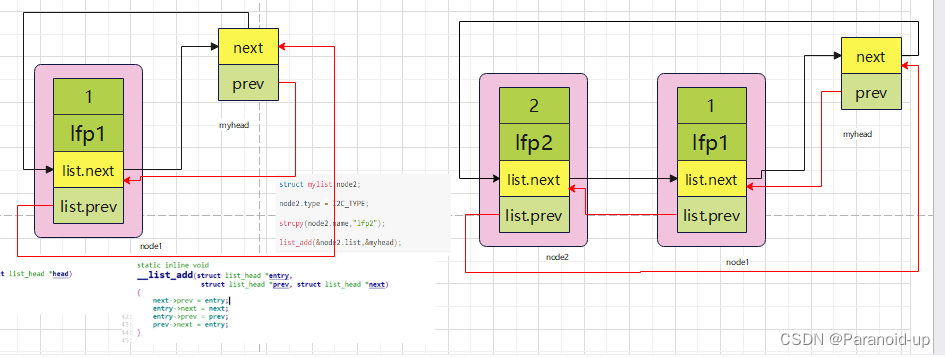

依此类推,每次插入的新节点都是紧挨着 header_task 表尾,而插入的第一个节点 my_first_task 排在了第一位, my_second_task 排在了第二位,可得出:先插入的节点排在前面,后插入的节点排在后面, “先进先出,后进后出” ,这不正是队列的特点吗(First in First out)!
删除节点
内核同样在 list.h 文件中提供了删除节点的接口 list_del(), 让我们看一下它的实现流程
static inline void
__list_del(struct list_head *prev, struct list_head *next)
{
    next->prev = prev;
    prev->next = next;
}

/**
 * Remove the element from the list it is in. Using this function will reset
 * the pointers to/from this element so it is removed from the list. It does
 * NOT free the element itself or manipulate it otherwise.
 *
 * Using list_del on a pure list head (like in the example at the top of
 * this file) will NOT remove the first element from
 * the list but rather reset the list as empty list.
 *
 * Example:
 * list_del(&foo->entry);
 *
 * @param entry The element to remove.
 */
static inline void
list_del(struct list_head *entry)
{
    __list_del(entry->prev, entry->next);
}
利用 list_del(struct list_head *entry) 接口就可以删除链表中的任意节点了,但需注意,前提条件是这个节点是已知的,既在链表中真实存在,且prev, next 指针都不为 NULL。
链表遍历
内核是同过下面这个宏定义来完成对 list_head 链表进行遍历的,如下 :
define list_for_each(pos, head) \
    for (pos = (head)->next; pos != (head); pos = pos->next)
上面这种方式是从前向后遍历的,同样也可以使用下面的宏反向遍历:
#define list_for_each_prev(pos, head) \
    for (pos = (head)->prev; pos != (head); pos = pos->prev)
而且, list.h 中也提供了 list_replace(节点替换) list_move(节点移位) ,翻转,查找等接口。
宿主结构
1.找出宿主结构 list_entry(ptr, type, member)
上面的所有操作都是基于 list_head 这个链表进行的,涉及的结构体也都是:
struct list_head {
    struct list_head *next, *prev;
};
我们真正更关心的是包含 list_head 这个结构体字段的宿主结构体,因为只有定位到了宿主结构体的起始地址,我们才能对对宿主结构体中的其它有意义的字段进行操作。
struct mylist{
    int type;
    char name[MAX_NAME_LEN];
    struct list_head list;
};
那我们如何根据 list 这个字段的地址而找到宿主结构 node1 的位置呢? list.h中定义如下:
/**
 * Alias of container_of
 */
#define list_entry(ptr, type, member) \
    container_of(ptr, type, member)
list.h 中提供了 list_entry 宏来实现对应地址的转换,但最终还是调用了container_of 宏,所以 container_of 宏的伟大之处不言而喻。
2 container_of
此宏在内核代码 kernel/include/linux/kernel.h 中定义
#define container_of(ptr, type, member) \
    (type *)((char *)(ptr) - (char *) &((type *)0)->member)
ptr 是指向结构体成员的指针;
type 是结构体类型名;
member 是结构体成员名。
该宏定义包含一个单独的表达式,它执行以下操作:
- (type *)0:首先将整数 0 强制转换为指向 type 类型的指针,即创建一个空的 type 类型的指针,这样就能够在后续计算中使用结构体成员的偏移量。
- &((type *)0)->member:使用成员运算符 -> 访问结构体指针的成员 member,然后取其地址 &,即得到 member 在结构体中的偏移量。
- (char *):将偏移量强制转换为指向 char 类型的指针,以便在后续计算中以字节为单位进行偏移。
- (char *)(ptr):将传入的结构体成员指针 ptr 强制转换为指向 char 类型的指针,以便在后续计算中以字节为单位进行偏移。
- (char *)(ptr) - (char *) &((type *)0)->member:计算从结构体成员指针 ptr 到结构体指针的偏移量,即结构体成员 member 在结构体中的偏移量,然后用结构体指针的地址减去该偏移量,得到整个结构体的指针。
- (type *)((char *)(ptr) - (char *) &((type *)0)->member):将计算出的指针强制转换为指向 type 类型的指针,即返回整个结构体的指针。
因此,这个宏定义的作用是通过一个结构体成员的指针,返回整个结构体的指针。它的实现原理是利用了 C 语言中结构体的内存布局特点,即结构体的第一个成员的地址就是结构体本身的地址,后续成员的地址依次递增。这样,通过结构体成员的偏移量,就能计算出整个结构体的地址。
或
#define container_of(ptr, type, member) ({            \
    const typeof( ((type *)0)->member ) *__mptr = (ptr);    \
    (type *)( (char *)__mptr - offsetof(type,member) );})
- 功能:根据结构体变量成员施址获取整个结构体的存储空间首地址
- 参数:
- ptr:结构体变量的成员地址
- type:结构体类型
- member:结构体成员
- #define 是 C 语言中的宏定义关键字,它定义了一个名为 container_of 的宏,宏参数有三个,分别是 ptr、type 和 member。
- {} 是 C 语言中的代码块,宏定义的代码块中包含了两个语句。
- typeof 是 GCC 编译器的一个扩展,它可以获取一个表达式的类型。
- ((type *)0)->member 是一个结构体成员访问表达式,它的意思是访问 type 结构体中的 member 成员,并返回该成员的类型。
- __mptr 是一个指向 member 成员的指针,它指向的类型是 const typeof(((type *)0)->member) *,也就是 type 结构体中 member 成员的类型的常量指针。
- (ptr) 是一个宏参数,它表示传入的结构体成员指针。
- (char *)__mptr 将指向 member 成员的指针转换为 char 类型的指针,这样可以通过指针运算来计算整个结构体的指针。
- offsetof 是 C 语言标准库中的一个宏,它可以计算一个结构体中某个成员相对于结构体起始地址的偏移量。
- (type *)((char *)__mptr - offsetof(type, member)) 是整个宏的返回值,它的意思是从 member 成员的指针计算出整个结构体的地址,并将其转换为 type * 类型的指针。
综上所述,这个宏定义实现了一个通用的容器类型转换技巧,可以在任何包含了指定成员的结构体中使用
而 offsetof 定义在 kernel/include/linux/stddef.h ,如下:
#define offsetof(TYPE, MEMBER) ((size_t) &((TYPE *)0)->MEMBER)
举个例子,来简单分析一下 container_of 内部实现机制。
例如:
struct test{
    int a;
    short char b;c;
};

struct test *p = (struct test *)malloc(sizeof(struct test));
test_function(&(p->b));

int test_function(short *addr_b){//获取 struct test 结构体空间的首地址
    struct addr = test *addr;
    container_of(addr_b,struct test,b);
}
展开 container_of 宏,探究内部的实现:
typeof ( ( (struct test *)0 )->b ) ; (1)
typeof ( ( (struct test *)0 )->b ) *__mptr = addr_b ; (2)
(struct test *)( (char *)__mptr - offsetof(struct test,b)) (3)
(1) 获取成员变量 b 的类型 ,这里获取的就是 short 类型。这是 GNU_C 的扩展语法。
(2) 用获取的变量类型,定义了一个指针变量 __mptr ,并且将成员变量 b 的首地址赋值给它
(3) 这里的 offsetof(struct test,b)是用来计算成员 b 在这个 struct test结构体的偏移。 __mptr是成员 b 的首地址, 现在 减去成员 b 在结构体里面的偏移值,算出来的是不是这个结构体的首地址呀 。
3. 宿主结构的遍历
我们可以根据结构体中成员变量的地址找到宿主结构的地址,并且我们可以对成员变量所建立的链表进行遍历,那我们是不是也可以通过某种方法对宿主结构进行遍历呢?答案肯定是可以的,内核在 list.h 中提供了下面的宏:
#define list_for_each_entry(pos, head, member)                \
    for (pos = list_first_entry(head, typeof(*pos), member);    \
         &pos->member != (head);                    \
         pos = list_next_entry(pos, member))
其中, list_first_entry 和 list_next_entry 宏都定义在 list.h 中,分别代表:获取第一个真正的宿主结构的地址;获取下一个宿主结构的地址。它们的实现都是利用 list_entry 宏。
/**
 * list_first_entry - get the first element from a list
 * @ptr:    the list head to take the element from.
 * @type:    the type of the struct this is embedded in.
 * @member:    the name of the list_head within the struct.
 *
 * Note, that list is expected to be not empty.
 */
#define list_first_entry(ptr, type, member) \
    list_entry((ptr)->next, type, member)

/**
 * list_last_entry - get the last element from a list
 * @ptr:    the list head to take the element from.
 * @type:    the type of the struct this is embedded in.
 * @member:    the name of the list_head within the struct.
 *
 * Note, that list is expected to be not empty.
 */
#define list_last_entry(ptr, type, member) \
    list_entry((ptr)->prev, type, member)
最终实现了宿主结构的遍历
#define list_for_each_entry(pos, head, member)                \
    for (pos = list_first_entry(head, typeof(*pos), member);    \
         &pos->member != (head);                    \
         pos = list_next_entry(pos, member))
首先 pos 定位到第一个宿主结构地址,然后循环获取下一个宿主结构地址,如果查到宿主结构中的 member 成员变量(宿主结构中 struct list_head 定义的字段)地址为 head,则退出,从而实现了宿主结构的遍历。如果要循环对宿主结构中的其它成员变量进行操作,这个遍历操作就显得特别有意义了。我们用上面的 nod 结构举个例子:
struct my_list *pos_ptr = NULL ;
list_for_each_entry (pos_ptr, &myhead, list ){
    printk ("val = %d\n" , pos_ptr->val);
}
