1--string容器
string 本质上是一个类,其不同于指针 char*,string 类的内部封装了 char*,用于管理字符串,是一个 char* 型的容器;
1-1--string构造函数
string 的构造函数原型:
string(); // 创建一个空的字符串
string(const char* s); // 使用字符串 s 进行初始化
string(const string& str); // 使用一个 string 对象初始化另一个 string 对象;
string(int n, char c); // 使用 n 个字符 c 进行初始化;
代码实例:
#include <iostream>
#include <string>
int main(int argc, char* argv[]){

    // string();  // 创建一个空的字符串
    std::string s1;

    // string(const char* s); // 使用字符串 s 进行初始化
    const char* str = "hello world";
    std::string s2(str);

    // string(const string& str); // 使用一个 string 对象初始化另一个 string 对象;
    std::string s3(s2);

    // string(int n, char c);  // 使用 n 个字符 c 进行初始化;
    std::string s4(10, 'a');

    std::cout << "s1: " << s1 << std::endl;
    std::cout << "s2: " << s2 << std::endl;
    std::cout << "s3: " << s3 << std::endl;
    std::cout << "s4: " << s4 << std::endl;

    return 0;
}
1-2--string赋值操作
string 赋值操作的函数原型:
string& operator=(const char* s); // 将 char* 类型的字符串赋值给当前字符串
string& operator=(const string &s); // 将字符串 s 赋给当前的字符串
string& operator=(char c); // 将字符 c 赋给当前的字符串
string& assign(const char *s); // 将字符串 s 赋给当前字符串
string& assign(const char *s, int n); // 将字符串 s 的前 n 个字符赋给当前的字符串
string& assign(const string &s); // 将字符串 s 赋给当前字符串
string& assign(int n, char c); // 将 n 个字符 c 赋给当前字符串
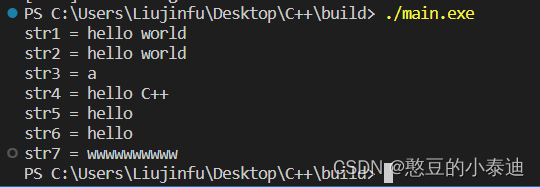
代码实例:
#include <iostream>
#include <string>
int main(int argc, char* argv[]){

    // string& operator=(const char* s); // 将 char* 类型的字符串赋值给当前字符串
    std::string str1;
    str1 = "hello world";
    std::cout << "str1 = " << str1 << std::endl;

    // string& operator=(const string &s); // 将字符串 s 赋给当前的字符串
    std::string str2;
    str2 = str1;
    std::cout << "str2 = " << str2 << std::endl;

    // string& operator=(char c); // 将字符 c 赋给当前的字符串
    std::string str3;
    str3 = 'a';
    std::cout << "str3 = " << str3 << std::endl;

    // string& assign(const char *s); // 将字符串 s 赋给当前字符串
    std::string str4;
    str4.assign("hello C++");
    std::cout << "str4 = " << str4 << std::endl;

    // string& assign(const char *s, int n); // 将字符串 s 的前 n 个字符赋给当前的字符串
    std::string str5;
    str5.assign("hello C++", 5);
    std::cout << "str5 = " << str5 << std::endl;

    // string& assign(const string &s); // 将字符串 s 赋给当前字符串
    std::string str6;
    str6.assign(str5);
    std::cout << "str6 = " << str6 << std::endl;

    // string& assign(int n, char c); // 将 n 个字符 c 赋给当前字符串
    std::string str7;
    str7.assign(10, 'w');
    std::cout << "str7 = " << str7 << std::endl;

    return 0;
}
1-3--string字符串拼接
string 实现在字符串末尾拼接字符串,其函数原型如下:
string& operator+=(const char* str); // 重载+=操作符来拼接
string& operator+=(const char c); // 重载+=操作符来拼接
string& operator+=(const string& str); // 重载+=操作符来拼接
string& append(const char *s); // 把字符串 s 拼接到当前字符串末尾
string& append(const char *s, int n); // 把字符串 s 的前 n 个字符拼接到当前字符串末尾
string& append(const string &s); // 把字符串 s 拼接到当前字符串末尾
string& append(const string &s, int pos, int n); // 把字符串 s 从 pos 位置开始截取 n 个字符,拼接到当前字符串末尾
#include <iostream>
#include <string>
int main(int argc, char* argv[]){

    std::string str1 = "I";
    str1 += " Love sleeping";
    std::cout << "str1: " << str1 << std::endl;

    std::string str2 = " and eating.";
    str1 += str2;
    std::cout << "str1: " << str1 << std::endl;

    std::string str3 = "I";
    str3.append(" Love");
    std::cout << "str3: " << str3 << std::endl;

    str3.append(" game abcd", 5); // 前 n 个字符
    std::cout << "str3: " << str3 << std::endl;

    str3.append(str2, 0, 4); // 截取字符串规定位置作为拼接; 第2个参数表示截取的起始位置,第3个参数表示截取字符的个数
    std::cout << "str3: " << str3 << std::endl;
    return 0;
}
1-4--string查找与替换
查找:查找指定字符串是否存在;
替换:在指定的位置替换字符串;
函数原型:
int find(const string& str, int pos = 0) const; // 查找str第一次出现的位置,从pos开始查找;
int find(const char* s, int pos = 0) const; // 查找s第一次出现的位置,从pos开始查找;
int find(const char* s, int pos, int n) const; // 从 pos 位置查找s的前n个字符;
int find(const char c, int pos = 0) const; // 查找字符c第一次出现的位置;
int rfind(const string& str, int pos = npos) const; // 查找str第一次出现的位置,从pos开始查找;(从右往左)
int rfind(const char* s, int pos = npos) const; // 查找s出现的位置,从pos开始查找;(从右往左)
int rfind(const char* s, int pos, int n) const; // 从 pos 位置查找s的前n个字符;(从右往左)
int rfind(const char c, int pos = 0) const; // 查找字符c出现的位置;(从右往左)
string& replace(int pos, int n, const string& str); // 替换从pos开始n个字符为字符串str
string& replace(int pos, int n, const char* s); // 替换从pos开始n个字符为字符串s
代码实例:
#include <iostream>
#include <string>
int main(int argc, char* argv[]){

    std::string str1  = "abcdabcd";
    // 从左往右查找
    int pos = str1.find("cd");
    if (pos == -1){
        std::cout << "The dst string is not exist";
    }
    else{
        std::cout << "Find the string, the start pos is: " << pos << std::endl;
    }

    // 从右往左查找
    int pos2 = str1.rfind("cd");
    if (pos2 == -1){
        std::cout << "The dst string is not exist";
    }
    else{
        std::cout << "Find the string, the start pos is: " << pos2 << std::endl;
    }

    // 替换
    std::string str2 = "abcdefg";
    str2.replace(1, 3, "123456"); // 先在原字符串从位置 1 开始删除 3 个字符,再将目标字符串复制到原字符串
    std::cout << "str2: " << str2 << std::endl;

    return 0;
}
1-5--string字符串比较
字符串比较是按字符的 ASCII 码进行比较,有以下三种情况:① =,返回 0; ② >,返回1;③ <,返回 -1;
函数原型:
int compare(const string &s) const; // 与字符串 s 比较
int compare(const char *s) const; // 与字符串 s 比较
#include <iostream>
#include <string>
int main(int argc, char* argv[]){

    std::string str1 = "C++";
    std::string str2 = "C++";

    if(str1.compare(str2) == 0){
        std::cout << "str1 == str2" << std::endl;
    }
    else if(str1.compare(str2) > 0){
        std::cout << "str1 > str2" << std::endl;
    }
    else{
        std::cout << "str1 < str2" << std::endl;
    }

    return 0;
}
1-6--string字符串存取
string中单个字符存取方式有两种:
char& operator[](int n); // 通过[]方式取字符
char& at(int n); // 通过at方法获取字符
#include <iostream>
#include <string>
int main(int argc, char* argv[]){

    std::string str1 = "Hello";
    std::cout << "str1: " << str1 << std::endl;

    // 通过[]访问单个字符
    for(int i = 0; i < str1.size(); i++){
        std::cout << str1[i] << " ";
    }
    std::cout << std::endl;

    // 通过at访问单个字符
    for(int i = 0; i < str1.size(); i++){
        std::cout << str1.at(i) << " ";
    }
    std::cout << std::endl;

    // 修改单个字符
    str1[0] = 'A';
    str1.at(1) = 'B';
    std::cout << "str1: " << str1 << std::endl;

    return 0;
}
1-7--string字符串插入和删除
对 string 字符串进行插入和删除字符操作,其函数原型如下:
string& insert(int pos, const char* s); // 插入字符串
string& insert(int pos, const string& str); // 插入字符串
string& insert(int pos, int n, char c); // 在指定位置插入 n 个字符c
string& erase(int pos, int n = npos); // 删除从 Pos 开始的 n 个字符
#include <iostream>
#include <string>
int main(int argc, char* argv[]){

    std::string str1 = "Hello";
    std::cout << "str1: " << str1 << std::endl;

    // 插入字符串
    str1.insert(1, "AAA"); // 第一个参数表示插入的位置,第二个参数表示插入的字符串
    std::cout << "str1: " << str1 << std::endl;

    // 删除字符串
    str1.erase(1, 3); // 第一个参数表示删除的位置,第二个参数表示删除的个数
    std::cout << "str1: " << str1 << std::endl;

    return 0;
}
1-8--获取string子串
在规定位置截取string字符串的子串,其函数原型如下:
std::string substr(int pos = 0, int n = npos) const; // 返回由pos开始的n个字符组成的字符串
#include <iostream>
#include <string>
int main(int argc, char* argv[]){

    std::string str1 = "123456@sysu.edu.cn";
    int pos = str1.find("@");
    std::string subStr = str1.substr(0, pos);

    std::cout << "subStr = " << subStr << std::endl;
    return 0;
}
2--vector容器
vector 数据结构与数组类似,被称为单端数组;
vector 与普通数组的区别在于:普通数组时静态空间,而 vector 可以动态扩展;
2-1--vector构造函数
用于创建 vector 容器,其函数原型如下:
vector<T> v; // 默认构造函数
vector(v.begin(), v.end()); // 将v[begin(), end()]区间中的元素拷贝到容器
vector(n, elem); // 构造函数将n个elem拷贝到容器
vector(const vector &vec); // 拷贝构造函数
# include <iostream>
# include <vector>
// # include <string>
// # include <algorithm> // 标准算法的头文件

void printVector(std::vector<int> &v){
    for(std::vector<int>::iterator it = v.begin(); it != v.end(); it++){
        std::cout << *it << " ";
    }
    std::cout << std::endl;
}

void test01(){
    std::vector<int>v1; // 默认构造
    for(int i = 0; i < 10; i++){
        v1.push_back(i);
    }
    printVector(v1);

    std::vector<int>v2(v1.begin(), v1.end()); // 利用区间进行构造
    printVector(v2);

    // n 个 elem 方式构造
    std::vector<int>v3(10, 100); // 10个100
    printVector(v3);

    //拷贝构造
    std::vector<int>v4(v3);
    printVector(v4);
}

int main(){
    test01();

    return 0;
}
2-2--vector赋值操作
vector容器赋值操作的函数原型如下:
vector& operator=(const vector &vec); // 重载等号操作符
assign(beg, end); // 将[beg, end]区间中的数据拷贝赋值给容器
assign(n, elem); // 将n个elem拷贝赋值给容器
# include <iostream>
# include <vector>

void printVector(std::vector<int> &v){
    for(std::vector<int>::iterator it = v.begin(); it != v.end(); it++){
        std::cout << *it << " ";
    }
    std::cout << std::endl;
}

void test01(){
    std::vector<int>v1;
    for(int i = 0; i < 10; i++){
        v1.push_back(i);
    }
    printVector(v1);

    // =赋值
    std::vector<int> v2;
    v2 = v1;
    printVector(v2);

    // assign赋值
    std::vector<int> v3;
    v3.assign(v1.begin(), v1.end());
    printVector(v3);

    std::vector<int> v4;
    v4.assign(10, 100);
    printVector(v4);
}

int main(){
    test01();

    return 0;
}
2-3--vector容器的容量和大小
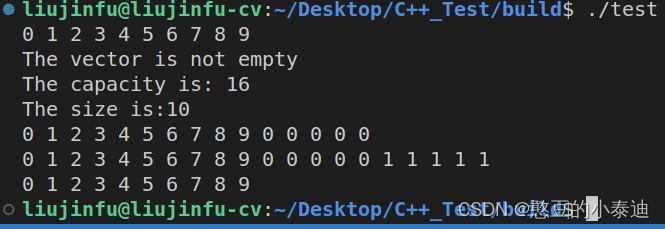
通过以下函数可以对vector容器的容量和大小进行操作:
empty(); // 判断容器是否为空
capacity(); // 容器的容量
size(); // 返回容器中元素的个数
resize(int num); // 重新指定容器的长度为num,若容器变长,则以默认值填充新位置;如果容器变短,则末尾超出容器长度的元素将会被删除;
resize(int num, elem); // 重新指定容器的长度为num,若容器变长,则以elem值填充新位置;如果容器变短,则末尾超出容器长度的元素将会被删除;
# include <iostream>
# include <vector>
// # include <string>
// # include <algorithm> // 标准算法的头文件

void printVector(std::vector<int> &v){
    for(std::vector<int>::iterator it = v.begin(); it != v.end(); it++){
        std::cout << *it << " ";
    }
    std::cout << std::endl;
}

void test01(){
    std::vector<int>v1;
    for(int i = 0; i < 10; i++){
        v1.push_back(i);
    }
    printVector(v1);

    if(v1.empty()){
        std::cout << "The vector is empty" << std::endl;
    }
    else{
        std::cout << "The vector is not empty" << std::endl;
        std::cout << "The capacity is: " << v1.capacity() << std::endl;
        std::cout << "The size is:" << v1.size() << std::endl;
    }

    // resize
    v1.resize(15);
    printVector(v1); // 默认以0填充
    v1.resize(20, 1);
    printVector(v1);
    v1.resize(10);
    printVector(v1);

}

int main(){
    test01();

    return 0;
}
2-4--vector的插入和删除
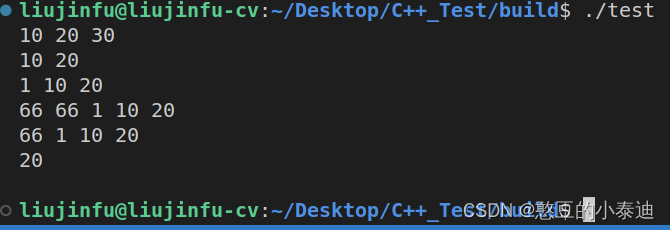
通过以下函数实现对vector容器的插入和删除:
push_back(ele); // 尾部插入元素ele
pop_back(); // 删除最后一个元素
insert(const_iterator pos, ele); // 迭代器指向位置pos插入元素ele
insert(const_iterator pos, int count, ele); // 迭代器指向位置pos插入count个元素ele
erase(const_iterator pos); // 删除迭代器指向的元素
erase(const_iterator start, const_iterator end); // 删除迭代器从start到end之间的元素
clear(); // 删除容器中所有元素
# include <iostream>
# include <vector>
// # include <string>
// # include <algorithm> // 标准算法的头文件

void printVector(std::vector<int> &v){
    for(std::vector<int>::iterator it = v.begin(); it != v.end(); it++){
        std::cout << *it << " ";
    }
    std::cout << std::endl;
}

void test01(){
    std::vector<int>v1;
    // 尾插
    v1.push_back(10);
    v1.push_back(20);
    v1.push_back(30);
    printVector(v1);

    // 尾删
    v1.pop_back();
    printVector(v1);

    // 插入
    v1.insert(v1.begin(), 1);
    printVector(v1);

    v1.insert(v1.begin(), 2, 66); // 开头插入2个66
    printVector(v1);

    v1.erase(v1.begin());
    printVector(v1);

    v1.erase(v1.begin(), v1.end() - 1);
    printVector(v1);

    v1.clear();
    printVector(v1);
}

int main(){
    test01();

    return 0;
}
2-5--vector数据存取
使用以下函数可以实现对vector容器的数据存取:
at(int idx); // 返回索引idx所指的数据
operator[]; // 返回索引idx所指的数据
front(); // 返回容器中第一个数据元素
back(); // 返回容器中最后一个数据元素
# include <iostream>
# include <vector>
// # include <string>
// # include <algorithm> // 标准算法的头文件

void printVector(std::vector<int> &v){
    for(std::vector<int>::iterator it = v.begin(); it != v.end(); it++){
        std::cout << *it << " ";
    }
    std::cout << std::endl;
}

void test01(){
    std::vector<int>v1;
    for(int i = 0; i < 10; i++){
        v1.push_back(i);
    }

    // 通过[]访问
    for(int i = 0; i < v1.size(); i++){
        std::cout<< v1[i] << " ";
    }
    std::cout << std::endl;

    // 通过at访问
    for(int i = 0; i < v1.size(); i++){
        std::cout<< v1.at(i) << " ";
    }
    std::cout << std::endl;

    // 获取第一个元素
    std::cout << "The first elem is: " << v1.front() << std::endl;
    // 获取最后一个元素
    std::cout << "The last elem is: " << v1.back() << std::endl;

}

int main(){
    test01();

    return 0;
}
2-6--vector容器互换
通过以下函数实现两个容器的互换:
swap(vec); // 将vec容器的元素和原来容器的元素进行互换;
# include <iostream>
# include <vector>
// # include <string>
// # include <algorithm> // 标准算法的头文件

void printVector(std::vector<int> &v){
    for(std::vector<int>::iterator it = v.begin(); it != v.end(); it++){
        std::cout << *it << " ";
    }
    std::cout << std::endl;
}

void test01(){
    std::vector<int>v1;
    for(int i = 0; i < 10; i++){
        v1.push_back(i);
    }

    std::vector<int> v2;
    for(int i = 10; i > 0; i--){
        v2.push_back(i);
    }

    std::cout << "互换前: " << std::endl;
    printVector(v1);
    printVector(v2);

    std::cout << "互换后: " << std::endl;
    v1.swap(v2);
    printVector(v1);
    printVector(v2);

}

void test02(){
    std::vector<int>v1;
    for(int i = 0; i < 100000; i++){
        v1.push_back(i);
    }
    std::cout << "v1.capacity: " << v1.capacity() << std::endl;
    std::cout << "v1.size: " << v1.size() << std::endl;

    v1.resize(3); // 重新指定大小,但容量并没有减少
    std::cout << "v1.capacity: " << v1.capacity() << std::endl;
    std::cout << "v1.size: " << v1.size() << std::endl;

    // 使用swap收缩内存
    std::vector<int>(v1).swap(v1); // std::vector<int>(v1)匿名对象
    std::cout << "v1.capacity: " << v1.capacity() << std::endl;
    std::cout << "v1.size: " << v1.size() << std::endl;

}


int main(){
    test02();

    return 0;
}
2-7--vector预留空间
通过预留空间可以减少vector在动态扩展容量时的扩展次数;
reserve(int len); // 容器预留 len 个元素长度,预留位置不初始化,元素不可访问;
# include <iostream>
# include <vector>
// # include <string>
// # include <algorithm> // 标准算法的头文件

void printVector(std::vector<int> &v){
    for(std::vector<int>::iterator it = v.begin(); it != v.end(); it++){
        std::cout << *it << " ";
    }
    std::cout << std::endl;
}

void test01(){
    std::vector<int>v1;
    int num1 = 0; // 统计开辟次数
    int *p1 = NULL;
    for(int i = 0; i < 100000; i++){
        v1.push_back(i);
        if(p1 != &v1[0]){
            p1 = &v1[0];
            num1++;
        }
    }
    std::cout << "num: " << num1 << std::endl;

    // 利用reserve()预留空间
    std::vector<int>v2;
    v2.reserve(100000);
    int num2 = 0; // 统计开辟次数
    int *p2 = NULL;
    for(int i = 0; i < 100000; i++){
        v2.push_back(i);
        if(p2 != &v2[0]){
            p2 = &v2[0];
            num2++;
        }
    }
    std::cout << "num: " << num2 << std::endl;
}

int main(){
    test01();

    return 0;
}


