注:本人也还没有完全弄懂WMI的原理,以下内容仅供参考。。。
简单来说,比起Win32提供的接口,WMI可以提供更多的系统信息,它本身是一个数据库架构,通过它可以访问、配置、管理和监视几乎所有的Windows资源,比如用户可以在远程计算机上启动一个进程。
例如,如果我想调取笔记本的电量信息,用Win32的api就只能获得以下几个参数:
typedef struct _SYSTEM_POWER_STATUS {
  BYTE  ACLineStatus; // AC电源状态
  BYTE  BatteryFlag; // 电池充电状态
  BYTE  BatteryLifePercent; // 剩余电池电量的百分比
  BYTE  SystemStatusFlag; // 节电器的状态
  DWORD BatteryLifeTime; // 剩余电量的秒数
  DWORD BatteryFullLifeTime; // 完全充电时的电池运行时间的秒数
} SYSTEM_POWER_STATUS, *LPSYSTEM_POWER_STATUS;
官方文档链接:https://learn.microsoft.com/en-us/windows/win32/api/winbase/ns-winbase-system_power_status
而使用WMI,可以获得多得多的信息:
[Dynamic, Provider("CIMWin32"), UUID("{8502C4B9-5FBB-11D2-AAC1-006008C78BC7}"), AMENDMENT]
class Win32_Battery : CIM_Battery
{
  uint16   Availability;
  uint32   BatteryRechargeTime;
  uint16   BatteryStatus;
  string   Caption;
  uint16   Chemistry;
  uint32   ConfigManagerErrorCode;
  boolean  ConfigManagerUserConfig;
  string   CreationClassName;
  string   Description;
  uint32   DesignCapacity;
  uint64   DesignVoltage;
  string   DeviceID;
  boolean  ErrorCleared;
  string   ErrorDescription;
  uint16   EstimatedChargeRemaining;
  uint32   EstimatedRunTime;
  uint32   ExpectedBatteryLife;
  uint32   ExpectedLife;
  uint32   FullChargeCapacity;
  datetime InstallDate;
  uint32   LastErrorCode;
  uint32   MaxRechargeTime;
  string   Name;
  string   PNPDeviceID;
  uint16   PowerManagementCapabilities[];
  boolean  PowerManagementSupported;
  string   SmartBatteryVersion;
  string   Status;
  uint16   StatusInfo;
  string   SystemCreationClassName;
  string   SystemName;
  uint32   TimeOnBattery;
  uint32   TimeToFullCharge;
};
官方文档链接:
https://learn.microsoft.com/en-us/windows/win32/cimwin32prov/win32-battery
接下来在VS中,用C++来使用WMI:
#define _WIN32_DCOM

#include <iostream>
#include <comdef.h>
#include <Wbemidl.h>

#pragma comment(lib, "wbemuuid.lib")

using namespace std;


int main(int argc, char** argv) {
    HRESULT hres;

    // Step 1: --------------------------------------------------
    // Initialize COM. ------------------------------------------

    hres = CoInitializeEx(0, COINIT_MULTITHREADED);
    if (FAILED(hres)) {
        cout << "Failed to initialize COM library. Error code = 0x"
            << hex << hres << endl;
        return 1;                  // Program has failed.
    }

    // Step 2: --------------------------------------------------
    // Set general COM security levels --------------------------

    hres = CoInitializeSecurity(
        NULL,
        -1,                          // COM authentication
        NULL,                        // Authentication services
        NULL,                        // Reserved
        RPC_C_AUTHN_LEVEL_DEFAULT,   // Default authentication
        RPC_C_IMP_LEVEL_IMPERSONATE, // Default Impersonation
        NULL,                        // Authentication info
        EOAC_NONE,                   // Additional capabilities
        NULL                         // Reserved
    );


    if (FAILED(hres)) {
        cout << "Failed to initialize security. Error code = 0x"
            << hex << hres << endl;
        CoUninitialize();
        return 1;                    // Program has failed.
    }

    // Step 3: ---------------------------------------------------
    // Obtain the initial locator to WMI -------------------------

    IWbemLocator* pLoc = NULL;

    hres = CoCreateInstance(
        CLSID_WbemLocator,
        0,
        CLSCTX_INPROC_SERVER,
        IID_IWbemLocator, (LPVOID*)&pLoc);

    if (FAILED(hres)) {
        cout << "Failed to create IWbemLocator object."
            << " Err code = 0x"
            << hex << hres << endl;
        CoUninitialize();
        return 1;                 // Program has failed.
    }

    // Step 4: -----------------------------------------------------
    // Connect to WMI through the IWbemLocator::ConnectServer method

    IWbemServices* pSvc = NULL;

    // Connect to the root\cimv2 namespace with
    // the current user and obtain pointer pSvc
    // to make IWbemServices calls.
    hres = pLoc->ConnectServer(
        _bstr_t(L"ROOT\\CIMV2"), // Object path of WMI namespace
        NULL,                    // User name. NULL = current user
        NULL,                    // User password. NULL = current
        0,                       // Locale. NULL indicates current
        NULL,                    // Security flags.
        0,                       // Authority (for example, Kerberos)
        0,                       // Context object
        &pSvc                    // pointer to IWbemServices proxy
    );

    if (FAILED(hres)) {
        cout << "Could not connect. Error code = 0x"
            << hex << hres << endl;
        pLoc->Release();
        CoUninitialize();
        return 1;                // Program has failed.
    }

    cout << "Connected to ROOT\\CIMV2 WMI namespace" << endl;


    // Step 5: --------------------------------------------------
    // Set security levels on the proxy -------------------------

    hres = CoSetProxyBlanket(
        pSvc,                        // Indicates the proxy to set
        RPC_C_AUTHN_WINNT,           // RPC_C_AUTHN_xxx
        RPC_C_AUTHZ_NONE,            // RPC_C_AUTHZ_xxx
        NULL,                        // Server principal name
        RPC_C_AUTHN_LEVEL_CALL,      // RPC_C_AUTHN_LEVEL_xxx
        RPC_C_IMP_LEVEL_IMPERSONATE, // RPC_C_IMP_LEVEL_xxx
        NULL,                        // client identity
        EOAC_NONE                    // proxy capabilities
    );

    if (FAILED(hres)) {
        cout << "Could not set proxy blanket. Error code = 0x"
            << hex << hres << endl;
        pSvc->Release();
        pLoc->Release();
        CoUninitialize();
        return 1;               // Program has failed.
    }

    // Step 6: --------------------------------------------------
    // Use the IWbemServices pointer to make requests of WMI ----

    // For example, get the name of the operating system
    IEnumWbemClassObject* pEnumerator = NULL;
    hres = pSvc->ExecQuery(
        bstr_t("WQL"),
        bstr_t("SELECT * FROM Win32_Battery"), // 改类名
        WBEM_FLAG_FORWARD_ONLY | WBEM_FLAG_RETURN_IMMEDIATELY,
        NULL,
        &pEnumerator);

    if (FAILED(hres)) {
        cout << "Query for operating system name failed."
            << " Error code = 0x"
            << hex << hres << endl;
        pSvc->Release();
        pLoc->Release();
        CoUninitialize();
        return 1;               // Program has failed.
    }

    // Step 7: -------------------------------------------------
    // Get the data from the query in step 6 -------------------

    IWbemClassObject* pclsObj = NULL;
    ULONG uReturn = 0;

    while (pEnumerator) {
        HRESULT hr = pEnumerator->Next(WBEM_INFINITE, 1,
            &pclsObj, &uReturn);

        if (0 == uReturn) {
            break;
        }

        VARIANT vtProp;

        VariantInit(&vtProp);
        // Get the value of the Name property
        hr = pclsObj->Get(L"Chemistry", 0, &vtProp, 0, 0); // 改成员变量
        wcout << " Chemistry : " << vtProp.intVal << endl; // 改变量值的类型
        VariantClear(&vtProp);

        pclsObj->Release();
    }

    // Cleanup
    // ========

    pSvc->Release();
    pLoc->Release();
    pEnumerator->Release();
    CoUninitialize();

    return 0;   // Program successfully completed.

}
控制台输出:
Connected to ROOT\CIMV2 WMI namespace
Chemistry : 6
D:\VSProject\demo1\Project1\x64\Debug\Project1.exe (process 9504) exited with code 0.
To automatically close the console when debugging stops, enable Tools->Options->Debugging->Automatically close the console when debugging stops.
Press any key to close this window . . .
说明我的笔记本用的是锂电池。
如果想要获得其他参数,改三个地方就可以了。
- 128行的
Win32_Battery - 161行的
Chemistry - 162行的
intVal
官方C++使用WMI的帮助文档:
https://learn.microsoft.com/en-us/windows/win32/wmisdk/example–getting-wmi-data-from-the-local-computer
原理分析:
WMI的架构图如下:
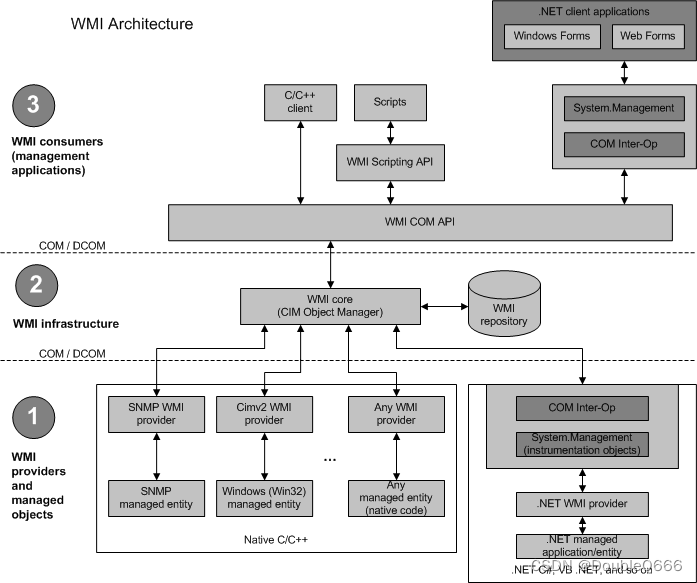
根据上图,作为顶层使用人员,可以有三种方式调取WMI数据库的结构:
- 使用C++
- 使用命令行shell
- 使用.NET客户端应用
也可以在命令行中直接敲命令,更简单:
PS C:\Users\Double Q> Get-WmiObject -Class Win32_Battery


__GENUS                     : 2
__CLASS                     : Win32_Battery
__SUPERCLASS                : CIM_Battery
__DYNASTY                   : CIM_ManagedSystemElement
__RELPATH                   : Win32_Battery.DeviceID="1Desay*******9ECW-41"
__PROPERTY_COUNT            : 33
__DERIVATION                : {CIM_Battery, CIM_LogicalDevice, CIM_LogicalElement, CIM_ManagedSystemElement}
__SERVER                    : LAPTOP-*********
__NAMESPACE                 : root\cimv2
__PATH                      : \\LAPTOP-********\root\cimv2:Win32_Battery.DeviceID="1Desay********ECW-41"
Availability                : 3
BatteryRechargeTime         :
BatteryStatus               : 1
Caption                     : 内部电池
Chemistry                   : 6
ConfigManagerErrorCode      :
ConfigManagerUserConfig     :
CreationClassName           : Win32_Battery
Description                 : 内部电池
DesignCapacity              :
DesignVoltage               : 14945
DeviceID                    : 1Desay********ECW-41
ErrorCleared                :
ErrorDescription            :
EstimatedChargeRemaining    : 44
EstimatedRunTime            : 85
ExpectedBatteryLife         :
ExpectedLife                :
FullChargeCapacity          :
InstallDate                 :
LastErrorCode               :
MaxRechargeTime             :
Name                        : ********ECW-41
PNPDeviceID                 :
PowerManagementCapabilities : {1}
PowerManagementSupported    : False
SmartBatteryVersion         :
Status                      : OK
StatusInfo                  :
SystemCreationClassName     : Win32_ComputerSystem
SystemName                  : LAPTOP-********
TimeOnBattery               :
TimeToFullCharge            :
PSComputerName              : LAPTOP-********