目录
前言
为什么要登录
登录的种类
Cookie-Session
Cookie-Session-local storage
JWT令牌
几种登陆总结
用户身份认证与授权
创建工程
添加依赖
启动项目
Bcrypt算法的工具
创建VO模型类
创建接口文件
创建XML文件
补充配置
添加依赖
添加配置
创建配置类
测试上面的配置
让Spring Security通过数据库验证密码
配置密码加密器
重写Spring Security下的用户相关抽象方法
测试成果
JWT
什么是JWT
为什么使用JWT
如何使用JWT
添加依赖
测试jwt
在Spring Security中使用JWT
自动装配AuthenticationManager对象
创建DTO类
创建接口类
创建实现类
创建控制器类
测试代码
返回客户端JWT数据
修改AdminServiceImpl实现类
修改控制器类
测试jwt数据返回
使用其他URL被屏蔽怎么办
使用请求头
结语
前言
登录这东西很奇怪哎,你说它难吗?好像客户端只需要调接口就行,那有啥难的?当你多多少少对登录的后台有些了解,又觉得好难啊,session,token,cookie,等等一堆东西,有老的大家都不喜欢用的,有新的一些不太懂的,根据公司项目规模不同,还要考虑成本的问题,真是有些头疼。博主今天推荐的一种登陆方式便是Spring Security + JWT的结合使用,为什么要两者结合呢?Spring Security现在已经很少用了,甚至有些人认为已经废弃了,但是因为Spring Security是Spring系列的东西,Spring对其支持很友好,不,是非常友好。但是我们不想使用他验证后的操作,所以我们要打断这个操作,让JWT工作。下面我们就来了解并手动操作一下吧,本篇还是集成在我们前面的微服务项目中,你也可以另起项目一起来做。
为什么要登录
我们平时都知道登录,不知道有没有思考过登录解决的是什么问题?大家会想到,不登录就不能拿到用户信息,一些用户行为和服务就没有办法关联到具体人身上,没错!比如购买行为。但我觉得这个说法不够具体,登录的具体作用应该是拿到用户的权限。
我们说,是人,就有不同的角色,一个男人,可以是儿子,可以是父亲,可以是员工,可以是老板等等。那我们就认为,一个登录体系中,必须要有一张用户表和一张角色表,还有刚刚说的权限表。这三张表之间还需要有表明其关系的关联表。
可以说,这三张表在任何一个登录体系都是必备的,甚至你还可以有临时的用户权限表,他们之间多是多对多的关系,要理清他们之间的关系并不简单。
登录的种类
登录的种类到目前为止所使用的技术大概五六种吧,其之间大同小异,从早期的Cookie-Session到现在的单点登录,中间跨越的时间不短,其中有一个时间分割点就是html5标准出现的时候,他带来了local storage,使得跨域问题得到良好的解决,但我们并不满足于这种方式,于是token技术出现,但是本质上和基于Cookie-Session+local storage的方式没有太大区别。为了解决微服务间的数据同步,基于Token的JWT认证诞生,其中还有一种利用session和redis的数据共享技术也能实现数据共享,这和token技术也类似。接下来,我们来简单的了解一下这几种登录方式:
Cookie-Session
这种方式要追溯到html5出现之前,那时只能利用cookie存储SessionId,但cookie在跨域问题上一言难尽,但并不是不能跨域,只是要比我们后面的方法麻烦,有local storage你还用cookie?而且cookie退出站点后就会销毁,这点让人极不能接受。其流程是:
- 用户输入用户名、密码或短信验证码登录
- 服务端验证后,返回一个 SessionId,其和用户信息关联。客户端将 SessionID存到cookie
- 当客户端再发起请求时带上cookie中的信息,服务端通过cookie获取 SessionID并校验,以判断用户是否登录
Cookie-Session-local storage
这种方式和以上相似,只是改了几个地方:
- 存储的位置不再是cookie,而是local storage
- 服务端不存储sessionid,而是改用redis做存储,可以解决同步问题,但也有缺点,同步会造成数据量增加,占用额外内存,我们通过一张图来说明
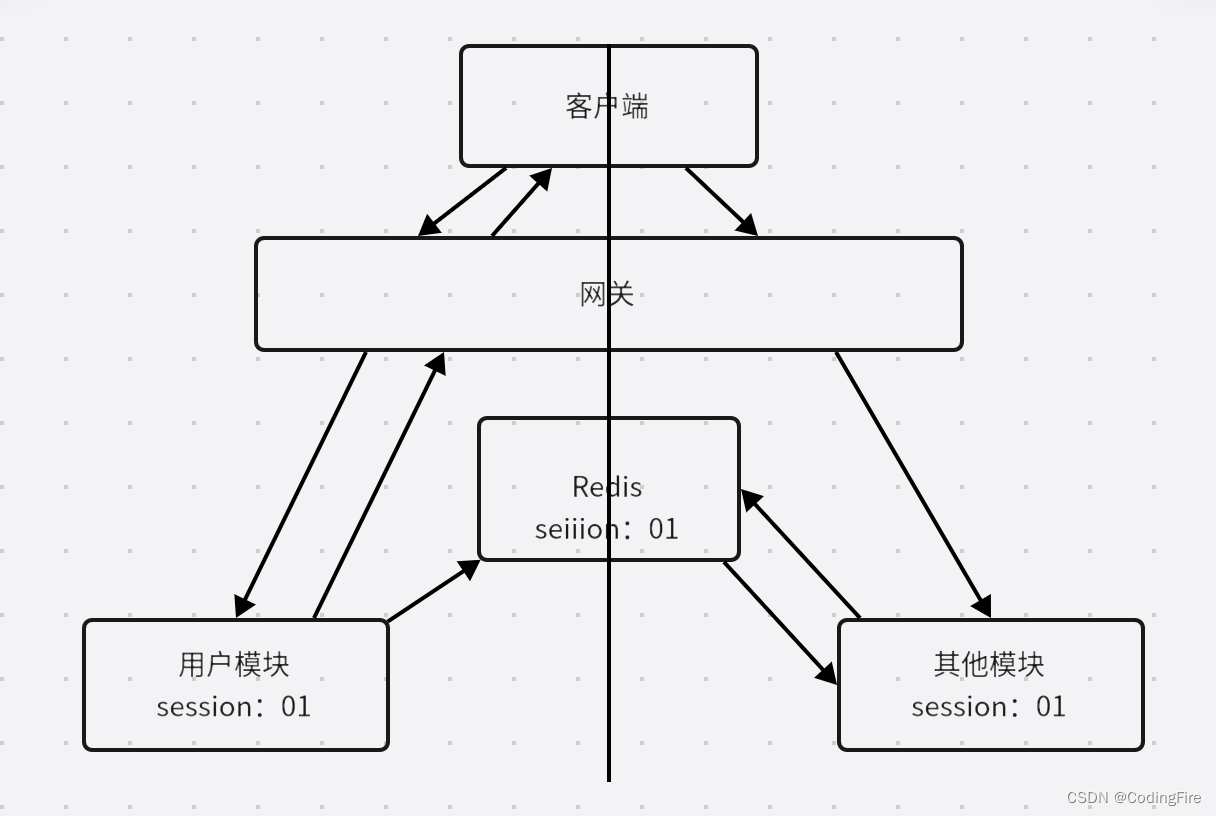
左边先行,获取用户信息,生成sessionid,存储在redis,右边访问其他模块,通过sessionid去redis拿用户信息,注意,用户模块和其他模块也会保存sessionid,这就是数据共享,用户量很大的情况会造成数据冗余,不适合用户量特别大的项目,中小型项目可以。对于客户端,sessionid当然是保存在local storage内了,毕竟谁也不想去额外解决跨域的问题。
JWT令牌
这种方式是目前使用比较多的一种方式,它和上面的方式也有相似之处,只是少了数据的存储,JWT不存储session这些东西,它只负责验证jwt是否正确,验证的过程就是解码的过程,关于JWT的标准制式的解释,请大家手动百度吧,不再赘述,博主也记不住,贴了浪费篇幅。看看,大概知道是怎么做的就行。
此处必须有图:
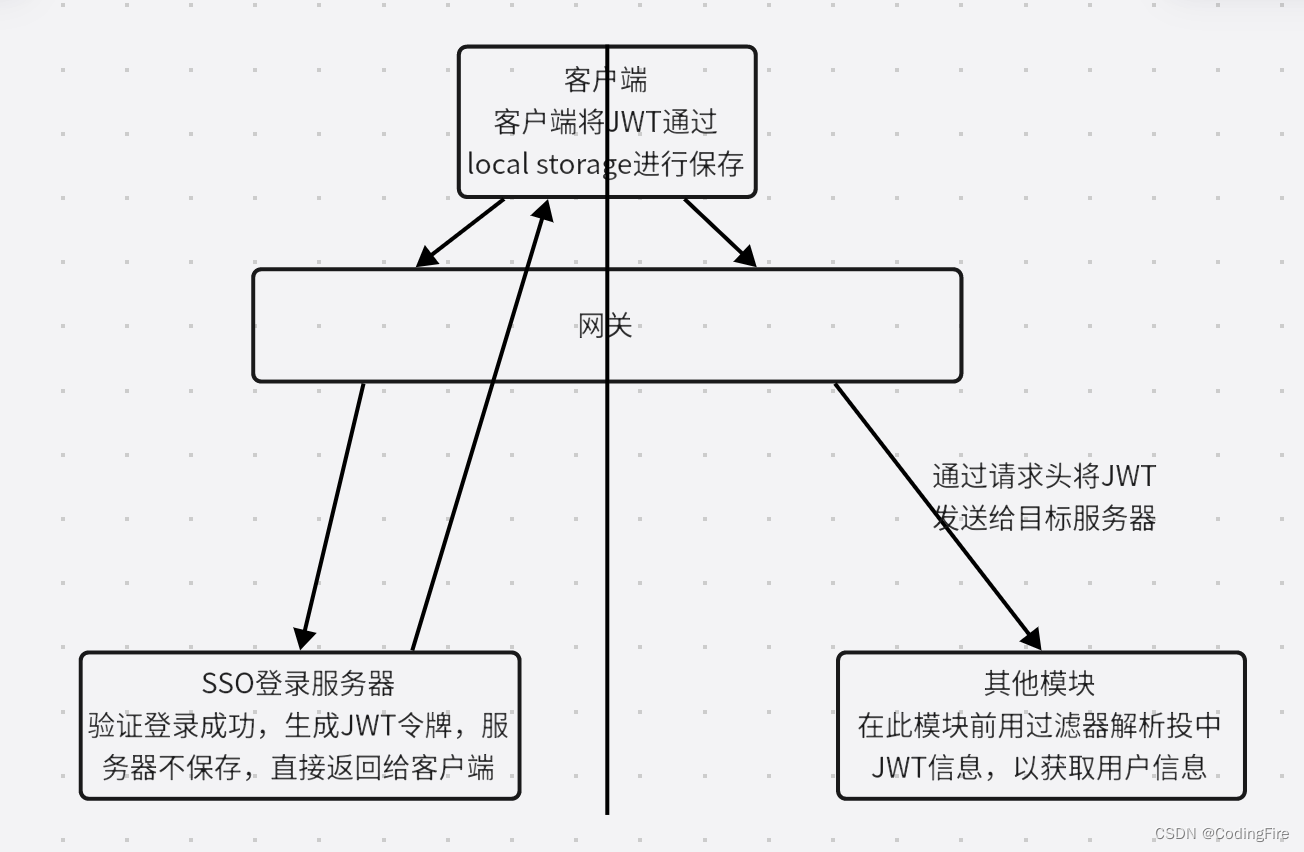
服务端不保存信息,这一点可以节省空间,谁的信息谁自己保存,解密方式在我这里,同时提高了安全性,何乐不为?
几种登陆总结
如果细分还能再分出几种登录方式,但基本大同小异,博主合并了其中相似的登录方式,总结出来这三种,此处忽略第三方登录,可自行了解。肯定还有其他方式,但总的来说,和这三种应该是类似,并不会完全不同。看了一篇OAuth2.0单点登录相关的文章,还有一篇总结登录的文章,真是写的太好了,分享给大家:
安全验证 - 知乎
Java——项目常用登录方式详解_new 海绵宝宝()的博客-CSDN博客
里面总结的很全面,也有一些案例,初学者可以看看。
用户身份认证与授权
从这里开始,就是我们的项目时间,首先出场的是Spring Security,它是用于解决认证与授权的框架。Spring Security有默认的登录账号和密码,用户名user,密码是随机的,每次启动项目都会重新生成一个。它要求所有的请求都必须先登录才允许访问,稍后我们集成后可以来进行测试。
创建工程
在微服务项目cloud下创建cloud-passport子项目:

添加依赖
<?xml version="1.0" encoding="UTF-8"?>
<project xmlns="http://maven.apache.org/POM/4.0.0" xmlns:xsi="http://www.w3.org/2001/XMLSchema-instance"
         xsi:schemaLocation="http://maven.apache.org/POM/4.0.0 https://maven.apache.org/xsd/maven-4.0.0.xsd">
    <modelVersion>4.0.0</modelVersion>
    <parent>
        <groupId>com.codingfire</groupId>
        <artifactId>cloud</artifactId>
        <version>0.0.1-SNAPSHOT</version>
    </parent>
    <groupId>com.codingfire</groupId>
    <artifactId>cloud-passport</artifactId>
    <version>0.0.1-SNAPSHOT</version>
    <name>cloud-passport</name>
    <description>Demo project for Spring Boot</description>

    <dependencies>
        <!-- Spring Boot Web:支持Spring MVC -->
        <dependency>
            <groupId>org.springframework.boot</groupId>
            <artifactId>spring-boot-starter-web</artifactId>
        </dependency>
        <!-- Spring Boot Security:处理认证与授权 -->
        <dependency>
            <groupId>org.springframework.boot</groupId>
            <artifactId>spring-boot-starter-security</artifactId>
        </dependency>
        <!-- Spring Boot Test:测试 -->
        <dependency>
            <groupId>org.springframework.boot</groupId>
            <artifactId>spring-boot-starter-test</artifactId>
            <scope>test</scope>
        </dependency>
    </dependencies>
</project>
父子关联
<modules>
    <module>cloud-commons</module>
    <module>cloud-bussiness</module>
    <module>cloud-cart</module>
    <module>cloud-order</module>
    <module>cloud-stock</module>
    <module>gateway</module>
    <module>search</module>
    <module>cloud-passport</module>
</modules>
启动项目
依赖添加完毕,什么都不需要做,直接运行passport的启动文件,可以在控制台看到如下输出:
Using generated security password: 1060ee9f-a56e-4ff5-bce4-68306b3265b1
这就是Spring Security生成的随机密码,它同时还提供了一个URL:http://localhost:8080/login
我们点开URL,在浏览器打开一个登录页面,我们输入用户名:user,密码就用上面的密码,登录成功后跳转回之前访问的URL,由于我们没有做这个页面,会显示404。这就是Spring Security默认要求所有的请求都是必须先登录才允许的访问的能力。
Bcrypt算法的工具
Spring Security的依赖项中包括了Bcrypt算法的工具类,这是一款非常优秀的密码加密工具,适和对需要存储下来的密码进行加密处理。我们来测试下看看。
打开测试类,添加如下测试代码:
package com.codingfire.cloud.passport;

import org.junit.jupiter.api.Test;
import org.springframework.boot.test.context.SpringBootTest;
import org.springframework.security.crypto.bcrypt.BCryptPasswordEncoder;

@SpringBootTest
class CloudPassportApplicationTests {

    private BCryptPasswordEncoder passwordEncoder = new BCryptPasswordEncoder();

    @Test
    public void testEncode() {
        // 原文相同的情况,每次加密得到的密文都不同
        for (int i = 0; i < 10; i++) {
            String rawPassword = "123456";
            String encodedPassword = passwordEncoder.encode(rawPassword);
            System.out.println("rawPassword = " + rawPassword);
            System.out.println("encodedPassword = " + encodedPassword);
        }
    }

    @Test
    public void testMatches() {
        String rawPassword = "123456";
        String encodedPassword = "$2a$10$4LHozWwptKuabvikrzM1KefYFgI7H4A9xCVv7cvMKsV9ycS4guS5K";
        boolean matchResult = passwordEncoder.matches(rawPassword, encodedPassword);
        System.out.println("match result : " + matchResult);
    }
}
我们分别运行这两个方法,会看到如下输出:
rawPassword = 123456
encodedPassword = $2a$10$4LHozWwptKuabvikrzM1KefYFgI7H4A9xCVv7cvMKsV9ycS4guS5K
        rawPassword = 123456
encodedPassword = $2a$10$VA9u7X9rSvuEtPlEixhnSujHdVsK8OwqkVIOqLzNydxa.ypCviVIq
        rawPassword = 123456
encodedPassword = $2a$10$d9lWItH5YhEFRns/Yj5U3OUyHM8rLKAE9X.SsbcIOA0WwRqUwFl82
        rawPassword = 123456
encodedPassword = $2a$10$W/PLc/Q04.8xfmEQgwSKC.g79FxRPJGFXRuFzISdVrn3cYWk1xkye
        rawPassword = 123456
encodedPassword = $2a$10$/9Ya1aqjQBX8342iH5blTOZeHJomKUitInVmLTsANonXriQjxhb5K
        rawPassword = 123456
encodedPassword = $2a$10$kX2u5zLrDN/VC8CLVRGmsOIFqA2FHCJRYJKnYmWeu/NyTQEjBCbki
        rawPassword = 123456
encodedPassword = $2a$10$igB96QfY9XDwhPz3U8Z7Nui1UQy.wtzSl9uk2n7m.lCdcKwhGqLXu
        rawPassword = 123456
encodedPassword = $2a$10$ssDypFmm0bN0CvIBqoB4huHIhT7oRwS9KsO1iopyFeSOUWYR96NPC
        rawPassword = 123456
encodedPassword = $2a$10$IWBuDVLYjvHCUqOM9qAQuu.kTlW8RH08CbIFlvYTzcdEMLHbVSFtS
        rawPassword = 123456
encodedPassword = $2a$10$J/eN5/loO6DTJG7ubgQh4.1ovwI9CS1H0yqnsbYEQFwnvqRq64bU.
match result : true
下面的解密使用上面的第一个加密后的密文进行的解密。大家要用自己的电脑生成的密文进行解密,用博主的可能会出现无法匹配的情况。
此加密工具有个特点,大家应该发现了,此加密得到的密文都不相同。
接着需要和数据库中存储的密文进行对比,此时需要使用SQL去数据库查询该用户的密文进行比对,比对通过,则可进行登录。此时就不能使用默认的user用户名和随机的密码的方式,具体做法我们继续往下看。
创建VO模型类
在commons工程下创建pojo.passport.vo.AdminLoginVO类:
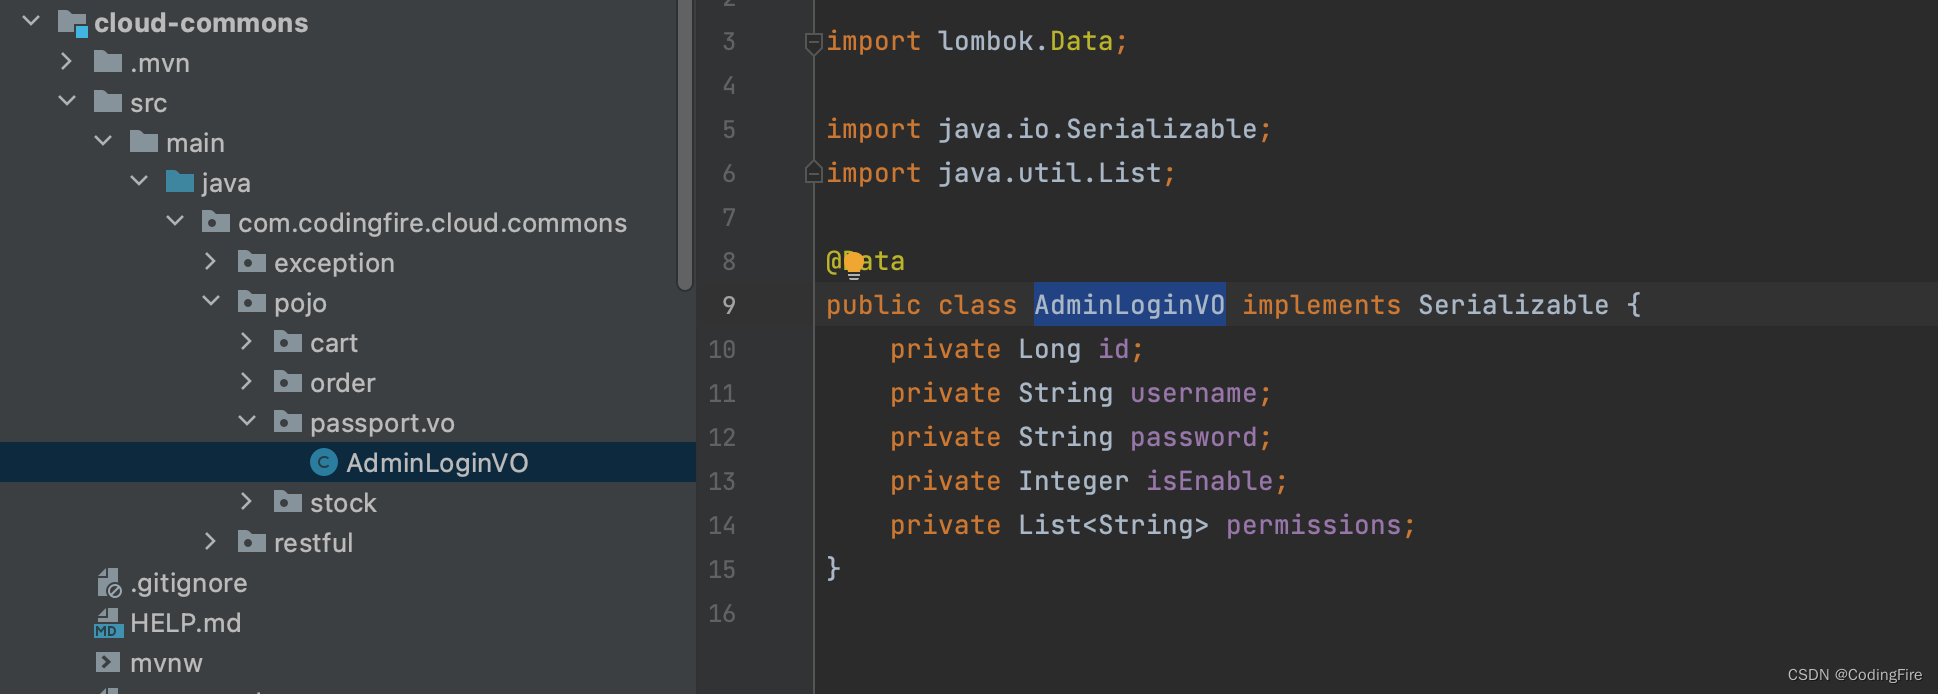
package com.codingfire.cloud.commons.pojo.passport.vo;

import lombok.Data;

import java.io.Serializable;
import java.util.List;

@Data
public class AdminLoginVO implements Serializable {
    private Long id;
    private String username;
    private String password;
    private Integer isLogin;
    private List<String> permissions;
}
创建完成后我们发现要使用commons模块,那需要依赖添加此模块:
<!--all-common依赖-->
<dependency>
    <groupId>com.codingfire</groupId>
    <artifactId>cloud-commons</artifactId>
    <version>0.0.1-SNAPSHOT</version>
</dependency>
创建接口文件
在passport下创建mapper.AdminMapper接口:
package com.codingfire.cloud.passport.mapper;

import com.codingfire.cloud.commons.pojo.passport.vo.AdminLoginVO;

public interface AdminMapper {
    AdminLoginVO getLoginInfoByUsername(String username);
}
创建XML文件
大家还记得吗?我们在Mybatis框架中有使用XML文件来写SQL。在src/main/resources下创建mapper文件夹,mapper文件夹下可以把前面的xml文件粘贴过来,写入如下SQL:
<?xml version="1.0" encoding="UTF-8" ?>
<!DOCTYPE mapper
        PUBLIC "-//mybatis.org//DTD Mapper 3.0//EN"
        "http://mybatis.org/dtd/mybatis-3-mapper.dtd">
<mapper namespace="com.codingfire.cloud.passport.mapper.AdminMapper">

    <!-- AdminLoginVO getLoginInfoByUsername(String username); -->
    <select id="getLoginInfoByUsername" resultMap="LoginInfoResultMap">
        select
        <include refid="LoginInfoQueryFields" />
        from admin
        left join admin_role
        on admin.id = admin_role.admin_id
        left join role_permission
        on admin_role.role_id = role_permission.role_id
        left join permission
        on role_permission.permission_id = permission.id
        where username=#{username}
    </select>

    <sql id="LoginInfoQueryFields">
        <if test="true">
            admin.id,
            admin.username,
            admin.password,
            admin.is_login,
            permission.name
        </if>
    </sql>

    <resultMap id="LoginInfoResultMap" type="com.codingfire.cloud.commons.pojo.passport.vo.AdminLoginVO">
        <id column="id" property="id" />
        <result column="username" property="username" />
        <result column="password" property="password" />
        <result column="is_login" property="isLogin" />
        <collection property="permissions" ofType="java.lang.String">
            <constructor>
                <arg column="name" />
            </constructor>
        </collection>
    </resultMap>

</mapper>
在这里大家要留意几个问题了,我们这里需要连接mybatis的数据库,第一次看博主文章的需要看看Java开发 - Mybatis框架初体验_CodingFire的博客-CSDN博客
这篇博客,才知道建的什么数据库, 有哪些表,有哪些参数,否则将很难进行下去。
补充配置
由于需要使用数据库,需要补充配置和依赖。
添加依赖
<!--mybatis整合springboot-->
<dependency>
    <groupId>org.mybatis.spring.boot</groupId>
    <artifactId>mybatis-spring-boot-starter</artifactId>
</dependency>
<!--alibaba 数据源德鲁伊-->
<dependency>
    <groupId>com.alibaba</groupId>
    <artifactId>druid</artifactId>
</dependency>
<!--mysql驱动-->
<dependency>
    <groupId>mysql</groupId>
    <artifactId>mysql-connector-java</artifactId>
</dependency>
添加配置
这里,我们选择从mybatis复制配置信息到properties文件:
spring.datasource.url=jdbc:mysql://localhost:3306/mybatis?useUnicode=true&characterEncoding=UTF-8&serverTimezone=Asia/Shanghai&allowPublicKeyRetrieval=true
spring.datasource.driver=com.mysql.cj.jdbc.Driver
spring.datasource.username=root
spring.datasource.password=0

mybatis.mapper-locations=classpath:mapper/AdminMapper.xml
密码写自己的数据库密码。
创建配置类
需要连接数据库,那么少不了mybatis配置了,创建MybatisConfiguration类,在passport下创建config包,此包下创建配置类:
package com.codingfire.cloud.passport.config;

import org.springframework.context.annotation.ComponentScan;
import org.springframework.context.annotation.Configuration;

@Configuration
@ComponentScan("com.codingfire.cloud.passport.mapper")
public class MybatisConfiguration {
}
前面也是有创建过的,你可以选择直接贴过来,但要注意扫描的路径改成自己的路径。原本需要在配置文件中配置mybatis.mapper-locations属性,上面已经补充过了。
测试上面的配置
在测试类下,我们添加如下代码:
    @Autowired
    AdminMapper adminMapper;

    @Test
    void selectUser() {
        AdminLoginVO adminLoginVO = adminMapper.getLoginInfoByUsername("admin04");
        System.out.println(adminLoginVO);
    }
这是我们原来表中的数据,没有数据的需要预先插入一些数据。运行测试方法,发现报错?
额,一大堆,看了......好一会儿,才发现有两个地方写错了:
一个是AdminMapper内没有添加@Repository注解:
另一个是MybatisConfiguration类上的scan注解写错了,修改一下:

然后再次运行测试方法,可以在控制台看到输出的用户信息如下:
AdminLoginVO(id=1, username=admin04, password=123456, isLogin=0, permissions=[全频道可删除, 全频道可筛选, 全频道读取, 单频道可删除, 单频道可筛选, 单频道观看])
代表我们的测试成功了。简直累的一逼,真是错一步都不行。
让Spring Security通过数据库验证密码
前面提过,要让Spring Security通过数据库的数据来验证用户名与密码,我们还需要做出一些修改和配置,我们看到每次控制台都会输出一串新的密码:
Using generated security password: a47b9983-3ea3-45d8-9632-faf701a7925b
下面,让我们看看怎样才能不让它输出。
配置密码加密器
在config包下创建SecurityConfiguration类:
package com.codingfire.cloud.passport.config;

import org.springframework.context.annotation.Bean;
import org.springframework.context.annotation.Configuration;
import org.springframework.security.crypto.bcrypt.BCryptPasswordEncoder;
import org.springframework.security.crypto.password.PasswordEncoder;

@Configuration
public class SecurityConfiguration {

    @Bean
    public PasswordEncoder passwordEncoder() {
        return new BCryptPasswordEncoder();
    }

}
重写Spring Security下的用户相关抽象方法
在passport下建新包security,包下建类UserDetailsServiceImpl,并实现UserDetailsService接口:
package com.codingfire.cloud.passport.security;

import com.codingfire.cloud.commons.pojo.passport.vo.AdminLoginVO;
import com.codingfire.cloud.passport.mapper.AdminMapper;
import org.springframework.beans.factory.annotation.Autowired;
import org.springframework.security.authentication.BadCredentialsException;
import org.springframework.security.core.userdetails.User;
import org.springframework.security.core.userdetails.UserDetails;
import org.springframework.security.core.userdetails.UserDetailsService;
import org.springframework.security.core.userdetails.UsernameNotFoundException;

@Service
public class UserDetailsServiceImpl implements UserDetailsService {
    @Autowired
    private AdminMapper adminMapper;

    @Override
    public UserDetails loadUserByUsername(String s) throws UsernameNotFoundException {
        System.out.println("根据用户名查询尝试登录的管理员信息,用户名=" + s);
        AdminLoginVO admin = adminMapper.getLoginInfoByUsername(s);
        System.out.println("通过持久层进行查询,结果=" + admin);

        if (admin == null) {
            System.out.println("根据用户名没有查询到有效的管理员数据,将抛出异常");
            throw new BadCredentialsException("登录失败,用户名不存在!");
        }

        System.out.println("查询到匹配的管理员数据,需要将此数据转换为UserDetails并返回");
        UserDetails userDetails = User.builder()
                .username(admin.getUsername())
                .password(admin.getPassword())
                .accountExpired(false)
                .accountLocked(false)
                .disabled(admin.getIsLogin() != 1)
                .credentialsExpired(false)
                .authorities(admin.getPermissions().toArray(new String[] {}))
                .build();
        System.out.println("转换得到UserDetails=" + userDetails);
        return userDetails;
    }

}
测试成果
重新启动工程,看看还有没有随机密码生成:
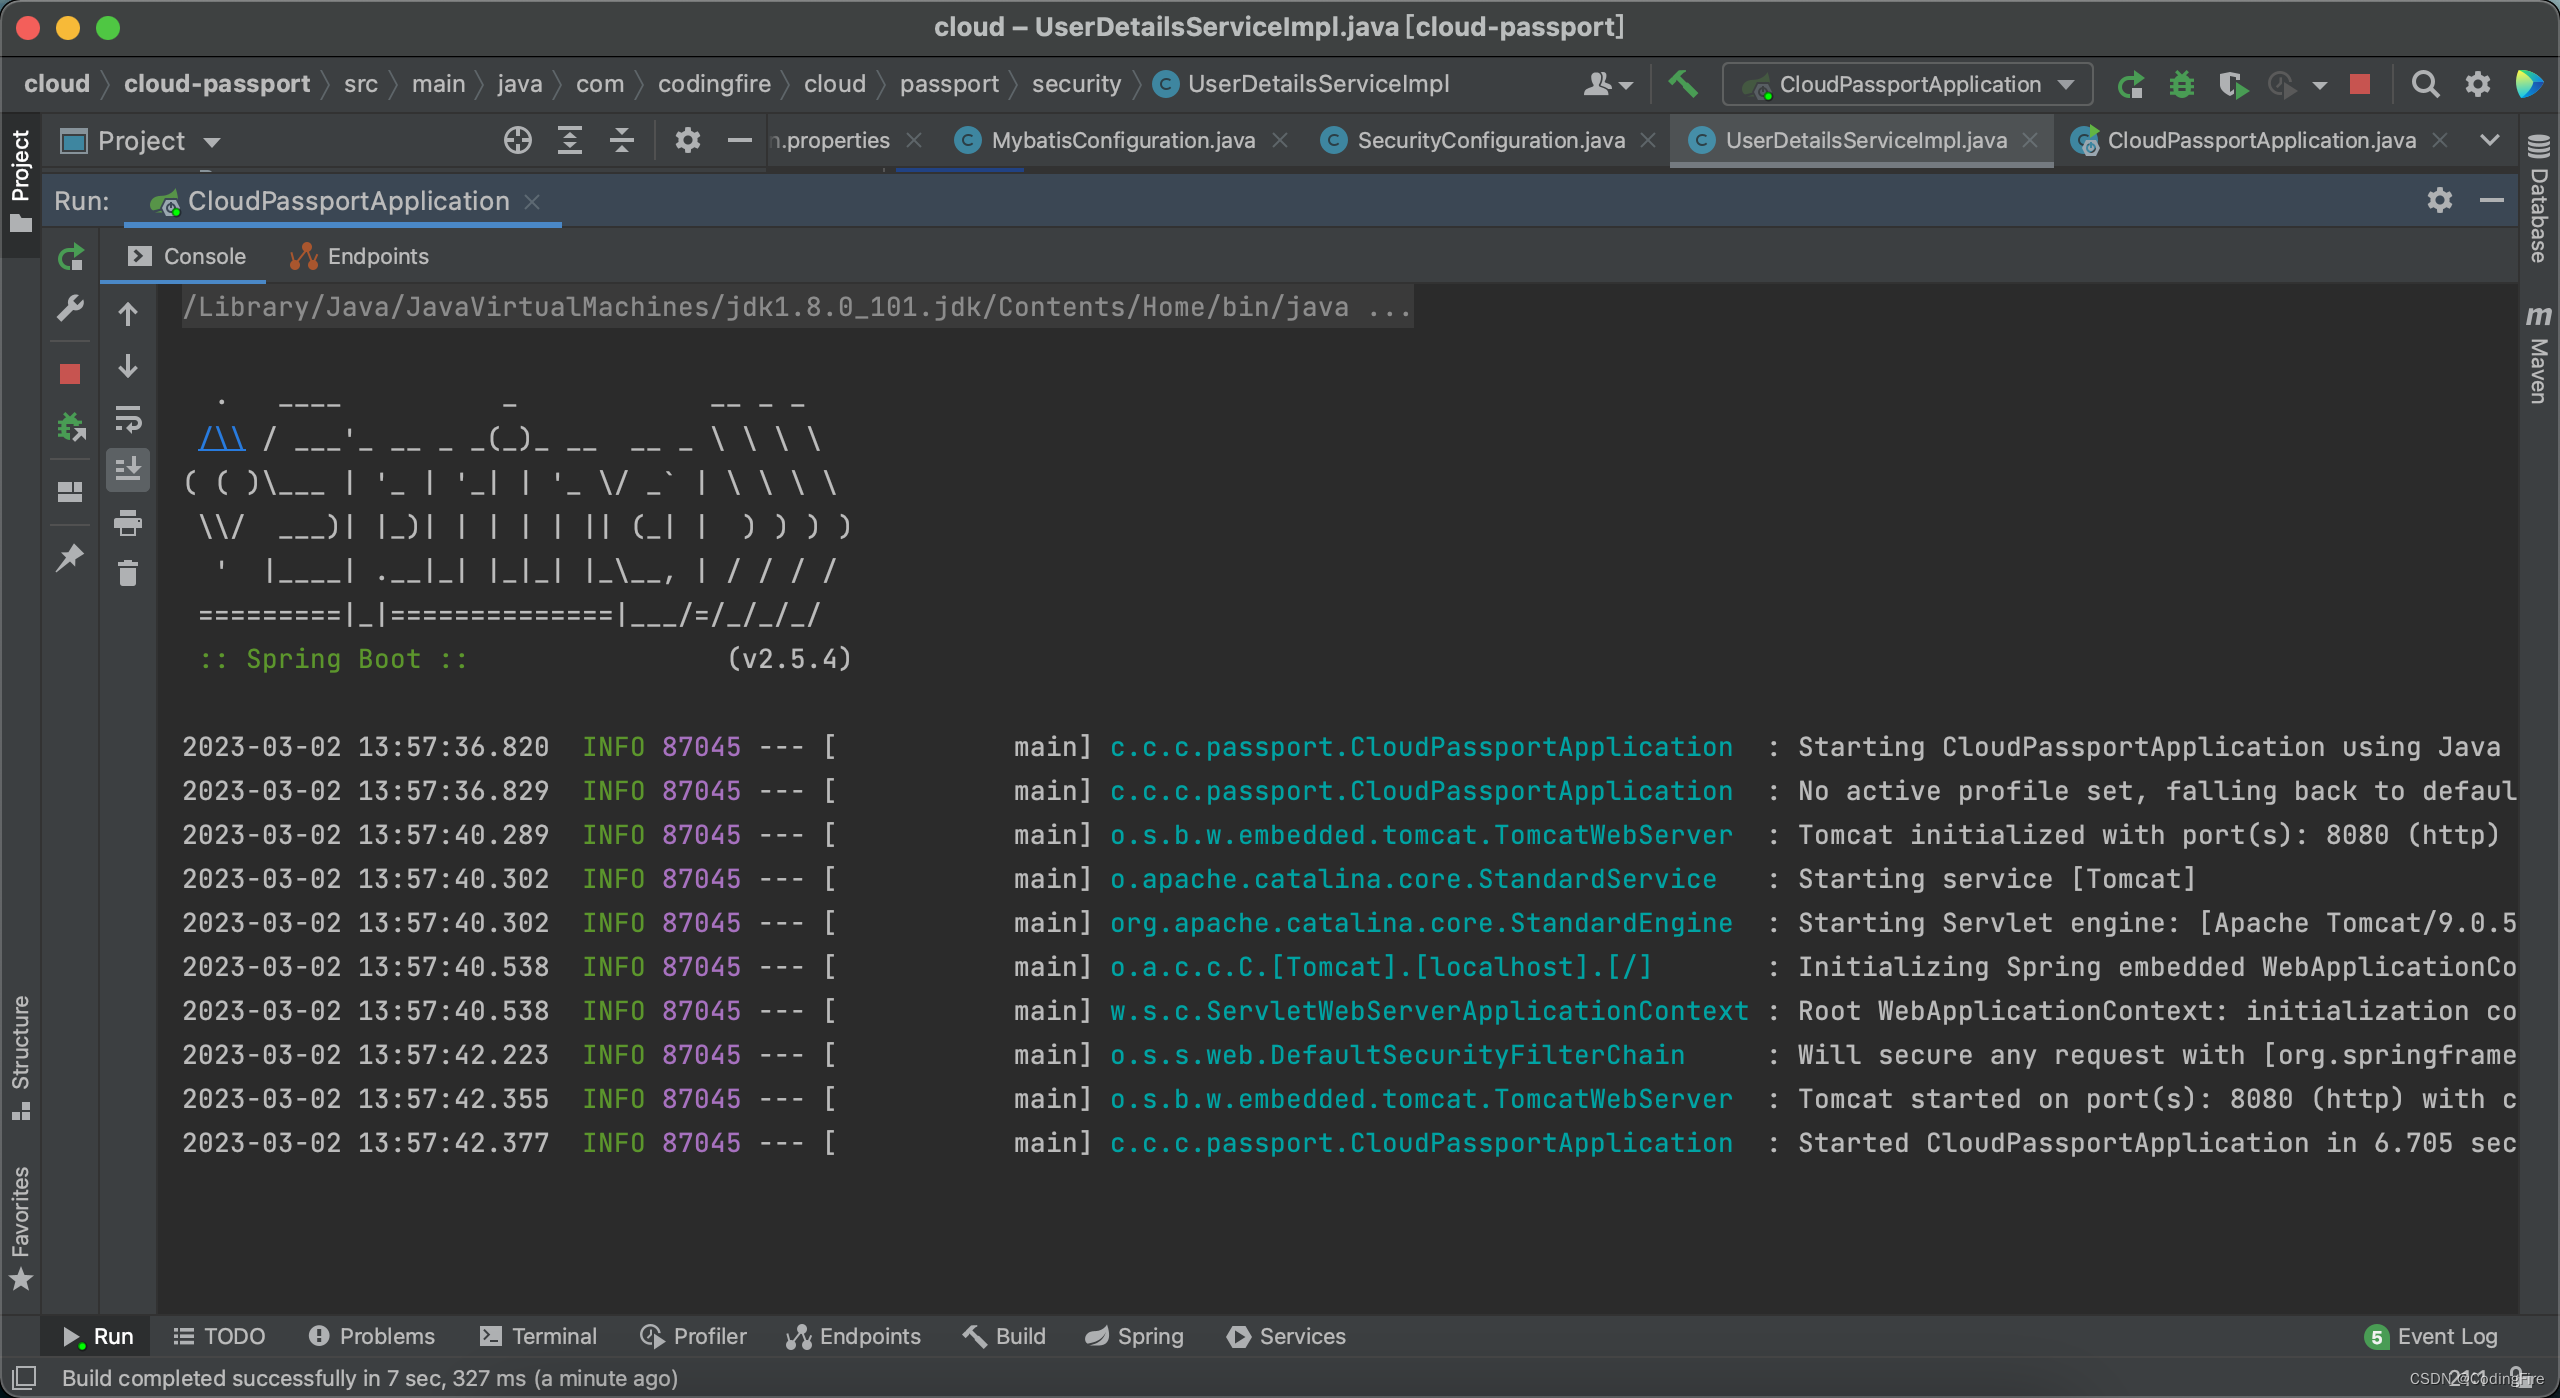
可以看到,随机密码已经不会再自动生成。
JWT
什么是JWT
Json web token (JWT), 是为了在网络应用环境间传递声明而执行的一种基于JSON的开放标准((RFC 7519).定义了一种简洁的,自包含的方法用于通信双方之间以JSON对象的形式安全的传递信息。因为数字签名的存在,这些信息是可信的,JWT可以使用HMAC算法或者是RSA的公私秘钥对进行签名。
客户端第1次访问服务器端时,是没有携带令牌访问的,当服务器进行响应时,会将JWT响应到客户端,客户端保存后,在第2次访问时就开始携带JWT进行请求,服务器收到请求中的JWT后就可以识别用户身份。
关于JWT的详细介绍,推荐这篇博客:SpringBoot集成JWT实现token验证 - 简书
为什么使用JWT
Spring Security默认使用Session机制存储用户信息,而HTTP协议是无状态协议,它不保存客户端信息,所以,同一个客户端的多次访问,等效于多个不同的客户端各访问一次服务端,为了保存用户信息,使服务器端能够识别客户端身份,我们推荐使用Token或其他技术,比如我们马上要说的JWT。
如何使用JWT
添加依赖
JWT只是一个概念,而实现生成JWT、解析JWT的框架却有不少,我们这里要使用的是jjwt,添加依赖如下:
<!-- https://mvnrepository.com/artifact/io.jsonwebtoken/jjwt -->
<dependency>
    <groupId>io.jsonwebtoken</groupId>
    <artifactId>jjwt</artifactId>
</dependency>
由于版本已经在主项目中控制,此处版本省略。
测试jwt
在测试类下创建JwtTests类,添加如下测试代码:
// 密钥,遵从越长越好,越乱越复杂越好的原则
    String secretKey = "asjdkahwehuqdyaoisdqwuphdabskbkansdjashdjasdh";

    @Test
    public void testGenerateJwt() {
        // Claims
        Map<String, Object> claims = new HashMap<>();
        claims.put("id", 01);
        claims.put("name", "codingfire");

        // JWT的组成部分:Header(头),Payload(载荷),Signature(签名)
        String jwt = Jwts.builder()
                // Header:指定算法与当前数据类型
                // 格式为: { "alg": 算法, "typ": "jwt" }
                .setHeaderParam(Header.CONTENT_TYPE, "HS256")
                .setHeaderParam(Header.TYPE, Header.JWT_TYPE)
                // Payload:通常包含Claims(自定义数据)和过期时间
                .setClaims(claims)
                .setExpiration(new Date(System.currentTimeMillis() + 5 * 60 * 1000))
                // Signature:由算法和密钥(secret key)这2部分组成
                .signWith(SignatureAlgorithm.HS256, secretKey)
                // 打包生成
                .compact();
        System.out.println(jwt);
    }
运行测试方法,输出加密后的密文如下:
eyJjdHkiOiJIUzI1NiIsInR5cCI6IkpXVCIsImFsZyI6IkhTMjU2In0.eyJuYW1lIjoiY29kaW5nZmlyZSIsImlkIjoxLCJleHAiOjE2Nzc3MzgyNzZ9.cz_cjbIT28GgZ5gQFkgOEAVmqjqFRW2MIliGftfT2As
你能看到里面有两个点,这是JWT加密的固定格式,需要你去看推荐的博文。
接着我们把这串密文用来解密试试看能得到什么:
    @Test
    public void testParseJwt() {
        String jwt = "eyJjdHkiOiJIUzI1NiIsInR5cCI6IkpXVCIsImFsZyI6IkhTMjU2In0.eyJuYW1lIjoiY29kaW5nZmlyZSIsImlkIjoxLCJleHAiOjE2Nzc3MzgyNzZ9.cz_cjbIT28GgZ5gQFkgOEAVmqjqFRW2MIliGftfT2As";
        Claims claims = Jwts.parser().setSigningKey(secretKey).parseClaimsJws(jwt).getBody();
        Object id = claims.get("id");
        Object name = claims.get("name");
        System.out.println("id=" + id);
        System.out.println("name=" + name);
    }
运行测试方法:
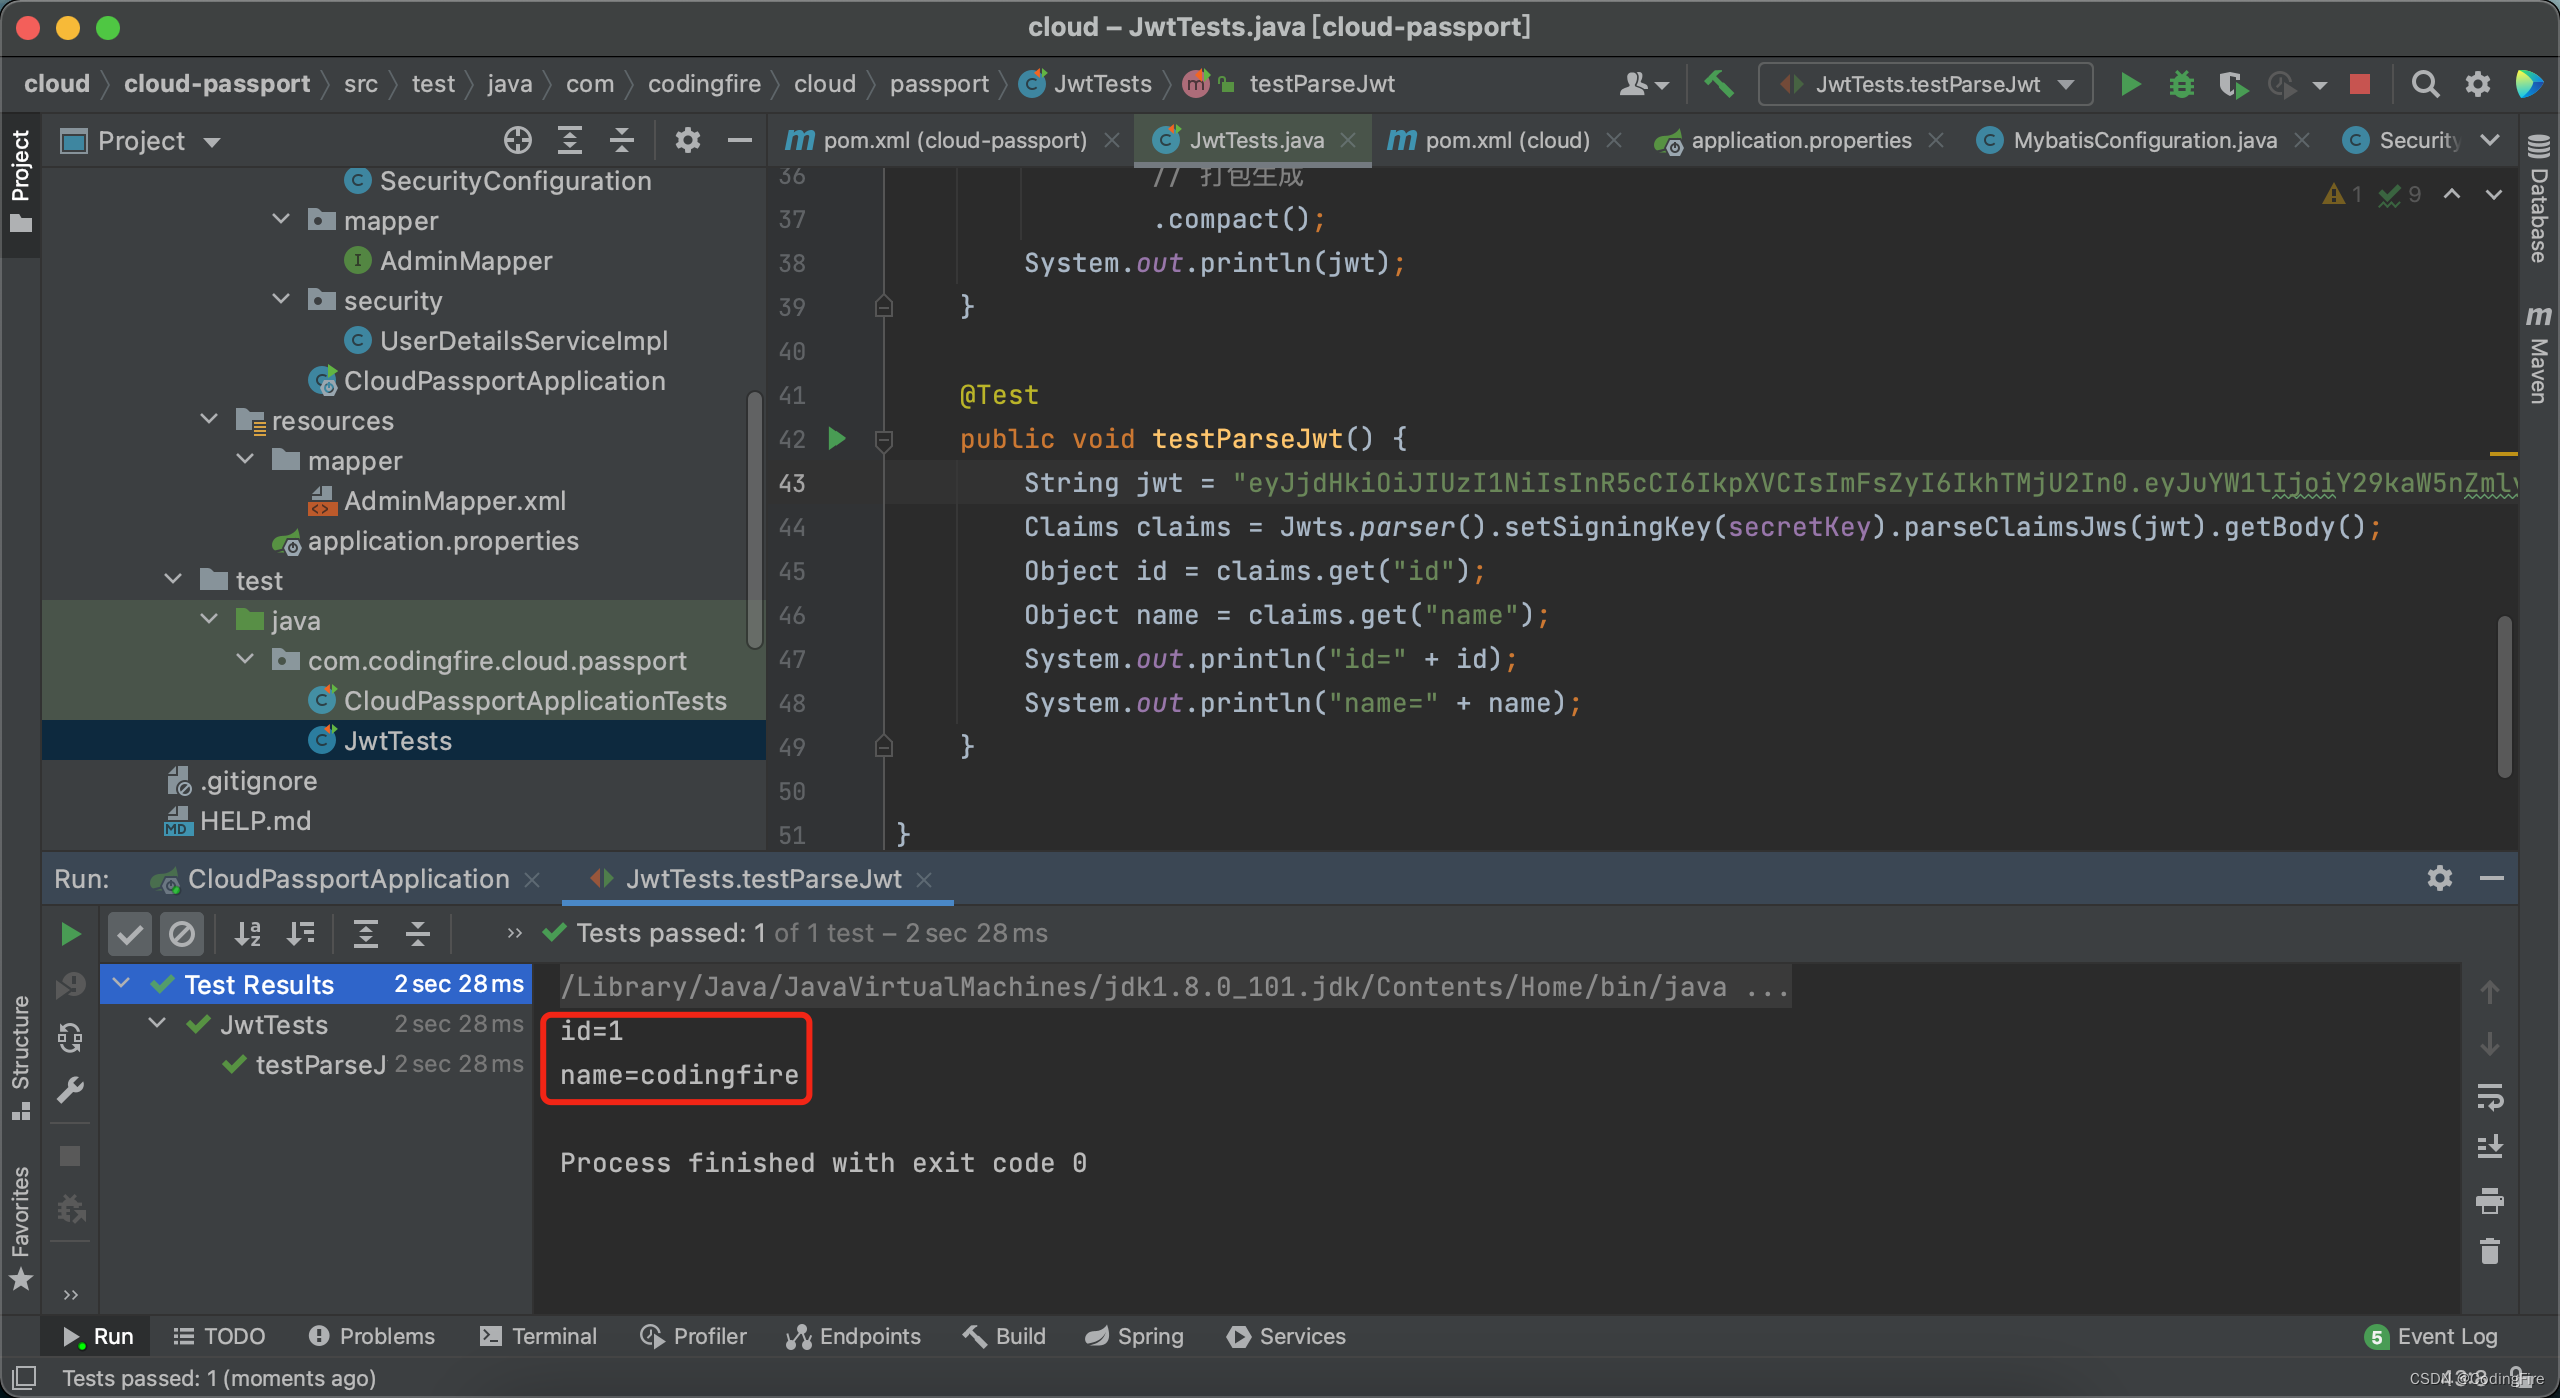
看到如图所示结果,你的jwt就已经引入成功。但,这还不够,我们是要在Spring Security中使用JWT,所以还有很多工作要做。
在Spring Security中使用JWT
自动装配AuthenticationManager对象
这是一个认证管理器,我们需要接管这个管理器,在SecurityConfiguration类中做一些操作,来看看最终的SecurityConfiguration类吧:
package com.codingfire.cloud.passport.config;

import org.springframework.context.annotation.Bean;
import org.springframework.context.annotation.Configuration;
import org.springframework.security.authentication.AuthenticationManager;
import org.springframework.security.config.annotation.web.builders.HttpSecurity;
import org.springframework.security.config.annotation.web.configuration.WebSecurityConfigurerAdapter;
import org.springframework.security.crypto.bcrypt.BCryptPasswordEncoder;
import org.springframework.security.crypto.password.PasswordEncoder;

@Configuration
public class SecurityConfiguration extends WebSecurityConfigurerAdapter {

    @Bean
    public PasswordEncoder passwordEncoder() {
        return new BCryptPasswordEncoder();
    }

    @Bean
    @Override
    public AuthenticationManager authenticationManagerBean() throws Exception {
        return super.authenticationManagerBean();
    }

    @Override
    protected void configure(HttpSecurity http) throws Exception {
        // 禁用防跨域攻击
        http.csrf().disable();

        // URL白名单
        String[] urls = {
                "/admins/login"
        };

        // 配置各请求路径的认证与授权
        http.authorizeRequests() // 请求需要授权才可以访问
                .antMatchers(urls) // 匹配一些路径
                .permitAll() // 允许直接访问(不需要经过认证和授权)
                .anyRequest() // 匹配除了以上配置的其它请求
                .authenticated(); // 都需要认证
    }
}
创建DTO类
在上面创建AdminLoginVO类的地方创建新的包dto,下面建新类:

创建接口类
在passport下创建service包,其下创建新接口类IAdminService:
package com.codingfire.cloud.passport.service;

import com.codingfire.cloud.commons.pojo.passport.dto.AdminLoginDTO;

public interface IAdminService {

    String login(AdminLoginDTO adminLoginDTO);

}
创建实现类
在service包下创建新包impl,其下创建实现类AdminServiceImpl:
package com.codingfire.cloud.passport.service.impl;

import com.codingfire.cloud.commons.pojo.passport.dto.AdminLoginDTO;
import com.codingfire.cloud.passport.service.IAdminService;
import org.springframework.beans.factory.annotation.Autowired;
import org.springframework.security.authentication.AuthenticationManager;
import org.springframework.security.authentication.UsernamePasswordAuthenticationToken;
import org.springframework.security.core.Authentication;
import org.springframework.stereotype.Service;


@Service
public class AdminServiceImpl implements IAdminService {

    @Autowired
    private AuthenticationManager authenticationManager;

    @Override
    public String login(AdminLoginDTO adminLoginDTO) {

        // 生成此用户数据的JWT
        String jwt = "This is a JWT."; // 临时
        return jwt;
    }
}
创建控制器类
在passport下创建controller包,其下创建AdminController:
package com.codingfire.cloud.passport.controller;

import com.codingfire.cloud.commons.pojo.passport.dto.AdminLoginDTO;
import com.codingfire.cloud.passport.service.IAdminService;
import org.springframework.beans.factory.annotation.Autowired;
import org.springframework.web.bind.annotation.RequestMapping;
import org.springframework.web.bind.annotation.RestController;

@RestController
@RequestMapping(value = "/admins", produces = "application/json; charset=utf-8")
public class AdminController {

    @Autowired
    private IAdminService adminService;

    @RequestMapping("/login")
    public String login(AdminLoginDTO adminLoginDTO) {
        String jwt = adminService.login(adminLoginDTO);
        return jwt;
    }

}
测试代码
启动项目,在浏览器输入:http://localhost:8080/admins/login?username= codingfire&password=123456
把用户名和密码改成你自己数据库中的用户名和密码,也可以写错的,然后进行多次尝试,看浏览器会返回什么:

看到此信息,就代表你的jwt接入成功了,但我们需要返回给客户端jwt数据,接下来我们实现这个过程。
返回客户端JWT数据
修改AdminServiceImpl实现类
package com.codingfire.cloud.passport.service.impl;

import com.codingfire.cloud.commons.pojo.passport.dto.AdminLoginDTO;
import com.codingfire.cloud.passport.service.IAdminService;
import io.jsonwebtoken.Header;
import io.jsonwebtoken.Jwts;
import io.jsonwebtoken.SignatureAlgorithm;
import org.springframework.beans.factory.annotation.Autowired;
import org.springframework.security.authentication.AuthenticationManager;
import org.springframework.security.authentication.UsernamePasswordAuthenticationToken;
import org.springframework.security.core.Authentication;
import org.springframework.security.core.userdetails.User;
import org.springframework.stereotype.Service;

import java.util.Date;
import java.util.HashMap;
import java.util.Map;


@Service
public class AdminServiceImpl implements IAdminService {

    @Autowired
    private AuthenticationManager authenticationManager;

    @Override
    public String login(AdminLoginDTO adminLoginDTO) {
        // 密钥,遵从越长越好,越乱越复杂越好的原则
        String secretKey = "asjdkahwehuqdyaoisdqwuphdabskbkansdjashdjasdh";

        // 准备被认证数据
        Authentication authentication
                = new UsernamePasswordAuthenticationToken(
                adminLoginDTO.getUsername(), adminLoginDTO.getPassword());
        // 调用AuthenticationManager验证用户名与密码
        // 执行认证,如果此过程没有抛出异常,则表示认证通过,如果认证信息有误,将抛出异常
        authenticationManager.authenticate(authentication);

        User user = (User) authentication.getPrincipal();
        System.out.println("从认证结果中获取Principal=" + user.getClass().getName());
        Map<String, Object> claims = new HashMap<>();
        claims.put("username", user.getUsername());
        claims.put("permissions", user.getAuthorities());
        System.out.println("即将向JWT中写入数据=" + claims);

        // JWT的组成部分:Header(头),Payload(载荷),Signature(签名)
        String jwt = Jwts.builder()
                // Header:指定算法与当前数据类型
                // 格式为: { "alg": 算法, "typ": "jwt" }
                .setHeaderParam(Header.CONTENT_TYPE, "HS256")
                .setHeaderParam(Header.TYPE, Header.JWT_TYPE)
                // Payload:通常包含Claims(自定义数据)和过期时间
                .setClaims(claims)
                .setExpiration(new Date(System.currentTimeMillis() + 5 * 60 * 1000))
                // Signature:由算法和密钥(secret key)这2部分组成
                .signWith(SignatureAlgorithm.HS256, secretKey)
                // 打包生成
                .compact();

        // 返回JWT数据
        return jwt;
    }
}
你会发现,这就是我们在测试类中测试的代码,基本上是直接贴过来的。
修改控制器类
package com.codingfire.cloud.passport.controller;

import com.codingfire.cloud.commons.pojo.passport.dto.AdminLoginDTO;
import com.codingfire.cloud.commons.restful.JsonResult;
import com.codingfire.cloud.passport.service.IAdminService;
import org.springframework.beans.factory.annotation.Autowired;
import org.springframework.web.bind.annotation.RequestMapping;
import org.springframework.web.bind.annotation.RestController;

@RestController
@RequestMapping(value = "/admins", produces = "application/json; charset=utf-8")
public class AdminController {

    @Autowired
    private IAdminService adminService;

    @RequestMapping("/login")
    public JsonResult<String> login(AdminLoginDTO adminLoginDTO) {
        String jwt = adminService.login(adminLoginDTO);
        return JsonResult.ok(jwt);
    }

}
修改返回值类型。
测试jwt数据返回
运行项目,在浏览器输入原来的html: http://localhost:8080/admins/login?username= codingfire&password=123456
浏览器将得到如下数据:
{"state":200,"message":"eyJjdHkiOiJIUzI1NiIsInR5cCI6IkpXVCIsImFsZyI6IkhTMjU2In0.eyJwZXJtaXNzaW9ucyI6Ilt7XCJhdXRob3JpdHlcIjpcIuWFqOmikemBk-WPr-WIoOmZpFwifSx7XCJhdXRob3JpdHlcIjpcIuWFqOmikemBk-WPr-etm-mAiVwifSx7XCJhdXRob3JpdHlcIjpcIuWFqOmikemBk-ivu-WPllwifSx7XCJhdXRob3JpdHlcIjpcIuWNlemikemBk-WPr-WIoOmZpFwifSx7XCJhdXRob3JpdHlcIjpcIuWNlemikemBk-WPr-etm-mAiVwifSx7XCJhdXRob3JpdHlcIjpcIuWNlemikemBk-ingueci1wifV0iLCJleHAiOjE2Nzc3NDkzOTUsInVzZXJuYW1lIjoiY29kaW5nZmlyZSJ9.dw4tk52xTXXQ4-D_qkZNhjL-RkHnzG6QKHe6Tq1j3_Y","data":null}
这里有个坑啊小伙伴们,如果你一直403,且控制台提示你Encoded password does not look like BCrypt,这是因为你的数据库存储的是明文密码,必须存储我们在测试类中使用BCryptPasswordEncoder加密后的密码。博主刚刚就犯了这个错,真实太容易忽略了,不知道该说啥,大家可别犯这个错。
使用其他URL被屏蔽怎么办
刚刚由于我们禁止了未登陆时直接进入Spring Security的登陆页,所以才需要添加了白名单解决屏蔽所有连接的问题。如果使用Knife4j,该怎么添加白名单呢?我们来看看:
        String[] urls = {
                "/admins/login",
                "/doc.html",  // 从本行开始,以下是新增
                "/**/*.js",
                "/**/*.css",
                "/swagger-resources",
                "/v2/api-docs",
                "/favicon.ico"
        };
使用请求头
得到JWT之后,在后续的请求中都需要在请求头中带上JWT,放在Authorization属性内,所以应该先判断请求头中是否有Authorization,而不能让请求直达服务器业务模块。这让我想到了前面讲过的过滤器,下面,我们在security包下创建一个过滤器类:
package com.codingfire.cloud.passport.security;

import org.springframework.stereotype.Component;
import org.springframework.web.filter.OncePerRequestFilter;

import javax.servlet.FilterChain;
import javax.servlet.ServletException;
import javax.servlet.http.HttpServletRequest;
import javax.servlet.http.HttpServletResponse;
import java.io.IOException;

@Component
public class JwtAuthenticationFilter extends OncePerRequestFilter {

    @Override
    protected void doFilterInternal(HttpServletRequest request, HttpServletResponse response, FilterChain filterChain) throws ServletException, IOException {
        System.out.println("JwtAuthenticationFilter.doFilterInternal()");
    }

}
过滤器类是需要注册后才能工作的,所以下一步对过滤器进行注册。用于验证JWT的过滤器应该运行在Spring Security处理登录的过滤器之前才能工作,所以需要在自定义的SecurityConfiguration中的configure()方法中将我们自定义的过滤器注册在Spring Security的相关过滤器之前。
同一个项目中允许存在多个过滤器,形成过滤器链,所以我们注册过滤器不需要单独建个类来处理了,而是在SecurityConfiguration类中进行,最终的类如下:
package com.codingfire.cloud.passport.config;

import com.codingfire.cloud.passport.security.JwtAuthenticationFilter;
import org.springframework.beans.factory.annotation.Autowired;
import org.springframework.context.annotation.Bean;
import org.springframework.context.annotation.Configuration;
import org.springframework.security.authentication.AuthenticationManager;
import org.springframework.security.config.annotation.method.configuration.EnableGlobalMethodSecurity;
import org.springframework.security.config.annotation.web.builders.HttpSecurity;
import org.springframework.security.config.annotation.web.configuration.WebSecurityConfigurerAdapter;
import org.springframework.security.crypto.bcrypt.BCryptPasswordEncoder;
import org.springframework.security.crypto.password.PasswordEncoder;
import org.springframework.security.web.authentication.UsernamePasswordAuthenticationFilter;

@Configuration
@EnableGlobalMethodSecurity(prePostEnabled = true)
public class SecurityConfiguration extends WebSecurityConfigurerAdapter {

    @Autowired
    private JwtAuthenticationFilter jwtAuthenticationFilter;

    @Bean
    public PasswordEncoder passwordEncoder() {
        return new BCryptPasswordEncoder();
    }

    @Bean
    @Override
    public AuthenticationManager authenticationManagerBean() throws Exception {
        return super.authenticationManagerBean();
    }

    @Override
    protected void configure(HttpSecurity http) throws Exception {
        // 禁用防跨域攻击
        http.csrf().disable();

        // URL白名单
        String[] urls = {
                "/admins/login",
                "/doc.html",  // 从本行开始,以下是新增
                "/**/*.js",
                "/**/*.css",
                "/swagger-resources",
                "/v2/api-docs",
                "/favicon.ico"
        };


        // 配置各请求路径的认证与授权
        http.authorizeRequests() // 请求需要授权才可以访问
                .antMatchers(urls) // 匹配一些路径
                .permitAll() // 允许直接访问(不需要经过认证和授权)
                .anyRequest() // 匹配除了以上配置的其它请求
                .authenticated(); // 都需要认证

        // 注册处理JWT的过滤器
        // 此过滤器必须在Spring Security处理登录的过滤器之前
        http.addFilterBefore(jwtAuthenticationFilter, UsernamePasswordAuthenticationFilter.class);
    }
}
我们重起项目,输入之前的url,不太对啊,下载了一个空的login文件,控制台看到了如下内容:
JwtAuthenticationFilter.doFilterInternal()
那是因为过滤器的工作还没有结束,他还需要实现以下功能:
- 尝试从请求头中获取JWT数据,如果无JWT数据,直接放行,Spring Security会进行下一步处理,比如,白名单的请求允许访问,其它请求禁止访问
- 如果存在JWT数据,应该尝试解析,解析失败,就是认证失败了,要求客户端重新登录,客户端就可以得到新的、正确的JWT,客户端在下一次提交请求时,使用新的JWT就可以正常访问
- 将解析得到的数据封装到
Authentication对象中,Spring Security的上下文中存储的数据类型就是Authentication类型 - 为避免存入1次后,Spring Security的上下文中始终存在
Authentication,在此过滤器执行的第一时间,应该先清除上一次的数据
下面,我们来看看自定义过滤器中还有哪些代码:
package com.codingfire.cloud.passport.security;

import com.alibaba.fastjson.JSON;
import com.codingfire.cloud.commons.restful.JsonResult;
import com.codingfire.cloud.commons.restful.ResponseCode;
import io.jsonwebtoken.*;
import org.springframework.security.authentication.UsernamePasswordAuthenticationToken;
import org.springframework.security.core.Authentication;
import org.springframework.security.core.authority.SimpleGrantedAuthority;
import org.springframework.security.core.context.SecurityContextHolder;
import org.springframework.stereotype.Component;
import org.springframework.util.StringUtils;
import org.springframework.web.filter.OncePerRequestFilter;

import javax.servlet.FilterChain;
import javax.servlet.ServletException;
import javax.servlet.http.HttpServletRequest;
import javax.servlet.http.HttpServletResponse;
import java.io.IOException;
import java.util.List;

/**
 * JWT过滤器:从请求头的Authorization中获取JWT中存入的用户信息
 * 并添加到Spring Security的上下文中
 * 以致于Spring Security后续的组件(包括过滤器等)能从上下文中获取此用户的信息
 * 从而验证是否已经登录、是否具有权限等
 */
@Component
public class JwtAuthenticationFilter extends OncePerRequestFilter {

    /**
     * JWT数据的密钥
     */
    private String secretKey = "fgfdsfadsfadsafdsafdsfadsfadsfdsafdasfdsafdsafdsafds4rttrefds";

    @Override
    protected void doFilterInternal(HttpServletRequest request,
                                    HttpServletResponse response,
                                    FilterChain filterChain) throws ServletException, IOException {
        System.out.println("JwtAuthenticationFilter.doFilterInternal()");
        // 清除Spring Security上下文中的数据
        // 避免此前曾经存入过用户信息,后续即使没有携带JWT,在Spring Security仍保存有上下文数据(包括用户信息)
        System.out.println("清除Spring Security上下文中的数据");
        SecurityContextHolder.clearContext();
        // 客户端提交请求时,必须在请求头的Authorization中添加JWT数据,这是当前服务器程序的规定,客户端必须遵守
        // 尝试获取JWT数据
        String jwt = request.getHeader("Authorization");
        System.out.println("从请求头中获取到的JWT=" + jwt);
        // 判断是否不存在jwt数据
        if (!StringUtils.hasText(jwt)) {
            // 不存在jwt数据,则放行,后续还有其它过滤器及相关组件进行其它的处理,例如未登录则要求登录等
            // 此处不宜直接阻止运行,因为“登录”、“注册”等请求本应该没有jwt数据
            System.out.println("请求头中无JWT数据,当前过滤器将放行");
            filterChain.doFilter(request, response); // 继续执行过滤器链中后续的过滤器
            return; // 必须
        }

        // 注意:此时执行时,如果请求头中携带了Authentication,日志中将输出,且不会有任何响应,因为当前过滤器尚未放行
        // 以下代码有可能抛出异常的
        // TODO 密钥和各个Key应该统一定义
        String username = null;
        String permissionsString = null;
        try {
            System.out.println("请求头中包含JWT,准备解析此数据……");
            Claims claims = Jwts.parser().setSigningKey(secretKey).parseClaimsJws(jwt).getBody();
            username = claims.get("username").toString();
            permissionsString = claims.get("permissions").toString();
            System.out.println("username=" + username);
            System.out.println("permissionsString=" + permissionsString);
        } catch (ExpiredJwtException e) {
            System.out.println("解析JWT失败,此JWT已过期:" + e.getMessage());
            JsonResult<Void> jsonResult = JsonResult.failed(
                    ResponseCode.ERR_JWT_EXPIRED, "您的登录已过期,请重新登录!");
            String jsonString = JSON.toJSONString(jsonResult);
            System.out.println("响应结果:" + jsonString);
            response.setContentType("application/json; charset=utf-8");
            response.getWriter().println(jsonString);
            return;
        } catch (MalformedJwtException e) {
            System.out.println("解析JWT失败,此JWT数据错误,无法解析:" + e.getMessage());
            JsonResult<Void> jsonResult = JsonResult.failed(
                    ResponseCode.ERR_JWT_MALFORMED, "获取登录信息失败,请重新登录!");
            String jsonString = JSON.toJSONString(jsonResult);
            System.out.println("响应结果:" + jsonString);
            response.setContentType("application/json; charset=utf-8");
            response.getWriter().println(jsonString);
            return;
        } catch (SignatureException e) {
            System.out.println("解析JWT失败,此JWT签名错误:" + e.getMessage());
            JsonResult<Void> jsonResult = JsonResult.failed(
                    ResponseCode.ERR_JWT_SIGNATURE, "获取登录信息失败,请重新登录!");
            String jsonString = JSON.toJSONString(jsonResult);
            System.out.println("响应结果:" + jsonString);
            response.setContentType("application/json; charset=utf-8");
            response.getWriter().println(jsonString);
            return;
        } catch (Throwable e) {
            System.out.println("解析JWT失败,异常类型:" + e.getClass().getName());
            e.printStackTrace();
            JsonResult<Void> jsonResult = JsonResult.failed(
                    ResponseCode.ERR_INTERNAL_SERVER_ERROR, "获取登录信息失败,请重新登录!");
            String jsonString = JSON.toJSONString(jsonResult);
            System.out.println("响应结果:" + jsonString);
            response.setContentType("application/json; charset=utf-8");
            response.getWriter().println(jsonString);
            return;
        }

        // 将此前从JWT中读取到的permissionsString(JSON字符串)转换成Collection<? extends GrantedAuthority>
        List<SimpleGrantedAuthority> permissions
                = JSON.parseArray(permissionsString, SimpleGrantedAuthority.class);
        System.out.println("从JWT中获取到的权限转换成Spring Security要求的类型:" + permissions);
        // 将解析得到的用户信息传递给Spring Security
        // 获取Spring Security的上下文,并将Authentication放到上下文中
        // 在Authentication中封装:用户名、null(密码)、权限列表
        // 因为接下来并不会处理认证,所以Authentication中不需要密码
        // 后续,Spring Security发现上下文中有Authentication时,就会视为已登录,甚至可以获取相关信息
        Authentication authentication
                = new UsernamePasswordAuthenticationToken(username, null, permissions);
        SecurityContextHolder.getContext().setAuthentication(authentication);
        System.out.println("将解析得到的用户信息传递给Spring Security");
        // 放行
        System.out.println("JwtAuthenticationFilter 放行");
        filterChain.doFilter(request, response);
    }

}
你可能在添加了这个类中的代码后会有一些报错,是因为错误码没有提前声明在枚举类,自己手动添加一下。
接着在SecurityConfiguration类上添加一个新的注解
@EnableGlobalMethodSecurity(prePostEnabled = true) // 新增
作用是开启“通过注解配置权限”的功能。
下面,我们来做个测试,在任何你需要设置权限的处理请求的方法上,通过@PreAuthorize注解来实现通过注解配置权限功能,你可以配置你想要的某种权限:
在AdminController类中添加如下方法:
    @GetMapping("/codingfire")
    @PreAuthorize("hasAuthority('单频道观看')") // 新增
    public String codingfire() {
        return "codingfire";
}重启项目,使用具有“单频道观看”权限的用户可以直接访问,不具有此权限的用户则不能访问,将出现403错误,可通过在线文档功能进行测试。
在线文档添加请求头方式:
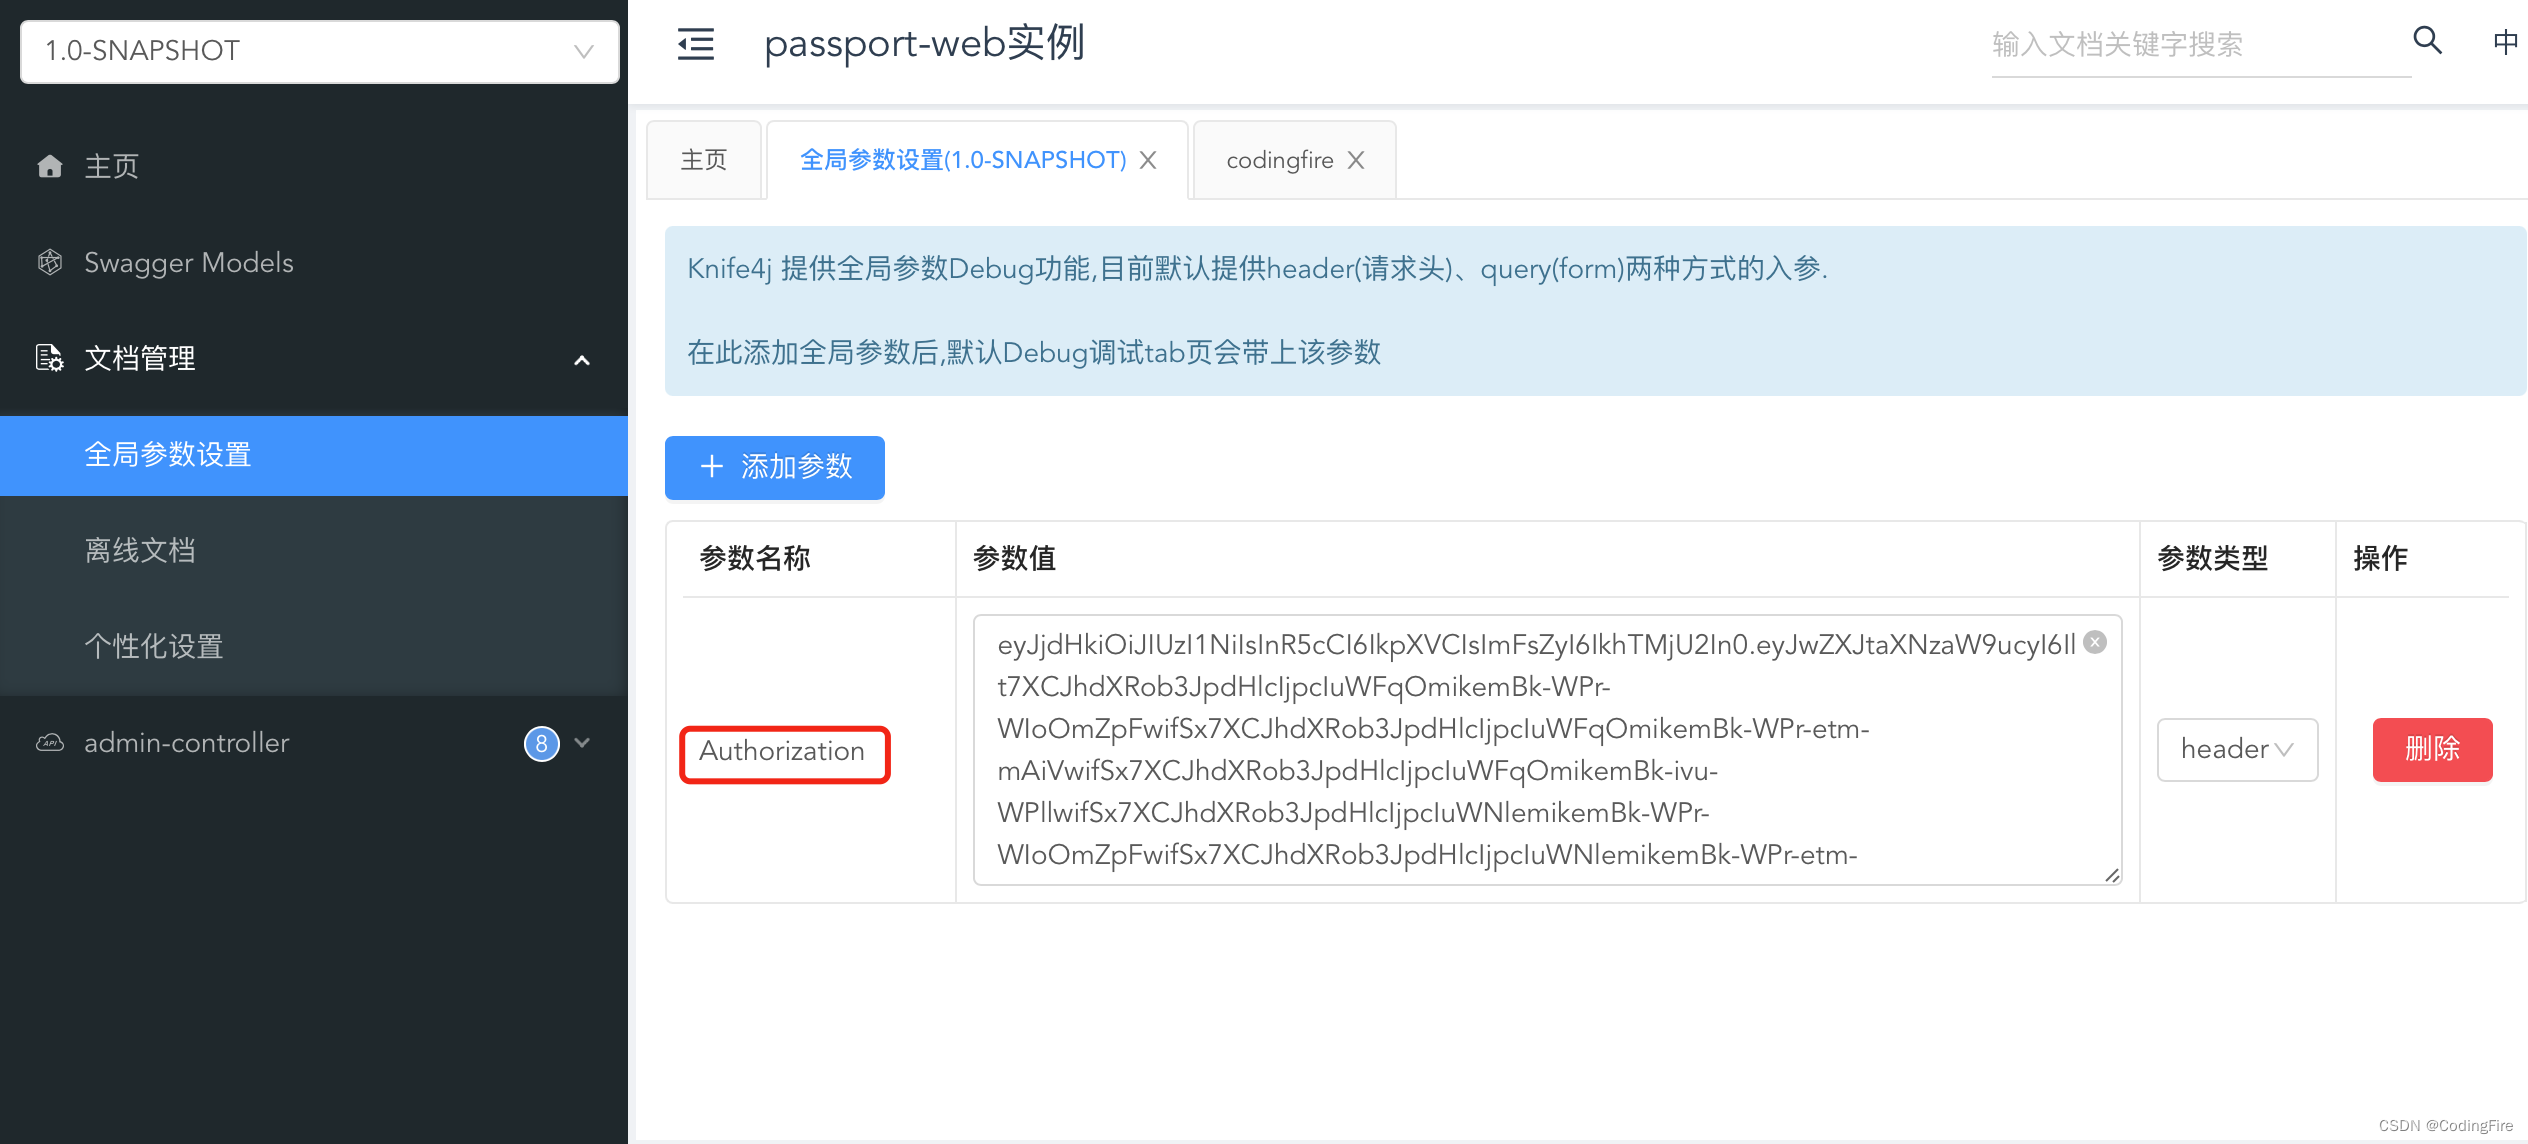
请求头内的数据使用正常用的登录后返回的JWT数据,登录的用户权限可自己调整,然后访问codingfire接口查看结果。博主就不再贴后续的内容了。
结语
虽然这篇博客结束了,但登录并没有结束,登录的整体逻辑还有不少,关键的部分本文已经全部列出,剩下的就要大家在实战中慢慢叠加了。3w字才码完,可以说是自己又学习了一遍,你会发现,很多东西都是套路的固定的,只有少部分东西是需要自己去写的,那就是涉及业务的部分。希望大家都能有所收获。


