普通
目录结构

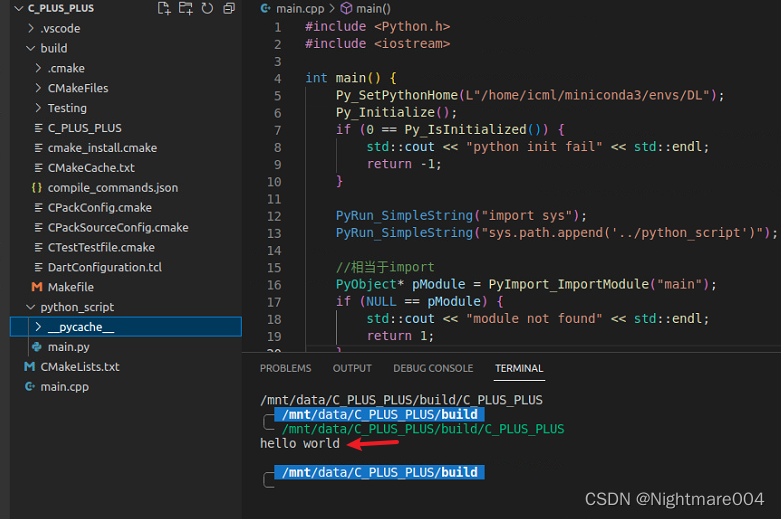
main.py
等会用c++调用func()
#!/usr/bin/env python
# _*_ coding:utf-8 _*_
import os


def func():
    print('hello world')


if __name__ == '__main__':
    func()
main.cpp
其中Py_SetPythonHome的路径是anaconda中环境的路径,最开始的L一定要加(因为代表wchar_t)
sys.path.append是用来找你的python文件路径的,其中
"
.
"
"."
"."表示可执行文件的路径
#include <Python.h>
#include <iostream>

int main() {
	Py_SetPythonHome(L"/home/icml/miniconda3/envs/DL");
	Py_Initialize();
	if (0 == Py_IsInitialized()) {
		std::cout << "python init fail" << std::endl;
		return -1;
	}

	PyRun_SimpleString("import sys");
	PyRun_SimpleString("sys.path.append('../python_script')");

	//相当于import
	PyObject* pModule = PyImport_ImportModule("main");
	if (NULL == pModule) {
		std::cout << "module not found" << std::endl;
		return -1;
	}

	PyObject* pFunc = PyObject_GetAttrString(pModule, "func");
	if (NULL == pFunc || 0 == PyCallable_Check(pFunc)) {
		std::cout << "not found function func" << std::endl;
		return -1;
	}


	PyObject_CallObject(pFunc, NULL);

	Py_Finalize();
	return 0;
}
CMakeLists.txt
稍微对照着修改一下就行
cmake_minimum_required(VERSION 3.0.0)
project(C_PLUS_PLUS VERSION 0.1.0)

# IF(NOT CMAKE_BUILD_TYPE)
#   SET(CMAKE_BUILD_TYPE Release)
# ENDIF()

set(PYTHON_INCLUDE_DIRS "/home/icml/miniconda3/envs/DL/include/python3.8")
INCLUDE_DIRECTORIES(${PYTHON_INCLUDE_DIRS})
link_directories("/home/icml/miniconda3/envs/DL/lib/python3.8/config-3.8-x86_64-linux-gnu")
set(PYTHON_LIBRARIES "/home/icml/miniconda3/envs/DL/lib/libpython3.8.so")
add_executable(${PROJECT_NAME} main.cpp)
target_link_libraries(${PROJECT_NAME} ${PYTHON_LIBRARIES})
我这里cmake最后产生到build目录里
opencv+numpy+pytorch
main.cpp
load_model
加载模型
get_predict_xy
用C++的opencv读图片,转numpy传入python
python再用pytorch预测,返回一个numpy
simple_test
用C++的opencv读图片,转numpy传入python
python直接传回来给C++,转opencv
顺带提一下,import_array()一定要写
#include <Python.h>
#include <iostream>
#include <string>
#include <numpy/arrayobject.h>
#include <opencv2/opencv.hpp>
void load_model(PyObject* pModule, const std::string& model_path){
PyObject* init_model = PyObject_GetAttrString(pModule, "init_model");
if (NULL == init_model || 0 == PyCallable_Check(init_model)) {
std::cout << "not found function init_model" << std::endl;
exit(-1);
}
PyObject *pArgs = PyTuple_New(1);
PyTuple_SetItem(pArgs, 0, Py_BuildValue("s", model_path.c_str()));
PyObject* result = PyObject_CallObject(init_model, pArgs);
if(NULL == result){
std::cout << "init_model failed" << std::endl;
exit(-1);
}
int return_value = -1;
PyArg_Parse(result, "i", &return_value);
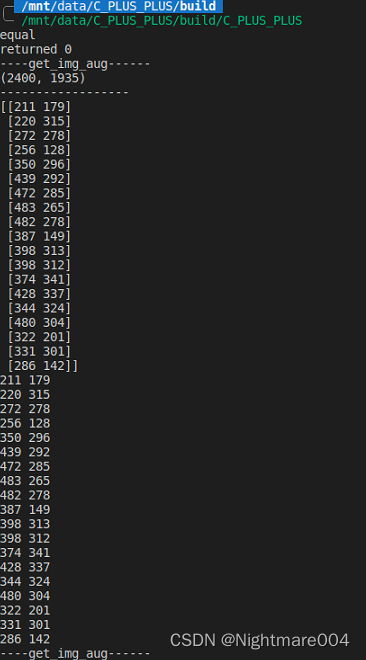
std::cout<<"returned "<<return_value<<std::endl;
}
void get_predict_xy(PyObject* pModule, const std::string& img_path){
cv::Mat img = cv::imread(img_path, 0);
PyObject* predict = PyObject_GetAttrString(pModule, "get_predict_xy");
if (NULL == predict || 0 == PyCallable_Check(predict)) {
std::cout << "not found function get_predict_xy" << std::endl;
exit(-1);
}
npy_intp dims[] = {img.rows, img.cols};
PyObject* pValue = PyArray_SimpleNewFromData(2, dims, NPY_UINT8, img.data);
PyObject *pArgs = PyTuple_New(1);
// PyTuple_SetItem(pArgs, 0, Py_BuildValue("s", img_path.c_str()));
PyTuple_SetItem(pArgs, 0, pValue);
PyObject* result = PyEval_CallObject(predict, pArgs);
if(NULL == result){
std::cout << "get_predict_xy failed" << std::endl;
exit(-1);
}
if(!PyArray_Check(result)){//None
std::cout << "didn't return numpy" << std::endl;
exit(-1);
}
PyArrayObject* ret_array;
PyArray_OutputConverter(result, &ret_array);
if(2 != PyArray_NDIM(ret_array)){
exit(-1);
}
npy_intp* shape = PyArray_SHAPE(ret_array);
int n = shape[0];
int m = shape[1];
cv::Mat return_key_points(n,m,CV_32F,PyArray_DATA(ret_array));
for(int i = 0; i < n; ++i){
for(int j = 0; j < m; ++j){
int* cur = reinterpret_cast<int*>(PyArray_GETPTR2(ret_array, i, j));
std::cout<<*cur<<' ';
}
std::cout<<std::endl;
}
//PyArray_GETPTR2
}
void simple_test(PyObject* pModule, const std::string& img_path){
cv::Mat img = cv::imread(img_path, 0);
PyObject* predict = PyObject_GetAttrString(pModule, "simple_test");
if (NULL == predict || 0 == PyCallable_Check(predict)) {
std::cout << "not found function simple_test" << std::endl;
exit(-1);
}
npy_intp dims[] = {img.rows, img.cols};
PyObject* pValue = PyArray_SimpleNewFromData(2, dims, NPY_UINT8, img.data);
PyObject *pArgs = PyTuple_New(1);
// PyTuple_SetItem(pArgs, 0, Py_BuildValue("s", img_path.c_str()));
PyTuple_SetItem(pArgs, 0, pValue);
PyObject* result = PyEval_CallObject(predict, pArgs);
if(NULL == result){
std::cout << "simple_test failed" << std::endl;
exit(-1);
}
if(!PyArray_Check(result)){//None
std::cout << "didn't return numpy" << std::endl;
exit(-1);
}
PyArrayObject* ret_array;
PyArray_OutputConverter(result, &ret_array);
if(2 != PyArray_NDIM(ret_array)){
exit(-1);
}
npy_intp* shape = PyArray_SHAPE(ret_array);
int n = shape[0];
int m = shape[1];
cv::Mat return_img(n,m,CV_8UC1,PyArray_DATA(ret_array));
// cv::imshow("test", return_img);
// cv::waitKey(0);
// cv::destroyAllWindows();
for(int i = 0; i < n; ++i){
uchar* data1 = img.ptr<uchar>(i);
uchar* data2 = return_img.ptr<uchar>(i);
for(int j = 0; j < m; ++j){
if(data1[j] != data2[j]){
std::cout<<"not equal"<<std::endl;
return;
}
}
}
std::cout<<"equal"<<std::endl;
}
int main() {
Py_SetPythonHome(L"/home/icml/miniconda3/envs/DL");
Py_Initialize();
if (0 == Py_IsInitialized()) {
std::cout << "python init fail" << std::endl;
return -1;
}
import_array(); //这句一定要写
PyRun_SimpleString("import sys");
PyRun_SimpleString("sys.path.append('../python_script')");
//相当于import
PyObject* pModule = PyImport_ImportModule("predict");
if (NULL == pModule) {
std::cout << "module not found" << std::endl;
return -1;
}
simple_test(pModule, "/mnt/data/datasets/landmark/ISBI2015_ceph/raw/001.bmp");
load_model(pModule, "../python_script/best.pth");
get_predict_xy(pModule, "/mnt/data/datasets/landmark/ISBI2015_ceph/raw/001.bmp");
get_predict_xy(pModule, "/mnt/data/datasets/landmark/ISBI2015_ceph/raw/001.bmp");
Py_Finalize();
return 0;
}
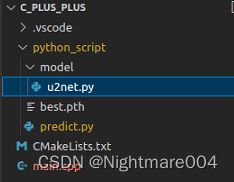
predict.py
UNet我没放出来
#!/usr/bin/env python
# _*_ coding:utf-8 _*_
import os
import numpy as np

from model.u2net import UNet
import torch
from cv2 import cv2
import imgaug.augmenters as iaa

model = UNet(in_channels=1, out_channels=19)
device = torch.device('cuda:0')
augmentation = iaa.Sequential([
    iaa.Resize({"width": 416, "height": 512})
])


def init_model(path):
    global model, device
    if not os.path.exists(path):
        print(f'not found {os.path.abspath(path)}')
        return -1
    model_state_dict = torch.load(path)
    model.load_state_dict(model_state_dict)
    model = model.to(device)
    return 0


def get_img_aug(img):
    global augmentation
    print('----get_img_aug------')
    print(img.shape)
    print('------------------')
    # img = cv2.imread(path, 0)  # 2490*1935
    img_aug = augmentation(image=img)
    img_aug = (img_aug - img_aug.min()) / (img_aug.max() - img_aug.min())
    img_aug = torch.FloatTensor(img_aug).unsqueeze(0).unsqueeze(0)  # torch.Size([1, 1, 512, 416])
    return img_aug


def get_heatmap_coordination_batch_numpy(heatmap):
    """
    get heatmap coordination by batch

    :param heatmap: (B,C,H,W) or (B,C,H,W,D) (C is the num of landmark)
    :return: coordination (B,C,2) or (B,C,3)
    """
    origin_shape = heatmap.shape
    heatmap = heatmap.reshape(*origin_shape[:2], -1)
    temp = np.argmax(heatmap, axis=-1)[..., np.newaxis]

    # unravel_index
    out = []
    for dim in reversed(origin_shape[2:]):
        out.append(temp % dim)
        temp = np.floor_divide(temp, dim)
    out = np.concatenate(out[::-1], axis=-1)
    return out


def get_predict_xy(img):
    global model
    # if not os.path.exists(path):
    #     return None
    img = get_img_aug(img).to(device)# 1 * 1 * 512 * 416
    output = model(img)['output'].to('cpu').detach().numpy() # 1 * 1 * 19 * 2
    predict_xy = get_heatmap_coordination_batch_numpy(output).squeeze(0)  # 19 * 2
    print(predict_xy)
    return predict_xy

def simple_test(img):
    return img

if __name__ == '__main__':
    path = '/mnt/data/datasets/landmark/ISBI2015_ceph/raw/001.bmp'
    init_model('best.pth')
    print('finish_init')
    print(get_predict_xy(path).shape)
    print(get_predict_xy(path).dtype)
CMakeLists.txt
cmake_minimum_required(VERSION 3.0.0)
project(C_PLUS_PLUS VERSION 0.1.0)

IF(NOT CMAKE_BUILD_TYPE)
  SET(CMAKE_BUILD_TYPE Release)
ENDIF()

set(PYTHON_INCLUDE_DIRS "/home/icml/miniconda3/envs/DL/include/python3.8")
set(NUMPY_INCLUDE_DIR "/home/icml/miniconda3/envs/DL/lib/python3.8/site-packages/numpy/core/include")
INCLUDE_DIRECTORIES(${PYTHON_INCLUDE_DIRS} ${NUMPY_INCLUDE_DIR})
link_directories("/home/icml/miniconda3/envs/DL/lib/python3.8/config-3.8-x86_64-linux-gnu")
set(PYTHON_LIBRARIES "/home/icml/miniconda3/envs/DL/lib/libpython3.8.so")
add_executable(${PROJECT_NAME} main.cpp)
target_link_libraries(${PROJECT_NAME} ${PYTHON_LIBRARIES})

find_package(OpenCV REQUIRED)
message(STATUS "OpenCV library status:")
message(STATUS "  config: ${OpenCV_DIR}")
message(STATUS "  version: ${OpenCV_VERSION}")
message(STATUS "  libraries: ${OpenCV_LIBS}")
message(STATUS "  include path: ${OpenCV_INCLUDE_DIRS}")
INCLUDE_DIRECTORIES(${OpenCV_INCLUDE_DIRS})
target_link_libraries(${PROJECT_NAME}  ${OpenCV_LIBS})
目录结构
运行