JPA之实体之间的关系
10.1.1实体类创建
注解的应用
@Table,@Entity
@Id+@GeneratedValue指定主键,@Column
P174 实体类编写规范
@Table(name = "t_user")
@Entity(name = "User")
public class User implements Serializable {
    @Id
    @GeneratedValue(strategy =GenerationType.AUTO)
    private Integer id;
    @Column(name = "name",length = 50,unique = false,insertable = true,updatable = true,table = "t_user",nullable = true)
    private String name;
+get和setter方法
+有参无参构造
+toSTring方法

    }
10.1.2jap的一对一,一对多,多对多用法
详见10.1.3-10.1.9
10.1.3单向一对一
P188 结合课本的单向一对一进行判断
本人理解的单向一对一的关系是。
往person表插入数据或者是删除数据的时候可以对idcard表进行操作。
但是操作idcard表无论如何也得不到person表的任何信息。
案例:person和身份证实体
- 通过用户可以找到身份证
- 通过身份证不能找到用户
- 关键是关系拥有方如何写
Person的代码:
@Table(name = "person")
@Entity(name="Person")
public class Person {
    @Id
    @GeneratedValue(strategy = GenerationType.AUTO)
    @Column(name = "personId")
    private Integer personId;

    @Column(name="personName")
    private String personName;
//    ================单项一对一==============
    @OneToOne(optional = true,cascade = CascadeType.ALL)
    @JoinColumn(name = "id_card")
    private IdCard idCard;

//构造函数+getter+setter+toString
...
}
IdCard的代码:就是编写一个实体类
@Table(name = "idcard")
@Entity(name="IdCard")
public class IdCard {
    @Id
    @GeneratedValue(strategy = GenerationType.AUTO)
    @Column(name = "cardId")
    private Integer cardId;

    @Column(name="cardName")
    private String cardName;
//构造函数+getter+setter
测试代码:
import com.lxz.demo2.entity.IdCard;
import com.lxz.demo2.entity.Person;

import javax.persistence.EntityManager;
import javax.persistence.EntityManagerFactory;
import javax.persistence.EntityTransaction;
import javax.persistence.Persistence;

public class PersonTest {
    public static void main(String[] args) {
        EntityManagerFactory factory=Persistence.createEntityManagerFactory("MyJPA2");
        EntityManager em=factory.createEntityManager();
        EntityTransaction transaction=em.getTransaction();
        transaction.begin();
        Person person=new Person(null,"李四");
        IdCard idCard=new IdCard(null,"李四身份证号码");
        person.setIdCard(idCard);
        em.persist(person);
        transaction.commit();
    }

}
效果图:


10.1.4双向一对一
1.双向一对一
本人理解的双向一对一的关系是。
往person表插入数据或者是删除数据的时候可以对idcard表进行操作。
操作idcard表同样也会操作person表。
1.Person表的代码不变
@Table(name = "t_person")
@Entity(name="Person1")
public class Person {
    @Id
    @GeneratedValue(strategy = GenerationType.AUTO)
    @Column(name = "personId")
    private Integer personId;

    @Column(name="personName")
    private String personName;
//    ================单项一对一==============
    @OneToOne(optional = true,cascade = CascadeType.ALL)
    @JoinColumn(name = "card_id")
    private IdCard idCard;}
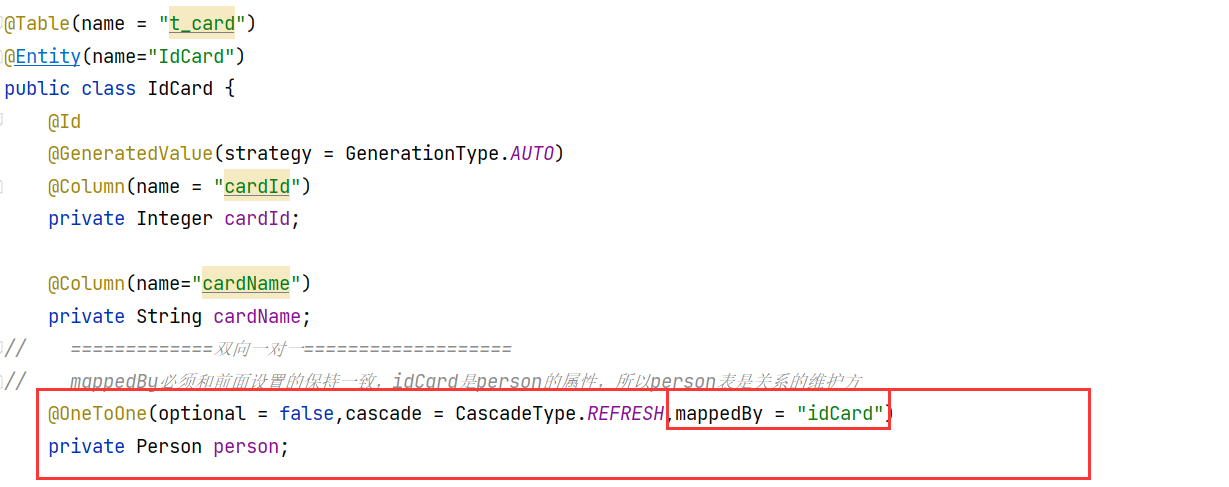
2.IdCard的代码
@Table(name = "t_card")
@Entity(name="IdCard")
public class IdCard {
    @Id
    @GeneratedValue(strategy = GenerationType.AUTO)
    @Column(name = "cardId")
    private Integer cardId;

    @Column(name="cardName")
    private String cardName;
//    =============双向一对一===================
//    mappedBy必须和前面设置的保持一致,idCard是person的属性,所以person表是关系的维护方
    @OneToOne(optional = false,cascade = CascadeType.REFRESH,mappedBy = "idCard")
    private Person person;

//构造函数+getter+setter
}
测试代码:
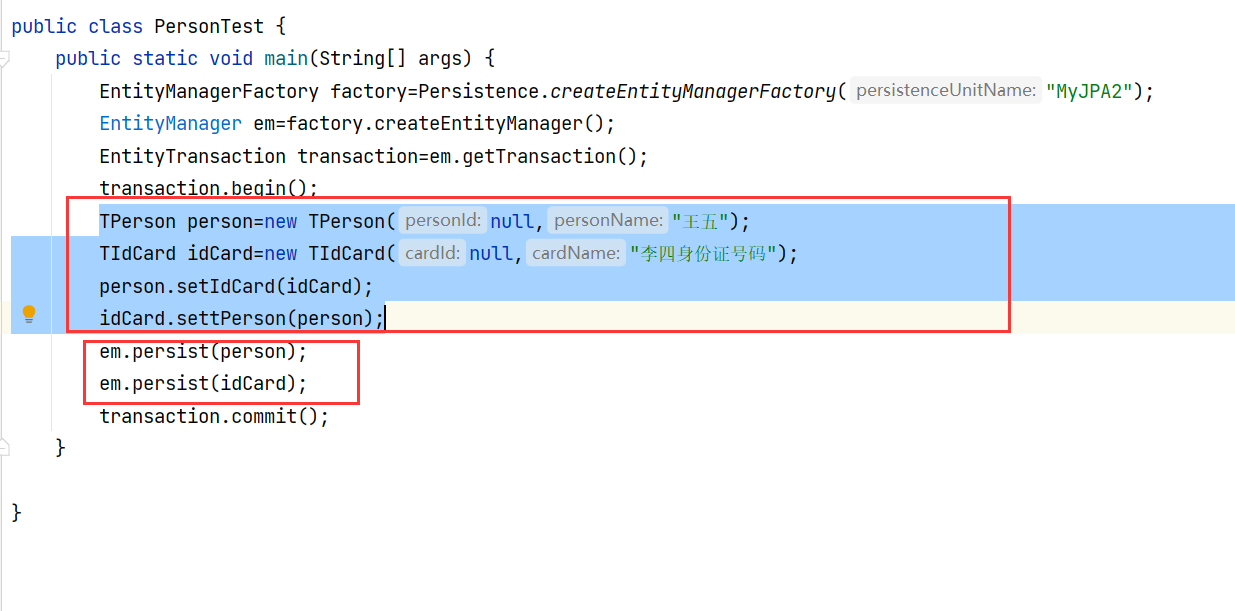
public class PersonTest {
    public static void main(String[] args) {
        EntityManagerFactory factory=Persistence.createEntityManagerFactory("MyJPA2");
        EntityManager em=factory.createEntityManager();
        EntityTransaction transaction=em.getTransaction();
        transaction.begin();
        TPerson person=new TPerson(null,"王五");
        TIdCard idCard=new TIdCard(null,"李四身份证号码");
        person.setIdCard(idCard);
        idCard.settPerson(person);
        em.persist(person);
        em.persist(idCard);
        transaction.commit();
    }

}
效果图:


10.1.5单向一对多
3.单向一对多
P193 单向一对多关系
案例:部门和员工的关系就是一对多的关系
- 外键关联
- 中间表
1.采用外键关联的方式
- 创建表
Department表:

Employee表:
- 创建
- 测试:
EntityManagerFactory factory=Persistence.createEntityManagerFactory("MyJPA2");
EntityManager em=factory.createEntityManager();
EntityTransaction transaction=em.getTransaction();
transaction.begin();
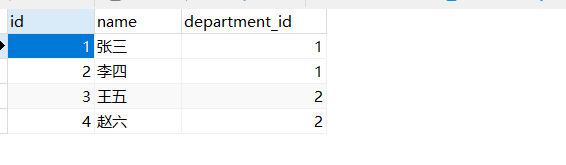
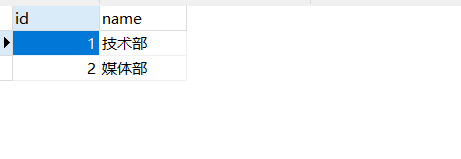
Department department=new Department(null,"媒体部",null);
Employee employee=new Employee(null,"王五");
Employee employee2=new Employee(null,"赵六");
List<Employee> e=new ArrayList<>();
e.add(employee);
e.add(employee2);
department.setEmployees(e);
em.persist(department);
transaction.commit();

2.基于中间表方式
案例:学生和选课之间的关系是就是单向一对一,一个学生可以选择多门课程可以形成一个中间表(选课信息表)
基于中间表的方式的区别和基于外键的区别在于配置单方(关系拥有方的时候需要配置中间表)
- student类
@Table(name = "student")
@Entity(name = "Student")
public class Student implements Serializable {
    @Id
    @GeneratedValue
    @Column(name = "id")
    private Integer id;
    @Column(name = "name")
    private String name;

    @OneToMany(cascade = CascadeType.ALL,fetch = FetchType.EAGER)
    @JoinTable(name="sc",
            joinColumns={
                    @JoinColumn(name = "student_id", referencedColumnName = "id")}
            ,inverseJoinColumns = {
            @JoinColumn(name = "course_id", referencedColumnName = "id")
    })

    List<Course> courses;
    }
- Course类:
@Entity(name = "Course")
@Table(name = "course")
public class Course {
    @Id
    @GeneratedValue
    @Column(name = "id")
    private Integer id;
    @Column(name = "name")
    private String name;
    }
- 测试类:
EntityManagerFactory factory=Persistence.createEntityManagerFactory("MyJPA2");
EntityManager em=factory.createEntityManager();
EntityTransaction transaction=em.getTransaction();
transaction.begin();
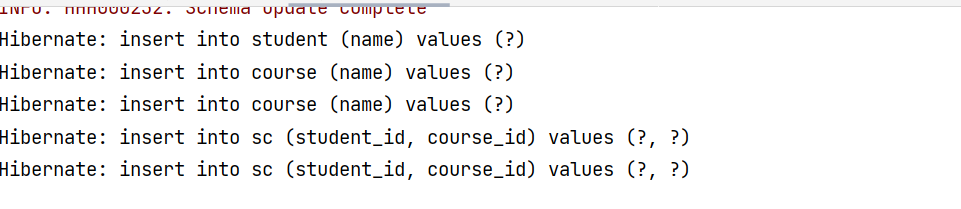
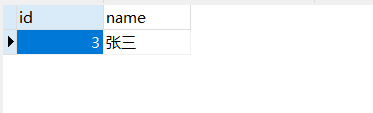
Student student=new Student(null,"张三",null);
Course c1=new Course(null,"数据库");
Course c2=new Course(null,"Java");
List<Course> e=new ArrayList<>();
e.add(c1);
e.add(c2);
student.setCourses(e);
em.persist(student);
transaction.commit();


查询测试:
  public static void main(String[] args) {
       EntityManagerFactory factory=Persistence.createEntityManagerFactory("MyJPA2");
       EntityManager em=factory.createEntityManager();
       Query query=em.createQuery("select student from Student student");
       System.out.println(query.getResultList());

   }

- 查多端的
public static void main(String[] args) {
       EntityManagerFactory factory=Persistence.createEntityManagerFactory("MyJPA2");
       EntityManager em=factory.createEntityManager();
       Query query=em.createQuery("select course from Course course");
       System.out.println(query.getResultList());

   }

10.1.6单向多对一/
1.单向一对多
10.1.7双向一对多/双向多对一
P193
从一方可以获取多方,从多方可以获取一方
@ManyToOne注解+@OneToMany注解的应用
- Student类:

@Table(name = "student")
@Entity(name = "Student")
public class Student implements Serializable {
    @Id
    @GeneratedValue
    @Column(name = "id")
    private Integer id;
    @Column(name = "name")
    private String name;

    @OneToMany(cascade = CascadeType.ALL,fetch = FetchType.EAGER)
    List<Course> courses;

    public Integer getId() {
        return id;
    }

    public void setId(Integer id) {
        this.id = id;
    }

    public String getName() {
        return name;
    }

    public void setName(String name) {
        this.name = name;
    }

    public List<Course> getCourses() {
        return courses;
    }

    public void setCourses(List<Course> courses) {
        this.courses = courses;
    }

    public Student() {
    }

    public Student(Integer id, String name, List<Course> courses) {
        this.id = id;
        this.name = name;
        this.courses = courses;
    }

    @Override
    public String toString() {
        return "Student{" +
                "id=" + id +
                ", name='" + name + '\'' +
                ", courses=" + courses +
                '}';
    }
}
- Course类
@Entity(name = "Course")
@Table(name = "course")
public class Course {
    @Id
    @GeneratedValue
    @Column(name = "id")
    private Integer id;
    @Column(name = "name")
    private String name;

    @ManyToOne
    @JoinTable(name="sc",
            joinColumns={
                    @JoinColumn(name = "course_id", referencedColumnName = "id")}
            ,inverseJoinColumns = {
            @JoinColumn(name = "student_id", referencedColumnName = "id")
    })
     private Student student;
    }
10.1.8单向多对多
P196
- Student表
@Entity(name = "Student")
@Table(name = "student")
public class Student {
    @Id
    @GeneratedValue
    private Integer id;
    private String name;
    @ManyToMany(cascade = CascadeType.ALL,fetch = FetchType.EAGER)
    @JoinTable(name = "sc")
    private Collection<Course> course=new ArrayList();


}
- course表:
@Entity(name = "theCourse")
@Table(name = "course")
public class Course {
    @Id
    @GeneratedValue
    private Integer id;
    private String name;
10.1.9双向多对多
P197
- Student
@Entity(name = "Student")
@Table(name = "student")
public class Student {
    @Id
    @GeneratedValue
    private Integer id;
    private String name;
    @ManyToMany(cascade = CascadeType.ALL,fetch = FetchType.EAGER)
    @JoinTable(name = "sc")
    private Collection<Course> courses=new ArrayList();
- Course
@Entity(name = "theCourse")
@Table(name = "course")
public class Course {
    @Id
    @GeneratedValue
    private Integer id;
    private String name;
    @ManyToMany(mappedBy = "courses",cascade = CascadeType.ALL)
    private Collection<Student> students;
10.1.10jpa单表的增删改查
- 目录
- 配置文件
<?xml version="1.0" encoding="UTF-8"?>
<persistence version="2.1"
xmlns="http://xmlns.jcp.org/xml/ns/persistence"
xmlns:xsi="http://www.w3.org/2001/XMLSchema-instance"
xsi:schemaLocation="http://xmlns.jcp.org/xml/ns/persistence
http://xmlns.jcp.org/xml/ns/persistence/persistence_2_1.xsd">
<persistence-unit name="MyJPA" transaction-type="RESOURCE_LOCAL">
<class>com.lxz.demo.entity.User</class>
<properties>
<!-- 标准配置方法,适用性高 -->
<property name="javax.persistence.jdbc.driver" value="com.mysql.cj.jdbc.Driver"/>
<property name="javax.persistence.jdbc.url" value="jdbc:mysql://localhost:3306/jdbc?useSSL=false&serverTimezone=GMT"/>
<property name="javax.persistence.jdbc.user" value="root"/>
<property name="javax.persistence.jdbc.password" value="root"/>
<!-- hibernate 的配置方法-->
<property name="hibernate.dialect" value="org.hibernate.dialect.MySQLDialect" />
<property name="hibernate.show_sql" value="true" />
<property name="hibernate.hbm2ddl.auto" value="update"/> <!--create,create-drop,update,validate -->
</properties>
</persistence-unit>
</persistence>
- 实体类
@Table(name = "t_user")
@Entity(name = "User")
public class User implements Serializable {
    @Id
    @GeneratedValue(strategy =GenerationType.AUTO)
    private Integer id;
    @Column(name = "name",length = 50,unique = false,insertable = true,updatable = true,table = "t_user",nullable = true)
    private String name;

    public Integer getId() {
        return id;
    }

    public void setId(Integer id) {
        this.id = id;
    }

    public String getName() {
        return name;
    }

    public void setName(String name) {
        this.name = name;
    }

    public User() {
    }

    public User(Integer id, String name) {
        this.id = id;
        this.name = name;
    }

    @Override
    public String toString() {
        return "User{" +
                "id=" + id +
                ", name='" + name + '\'' +
                '}';
    }
}
- UserDao类
public class UserDao {
    public boolean add(User user){
        try {
            EntityManagerFactory factory = Persistence.createEntityManagerFactory("MyJPA");
            EntityManager em = factory.createEntityManager();
            EntityTransaction transaction = em.getTransaction();
            transaction.begin();
            em.persist(user);
            transaction.commit();
            em.close();
            factory.close();
            return true;
        }
        catch (Exception e){
            e.printStackTrace();
            return false;
        }
    }

    public boolean update(User user){
        try {
            EntityManagerFactory factory = Persistence.createEntityManagerFactory("MyJPA");
            EntityManager em = factory.createEntityManager();
            EntityTransaction transaction = em.getTransaction();
            transaction.begin();
            em.merge(user);
            transaction.commit();
            em.close();
            factory.close();
            return true;
        }
        catch (Exception e){
            return false;
        }
    }
    public boolean delete(Integer id){
        try {
        EntityManagerFactory factory= Persistence.createEntityManagerFactory("MyJPA");
        EntityManager em=factory.createEntityManager();
        EntityTransaction transaction=em.getTransaction();
        transaction.begin();
        User user=new User();
        user=em.find(User.class,id);
        em.remove(user);
        transaction.commit();
        em.close();
        factory.close();
        return true;
        }
        catch (Exception e){
            return false;
        }
    }
    public User findById(Integer id){
        EntityManagerFactory factory= Persistence.createEntityManagerFactory("MyJPA");
        EntityManager em=factory.createEntityManager();
        EntityTransaction transaction=em.getTransaction();
        User user=em.find(User.class,id);
        em.close();
        factory.close();
        return user;
    }
    public List<User> findAll(){
        EntityManagerFactory factory= Persistence.createEntityManagerFactory("MyJPA");
        EntityManager em=factory.createEntityManager();
        EntityTransaction transaction=em.getTransaction();
        Query query =em.createQuery("select user from User user");
        List<User> users=query.getResultList();
        em.close();
        factory.close();
        return users;
    }
}
- 测试类
public class UserDaoTest {
    public static void main(String[] args) {
        UserDao userDao=new UserDao();
        System.out.println(userDao.add(new User(null,"add")));
        System.out.println(userDao.update(new User(2,"update")));
        System.out.println(userDao.delete(9));
        System.out.println(userDao.findAll());
        System.out.println(userDao.findById(2));
    }

}