基本思想:简单记录一下训练过程,数据集在coco基础上进行,进行筛选出杯子的数据集,然后进行训练,比较简单, 从coco数据集中筛选出杯子的数据集,然后在labelme数据集的基础上,转成paddleseg数据集,然后训练即可,生成的标签在代码中添加相应的数据格式,贴到txt即可
实验模型链接: https://pan.baidu.com/s/1w50vkX1kLfEhj2labK1xuQ?pwd=79qk 提取码: 79qk
一、数据集准备45、实例分割的labelme数据集转coco数据集以及coco数据集转labelme数据集、转paddleSeg数据集_sxj731533730的博客-CSDN博客_实例分割labelme
得到杯子数据集:链接: https://pan.baidu.com/s/1DWf7d1xWAscAKmIvNYJ9Rw?pwd=n2vs 提取码: n2vs
二、配置文件使用修改pp_liteseg_stdc1_camvid_960x720_10k.yml
ubuntu@ubuntu:~/PaddleSeg/configs/pp_liteseg$ cp pp_liteseg_stdc1_camvid_960x720_10k.yml pp_liteseg_stdc1_camvid_300x300_10k.yml
文件内容
batch_size: 6  # total: 4*6
iters: 100000

train_dataset:
  type: Dataset
  dataset_root: /home/ubuntu/PaddleSeg/paddleSegCup/datasets/train
  num_classes: 2 #backgroud+cup
  mode: train
  train_path: /home/ubuntu/PaddleSeg/paddleSegCup/datasets/train/train.txt
  transforms:
    - type: ResizeStepScaling
      min_scale_factor: 0.5
      max_scale_factor: 2.5
      scale_step_size: 0.25
    - type: RandomPaddingCrop
      crop_size: [300, 300]
    - type: RandomHorizontalFlip
    - type: RandomDistort
      brightness_range: 0.5
      contrast_range: 0.5
      saturation_range: 0.5
    - type: Normalize

val_dataset:
  type: Dataset
  dataset_root: /home/ubuntu/PaddleSeg/paddleSegCup/datasets/val
  num_classes: 2
  mode: val
  val_path: /home/ubuntu/PaddleSeg/paddleSegCup/datasets/val/val.txt
  transforms:
    - type: Normalize

optimizer:
  type: sgd
  momentum: 0.9
  weight_decay: 5.0e-4

lr_scheduler:
  type: PolynomialDecay
  learning_rate: 0.01
  end_lr: 0
  power: 0.9
  warmup_iters: 200
  warmup_start_lr: 1.0e-5

loss:
  types:
    - type: OhemCrossEntropyLoss
      min_kept: 250000   # batch_size * 300 * 300 // 16
    - type: OhemCrossEntropyLoss
      min_kept: 250000
    - type: OhemCrossEntropyLoss
      min_kept: 250000
  coef: [1, 1, 1]

model:
  type: PPLiteSeg
  backbone:
    type: STDC1
    pretrained: https://bj.bcebos.com/paddleseg/dygraph/PP_STDCNet1.tar.gz
  arm_out_chs: [32, 64, 128]
  seg_head_inter_chs: [32, 64, 64]
训练起来了
ubuntu@ubuntu:~/PaddleSeg$ ubuntu@ubuntu:~/PaddleSeg$ python3 train.py --config configs/pp_liteseg/pp_liteseg_stdc1_camvid_300x300_10k.yml --do_eval
2022-11-25 16:46:23 [INFO]
------------Environment Information-------------
platform: Linux-5.15.0-52-generic-x86_64-with-glibc2.29
Python: 3.8.10 (default, Jun 22 2022, 20:18:18) [GCC 9.4.0]
Paddle compiled with cuda: True
NVCC: Build cuda_11.1.TC455_06.29069683_0
cudnn: 8.2
GPUs used: 1
CUDA_VISIBLE_DEVICES: None
GPU: ['GPU 0: NVIDIA GeForce']
GCC: gcc (Ubuntu 9.4.0-1ubuntu1~20.04.1) 9.4.0
PaddleSeg: 2.6.0
PaddlePaddle: 2.3.2
OpenCV: 4.6.0
------------------------------------------------
2022-11-25 16:46:23 [INFO]
---------------Config Information---------------
batch_size: 6
iters: 10000
loss:
  coef:
  - 1
  - 1
  - 1
  types:
2022-11-25 16:54:19 [INFO]	[TRAIN] epoch: 1, iter: 10/10000, loss: 2.7239, lr: 0.000460, batch_cost: 0.2893, reader_cost: 0.01094, ips: 20.7363 samples/sec | ETA 00:48:10
2022-11-25 16:54:19 [INFO]	[TRAIN] epoch: 1, iter: 20/10000, loss: 2.3742, lr: 0.000959, batch_cost: 0.0511, reader_cost: 0.00009, ips: 117.4557 samples/sec | ETA 00:08:29
2022-11-25 16:54:20 [INFO]	[TRAIN] epoch: 1, iter: 30/10000, loss: 1.9726, lr: 0.001459, batch_cost: 0.0536, reader_cost: 0.00026, ips: 111.8903 samples/sec | ETA 00:08:54
2022-11-25 16:54:20 [INFO]	[TRAIN] epoch: 2, iter: 40/10000, loss: 1.7898, lr: 0.001958, batch_cost: 0.0576, reader_cost: 0.00709, ips: 104.1587 samples/sec | ETA 00:09:33
2022-11-25 16:54:21 [INFO]	[TRAIN] epoch: 2, iter: 50/10000, loss: 2.6318, lr: 0.002458, batch_cost: 0.0550, reader_cost: 0.00426, ips: 109.1434 samples/sec | ETA 00:09:06
2022-11-25 16:54:21 [INFO]	[TRAIN] epoch: 2, iter: 60/10000, loss: 2.1906, lr: 0.002957, batch_cost: 0.0566, reader_cost: 0.00435, ips: 106.0024 samples/sec | ETA 00:09:22
2022-11-25 16:54:22 [INFO]	[TRAIN] epoch: 2, iter: 70/10000, loss: 1.9887, lr: 0.003457, batch_cost: 0.0567, reader_cost: 0.00542, ips: 105.8548 samples/sec | ETA 00:09:22
2022-11-25 16:54:23 [INFO]	[TRAIN] epoch: 3, iter: 80/10000, loss: 2.3479, lr: 0.003956, batch_cost: 0.0611, reader_cost: 0.01129, ips: 98.2484 samples/sec | ETA 00:10:05
2022-11-25 16:54:23 [INFO]	[TRAIN] epoch: 3, iter: 90/10000, loss: 2.0537, lr: 0.004456, batch_cost: 0.0551, reader_cost: 0.00373, ips: 108.8724 samples/sec | ETA 00:09:06
2022-11-25 16:54:24 [INFO]	[TRAIN] epoch: 3, iter: 100/10000, loss: 2.0187, lr: 0.004955, batch_cost: 0.0539, reader_cost: 0.00411, ips: 111.2684 samples/sec | ETA 00:08:53
2022-11-25 16:54:24 [INFO]	[TRAIN] epoch: 3, iter: 110/10000, loss: 2.1657, lr: 0.005455, batch_cost: 0.0508, reader_cost: 0.00069, ips: 118.2217 samples/sec | ETA 00:08:21
训练完成和测试
ubuntu@ubuntu:~/PaddleSeg/output$ ls
iter_10000  iter_6000  iter_7000  iter_8000  iter_9000
三、测试
ubuntu@ubuntu:~/PaddleSeg$ python3 predict.py --config /home/ubuntu/PaddleSeg/configs/pp_liteseg/pp_liteseg_stdc1_camvid_300x300_10k.yml --model_path /home/ubuntu/PaddleSeg/output/best_model/model.pdparams --image_path /home/ubuntu/PaddleSeg/paddleSegCup/datasets/val/JPEGImages/000000002157.jpg
测试结果

三、转模型,从modelparam到onnx,然后到openvino,最后到blob
1)onnx转换,
model = SavedSegmentationNet(model) # add argmax to the last layer后续错误不用在意,这里测试以427 640 图片为例子,还是建议统一图片尺寸在训练,因为voc数据集大小不统一,所以,我只生成了一个427 640 的数据集
ubuntu@ubuntu:~/PaddleSeg$ python3 deploy/python/infer_onnx_trt.py --config /home/ubuntu/PaddleSeg/configs/pp_liteseg/pp_liteseg_stdc1_camvid_300x300_10k.yml --model_path /home/ubuntu/PaddleSeg/output/best_model/model.pdparams --save_dir ./saved --width 640 --height 427
W1126 10:34:49.439234 19118 gpu_resources.cc:61] Please NOTE: device: 0, GPU Compute Capability: 8.6, Driver API Version: 11.7, Runtime API Version: 11.1
W1126 10:34:49.441439 19118 gpu_resources.cc:91] device: 0, cuDNN Version: 8.2.
2022-11-26 10:34:50 [INFO]	Loading pretrained model from https://bj.bcebos.com/paddleseg/dygraph/PP_STDCNet1.tar.gz
2022-11-26 10:34:50 [INFO]	There are 145/145 variables loaded into STDCNet.
2022-11-26 10:34:50 [INFO]	Loading pretrained model from /home/ubuntu/PaddleSeg/output/best_model/model.pdparams
2022-11-26 10:34:50 [INFO]	There are 247/247 variables loaded into PPLiteSeg.
2022-11-26 10:34:50 [INFO]	Loaded trained params of model successfully
input shape: [1, 3, 427, 640]
out shape: (1, 1, 427, 640)


2022-11-26 09:15:33 [INFO]	Static PaddlePaddle model saved in ./saved/paddle_model_static_onnx_temp_dir.
[Paddle2ONNX] Start to parse PaddlePaddle model...
[Paddle2ONNX] Model file path: ./saved/paddle_model_static_onnx_temp_dir/model.pdmodel
[Paddle2ONNX] Paramters file path: ./saved/paddle_model_static_onnx_temp_dir/model.pdiparams
[Paddle2ONNX] Start to parsing Paddle model...
[Paddle2ONNX] Use opset_version = 11 for ONNX export.
[Paddle2ONNX] PaddlePaddle model is exported as ONNX format now.
2022-11-26 09:15:33 [INFO]	ONNX model saved in ./saved/pp_liteseg_stdc1_camvid_300x300_10k_model.onnx.
Completed export onnx model.
2)转openvino
ubuntu@ubuntu:~/PaddleSeg$ python3 /opt/intel/openvino_2021/deployment_tools/model_optimizer/mo.py --input_model /home/ubuntu/PaddleSeg/saved/pp_liteseg_stdc1_camvid_300x300_10k_model.onnx --output_dir /home/ubuntu/PaddleSeg/saved/FP16 --input_shape [1,3,427,640] --data_type FP16 --scale_values [127.5,127.5,127.5] --mean_values [127.5,127.5,127.5cmakelist.txt
cmake_minimum_required(VERSION 3.4.1)
set(CMAKE_CXX_STANDARD 14)


project(nanodet_demo)

find_package(OpenCV REQUIRED)
find_package(ngraph REQUIRED)
find_package(InferenceEngine REQUIRED)

include_directories(
        ${OpenCV_INCLUDE_DIRS}
        ${CMAKE_CURRENT_SOURCE_DIR}
        ${CMAKE_CURRENT_BINARY_DIR}
)

add_executable(nanodet_demo main.cpp )

target_link_libraries(
        nanodet_demo
        ${InferenceEngine_LIBRARIES}
        ${NGRAPH_LIBRARIES}
        ${OpenCV_LIBS}
)
main.cpp
#include <inference_engine.hpp>
#include <opencv2/core/core.hpp>
#include <opencv2/highgui/highgui.hpp>
#include <opencv2/imgproc/imgproc.hpp>
#include <iostream>
#include <vector>
#include <chrono>
#include <iomanip> // Header file needed to use setprecision

using namespace std;
using namespace cv;

void preprocess(cv::Mat image, InferenceEngine::Blob::Ptr &blob) {
    int img_w = image.cols;
    int img_h = image.rows;
    int channels = 3;

    InferenceEngine::MemoryBlob::Ptr mblob = InferenceEngine::as<InferenceEngine::MemoryBlob>(blob);
    if (!mblob) {
        THROW_IE_EXCEPTION << "We expect blob to be inherited from MemoryBlob in matU8ToBlob, "
                           << "but by fact we were not able to cast inputBlob to MemoryBlob";
    }
    // locked memory holder should be alive all time while access to its buffer happens
    auto mblobHolder = mblob->wmap();

    float *blob_data = mblobHolder.as<float *>();


    for (size_t c = 0; c < channels; c++) {
        for (size_t h = 0; h < img_h; h++) {
            for (size_t w = 0; w < img_w; w++) {
                blob_data[c * img_w * img_h + h * img_w + w] =
                        (float) image.at<cv::Vec3b>(h, w)[c];
            }
        }
    }
}

int main(int argc, char **argv) {
    cv::Mat bgr = cv::imread("/home/ubuntu/PaddleSeg/paddleSegCup/datasets/val/JPEGImages/000000002157.jpg");
    int orignal_width = bgr.cols;
    int orignal_height = bgr.rows;
    int target_width = 640;
    int target_height = 427;
    cv::Mat resize_img;
    cv::resize(bgr, resize_img, cv::Size(target_width, target_height));

    cv::Mat rgb;
    cv::cvtColor(resize_img, rgb, cv::COLOR_BGR2RGB);


    // resize_img.convertTo(resize_img, CV_32FC1, 1.0 / 255, 0);
    //resize_img = (resize_img - 0.5) / 0.5;
    auto start = chrono::high_resolution_clock::now();    //开始时间

    std::string input_name_ = "x";
    std::string output_name_ = "argmax_0.tmp_0";
    std::string model_path = "/home/ubuntu/PaddleSeg/saved/FP16/pp_liteseg_stdc1_camvid_300x300_10k_model.xml";
    InferenceEngine::Core ie;
    InferenceEngine::CNNNetwork model = ie.ReadNetwork(model_path);
    // prepare input settings
    InferenceEngine::InputsDataMap inputs_map(model.getInputsInfo());
    input_name_ = inputs_map.begin()->first;
    InferenceEngine::InputInfo::Ptr input_info = inputs_map.begin()->second;
    //input_info->setPrecision(InferenceEngine::Precision::FP32);
    //input_info->setLayout(InferenceEngine::Layout::NCHW);


    //prepare output settings
    InferenceEngine::OutputsDataMap outputs_map(model.getOutputsInfo());
    for (auto &output_info : outputs_map) {
        std::cout << "Output:" << output_info.first << std::endl;
        output_info.second->setPrecision(InferenceEngine::Precision::FP32);
    }

    //get network
    InferenceEngine::ExecutableNetwork network_ = ie.LoadNetwork(model, "CPU");
    InferenceEngine::InferRequest infer_request_ = network_.CreateInferRequest();
    InferenceEngine::Blob::Ptr input_blob = infer_request_.GetBlob(input_name_);
    preprocess(rgb, input_blob);

    // do inference
    infer_request_.Infer();
    const InferenceEngine::Blob::Ptr pred_blob = infer_request_.GetBlob(output_name_);

    auto m_pred = InferenceEngine::as<InferenceEngine::MemoryBlob>(pred_blob);
    auto m_pred_holder = m_pred->rmap();
    const float *pred = m_pred_holder.as<const float *>();
    auto end = chrono::high_resolution_clock::now();    //结束时间
    auto duration = (end - start).count();
    cout << "程序运行时间:" << std::setprecision(10) << duration / 1000000000.0 << "s"
         << ";  " << duration / 1000000.0 << "ms"
         << ";  " << duration / 1000.0 << "us"
         << endl;

    int w = target_height;
    int h = target_width;
    std::vector<int> vec_host_scores;
    for (int i = 0; i < w * h; i++) {
        vec_host_scores.emplace_back(pred[i]);
    }

    int num_class = 1;
    vector<int> color_map(num_class * 3);
    for (int i = 0; i < num_class; i++) {
        int j = 0;
        int lab = i;
        while (lab) {
            color_map[i * 3] |= ((lab >> 0 & 1) << (7 - j));
            color_map[i * 3 + 1] |= (((lab >> 1) & 1) << (7 - j));
            color_map[i * 3 + 2] |= (((lab >> 2) & 1) << (7 - j));
            j += 1;
            lab >>= 3;
        }
    }

    cv::Mat pseudo_img(w, h, CV_8UC3, cv::Scalar(0, 0, 0));
    for (int r = 0; r < w; r++) {
        for (int c = 0; c < h; c++) {
            int idx = vec_host_scores[r * h + c];
            pseudo_img.at<Vec3b>(r, c)[0] = color_map[idx * 3];
            pseudo_img.at<Vec3b>(r, c)[1] = color_map[idx * 3 + 1];
            pseudo_img.at<Vec3b>(r, c)[2] = color_map[idx * 3 + 2];
        }
    }
    cv::Mat result;
    cv::addWeighted(resize_img, 0.4, pseudo_img, 0.6, 0, result, 0);

    cv::imshow("pseudo_img", pseudo_img);
    cv::imwrite("pseudo_img.jpg", pseudo_img);
    cv::imshow("bgr", bgr);
    cv::imwrite("resize_img.jpg", resize_img);
    cv::imshow("result", result);
    cv::imwrite("result.jpg", result);
    cv::waitKey(0);
    return 0;

}
测试结果


3)转OAK模型
ubuntu@ubuntu:/opt/intel/openvino_2021/deployment_tools/tools$ sudo chmod 777 compile_tool/
ubuntu@ubuntu:/opt/intel/openvino_2021/deployment_tools/tools$ cd compile_tool/
ubuntu@ubuntu:/opt/intel/openvino_2021/deployment_tools/tools/compile_tool$ ./compile_tool -m /home/ubuntu/PaddleSeg/saved/FP16/pp_liteseg_stdc1_camvid_300x300_10k_model.xml -ip U8 -d MYRIAD -VPU_NUMBER_OF_SHAVES 4 -VPU_NUMBER_OF_CMX_SLICES 4
Inference Engine:
	IE version ......... 2021.4.1
	Build ........... 2021.4.1-3926-14e67d86634-releases/2021/4

Network inputs:
    x : U8 / NCHW
Network outputs:
    bilinear_interp_v2_13.tmp_0 : FP16 / NCHW
[Warning][VPU][Config] Deprecated option was used : VPU_MYRIAD_PLATFORM
Done. LoadNetwork time elapsed: 5132 ms
ubuntu@ubuntu:/opt/intel/openvino_2021/deployment_tools/tools/compile_tool$ cp pp_liteseg_stdc1_camvid_300x300_10k_model.blob /home/ubuntu/PaddleSeg/saved/FP16
cmakelist.txt 测试图片的
cmake_minimum_required(VERSION 3.16)
project(untitled15)
set(CMAKE_CXX_STANDARD 11)
find_package(OpenCV REQUIRED)
#message(STATUS ${OpenCV_INCLUDE_DIRS})
#添加头文件
include_directories(${OpenCV_INCLUDE_DIRS})
include_directories(${CMAKE_SOURCE_DIR}/include)
include_directories(${CMAKE_SOURCE_DIR}/include/utility)
#链接Opencv库
find_package(depthai CONFIG REQUIRED)
add_executable(untitled15 main.cpp include/utility/utility.cpp)
target_link_libraries(untitled15 ${OpenCV_LIBS}  depthai::opencv )
main.cpp
#include <stdio.h>
#include <string>
#include <iostream>
#include <opencv2/core/core.hpp>
#include <opencv2/highgui/highgui.hpp>
#include <opencv2/imgproc/imgproc.hpp>

#include "utility.hpp"
#include <vector>
#include "depthai/depthai.hpp"
using namespace std;
using namespace std::chrono;
using namespace cv;
int post_process(std::vector<int> vec_host_scores,cv::Mat resize_img,cv::Mat &result, vector<int> color_map,int w,int h){


    cv::Mat pseudo_img(w, h, CV_8UC3, cv::Scalar(0, 0, 0));
    for (int r = 0; r < w; r++) {
        for (int c = 0; c < h; c++) {
            int idx = vec_host_scores[r*h  + c];
            pseudo_img.at<Vec3b>(r, c)[0] = color_map[idx * 3];
            pseudo_img.at<Vec3b>(r, c)[1] = color_map[idx * 3 + 1];
            pseudo_img.at<Vec3b>(r, c)[2] = color_map[idx * 3 + 2];
        }
    }

    cv::addWeighted(resize_img, 0.4, pseudo_img, 0.6, 0, result, 0);
    //cv::imshow("pseudo_img", pseudo_img);
    cv::imwrite(".pseudo_img.jpg", pseudo_img);
    // cv::imshow("bgr", resize_img);
    cv::imwrite("resize_img.jpg", resize_img);
    //cv::imshow("result", result);
    cv::imwrite("result.jpg", result);
    //cv::waitKey(0);
    return 0;
}


int main(int argc, char **argv) {
    int num_class = 256;
    vector<int> color_map(num_class * 3);
    for (int i = 0; i < num_class; i++) {
        int j = 0;
        int lab = i;
        while (lab) {
            color_map[i * 3] |= ((lab >> 0 & 1) << (7 - j));
            color_map[i * 3 + 1] |= (((lab >> 1) & 1) << (7 - j));
            color_map[i * 3 + 2] |= (((lab >> 2) & 1) << (7 - j));
            j += 1;
            lab >>= 3;
        }
    }
    int target_width=427;
    int target_height=640;
    dai::Pipeline pipeline;
    //定义
    auto cam = pipeline.create<dai::node::XLinkIn>();
    cam->setStreamName("inFrame");
    auto net = pipeline.create<dai::node::NeuralNetwork>();
    dai::OpenVINO::Blob blob("/opt/intel/openvino_2021.4.689/deployment_tools/tools/compile_tool/pp_liteseg_stdc1_camvid_300x300_10k_model.blob");
    net->setBlob(blob);
    net->input.setBlocking(false);

    //基本熟练明白oak的函数使用了
    cam->out.link(net->input);


    //定义输出
    auto xlinkParserOut = pipeline.create<dai::node::XLinkOut>();
    xlinkParserOut->setStreamName("parseOut");
    auto xlinkoutOut = pipeline.create<dai::node::XLinkOut>();
    xlinkoutOut->setStreamName("out");

    auto xlinkoutpassthroughOut = pipeline.create<dai::node::XLinkOut>();

    xlinkoutpassthroughOut->setStreamName("passthrough");


    net->out.link(xlinkParserOut->input);

    net->passthrough.link(xlinkoutpassthroughOut->input);

    //结构推送相机
    dai::Device device(pipeline);
    //取帧显示
    auto inqueue = device.getInputQueue("inFrame");//maxsize 代表缓冲数据
    auto detqueue = device.getOutputQueue("parseOut", 8, false);//maxsize 代表缓冲数据

    bool printOutputLayersOnce=true;

    cv::Mat frame=cv::imread("/home/ubuntu/PaddleSeg/paddleSegCup/datasets/val/JPEGImages/000000002157.jpg");
    while(true) {

        if(frame.empty()) break;

        auto img = std::make_shared<dai::ImgFrame>();
        frame = resizeKeepAspectRatio(frame, cv::Size(target_height, target_width), cv::Scalar(0));
        toPlanar(frame, img->getData());
        img->setTimestamp(steady_clock::now());
        img->setWidth(target_height);
        img->setHeight(target_width);
        inqueue->send(img);

        auto inNN = detqueue->get<dai::NNData>();
        if( printOutputLayersOnce&&inNN) {
            std::cout << "Output layer names: ";
            for(const auto& ten : inNN->getAllLayerNames()) {
                std::cout << ten << ", ";
            }
            std::cout << std::endl;
            printOutputLayersOnce = false;
        }
        cv::Mat result;
        auto pred=inNN->getLayerInt32(inNN->getAllLayerNames()[0]);

        post_process(pred,frame,result,color_map,target_width,target_height);
        cv::imshow("demo", frame);
        cv::imshow("result", result);
        cv::imwrite("result.jpg",result);
        int key = cv::waitKey(1);
        if(key == 'q' || key == 'Q') return 0;
    }

//    while (true) {
//
//
//        auto ImgFrame = outqueue->get<dai::ImgFrame>();
//        auto frame = ImgFrame->getCvFrame();
//
//        auto inNN = detqueue->get<dai::NNData>();
//        if( printOutputLayersOnce&&inNN) {
//            std::cout << "Output layer names: ";
//            for(const auto& ten : inNN->getAllLayerNames()) {
//                std::cout << ten << ", ";
//            }
//            std::cout << std::endl;
//            printOutputLayersOnce = false;
//        }
//        cv::Mat result;
//        auto pred=inNN->getLayerInt32(inNN->getAllLayerNames()[0]);
//
//        post_process(pred,frame,result,color_map,target_width,target_height);
//        cv::imshow("demo", frame);
//        cv::imshow("result", result);
//        cv::imwrite("result.jpg",result);
//        cv::waitKey(1);
//
//
//    }


    return 0;
}
测试结果


实际测试视频472 640 的帧率在16fps左右
#include <stdio.h>
#include <string>
#include <iostream>
#include <opencv2/core/core.hpp>
#include <opencv2/highgui/highgui.hpp>
#include <opencv2/imgproc/imgproc.hpp>

#include "utility.hpp"
#include <vector>
#include "depthai/depthai.hpp"

using namespace std;
using namespace std::chrono;
using namespace cv;

int post_process(std::vector<int> vec_host_scores, cv::Mat resize_img, cv::Mat &result, vector<int> color_map, int w,
                 int h) {


    cv::Mat pseudo_img(w, h, CV_8UC3, cv::Scalar(0, 0, 0));
    for (int r = 0; r < w; r++) {
        for (int c = 0; c < h; c++) {
            int idx = vec_host_scores[r * h + c];
            pseudo_img.at<Vec3b>(r, c)[0] = color_map[idx * 3];
            pseudo_img.at<Vec3b>(r, c)[1] = color_map[idx * 3 + 1];
            pseudo_img.at<Vec3b>(r, c)[2] = color_map[idx * 3 + 2];
        }
    }

    cv::addWeighted(resize_img, 0.4, pseudo_img, 0.6, 0, result, 0);
    //cv::imshow("pseudo_img", pseudo_img);
    cv::imwrite(".pseudo_img.jpg", pseudo_img);
    // cv::imshow("bgr", resize_img);
    cv::imwrite("resize_img.jpg", resize_img);
    //cv::imshow("result", result);
    cv::imwrite("result.jpg", result);
    //cv::waitKey(0);
    return 0;
}


int main(int argc, char **argv) {
    int num_class = 256;
    vector<int> color_map(num_class * 3);
    for (int i = 0; i < num_class; i++) {
        int j = 0;
        int lab = i;
        while (lab) {
            color_map[i * 3] |= ((lab >> 0 & 1) << (7 - j));
            color_map[i * 3 + 1] |= (((lab >> 1) & 1) << (7 - j));
            color_map[i * 3 + 2] |= (((lab >> 2) & 1) << (7 - j));
            j += 1;
            lab >>= 3;
        }
    }
    int target_width = 427;
    int target_height = 640;
    dai::Pipeline pipeline;
    //定义
    auto cam = pipeline.create<dai::node::ColorCamera>();
    cam->setBoardSocket(dai::CameraBoardSocket::RGB);
    cam->setResolution(dai::ColorCameraProperties::SensorResolution::THE_1080_P);
    cam->setPreviewSize(target_height, target_width);  // NN input
    cam->setInterleaved(false);

    auto net = pipeline.create<dai::node::NeuralNetwork>();
    dai::OpenVINO::Blob blob("/home/ubuntu/PaddleSeg/saved/FP16/pp_liteseg_stdc1_camvid_300x300_10k_model.blob");
    net->setBlob(blob);
    net->input.setBlocking(false);

    //基本熟练明白oak的函数使用了
    cam->preview.link(net->input);


    //定义输出
    auto xlinkParserOut = pipeline.create<dai::node::XLinkOut>();
    xlinkParserOut->setStreamName("parseOut");
    auto xlinkoutOut = pipeline.create<dai::node::XLinkOut>();
    xlinkoutOut->setStreamName("out");

    auto xlinkoutpassthroughOut = pipeline.create<dai::node::XLinkOut>();

    xlinkoutpassthroughOut->setStreamName("passthrough");


    net->out.link(xlinkParserOut->input);

    net->passthrough.link(xlinkoutpassthroughOut->input);

    //结构推送相机
    dai::Device device(pipeline);
    //取帧显示
    auto outqueue = device.getOutputQueue("passthrough", 8, false);//maxsize 代表缓冲数据
    auto detqueue = device.getOutputQueue("parseOut", 8, false);//maxsize 代表缓冲数据

    bool printOutputLayersOnce = true;
    auto startTime = steady_clock::now();
    int counter = 0;
    float fps = 0;
    while (true) {


    auto ImgFrame = outqueue->get<dai::ImgFrame>();
    auto frame = ImgFrame->getCvFrame();

    auto inNN = detqueue->get<dai::NNData>();
    if (printOutputLayersOnce && inNN) {
        std::cout << "Output layer names: ";
        for (const auto &ten : inNN->getAllLayerNames()) {
            std::cout << ten << ", ";
        }
        std::cout << std::endl;
        printOutputLayersOnce = false;
    }
    cv::Mat result;
    auto pred = inNN->getLayerInt32(inNN->getAllLayerNames()[0]);

    post_process(pred, frame, result, color_map, target_width, target_height);

    counter++;
    auto currentTime = steady_clock::now();
    auto elapsed = duration_cast<duration<float>>(currentTime - startTime);
    if (elapsed > seconds(1)) {
        fps = counter / elapsed.count();
        counter = 0;
        startTime = currentTime;
    }
        std::stringstream fpsStr;
        fpsStr << "NN fps: " << std::fixed << std::setprecision(2) << fps;
        cv::putText(result, fpsStr.str(), cv::Point(2, result.rows - 4), cv::FONT_HERSHEY_TRIPLEX, 0.4, cv::Scalar(0,255,0));
        //cv::imshow("demo", frame);
        cv::imshow("result", result);
        //cv::imwrite("result.jpg", result);
        cv::waitKey(1);


    }


    return 0;
}
测试数据
/home/ubuntu/CLionProjects/untitled5/cmake-build-debug/untitled15
[19443010C130FF1200] [1.5] [1.155] [NeuralNetwork(1)] [warning] Network compiled for 4 shaves, maximum available 13, compiling for 6 shaves likely will yield in better performance
Output layer names: argmax_0.tmp_0,
NN fps: 0.00
NN fps: 0.00
NN fps: 0.00
NN fps: 0.00
NN fps: 0.00
NN fps: 0.00
NN fps: 0.00
NN fps: 0.00
NN fps: 0.00
NN fps: 0.00
NN fps: 10.58
NN fps: 10.58
NN fps: 10.58
NN fps: 10.58
NN fps: 10.58
NN fps: 10.58
NN fps: 10.58
NN fps: 10.58
NN fps: 10.58
NN fps: 10.58
NN fps: 10.58
NN fps: 10.58
NN fps: 10.58
NN fps: 10.58
NN fps: 10.58
NN fps: 10.58
NN fps: 15.26
NN fps: 15.26
NN fps: 15.26
NN fps: 15.26
NN fps: 15.26
NN fps: 15.26
NN fps: 15.26
NN fps: 15.26
NN fps: 15.26
NN fps: 15.26
NN fps: 15.26
NN fps: 15.26
NN fps: 15.26
NN fps: 15.26
NN fps: 15.26
NN fps: 15.26
NN fps: 15.65
NN fps: 15.65
NN fps: 15.65
NN fps: 15.65
NN fps: 15.65
NN fps: 15.65
NN fps: 15.65
NN fps: 15.65
NN fps: 15.65
NN fps: 15.65
NN fps: 15.65
NN fps: 15.65
NN fps: 15.65
NN fps: 15.65
NN fps: 15.65
NN fps: 15.65
NN fps: 14.99
NN fps: 14.99
NN fps: 14.99
NN fps: 14.99
NN fps: 14.99
NN fps: 14.99
NN fps: 14.99
测试图片
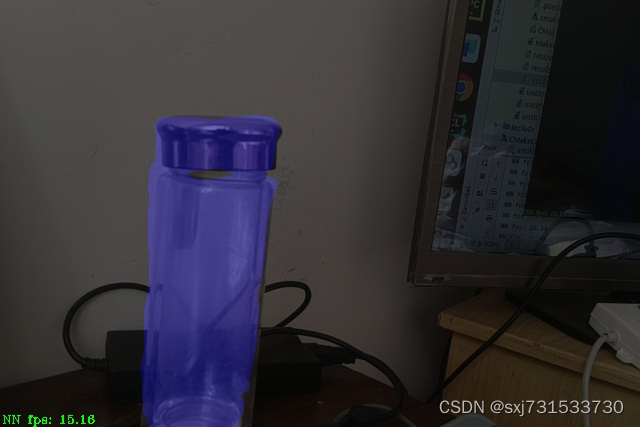
有时候识别效果还是差,数据集可能太少了。。毕竟才150张。。。


![[附源码]计算机毕业设计JAVA企业信息网站](https://img-blog.csdnimg.cn/c1c64873b1bb422fb3ebea351d6dc0d8.png)