一.多Maser集群架构的了解
Kubernetes作为容器集群系统,通过健康检查+重启策略是实现Pod故障自我修复能力,通过调度室实现Pod分布式部署,并保持预期副本数,根据Node失效状态自动在其他Node拉起Pod,实现了应用层的高可用。
针对Kubernetes集群,高可用性还应包含以下两个层面的考虑:Etcd数据库的高可用性和Kubernetes Master组件的高可用性。而Etcd我们以及采用3个节点组建集群实现高可用,
Master节点是控制中心的角色,通过不断与工作节点上的Kubelet进行通信来维护整个集群的健康工作状态。如果Master节点故障,将无法使用kubect工具或者API如何集群管理。
Master节点主要有三个服务kube-apiserver,kube-controller-mansger和kube-schedule,其中kube-controller-mansger和kube-scheduler组件自身通过选择机制已实现了高可用,所以Master高可用主要针对kube-apiserver组件,而该组件是以HTTP API提供服务,因此对他高可用与Web服务器类似,增加负载均衡器对其负载均衡即可,并且可水平扩容
二、master2 节点部署
2.1 环境准备:
节点 | IP地址 | 安装 |
master01 | 192.168.2.66 | kube-apiserver,kube-controller-manager,kube-scheduler,etcd |
node1 | 192.168.2.200 | kubelet,kube-proxy,docker, etcd |
node2 | 192.168.2.77 | kubelet,kube-proxy,docker, etcd |
master02 | 192.168.2.22 | kube-apiserver,kube-controller-manager,kube-scheduler,etcd |
lb01 | 192.168.2.11 | Nginx L4 ,keepalived |
lb02 | 192.168.2.33 | Nginx L4 ,keepalived |
关闭防火墙
systemctl stop firewalld
systemctl disable firewalld

关闭swap
swapoff -a
sed -ri 's/.*swap.*/#&/' /etc/fstab

根据规划设置主机名
hostnamectl set -hostname master02

在master节点以及各个Node节点均添加hosts
cat >> /etc/hosts <<EOF
192.168.2.66 master01
192.168.2.200 node01
192.168.2.77 node02
192.168.2.22 master02
EOF

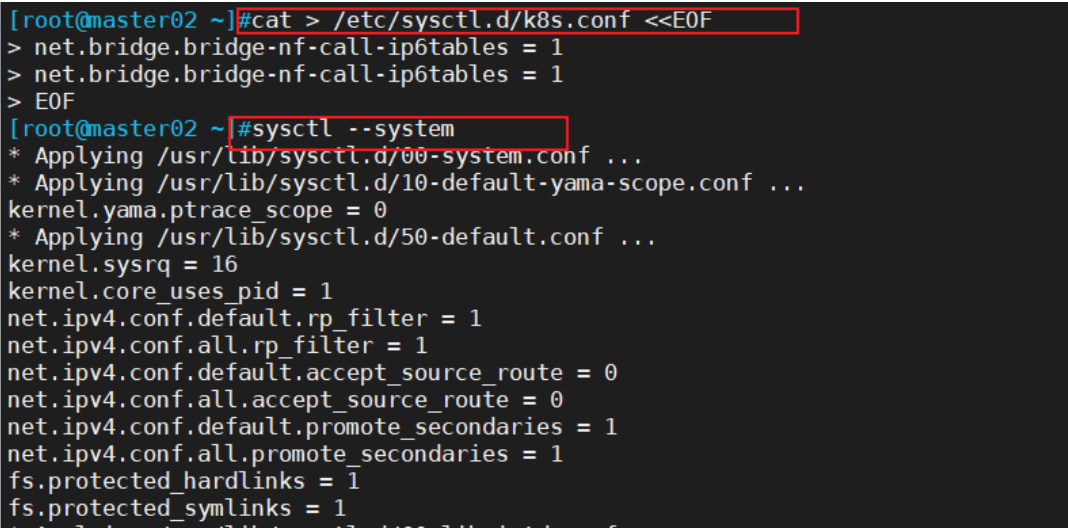
将桥接的IPv4流量递到iptables的链
cat > /etc/sysctl.d/k8s.conf <<EOF
net.bridge.bridge-nf-call-ip6tables = 1
net.bridge.bridge-nf-call-ip6tables = 1
EOF<br>sysctl --system
时间同步
yum -y install ntpdate
ntpdate time.windows.com

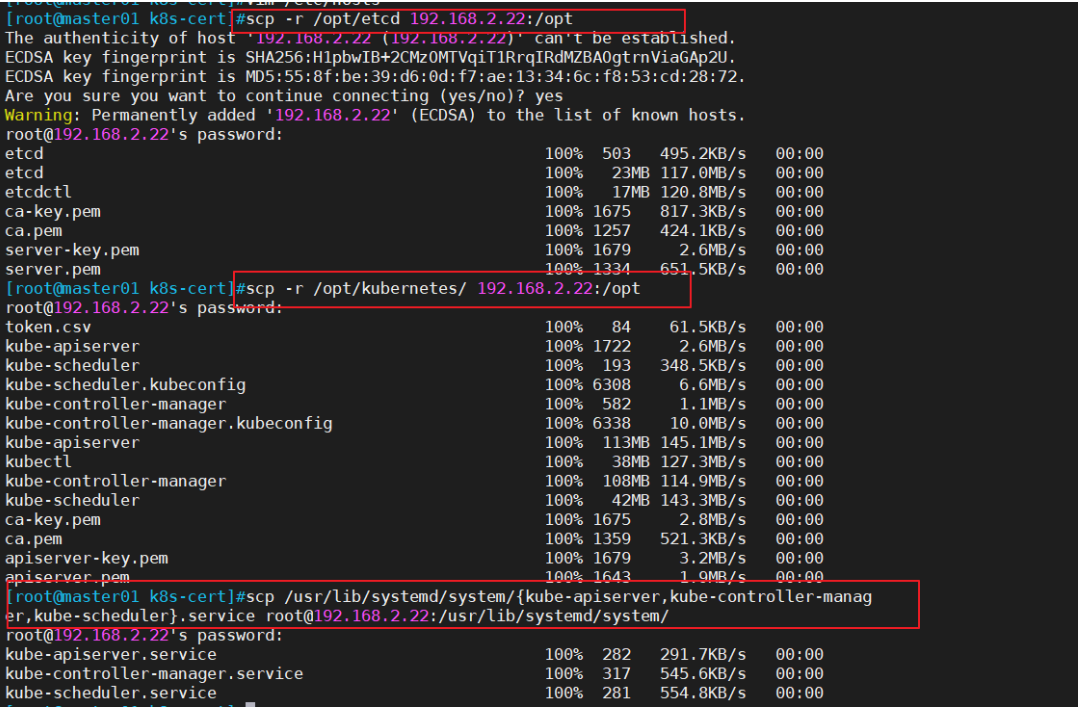
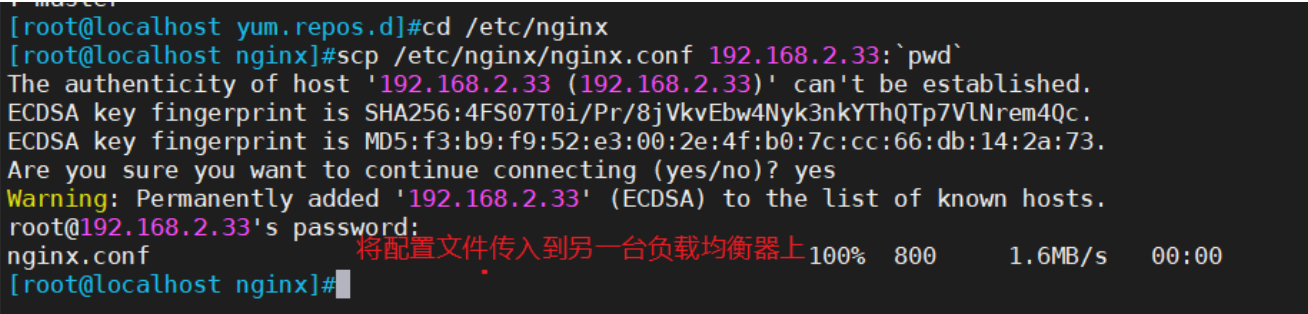
2.2 从master01节点上拷贝证书文件,各master组件的配置文件和服务管理文件到master02节点
scp -r /opt/etcd/ root@192.168.2.22:/opt/
scp -r /opt/kubernetes/ root@192.168.2.22:/opt
scp /usr/lib/systemd/system/{kube-apiserver,kube-controller-manager,kube-scheduler}.service root@192.168.2.22:/usr/lib/systemd/system/
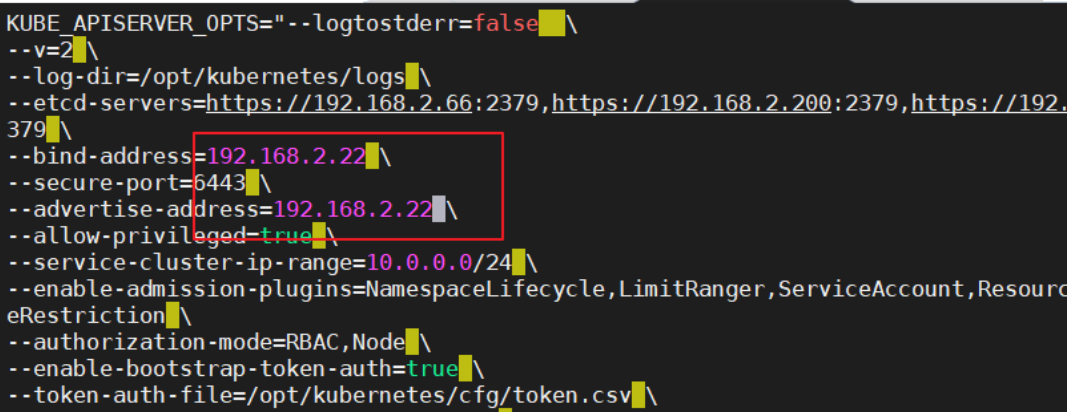
2.3 修改配置文件kube-apiserver中的IP
vim /opt/kubernetes/cfg/kube-apiserver
KUBE_APISERVER_OPTS="--logtostderr=true \
--v=4 \
--etcd-servers=https://192.168.2.66:2379,https://192.168.2.200:2379,https://192.168.2.77:2379 \
--bind-address=192.168.229.22 \ #修改
--secure-port=6443 \
--advertise-address=192.168.229.22 \ #修改
......
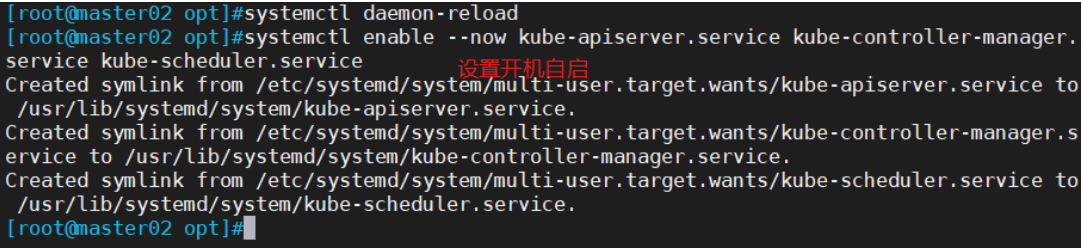
2.4 在master02节点上启动各服务器并设置开机自启
systemctl daemon-reload
systemctl enable --now kube-apiserver.service kube-controller-manager.service kube-scheduler.service
2.5 查看node节点状态
ln -s /opt/kubernetes/bin/* /usr/local/bin/
kubectl get nodes
scp -r .kube/ 192.168.2.22:/root #添加kubectl认证
kubectl get nodes
kubectl get nodes -o wide #-o=wide:输出额外信息;对于Pod,将输出Pod所在的Node名 此时在master02节点查到的node节点状态仅是从etcd查询到的信息,而此时node节点实际上并未与master02节点建立通信连接,因此需要使用一个VIP把node节点与master节点都关联起来


三.负载均衡部署
配置load balancer集群双机热备负载均衡(nginx实现负载均衡,keepalived实现双机热备)
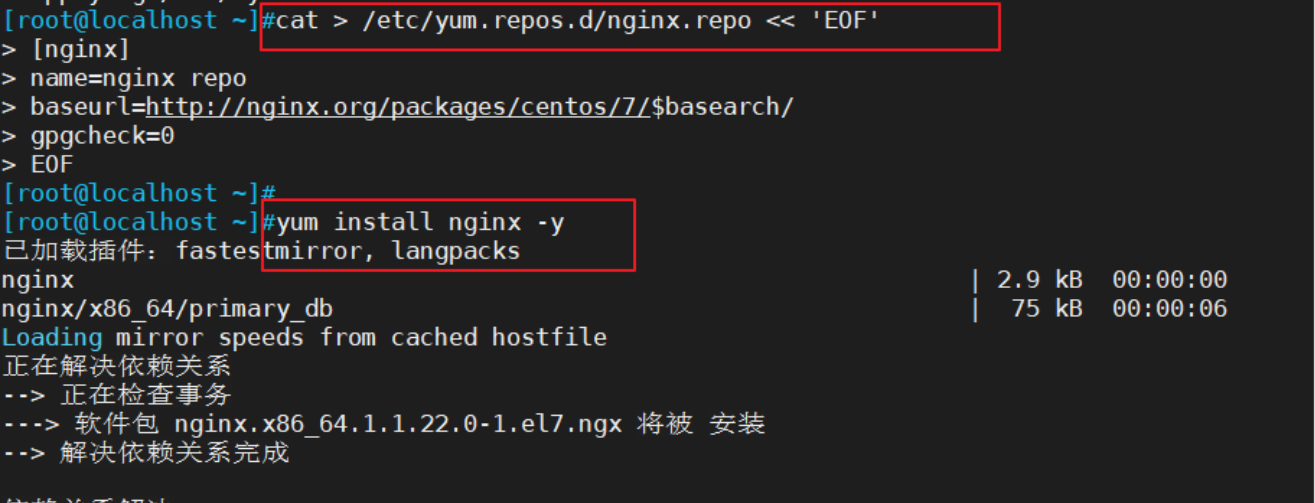
3.1 配置nginx的官方在线yum源,配置本地nginx的yum源
cat > /etc/yum.repos.d/nginx.repo << 'EOF'
[nginx]
name=nginx repo
baseurl=http://nginx.org/packages/centos/7/$basearch/
gpgcheck=0
EOF
yum install nginx -y
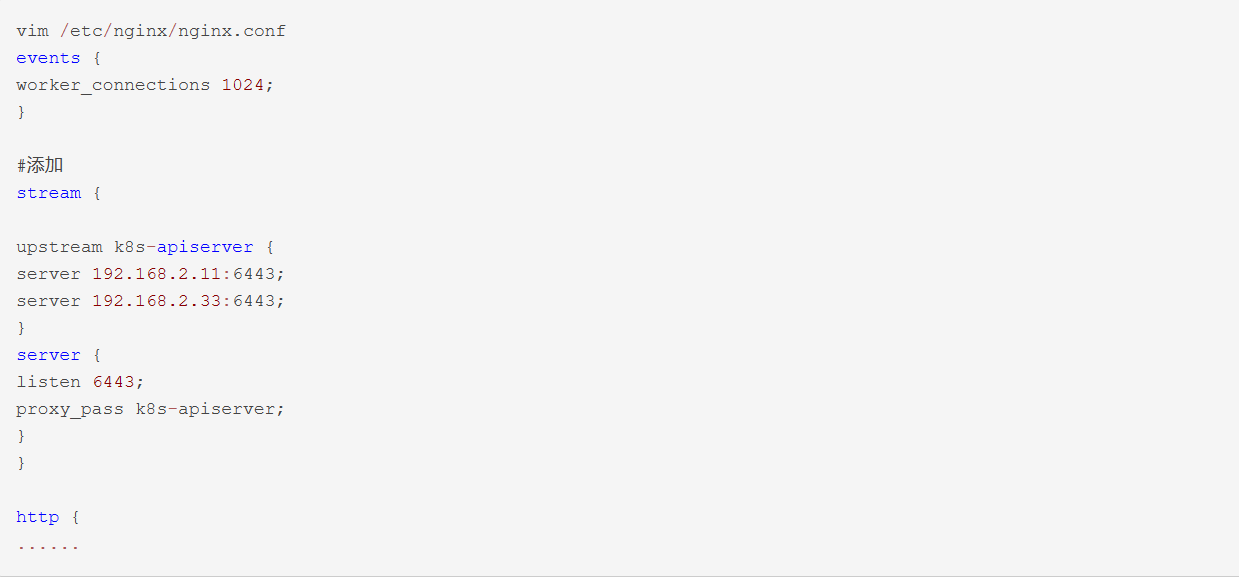
3.2修改nginx配置文件,配置四层反向代理负载均衡,指定k8s群集2台master的节点ip和6443端口


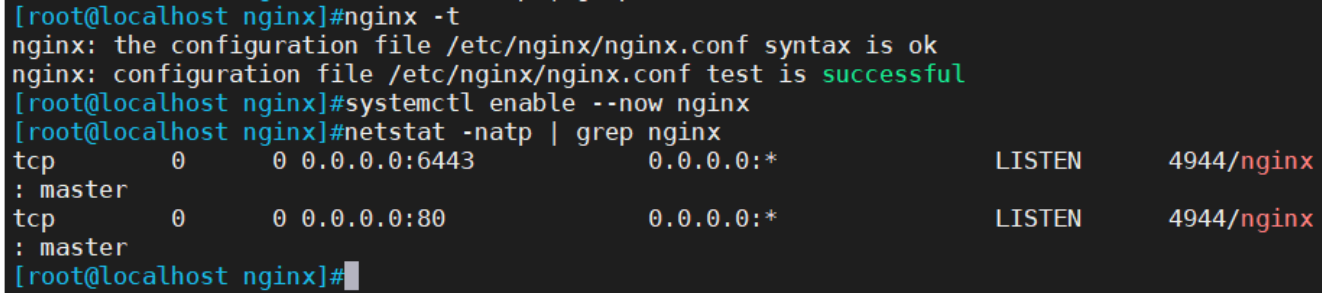
3.3检查配置文件语法
nginx -t

3.4 检查配置文件语法
systemctl start nginx
systemctl enable nginx
netstat -natp | grep nginx

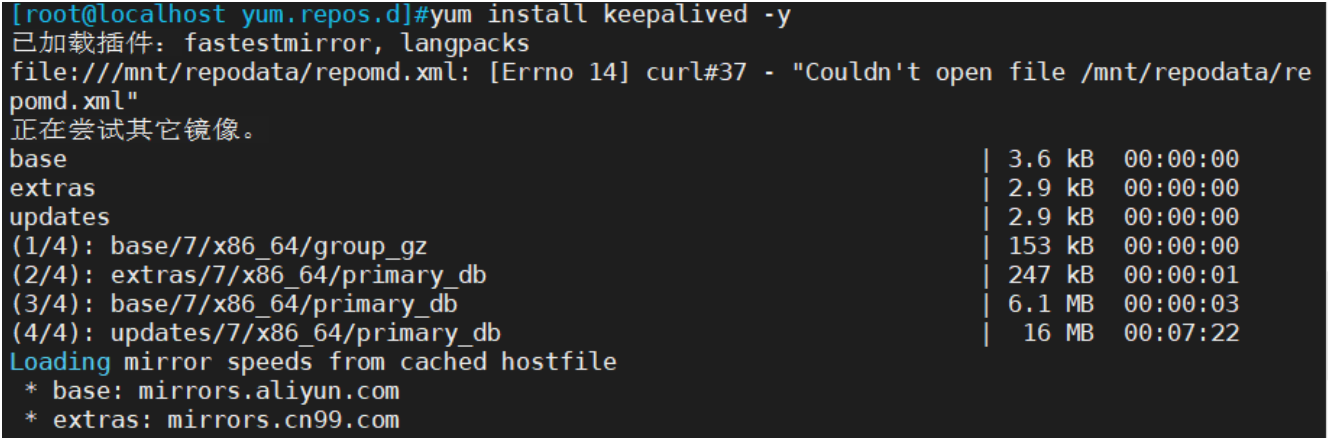
3.5 部署keepalived服务
yum install keepalived -y
3.6 修改keepalived配置文件


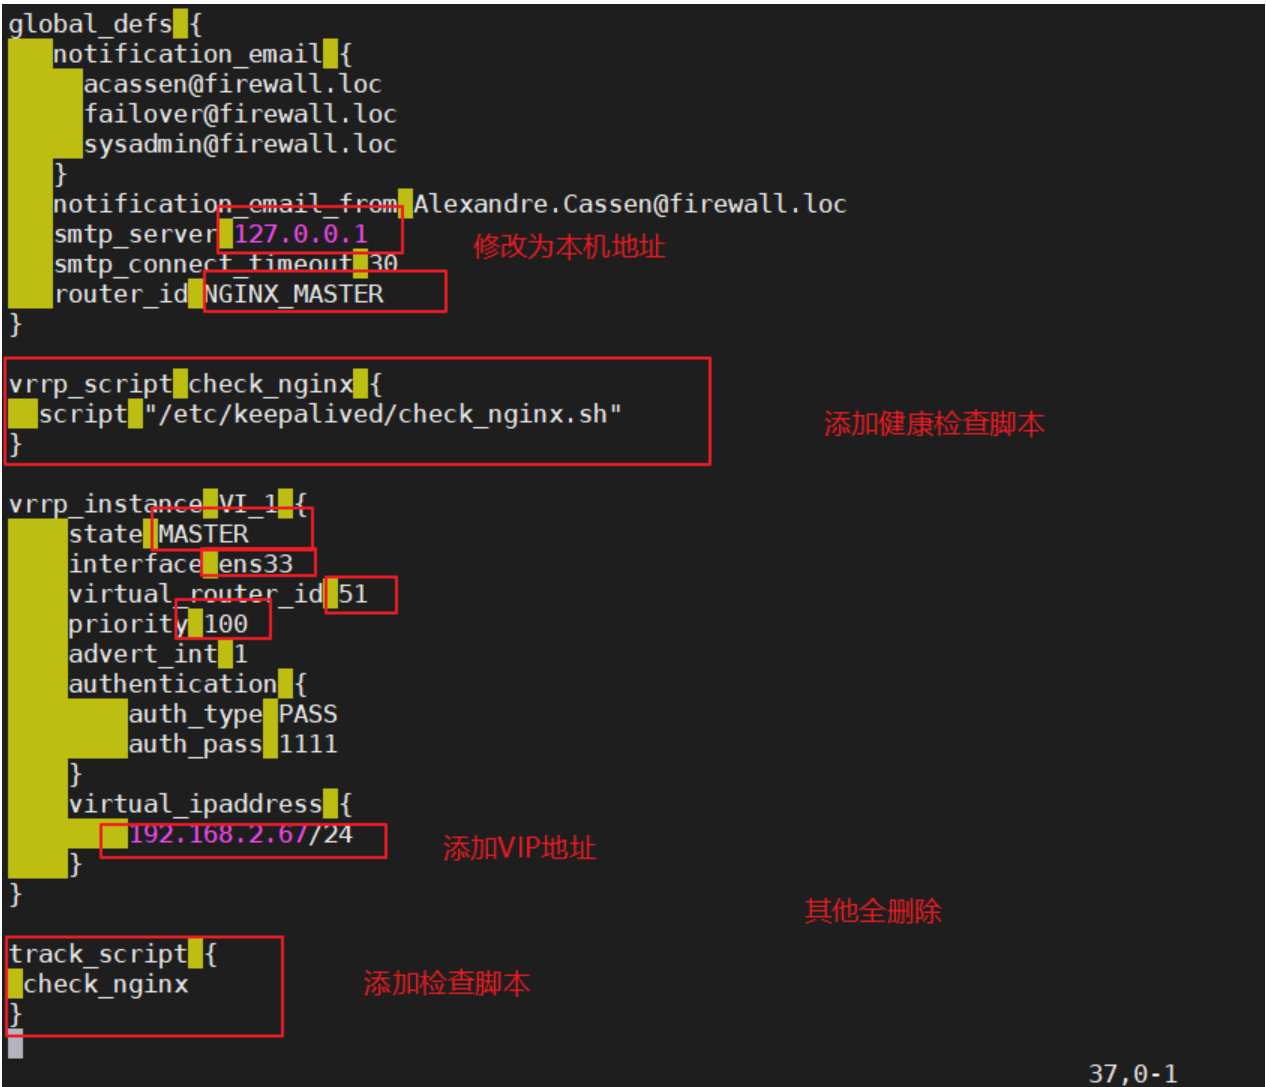


3.7创建nginx状态检查脚本
vim /etc/keepalived/check_nginx.sh
#!/bin/bash#egrep -cv "grep|$$" 用于过滤掉包含grep 或者 $$ 表示的当前Shell进程ID
count=$(ps -ef | grep nginx | egrep -cv "grep|$$")

if [ "$count" -eq 0 ];then
systemctl stop keepalived
fichmod +x /etc/keepalived/check_nginx.sh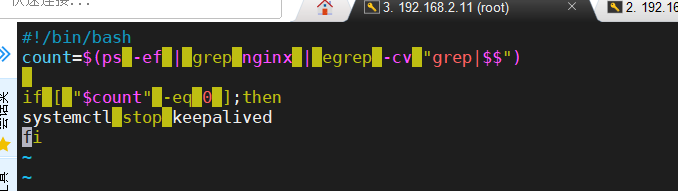

3.8 启动keepalived服务(一定要先启动了nginx服务,再启动keepalived服务)
systemctl start keepalived
systemctl enable keepalived
ip a    #查看VIP是否生成

3.9 修改node节点上的bootstrap.kubeconfig,kubelet.kubeconfig配置文件为VIP
cd /opt/kubernetes/cfg/
vim bootstrap.kubeconfig
server: https://192.168.2.67:6443vim kubelet.kubeconfig
server: https://192.168.2.67:6443vim kube-proxy.kubeconfig
server: https://192.168.2.67:6443

三个配置文件修改相同,都修改为虚拟VIP即可,这里只展示一个文件的修改;两个Node节点都需要修改
3.10 重启kubelet和kube-proxy服务
systemctl restart kubelet.service
systemctl restart kube-proxy.service
======在 master02节点上操作 ======
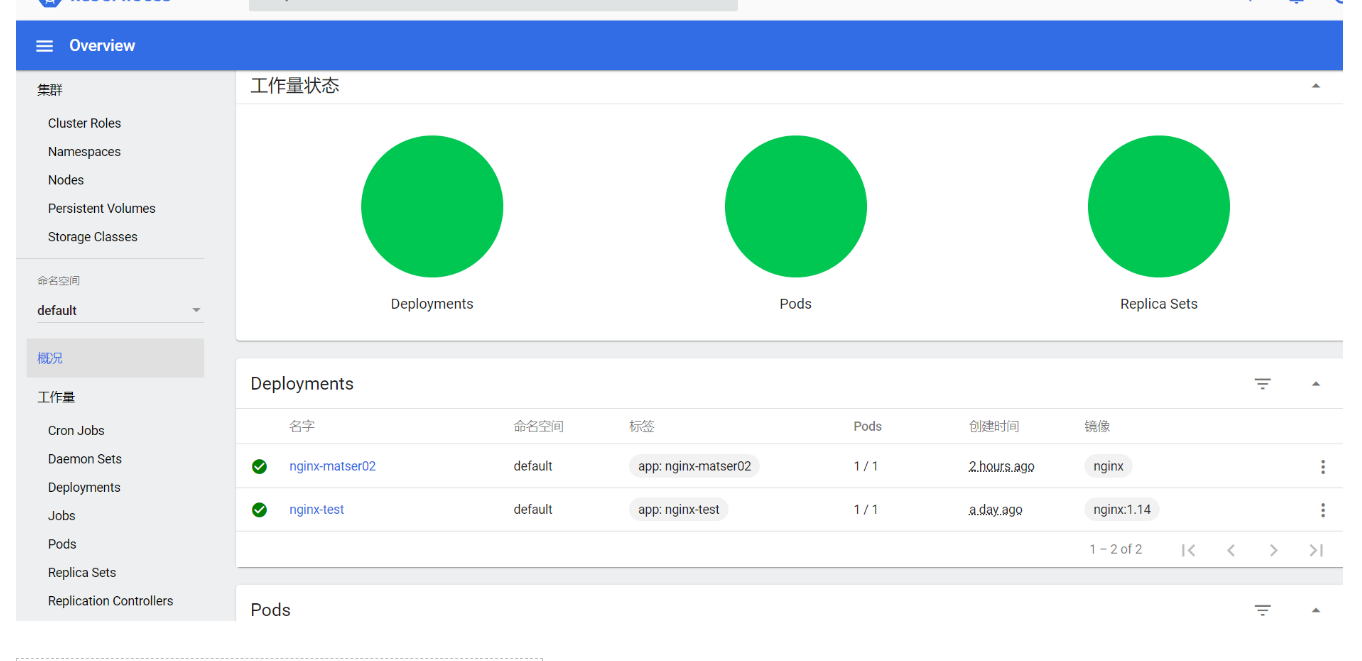
3.11测试创建pod
kubectl create deployment redis-master02 --image=redis 3.12 查看Pod的状态信息
kubectl get pods
nginx-dbddb74b8-nf9sk 0/1 ContainerCreating 033s #正在创建中
kubectl get pods
NAME READY STATUS RESTARTS AGE
nginx-dbddb74b8-nf9sk 1/1 Running 080s #创建完成,运行中
kubectl get pods -o wide
//READY为1/1,表示这个Pod中有1个容器

3.13 在对应网段的node节点上操作,可以直接使用浏览器或者curl命令访问
curl10.244.1.3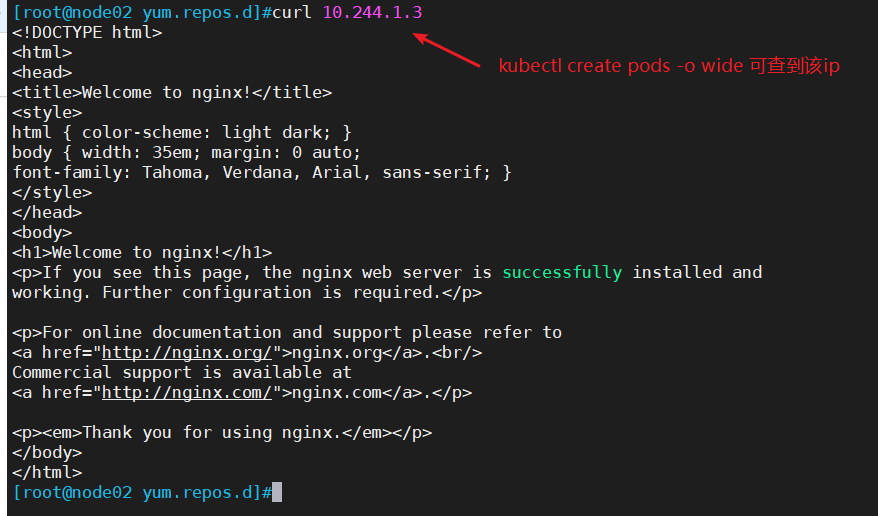
3.14 这时在master01节点上查看nginx日志
kubectl logs nginx-matser02-9fbbbc86c-2ztgd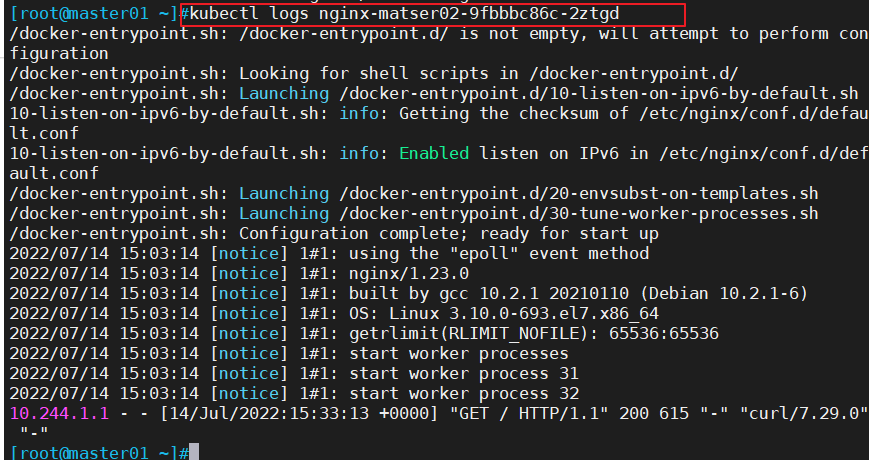
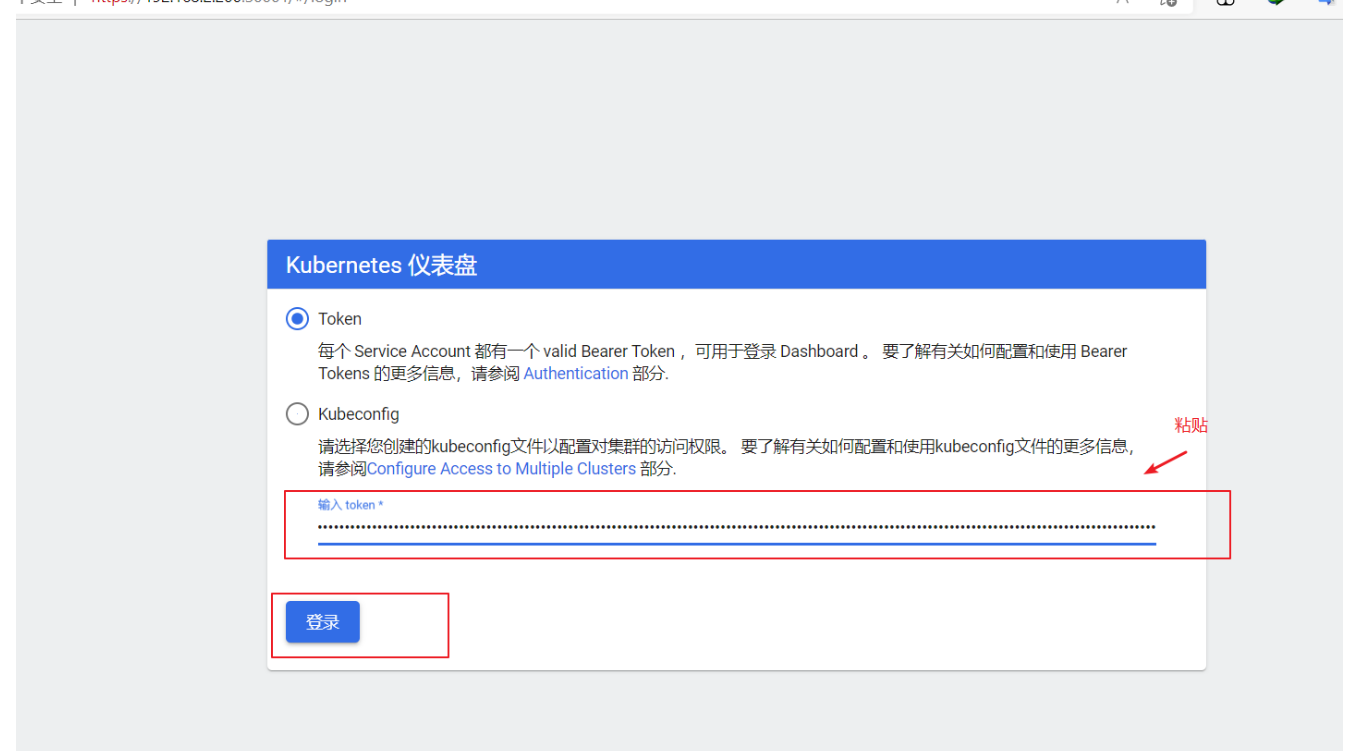
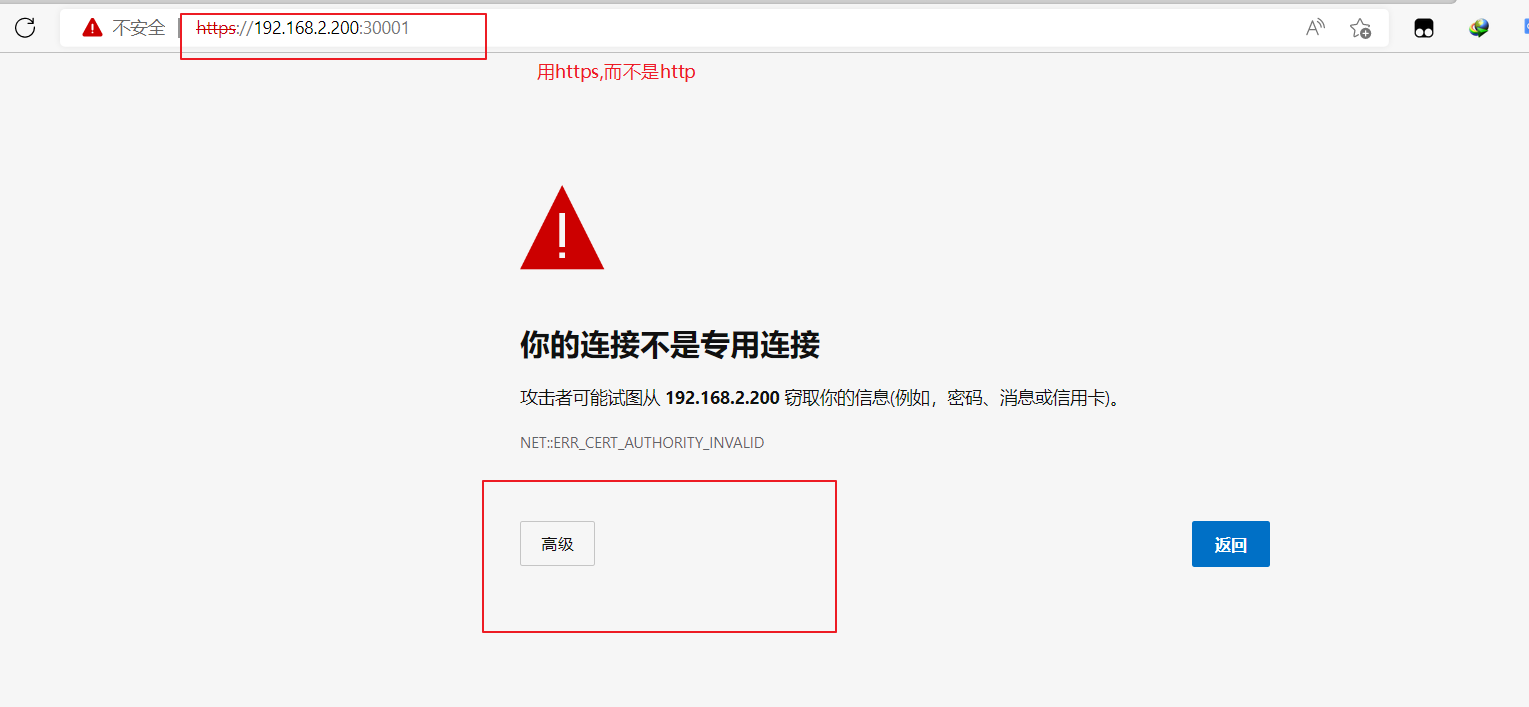
四、部署 Dashboard UI
Dashboard 介绍
仪表板是基于Web的Kubernetes用户界面。您可以使用仪表板将容器化应用程序部署到Kubernetes集群,对容器化应用程序进行故障排除,并管理集群本身及其伴随资源。
您可以使用仪表板来概述群集上运行的应用程序,以及创建或修改单个Kubernetes资源(例如部署,作业,守护进程等)。
例如,您可以使用部署向导扩展部署,启动滚动更新,重新启动Pod或部署新应用程序。仪表板还提供有关群集中Kubernetes资源状态以及可能发生的任何错误的信息。
====== 在 node 节点上操作 ======
上传镜像文件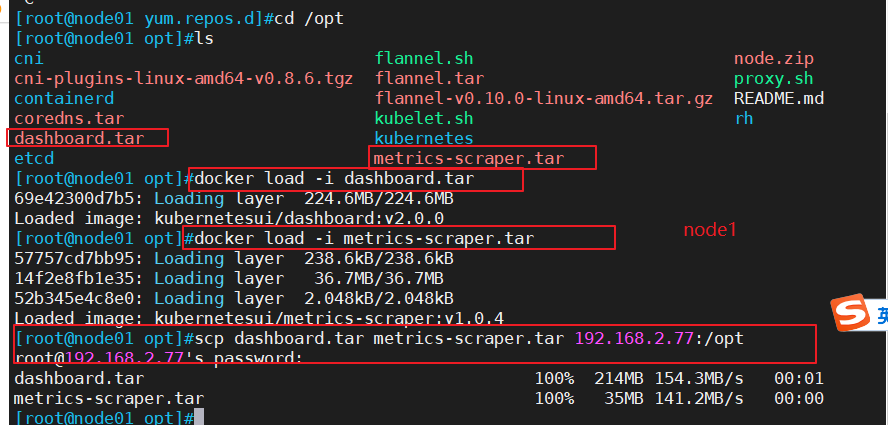

====== 在 master1 节点上操作 ======
上传recommended.yaml文件到/opt/k8s日录中
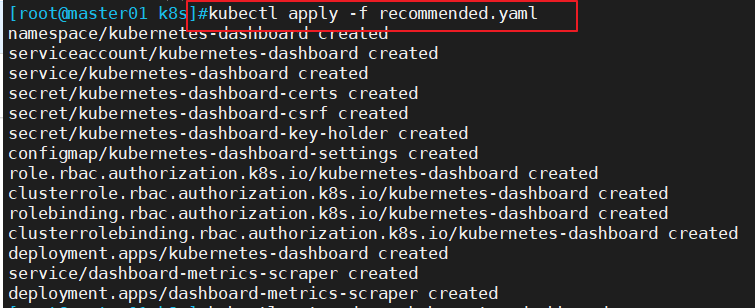
vim recommended.yaml
kubectl apply-f recommended.yaml

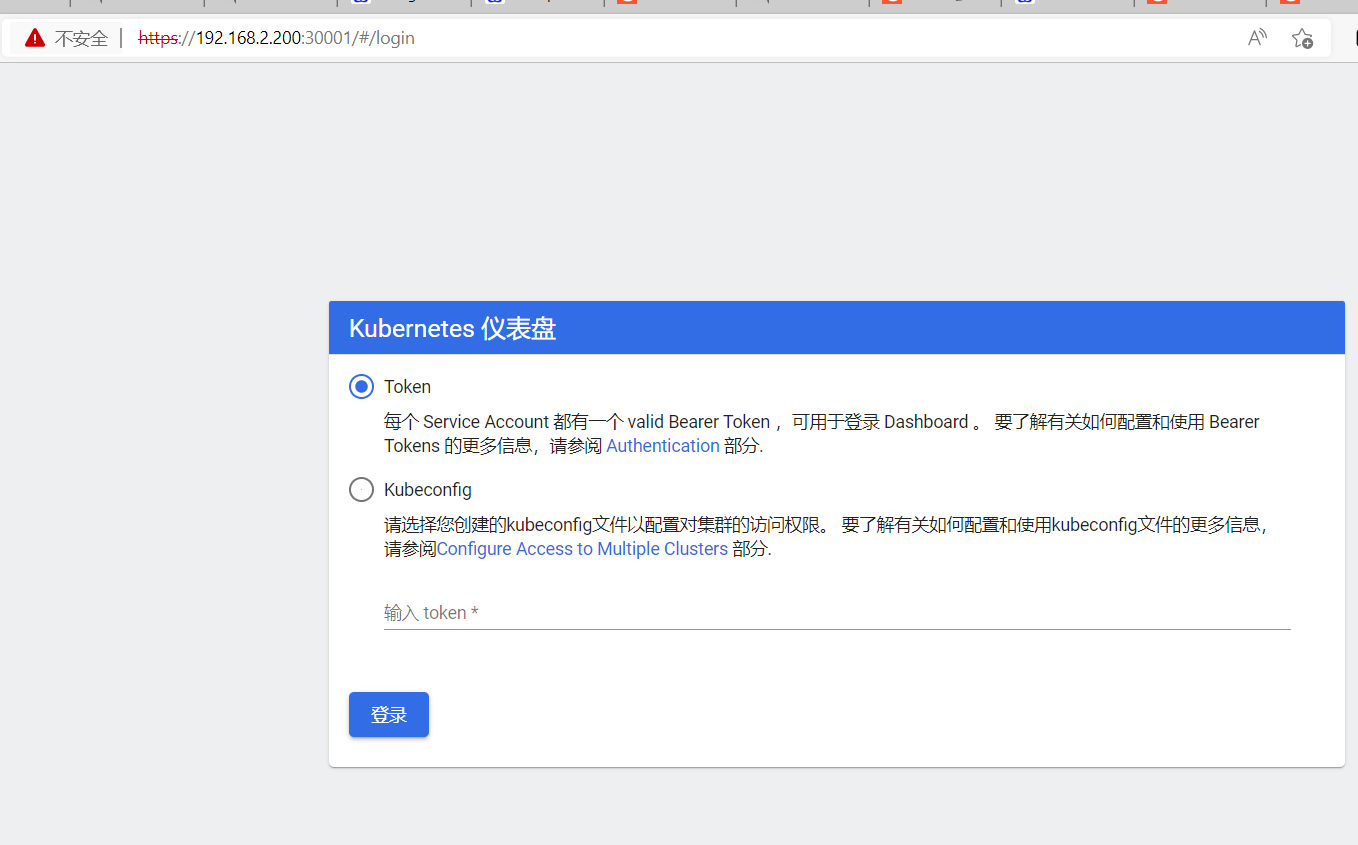
#创建service account并绑定默认cluster-admin管理员集群角色
kubectl create serviceaccount dashboard-admin -n kube-system
kubectl create clusterrolebinding dashboard-admin --clusterrole=cluster-admin --serviceaccount=kube-system:dashboard-admin
kubectl get secret -n kube-system
kubectl describe secret dashboard-admin-token-5mwwc -n kube-system