目录
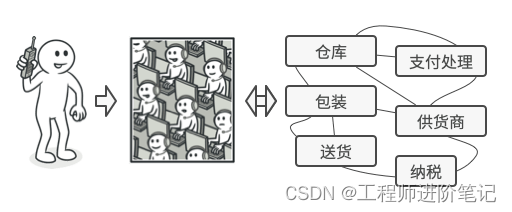
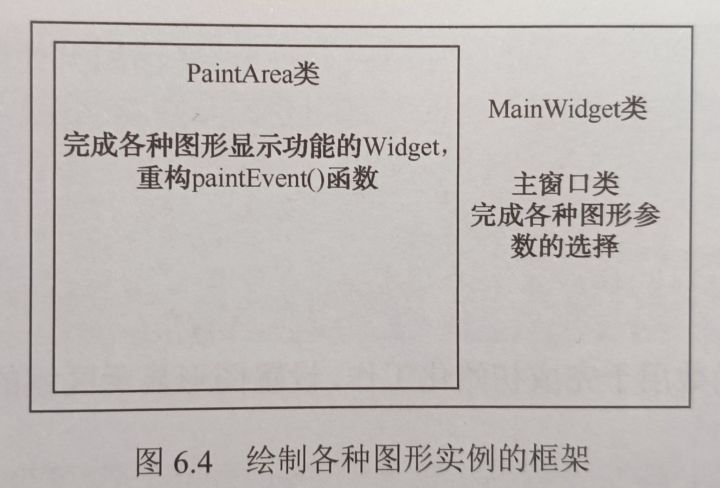
一、绘图框架设计
二、绘图区的实现
2.1 PaintArea类
2.2 PaintArea类讲解
三、主窗口的实现
3.1 MainWidget类
3.2 MainWidget类讲解
3.3 槽函数编写
3.5 其他内容
一、绘图框架设计
界面
两个类
二、绘图区的实现
2.1 PaintArea类
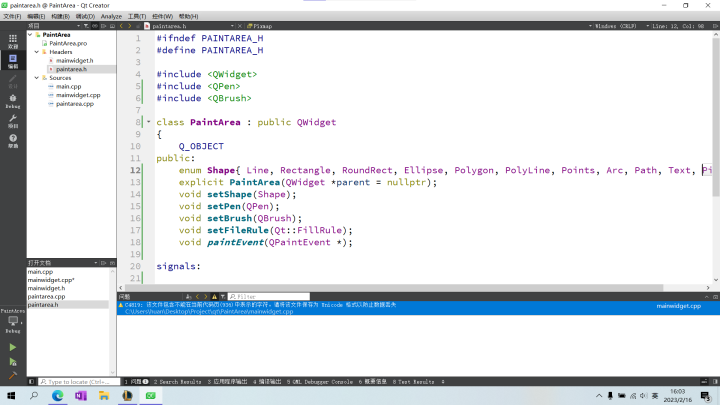
paintarea.h
#ifndef PAINTAREA_H
#define PAINTAREA_H

#include <QWidget>
#include <QPen>
#include <QBrush>

class PaintArea : public QWidget
{
    Q_OBJECT
public:
    enum Shape{ Line, Rectangle, RoundRect, Ellipse, Polygon, PolyLine, Points, Arc, Path, Text, Pixmap };
    explicit PaintArea(QWidget *parent = nullptr);
    void setShape(Shape);
    void setPen(QPen);
    void setBrush(QBrush);
    void setFileRule(Qt::FillRule);
    void paintEvent(QPaintEvent *);

signals:

private:
    Shape shape;
    QPen pen;
    QBrush brush;
    Qt::FillRule fillRule;
};

#endif // PAINTAREA_H
paintarea.cpp
#include "paintarea.h"
#include <QPainter>
#include <QPainterPath>
PaintArea::PaintArea(QWidget *parent) : QWidget(parent)
{
//QPalete::Window——通常指窗口部件的背景色;
setPalette(QPalette(Qt::white)); //给窗口设置背景图片无效
//上面的代码可替换为下面三行
//QPalette p = palette();
//p.setColor(QPalette::Window, Qt::white);
//setPalette(p);
setAutoFillBackground(true);
setMinimumSize(400, 400);
}
//设置形状
void PaintArea::setShape(PaintArea::Shape s)
{
shape = s;
update();
}
// 设置画笔
void PaintArea::setPen(QPen p)
{
pen = p;
update();
}
// 设置画刷
void PaintArea::setBrush(QBrush b)
{
brush = b;
update();
}
// 设置填充模式
void PaintArea::setFileRule(Qt::FillRule rule)
{
fillRule = rule;
update();
}
void PaintArea::paintEvent(QPaintEvent *)
{
QPainter p(this); //新建一个QPainter对象
p.setPen(pen); //设置QPainter对象的画笔
p.setBrush(brush); //设置QPainter对象的画刷
QRect rect(50, 100, 300, 200); //(a)
static const QPoint points[4] = //(b)
{
QPoint(150, 100),
QPoint(300, 150),
QPoint(300, 250),
QPoint(100, 300)
};
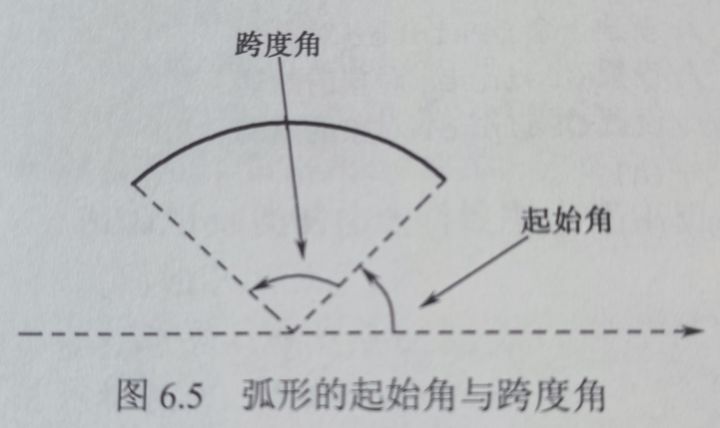
int startAngle = 30 * 16; //(c)
int spanAngle = 120 * 16;
QPainterPath path; //新建一个QPainterPath对象为路径做准备
path.addRect(150, 150, 100, 100);
path.moveTo(100, 100);
path.cubicTo(300, 100, 200, 200, 300, 300);
path.cubicTo(100, 300, 200, 200, 100, 100);
path.setFillRule(fillRule);
switch (shape) //(d)
{
case Line: //直线
p.drawLine(rect.topLeft(), rect.bottomRight()); break;
case Rectangle: //长方形
p.drawRect(rect); break;
case RoundRect: //圆角方形
p.drawRoundedRect(rect, 4, 4); break;
case Ellipse: //椭圆形
p.drawEllipse(rect); break;
case Polygon: //多边形
p.drawPolygon(points, 4); break;
case Points: //点
p.drawPoints(points, 4); break;
case Arc: //弧
p.drawArc(rect, startAngle, spanAngle); break;
case Path: //路径
p.drawPath(path); break;
case Text: //文字
p.drawPolygon(points, 4); break;
case DrawPixmap: //图片
p.Pixmap(150, 150, QPixmap("butterfly.png")); break;
default: break;
}
}2.2 PaintArea类讲解
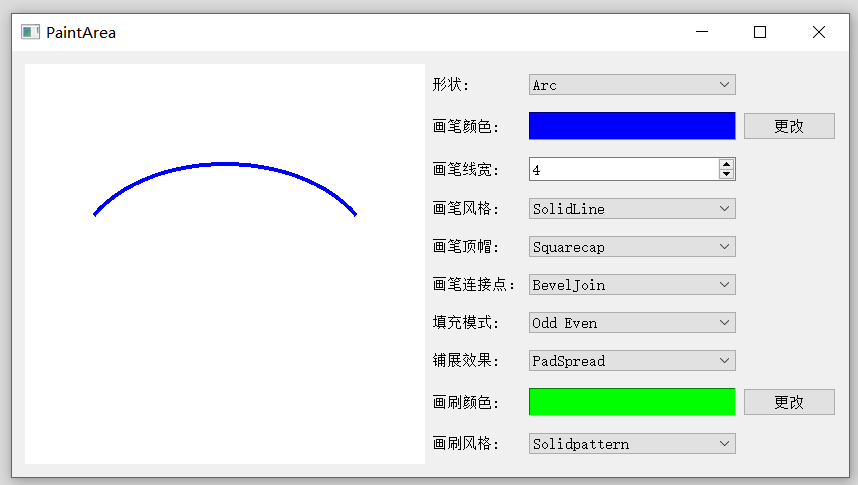
(a) 用QPainter画弧形所使用的角度值,是以 1/16° 为单位的,startAngle=30*16 和 spanAngle=120*16 能绘制出下面的图像
(d) QPainter 对象内置了很多函数,能绘制多种图形
(d) QPointerPath 类为 QPointer 类提供了一个存储容器,里面包含了所要绘制的内容的集合及绘制的顺序,我们只需要调用 QPainter 类的 drawPath() 函数即可
QPointer 对象提供了许多函数接口。可以很方便地加入一些规则图形。例如,addRect() 函数加入一个方形,addEllipse() 函数加入一个椭圆形,addText() 函数加入一个字符串,addPolygon() 函数加入一个多边形等。同时,QPainterPath 类还提供了 addPath() 函数,用于加入另一个 QPainter 对象中保存的内容
QPainterPath 对象的当前点自动处在上一部分图形内容的结束点上,若下一部分图形的起点不在此结束点,则需调用 moveTo() 函数将当前点移动到下一部分图形的起点
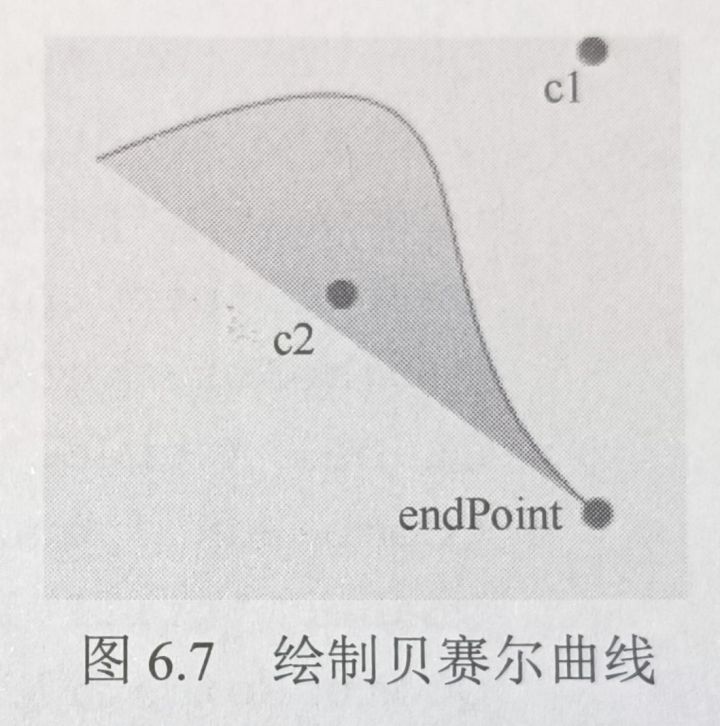
cubicTo() 函数绘制的是贝塞尔曲线,需要三个点的坐标 cubicTo(c1, c2, endPoint)
QPainterPath path;
path.moveTo(0,0);
path.lineTo(200, 0);
path.lineTo(200,100);
三、主窗口的实现
3.1 MainWidget类

mainwidget.h
#ifndef MAINWIDGET_H
#define MAINWIDGET_H

#include <QWidget>
#include "paintarea.h"
#include <QLabel>
#include <QComboBox>
#include <QSpinBox>
#include <QPushButton>
#include <QGridLayout>
#include <QGradient>

class MainWidget : public QWidget
{
    Q_OBJECT

public:
    MainWidget(QWidget *parent = nullptr);
    ~MainWidget();

private:
    PaintArea *paintArea;
    QLabel *shapeLabel;
    QComboBox *shapeComboBox;
    QLabel *penWidthLabel;
    QSpinBox *penWidthSpinBox;
    QLabel *penColorLabel;
    QFrame *penColorFrame;
    QPushButton *penColorBtn;
    QLabel *penStyleLabel;
    QComboBox *penStyleComboBox;
    QLabel *penCapLabel;
    QComboBox *penCapComboBox;
    QLabel *penJoinLabel;
    QComboBox *penJoinComboBox;
    QLabel *fillRuleLabel;
    QComboBox *fillRuleComboBox;
    QLabel *spreadLabel;
    QComboBox *spreadComboBox;
    QGradient::Spread spread;
    QLabel *brushStyleLabel;
    QComboBox *brushStyleComboBox;
    QLabel *brushColorLabel;
    QFrame *brushColorFrame;
    QPushButton *brushColorBtn;
    QGridLayout *rightLayout;

protected slots:
    void ShowShape(int);
    void ShowPenWidth(int);
    void ShowPenColor();
    void ShowPenStyle(int);
    void ShowPenCap(int);
    void ShowPenJoin(int);
    void ShowSpreadStyle();
    void ShowFillRule();
    void ShowBrushColor();
    void ShowBrush(int);
};
#endif // MAINWIDGET_H
mainwidget.cpp
#include "mainwidget.h"
#include <QColorDialog>
MainWidget::MainWidget(QWidget *parent)
: QWidget(parent)
{
paintArea = new PaintArea;
shapeLabel = new QLabel(tr("形状:")); //形状选择下拉列表框
shapeComboBox = new QComboBox;
shapeComboBox->addItem(tr("Line"), PaintArea::Line); //(a)
shapeComboBox->addItem(tr("Rectangle"), PaintArea::Rectangle);
shapeComboBox->addItem(tr("RoundedRect"), PaintArea::RoundRect);
shapeComboBox->addItem(tr("Ellipse"), PaintArea::Ellipse);
shapeComboBox->addItem(tr("Polygon"), PaintArea::Polygon);
shapeComboBox->addItem(tr("PolyLine"), PaintArea::PolyLine);
shapeComboBox->addItem(tr("Points"), PaintArea::Points);
shapeComboBox->addItem(tr("Arc"), PaintArea::Arc);
shapeComboBox->addItem(tr("Path"), PaintArea::Path);
shapeComboBox->addItem(tr("Text"), PaintArea::Text);
shapeComboBox->addItem(tr("Pixmap"), PaintArea::Pixmap);
connect(shapeComboBox, SIGNAL(activated(int)), this, SLOT(ShowShape(int)));
penColorLabel = new QLabel(tr("画笔颜色: ")); //画笔颜色选择控件
penColorFrame = new QFrame;
penColorFrame->setFrameStyle(QFrame::Panel|QFrame::Sunken);
penColorFrame->setAutoFillBackground(true);
penColorFrame->setPalette(QPalette(Qt::blue));
penColorBtn = new QPushButton(tr("更改"));
connect(penColorBtn,SIGNAL(clicked()),this,SLOT(ShowPenColor()));
penWidthLabel = new QLabel(tr("画笔线宽: ")); //画笔线宽选择控件
penWidthSpinBox = new QSpinBox;
penWidthSpinBox->setRange(0,20);
connect(penWidthSpinBox, SIGNAL(valueChanged(int)), this, SLOT(ShowPenWidth(int)));
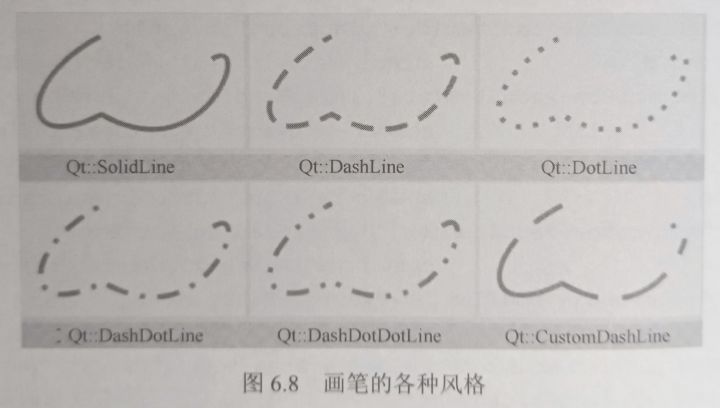
penStyleLabel = new QLabel(tr("画笔风格: ")); //画笔风格选择下拉列表框
penStyleComboBox= new QComboBox;
penStyleComboBox->addItem(tr("SolidLine"), static_cast<int>(Qt::SolidLine)); //(b)
penStyleComboBox->addItem(tr("DashLine"), static_cast<int>(Qt::DashLine));
penStyleComboBox->addItem(tr("DotLine"), static_cast<int>(Qt::DotLine));
penStyleComboBox->addItem(tr("DashDotLine"), static_cast<int>(Qt::DashDotLine));
penStyleComboBox->addItem(tr("DashDotDotLine"), static_cast<int>(Qt::DashDotDotLine));
penStyleComboBox->addItem(tr("CustomDashLine"), static_cast<int>(Qt::CustomDashLine));
connect(penStyleComboBox, SIGNAL(activated(int)), this, SLOT(ShowPenStyle(int)));
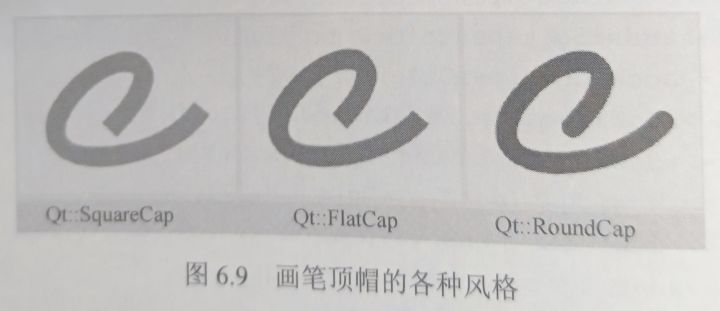
penCapLabel = new QLabel(tr("画笔顶帽: ")); //画笔顶帽风格选择下拉列表框
penCapComboBox= new QComboBox;
penCapComboBox->addItem(tr("Squarecap"), Qt::SquareCap); //(c)
penCapComboBox->addItem(tr("FlatCap"), Qt::FlatCap);
penCapComboBox->addItem(tr("RoundCap"), Qt::RoundCap);
connect(penCapComboBox, SIGNAL(activated(int)), this, SLOT(ShowPenCap(int)));
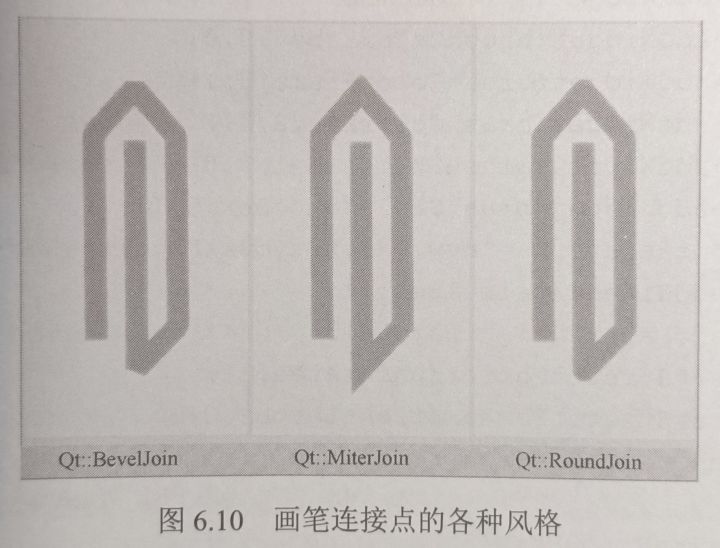
penJoinLabel = new QLabel(tr("画笔连接点:")); //画笔连接点风格选择下拉列表框
penJoinComboBox = new QComboBox;
penJoinComboBox->addItem(tr("BevelJoin"), Qt::BevelJoin); //(d)
penJoinComboBox->addItem(tr("MiterJoin"), Qt::MiterJoin);
penJoinComboBox->addItem(tr("RoundJoin"), Qt::RoundJoin);
connect(penJoinComboBox, SIGNAL(activated(int)), this, SLOT(ShowPenJoin(int)));
fillRuleLabel = new QLabel(tr("填充模式: ")); //填充模式选择下拉列表能
fillRuleComboBox = new QComboBox;
fillRuleComboBox->addItem(tr("Odd Even"), Qt::OddEvenFill);
fillRuleComboBox->addItem(tr("Winding"), Qt::WindingFill); //(e)
connect(fillRuleComboBox, SIGNAL(activated(int)), this, SLOT(ShowFillRule()));
spreadLabel = new QLabel(tr("铺展效果: ")); //铺展效果选择下拉列表框
spreadComboBox = new QComboBox;
spreadComboBox->addItem(tr("PadSpread"),QGradient::PadSpread); //(f)
spreadComboBox->addItem(tr("RepeatSpread"), QGradient::RepeatSpread);
spreadComboBox->addItem(tr("ReflectSpread"), QGradient::ReflectSpread);
connect (spreadComboBox, SIGNAL(activated(int)), this, SLOT(ShowSpreadStyle()));
brushColorLabel = new QLabel(tr("画刷颜色: ")); //画刷颜色选择控件
brushColorFrame = new QFrame;
brushColorFrame->setFrameStyle(QFrame::Panel|QFrame::Sunken);
brushColorFrame->setAutoFillBackground(true);
brushColorFrame->setPalette(QPalette(Qt::green));
brushColorBtn = new QPushButton(tr("更改"));
connect (brushColorBtn,SIGNAL(clicked()),this,SLOT(ShowBrushColor()));
brushStyleLabel = new QLabel(tr("画刷风格: ")); //画刷风格选择下拉列表框
brushStyleComboBox = new QComboBox;
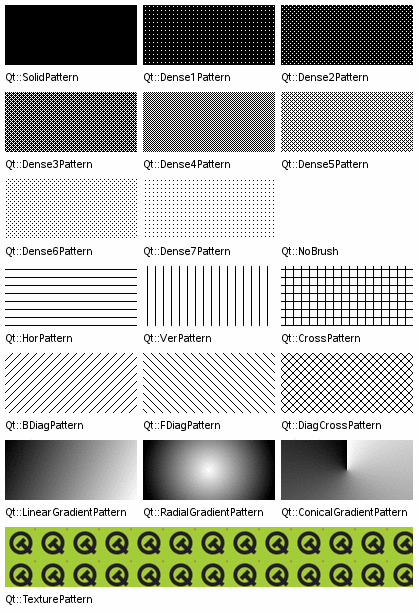
brushStyleComboBox->addItem(tr("Solidpattern"), static_cast<int>(Qt::SolidPattern)); //(g)
brushStyleComboBox->addItem(tr("DenselPattern"), static_cast<int>(Qt::Dense1Pattern));
brushStyleComboBox->addItem(tr("Dense2Pattern"), static_cast<int>(Qt::Dense2Pattern));
brushStyleComboBox->addItem(tr("Dense3Pattern"), static_cast<int>(Qt::Dense3Pattern));
brushStyleComboBox->addItem(tr("Dense4Pattern"), static_cast<int>(Qt::Dense4Pattern));
brushStyleComboBox->addItem(tr("Dense5Pattern"), static_cast<int>(Qt::Dense5Pattern));
brushStyleComboBox->addItem(tr("Dense6Pattern"), static_cast<int>(Qt::Dense6Pattern));
brushStyleComboBox->addItem(tr("Dense7Pattern"), static_cast<int>(Qt::Dense7Pattern));
brushStyleComboBox->addItem(tr("HorPattern"), static_cast<int>(Qt::HorPattern));
brushStyleComboBox->addItem(tr("VerPattern"), static_cast<int>(Qt::VerPattern));
brushStyleComboBox->addItem(tr("CrossPattern"), static_cast<int>(Qt::CrossPattern));
brushStyleComboBox->addItem(tr("BDiagPattern"), static_cast<int>(Qt::BDiagPattern));
brushStyleComboBox->addItem(tr("FDiagPattern"), static_cast<int>(Qt::FDiagPattern));
brushStyleComboBox->addItem(tr("DiagCrossPattern"), static_cast<int>(Qt:: DiagCrossPattern));
brushStyleComboBox->addItem(tr("LinearGradientPattern"), static_cast<int>(Qt::LinearGradientPattern));
brushStyleComboBox->addItem(tr("ConicalGradientPattern"), static_cast<int>(Qt::ConicalGradientPattern));
brushStyleComboBox->addItem(tr("RadialGradientPattern"), static_cast<int>(Qt::RadialGradientPattern));
brushStyleComboBox->addItem(tr("TexturePattern"), static_cast<int>(Qt::TexturePattern));
connect(brushStyleComboBox, SIGNAL(activated(int)), this, SLOT(ShowBrush(int)));
rightLayout = new QGridLayout;
rightLayout->addWidget(shapeLabel, 0, 0); //控制面板的布局
rightLayout->addWidget(shapeComboBox, 0, 1);
rightLayout->addWidget(penColorLabel, 1, 0);
rightLayout->addWidget(penColorFrame, 1, 1);
rightLayout->addWidget(penColorBtn, 1, 2);
rightLayout->addWidget(penWidthLabel, 2, 0);
rightLayout->addWidget(penWidthSpinBox, 2, 1);
rightLayout->addWidget (penStyleLabel, 3, 0);
rightLayout->addWidget(penStyleComboBox, 3, 1);
rightLayout->addWidget(penCapLabel, 4, 0);
rightLayout->addWidget(penCapComboBox, 4, 1);
rightLayout->addWidget(penJoinLabel, 5, 0);
rightLayout->addWidget(penJoinComboBox, 5, 1);
rightLayout->addWidget(fillRuleLabel, 6, 0);
rightLayout->addWidget(fillRuleComboBox, 6, 1);
rightLayout->addWidget(spreadLabel, 7, 0);
rightLayout->addWidget(spreadComboBox, 7, 1);
rightLayout->addWidget(brushColorLabel, 8, 0);
rightLayout->addWidget(brushColorFrame, 8, 1);
rightLayout->addWidget(brushColorBtn, 8, 2);
rightLayout->addWidget (brushStyleLabel, 9, 0);
rightLayout->addWidget(brushStyleComboBox, 9, 1);
QHBoxLayout *mainLayout = new QHBoxLayout(this); //整体的布局
mainLayout->addWidget(paintArea);
mainLayout->addLayout(rightLayout);
mainLayout->setStretchFactor(paintArea, 1);
mainLayout->setStretchFactor(rightLayout, 0);
ShowShape(shapeComboBox->currentIndex()); //显示默认的图形
}
MainWidget::~MainWidget()
{
}
void MainWidget::ShowShape(int)
{
}
void MainWidget::ShowPenWidth(int)
{
}
void MainWidget::ShowPenColor()
{
}
void MainWidget::ShowPenStyle(int)
{
}
void MainWidget::ShowPenCap(int)
{
}
void MainWidget::ShowPenJoin(int)
{
}
void MainWidget::ShowSpreadStyle()
{
}
void MainWidget::ShowFillRule()
{
}
void MainWidget::ShowBrushColor()
{
}
void MainWidget::ShowBrush(int)
{
}3.2 MainWidget类讲解
(a) shapeComboBox 增加选项。可以只插入前面的这个文本,也可以同时插入文本相应的具体数据(通常为枚举类型)

(b) penStyleComboBox->addItem(tr("SolidLine"), static_cast<int>(Qt::SolidLine));
这里是选择画笔的风格
(c) penCapComboBox->addItem(tr("Squarecap"), Qt::SquareCap);
画笔顶帽风格
(d) penJoinComboBox->addItem(tr("BevelJoin"), Qt::BevelJoin);
画笔连接点风格,分别是方、尖、圆
(e) fillRuleComboBox->addItem(tr("Winding"), Qt::WindingFill);
Qt 为 QPainterPath 类提供了两种填充规则,分别是 Qt::OddEvenFill 和 Qt::WindingFill,如下图所示
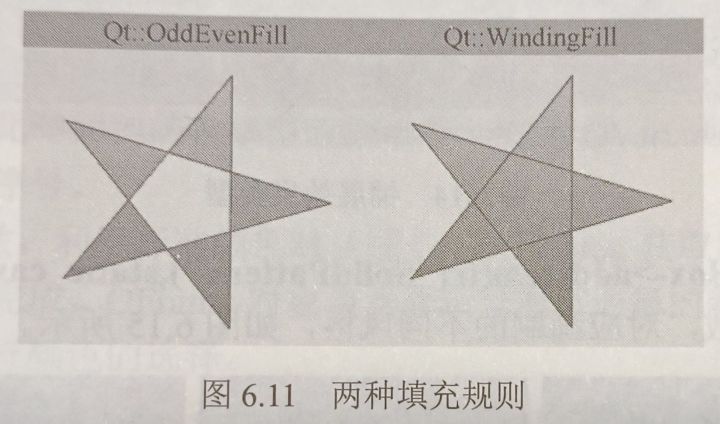
这两种填充规则在判定图形中某一点是处内部还是外部时,判断依据不同:
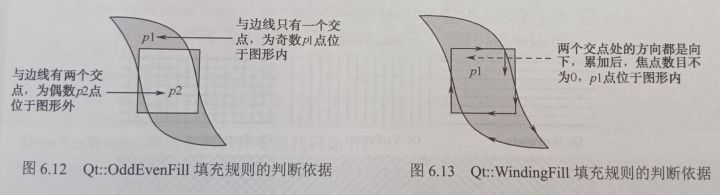
Qt::OddEvenFill 填充规则判断依据是从图形中某一点画一条水平线到图形外。若这条水平线与图形边线的交点数目为奇数,则说明此点位于图形的内部;若焦点数目为偶数,则此点位于图形的外部,如图 6.12
Qt::WindingFill 填充规则的判断依据是从图形中某一点画一条水平线到图形外,每个点外边线的方向可能向上,也可能向下,若最后结果为 0 则说明在图形外,如图 6.13 (边线的方向是由 QPainterPath 创建时根据描述的顺序决定的时候。如果采用 addRect() 或 addPolygon() 等函数加入的图形,默认是按照顺时针方向)
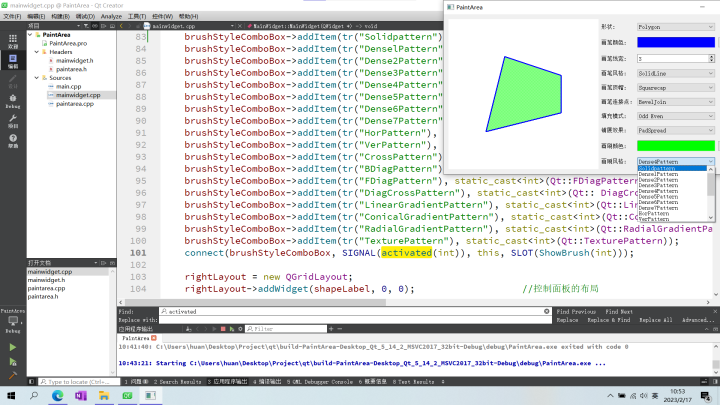
(g) brushStyleComboBox->addItem(tr("Solidpattern"), static_cast<int>(Qt::SolidPattern));
画刷的各种风格:
3.3 槽函数编写

showShape() 槽函数,根据当前下拉列表框中选择的选项,调用 PaintArea 类的 setShape() 函数来设置 PaintArea 对象的形状参数:
void MainWidget::ShowShape(int value)
{
    PaintArea::Shape shape = PaintArea::Shape(shapeComboBox->itemData(value, Qt::UserRole).toInt());
    paintArea->setShape(shape);
}
QComboBox 类的 itemData 方法返回当前显示的下拉列表框数据,是一个 QVariant 对象,此对象与控件初始化时插入的枚举型数据相关,调用 QVariant 类的 toInt() 函数获得此数据在枚举型数据集合中的序号
其他槽函数比较简单就不做过多赘述。其中铺展效果好像演示不了,我不知道是不是我版本是 QT5 的缘故,还是我抄代码抄错了,有小伙伴知道的告诉我一声
//设置画笔颜色(边线颜色)
void MainWidget::ShowPenColor()
{
QColor color = QColorDialog::getColor(static_cast<int>(Qt::blue));
penColorFrame->setPalette(QPalette(color));
int value = penWidthSpinBox->value();
Qt::PenStyle style = Qt::PenStyle(penStyleComboBox->itemData(penStyleComboBox->currentIndex(), Qt::UserRole).toInt());
Qt::PenCapStyle cap = Qt:: PenCapStyle(penCapComboBox->itemData(penCapComboBox->currentIndex(), Qt::UserRole).toInt());
Qt::PenJoinStyle join = Qt::PenJoinStyle(penJoinComboBox->itemData(penJoinComboBox->currentIndex(), Qt::UserRole).toInt());
paintArea->setPen(QPen(color, value, style, cap, join));
}
//设置画笔宽度
void MainWidget::ShowPenWidth(int value)
{
QColor color = penColorFrame->palette().color(QPalette::Window);
Qt::PenStyle style = Qt::PenStyle(penStyleComboBox->itemData(penStyleComboBox->currentIndex(), Qt::UserRole).toInt());
Qt::PenCapStyle cap = Qt::PenCapStyle(penCapComboBox->itemData(penCapComboBox->currentIndex(), Qt::UserRole).toInt());
Qt::PenJoinStyle join = Qt::PenJoinStyle(penJoinComboBox->itemData(penJoinComboBox->currentIndex(), Qt::UserRole).toInt());
paintArea->setPen(QPen(color, value, style, cap, join));
}
//设置画笔风格
void MainWidget::ShowPenStyle(int stylevalue)
{
QColor color = penColorFrame->palette().color(QPalette::Window);
int value = penWidthSpinBox->value();
Qt::PenStyle style = Qt::PenStyle(penStyleComboBox->itemData(stylevalue, Qt::UserRole).toInt());
Qt::PenCapStyle cap = Qt::PenCapStyle(penCapComboBox->itemData(penCapComboBox->currentIndex(), Qt::UserRole).toInt());
Qt::PenJoinStyle join = Qt::PenJoinStyle(penJoinComboBox->itemData(penJoinComboBox->currentIndex(), Qt::UserRole).toInt());
paintArea->setPen(QPen(color, value, style, cap, join));
}
//设置画笔顶帽
void MainWidget::ShowPenCap(int capValue)
{
QColor color = penColorFrame->palette().color(QPalette::Window);
int value = penWidthSpinBox->value();
Qt::PenStyle style = Qt::PenStyle(penStyleComboBox->itemData(penStyleComboBox->currentIndex(), Qt::UserRole).toInt());Qt::PenCapStyle cap = Qt::PenCapStyle(penCapComboBox->itemData(capValue,Qt::UserRole).toInt());
Qt::PenJoinStyle join = Qt::PenJoinStyle(penJoinComboBox->itemData(penJoinComboBox->currentIndex(), Qt::UserRole).toInt());
paintArea->setPen(QPen(color,value,style,cap,join));
}
//设置画笔连接点
void MainWidget::ShowPenJoin(int joinValue)
{
QColor color = penColorFrame->palette().color (QPalette::Window);
int value = penWidthSpinBox->value();
Qt::PenStyle style = Qt::PenStyle(penStyleComboBox->itemData(penStyleComboBox->currentIndex(),Qt::UserRole).toInt());
Qt::PenCapStyle cap = Qt::PenCapStyle(penCapComboBox->itemData(penCapComboBox->currentIndex(),Qt::UserRole).toInt());
Qt::PenJoinStyle join = Qt::PenJoinStyle(penJoinComboBox->itemData(joinValue, Qt::UserRole).toInt());
paintArea->setPen(QPen(color, value, style, cap, join));
}
//设置填充模式(点在图形内还是图形外的判定规则)
void MainWidget::ShowFillRule()
{
Qt::FillRule rule = Qt::FillRule(fillRuleComboBox->itemData(fillRuleComboBox->currentIndex(), Qt::UserRole).toInt());
paintArea->setFileRule(rule);
}
// 设置扩散方式
void MainWidget::ShowSpreadStyle()
{
spread = QGradient::Spread(spreadComboBox->itemData(spreadComboBox->currentIndex(), Qt::UserRole).toInt());
}
// 设置画刷颜色(内部颜色)
void MainWidget::ShowBrushColor()
{
QColor color = QColorDialog::getColor(static_cast<int>(Qt::blue));
brushColorFrame->setPalette(QPalette(color));
ShowBrush(brushStyleComboBox->currentIndex());
}
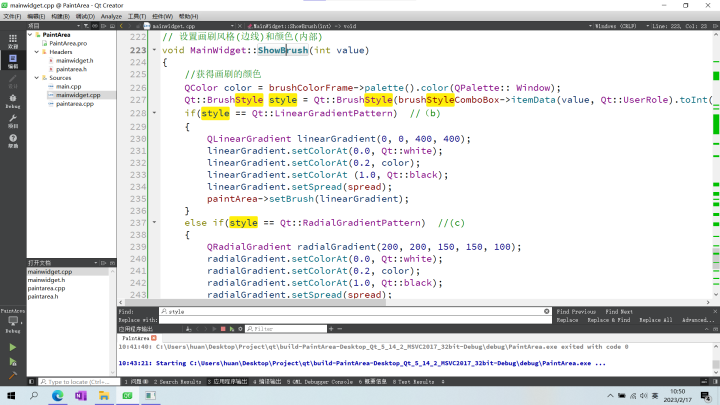
// 设置画刷风格(边线)和颜色(内部)
void MainWidget::ShowBrush(int value)
{
//获得画刷的颜色
QColor color = brushColorFrame->palette().color(QPalette:: Window);
Qt::BrushStyle style = Qt::BrushStyle(brushStyleComboBox->itemData(value, Qt::UserRole).toInt()); //(a)
if(style == Qt::LinearGradientPattern) //(b)
{
QLinearGradient linearGradient(0, 0, 400, 400);
linearGradient.setColorAt(0.0, Qt::white);
linearGradient.setColorAt(0.2, color);
linearGradient.setColorAt (1.0, Qt::black);
linearGradient.setSpread(spread);
paintArea->setBrush(linearGradient);
}
else if(style == Qt::RadialGradientPattern) //(c)
{
QRadialGradient radialGradient(200, 200, 150, 150, 100);
radialGradient.setColorAt(0.0, Qt::white);
radialGradient.setColorAt(0.2, color);
radialGradient.setColorAt(1.0, Qt::black);
radialGradient.setSpread(spread);
paintArea->setBrush(radialGradient);
}
else if(style == Qt::ConicalGradientPattern)
{
QConicalGradient conicalGradient(200, 200, 30);
conicalGradient.setColorAt(0.0, Qt::white);
conicalGradient.setColorAt (0.2, color);
conicalGradient.setColorAt(1.0, Qt::black);
paintArea->setBrush(conicalGradient);
}
else if(style == Qt::TexturePattern)
{
paintArea->setBrush(QBrush(QPixmap("butterfly.png")));
}
else
{
paintArea->setBrush(QBrush(color, style));
}
}
最后一个函数涉及到的内容很多,可以自己看一下源码。简单的意思就是下面两个图,根据 value 选择的值来对应 style,然后根据 style 的不同值做不同的处理。进入这个函数是 画刷风格触发的槽函数 或者 ShowBrushColor()函数
3.5 其他内容
Qt 画图的坐标系默认以左上角为原点,x 轴向右,y 轴向下。此坐标系可受到 QPainter 类的控制,QPainter 类提供了相应的变形函数,包括旋转、缩放、平移和切边。调用这些函数时,看起来是对绘制内容的改变,实际上是坐标系的改变。如果还需要实现更复杂的变形,则可以采用 QTransform 类实现