做UG二次开发快一年了,每次遇到装配的问题涉及到部件事件、部件原型和部件实例还是一头雾水,什么是实例,什么是原型这些专业术语等等。
针对这个问题,今天专门写了一篇特辑,结合装配实例深度剖析装配过程中的的所有参数。
先来看看装配相关的基本概念:
UG装配是以树型结构组织装配中的部件,一个部件文件中只能有一棵装配树,即只能存在一个装配根节点。装配中的节点由部件原型、部件事件与部件实例3种对象进行描述。
- 部件事件(partoccurrence)是装配环境下对实际存在的部件模型(即部件原型)的一种引用,部件事件也可以理解为指向部件原型的指针。如果需要一次或多次装配一个部件,并不复制该部件的原型,而是建立该部件原型所对应的事件。在装配中,不同的部件事件表征不同的装配节点,因此UG赋予它唯一的标识。
- 部件原型(partPrototype)是真实存在的部件模型,它记录了模型所需的所有数据。当一个部件文件被多次装入时,将产生不同的部件事件,但这些事件都指向相同的部件原型。可以看出,部件原型与部件事件之间形成一对多的映射关系。部件事件随原型的改变而改变,但修改部件事件不会影响它的原型。
- 部件实例(partInstance)记录子节点与其父节点之间的关联关系,从而形成各节点间的层次结构。在装配体重,部件与其子部件之间的装配关系是利用部件实例来描述的。部件实例是指一次或多次装入装配体的部件对象,它描述装配环境下实例之间的层次关系,并表征唯一的上下级部件间的装配关系。部件实例也可以理解为一种指针,由下级部件事件指向上一级部件事件。可以看出,部件实例与部件事件之间形成一对多的映射关系,即不同的装配节点可能具有相同的装配关系。
一、实例截图及免费下载地址
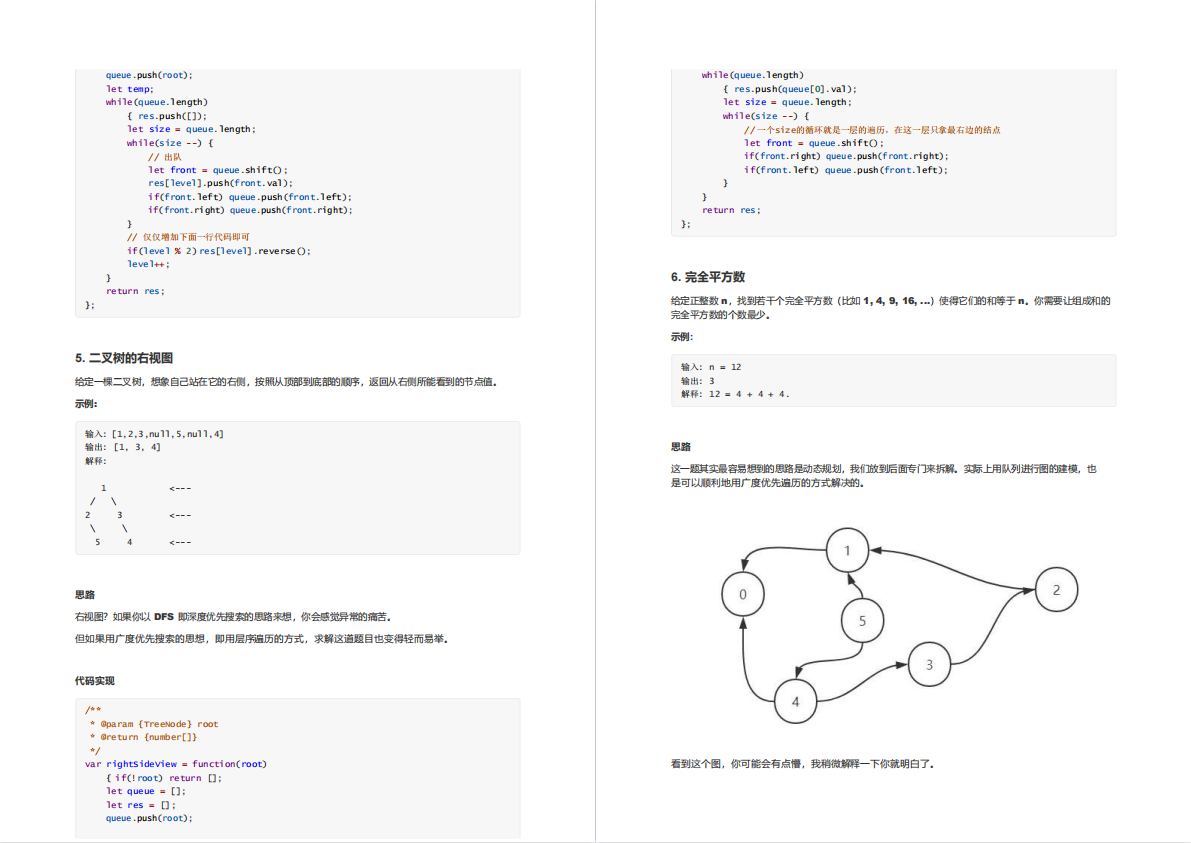
从截图可以看到,本实例创建了一个简单的装配,为了方便区分各节点特意用了:2个球、1个圆柱、一个圆锥和一个长方体来进行案例分析。
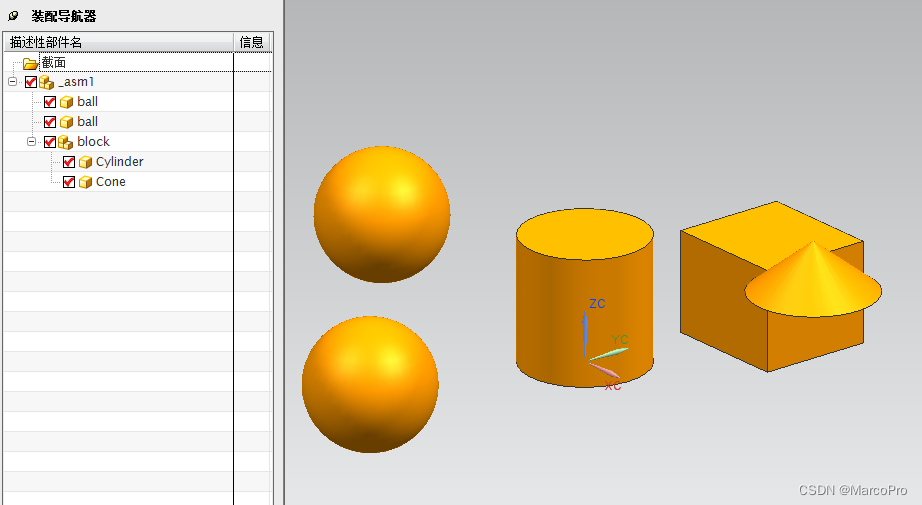
实例免费下载地址入口:https://download.csdn.net/download/MarcoPro/87452892
二、 部件事件、部件原型和部件实例分析
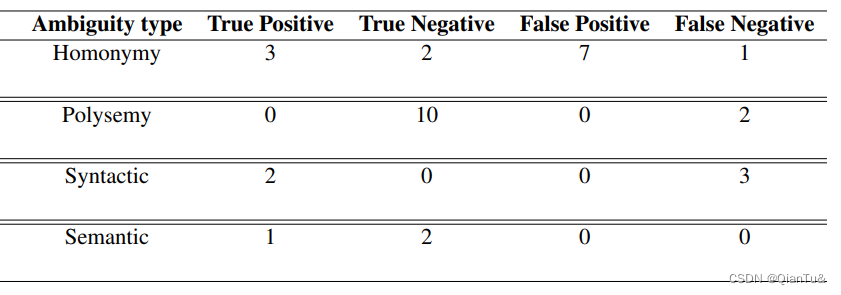
光看上面的概念,很难理解部件事件、部件原型和部件实例到底是什么,更不要提怎么用了,那么我们先把所有节点的数据拿出来看一下:
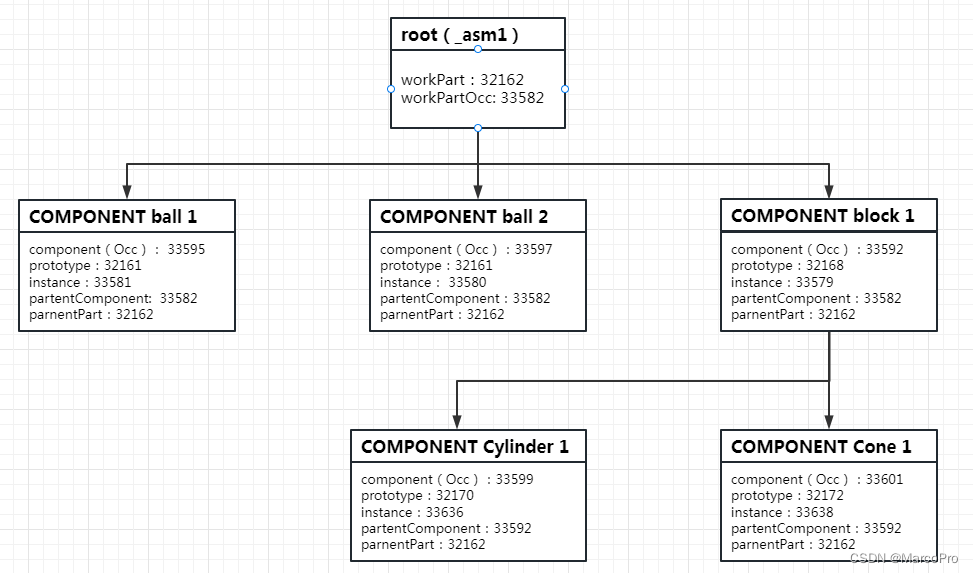
上图的数字都是相关属性的Tag值,从上之下三层代表了装配的层级关系,其中根节点下有:2个球和2个长方体,长方体下面有两个子节点:圆柱和圆锥。下面我会逐个分析所有节点:
1、根节点_asm1
根节点比较特殊,因为他没有原型,实际上是一个虚拟的节点,参数获取方法如下:
workpart = theUFSession.Assem.AskWorkPart(); //获得当前workpart的部件 tag
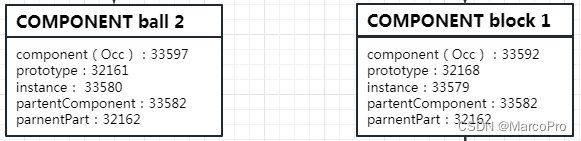
workocc = theUFSession.Assem.AskWorkOccurrence(); //获得当前workpart的occurrence tag2、二级节点COMPONENT ball 1、COMPONENT ball 2和COMPONENT block 1
1)为什么这里要做2个球体,就是为了看看来自同一个零件原型的节点,他的部件原型是否相同。
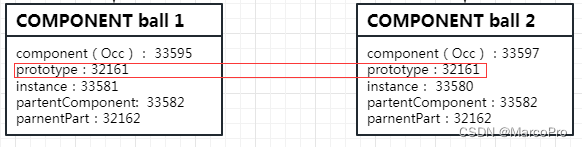
从数据不难发现,他们有相同的部件原型tag:32161,有不同的部件事件33595和33597,不同的部件实例33581和33580,然后他们的父部件和父部件事件是相同的。
2)反观同样在二级目录的球和长方体的数据,他们的部件事件、部件原型和部件实例都是不一样的,父部件和父部件事件是相同的。
3、三级节点COMPONENT Cylinder 1和COMPONENT Cone 1

从长方体和圆柱体、圆锥的数据不难发现,部件事件、部件原型和部件实例以及父节点和子节点的关系已经很明朗了。
三、 部件事件、部件原型和部件实例数据的获取方法
那么,上面的数据是怎么获取的呢?下面直接上源码:
1、调用主方法
theSession = Session.GetSession();
displayPart = theSession.Parts.Display;
List<Component> allComponents = new List<Component>();
List<ComponentModel> componentList = new List<ComponentModel>();
Component root = displayPart.ComponentAssembly.RootComponent;
if (root != null)
{
    AssemHelper.GetAllComponents(displayPart.ComponentAssembly.RootComponent, allComponents, componentList);
}

theUFSession = UFSession.GetUFSession();
Tag workpart;
Tag workocc;
workpart = theUFSession.Assem.AskWorkPart(); //获得当前workpart的prototype tag
workocc = theUFSession.Assem.AskWorkOccurrence(); //获得当前workpart的occurrence tag
if (workocc == Tag.Null) workocc = theUFSession.Assem.AskRootPartOcc(workpart);

int ChildOccNum = 0;
Tag[] childOccs; //子组件的occurrence
ChildOccNum = theUFSession.Assem.AskPartOccChildren(workocc, out childOccs);

Tag[] childInstances = new Tag[ChildOccNum]; //子组件的instance
for (int i = 0; i < ChildOccNum; i++)
{
    Tag childInstance = theUFSession.Assem.AskInstOfPartOcc(childOccs[i]);
    childInstances[i] = childInstance;
}

int ChildOccNum1 = 0;
Tag[] childOccs1;
ChildOccNum1 = theUFSession.Assem.AskPartOccChildren((Tag)int.Parse("33592"), out childOccs1);

Tag[] childInstances1 = new Tag[ChildOccNum1]; //子组件的instance
for (int i = 0; i < ChildOccNum1; i++)
{
    Tag childInstance1 = theUFSession.Assem.AskInstOfPartOcc(childOccs1[i]);
    childInstances1[i] = childInstance1;
}
2、子方法
/// <summary>
/// 用递归获得所有组件的方法
/// </summary>
/// <param name="fatherComponent">父组件</param>
/// <param name="allComponents">全部的组件集合</param>
public static void GetAllComponents(Component fatherComponent, List<Component> allComponents, List<ComponentModel> componentsList)
{
    theUFSession = UFSession.GetUFSession();
    Component[] tempComponent = fatherComponent.GetChildren();  //得到子组件数组
    foreach (Component x in tempComponent)//没有子组件时foreach的语句不会执行,跳出递归
    {
        allComponents.Add(x);
        string partName, refsetName, instanceName;
        double[] origin = new double[3]; //组件的位置
        double[] csys_matrix = new double[9]; //坐标系矩阵
        double[,] transform = new double[4, 4]; //转换矩阵
        theUFSession.Assem.AskComponentData(x.Tag, out partName, out refsetName, out instanceName, origin, csys_matrix, transform);
        ComponentModel model = new ComponentModel();
        model.origin = new double[3];
        model.csys_matrix = new double[9];
        model.transform = new double[4, 4];
        model.origin = origin;
        model.csys_matrix = csys_matrix;
        model.transform = transform;
        model.partName = partName;
        model.refsetName = refsetName;
        model.instanceName = instanceName;
        model.journalIdentifier = x.JournalIdentifier;
        componentsList.Add(model);

        GetAllComponents(x, allComponents, componentsList);
    }
}
四、小节
通过上面的梳理,我们了解了部件事件、部件原型和部件实例的基本概念以及在装配过程中的具体数据表现形式。
但是说实话,在实际项目中这些概念似乎并不是必须有用的,比如在使用Nxopen进行开发的过程中,我们不需要了解部件原型和部件事件,我们只需要找到component Tag就能去操作零件,其实这里的component Tag就是部件事件。
作为一名合格的程序员,我相信大家都有专研精神,对于黑盒的深入了解才是一步一步走向职业生涯巅峰的正确途径。