文章目录
- 1. 搭建资源服务器
- 1. Token存储配置类 TokenStoreAutoConfiguration
- 2. 资源服务器配置类 ResourceServerAutoConfiguration
- 3. 在META-INF/spring.factories文件下添加配置类
- 2. 搭建授权服务器
- 1. 密码加密配置类 PasswordEncodeConfig
- 2. RestTemplateConfig
- 3. 授权服务器配置类 AuthorizationServerConfiguration
- 4. 数据库表的数据准备
- 5. 密码加密工具类 BcryptUtil
- 3. 自定义AuthProvider实现认证登录
- 1. 登录请求入口 AuthController
- 2. 登录成功的响应类 AuthenticationInfo
- 3. 登录认证 LoginServiceImpl
- 4. 自定义认证管理器 CustomerAuthProvider
- 5. 自定义UserDetailService实现类 CustomUserDetailService
- 6. 认证成功后的用户对象 AuthUser
- 7. 安全配置类中添加自定义认证管理器 WebSecurityConfig
- 8. 启动项目测试登录功能
这是一个系列文章,具体项目结构可以参考这篇文章: SpringSecurity Oauth2实战 - 01 搭建授权服务器(密码模式)
1. 搭建资源服务器
1. Token存储配置类 TokenStoreAutoConfiguration
@Configuration
public class TokenStoreAutoConfiguration {

    @Autowired
    private RedisConnectionFactory connectionFactory;

    /**
     * 初始化 RedisTokenStore 用于将 token 存储至 Redis
     */
    @Bean
    public RedisTokenStore redisTokenStore() {
        RedisTokenStore redisTokenStore = new RedisTokenStore(connectionFactory);
        // 设置key的层级前缀,方便查询
        redisTokenStore.setPrefix("TOKEN:");
        return redisTokenStore;
    }
}
2. 资源服务器配置类 ResourceServerAutoConfiguration
@Slf4j
@Configuration
@EnableResourceServer
@EnableGlobalMethodSecurity(prePostEnabled = true)
public class ResourceServerAutoConfiguration extends ResourceServerConfigurerAdapter {

    @Autowired
    private TokenStore tokenStore;

    @Value("${spring.application.name}")
    private String appName;

    @Override
    public void configure(ResourceServerSecurityConfigurer resources) {
        resources.resourceId(appName);
        resources.tokenStore(tokenStore);
    }
}
3. 在META-INF/spring.factories文件下添加配置类
# Auto Configure
org.springframework.boot.autoconfigure.EnableAutoConfiguration=\
com.hh.config.ResourceServerAutoConfiguration,\
com.hh.config.TokenStoreAutoConfiguration
2. 搭建授权服务器
1. 密码加密配置类 PasswordEncodeConfig
@Configuration
public class PasswordEncodeConfig {

    @Bean
    public PasswordEncoder passwordEncoder() {
        return new BCryptPasswordEncoder();
    }
}
2. RestTemplateConfig
@Configuration
public class RestTemplateConfig {
    @Bean
    public RestTemplate restTemplate() {
        return new RestTemplate();
    }
}
3. 授权服务器配置类 AuthorizationServerConfiguration
/**
 * 配置授权服务器
 */
@Configuration
@EnableAuthorizationServer
public class AuthorizationServerConfiguration extends AuthorizationServerConfigurerAdapter {

    @Autowired
    @Qualifier("refreshTokenUserDetailService")
    private UserDetailsService refreshTokenUserDetailService;

    @Autowired
    private AuthenticationManager authenticationManager;

    @Autowired
    private PasswordEncoder passwordEncoder;

    @Autowired
    private TokenStore tokenStore;

    /**
     * 用来配置授权服务器可以为哪些客户端授权,使用哪种授权模式
     *
     * 密码模式:在密码模式中,用户向客户端提供用户名和密码,客户端通过用户名和密码到认证服务器获取令牌
     * (A)用户访问客户端,提供URI连接包含用户名和密码信息给授权服务器
     * (B)授权服务器对客户端进行身份验证
     * (C)授权通过,返回access_token给客户端
     */
    @Override
    public void configure(ClientDetailsServiceConfigurer clients) throws Exception {
        clients.inMemory()
                // 客户端id
                .withClient("client_id")
                // 客户端秘钥
                .secret(passwordEncoder.encode("client_secret"))
                // 授权模式
                .authorizedGrantTypes("password", "refresh_token", "client_credentials")
                // access_token的过期时长
                .accessTokenValiditySeconds(43200)
                // refresh_token的过期时长
                .refreshTokenValiditySeconds(86400)
                // 允许授权的范围
                .scopes("all");
    }

    /**
     * 刷新令牌必须配置userDetailsService,用来刷新令牌时的认证
     */
    @Override
    public void configure(AuthorizationServerEndpointsConfigurer endpoints) {
        // 配置token的存储方式
        endpoints.tokenStore(tokenStore);
        // 配置认证管理器
        endpoints.authenticationManager(authenticationManager);
        // 配置认证数据源,刷新令牌时的认证
        endpoints.userDetailsService(refreshTokenUserDetailService);
    }

    /**
     * 开启token检查接口
     */
    @Override
    public void configure(AuthorizationServerSecurityConfigurer security){
        security.allowFormAuthenticationForClients().checkTokenAccess("permitAll()");
    }
}
注意: 刷新令牌必须配置 UserDetailsService,用来刷新令牌时的认证,这里配置了一个RefreshTokenUserDetailServiceImpl 实现 UserDetailsService 接口,默认使用的账号密码验证方式会自动加载DaoAuthenticationProvider类,该类会自动扫描一个UserDetailService实现类并注入,如果存在多个UserDetailService实现类会注入失败。
@Slf4j
@Service("refreshTokenUserDetailService")
public class RefreshTokenUserDetailServiceImpl implements UserDetailsService {
    @Override
    public UserDetails loadUserByUsername(String username) throws UsernameNotFoundException {

    }
}
4. 数据库表的数据准备
因为项目使用的flyway组件,因此项目启动时就会执行sql脚本创建表并添加表中数据:
-- 用户表
CREATE TABLE `user`(
    `id`         varchar(64)  NOT NULL COMMENT '用户id',
    `username`   varchar(50)  NOT NULL COMMENT '账户名称',
    `password`   varchar(200) NOT NULL COMMENT '用户密码密文',
    `phone`      varchar(20) DEFAULT NULL COMMENT '手机号码',
    `createTime` datetime    DEFAULT NULL COMMENT '创建时间',
    PRIMARY KEY (`id`)
) ENGINE = InnoDB DEFAULT CHARSET = utf8;

-- 角色表
CREATE TABLE `role`(
    `id`          varchar(64) NOT NULL COMMENT '主键',
    `name`        varchar(255) DEFAULT NULL COMMENT '角色名称',
    `description` varchar(300) DEFAULT NULL,
    `createTime`  datetime     DEFAULT NULL COMMENT '创建时间',
    PRIMARY KEY (`id`)
) ENGINE = InnoDB DEFAULT CHARSET = utf8;

-- 权限表
CREATE TABLE `policy`(
    `id`         varchar(32) NOT NULL,
    `name`       varchar(64) NOT NULL COMMENT '权限策略名',
    `createTime` timestamp   NOT NULL DEFAULT current_timestamp() COMMENT '创建时间',
    PRIMARY KEY (`id`) USING BTREE
) ENGINE = InnoDB DEFAULT CHARSET = utf8mb4 ROW_FORMAT = DYNAMIC COMMENT ='权限策略表';

-- 用户角色表
CREATE TABLE `user_role`(
    `id`         varchar(64) NOT NULL COMMENT '主键',
    `userId`     varchar(64) DEFAULT NULL COMMENT '用户id',
    `roleId`     varchar(64) DEFAULT NULL COMMENT '角色id',
    `createTime` datetime    DEFAULT NULL COMMENT '创建时间',
    PRIMARY KEY (`id`)
) ENGINE = InnoDB DEFAULT CHARSET = utf8;

-- 角色权限表
CREATE TABLE `role_policy`(
    `id`         varchar(64) NOT NULL COMMENT '主键',
    `roleId`     varchar(64) DEFAULT NULL COMMENT '角色id',
    `policyId`   varchar(64) DEFAULT NULL COMMENT '菜单权限id',
    `createTime` datetime    DEFAULT NULL COMMENT '创建时间',
    PRIMARY KEY (`id`)
) ENGINE = InnoDB DEFAULT CHARSET = utf8;
-- 添加两个用户
INSERT INTO `authority`.`user` (`id`, `username`, `password`, `phone`, `createTime`) VALUES ('c24e51170fc64702ab38778e6562d8ac', 'zhangsan', '$2a$12$ECL54x35.kTMjNuefp28nOJu3bnTY7TPyVLGEMfapem10m1u0hMze', '18751779090', '2022-11-04 06:11:35');
INSERT INTO `authority`.`user` (`id`, `username`, `password`, `phone`, `createTime`) VALUES ('d20ff7f13c61474687b7cb6148e2823b', 'root', '$2a$12$f2csfxV4IE6/lLD.4ZWJCOGOLNtjYhYfPMn20s1bMOkKN/RtaBOTe', '18751779090', '2022-11-04 15:49:05');

-- 添加两个角色
INSERT INTO `authority`.`role` (`id`, `name`, `description`, `createTime`) VALUES ('3e65cd3532d94feb9bdaade9c09b8f08', '超级管理员', '超级管理员', '2022-11-04 06:18:41');
INSERT INTO `authority`.`role` (`id`, `name`, `description`, `createTime`) VALUES ('bca2b44e287642fb9eac63d2f0f08b4b', '平台管理员', '平台管理员', '2022-11-04 06:12:24');

-- 添加5个权限
INSERT INTO `authority`.`policy` (`id`, `name`, `createTime`) VALUES ('5eca3c4d9c224580855edb876beaa0ce', 'userEdit', '2022-11-04 06:16:29');
INSERT INTO `authority`.`policy` (`id`, `name`, `createTime`) VALUES ('618717f96b9a4f0380571ab203a5ac75', 'superAdmin', '2022-11-04 06:16:57');
INSERT INTO `authority`.`policy` (`id`, `name`, `createTime`) VALUES ('cab872e977824f65849b4ae1fc763d84', 'knowledgeQuery', '2022-11-04 06:16:09');
INSERT INTO `authority`.`policy` (`id`, `name`, `createTime`) VALUES ('fb693bf8ec13424e8ee370c08a597fcf', 'userQuery', '2022-11-04 06:16:40');
INSERT INTO `authority`.`policy` (`id`, `name`, `createTime`) VALUES ('fd60b1eaf222482496bb9ec5ec3f86dc', 'knowledgeEdit', '2022-11-04 06:16:00');

-- 给zhangsan用户关联2个角色
INSERT INTO `authority`.`user_role` (`id`, `userId`, `roleId`, `createTime`) VALUES ('cdcc6217725b49efa733f5e50b09ab7a', 'c24e51170fc64702ab38778e6562d8ac', '3e65cd3532d94feb9bdaade9c09b8f08', '2022-11-04 06:20:37');

-- 给超级管理员角色添加5个权限
INSERT INTO `authority`.`role_policy` (`id`, `roleId`, `policyId`, `createTime`) VALUES ('adb5aead86f444ec8aef9f8e60fdc649', '3e65cd3532d94feb9bdaade9c09b8f08', '618717f96b9a4f0380571ab203a5ac75', '2022-11-04 06:24:27');
INSERT INTO `authority`.`role_policy` (`id`, `roleId`, `policyId`, `createTime`) VALUES ('c6028a63797e44e99e83d9d1cb87e11b', '3e65cd3532d94feb9bdaade9c09b8f08', '5eca3c4d9c224580855edb876beaa0ce', '2022-11-04 06:24:12');
INSERT INTO `authority`.`role_policy` (`id`, `roleId`, `policyId`, `createTime`) VALUES ('c7c8ac1db9b04cf387bb886a7d71834a', '3e65cd3532d94feb9bdaade9c09b8f08', 'fb693bf8ec13424e8ee370c08a597fcf', '2022-11-04 06:24:48');
INSERT INTO `authority`.`role_policy` (`id`, `roleId`, `policyId`, `createTime`) VALUES ('dda442d423de4386bfb43a7126a03c12', '3e65cd3532d94feb9bdaade9c09b8f08', 'fd60b1eaf222482496bb9ec5ec3f86dc', '2022-11-04 06:25:02');
INSERT INTO `authority`.`role_policy` (`id`, `roleId`, `policyId`, `createTime`) VALUES ('ff95697aa0c54d83af00e8e36816b5fa', '3e65cd3532d94feb9bdaade9c09b8f08', 'cab872e977824f65849b4ae1fc763d84', '2022-11-04 06:24:40');
5. 密码加密工具类 BcryptUtil
/**
 * bcrypt算法工具
 * bcrypt加密算法属于单向hash加密, salt与密文按照约定拼接, 不用单独管理salt, 每次生成不同密文, 即使明文相同
 */
@Slf4j
public class BcryptUtil {
    /**
     * bcrypt加密算法的long_round参数配置, 安全基线明确要求>=12
     */
    private static BCryptPasswordEncoder bCryptPasswordEncoder = new BCryptPasswordEncoder(12);

    /**
     * 对密码进行加密
     *
     * @param rawPwd 原始密码
     * @return 加密后的密码
     */
    public static String bEncryptEncode(String rawPwd) {
        return bCryptPasswordEncoder.encode(rawPwd);
    }

    /**
     * 进行加盐的比对
     *
     * @param rawPwd 原有的密码
     * @param dbPwd  加密后的密码
     * @return boolean 是否相同
     */
    public static boolean bEncryptMatch(String rawPwd, String dbPwd) {
        return bCryptPasswordEncoder.matches(rawPwd, dbPwd);
    }
}
3. 自定义AuthProvider实现认证登录
1. 登录请求入口 AuthController
@Slf4j
@RestController
@RequestMapping("/api/v1")
public class AuthController {

    @Autowired
    private LoginService loginService;

    @PostMapping("/login")
    public ApiResponse<AuthenticationInfo> authority( @Validated @RequestBody LoginQo loginQo){
        AuthenticationInfo authenticationInfo = loginService.checkAndAuth( loginQo);
        return new ApiResponse<>(0,"success",authenticationInfo);
    }
}
注意:/api/v1/login 请求资源时受保护的资源,因此需要在资源服务器中放行该请求
@Slf4j
@Configuration
@EnableResourceServer
@EnableGlobalMethodSecurity(prePostEnabled = true)
public class ResourceServerAutoConfiguration extends ResourceServerConfigurerAdapter {

    @Autowired
    private TokenStore tokenStore;

    @Value("${spring.application.name}")
    private String appName;

    @Override
    public void configure(ResourceServerSecurityConfigurer resources) {
        resources.resourceId(appName);
        resources.tokenStore(tokenStore);
    }

    @Override
    public void configure(HttpSecurity http) throws Exception {
        http.authorizeRequests()
            // 放行的请求
            .antMatchers("/api/v1/login").permitAll()
            // 其他请求必须认证才能访问
            .anyRequest().authenticated()
            .and()
            .csrf().disable();
    }
}
2. 登录成功的响应类 AuthenticationInfo
@Data
public class AuthenticationInfo {

    /*令牌对象*/
    private AuthToken authToken;

    /*用户详情*/
    private User user;
}
① 登录成功返回的用户信息 User
@Data
public class User implements Serializable {
    private static final long serialVersionUID = 160958617672077663L;
    /**
    * 用户id
    */
    private String id;
    /**
    * 账户名称
    */
    private String username;
    /**
    * 用户密码密文
    */
    private String password;
    /**
    * 手机号码
    */
    private String phone;
    /**
    * 创建时间
    */
    private Date createTime;
}
② 认证成功返回的 AuthToken
/**
 * 认证返回的AccessToken
 */
@Data
public class AuthToken {

    /*令牌*/
    private String accessToken;

    /*令牌类型*/
    private String tokenType;

    /*刷新使用的令牌*/
    private String refreshToken;

    /*过期时间长,单位:秒*/
    private Integer expiresIn;

   /*令牌的作用范围*/
    private String scope;
}
③ 认证的主体
/**
 * 用于jwt认证的主体
 */
@Data
@Builder
@NoArgsConstructor
@AllArgsConstructor
public class AuthJwtPrincipal implements Serializable {
    /*用户ID*/
    private String userId;
}
3. 登录认证 LoginServiceImpl
@Service
@Slf4j
public class LoginServiceImpl implements LoginService {

    @Autowired
    private UserService userService;

    @Autowired
    private RestTemplate restTemplate;

    /**
     * 登录认证
     * @param loginQo 登录请求体
     * @return AuthenticationInfo
     */
    @Override
    public AuthenticationInfo checkAndAuth(LoginQo loginQo) {
        // 密码认证:数据库中的密码是经过bcrypt加密算法存储的
        User user = userService.queryByName(loginQo.getName());
        String dbEncryptPwd = user.getPassword();
        boolean isPassed = BcryptUtil.bEncryptMatch(loginQo.getPassword(), dbEncryptPwd);
        // 登陆失败
        if (!isPassed) {
            log.info("the user: {} login failed, account or password is wrong", user.getId());
            throw new RuntimeException("用户账号或者密码错误");
        }
        // 登录成功,获取用户认证信息
        AuthJwtPrincipal authJwtPrincipal = AuthJwtPrincipal.builder().userId(user.getId()).build();
        AuthenticationInfo authenticationInfo =  obtainAuthenticationInfo(authJwtPrincipal,user);
        String accessToken = authenticationInfo.getAuthToken().getAccessToken();
        if(StringUtils.isBlank(accessToken)){
            throw new RuntimeException("用户账号或者密码错误");
        }
        return authenticationInfo;
    }

    /**
     * 获取认证信息
     * @param authJwtPrincipal 认证主体
     * @param user 用户信息
     * @return AuthenticationInfo
     */
    private AuthenticationInfo obtainAuthenticationInfo(AuthJwtPrincipal authJwtPrincipal,User user) {
        AuthenticationInfo authenticationInfo = new AuthenticationInfo();
        // SpringSecurity Oauth2获取access_token
        AuthToken authToken = getAccessToken(authJwtPrincipal);
        authenticationInfo.setAuthToken(authToken);
        authenticationInfo.setUser(user);
        return authenticationInfo;
    }

    /**
     *  通过登陆信息获取相应的令牌对象
     * @param authJwtPrincipal 认证主体
     * @return AuthToken
     */
    public AuthToken getAccessToken(AuthJwtPrincipal authJwtPrincipal) {
        String loginJsonString = JSON.toJSONString(authJwtPrincipal);
        MultiValueMap<String, String> map = new LinkedMultiValueMap<>();
        map.add("username", loginJsonString);
        // 因为使用的是自定义认证方式 CustomerAuthProvider,密码用不到,所以设为一个空值即可
        map.add("password", StringUtils.EMPTY);
        map.add("client_id", "client_id");
        map.add("client_secret","client_secret");
        map.add("grant_type", "password");
        map.add("scope", "all");
        // 这里会进行Oauth2.0的请求 在CustomerAuthProvider进行认证处理
        Map response = restTemplate.postForObject("http://127.0.0.1:8081/oauth/token", map, Map.class);
        if (MapUtil.isEmpty(response)) {
            return null;
        }
        // 封装返回
        AuthToken authToken = new AuthToken();
        authToken.setAccessToken((String) response.get("access_token"));
        authToken.setExpiresIn((Integer) response.get("expires_in"));
        authToken.setRefreshToken((String) response.get("refresh_token"));
        authToken.setTokenType((String) response.get("token_type"));
        authToken.setScope((String) response.get("scope"));
        return authToken;
    }
}
4. 自定义认证管理器 CustomerAuthProvider
@Slf4j
@Component
public class CustomAuthProvider implements AuthenticationProvider {

    @Autowired
    private CustomUserDetailService customUserDetailService;

    @Override
    public Authentication authenticate(Authentication authentication) throws AuthenticationException {
        // LoginServiceImpl#getAccessToken方法中的loginJsonString
        String contentJsonStr
                = Objects.isNull(authentication.getPrincipal()) ? StringUtils.EMPTY : authentication.getName();
        // 通过authentication获取登录用户信息AuthUser
        AuthUser user = customUserDetailService.loadUserByContent(contentJsonStr);
        UsernamePasswordAuthenticationToken result = new UsernamePasswordAuthenticationToken(
                user, authentication.getCredentials(), user.getAuthorities()
        );
        result.setDetails(authentication.getDetails());
        return result;
    }

    @Override
    public boolean supports(Class<?> authentication) {
        return UsernamePasswordAuthenticationToken.class.isAssignableFrom(authentication);
    }
}
5. 自定义UserDetailService实现类 CustomUserDetailService
作为UserDetailService实现类,原本应该继承UserDetailService接口,但是由于默认使用的账号密码验证方式会自动加载DaoAuthenticationProvider类,该类会自动扫描一个UserDetailService实现类并注入,如果存在多个UserDetailService实现类会注入失败,所以这里不继承该接口,直接实现功能,前面我们已经配置了一个RefreshTokenUserDetailServiceImpl
/**
 * 自定义的UserDetailService调用实现
 */
@Slf4j
@Service("customUserDetailService")
public class CustomUserDetailService{

    @Autowired
    private UserService userService;

    @Autowired
    private PolicyService policyService;

    @Autowired
    private PasswordEncoder passwordEncoder;

    @Autowired
    private RolePolicyService rolePolicyService;

    /**
     * 通过用户ID获取相应的角色信息
     *
     * @param content 内容
     * @return NgsocUser
     * @throws UsernameNotFoundException
     */
    public AuthUser loadUserByContent(String content) throws UsernameNotFoundException {
        if (StringUtils.isBlank(content)) {
            throw new UsernameNotFoundException("exceptions.authentication.principal.error");
        }
        // content是loginJsonString,可以转为AuthJwtPrincipal
        AuthJwtPrincipal authJwtPrincipal = JSON.parseObject(content, AuthJwtPrincipal.class);
        String userId = authJwtPrincipal.getUserId();

        // 获取登录用户信息
        User user = userService.queryById(userId);
        if (Objects.isNull(user)) {
            throw new UsernameNotFoundException("exceptions.authentication.principal.error");
        }

        // 获取登录用户的角色信息
        List<UserRole> userRoleList  = userService.getUserRoleByUserId(userId);
        List<String> roleIds = userRoleList.stream().map(UserRole::getRoleId).collect(Collectors.toList());

        // 获取登录用户的权限信息
        List<Policy> policyList = policyService.getPolicyByRoleIds(roleIds);
        if (CollectionUtils.isEmpty(policyList)) {
            throw new UsernameNotFoundException("contact.administrator.to.assign.policy");
        }
        List<String> policyNames = policyList.stream().map(Policy::getName).collect(Collectors.toList());
        Set<GrantedAuthority> grantedAuthoritySet = policyList.stream()
                .map(policyEntity -> new SimpleGrantedAuthority(policyEntity.getName()))
                .collect(Collectors.toSet());

        // 存储本地用户信息
        UserInfo userInfo = new UserInfo();
        userInfo.setId(user.getId());
        userInfo.setUsername(user.getUsername());
        userInfo.setRoleIds(roleIds);
        userInfo.setPolicyName(policyNames);

        String encodePasswordStr = passwordEncoder.encode("password");
        return new AuthUser(userId, encodePasswordStr, userInfo, grantedAuthoritySet);
    }
}
6. 认证成功后的用户对象 AuthUser
/**
 * 认证成功后的用户对象
 */
@AllArgsConstructor
@NoArgsConstructor
public class AuthUser implements UserDetails {
    @Setter
    private String username;

    @Setter
    private String password;

    @Setter
    @Getter
    private UserInfo userInfo;

    /*登录用户具备的权限*/
    @Setter
    private Set<GrantedAuthority> authorities;

    public AuthUser(String username, String password){
        this.username = username;
        this.password = password;
    }

    public AuthUser(String username, String password, Set<GrantedAuthority> authorities){
        this(username,password);
        this.authorities = authorities;
    }

    @Override
    public Collection<? extends GrantedAuthority> getAuthorities() {
        return authorities;
    }

    @Override
    public String getPassword() {
        return password;
    }

    @Override
    public String getUsername() {
        return username;
    }

    @Override
    public boolean isAccountNonExpired() {
        return true;
    }

    @Override
    public boolean isAccountNonLocked() {
        return true;
    }

    @Override
    public boolean isCredentialsNonExpired() {
        return true;
    }

    @Override
    public boolean isEnabled() {
        return true;
    }
}
用户信息 UserInfo :
@Data
@AllArgsConstructor
@NoArgsConstructor
public class UserInfo implements Serializable {
    private static final long serialVersionUID = 671647501342140183L;
    // 用户信息
    private String id;
    private String username;
    // 角色信息
    private List<String> roleIds;
    // 权限信息
    private List<String> policyName;
}
7. 安全配置类中添加自定义认证管理器 WebSecurityConfig
/**
 * - @EnableGlobalMethodSecurity:该注解是用来开启权限注解
 * - prePostEnabled = true:开启Spring Security提供的四个权限注解,@PostAuthorize、@PostFilter、@PreAuthorize 以及@PreFilter
 */
@Configuration
@EnableGlobalMethodSecurity(prePostEnabled = true)
@EnableWebSecurity
public class WebSecurityConfig extends WebSecurityConfigurerAdapter {

    @Autowired
    private PasswordEncoder passwordEncoder;

    /**
     * 登陆认证相关
     */
    @Autowired
    private CustomAuthProvider customAuthProvider;

    @Override
    protected void configure(HttpSecurity http) throws Exception {
        super.configure(http);
    }

    // 自定义AuthenticationManager:并没有在工厂中暴露出来
    // 使用AuthenticationManagerBuilder来自定义AuthenticationManager,覆盖默认的AuthenticationManager
    @Override
    protected void configure(AuthenticationManagerBuilder auth) {
        auth.authenticationProvider(customAuthProvider);
    }

    // 如需使用AuthenticationManager,则可以通过覆盖此方法,将configure(AuthenticationManagerBuilder)方法构造的AuthenticationManager暴露为Bean。
    @Bean
    @Override
    public AuthenticationManager authenticationManagerBean() throws Exception {
        return super.authenticationManagerBean();
    }
}
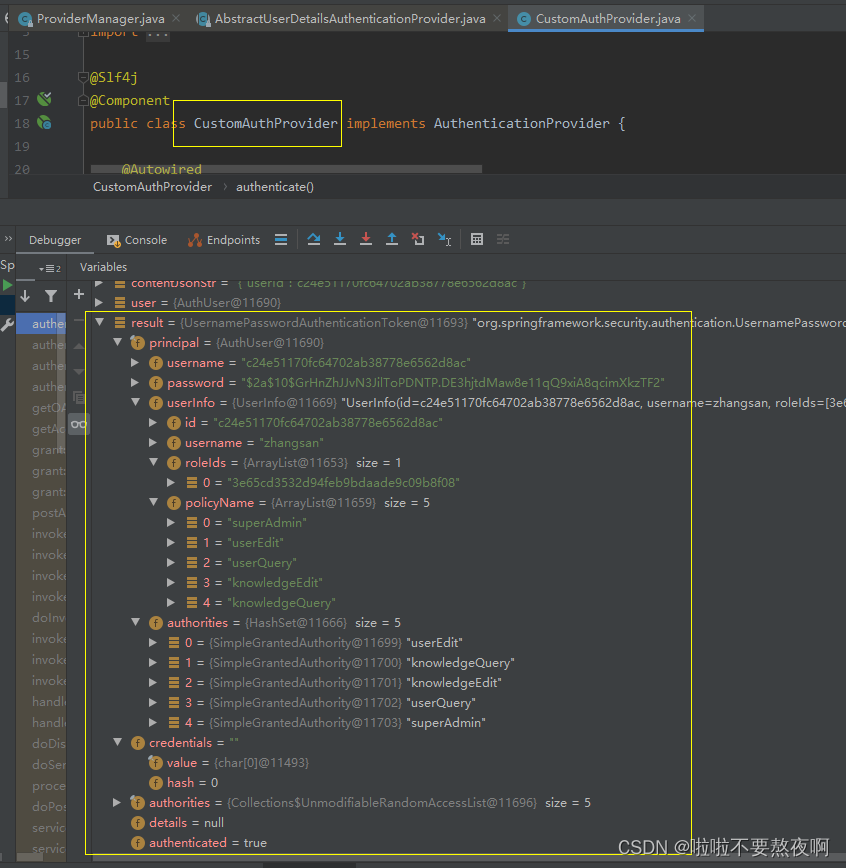
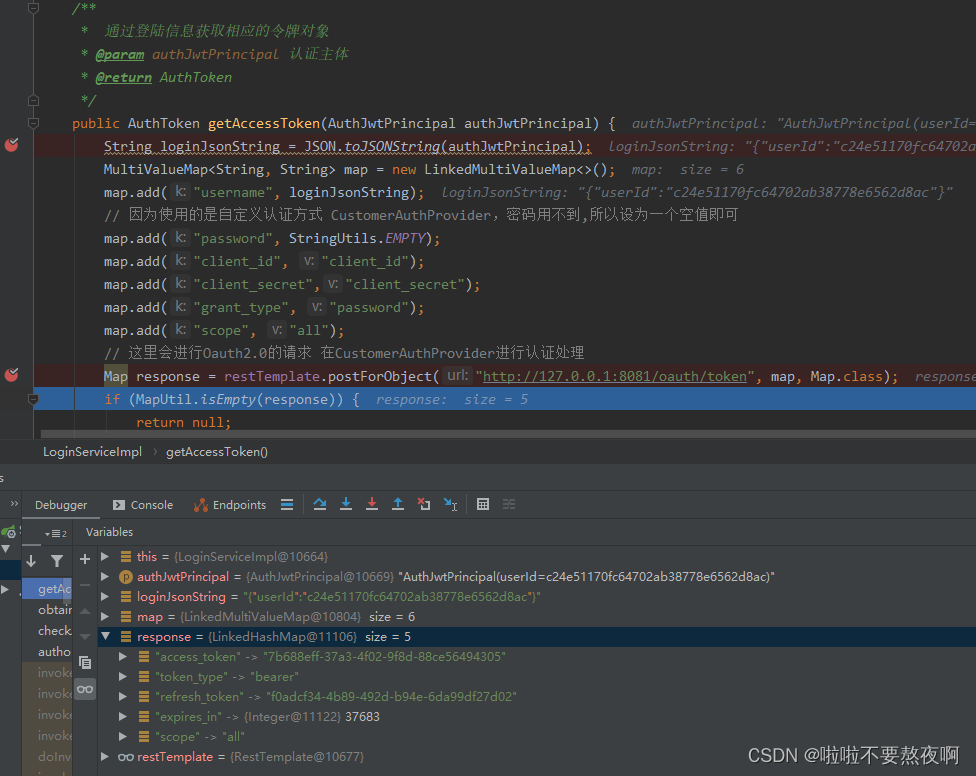
8. 启动项目测试登录功能
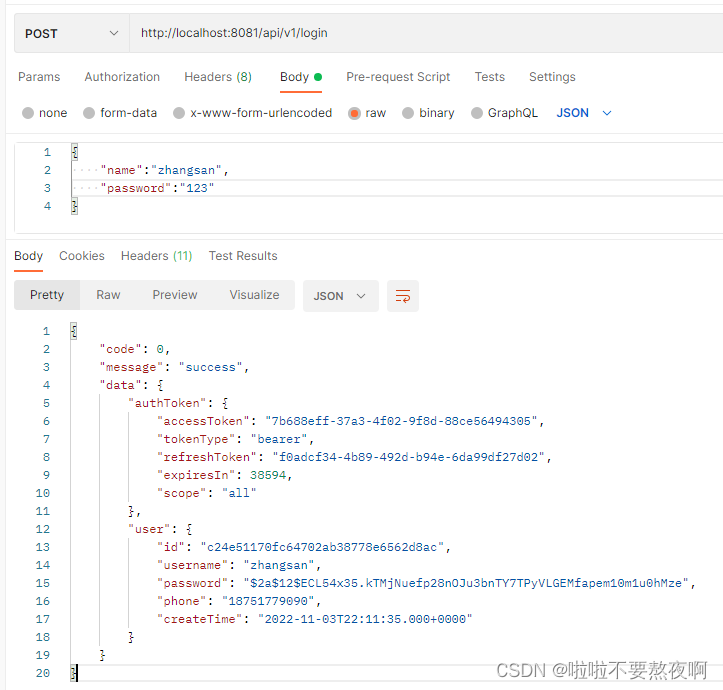
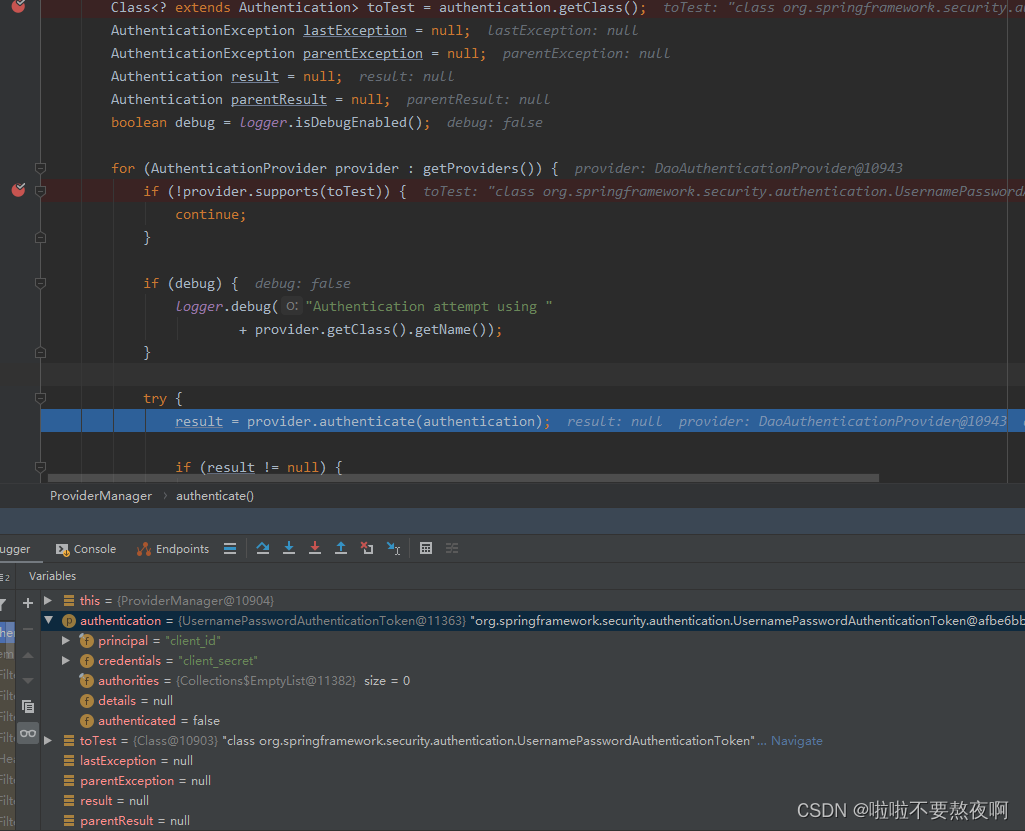
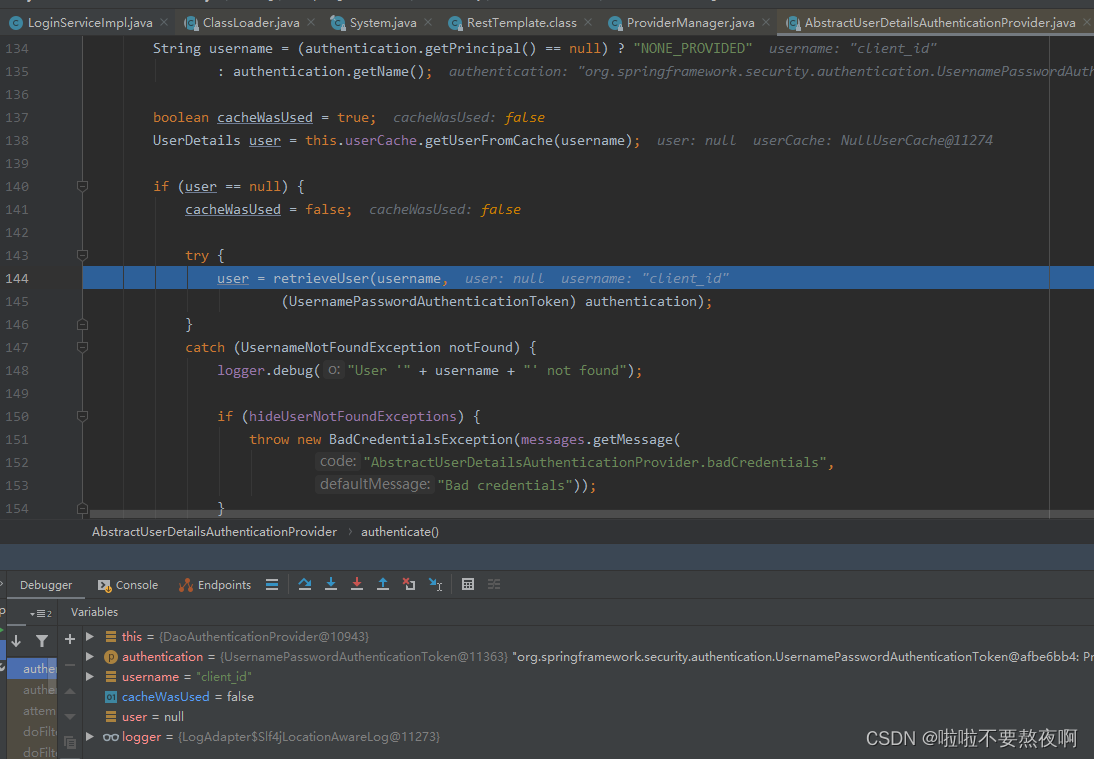
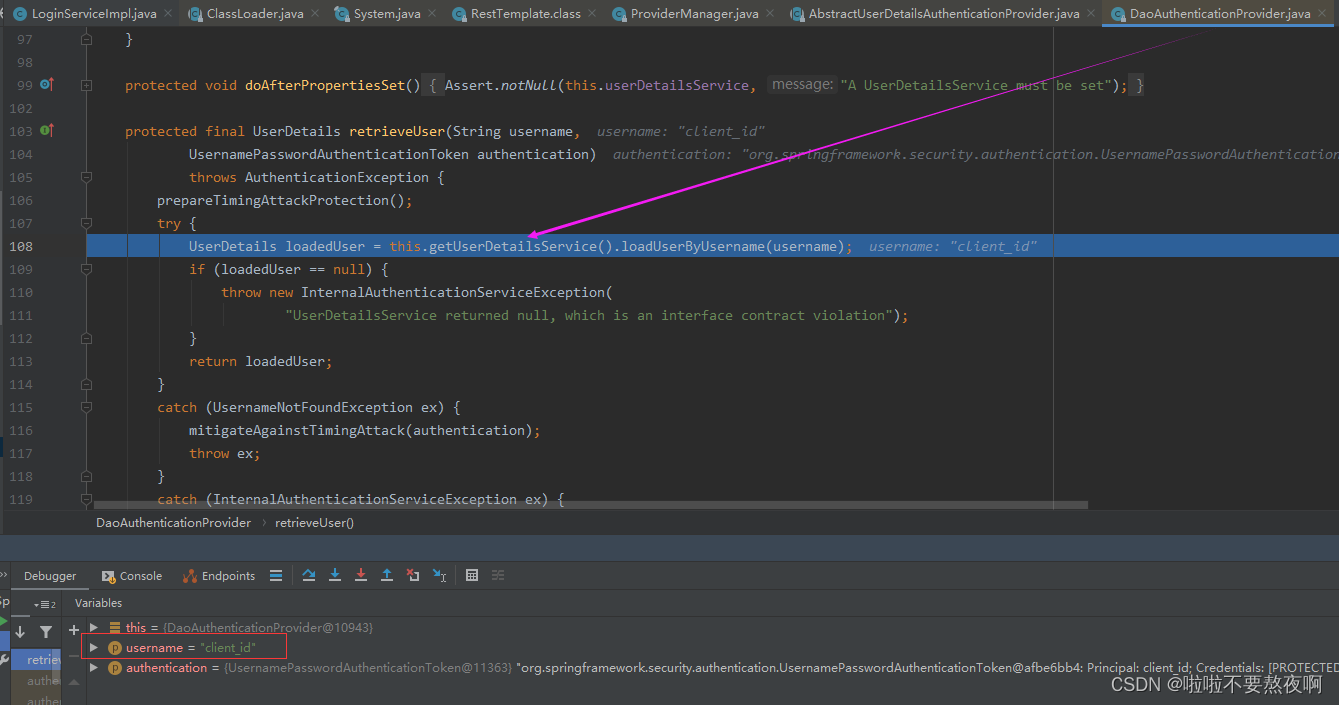
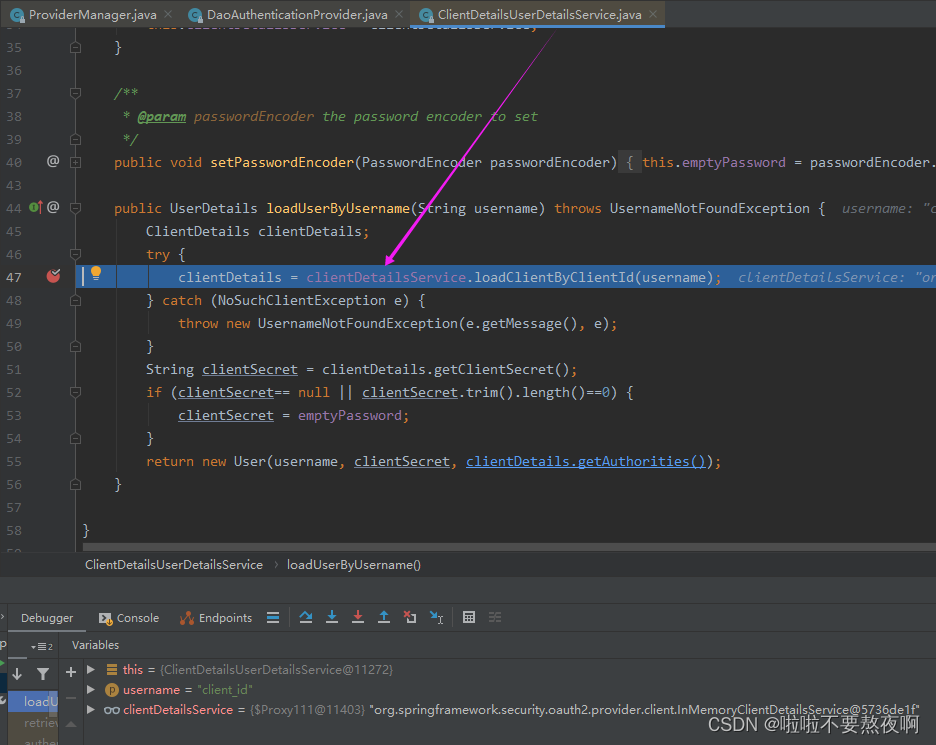
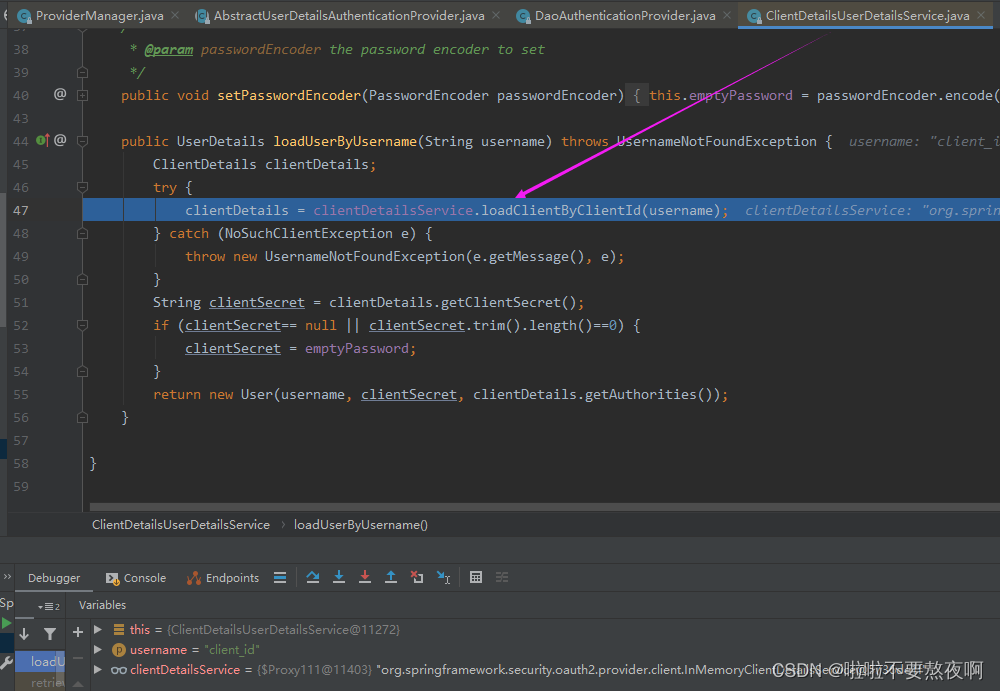
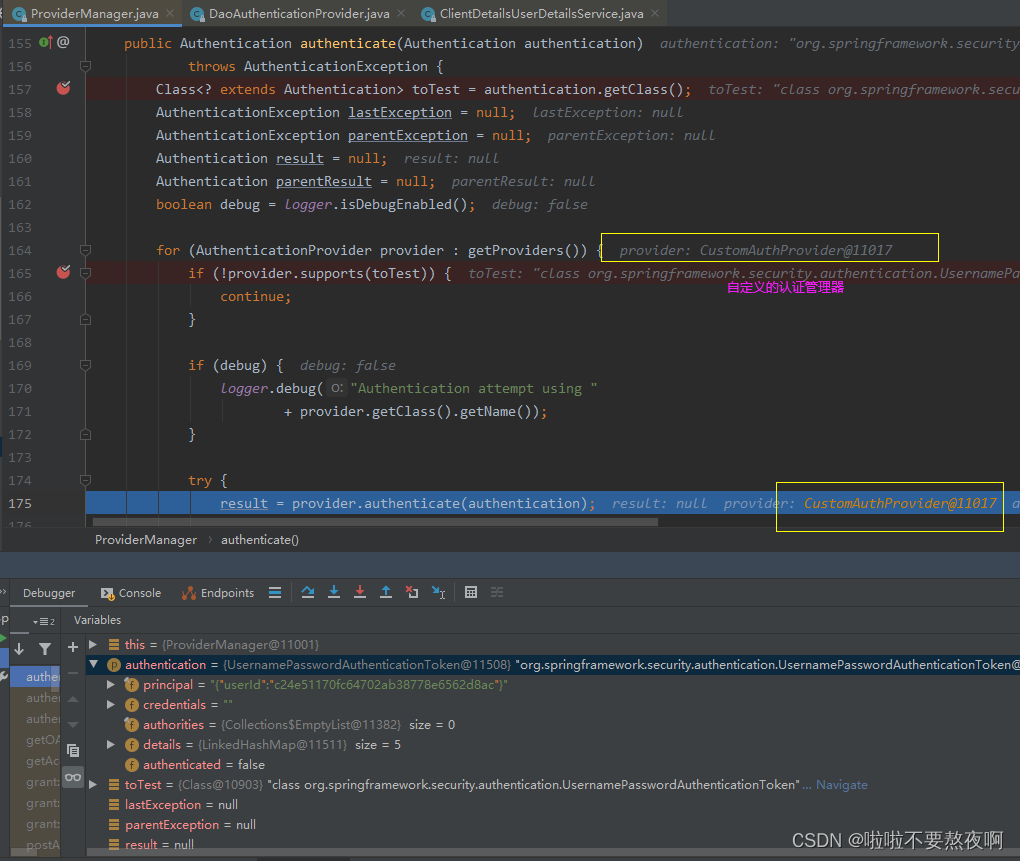
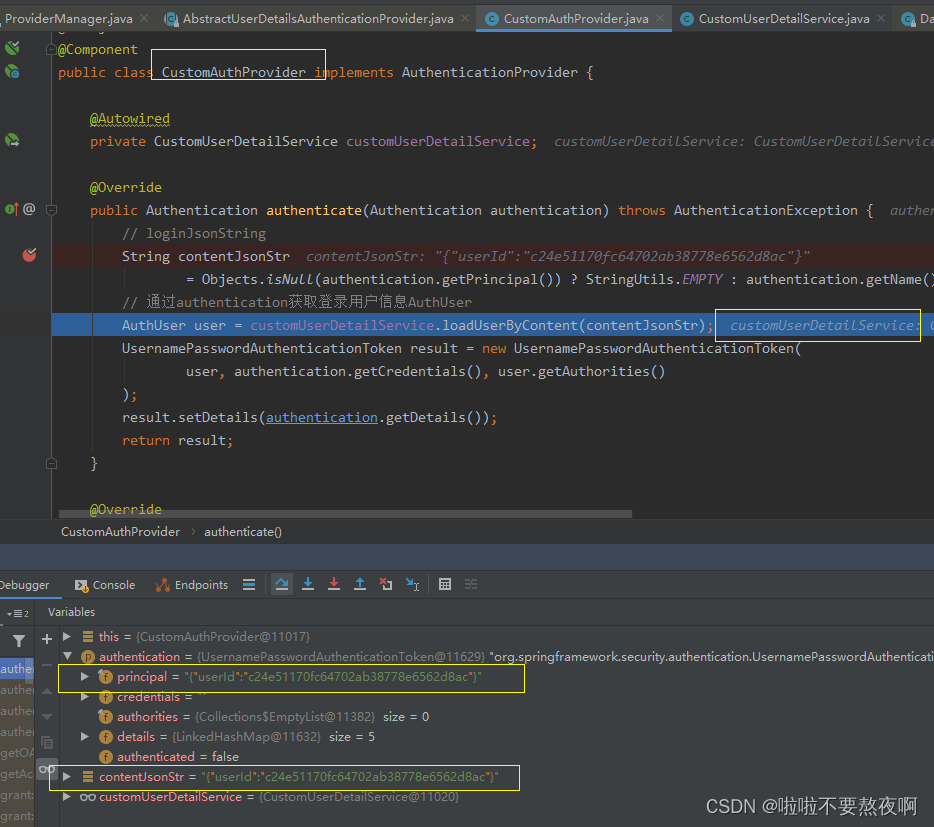
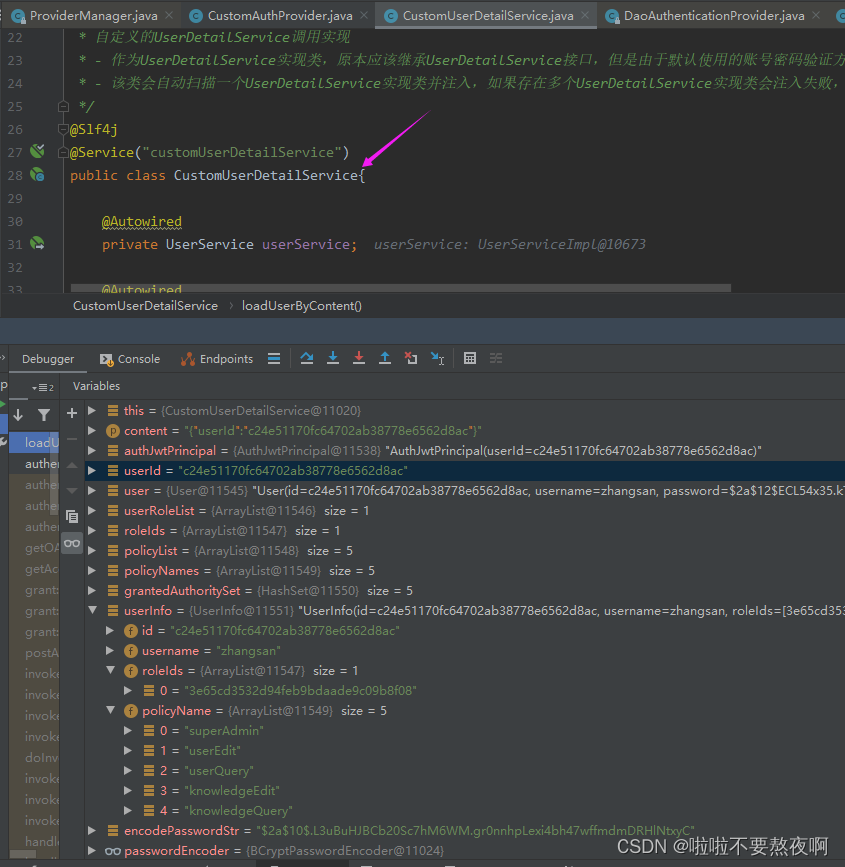
核心点debug过程:
