一,常用控件的使用方法
1,TextView
   <TextView
        android:id="@+id/text_view"
        android:layout_width="match_parent"
        android:layout_height="wrap_content"
        android:gravity="center"
        android:textSize="24sp"
        android:textColor="#00ff00"
        android:text="文本"/>
实现效果:

2,Button
    <Button
        android:id="@+id/button"
        android:layout_width="match_parent"
        android:layout_height="wrap_content"
        android:text="按钮"
        android:textAllCaps="false"/>
绑定事件:
Button button1=(Button) findViewById(R.id.button);
button1.setOnClickListener(new View.OnClickListener() {
    @Override
    public void onClick(View view) {
        Intent intent=new Intent(FirstActivity.this,SecondActivity.class);
        startActivity(intent);
    }
});
3,EditText
    <EditText
        android:layout_width="match_parent"
        android:layout_height="wrap_content"
        android:id="@+id/edit_text"
        android:hint="请在这里输入字符"
        android:maxLines="2"/>
按钮获取内容弹窗显示:
        Button button1=(Button) findViewById(R.id.button);
        EditText editText=(EditText) findViewById(R.id.edit_text);
        button1.setOnClickListener(new View.OnClickListener() {
            @Override
            public void onClick(View view) {
                String inputText=editText.getText().toString();
                Toast.makeText(FirstActivity.this, inputText, Toast.LENGTH_SHORT).show();
            }
        });
4,ImageView
    <ImageView
        android:id="@+id/image_view"
        android:layout_width="wrap_content"
        android:layout_height="wrap_content"
        android:src="@drawable/img_1"/>
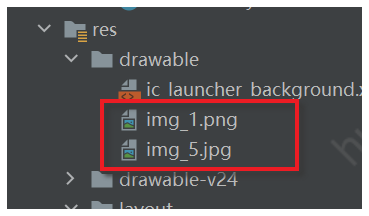
切换图片:
        Button button1=(Button) findViewById(R.id.button);
        ImageView imageView=(ImageView) findViewById(R.id.image_view);
        button1.setOnClickListener(new View.OnClickListener() {
            @Override
            public void onClick(View view) {
                    imageView.setImageResource(R.drawable.img_5);
            }
        });
图片地址:
5,ProgressBar进度条
圆形进度条:
    <ProgressBar
        android:id="@+id/progress_bar"
        android:layout_width="match_parent"
        android:layout_height="wrap_content"/>
控制圆形进度条的显隐:
 button1.setOnClickListener(new View.OnClickListener() {
     @Override
     public void onClick(View view) {
         //visible:可见,invisible,不可见但占位,gone不可见不占位
         //View.GONE是内置的常数
         if(progressBar.getVisibility()==View.GONE){
             progressBar.setVisibility(View.VISIBLE);
         }else{
             progressBar.setVisibility(View.GONE);
         }
     }
 });
切换成长条形进度条:
    <ProgressBar
        android:id="@+id/progress_bar"
        style="?android:attr/progressBarStyleHorizontal"
        android:max="100"
        android:layout_width="match_parent"
        android:layout_height="wrap_content"/>
动态设置进度:
        ProgressBar progressBar=(ProgressBar) findViewById(R.id.progress_bar);
        button1.setOnClickListener(new View.OnClickListener() {
            @Override
            public void onClick(View view) {
                int progress=progressBar.getProgress();
                progress=progress+10;
                progressBar.setProgress(progress);
            }
        });
6,AlertDialog对话框
        button1.setOnClickListener(new View.OnClickListener() {
            @Override
            public void onClick(View view) {
                AlertDialog.Builder dialog=new AlertDialog.Builder(FirstActivity.this);
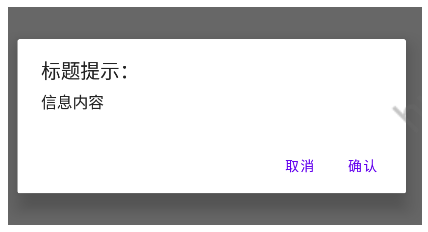
                dialog.setTitle("标题提示:");
                dialog.setMessage("信息内容");
                dialog.setPositiveButton("确认", new DialogInterface.OnClickListener() {
                    @Override
                    public void onClick(DialogInterface dialogInterface, int i) {
                        //点击确认执行的内容
                    }
                });
                dialog.setNegativeButton("取消", new DialogInterface.OnClickListener() {
                    @Override
                    public void onClick(DialogInterface dialogInterface, int i) {
                        //点击取消执行的内容
                    }
                });
                dialog.show();
            }
        });
实现的效果:
7,ProgressDialog
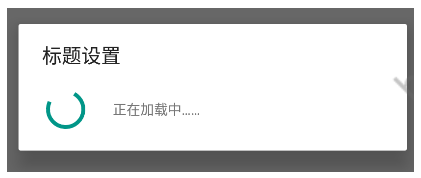
和AlertDialog一样能屏蔽其他控件的交互能力。不同的是他有个loading。
ProgressDialog progressDialog= new ProgressDialog(FirstActivity.this);
progressDialog.setTitle("标题设置");
progressDialog.setMessage("正在加载中……");
progressDialog.setCancelable(true);
progressDialog.show();
实现的效果:
注意,如果在 setCancelable()中传人了 false,表示 ProgressDialog 是不能通过 Back键取消掉的,这时你就一定要在代码中做好控制,当数据加载完成后必须要调用 ProgressDialog的dismiss()方法来关闭对话框,否则 ProgressDialog将会一直存在。
二,4种基本布局
啥是布局?前端体系里面已经很清晰了,无非就是更好地组织页面元素的一种手段或者说排版。
1,线性布局LinearLayout
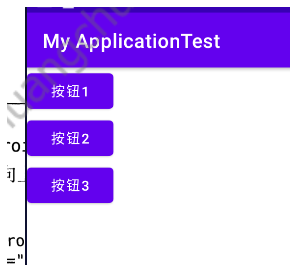
页面元素按照线性排列,横向或者是纵向。值得注意的是,它只控制一行或者一列,也就是说垂直布局时,不能把其中一个子元素的宽度设置成100%,这样其他子元素会没地方排列。
<LinearLayout xmlns:android="http://schemas.android.com/apk/res/android"
    android:orientation="vertical"
    android:layout_width="match_parent"
    android:layout_height="match_parent"
    >
    <Button
        android:id="@+id/button1"
        android:layout_width="wrap_content"
        android:layout_height="wrap_content"
        android:text="按钮1"
        android:textAllCaps="false"/>
    <Button
        android:id="@+id/button2"
        android:layout_width="wrap_content"
        android:layout_height="wrap_content"
        android:text="按钮2"
        android:textAllCaps="false"/>
    <Button
        android:id="@+id/button3"
        android:layout_width="wrap_content"
        android:layout_height="wrap_content"
        android:text="按钮3"
        android:textAllCaps="false"/>
</LinearLayout>
实现的效果:
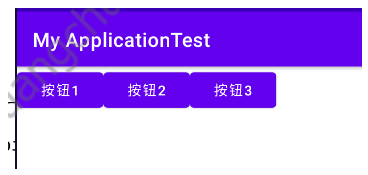
如果设置成横向 android:orientation=“horizontal”,则是下图这样:
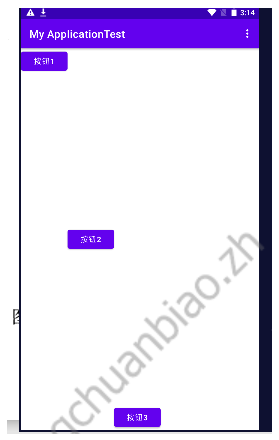
【android:layout_gravity属性】
他写在布局的元素上面,用于控制子元素在交叉轴的排布方式,和前端的flex布局中的item-self是一样的 效果。
例如:
<LinearLayout xmlns:android="http://schemas.android.com/apk/res/android"
    android:orientation="horizontal"
    android:layout_width="match_parent"
    android:layout_height="match_parent"
    >
    <Button
        android:id="@+id/button1"
        android:layout_width="wrap_content"
        android:layout_height="wrap_content"
        android:text="按钮1"
        android:layout_gravity="top"
        android:textAllCaps="false"/>
    <Button
        android:id="@+id/button2"
        android:layout_width="wrap_content"
        android:layout_height="wrap_content"
        android:text="按钮2"
        android:layout_gravity="center"
        android:textAllCaps="false"/>
    <Button
        android:id="@+id/button3"
        android:layout_width="wrap_content"
        android:layout_height="wrap_content"
        android:layout_gravity="bottom"
        android:text="按钮3"
        android:textAllCaps="false"/>
</LinearLayout>
实现的效果:
【android:layout_weight="1"属性】
就和flex布局中的flex-grow差不多,使用这个值的时候,我们通常把该元素的android:layout_width="0dp"设置为0dp,于是元素的宽度就只受layout_weight管控。
layout_weight的计算方式是:先得到全宽(可供设置了layout_weight的元素分配的长度总额),然后按比例分配给对应元素。
例如,有一个输入框和一个按钮。按钮定宽,输入框自适应。则可以这样写:
<LinearLayout xmlns:android="http://schemas.android.com/apk/res/android"
    android:orientation="horizontal"
    android:layout_width="match_parent"
    android:layout_height="match_parent"
    >
    <EditText
        android:id="@+id/input_message"
        android:layout_width="0dp"
        android:layout_height="wrap_content"
        android:layout_weight="1"
        android:hint="请输入内容"/>
    <Button
        android:id="@+id/button3"
        android:layout_width="wrap_content"
        android:layout_height="wrap_content"
        android:text="按钮3"
        android:textAllCaps="false"/>
</LinearLayout>

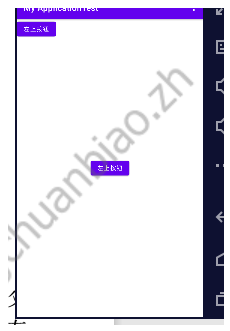
2,相对布局
参照选父元素时:
<RelativeLayout xmlns:android="http://schemas.android.com/apk/res/android"
    android:orientation="horizontal"
    android:layout_width="match_parent"
    android:layout_height="match_parent"
    >
    <Button
        android:id="@+id/button1"
        android:layout_width="wrap_content"
        android:layout_height="wrap_content"
        android:layout_alignParentTop="true"
        android:layout_alignParentLeft="true"
        android:text="左上按钮"
        android:textAllCaps="false"/>
    <Button
        android:id="@+id/button2"
        android:layout_width="wrap_content"
        android:layout_height="wrap_content"
        android:layout_centerInParent="true"
        android:text="中间按钮"
        android:textAllCaps="false"/>
</RelativeLayout>
实现效果:
参照物选同级元素时:
<RelativeLayout xmlns:android="http://schemas.android.com/apk/res/android"
    android:orientation="horizontal"
    android:layout_width="match_parent"
    android:layout_height="match_parent"
    >
    <Button
        android:id="@+id/button1"
        android:layout_width="wrap_content"
        android:layout_height="wrap_content"
        android:layout_above="@+id/button2"
        android:layout_toLeftOf="@id/button2"
        android:text="左上按钮"
        android:textAllCaps="false"/>
    <Button
        android:id="@+id/button2"
        android:layout_width="wrap_content"
        android:layout_height="wrap_content"
        android:layout_centerInParent="true"
        android:text="中间按钮"
        android:textAllCaps="false"/>
    <Button
        android:id="@+id/button3"
        android:layout_width="wrap_content"
        android:layout_height="wrap_content"
        android:layout_below="@+id/button2"
        android:layout_toLeftOf="@id/button2"
        android:text="左上按钮"
        android:textAllCaps="false"/>
</RelativeLayout>
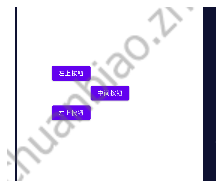
还有以同级为参照物,某一边缘对齐。这个属性则是:layout_alignLeft等。
3,帧布局FrameLayout
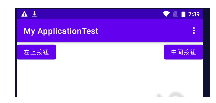
这种布局没有方便的定位方式,所有的控件都会默认地摆放在布局的左上角。而且是重叠着摆放的。
当然,它可以配合layout_gravity来处理。就和前端中的float布局类似。
<FrameLayout xmlns:android="http://schemas.android.com/apk/res/android"
    android:orientation="horizontal"
    android:layout_width="match_parent"
    android:layout_height="match_parent"
    >
    <Button
        android:id="@+id/button1"
        android:layout_width="wrap_content"
        android:layout_height="wrap_content"
        android:layout_gravity="left"
        android:text="左上按钮"
        android:textAllCaps="false"/>
    <Button
        android:id="@+id/button2"
        android:layout_width="wrap_content"
        android:layout_height="wrap_content"
        android:layout_gravity="right"
        android:text="中间按钮"
        android:textAllCaps="false"/>
</FrameLayout>
4,百分比布局
其实这种布局已经弃用了。
由于linearLayout本身已经支持按比例了,所以百分比布局只是针对Frame-layout和RelativeLayout进行了功能扩展。
不同于前 3 种布局,百分比布局属于新增布局,那么怎么才能做到让新增布局在所有 Android版本上都能使用呢?为此,Android 团队将百分比布局定义在了 support库当中,我们只需要在项目的 build.gradle中添加百分比布局库的依赖,就能保证百分比布局在 Android 所有系统版本上的兼容性了
打开app/buildgradle文件,在dependencies 闭中添加如下内容:
implementation 'androidx.percentlayout:percentlayout:1.0.0'
修改完AS顶部会有这个提示:

点击Sync Now,gradle就会开始同步了。
布局代码:
<?xml version="1.0" encoding="utf-8"?>
<androidx.percentlayout.widget.PercentFrameLayout xmlns:android="http://schemas.android.com/apk/res/android"
    android:layout_width="match_parent"
    android:layout_height="match_parent"
    xmlns:app="http://schemas.android.com/apk/res-auto">

    <Button
        android:id="@+id/button1"
        android:text="Button 1"

        android:layout_gravity="left|top"
        app:layout_widthPercent="50%"
        app:layout_heightPercent="50%"
        />
    <Button
        android:id="@+id/button2"
        android:text="Button 2"

        android:layout_gravity="right|top"
        app:layout_widthPercent="50%"
        app:layout_heightPercent="50%"
        />
    <Button
        android:id="@+id/button3"
        android:text="Button 3"

        android:layout_gravity="left|bottom"
        app:layout_widthPercent="50%"
        app:layout_heightPercent="50%"
        />
    <Button
        android:id="@+id/button4"
        android:text="Button 4"

        android:layout_gravity="right|bottom"
        app:layout_widthPercent="50%"
        app:layout_heightPercent="50%"
        />


</androidx.percentlayout.widget.PercentFrameLayout>
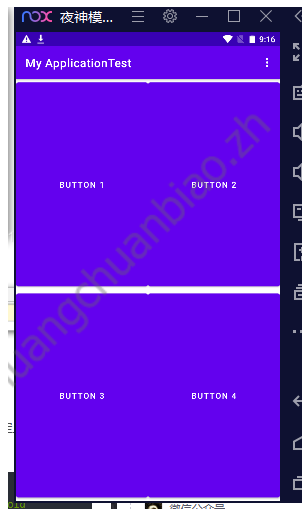
实现效果:
三,创建自定义控件
1,自定义和引入布局
只是布局xml罢了(只有ui),而不是前端中的最小功能单元(有ui和事件)
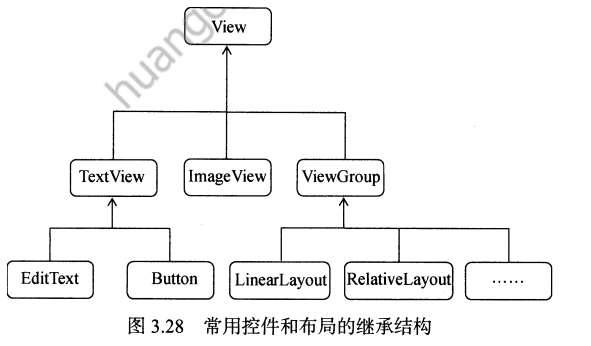
例如我们要创建标题栏时:
第一步,创建title.xml布局文件:
<LinearLayout xmlns:android="http://schemas.android.com/apk/res/android"
    android:layout_width="match_parent"
    android:layout_height="wrap_content">
    <Button
        android:id="@+id/title_back"
        android:layout_width="wrap_content"
        android:layout_height="wrap_content"
        android:layout_gravity="center"
        android:layout_margin="5dp"
        android:textColor="#fff"
        android:text="返回" />
    <TextView
        android:id="@+id/title_text"
        android:layout_width="0dp"
        android:layout_height="wrap_content"
        android:layout_gravity="center"
        android:layout_weight="1"
        android:gravity="center"
        android:text="标题"
        android:textColor="#000000"
        android:textSize="24sp"/>
    <Button
        android:id="@+id/title_edit"
        android:layout_width="wrap_content"
        android:layout_height="wrap_content"
        android:layout_gravity="center"
        android:layout_margin="5dp"
        android:textColor="#fff"
        android:text="编辑" />
</LinearLayout>
第二步:引入title.xml布局
<LinearLayout xmlns:android="http://schemas.android.com/apk/res/android"
    android:layout_width="match_parent"
    android:layout_height="match_parent">
    <include layout="@layout/title"/>
</LinearLayout>
第三步:屏蔽默认的标题栏:
    protected void onCreate(Bundle savedInstanceState) {
        super.onCreate(savedInstanceState);
        setContentView(R.layout.first_layout);
        ActionBar actionbar=getSupportActionBar();
        if(actionbar!=null){
            actionbar.hide();
        }
    }
实现的效果:

2,自定义控件
如上文,我们已经在一个活动中创建了标题,但是如果有多个页面都需要这个标题,且有点击事件,那每个活动中都写一次点击事件,多多少少有点冗余。
我们希望像前端的公共组件一样,让他有内置的事件处理。这就需要创建自定义的控件。
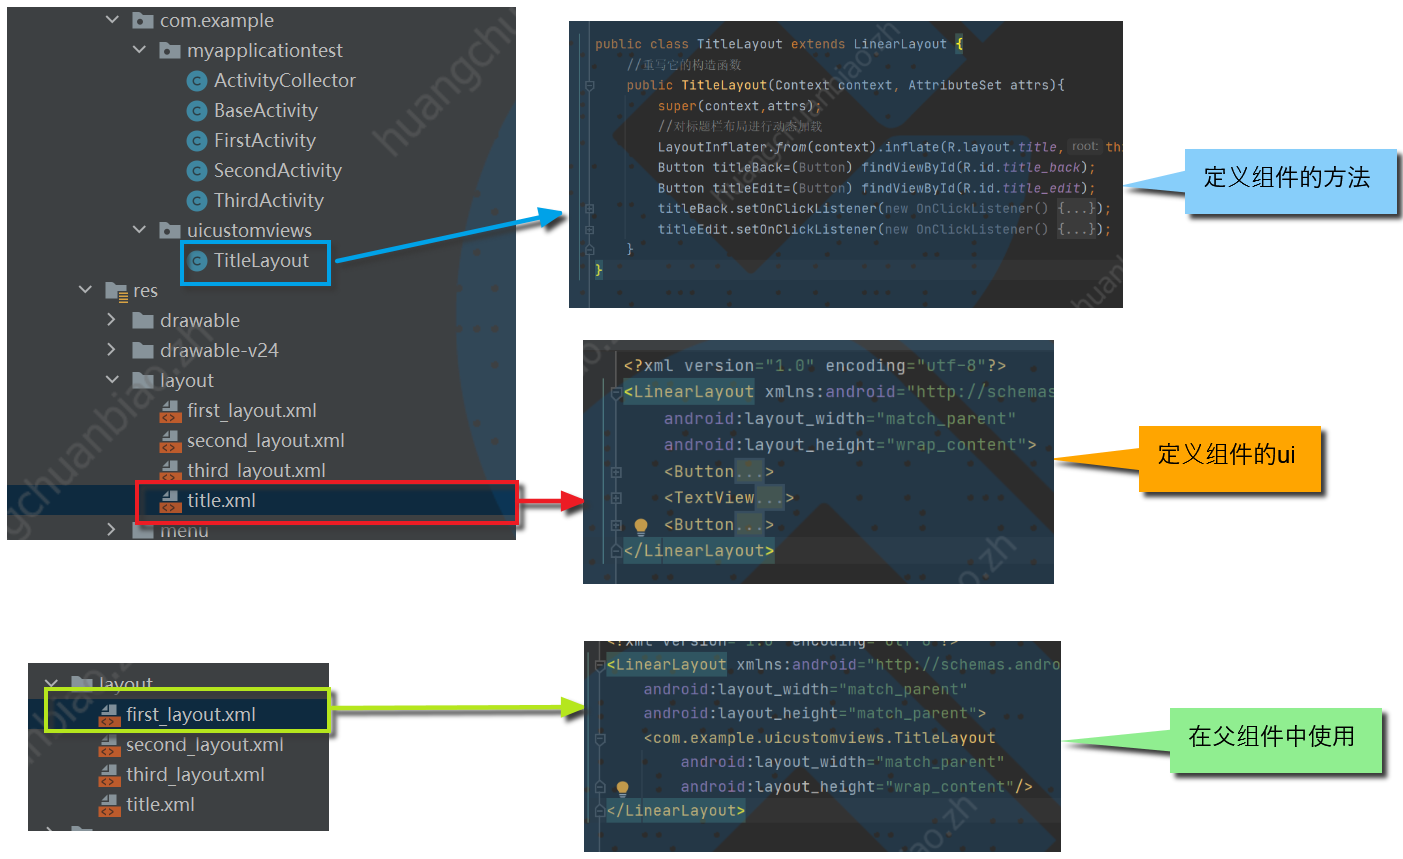
第一步:新建com.example.uicustomviews,在其中新建TitleLayout继承自LinearLayout,让它成为我们自定义的标题栏控件。
public class TitleLayout extends LinearLayout {
    //重写它的构造函数
    public TitleLayout(Context context, AttributeSet attrs){
        super(context,attrs);
        //对标题栏布局进行动态加载
        LayoutInflater.from(context).inflate(R.layout.title,this);
    }
}
第二步:在布局文件中添加这个自定义控件:
<LinearLayout xmlns:android="http://schemas.android.com/apk/res/android"
    android:layout_width="match_parent"
    android:layout_height="match_parent">
    <com.example.uicustomviews.TitleLayout
        android:layout_width="match_parent"
        android:layout_height="wrap_content"/>
</LinearLayout>
编译后会发现和之前的写法效果一样。
第三步:在TitleLayout中定义事件。
public class TitleLayout extends LinearLayout {
    //重写它的构造函数
    public TitleLayout(Context context, AttributeSet attrs){
        super(context,attrs);
        //对标题栏布局进行动态加载
        LayoutInflater.from(context).inflate(R.layout.title,this);
        Button titleBack=(Button) findViewById(R.id.title_back);
        Button titleEdit=(Button) findViewById(R.id.title_edit);
        titleBack.setOnClickListener(new OnClickListener() {
            @Override
            public void onClick(View view) {
                ((Activity) getContext()).finish();
            }
        });
        titleEdit.setOnClickListener(new OnClickListener() {
            @Override
            public void onClick(View view) {
                Toast.makeText(getContext(), "点击编辑", Toast.LENGTH_SHORT).show();
            }
        });
    }
}
这样一来,就和前端中的组件一样了,有ui和对应的事件。
过程如下:
四,最常用的控件ListView
其实就是长列表啦。
1,简单使用
第一步:在layout中使用:
<LinearLayout xmlns:android="http://schemas.android.com/apk/res/android"
    android:layout_width="match_parent"
    android:layout_height="match_parent">
   <ListView
       android:id="@+id/list_view"
       android:layout_width="match_parent"
       android:layout_height="match_parent"/>
</LinearLayout>
第二步:在活动中传入数据
public class FirstActivity extends BaseActivity {
    //定义的数据,实际应该来自网络请求等
    private String [] data ={
"asda","adfsg","asda","adfsg","asda","adfsg","asda","adfsg","asda","adfsg","asda","adfsg","asda","adfsg","asda","adfsg","asda","adfsg","asda","adfsg","asda","adfsg","asda","adfsg","asda","adfsg","asda","adfsg","asda","adfsg","asda","adfsg",
    };

    @Override
    protected void onCreate(Bundle savedInstanceState) {
        super.onCreate(savedInstanceState);
        setContentView(R.layout.first_layout);
        //使用ArrayAdapter适配器将数据格式转化成listView可以使用的格式
        ArrayAdapter<String> adapter =new ArrayAdapter<String>(FirstActivity.this,android.R.layout.simple_list_item_1,data);
        ListView listView=(ListView) findViewById(R.id.list_view);
        //将转化后的数据赋值给listView
        listView.setAdapter(adapter);
    }
}
值得注意的是android.R.layout.simple_list_item_1是内置的一个xml文件,里面只用一个TextView,用来简单使用文本。
实现的效果:

五,更为强大的RecyclerView
它是更强的长列表组件,更推荐使用它。
1,引入包
Recyclerview是一个基于support包的控件,由于目前androidx已经取代了supprot包,因此在此推荐大家使用Androidx的包。
在build.gradle文件中引入如下代码以引入RecyclerView包:
dependencies {
    implementation 'androidx.recyclerview:recyclerview:1.1.0'
}
2,在主活动中使用
<LinearLayout xmlns:android="http://schemas.android.com/apk/res/android"
    android:layout_width="match_parent"
    android:layout_height="match_parent">
   <androidx.recyclerview.widget.RecyclerView
       android:id="@+id/list_main"
       android:layout_width="match_parent"
       android:layout_height="match_parent" />
</LinearLayout>
3,编写适配器
新建FruitAdapter类:
public class FruitAdapter extends RecyclerView.Adapter<FruitAdapter.ViewHolder> {
    private List<Fruit> mFruitList;
    //定义了内部类ViewHolder
    static class ViewHolder extends RecyclerView.ViewHolder{
        ImageView fruitImage;
        TextView fruitName;
        //构造函数传入view,通常是recyclerView子项的最外层布局
        public ViewHolder(View view){
            super(view);
            fruitImage=(ImageView) view.findViewById(R.id.fruit_image);
            fruitName=(TextView) view.findViewById(R.id.fruit_name);
        }
    }
    //构造函数,用于把要展示地数据源传进来,并赋值给一个全局变量mFruitList
    public FruitAdapter(List<Fruit> fruitList){
        mFruitList= fruitList;
    }
    //重写方法,用于创建ViewHoler实例,我们在这个方法中将fruit_item布局加载进来,然后创建一个ViewHolder实例。
    //并且把加载出来的布局传入到构造函数中,最后将ViewHolder的实例返回。
    @Override
    public ViewHolder onCreateViewHolder(@NonNull ViewGroup parent, int viewType) {
        View view= LayoutInflater.from(parent.getContext()).inflate(R.layout.fruit_item,parent,false);
        ViewHolder holder=new ViewHolder(view);
        return holder;
    }
    //用于对RecyclerView子项的数据进行赋值的,会在每个子项被滚动到屏幕内的时候执行。
    //这里我们通过position参数得到当前项的Fruit实例
    //再将数据设置到ViewHolder的ImageView和TetxView当中
    @Override
    public void onBindViewHolder(@NonNull FruitAdapter.ViewHolder holder, int position) {
        Fruit fruit =mFruitList.get(position);
        holder.fruitImage.setImageResource(fruit.getImageId());
        holder.fruitName.setText(fruit.getName());
    }
    //它用于告诉RecyclerView一共有多少子项,直接返回数据源的长度就可以了。
    @Override
    public int getItemCount() {
        return mFruitList.size();
    }
}
4,使用适配器
适配器准备好之后,我们就可以开始使用RecyclerView了,修改FirstActivity中的代码:
public class FirstActivity extends BaseActivity {
    //定义的数据,实际应该来自网络请求等
    private List<Fruit> fruitList=new ArrayList<Fruit>();

    @Override
    protected void onCreate(Bundle savedInstanceState) {
        super.onCreate(savedInstanceState);
        setContentView(R.layout.first_layout);
        initFruits();
        RecyclerView recyclerView=(RecyclerView) findViewById(R.id.recycler_view);
        //使用线性布局
        LinearLayoutManager layoutManager=new LinearLayoutManager(this);
        recyclerView.setLayoutManager(layoutManager);
        //将数据传入适配器,构造视图
        FruitAdapter adapter=new FruitAdapter(fruitList);
        recyclerView.setAdapter(adapter);
    }
    private void initFruits(){
        for (int i=0;i<5;i++){
            Fruit apple=new Fruit("Apple",R.drawable.img_1);
            fruitList.add(apple);
            Fruit banana=new Fruit("banana",R.drawable.img_2);
            fruitList.add(banana);
            Fruit orange=new Fruit("orange",R.drawable.img_3);
            fruitList.add(orange);
            Fruit pear=new Fruit("pear",R.drawable.img_4);
            fruitList.add(pear);
        }
    }
}
其中Fruit类和fruit_item.xml是使用的上一节的代码。
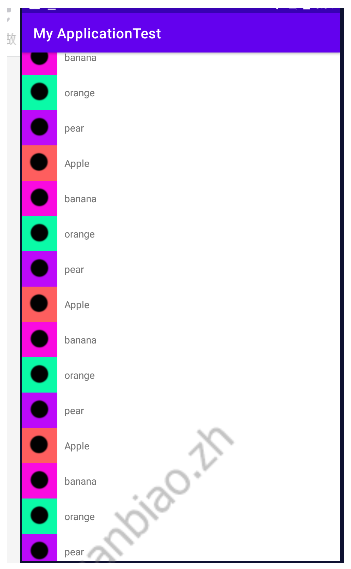
5,实现的效果
6,实现横向滚动和瀑布流布局
就上文而言,如果改成横向滚动,需要把fruit_item修改成纵向布局:
第一步:修改item的布局
<LinearLayout xmlns:android="http://schemas.android.com/apk/res/android"
    android:orientation="vertical"
    android:layout_width="100dp"
    android:layout_height="wrap_content">
    <ImageView
        android:id="@+id/fruit_image"
        android:layout_width="wrap_content"
        android:layout_height="wrap_content"
        android:layout_gravity="center_horizontal"/>
    <TextView
        android:id="@+id/fruit_name"
        android:layout_width="wrap_content"
        android:layout_height="wrap_content"
        android:layout_gravity="center_horizontal"
        android:layout_marginTop="10dp"
        />

</LinearLayout>
第二步:将默认的纵向布局修改为横向布局
public class FirstActivity extends BaseActivity {
    //定义的数据,实际应该来自网络请求等
    private List<Fruit> fruitList=new ArrayList<Fruit>();

    @Override
    protected void onCreate(Bundle savedInstanceState) {
        super.onCreate(savedInstanceState);
        setContentView(R.layout.first_layout);
        initFruits();
        RecyclerView recyclerView=(RecyclerView) findViewById(R.id.recycler_view);
        //使用线性布局
        LinearLayoutManager layoutManager=new LinearLayoutManager(this);
        //将默认的纵向布局修改为横向布局
        layoutManager.setOrientation(LinearLayoutManager.HORIZONTAL);
        recyclerView.setLayoutManager(layoutManager);
        //将数据传入适配器,构造视图
        FruitAdapter adapter=new FruitAdapter(fruitList);
        recyclerView.setAdapter(adapter);
    }
    private void initFruits(){
        for (int i=0;i<5;i++){
            Fruit apple=new Fruit("Apple",R.drawable.img_1);
            fruitList.add(apple);
            Fruit banana=new Fruit("banana",R.drawable.img_2);
            fruitList.add(banana);
            Fruit orange=new Fruit("orange",R.drawable.img_3);
            fruitList.add(orange);
            Fruit pear=new Fruit("pear",R.drawable.img_4);
            fruitList.add(pear);
        }
    }
}
实现的效果:

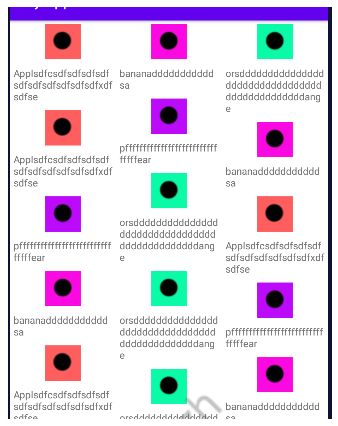
7,瀑布流布局
第一步:修改item的布局
<LinearLayout xmlns:android="http://schemas.android.com/apk/res/android"
    android:orientation="vertical"
    android:layout_width="match_parent"
    android:layout_height="wrap_content"
    android:layout_margin="5dp"
    >
    <ImageView
        android:id="@+id/fruit_image"
        android:layout_width="wrap_content"
        android:layout_height="wrap_content"
        android:layout_gravity="center_horizontal"/>
    <TextView
        android:id="@+id/fruit_name"
        android:layout_width="wrap_content"
        android:layout_height="wrap_content"
        android:layout_gravity="left"
        android:layout_marginTop="10dp"
        />

</LinearLayout>
第二步:修改FirstActivity.xml
protected void onCreate(Bundle savedInstanceState) {
        super.onCreate(savedInstanceState);
        setContentView(R.layout.first_layout);
        initFruits();
        RecyclerView recyclerView=(RecyclerView) findViewById(R.id.recycler_view);
        //修改为栅格布局
        StaggeredGridLayoutManager layoutManager=new StaggeredGridLayoutManager(3,StaggeredGridLayoutManager.VERTICAL);
        recyclerView.setLayoutManager(layoutManager);
        //将数据传入适配器,构造视图
        FruitAdapter adapter=new FruitAdapter(fruitList);
        recyclerView.setAdapter(adapter);
    }
实现的效果:
8,它的点击事件
修改适配器文件:
public class FruitAdapter extends RecyclerView.Adapter<FruitAdapter.ViewHolder> {
    private List<Fruit> mFruitList;
    //定义了内部类ViewHolder
    static class ViewHolder extends RecyclerView.ViewHolder{
        View fruitView;
        ImageView fruitImage;
        TextView fruitName;
        //构造函数传入view,通常是recyclerView子项的最外层布局
        public ViewHolder(View view){
            super(view);
            fruitView=view;
            fruitImage=(ImageView) view.findViewById(R.id.fruit_image);
            fruitName=(TextView) view.findViewById(R.id.fruit_name);
        }
    }
    //构造函数,用于把要展示地数据源传进来,并赋值给一个全局变量mFruitList
    public FruitAdapter(List<Fruit> fruitList){
        mFruitList= fruitList;
    }
    //重写方法,用于创建ViewHoler实例,我们在这个方法中将fruit_item布局加载进来,然后创建一个ViewHolder实例。
    //并且把加载出来的布局传入到构造函数中,最后将ViewHolder的实例返回。
    @Override
    public ViewHolder onCreateViewHolder(@NonNull ViewGroup parent, int viewType) {
        View view= LayoutInflater.from(parent.getContext()).inflate(R.layout.fruit_item,parent,false);
        final ViewHolder holder=new ViewHolder(view);
        holder.fruitView.setOnClickListener(new View.OnClickListener(){
            @Override
            public void onClick(View v){
                int position=holder.getAdapterPosition();
                Fruit fruit =mFruitList.get(position);
                Toast.makeText(v.getContext(), fruit.getName(), Toast.LENGTH_SHORT).show();
            }
        });
        holder.fruitImage.setOnClickListener(new View.OnClickListener(){
            @Override
            public void onClick(View v){
                int position=holder.getAdapterPosition();
                Fruit fruit =mFruitList.get(position);
                Toast.makeText(v.getContext(), "点击了图片", Toast.LENGTH_SHORT).show();
            }
        });
        return holder;
    }
    //用于对RecyclerView子项的数据进行赋值的,会在每个子项被滚动到屏幕内的时候执行。
    //这里我们通过position参数得到当前项的Fruit实例
    //再将数据设置到ViewHolder的ImageView和TetxView当中
    @Override
    public void onBindViewHolder(@NonNull FruitAdapter.ViewHolder holder, int position) {
        Fruit fruit =mFruitList.get(position);
        holder.fruitImage.setImageResource(fruit.getImageId());
        holder.fruitName.setText(fruit.getName());
    }
    //它用于告诉RecyclerView一共有多少子项,直接返回数据源的长度就可以了。
    @Override
    public int getItemCount() {
        return mFruitList.size();
    }
}
六,编写页面的最佳实践
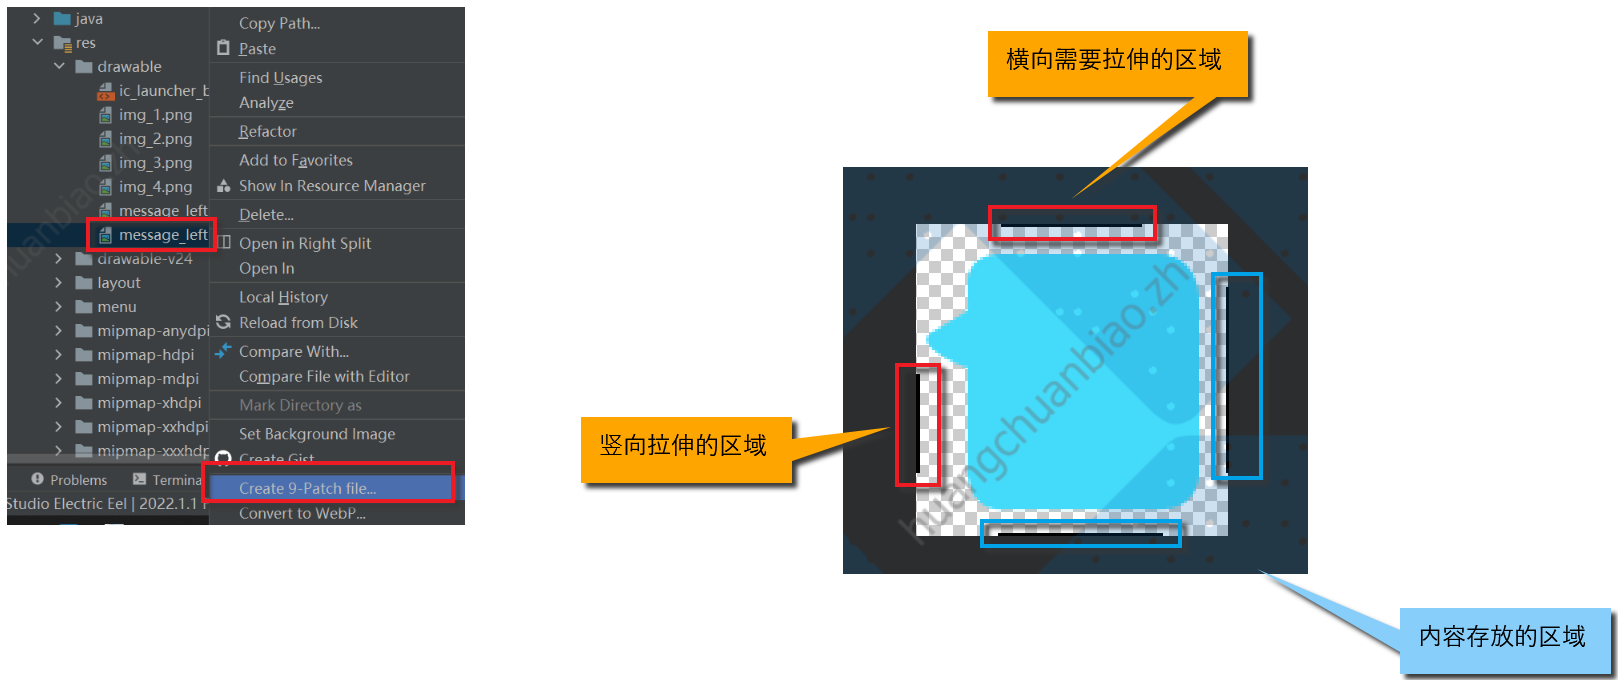
1,制作Nine-Patch图片
这种格式的图片可以指定哪些区域可以拉伸,哪些区域不可以。
2,修改firstLayout.xml测试下
<LinearLayout xmlns:android="http://schemas.android.com/apk/res/android"
    android:layout_width="match_parent"
    android:layout_height="wrap_content"
    android:background="@drawable/message_left"
    >
</LinearLayout>
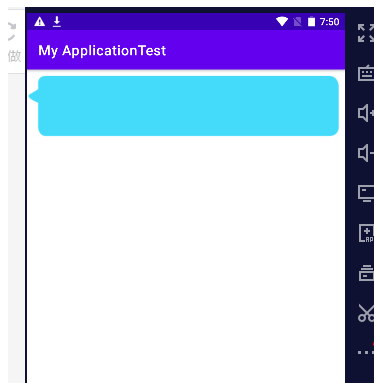
3,开始编写聊天界面
先用同样的方法制作message_right图片。
因为我们需要使用到recyclerView所以按照上文的方法,需要先引入。
在build.gradle文件中引入如下代码以引入RecyclerView包:
dependencies {
    implementation 'androidx.recyclerview:recyclerview:1.1.0'
}
编写主活动的页面布局:
<LinearLayout xmlns:android="http://schemas.android.com/apk/res/android"
    android:orientation="vertical"
    android:layout_width="match_parent"
    android:layout_height="match_parent"
    android:background="#d8e0e8"
    >
    <androidx.recyclerview.widget.RecyclerView
        android:id="@+id/recycler_view"
        android:layout_width="match_parent"
        android:layout_height="0dp"
        android:layout_weight="1"/>
    <LinearLayout
        android:layout_width="match_parent"
        android:layout_height="wrap_content">
        <EditText
            android:id="@+id/input_text"
            android:layout_width="0dp"
            android:layout_height="wrap_content"
            android:layout_weight="1"
            android:hint="请输入文本"
            android:maxLines="2"/>
        <Button
            android:id="@+id/send"
            android:layout_width="wrap_content"
            android:layout_height="wrap_content"
            android:text="发送"/>

    </LinearLayout>
</LinearLayout>
然后新建Msg类:
public class Msg {
    //表示是收到的信息
    public static final int TYPE_RECEIVED=0;
    //表示是发出的信息
    public static final int TYPE_SEND=1;
    public String content;
    private int type;
    public Msg(String content,int type){
        this.content=content;
        this.type=type;
    }
    public String getContent(){
        return content;
    }
    public int getType(){
        return type;
    }
}
接下来编写recyclerView子项的布局,新建msg_item.xml文件:
<LinearLayout xmlns:android="http://schemas.android.com/apk/res/android"
    android:orientation="vertical"
    android:layout_width="match_parent"
    android:layout_height="wrap_content"
    android:padding="10dp">

    <LinearLayout
        android:id="@+id/left_layout"
        android:layout_width="wrap_content"
        android:layout_height="wrap_content"
        android:layout_gravity="left"
        android:background="@drawable/message_left"
        android:orientation="horizontal">
        <TextView
            android:id="@+id/left_msg"
            android:layout_width="wrap_content"
            android:layout_height="wrap_content"
            android:layout_gravity="center"
            android:layout_margin="10dp"
            android:textColor="#000"/>
    </LinearLayout>
    <LinearLayout
        android:id="@+id/right_layout"
        android:layout_width="wrap_content"
        android:layout_height="wrap_content"
        android:layout_gravity="left"
        android:background="@drawable/message_right"
        android:orientation="horizontal">
        <TextView
            android:id="@+id/right_msg"
            android:layout_width="wrap_content"
            android:layout_height="wrap_content"
            android:layout_gravity="center"
            android:layout_margin="10dp"
            android:textColor="#000"/>
    </LinearLayout>
</LinearLayout>
接下来创建适配器,新建类MsgAdapter:
public class MsgAdapter extends RecyclerView.Adapter<MsgAdapter.ViewHolder> {
    private List<Msg> mMsgList;
    //定义了内部类ViewHolder
    static class ViewHolder extends RecyclerView.ViewHolder{
        LinearLayout leftLayout;
        LinearLayout rightLayout;
        TextView leftMsg;
        TextView rightMsg;
        //构造函数传入view,通常是recyclerView子项的最外层布局
        public ViewHolder(View view){
            super(view);
            leftLayout=(LinearLayout) view.findViewById(R.id.left_layout);
            rightLayout=(LinearLayout) view.findViewById(R.id.right_layout);
            leftMsg=(TextView) view.findViewById(R.id.left_msg);
            rightMsg=(TextView) view.findViewById(R.id.right_msg);
        }
    }
    //构造函数,用于把要展示地数据源传进来,并赋值给一个全局变量mFruitList
    public MsgAdapter(List<Msg> msgList){
        mMsgList= msgList;
    }
    //重写方法,用于创建ViewHoler实例,我们在这个方法中将fruit_item布局加载进来,然后创建一个ViewHolder实例。
    //并且把加载出来的布局传入到构造函数中,最后将ViewHolder的实例返回。
    @Override
    public ViewHolder onCreateViewHolder(@NonNull ViewGroup parent, int viewType) {
        View view= LayoutInflater.from(parent.getContext()).inflate(R.layout.msg_item,parent,false);
        ViewHolder holder=new ViewHolder(view);
        return holder;
    }
    //用于对RecyclerView子项的数据进行赋值的,会在每个子项被滚动到屏幕内的时候执行。
    //这里我们通过position参数得到当前项的Fruit实例
    //再将数据设置到ViewHolder的ImageView和TetxView当中
    @Override
    public void onBindViewHolder(@NonNull MsgAdapter.ViewHolder holder, int position) {
        Msg msg =mMsgList.get(position);
       if(msg.getType()==Msg.TYPE_RECEIVED){
           //左侧收到
           holder.leftLayout.setVisibility(View.VISIBLE);
           holder.rightLayout.setVisibility(View.GONE);
           holder.leftMsg.setText(msg.getContent());
       }else if(msg.getType()==Msg.TYPE_SEND){
           //右侧收到
           holder.leftLayout.setVisibility(View.GONE);
           holder.rightLayout.setVisibility(View.VISIBLE);
           holder.rightMsg.setText(msg.getContent());
       }
    }
    //它用于告诉RecyclerView一共有多少子项,直接返回数据源的长度就可以了。
    @Override
    public int getItemCount() {
        return mMsgList.size();
    }
}
然后再在主活动中传入数据:
public class FirstActivity extends BaseActivity {
    private List<Msg> msgList=new ArrayList<>();
    private EditText inputText;
    private Button send;
    private RecyclerView msgRecyclerView;
    private MsgAdapter adapter;
    @Override
    protected void onCreate(Bundle savedInstanceState) {
        super.onCreate(savedInstanceState);
        setContentView(R.layout.first_layout);
        initMsgs();
        inputText=(EditText) findViewById(R.id.input_text);
        send =(Button) findViewById(R.id.send);
        msgRecyclerView=(RecyclerView) findViewById(R.id.recycler_view);
        LinearLayoutManager layoutManager =new LinearLayoutManager(this);
        //将信息显示区域设定成线性布局
        msgRecyclerView.setLayoutManager(layoutManager);
        //传入数据给适配器处理
        adapter=new MsgAdapter(msgList);
        msgRecyclerView.setAdapter(adapter);

        send.setOnClickListener(new View.OnClickListener() {
            @Override
            public void onClick(View view) {
                String content =inputText.getText().toString();
                if(!"".equals(content)){
                    Msg msg=new Msg(content,Msg.TYPE_SEND);
                    msgList.add(msg);
                    //当有新消息时,刷新显示
                    adapter.notifyItemInserted(msgList.size()-1);
                    //将ListView定位到最后一行
                    msgRecyclerView.scrollToPosition(msgList.size()-1);
                    inputText.setText("");
                }
            }
        });
    }
    private void initMsgs(){
        Msg msg1=new Msg("hello guy",Msg.TYPE_RECEIVED);
        msgList.add(msg1);
        Msg msg2=new Msg("hello what is that?",Msg.TYPE_SEND);
        msgList.add(msg2);
        Msg msg3=new Msg("煞笔吧,会说中文拽啥英文",Msg.TYPE_RECEIVED);
        msgList.add(msg3);
    }
}
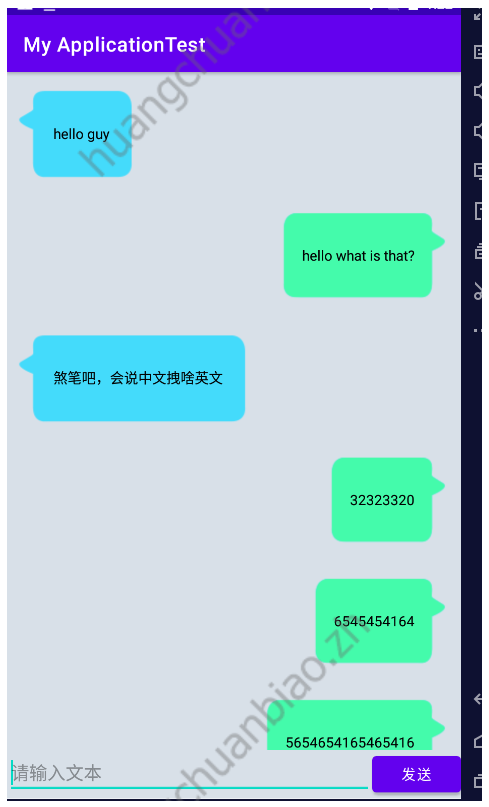
实现的效果:
