ReentrantLock原理(**)
讲解除了FairLock部分是FairLock流程,其余均NonFairLock源码 (FairLock部分会讲解两者不同)
1. NonFairLock实现原理
加锁解锁流程
先从构造器开始看,默认为非公平锁实现
public ReentrantLock() {
 sync = new NonfairSync();
}
NonfairSync 继承自 AQS
没有竞争时
![[外链图片转存失败,源站可能有防盗链机制,建议将图片保存下来直接上传(img-aCLfgIPE-1667463827119)(assets/image-20221102125643095.png)]](https://img-blog.csdnimg.cn/4b6521b6124e4e16af4b077d1ac77a08.png)
第一个竞争出现时
![[外链图片转存失败,源站可能有防盗链机制,建议将图片保存下来直接上传(img-0YJO8pwz-1667463827121)(assets/image-20221102125927003.png)]](https://img-blog.csdnimg.cn/41d314fbf783490f8b6f4849b079334e.png)
Thread-1 执行了
- CAS 尝试将 state 由 0 改为 1,结果失败
- 进入 tryAcquire 逻辑,这时 state 已经是1,结果仍然失败
- 接下来进入 addWaiter 逻辑,构造 Node 队列
- 图中黄色三角表示该 Node 的 waitStatus 状态,其中 0 为默认正常状态
- Node 的创建是懒惰的(从上面
enq()可以看出) - 其中第一个 Node 称为 Dummy(哑元)或哨兵,用来占位,并不关联线程
![[外链图片转存失败,源站可能有防盗链机制,建议将图片保存下来直接上传(img-5EPUyt5q-1667463827121)(assets/image-20221102130936003.png)]](https://img-blog.csdnimg.cn/5f0bbc35118944fb87d0de9e588dbdb0.png)
protected final boolean tryAcquire(int acquires) {
            return nonfairTryAcquire(acquires);
        }


final boolean nonfairTryAcquire(int acquires) {
            final Thread current = Thread.currentThread();
            int c = getState();
            if (c == 0) {
                if (compareAndSetState(0, acquires)) {  // 当节点/线程 state为0
                    setExclusiveOwnerThread(current);
                    return true;
                }
            }
            else if (current == getExclusiveOwnerThread()) {
                int nextc = c + acquires;
                if (nextc < 0) // overflow
                    throw new Error("Maximum lock count exceeded");
                setState(nextc);
                return true;
            }
            return false;
        }
当前线程进入 acquireQueued 逻辑
- acquireQueued 会在一个死循环中不断尝试获得锁,失败后进入 park 阻塞
- 如果自己是紧邻着 head(排第二位),那么再次 tryAcquire 尝试获取锁,当然这时 state 仍为 1,失败
- 进入 shouldParkAfterFailedAcquire 逻辑,将前驱 node,即 head 的 waitStatus 改为 -1,这次返回 false
是否需要 unpark 是由当前节点的前驱节点的 waitStatus == Node.SIGNAL 来决定,而不是本节点的
waitStatus 决定
![[外链图片转存失败,源站可能有防盗链机制,建议将图片保存下来直接上传(img-aStXhjPI-1667463827122)(assets/image-20221102132428786.png)]](https://img-blog.csdnimg.cn/a2c4e4931ad54f59b6acdb3d7a259b64.png)
final boolean acquireQueued(final Node node, int arg) {
        boolean failed = true;
        try {
            boolean interrupted = false;
            for (;;) {
                final Node p = node.predecessor();
                if (p == head && tryAcquire(arg)) {
                    setHead(node);  //  当前节点属性赋为null,置空,作为dummy节点
                    p.next = null; // help GC   dummy节点直接空指向,垃圾回收
                    failed = false;
                    return interrupted;
                }
                if (shouldParkAfterFailedAcquire(p, node) &&
                    parkAndCheckInterrupt())
                    interrupted = true;
            }
        } finally {
            if (failed)
                cancelAcquire(node);
        }
    }

 private static boolean shouldParkAfterFailedAcquire(Node pred, Node node) {
        int ws = pred.waitStatus;
        if (ws == Node.SIGNAL)
            /*
             * This node has already set status asking a release
             * to signal it, so it can safely park.
             */
            return true;
        if (ws > 0) {
            /*
             * Predecessor was cancelled. Skip over predecessors and
             * indicate retry.
             */
            do {
                node.prev = pred = pred.prev;
            } while (pred.waitStatus > 0);
            pred.next = node;  //  找到前面第一个<=0的节点,也就是已经处理好的节点
        } else {
            /*
             * waitStatus must be 0 or PROPAGATE.  Indicate that we
             * need a signal, but don't park yet.  Caller will need to
             * retry to make sure it cannot acquire before parking.
             */
            compareAndSetWaitStatus(pred, ws, Node.SIGNAL);
        }
        return false;
    }

private final boolean parkAndCheckInterrupt() {
        LockSupport.park(this);
        return Thread.interrupted();
    }
- shouldParkAfterFailedAcquire 执行完毕回到 acquireQueued ,再次 tryAcquire 尝试获取锁,当然这时
state 仍为 1,失败
- 当再次进入 shouldParkAfterFailedAcquire 时,这时因为其前驱 node 的 waitStatus 已经是 -1,这次返回
true
- 进入 parkAndCheckInterrupt, Thread-1 park(灰色表示)
![[外链图片转存失败,源站可能有防盗链机制,建议将图片保存下来直接上传(img-XWbIXeoX-1667463827124)(assets/image-20221102165002712.png)]](https://img-blog.csdnimg.cn/022b6dc90d344dcdb7f7a912fa3eba58.png)
![[外链图片转存失败,源站可能有防盗链机制,建议将图片保存下来直接上传(img-E40xibo0-1667463827125)(assets/image-20221102165020522.png)]](https://img-blog.csdnimg.cn/02ad77c402e1459d965eb593accbec3d.png)
Thread-0 释放锁,进入 tryRelease 流程,如果成功
- 设置 exclusiveOwnerThread 为 null
- state = 0
   /**
     * Releases in exclusive mode.  Implemented by unblocking one or
     * more threads if {@link #tryRelease} returns true.
     * This method can be used to implement method {@link Lock#unlock}.
     *
     * @param arg the release argument.  This value is conveyed to
     *        {@link #tryRelease} but is otherwise uninterpreted and
     *        can represent anything you like.
     * @return the value returned from {@link #tryRelease}
     */
    public final boolean release(int arg) {
        if (tryRelease(arg)) {
            Node h = head;
            if (h != null && h.waitStatus != 0)
                unparkSuccessor(h);
            return true;
        }
        return false;
    }


protected final boolean tryRelease(int releases) {
            int c = getState() - releases; //  每持有一次锁就+1  释放锁将自己持有的锁全部删除
            if (Thread.currentThread() != getExclusiveOwnerThread())
                throw new IllegalMonitorStateException();
            boolean free = false;
            if (c == 0) {
                free = true;
                setExclusiveOwnerThread(null); //  拥有线程置空
            }
            setState(c); //  state = 0
            return free;
        }
![[外链图片转存失败,源站可能有防盗链机制,建议将图片保存下来直接上传(img-IZVO1gzN-1667463827126)(assets/image-20221102165753429.png)]](https://img-blog.csdnimg.cn/dead35a8d38a42b9938e6d07372271eb.png)
当前队列不为 null,并且 head 的 waitStatus = -1,进入 unparkSuccessor 流程
找到队列中离 head 最近的一个 Node(没取消的),unpark 恢复其运行,本例中即为 Thread-1
回到 Thread-1 的 acquireQueued 流程
    /**
     * Wakes up node's successor, if one exists.
     *
     * @param node the node
     */
    private void unparkSuccessor(Node node) {
        /*
         * If status is negative (i.e., possibly needing signal) try
         * to clear in anticipation of signalling.  It is OK if this
         * fails or if status is changed by waiting thread.
         */
        int ws = node.waitStatus;  //  获得当前Node保存线程的状态
        if (ws < 0)
            compareAndSetWaitStatus(node, ws, 0);

        /*
         * Thread to unpark is held in successor, which is normally
         * just the next node.  But if cancelled or apparently null,
         * traverse backwards from tail to find the actual
         * non-cancelled successor.
         */
        Node s = node.next;
        if (s == null || s.waitStatus > 0) {
            s = null;
            for (Node t = tail; t != null && t != node; t = t.prev)
                if (t.waitStatus <= 0)
                    s = t;  // 从尾节点向前找到等待中的Thread
        }
        if (s != null)
            LockSupport.unpark(s.thread); // 启动第一个Thread
    }
![[外链图片转存失败,源站可能有防盗链机制,建议将图片保存下来直接上传(img-PNYQWDTm-1667463827127)(assets/image-20221102171127957.png)]](https://img-blog.csdnimg.cn/d4635b8a312445058e30942a28ce9756.png)
如果加锁成功(没有竞争),会设置
-
exclusiveOwnerThread 为 Thread-1,state = 1
-
head 指向刚刚 Thread-1 所在的 Node,该 Node 清空 Thread
-
原本的 head 因为从链表断开,而可被垃圾回收
如果这时候有其它线程来竞争(非公平的体现),例如这时有 Thread-4 来了
![[外链图片转存失败,源站可能有防盗链机制,建议将图片保存下来直接上传(img-UFKEmdxz-1667463827128)(assets/image-20221102171709907.png)]](https://img-blog.csdnimg.cn/1a6ddc146c1a4708a6d7203cda0945a2.png)
如果不巧又被 Thread-4 占了先
-
Thread-4 被设置为 exclusiveOwnerThread,state = 1
-
Thread-1 再次进入 acquireQueued 流程,获取锁失败,重新进入 park 阻塞
重复步骤代码如上面的acquireQueued方法
2.可重入原理
这里顺便再捋一下调用顺序
public void lock() {
        sync.lock();
    }

final void lock() {
            if (compareAndSetState(0, 1))
                setExclusiveOwnerThread(Thread.currentThread()); //  如果前面没有线程在使用直接获得锁
            else
                acquire(1);
        }


public final void acquire(int arg) {
        if (!tryAcquire(arg) &&
            acquireQueued(addWaiter(Node.EXCLUSIVE), arg)) //  这里可以看上一节的代码内容
            selfInterrupt();
    }

 protected final boolean tryAcquire(int acquires) {
            return nonfairTryAcquire(acquires);
        }


final boolean nonfairTryAcquire(int acquires) {
            final Thread current = Thread.currentThread();
            int c = getState();
            if (c == 0) {
                if (compareAndSetState(0, acquires)) {
                    setExclusiveOwnerThread(current);
                    return true;
                }
            }
            else if (current == getExclusiveOwnerThread()) {
                int nextc = c + acquires;  //  如果已经持有这把锁了就++ ,在tryRelease时会将state置零
                if (nextc < 0) // overflow
                    throw new Error("Maximum lock count exceeded");
                setState(nextc);
                return true;
            }
            return false;
        }
3.可打断原理
- 不可打断模式
private final boolean parkAndCheckInterrupt() {
        LockSupport.park(this); //  park状态为true , interrupt会让此失效
        return Thread.interrupted(); // interrupted 会清除打断标记
    }


  final boolean acquireQueued(final Node node, int arg) {
        boolean failed = true;
        try {
            boolean interrupted = false;
            for (;;) {
                final Node p = node.predecessor();
                if (p == head && tryAcquire(arg)) {
                    setHead(node);
                    p.next = null; // help GC
                    failed = false;
                    // 还是需要获得锁后, 才能返回打断状态
                    return interrupted;
                }
                if (shouldParkAfterFailedAcquire(p, node) &&
                    parkAndCheckInterrupt())
                    // 如果是因为 interrupt 被唤醒, 返回打断状态为 true
                    interrupted = true;
            }
        } finally {
            if (failed)
                cancelAcquire(node);
        }
    }

public final void acquire(int arg) {
        if (!tryAcquire(arg) &&
            acquireQueued(addWaiter(Node.EXCLUSIVE), arg))
            // 如果打断状态为 true
            selfInterrupt();
    }

static void selfInterrupt() {
    // 重新产生一次中断
        Thread.currentThread().interrupt();
    }
在此模式下,即使它被打断,仍会驻留在 AQS 队列中,一直要等到获得锁后方能得知自己被打断了
- 可打断模式
public void lockInterruptibly() throws InterruptedException {
        sync.acquireInterruptibly(1);
    }

public final void acquireInterruptibly(int arg)
            throws InterruptedException {
        if (Thread.interrupted())
            throw new InterruptedException();
        if (!tryAcquire(arg))
            doAcquireInterruptibly(arg);
    }

private void doAcquireInterruptibly(int arg)
        throws InterruptedException {
        final Node node = addWaiter(Node.EXCLUSIVE);
        boolean failed = true;
        try {
            for (;;) {
                final Node p = node.predecessor();
                if (p == head && tryAcquire(arg)) {
                    setHead(node);
                    p.next = null; // help GC
                    failed = false;
                    return;
                }
                if (shouldParkAfterFailedAcquire(p, node) &&
                    parkAndCheckInterrupt())
                    // 在 park 过程中如果被 interrupt 会进入此 这时候抛出异常, 而不会再次进入 for (;;)
                    // (**) 与不可打断模式区别
                    throw new InterruptedException();
            }
        } finally {
            if (failed)
                cancelAcquire(node);
        }
    }
4.FairLock实现原理
static final class FairSync extends Sync {
        private static final long serialVersionUID = -3000897897090466540L;

        final void lock() {
            acquire(1);
        }

        /**
         * Fair version of tryAcquire.  Don't grant access unless
         * recursive call or no waiters or is first.
         *除非当前节点/线程是队列中的第一个 或者 线程新进入没有等待队列时 可以获取锁
         */
        protected final boolean tryAcquire(int acquires) {
            final Thread current = Thread.currentThread();
            int c = getState();
            if (c == 0) {
                // 先检查 AQS 队列中是否有前驱节点, 没有才去竞争
                if (!hasQueuedPredecessors() &&
                    compareAndSetState(0, acquires)) {
                    setExclusiveOwnerThread(current);
                    return true;
                }
            }
            else if (current == getExclusiveOwnerThread()) {
                int nextc = c + acquires;
                if (nextc < 0)
                    throw new Error("Maximum lock count exceeded");
                setState(nextc);
                return true;
            }
            return false;
        }
    }

public final boolean hasQueuedPredecessors() {
        // The correctness of this depends on head being initialized
        // before tail and on head.next being accurate if the current
        // thread is first in queue.
        Node t = tail; // Read fields in reverse initialization order
        Node h = head;
        Node s;
        return h != t &&
            ((s = h.next) == null || s.thread != Thread.currentThread());
    }
5.条件变量实现原理
每个条件变量其实就对应着一个等待队列,其实现类是 ConditionObject
await 流程
开始 Thread-0 持有锁,调用 await,进入 ConditionObject 的 addConditionWaiter 流程
创建新的 Node 状态为 -2Node.CONDITION,关联 Thread-0,加入等待队列尾部
![[外链图片转存失败,源站可能有防盗链机制,建议将图片保存下来直接上传(img-Ul2CnKic-1667463827129)(assets/image-20221102180012325.png)]](https://img-blog.csdnimg.cn/5e9fdea6a03d4162b74dd798ddde8189.png)
接下来进入 AQS 的 fullyRelease 流程,释放同步器上的锁
![[外链图片转存失败,源站可能有防盗链机制,建议将图片保存下来直接上传(img-omo1sGps-1667463827129)(assets/image-20221102181148516.png)]](https://img-blog.csdnimg.cn/17ec77015e0743ff85621656ebf81aa2.png)
unpark AQS 队列中的下一个节点,竞争锁,假设没有其他竞争线程,那么 Thread-1 竞争成功
![[外链图片转存失败,源站可能有防盗链机制,建议将图片保存下来直接上传(img-QuL7hcBR-1667463827130)(assets/image-20221102181931191.png)]](https://img-blog.csdnimg.cn/03ed1a9bd3fd4013bca6a4c04c5dfa95.png)
park 阻塞 Thread-0
![[外链图片转存失败,源站可能有防盗链机制,建议将图片保存下来直接上传(img-kQ6ZlIQx-1667463827131)(assets/image-20221102182006824.png)]](https://img-blog.csdnimg.cn/9d27416046134c81b3532ad840b806aa.png)
        /**
         * Implements interruptible condition wait.
         * <ol>
         * <li> If current thread is interrupted, throw InterruptedException.
         * <li> Save lock state returned by {@link #getState}.
         * <li> Invoke {@link #release} with saved state as argument,
         *      throwing IllegalMonitorStateException if it fails.
         * <li> Block until signalled or interrupted.
         * <li> Reacquire by invoking specialized version of
         *      {@link #acquire} with saved state as argument.
         * <li> If interrupted while blocked in step 4, throw InterruptedException.
         * </ol>
         */
        public final void await() throws InterruptedException {
            if (Thread.interrupted())
                throw new InterruptedException();
            Node node = addConditionWaiter(); //  将当前线程包装成 node
            int savedState = fullyRelease(node); //  获取并且释放当前线程持有锁,唤醒线程
            int interruptMode = 0;

            while (!isOnSyncQueue(node)) {
                LockSupport.park(this);
                if ((interruptMode = checkInterruptWhileWaiting(node)) != 0)
                    break;  //  被唤醒
            }
            if (acquireQueued(node, savedState) && interruptMode != THROW_IE)
                interruptMode = REINTERRUPT;  //  被interrupt会被打断  interruptMode 赋值
            if (node.nextWaiter != null) // clean up if cancelled
                unlinkCancelledWaiters();
            if (interruptMode != 0)
                reportInterruptAfterWait(interruptMode); //  检测到被interrupt
        }

        final int fullyRelease(Node node) {
                boolean failed = true;
                try {
                    int savedState = getState();
                    if (release(savedState)) {
                        failed = false;
                        return savedState;
                    } else {
                        throw new IllegalMonitorStateException();
                    }
                } finally {
                    if (failed)
                        node.waitStatus = Node.CANCELLED;
                }
            }

        public final boolean release(int arg) {
                if (tryRelease(arg)) {
                    Node h = head;
                    if (h != null && h.waitStatus != 0)
                        unparkSuccessor(h);  //  唤醒线程
                    return true;
                }
                return false;
            }

        protected final boolean tryRelease(int releases) {
                    int c = getState() - releases;   //  清空state
                    if (Thread.currentThread() != getExclusiveOwnerThread())
                        throw new IllegalMonitorStateException();
                    boolean free = false;
                    if (c == 0) {
                        free = true;
                        setExclusiveOwnerThread(null);
                    }
                    setState(c);
                    return free;
                }
6.signal实现原理
假设 Thread-1 要来唤醒 Thread-0
![[外链图片转存失败,源站可能有防盗链机制,建议将图片保存下来直接上传(img-CXeBnbZu-1667463827132)(assets/image-20221102182317308.png)]](https://img-blog.csdnimg.cn/d26c89c4d5cd4ff9950dd0835e947974.png)
进入 ConditionObject 的 doSignal 流程,取得等待队列中第一个 Node,即 Thread-0 所在 Node
![[外链图片转存失败,源站可能有防盗链机制,建议将图片保存下来直接上传(img-RaxP3uWe-1667463827133)(assets/image-20221102182347181.png)]](https://img-blog.csdnimg.cn/45c43e1d282c442a87fbbefa429ae9d0.png)
执行transferForSignal流程,将该 Node 加入 AQS 队列尾部,将 Thread-0 的 waitStatus 改为 0,Thread-3 的
waitStatus 改为 -1
![[外链图片转存失败,源站可能有防盗链机制,建议将图片保存下来直接上传(img-5JstuTiJ-1667463827134)(assets/image-20221102183244989.png)]](https://img-blog.csdnimg.cn/468a4a69ffa54b6bb7a9b39cb55bcf32.png)
Thread-1 释放锁,进入 unlock 流程,略
public final void signal() {
            if (!isHeldExclusively())
                throw new IllegalMonitorStateException();
            Node first = firstWaiter;
            if (first != null)
                doSignal(first);
        }

 // 唤醒 - 将没取消的第一个节点转移至 AQS 队列
    private void doSignal(Node first) {
        do {
            // 已经是尾节点了
            if ( (firstWaiter = first.nextWaiter) == null) {
                lastWaiter = null;
            }
            first.nextWaiter = null;
        } while (
            // 将等待队列中的 Node 转移至 AQS 队列, 不成功且还有节点则继续循环 ㈢
                !transferForSignal(first) &&
                        // 队列还有节点
                        (first = firstWaiter) != null
        );
    }

final boolean transferForSignal(Node node) {
        /*
         * If cannot change waitStatus, the node has been cancelled.
         */
        if (!compareAndSetWaitStatus(node, Node.CONDITION, 0))
            return false;

        /*
         * Splice onto queue and try to set waitStatus of predecessor to
         * indicate that thread is (probably) waiting. If cancelled or
         * attempt to set waitStatus fails, wake up to resync (in which
         * case the waitStatus can be transiently and harmlessly wrong).
         */
        Node p = enq(node);  //  将节点放入AQS队列
        int ws = p.waitStatus;
        if (ws > 0 || !compareAndSetWaitStatus(p, ws, Node.SIGNAL))
            LockSupport.unpark(node.thread);
        return true;
    }

//  将node放入AQS队列
private Node enq(final Node node) {
        for (;;) {
            Node t = tail;
            if (t == null) { // Must initialize
                if (compareAndSetHead(new Node()))
                    tail = head;
            } else {
                node.prev = t;
                if (compareAndSetTail(t, node)) {
                    t.next = node;
                    return t;
                }
            }
        }
    }
7.state && ConditionObject
    static final class Node {
        /** Marker to indicate a node is waiting in shared mode */
        static final Node SHARED = new Node();
        /** Marker to indicate a node is waiting in exclusive mode */
        static final Node EXCLUSIVE = null;

        /** waitStatus value to indicate thread has cancelled */
        static final int CANCELLED =  1;  //  节点取消
        /** waitStatus value to indicate successor's thread needs unparking */
        static final int SIGNAL    = -1;  //  等待唤醒
        /** waitStatus value to indicate thread is waiting on condition */
        static final int CONDITION = -2;  //  等待condition signal
        /**
         * waitStatus value to indicate the next acquireShared should
         * unconditionally propagate
         */
        static final int PROPAGATE = -3;  //  状态表示下一次获取共享锁应该无条件传播
        }
关于更多传播性可以 看看 从PROPAGATE和setHeadAndPropagate()分析共享锁的传播性
共享锁是可以多个线程共有的,当一个节点的线程获取共享锁后,必然要通知后继共享节点的线程,也可以获取锁了,这样就不会让其他等待的线程等很久,而传播性的目的也是尽快通知其他等待的线程尽快获取锁
public class ConditionObject implements Condition, java.io.Serializable {
    private static final long serialVersionUID = 1173984872572414699L;

    // 第一个等待节点
    private transient Node firstWaiter;

    // 最后一个等待节点
    private transient Node lastWaiter;
    public ConditionObject() { }
    // ㈠ 添加一个 Node 至等待队列
    private Node addConditionWaiter() {
        Node t = lastWaiter;
        // 所有已取消的 Node 从队列链表删除, 见 ㈡
        if (t != null && t.waitStatus != Node.CONDITION) {
            unlinkCancelledWaiters();
            t = lastWaiter;
        }
        // 创建一个关联当前线程的新 Node, 添加至队列尾部
        Node node = new Node(Thread.currentThread(), Node.CONDITION);
        if (t == null)
            firstWaiter = node;
        else
            t.nextWaiter = node;
        lastWaiter = node;
        return node;
    }
    // 唤醒 - 将没取消的第一个节点转移至 AQS 队列
    private void doSignal(Node first) {
        do {
            // 已经是尾节点了
            if ( (firstWaiter = first.nextWaiter) == null) {
                lastWaiter = null;
            }
            first.nextWaiter = null;
        } while (
            // 将等待队列中的 Node 转移至 AQS 队列, 不成功且还有节点则继续循环 ㈢
                !transferForSignal(first) &&
                        // 队列还有节点
                        (first = firstWaiter) != null
        );
    }

    // 外部类方法, 方便阅读, 放在此处
    // ㈢ 如果节点状态是取消, 返回 false 表示转移失败, 否则转移成功
    final boolean transferForSignal(Node node) {
        // 如果状态已经不是 Node.CONDITION, 说明被取消了
        if (!compareAndSetWaitStatus(node, Node.CONDITION, 0))
            return false;
        // 加入 AQS 队列尾部
        Node p = enq(node);
        int ws = p.waitStatus;
        if (
            // 上一个节点被取消
                ws > 0 ||
                        // 上一个节点不能设置状态为 Node.SIGNAL
                        !compareAndSetWaitStatus(p, ws, Node.SIGNAL)
        ) {
            // unpark 取消阻塞, 让线程重新同步状态
            LockSupport.unpark(node.thread);
        }
        return true;
    }
// 全部唤醒 - 等待队列的所有节点转移至 AQS 队列
private void doSignalAll(Node first) {
    lastWaiter = firstWaiter = null;
    do {
        Node next = first.nextWaiter;
        first.nextWaiter = null;
        transferForSignal(first);
        first = next;
    } while (first != null);
}

    // ㈡
    private void unlinkCancelledWaiters() {
        // ...
    }
    // 唤醒 - 必须持有锁才能唤醒, 因此 doSignal 内无需考虑加锁
    public final void signal() {
        if (!isHeldExclusively())
            throw new IllegalMonitorStateException();
        Node first = firstWaiter;
        if (first != null)
            doSignal(first);
    }
    // 全部唤醒 - 必须持有锁才能唤醒, 因此 doSignalAll 内无需考虑加锁
    public final void signalAll() {
        if (!isHeldExclusively())
            throw new IllegalMonitorStateException();
        Node first = firstWaiter;
        if (first != null)
            doSignalAll(first);
    }
    // 不可打断等待 - 直到被唤醒
    public final void awaitUninterruptibly() {
        // 添加一个 Node 至等待队列, 见 ㈠
        Node node = addConditionWaiter();
        // 释放节点持有的锁, 见 ㈣
        int savedState = fullyRelease(node);
        boolean interrupted = false;
        // 如果该节点还没有转移至 AQS 队列, 阻塞
        while (!isOnSyncQueue(node)) {
            // park 阻塞
            LockSupport.park(this);
            // 如果被打断, 仅设置打断状态
            if (Thread.interrupted())
                interrupted = true;
        }
        // 唤醒后, 尝试竞争锁, 如果失败进入 AQS 队列
        if (acquireQueued(node, savedState) || interrupted)
            selfInterrupt();
    }
    // 外部类方法, 方便阅读, 放在此处
    // ㈣ 因为某线程可能重入,需要将 state 全部释放
    final int fullyRelease(Node node) {
        boolean failed = true;
        try {
            int savedState = getState();
            if (release(savedState)) {
                failed = false;
                return savedState;
            } else {
                throw new IllegalMonitorStateException();
            }
        } finally {
            if (failed)
                node.waitStatus = Node.CANCELLED;
        }
    }
    // 打断模式 - 在退出等待时重新设置打断状态
    private static final int REINTERRUPT = 1;
    // 打断模式 - 在退出等待时抛出异常
    private static final int THROW_IE = -1;
    // 判断打断模式
    private int checkInterruptWhileWaiting(Node node) {
        return Thread.interrupted() ?
                (transferAfterCancelledWait(node) ? THROW_IE : REINTERRUPT) :
                0;
    }
    // ㈤ 应用打断模式
    private void reportInterruptAfterWait(int interruptMode)
            throws InterruptedException {
        if (interruptMode == THROW_IE)
            throw new InterruptedException();
        else if (interruptMode == REINTERRUPT)
            selfInterrupt();
    }
    // 等待 - 直到被唤醒或打断
    public final void await() throws InterruptedException {
        if (Thread.interrupted()) {
            throw new InterruptedException();
        }
        // 添加一个 Node 至等待队列, 见 ㈠
        Node node = addConditionWaiter();
        // 释放节点持有的锁
        int savedState = fullyRelease(node);
        int interruptMode = 0;
        // 如果该节点还没有转移至 AQS 队列, 阻塞
        while (!isOnSyncQueue(node)) {
            // park 阻塞
            LockSupport.park(this);
            // 如果被打断, 退出等待队列
            if ((interruptMode = checkInterruptWhileWaiting(node)) != 0)
                break;
        }
        // 退出等待队列后, 还需要获得 AQS 队列的锁
        if (acquireQueued(node, savedState) && interruptMode != THROW_IE)
            interruptMode = REINTERRUPT;
        // 所有已取消的 Node 从队列链表删除, 见 ㈡
        if (node.nextWaiter != null)
            unlinkCancelledWaiters();
        // 应用打断模式, 见 ㈤
        if (interruptMode != 0)
            reportInterruptAfterWait(interruptMode);
    }
    // 等待 - 直到被唤醒或打断或超时
    public final long awaitNanos(long nanosTimeout) throws InterruptedException {
        if (Thread.interrupted()) {
            throw new InterruptedException();
        }
        // 添加一个 Node 至等待队列, 见 ㈠
        Node node = addConditionWaiter();
        // 释放节点持有的锁
        int savedState = fullyRelease(node);
        // 获得最后期限
        final long deadline = System.nanoTime() + nanosTimeout;
        int interruptMode = 0;
        // 如果该节点还没有转移至 AQS 队列, 阻塞
        while (!isOnSyncQueue(node)) {
            // 已超时, 退出等待队列
            if (nanosTimeout <= 0L) {
                transferAfterCancelledWait(node);
                break;
            }
            // park 阻塞一定时间, spinForTimeoutThreshold 为 1000 ns
            if (nanosTimeout >= spinForTimeoutThreshold)
                LockSupport.parkNanos(this, nanosTimeout);
            // 如果被打断, 退出等待队列
            if ((interruptMode = checkInterruptWhileWaiting(node)) != 0)
                break;
            nanosTimeout = deadline - System.nanoTime();
        }
        // 退出等待队列后, 还需要获得 AQS 队列的锁
        if (acquireQueued(node, savedState) && interruptMode != THROW_IE)
            interruptMode = REINTERRUPT;
        // 所有已取消的 Node 从队列链表删除, 见 ㈡
        if (node.nextWaiter != null)
            unlinkCancelledWaiters();
        // 应用打断模式, 见 ㈤
        if (interruptMode != 0)
            reportInterruptAfterWait(interruptMode);
        return deadline - System.nanoTime();
    }
    // 等待 - 直到被唤醒或打断或超时, 逻辑类似于 awaitNanos
    public final boolean awaitUntil(Date deadline) throws InterruptedException {
        // ...
    }
    // 等待 - 直到被唤醒或打断或超时, 逻辑类似于 awaitNanos
    public final boolean await(long time, TimeUnit unit) throws InterruptedException {
        // ...
    }
    // 工具方法 省略 ...
}
3.ReentrantReadWriteLock
当读操作远远高于写操作时,这时候使用 读写锁 让 读-读 可以并发,提高性能。 类似于数据库中的 select …
from … lock in share mode
x锁和s锁? 数据库概论
提供一个 数据容器类 内部分别使用读锁保护数据的 read() 方法,写锁保护数据的 write() 方法
简单的应用
TEST
import lombok.extern.slf4j.Slf4j;

import java.util.concurrent.locks.ReentrantReadWriteLock;

import static cn.itcast.n2.util.Sleeper.sleep;

@Slf4j(topic = "c.TestReadWriteLock")
public class TestReadWriteLock {
    public static void main(String[] args) throws InterruptedException {
        DataContainer dataContainer = new DataContainer();
        new Thread(() -> {
            dataContainer.read();
        }, "t1").start();

        new Thread(() -> {
            dataContainer.read();
        }, "t2").start();
    }
}

@Slf4j(topic = "c.DataContainer")
class DataContainer {
    private Object data;
    private ReentrantReadWriteLock rw = new ReentrantReadWriteLock();
    private ReentrantReadWriteLock.ReadLock r = rw.readLock();
    private ReentrantReadWriteLock.WriteLock w = rw.writeLock();

    public Object read() {
        log.debug("获取读锁...");
        r.lock();
        try {
            log.debug("读取");
            sleep(1);
            return data;
        } finally {
            log.debug("释放读锁...");
            r.unlock();
        }
    }

    public void write() {
        log.debug("获取写锁...");
        w.lock();
        try {
            log.debug("写入");
            sleep(1);
        } finally {
            log.debug("释放写锁...");
            w.unlock();
        }
    }
}
测试 读锁-读锁可以并发:
DataContainer dataContainer = new DataContainer();
new Thread(() -> {
 dataContainer.read();
}, "t1").start();
new Thread(() -> {
 dataContainer.read();
}, "t2").start()

out.
14:05:14.341 c.DataContainer [t2] - 获取读锁...
14:05:14.341 c.DataContainer [t1] - 获取读锁...
14:05:14.345 c.DataContainer [t1] - 读取
14:05:14.345 c.DataContainer [t2] - 读取
14:05:15.365 c.DataContainer [t2] - 释放读锁...
14:05:15.386 c.DataContainer [t1] - 释放读锁...
测试 读锁-写锁 相互阻塞:
DataContainer dataContainer = new DataContainer();
new Thread(() -> {
 dataContainer.read();
}, "t1").start();
Thread.sleep(100);
new Thread(() -> {
 dataContainer.write();
}, "t2").start();

out.
14:04:21.838 c.DataContainer [t1] - 获取读锁...
14:04:21.838 c.DataContainer [t2] - 获取写锁...
14:04:21.841 c.DataContainer [t2] - 写入
14:04:22.843 c.DataContainer [t2] - 释放写锁...
14:04:22.843 c.DataContainer [t1] - 读取
14:04:23.843 c.DataContainer [t1] - 释放读锁...
写锁-写锁也是相互阻塞的
- 重入时降级支持:即持有写锁的情况下去获取读锁,不支持
锁升级
class CachedData {
    Object data;
    // 是否有效,如果失效,需要重新计算 data
    volatile boolean cacheValid;
    final ReentrantReadWriteLock rwl = new ReentrantReadWriteLock();
    void processCachedData() {
        rwl.readLock().lock();
        if (!cacheValid) {
            // 获取写锁前必须释放读锁
            rwl.readLock().unlock();
            rwl.writeLock().lock();
            try {
                // 判断是否有其它线程已经获取了写锁、更新了缓存, 避免重复更新
                if (!cacheValid) {
                    data = ...
                    cacheValid = true;
                }
                // 降级为读锁, 释放写锁, 这样能够让其它线程读取缓存
                rwl.readLock().lock();
            } finally {
                rwl.writeLock().unlock();
            }
        }
        // 自己用完数据, 释放读锁
        try {
            use(data);
        } finally {
            rwl.readLock().unlock();
        }
    }
}
ReentrantReadWriteLock原理
1. 图解流程
读写锁用的是同一个 Sycn 同步器,因此等待队列、state 等也是同一个
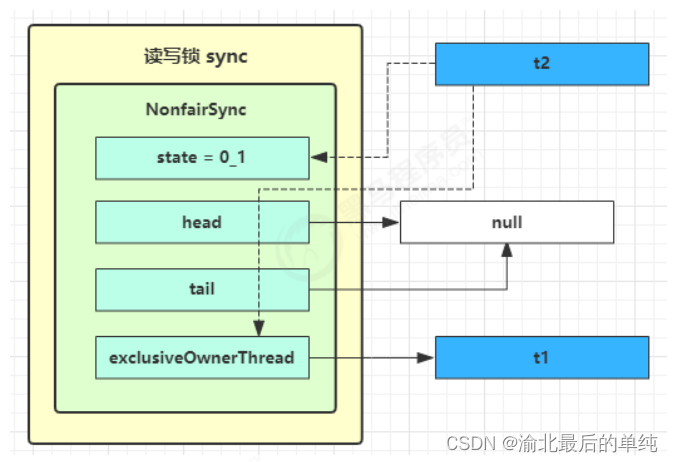
t1 w.lock,t2 r.lock
- 成功上锁,流程与 ReentrantLock 加锁相比没有特殊之处,不同是写锁状态占了 state 的低 16 位,而读锁使用的是 state 的高 16 位
![[外链图片转存失败,源站可能有防盗链机制,建议将图片保存下来直接上传(img-H2V7rUtT-1667463827135)(assets/image-20221102192009513.png)]](https://img-blog.csdnimg.cn/0eaddeb6802f4cc4b3625f3d6535b550.png)
-
t2 执行 r.lock,这时进入读锁的 sync.acquireShared(1) 流程,首先会进入 tryAcquireShared 流程。如果有写
锁占据,那么 tryAcquireShared 返回 -1 表示失败
tryAcquireShared 返回值表示
-
-1 表示失败
-
0 表示成功,但后继节点不会继续唤醒
-
正数表示成功,而且数值是还有几个后继节点需要唤醒,读写锁返回 1
- 这时会进入 sync.doAcquireShared(1) 流程,首先也是调用 addWaiter 添加节点,不同之处在于节点被设置为
Node.SHARED 模式而非 Node.EXCLUSIVE 模式,注意此时 t2 仍处于活跃状态
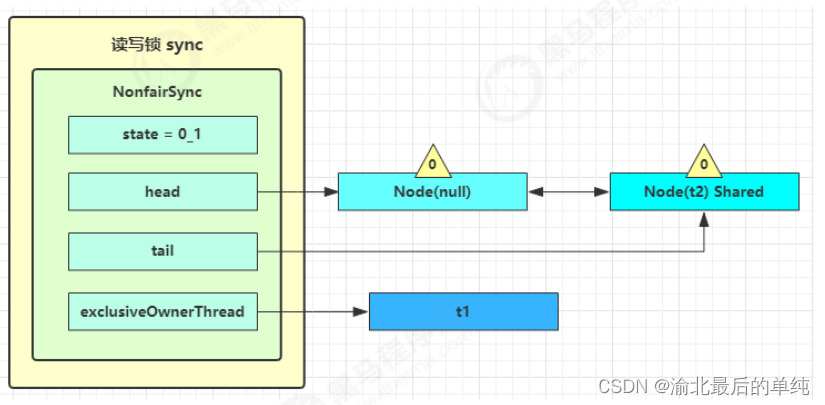
-
-
t2 会看看自己的节点是不是老二,如果是,还会再次调用 tryAcquireShared(1) 来尝试获取锁
-
如果没有成功,在 doAcquireShared 内 for (;😉 循环一次,把前驱节点的 waitStatus 改为 -1,再 for (;😉 循环一次尝试 tryAcquireShared(1) 如果还不成功,那么在 parkAndCheckInterrupt() 处 park
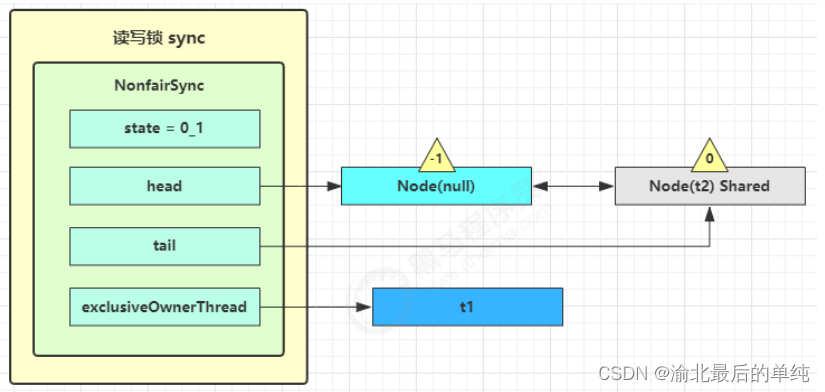
t3 r.lock,t4 w.lock
这种状态下,假设又有 t3 加读锁和 t4 加写锁,这期间 t1 仍然持有锁,就变成了下面的样子

t1 w.unlock
这时会走到写锁的 sync.release(1) 流程,调用 sync.tryRelease(1) 成功,变成下面的样子

接下来执行唤醒流程 sync.unparkSuccessor,即让老二恢复运行,这时 t2 在 doAcquireShared 内
parkAndCheckInterrupt() 处恢复运行
这回再来一次 for (;😉 执行 tryAcquireShared 成功则让读锁计数加一

这时 t2 已经恢复运行,接下来 t2 调用 setHeadAndPropagate(node, 1),它原本所在节点被置为头节点
setHeadAndPropagate就是前文中讲到的 传播性共享锁是可以多个线程共有的,当一个节点的线程获取共享锁后,必然要通知后继共享节点的线程,也可以获取锁了,这样就不会让其他等待的线程等很久,而传播性的目的也是尽快通知其他等待的线程尽快获取锁
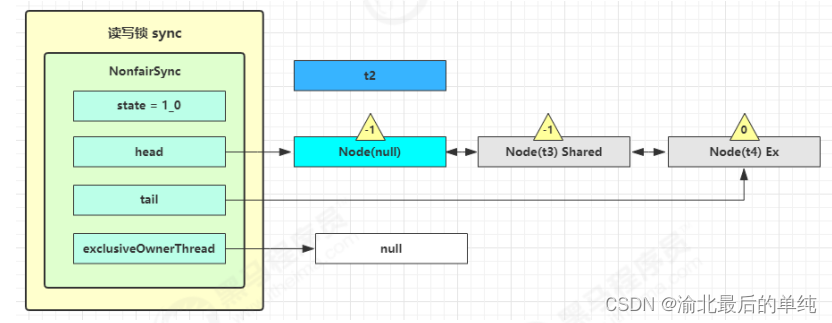
事情还没完,在 setHeadAndPropagate 方法内还会检查下一个节点是否是 shared,如果是则调用
doReleaseShared() 将 head 的状态从 -1 改为 0 并唤醒老二,这时 t3 在 doAcquireShared 内
parkAndCheckInterrupt() 处恢复运行
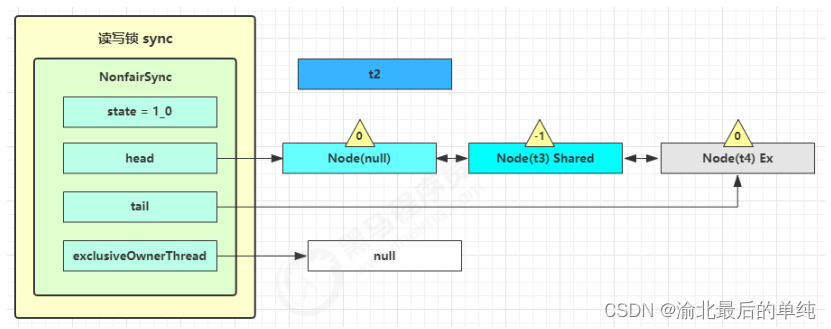
这回再来一次 for (;😉 执行 tryAcquireShared 成功则让读锁计数加一
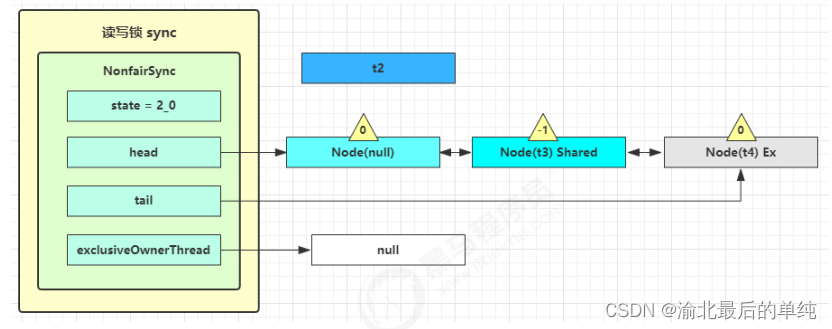
这时 t3 已经恢复运行,接下来 t3 调用 setHeadAndPropagate(node, 1),它原本所在节点被置为头节点
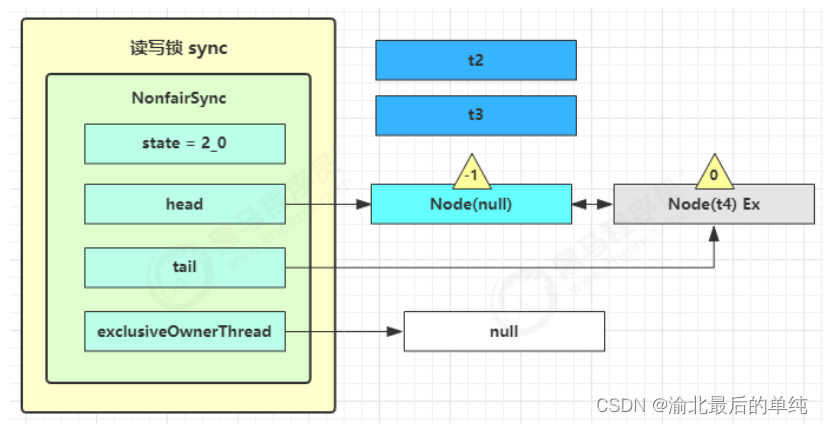
下一个节点不是 shared 了,因此不会继续唤醒 t4 所在节点
t2 r.unlock,t3 r.unlock
t2 进入 sync.releaseShared(1) 中,调用 tryReleaseShared(1) 让计数减一,但由于计数还不为零
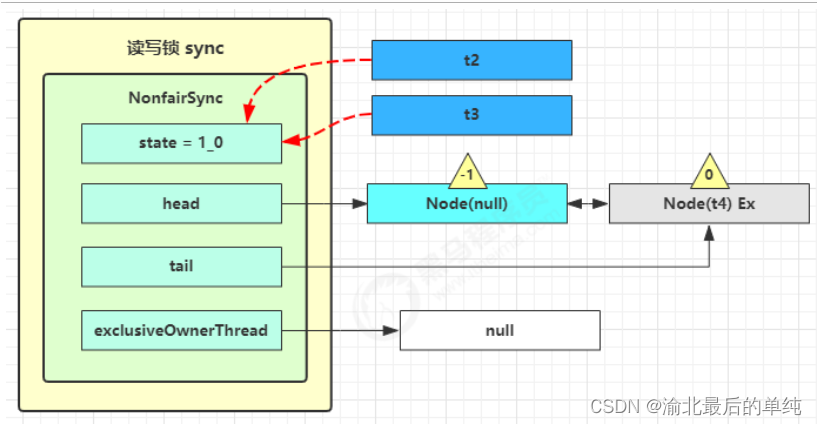
t3 进入 sync.releaseShared(1) 中,调用 tryReleaseShared(1) 让计数减一,这回计数为零了,进入
doReleaseShared() 将头节点从 -1 改为 0 并唤醒老二,即
![[外链图片转存失败,源站可能有防盗链机制,建议将图片保存下来直接上传(img-viETBwci-1667463827144)(assets/image-20221102194610185.png)]](https://img-blog.csdnimg.cn/6ef7c0186b5d4bd4b771492032fb8942.png)
之后 t4 在 acquireQueued 中 parkAndCheckInterrupt 处恢复运行,再次 for (;😉 这次自己是老二,并且没有其他
竞争,tryAcquire(1) 成功,修改头结点,流程结束
![[外链图片转存失败,源站可能有防盗链机制,建议将图片保存下来直接上传(img-eZZ1U492-1667463827145)(assets/image-20221102194631484.png)]](https://img-blog.csdnimg.cn/820c24e7e2e149d49da2228fd2601304.png)
总结:
整体流程与前文中的ReetrantLock流程相似,只不过这个是在高16位加读锁,低16位加写锁,读写锁互斥。其他逻辑与ReentrantLock基本一致
思考: 1. 高32位也就是65536 也就是 读锁最多有 65536 同时使用
2. 当写状态更多时 是否可以调整读写锁的优先级?
写锁上锁源码
static final class NonfairSync extends Sync {
    // ... 省略无关代码

    // 外部类 WriteLock 方法, 方便阅读, 放在此处
    public void lock() {
        sync.acquire(1);
    }

    // AQS 继承过来的方法, 方便阅读, 放在此处
    public final void acquire(int arg) {
        if (
            // 尝试获得写锁失败
                !tryAcquire(arg) &&
                        // 将当前线程关联到一个 Node 对象上, 模式为独占模式
                        // 进入 AQS 队列阻塞
                        acquireQueued(addWaiter(Node.EXCLUSIVE), arg)
        ) {
            selfInterrupt();
        }
    }

    // Sync 继承过来的方法, 方便阅读, 放在此处
    protected final boolean tryAcquire(int acquires) {
        // 获得低 16 位, 代表写锁的 state 计数
        Thread current = Thread.currentThread();
        int c = getState();
        int w = exclusiveCount(c);

        if (c != 0) {
            if (
                // c != 0 and w == 0 表示有读锁, 或者
                    w == 0 ||
                            // 如果 exclusiveOwnerThread 不是自己
                            current != getExclusiveOwnerThread()
            ) {
                // 获得锁失败
                return false;
            }
            // 写锁计数超过低 16 位, 报异常
            if (w + exclusiveCount(acquires) > MAX_COUNT)
                throw new Error("Maximum lock count exceeded");
            // 写锁重入, 获得锁成功
            setState(c + acquires);
            return true;
        }
        if (
            // 判断写锁是否该阻塞, 或者
                writerShouldBlock() ||
                        // 尝试更改计数失败
                        !compareAndSetState(c, c + acquires)
        ) {
            // 获得锁失败
            return false;
        }
        // 获得锁成功
        setExclusiveOwnerThread(current);
        return true;
    }

    // 非公平锁 writerShouldBlock 总是返回 false, 无需阻塞
    final boolean writerShouldBlock() {
        return false;
    }
}
写锁释放流程
static final class NonfairSync extends Sync {
    // ... 省略无关代码

    // WriteLock 方法, 方便阅读, 放在此处
    public void unlock() {
        sync.release(1);
    }

    // AQS 继承过来的方法, 方便阅读, 放在此处
    public final boolean release(int arg) {
        // 尝试释放写锁成功
        if (tryRelease(arg)) {
            // unpark AQS 中等待的线程
            Node h = head;
            if (h != null && h.waitStatus != 0)
                unparkSuccessor(h);
            return true;
        }
        return false;
    }

    // Sync 继承过来的方法, 方便阅读, 放在此处
    protected final boolean tryRelease(int releases) {
        if (!isHeldExclusively())
            throw new IllegalMonitorStateException();
        int nextc = getState() - releases;
        // 因为可重入的原因, 写锁计数为 0, 才算释放成功
        boolean free = exclusiveCount(nextc) == 0;
        if (free) {
            setExclusiveOwnerThread(null);
        }
        setState(nextc);
        return free;
    }
}
读锁上锁流程
static final class NonfairSync extends Sync {

    // ReadLock 方法, 方便阅读, 放在此处
    public void lock() {
        sync.acquireShared(1);
    }

    // AQS 继承过来的方法, 方便阅读, 放在此处
    public final void acquireShared(int arg) {
        // tryAcquireShared 返回负数, 表示获取读锁失败
        if (tryAcquireShared(arg) < 0) {
            doAcquireShared(arg);
        }
    }

    // Sync 继承过来的方法, 方便阅读, 放在此处
    protected final int tryAcquireShared(int unused) {
        Thread current = Thread.currentThread();
        int c = getState();
        // 如果是其它线程持有写锁, 获取读锁失败
        if (
                exclusiveCount(c) != 0 &&
                        getExclusiveOwnerThread() != current
        ) {
            return -1;
        }
        int r = sharedCount(c);
        if (
            // 读锁不该阻塞(如果老二是写锁,读锁该阻塞), 并且
                !readerShouldBlock() &&
                        // 小于读锁计数, 并且
                        r < MAX_COUNT &&
                        // 尝试增加计数成功
                        compareAndSetState(c, c + SHARED_UNIT)
        ) {
            // ... 省略不重要的代码
            return 1;
        }
        return fullTryAcquireShared(current);
    }

    // 非公平锁 readerShouldBlock 看 AQS 队列中第一个节点是否是写锁
    // true 则该阻塞, false 则不阻塞
    final boolean readerShouldBlock() {
        return apparentlyFirstQueuedIsExclusive();
    }

    // AQS 继承过来的方法, 方便阅读, 放在此处
    // 与 tryAcquireShared 功能类似, 但会不断尝试 for (;;) 获取读锁, 执行过程中无阻塞
    final int fullTryAcquireShared(Thread current) {
        HoldCounter rh = null;
        for (;;) {
            int c = getState();
            if (exclusiveCount(c) != 0) {
                if (getExclusiveOwnerThread() != current)
                    return -1;
            } else if (readerShouldBlock()) {
                // ... 省略不重要的代码
            }
            if (sharedCount(c) == MAX_COUNT)
                throw new Error("Maximum lock count exceeded");
            if (compareAndSetState(c, c + SHARED_UNIT)) {
                // ... 省略不重要的代码
                return 1;
            }
        }
    }

    // AQS 继承过来的方法, 方便阅读, 放在此处
    private void doAcquireShared(int arg) {
        // 将当前线程关联到一个 Node 对象上, 模式为共享模式
        final Node node = addWaiter(Node.SHARED);
        boolean failed = true;
        try {
            boolean interrupted = false;
            for (;;) {
                final Node p = node.predecessor();
                if (p == head) {

                    // 再一次尝试获取读锁
                    int r = tryAcquireShared(arg);
                    // 成功
                    if (r >= 0) {
                        // ㈠
                        // r 表示可用资源数, 在这里总是 1 允许传播
                        //(唤醒 AQS 中下一个 Share 节点)
                        setHeadAndPropagate(node, r);
                        p.next = null; // help GC
                        if (interrupted)
                            selfInterrupt();
                        failed = false;
                        return;
                    }
                }
                if (
                    // 是否在获取读锁失败时阻塞(前一个阶段 waitStatus == Node.SIGNAL)
                        shouldParkAfterFailedAcquire(p, node) &&
                                // park 当前线程
                                parkAndCheckInterrupt()
                ) {
                    interrupted = true;
                }
            }
        } finally {
            if (failed)
                cancelAcquire(node);
        }
    }

    // ㈠ AQS 继承过来的方法, 方便阅读, 放在此处
    private void setHeadAndPropagate(Node node, int propagate) {
        Node h = head; // Record old head for check below
        // 设置自己为 head
        setHead(node);

        // propagate 表示有共享资源(例如共享读锁或信号量)
        // 原 head waitStatus == Node.SIGNAL 或 Node.PROPAGATE
        // 现在 head waitStatus == Node.SIGNAL 或 Node.PROPAGATE
        if (propagate > 0 || h == null || h.waitStatus < 0 ||
                (h = head) == null || h.waitStatus < 0) {
            Node s = node.next;
            // 如果是最后一个节点或者是等待共享读锁的节点
            if (s == null || s.isShared()) {
                // 进入 ㈡
                doReleaseShared();
            }
        }
    }

    // ㈡ AQS 继承过来的方法, 方便阅读, 放在此处
    private void doReleaseShared() {
        // 如果 head.waitStatus == Node.SIGNAL ==> 0 成功, 下一个节点 unpark
        // 如果 head.waitStatus == 0 ==> Node.PROPAGATE, 为了解决 bug, 见后面分析
        for (;;) {
            Node h = head;
            // 队列还有节点
            if (h != null && h != tail) {
                int ws = h.waitStatus;
                if (ws == Node.SIGNAL) {
                    if (!compareAndSetWaitStatus(h, Node.SIGNAL, 0))
                        continue; // loop to recheck cases
                    // 下一个节点 unpark 如果成功获取读锁
                    // 并且下下个节点还是 shared, 继续 doReleaseShared
                    unparkSuccessor(h);
                }
                else if (ws == 0 &&
                        !compareAndSetWaitStatus(h, 0, Node.PROPAGATE))
                    continue; // loop on failed CAS
            }
            if (h == head) // loop if head changed
                break;
        }
    }
}
读锁释放流程
static final class NonfairSync extends Sync {

    // ReadLock 方法, 方便阅读, 放在此处
    public void unlock() {
        sync.releaseShared(1);
    }

    // AQS 继承过来的方法, 方便阅读, 放在此处
    public final boolean releaseShared(int arg) {
        if (tryReleaseShared(arg)) {
            doReleaseShared();
            return true;
        }
        return false;
    }

    // Sync 继承过来的方法, 方便阅读, 放在此处
    protected final boolean tryReleaseShared(int unused) {
        // ... 省略不重要的代码
        for (;;) {
            int c = getState();
            int nextc = c - SHARED_UNIT;
            if (compareAndSetState(c, nextc)) {
                // 读锁的计数不会影响其它获取读锁线程, 但会影响其它获取写锁线程
                // 计数为 0 才是真正释放
                return nextc == 0;
            }
        }
    }

    // AQS 继承过来的方法, 方便阅读, 放在此处
    private void doReleaseShared() {
        // 如果 head.waitStatus == Node.SIGNAL ==> 0 成功, 下一个节点 unpark
        // 如果 head.waitStatus == 0 ==> Node.PROPAGATE
        for (;;) {
            Node h = head;
            if (h != null && h != tail) {
                int ws = h.waitStatus;
                // 如果有其它线程也在释放读锁,那么需要将 waitStatus 先改为 0
                // 防止 unparkSuccessor 被多次执行
                if (ws == Node.SIGNAL) {
                    if (!compareAndSetWaitStatus(h, Node.SIGNAL, 0))
                        continue; // loop to recheck cases
                    unparkSuccessor(h);
                }
                // 如果已经是 0 了,改为 -3,用来解决传播性,见后文信号量 bug 分析
                else if (ws == 0 &&
                        !compareAndSetWaitStatus(h, 0, Node.PROPAGATE))
                    continue; // loop on failed CAS
            }
            if (h == head) // loop if head changed
                break;
        }
    }
}



![[Spring MVC 4] MyBatis 分页开发](https://img-blog.csdnimg.cn/0e18962f450340e8a4fdff8208f7943a.png)

