supermallagain-学习记录
项目目录搭建
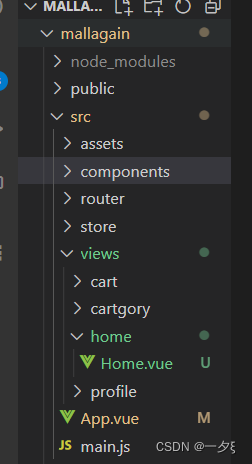
安装vue以及整理目录
样式初始化
引入assets/css/normalize.css文件
在实际开发中,经常会将浏览器默认的样式进行重置
*{margin:0;padding:0;border:0;}
但是*是通配符,需要把所有的标签都遍历一遍,当网站较大时,样式比较多,会加大网站运行的负载。
normalize.css:保留有用的默认值,更正了常见浏览器不一致性等错误
直接在github中下载normalize.css文件放入对应的文件夹中。再在App.vue中使用:
</script>

<style>
@import 'assets/css/normalize.css';
使用router实现4个页面的跳转
创建路由组件
可以去package-lock.json文件里面查看是否安装成功
main.js/引入
//src/main.js   整个项目的核心文件
import Vue from 'vue' //引入vue核心库
import App from './App.vue'//引入当前目录结构下名字有App.vue的组件
import router from './router'  //这里import后面的router不能首字母大写
Vue.config.productionTip = false //是否有提示信息

new Vue({//生成一个vue实例
    router,
    render: h => h(App),
}).$mount('#app')
配置路由映射:组件和路径映射的关系
为文件夹起别名
修改src下面的vue.config.js
//src/vue.config.js  这里的webpack配置会和公共的webpack.config.js进行合并
const path = require('path');

function resolve(dir) {
    return path.join(__dirname, dir)
}

module.exports = {
    lintOnSave: false,//是否再保存的时候使用'eslint-loader进行检查  默认为true  最好修改为false
    chainWebpack: config => {
        config.resolve.alias
            .set('@', resolve('src'))
            .set('assets', resolve('src/assets'))
            .set('components', resolve('src/components'))
            // .set('network', resolve('src/network'))
            .set('views', resolve('src/views'))
    }
}
配置映射关系
//src/router/index.js
import Vue from 'vue'
import Router from 'vue-router'
const Home = () =>
    import ('views/home/Home.vue')
const Cart = () =>
    import ('views/cart/Cart.vue')
Vue.use(Router)
export default new Router({
    routes: [{
            path: '',
            redirect: '/home'
        },
        {
            path: '/home',
            name: 'home',
            component: Home
        },
        {
            path: '/cart',
            name: 'cart',
            component: Cart
        }, {
            path: '/cartgory',
            name: 'cartgory',
            component: () =>
                import ('views/cartgory/Cartgory')
        },
        {
            path: '/profile',
            name: 'profile',
            component: () =>
                import ('views/profile/Profile')
        }
    ]
})
使用路由:router-view
<!-- src/App.vue -->
<template>
  <div id="app">
   <router-view></router-view>
  </div>
</template>
底部导航栏
分析
观察到每个页面下面都有这个底部的导航栏,因此应该直接引入到App.vue中


**需要实现的功能:**点击图标,图标和文字处于活跃状态,并跳转到相应的页面
这一步比较难,因为每个tabbaritem不是for循环出来的,因此不能使用currentindex==index来设置是否活跃

实现
//componnets/common/tabbar/TabBar.vue
<template>
  <div id="tabbar">
<Tab-bar-item path="/home">
    <div slot="item-img"><img src="~assets/img/tabbar/home.svg" alt=""></div>
    <div slot="item-img-active"><img src="~assets/img/tabbar/home_active.svg" alt=""></div>
    <div slot="item-text">首页</div>
</Tab-bar-item>
<Tab-bar-item path="/category">
    <div slot="item-img"><img src="~assets/img/tabbar/category.svg" alt=""></div>
    <div slot="item-img-active"><img src="~assets/img/tabbar/category_active.svg" alt=""></div>
    <div slot="item-text">分类</div>
</Tab-bar-item>
<Tab-bar-item path="/cart">
    <div slot="item-img"><img src="~assets/img/tabbar/shopcart.svg" alt=""></div>
    <div slot="item-img-active"><img src="~assets/img/tabbar/shopcart_active.svg" alt=""></div>
    <div slot="item-text">购物车</div>
</Tab-bar-item>
<Tab-bar-item path="/profile">
    <div slot="item-img"><img src="~assets/img/tabbar/profile.svg" alt=""></div>
    <div slot="item-img-active"><img src="~assets/img/tabbar/profile_active.svg" alt=""></div>
    <div slot="item-text">我的</div>
</Tab-bar-item>
  </div>
</template>

<script>
import TabBarItem from 'components/common/tabbar/TabBarItem'
export default {
    name: 'TabBar',
components:{TabBarItem}
}
</script>

<style scoped>
#tabbar{
    width:100%;
    height:58px;
    /* background-color: red; */
   position:fixed;
    bottom:0px;
    left:0px;
    right:0px;
    display: flex;
    justify-content: space-around;
    border-top:1px solid rgba(100,100,100,0.2)
}
</style>
<!--//componnets/common/tabbar/TabBarItem.vue -->
<template>
  <div class="tabbaritem" >
    <!-- slot上面除了name属性外,最好不要再绑定其他的属性,如果要绑定其他属性的话,就在外面包裹一层div -->
<div class="item-box" @click="boxclick">
    <div v-show="!(path==$route.path)">
        <slot name="item-img" ></slot>
    </div>
    <div v-show="path==$route.path">
        <slot name="item-img-active"></slot>
    </div>
    <div class="text" :class="{isActive:(path==$route.path)}">
        <slot name="item-text" ></slot>
    </div>

</div>
  </div>
</template>

<script >
export default {
    name: 'TabBarItem',
    data() {
    return {
isActive:false
        }
    },
    props: {
        path: {
            type: String,
            default:'/home'
        }
    },
    methods: {
        boxclick() {
            this.$router.replace(this.path)//路由跳转
    }
}
}
</script>

<style scoped>
.tabbaritem{
    height:58px;
    display: flex;
    flex-direction: column;
    justify-content: space-around;
}
.tabbaritem img{
    width:28px;
    height:28px;
}
.isActive{
    color:red
}
</style>
问题
重复点击导航时,控制台会报错:

**因此需要判断当前的路径是否等于当前的path,如果不等于的时候,再进行跳转:**同时isActive可以定义一个计算属性
<div class="item-box" @click="boxclick">
    <div v-show="!isActive">
        <slot name="item-img" ></slot>
    </div>
    <div v-show="isActive">
        <slot name="item-img-active"></slot>
    </div>
    <div class="text" :class="{isActive:isActive}">
        <slot name="item-text" ></slot>
    </div>
</div>

 computed: {
        isActive() {
            return this.path==this.$route.path
        }
    },
    props: {
        path: {
            type: String,
            default:'/home'
        }
    },
    methods: {
        boxclick() {
            if(this.$route.path!==this.path) //当不等于的时候才进行跳转
                this.$router.replace(this.path)//路由跳转
    }
}
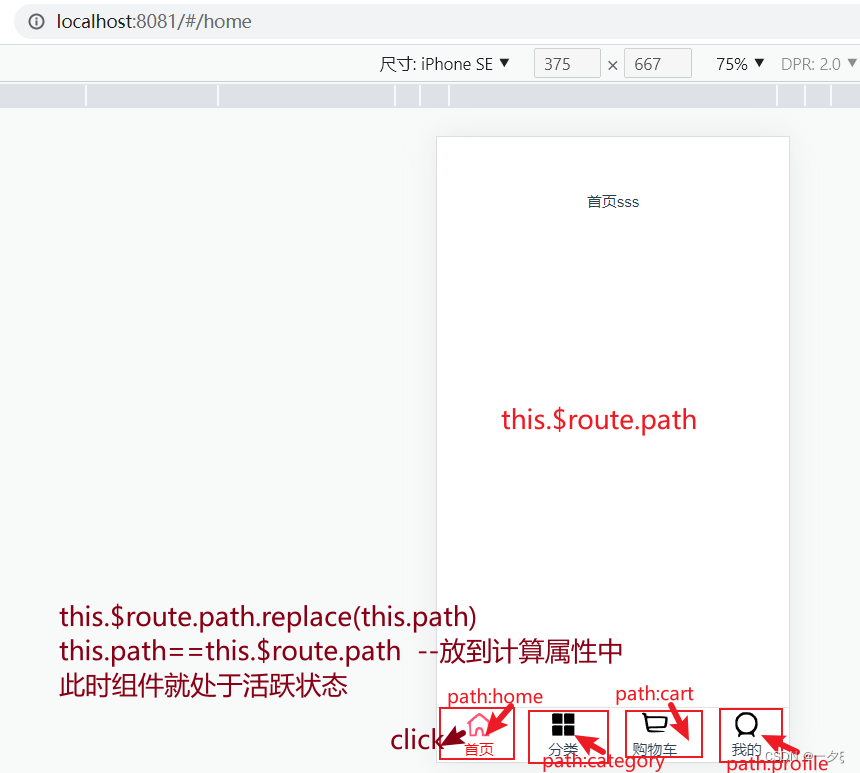
总结:点击后变色
通过v-for遍历产生
此时在进行遍历的时候可以获取被遍历数组的index和item
可以在data中定义一个currentindex来存储当前的index,只有项目被标记的index和当前currentindex相同时,才有效
通过点击改变当前currentindex的值,点击的时候将改index传入,并赋值给currentindex
并不是遍历产生,比如上面的情况
添加一个属性,props到子组件,然后通过路由path来判断
首页
顶部导航栏
需要多次使用,因此放到common中

<!-- components/common/navbar/NavBar -->
<template>
  <div id="navbar">
    <slot></slot>
    </div>
</template>

<script>
export default {
name:'NavBar'
}
</script>

<style scoped>
#navbar{
  width:100%;
  height:48px;
  background-color: rgb(247, 29, 66);
  font-size:25px;
  font-weight: 600;
  color:#fff;
  text-align: center;
  line-height: 48px;
  position:fixed;
  top:0px;
}


</style>
<!-- src/views/home -->
<template>
  <div>
    <Nav-bar>购物街</Nav-bar>
  </div>
</template>

<script>
import NavBar from 'components/common/navbar/NavBar'
export default {
  name: 'View-Home',
components:{NavBar}
}
网络请求
之后需要使用网络请求过来的图片数据
axios封装
安装axios
cnpm install axios@0.18.0 --save
封装axios
//network/request.js
import axios from 'axios'
export function request(config) {
    const instance = axios.create({
        baseURL: 'http://123.207.32.32:8000',
        timeout: 5000,
    })
    return instance(config)
}
单独封装home发起网络请求
//network/home.js
import { request } from 'network/request.js'
export function getmultidata() {
    return request({ url: '/home/multidata' })
}
Home.vue中发请求并获取数据
<script>
import {getmultidata} from 'network/home.js'
import NavBar from 'components/common/navbar/NavBar'
export default {
  name: 'View-Home',
  components: { NavBar },
  created(){ //一般在组件的创建阶段就发请求
    // request({url:'/home/multidata'}).then(res=>{console.log(res);}) 进一步封装到一个单独的文件中
    getmultidata().then(res=>{console.log(res);})
}
}
</script>
轮播图部分
根据网络请求回来的数据,整理出轮播图需要的数据
使用swipper插件实现轮播效果
安装swipper
npm install vue-awesome-swiper@3 --save -dev
创建swiper子组件
公用的组件
<!-- components/common/swiper/swiper -->
<template>
    <div class="swiper-container" >
        <div class="swiper-wrapper">
            <!-- 存放具体的轮播内容 -->
            <slot name ="swiper-con"></slot>
        </div>
        <!-- 分页器 -->
        <div class="swiper-pagination">
       </div>
    </div>
  </template>
  <script>
  import Swiper from "swiper";
  import "swiper/dist/css/swiper.min.css";
// import 'swiper/swiper-bundle'
  export default {
    mounted() {
          new Swiper('.swiper-container', {
            autoplay: 1000,//可选选项,自动滑动
              direction: 'horizontal',
              autoplayDisableOnInteraction: false,
              grabCursor: true,
              roundLengths: true,
              pagination: '.swiper-pagination',
              loop: true,
        })
    }
  };
  </script>

  <style scoped>
  .swiper-container{
    margin-top:0px;
    width:100%;
    height: 195px;
    background-color: red;
    display: flex;
  }
  .swiper-wrapper{
    flex: 1;
  }
  .swiper-pagination-bullet-active {
    background: #fff;
  }
  .swiper-container-horizontal > .swiper-pagination-bullets {
      bottom: 1rem;
      width: 100%;
      text-align: center;
    }
.my-bullet-active{
    background: #ffffff;
    opacity: 1;
}
.swiper-pagination-bullet{
    width: 20px;
     height: 20px;
     background: #b3e9cf;
}
img{
  width:100%
}
  </style>
创建HomeSwiper组件
<!-- views/home/childcomponent/HomeSwipper -->
<template>
  <div>
<swiper swipeid="swipe" ref="swiper" :autoPlay="3000" effect="slide">
    <div slot="swiper-con" v-for="(item,index) in swiperimg" :key="index" class="swiper-slide">
      <a :href="item.link"><img :src="item.image" alt=""></a>
    </div>
</swiper>
  </div>
</template>

<script>
import swiper from 'components/common/swiper/swiper'
export default {
    name: 'HomeSwipper',
    components: { swiper },
    props: {
        swiperimg: {
            type: Array,
            default() {
            return []
        }
    }
}
}
</script>

<style>
.swiper-slide{
    height:auto
}
</style>
在Home中使用
    <Nav-bar>购物街</Nav-bar>
    <Home-swipper :swiperimg="HomeImageBanner"></Home-swipper>

import HomeSwipper from 'views/home/childcomponent/HomeSwipper'
export default {
  name: 'View-Home',
  components: { NavBar,HomeSwipper },
问题
用fixed定义但又不希望元素脱离标准流
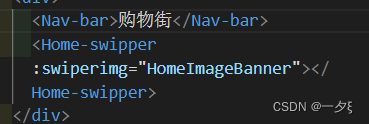
可以在flex元素外面再套一个相对定位的盒子
重新修改navbar的组件
<template>
  <div id="navbar">
    <div class="content">
      <slot></slot>
    </div>
    </div>
</template>
.content{
  width:100%;
  height:48px;
  background-color: rgb(247, 29, 66);
  font-size:25px;
  font-weight: 600;
  color:#fff;
  text-align: center;
  line-height: 48px;
  position:fixed;
  top:0px;
}
#navbar{
  position:relative;
  height:48px;
  top:0px;
   z-index:999
}
或者只需要使用一个div去占位,用一个空的div,把他放在fixed固定的元素的位置,让他拥有和fixed元素一样的宽高
声明.d.ts文件
Try `npm i --save-dev @types/swiper` if it exists or add a new declaration (.d.ts) file containing `declare module 'swiper';
新建文件
// shengmi.d.ts
declare module 'swiper'
引入文件
pakage.json:
    "includes": [
        "shengmi.d.ts"
    ],
组件名字报错
vue.runtime.esm.js?2b0e:619 [Vue warn]: Unknown custom element: - did you register the component correctly? For recursive components, make sure to provide the “name” option.
检查代码规范,模块引入是否加{}
import语句导入组件时from后面的路径写错
注册组件时括号内的组件名写错,与import声明不一致
注册组件关键字components写错
使用组件错误
swiper有时候无法滚动
需要重新初始化
添加观察参数,进行自动更新
<!-- components/common/swiper/swiper -->
  export default {
    mounted() {
          new Swiper('.swiper-container', {
            autoplay: 1000,//可选选项,自动滑动
              direction: 'horizontal',
              autoplayDisableOnInteraction: false,
              grabCursor: true,
              roundLengths: true,
              pagination: '.swiper-pagination',
            loop: true,//循环模式选项
            observer: true,//修改swiper自己或子元素,自动初始化swiper
            observerParents: true,//修改swiper的父元素,自动初始化swiper

        })
    }
推荐部分
因为仅有home页面需要,因此不需要再单独抽取组件
<!-- views/home/childcomponent/HomeRecommend -->
<template>
  <div id="recommend-info">
    <div class="info-content" v-for="(item,index) in HomeRecomenddata" :key="index">
<div class="content-img">
  <a :href="item.link"> <img :src="item.image" alt=""></a>
</div>
    <div class="content-text">
        {{item.title}}
    </div>
    </div>
  </div>
</template>

<script>
export default {
    name: 'HomeRecommend',
    props: {
        HomeRecomenddata: {
            type: Array,
            default:[]
        }
}
}
</script>

<style scoped>
#recommend-info{
    width:100%;
    height:140px;
    background-color: #ffff;
    display: flex;
    justify-content: space-between;

    border-bottom:5px solid rgba(179, 179, 188,0.5)
}

.content-img img{
    width:70px;
    height:70px;
}
.info-content{
       width:80px;
    display: flex;
    justify-content: center;
    flex-direction: column;
    text-align: center;
}
</style>
//home.vue
    <Home-recommend :HomeRecomenddata="HomeRecomenddata"></Home-recommend>

    import HomeRecommend from 'views/home/childcomponent/HomeRecommend'
export default {
  name: 'View-Home',
  components: { NavBar,HomeSwipper,HomeRecommend },
  data() {
    return {
      HomeImageBanner: [],
      HomeRecomenddata: []
    }
  },

   getmultidata().then(res => {
      let data = res.data.data
      console.log(data);
      this.HomeImageBanner = data.banner.list
      this.HomeRecomenddata=data.recommend.list
    })
本周流行部分
<!-- views/home/childcomponent/Feature -->
<template>
  <div id="Feature">
   <img src="~assets/img/home/recommend_bg.jpg" alt="">
  </div>
</template>

<script>
export default {
name:'Feature'
}
</script>

<style>
#Feature{
    width:100%;
    height:275px;
}
#Feature img{
    width:100%;
    height:100%
}
</style>
此时出现与之前一样的问题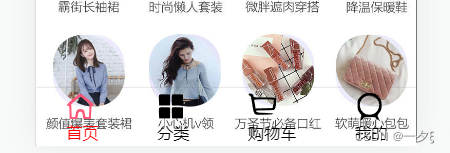
这是由于tabbar是使用flex布局的,因此脱离了文档流
 <div id="box-tabbar">
        <div id="tabbar">

#tabbar{
    width:100%;
    height:58px;
    /* background-color: red; */
   position:fixed;
    bottom:0px;
    left:0px;
    right:0px;
    display: flex;
    justify-content: space-around;
    border-top:1px solid rgba(100,100,100,0.2);
    background-color: #fff
}
#box-tabbar{
    width:100%;
    height:58px;
    position:relative;
    top:0px;
    z-index:999
}
控制栏部分

需求
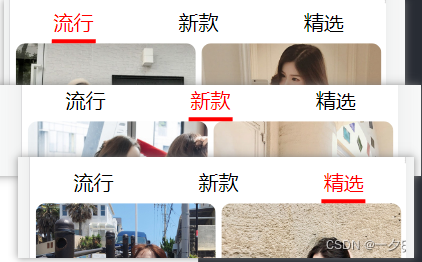
点击字体变色,以及添加相同颜色的下划线;同时面展示相对应的图片
监听点击
类似于导航栏效果,这里生成的三个元素,最好使用for循环生成

<!-- views/home/childcomponent/TabControl -->
<template>
  <div id="tabcontrol">
    <div v-for="(item,index) in tabitem" :key="index" @click="itemclick(index)" :class="{changecolor:currentindex==index}" class="control-item">{{item}}</div>

  </div>
</template>

<script>
export default {
    name: 'TabControl',
    props: {
        tabitem: {
            type: Array,
            default:[]
        }
    },
    data() {
        return {
            currentindex:''
        }
    },
    methods: {
        itemclick(index) {
            this.currentindex=index
    }
}
}
</script>

<style>
#tabcontrol{
height:40px;
width:100%;
display:flex;
justify-content:space-around;
font-size:20px;
line-height: 40px;
border-bottom:5px solid rgba(183,183,183,0.5)
}
.changecolor{
    color:red
}
.control-item{
    position:relative;
    top:0px;

}
.changecolor::after{
    content:'';
    position:absolute;
    left:-2px;
    right:-2px;
    bottom:0px;
    border:4px;
    height:4px;
    background-color: red;
}
</style>
显示响应的数据
封装请求–需要携带参数
//network/home.js
export function getdata(type, page) {
    ///home/data?type=sell&page=1
    return request({
        url: '/home/data',
        params: {
            type,
            page
        }
    })
}
使用
//home.vue
import {getmultidata,getdata} from 'network/home.js'

getdata('sell',1).then(res=>{console.log(res);})//created阶段
展示
监听点击事件
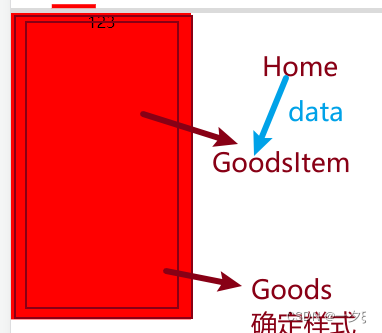
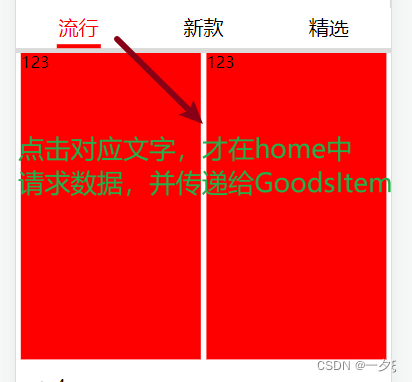
在tab-control中点击元素的时候,向父组件发射点击事件,并将点击的index传递过去
<!-- views/home/childcomponent/TabControl -->
  itemclick(index) {
            this.currentindex = index
            this.$emit('itemclick',index)
    }
样式
<!-- components/common/goods/Goods -->
<template>
  <div>
 <slot></slot>
  </div>
</template>

<script>
export default {
name:'Goods'
}
</script>

<style scoped>

</style>
<!-- components/content/homegoods/GoodsItem -->
<template>
  <div id="goods-info">
   <Goods v-for="(item,index) in goodsmessage" :key="index" class="info-item">
    <div class="item-image">
       <img :src="item.showLarge.img" alt="">
    </div>
    <div class="item-text">
        <div class="text-title">{{item.title}}</div>
        <div class="text-addition">
        <span class="addition-price">{{item.price}}</span>
        <span class="addition-collect">{{item.cfav}}</span>
        </div>
    </div>
   </Goods>
  </div>
</template>

<script>
import Goods from 'components/common/goods/Goods'
export default {
    name: 'GoodsItem',
    components: { Goods },
    props: {
        goodsmessage: {
            type: Array,
            default:[]
        }
}
}
</script>

<style scoped>
#goods-info{
    display: flex;
    flex-wrap: wrap;
    justify-content: space-evenly;
}
.info-item{
width:180px;
height:306px;
}
.item-image{
    width:180px;
height:267px;

}
.item-image img{
    width:100%;
    height:100%;border-radius: 10px 10px;
}
.item-text .text-title{
    font-size:15px;
    width:100%;
    overflow:hidden;
    text-overflow: ellipsis;
    white-space: nowrap;
}
.addition-price{
    color:red;
    margin-right:25px;
}
.addition-collect{
    position:relative;
    top:0px;
    font-size:15px;

}
.addition-collect::before{
    content:'';
    position:absolute;
    left:-21px;
    top:4px;
    width:14px;
    height:14px;
    background: url("~assets/img/home/collect.svg") 0 0/14px 14px;


}
</style>
//home
 <Goods-item :goodsmessage="goodsmessage"></Goods-item>
import GoodsItem from 'components/content/homegoods/GoodsItem'

  data() {
    return {
      HomeImageBanner: [],
      HomeRecomenddata: [],
      tabitem: ['流行', '新款', '精选'],
      currentindex: 0,
      goodsmessage:[]
    }
  },
created(){
    // request({url:'/home/multidata'}).then(res=>{console.log(res);}) 进一步封装到一个单独的文件中
    getmultidata().then(res => {
      let data = res.data.data
      this.HomeImageBanner = data.banner.list
      this.HomeRecomenddata=data.recommend.list
    })
    getdata('pop', 1).then(res => {
      console.log(res.data.data);
      let data=res.data.data
      this.goodsmessage=data.list
    })
  },
  methods: {
    clickchose(index) {
      if (this.currentindex === index) { console.log('数据已经请求过了'); }
      if (this.currentindex != index) {
        console.log('将会重新请求数据');
        this.currentindex = index
        switch (index) {
          case '0':
          getdata('pop', 1).then(res => {
      console.log(res.data.data)
      let data=res.data.data
            this.goodsmessage = data.list
          })
          break;
          case '1':
          getdata('new', 1).then(res => {
      console.log(res.data.data)
      let data=res.data.data
            this.goodsmessage = data.list
          })
            break;
            case '2':
          getdata('sell', 1).then(res => {
      console.log(res.data.data)
      let data=res.data.data
            this.goodsmessage = data.list
          })
          break;
        }
      }

  }
}
请求相应数据
默认情况下,显示的是流行的数据,因此在created阶段先将流行的数据请求过来并进行保存
点击之后,如果需要重新请求的话,就重新请求数据,并展示。需要重新修改home组件中的数据请求部分的代码
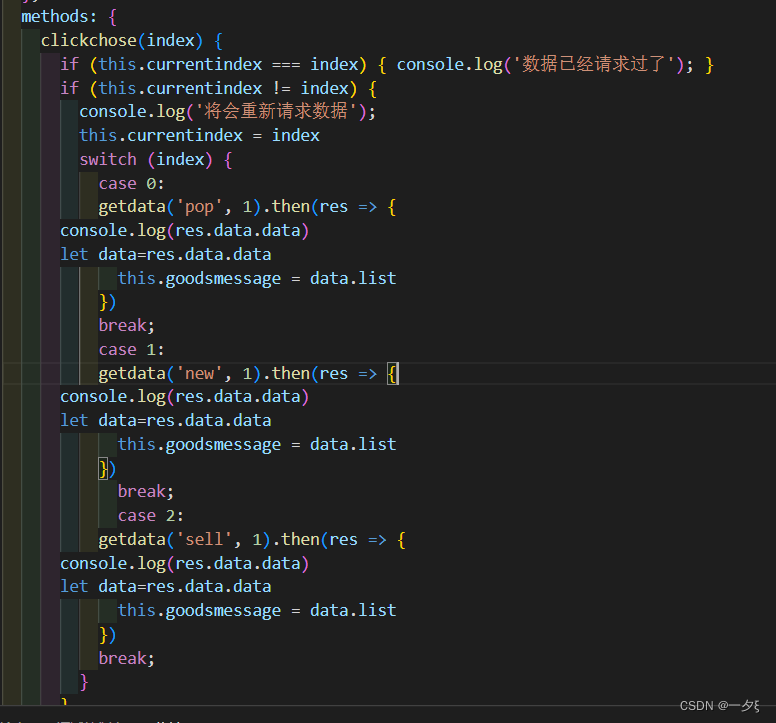
不能这样子写,只要点击不同的元素,就发一次请求,这个是没有必要的。如果之前已经获取数据了,那就不用重新获取
数据处理
先一次性获取所有的数据
  totalmessage: {
        'pop': {page: 1,list:[]},
        'new': {page: 1,list:[]},
        'sell': {page: 1,list:[]}
      }
      //created阶段
       getdata('pop', 1).then(res => {
      console.log(res.data.data);
      let data = res.data.data
      this.totalmessage.pop.list=data.list
      this.goodsmessage=data.list
    })
    getdata('new', 1).then(res => {
      let data = res.data.data
      this.totalmessage.new.list=data.list
    })
    getdata('sell', 1).then(res => {
      let data = res.data.data
      this.totalmessage.sell.list=data.list
    })
在根据点击的元素,动态修改goodsmessage的数据
    clickchose(index) {
      if (this.currentindex === index) { console.log('数据已经请求过了'); }
      if (this.currentindex != index) {
        this.currentindex = index
        switch (index) {
          case 0:
            this.goodsmessage =  this.totalmessage.pop.list
          break;
          case 1:
            this.goodsmessage = this.totalmessage.new.list
            break;
            case 2:
            this.goodsmessage =  this.totalmessage.sell.list
          break;
        }
      }
  }
axios请求
需要再次梳理
better-scroll 解决移动端的滚动效果
安装betterscroll
cnpm install better-scroll --save
创建scroll的公共子组件
<!-- components/common/scroll/scroll -->
<template>
  <div ref='wrapper'>
    <div class="content">
      <slot></slot>
    </div>
  </div>
</template>

<script>
import BScroll from 'better-scroll'
import ObserveDom from '@better-scroll/observe-dom'
BScroll.use(ObserveDom)
import ObserveImage from '@better-scroll/observe-image'
  BScroll.use(ObserveImage)
export default {
    name: "scroll",
    props: {//这些都是从父组件中拿到的
           /**
       * 1 滚动的时候会派发scroll事件,会截流。
       * 2 滚动的时候实时派发scroll事件,不会截流。
       * 3 除了实时派发scroll事件,在swipe的情况下仍然能实时派发scroll事件
       */
        probeType: {
            type: Number,
            default:3//probe 侦测 0:不实时的侦测滚动,1:不侦测实时位置  2:可以实时政策位置,在滚动的过程中侦测,而手指离开后的惯性滚动不侦测  3:只要是滚动,就都会侦测
        },
          /**
       * 点击列表是否派发click事件
       */
    click: {
        type: Boolean,
        default:true,
        },
          /**
       * 是否开启横向滚动
       */
        scrollX: {
            type: Boolean,
        default:false
        },
         /**
       * 是否派发滚动事件
       */
        listenScroll: {
            type: Boolean,
        default:false
        },
           /**
       * 列表的数据
       */
        data: {
            // type: Array,
        default:null
        },
          /**
       * 是否派发滚动到底部的事件,用于上拉加载
       */
        pullup: {
            type: Boolean,
            default:false
        },
         /**
       * 是否派发顶部下拉的事件,用于下拉刷新
       */
        pulldown: {
            type: Boolean,
        default:false
        },
          /**
       * 是否派发列表滚动开始的事件
       */
        beforeScroll: {
            type: Boolean,
        default:false
        },
         /**
       * 当数据更新后,刷新scroll的延时。
       */
        refreshDelay: {
            type: Number,
        default:20
        }
    },
    mounted() {
        // console.log(this.data);
    //     this.$nextTick(() => {
    //      _initScroll()
    // })   ..不要用$nextTick会出错
     // 保证在DOM渲染完毕后初始化better-scroll
      setTimeout(() => {
      // console.log(2);
        this._initScroll()
      }, 20)
    },
    methods: {
        _initScroll() {
            if (!this.$refs.wrapper) {
            return
            }
             // better-scroll的初始化
        this.scroll = new BScroll(this.$refs.wrapper, {
          observeImage: true, // 开启 observe-image 插件
              observDom:true,
                probeType: this.probeType,
                click: this.click,
                scrollX: this.scrollX,
          scrollbar: true,
          pullUpLoad: true,
          mouseWheel: {//鼠标滚轮
      speed: 20,
      invert: false,
            easeTime: 300,
            disableMouse: false,
      disableTouch:false
    }
            })
              // 是否派发滚动事件
        if (this.listenScroll) {
              // console.log(2);
          this.scroll.on('scroll', (pos) => {
                  // console.log(pos);
                this.$emit('scroll',pos)
            })
            }
                   // 是否派发滚动到底部事件,用于上拉加载
        if (this.pullup) {
              // console.log(3);
                this.scroll.on('scrollEnd', () => {//不用scrollEnd
                    //   // 滚动到底部
                    if (this.scroll.y <= (this.scroll.maxScrollY + 50)) {
                      // console.log(5);
                      this.$emit('scrollToEnd')
                        //处理完成后,必须调用finish 只有调用后我们才能再次触发上拉加载时间
                        this.scroll.finishPullUp()
                    }
            })
            }
               // 是否派发顶部下拉事件,用于下拉刷新
            if (this.pulldown) {
                this.scroll.on('touchEnd', (pos) => {
                    if (pos.y > 50) {
                    this.$emit('pulldown')
                }
            })
            }
          // 是否派发列表滚动开始的事件
          if (this.beforeScroll) {
          this.scroll.on('beforeScrollStart', () => {
            this.$emit('beforeScroll')
          })
        }
        },
        disable() {
        // 代理better-scroll的disable方法
        this.scroll && this.scroll.disable()
      },
      enable() {
        // 代理better-scroll的enable方法
        this.scroll && this.scroll.enable()
      },
      refresh() {
        // 代理better-scroll的refresh方法
        this.scroll && this.scroll.refresh()
      },
      scrollTo() {
        // 代理better-scroll的scrollTo方法
        this.scroll && this.scroll.scrollTo.apply(this.scroll, arguments)
      },
      // scrollTo(x, y, time=300) {
      //   this.scroll.scrollTo(x, y, time)
      // },
      scrollToElement() {
        // 代理better-scroll的scrollToElement方法
        this.scroll && this.scroll.scrollToElement.apply(this.scroll, arguments)
      }
    },
    watch: {
      // 监听数据的变化,延时refreshDelay时间后调用refresh方法重新计算,保证滚动效果正常
      data() {
          // 这里监听的是props传入的data,而不是钩子中的data
      // 在该组件并没有使用传进来的data,但很有必要传进来,因为当外部组件通过异步获取数据前,		better-scroll就已经初始化好了,但此时初始化的可滚动的高度是还没有拿到服务器数据就初始化好的
      //那么当数据加载好后,就需要让better-scroll调用refresh()函数刷新一下可滚动的高度,这一步很重要,否则无法滚动。
        setTimeout(() => {
          this.refresh()
        }, this.refreshDelay)
      }
    }
}
</script>

<style scoped>

</style>
使用scroll
//home组件中
<template>
  <div>
    <Nav-bar>购物街</Nav-bar>
    <scroll class="wrapper"
          :pullup="true"
          ref="scroll">
    <Home-swipper :swiperimg="HomeImageBanner"></Home-swipper>
    <Home-recommend :HomeRecomenddata="HomeRecomenddata"></Home-recommend>
    <Feature></Feature>
    <Tab-control :tabitem="tabitem" @itemclick="clickchose"></Tab-control>
   <Goods-item :goodsmessage="goodsmessage"></Goods-item>
   </scroll>
  </div>
</template>

import BScroll from 'better-scroll'
import scroll from 'components/common/scroll/scroll'

<style scoped>
  .wrapper{
    position: absolute;
    height: calc(100% - 48px - 59px);
  left: 0;
  right: 0;
  top:44px;
  bottom: 2.09rem;
  overflow: hidden;
}
</style>
better-scroll问题
真的是服了,昨晚还好好的可以滚动,今天一看就不能滚动,去调式
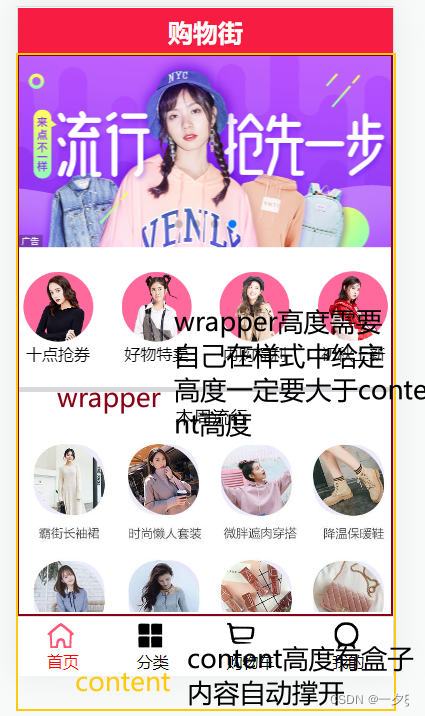
1、wrapper高度已经给定,content的高度也有,而且也满足比wrapper的高度大
2、想是不是因为图片加载问题,需要去refresh一下,然后就去调用better-scroll的插件–使用oberver-DOM和observer-Image,结果还是不行
3、去增加imageload时间,当图片加载完成后,自动refresh,但此时使用this.
r
e
f
s
.
s
c
r
o
l
l
.
s
c
r
o
l
l
.
r
e
f
r
e
s
h
(
)
或者
t
h
i
s
.
refs.scroll.scroll.refresh()或者this.
refs.scroll.scroll.refresh()或者this.refs.scroll.refresh()也会报错
4、发现content元素并没有添加相关的样式

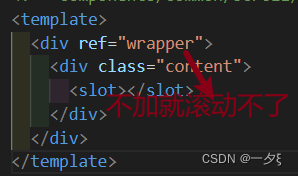
但又不知道怎么解决
没办法,直接关机重启,再打开
发现又解决了
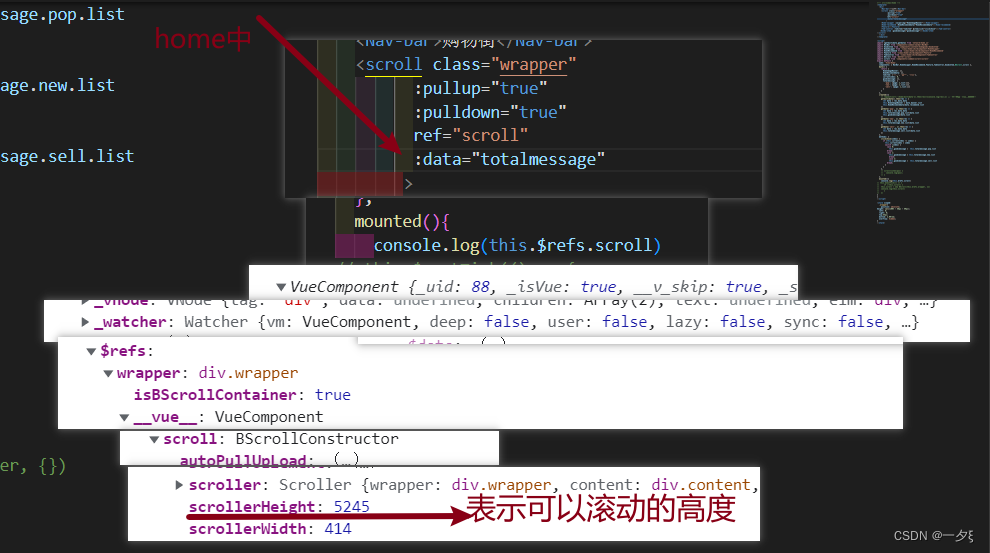
怎么查看scrollHeight值
实现上拉加载更多
//home中
data() {
    return {
      HomeImageBanner: [],
      HomeRecomenddata: [],
      tabitem: ['流行', '新款', '精选'],
      currentindex: 0,
      goodsmessage: [],
      totalmessage: {
        'pop': {page: 1,list:[]},
        'new': {page: 1,list:[]},
        'sell': {page: 1,list:[]}
      }
    }
  },
  created(){
    // request({url:'/home/multidata'}).then(res=>{console.log(res);}) 进一步封装到一个单独的文件中
    getmultidata().then(res => {
      let data = res.data.data
      this.HomeImageBanner = data.banner.list
      this.HomeRecomenddata=data.recommend.list
    })
    getdata('pop', 1).then(res => {
      let data = res.data.data
      this.totalmessage.pop.list=data.list
      this.goodsmessage=data.list
    })
    getdata('new', 1).then(res => {
      let data = res.data.data
      this.totalmessage.new.list=data.list
    })
    getdata('sell', 1).then(res => {
      let data = res.data.data
      this.totalmessage.sell.list=data.list
    })
  },
  methods: {
    clickchose(index) {
      if (this.currentindex != index) {
        this.currentindex = index
        switch (index) {
          case 0:
            this.goodsmessage =  this.totalmessage.pop.list
          break;
          case 1:
            this.goodsmessage = this.totalmessage.new.list
            break;
            case 2:
            this.goodsmessage =  this.totalmessage.sell.list
          break;
        }
      }
    },
    scrollToEnd() {
      console.log('到底啦');
      //到底之后需要加载更多的数据,将page+1,并且重新调用getdata,以及将加载到的数据添加到原来的数组中
      console.log(this.currentindex);
      if (this.currentindex == '0') {
        this.totalmessage.pop.page += 1
        let page=this.totalmessage.pop.page
        getdata('pop', page).then(res => {
          let data = res.data.data
      this.totalmessage.pop.list.push(...data.list)//为什么这里用 this.totalmessage.pop.list.concat(data.list)就不能实现页面的增加数据
      this.goodsmessage=this.totalmessage.pop.list
    })
      }
      if (this.currentindex == '1') {
        this.totalmessage.new.page += 1
        let page=this.totalmessage.new.page
        getdata('new', page).then(res => {
          console.log(2);
          let data = res.data.data
      this.totalmessage.new.list.push(...data.list)//为什么这里用 this.totalmessage.pop.list.concat(data.list)就不能实现页面的增加数据
      this.goodsmessage=this.totalmessage.new.list
    })
      }
    }
  },
  mounted(){

}
这样写获取数据会特别慢
这是因为,鼠标一到底部的时候,就会触发上拉加载时间,就会触发这个函数,导致多次触发,从而多次请求,因此就会出现一直请求的原因–解决:加节流
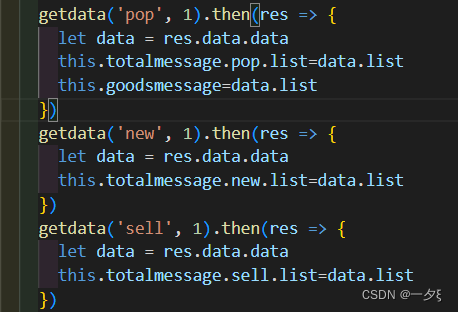 多次用到getdata发网络请求,因此可以对其进行封装
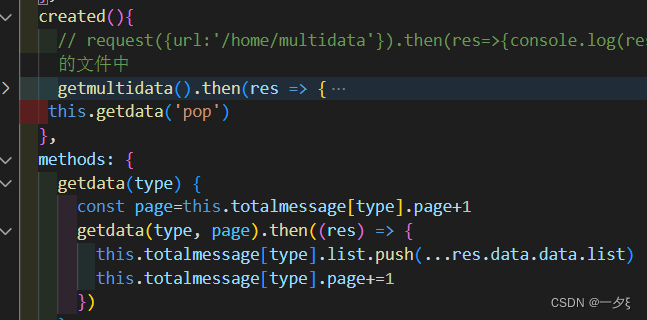
修改后:
  data() {
    return {
      HomeImageBanner: [],
      HomeRecomenddata: [],
      tabitem: ['流行', '新款', '精选'],
      chose:'pop',
      totalmessage: {
        'pop': {page: 0,list:[]},
        'new': {page:0,list:[]},
        'sell': {page: 0,list:[]}
      }
    }
  },
  computed: {
    goodsmessage() {
  return this.totalmessage[this.chose].list
}
  },
  created(){
    // request({url:'/home/multidata'}).then(res=>{console.log(res);}) 进一步封装到一个单独的文件中
    getmultidata().then(res => {
      let data = res.data.data
      this.HomeImageBanner = data.banner.list
      this.HomeRecomenddata=data.recommend.list
    })
//页面开始先把第一页的数据获取过来
    this.getdata('pop')
    this.getdata('new')
    this.getdata('sell')
  },
  methods: {
    getdata(type) {
      const page=this.totalmessage[type].page+1
      getdata(type, page).then((res) => {
        this.totalmessage[type].list.push(...res.data.data.list)
        this.totalmessage[type].page+=1
      })
    },
    clickchose(index) {
      switch (index) {
        case 0:
          this.chose = 'pop'
          break;
        case 1:
          this.chose = 'new'
          break;
        case 2:
          this.chose = 'sell'
          break;
}
    },
    scrollToEnd() {
      //到底之后需要加载更多的数据,将page+1,并且重新调用getdata,type就是当前的chose
      this.getdata(this.chose)
    }
  },
数组的拼接
concat
//concat()把两个或者多个数组拼接在一起,但是不改变已经存在的数组,并将拼接后的结果返回给一个新数组
a=[1,2,3,4]
a2=[1,2]
a.concat(a2)
console.log(a)//[1,2,3,4]
let b=a.concat(a2)
console.log(b)//[1,2,3,4,1,2]
扩展运算符…
a=[1,2,3,4]
a2=[1,2]
a.push(...a2)
console.log(a)//[1,2,3,4,1,2]
控制栏的吸顶效果
监听滚动事件
    <scroll class="wrapper"
          :pullup="true"
          :pulldown="true"
          ref="scroll"
          :data="totalmessage"
          :listenScroll="true"
          @scrollToEnd="scrollToEnd"
          @scroll="scroll"
         >
//methods中
 scroll(pos) {
      console.log(pos.y);
    }
实现吸顶
在应用了属性transform的父元素上,如果其拥有fixed属性的子元素,则该子元素的fixed属性将会失效,并将以其父元素为定位基准
因此这里不能直接对tab-control采用fixed的定位来实现吸顶效果

使用sticky粘滞定位:
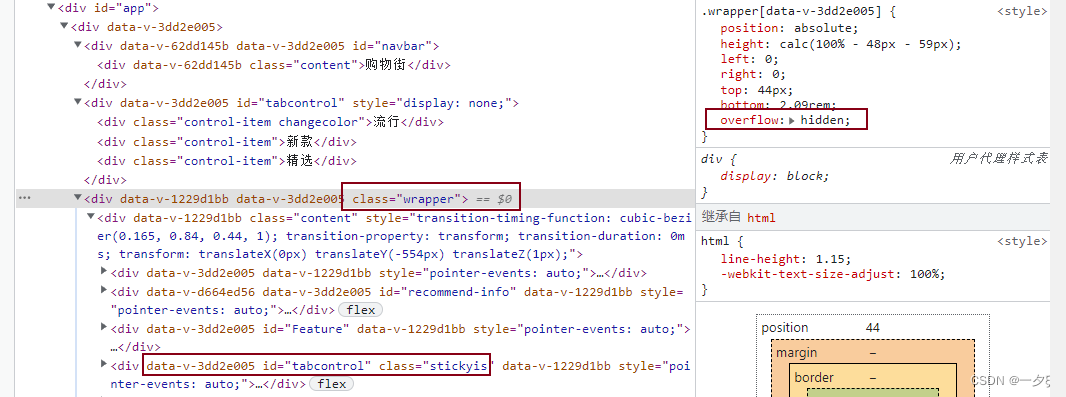
但是其父元素(不单单指元素直系的父元素,任意引用了次组件的父组件也包括)设置了overflow属性,因此也会失效
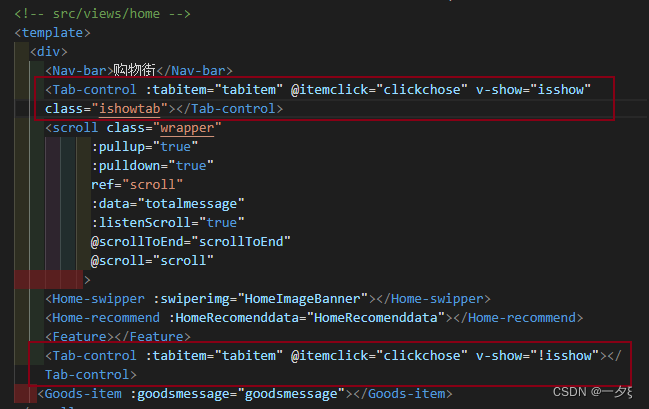
新增一个组件放到scroll的上面,通过isshow的显示和隐藏来实现吸顶效果
//home组件
//data中
      isshow:false
//methods中
          scroll(pos) {
      console.log(pos.y);
      if (-pos.y > 598) {
        console.log(55);
       this.isshow=true
      }
      else {
      this.isshow=false
     }
    }

.ishowtab{
  position:fixed;
  top:48px;
  z-index:99;
height:40px
}
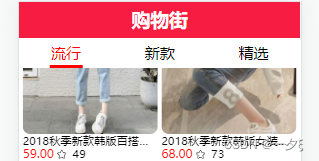
问题
新增的tabcontrol里面无法实现点击
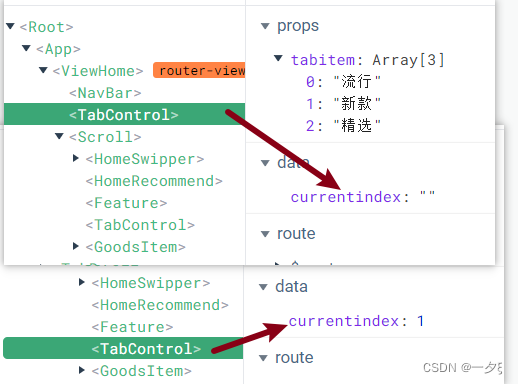
说明这两个组件里面的currentindex并不是相同的
相同的组件,但是使用两次,里面的数据不共享,(这不就是因为组件里面的data是一个函数,所以重复使用组件,里面的数据本身就不是共享的)
那么现在需要共享,可以通过vuex状态管理器,添加一个公共的currentindex
安装vuex
cnpm install vuex@3.0.1 --save
配置
//src/store/index.js
import Vue from 'vue'
import Vuex from 'vuex'
Vue.use(Vuex)
const store = new Vuex.Store({
    state: {
        currentindex: ''
    },
    mutations: {
        Currentindex(state, payload) {
            state.currentindex = payload
        }
    }
})
export default store

//src/main.js
import Vue from 'vue'
import App from './App.vue'
import router from './router'
import store from './store'
Vue.config.productionTip = false
Vue.prototype.$bus = new Vue()
new Vue({
    router,
    store,
    render: h => h(App),
}).$mount('#app')
TabControl使用vuex里面的currentindex
<!-- views/home/childcomponent/TabControl -->
<template>
  <div id="tabcontrol">
    <div v-for="(item,index) in tabitem" :key="index" @click="itemclick(index)" :class="{changecolor:$store.state.currentindex==index}" class="control-item">{{item}}</div>
  </div>
</template>

<script>
export default {
    name: 'TabControl',
    props: {
        tabitem: {
            type: Array,
            default:[]
        }
    },
    data() {
        return {
            // currentindex:''
        }
    },
    methods: {
        itemclick(index) {
            this.$store.commit('Currentindex',index)//store里面的属性不能直接需要,必须在mutations中修改
            this.$emit('itemclick',index)
    }
}
}
</script>
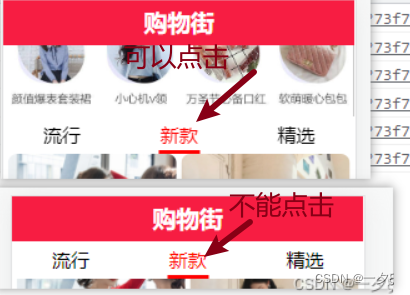
但是此时又有一个问题,一个tabcontrol里面的元素可以监听点击事件,而另外一个就无法监听点击事件,也不知道为什么
原因:
//之前在做tabbar组件的时候,外面是套了一层box-tabbar的;当时设置的z-index是999
//而当前tabcontrol设置的z-index是99  因此就会覆盖,显示fixed后的tabcontrol,那么久无法实现点击效果
//修改 box-tabbar属性
#box-tabbar{
    width:100%;
    height:58px;
    position:relative;
   bottom:0px;
    z-index:9
}
//其实,此时使用了better-scroll后,没有必要再在外面套一层box-tabbar来占位了
//修改后的TabBar
<!-- src/components/common/tabbar/TabBar -->
<template>
        <div id="tabbar">
<Tab-bar-item path="/home">
    <div slot="item-img"><img src="~assets/img/tabbar/home.svg" alt=""></div>
    <div slot="item-img-active"><img src="~assets/img/tabbar/home_active.svg" alt=""></div>
    <div slot="item-text">首页</div>
</Tab-bar-item>
<Tab-bar-item path="/category">
    <div slot="item-img"><img src="~assets/img/tabbar/category.svg" alt=""></div>
    <div slot="item-img-active"><img src="~assets/img/tabbar/category_active.svg" alt=""></div>
    <div slot="item-text">分类</div>
</Tab-bar-item>
<Tab-bar-item path="/cart">
    <div slot="item-img"><img src="~assets/img/tabbar/shopcart.svg" alt=""></div>
    <div slot="item-img-active"><img src="~assets/img/tabbar/shopcart_active.svg" alt=""></div>
    <div slot="item-text">购物车</div>
</Tab-bar-item>
<Tab-bar-item path="/profile">
    <div slot="item-img"><img src="~assets/img/tabbar/profile.svg" alt=""></div>
    <div slot="item-img-active"><img src="~assets/img/tabbar/profile_active.svg" alt=""></div>
    <div slot="item-text">我的</div>
</Tab-bar-item>
  </div>
    <!-- </div> -->

</template>

<script>
import TabBarItem from 'components/common/tabbar/TabBarItem'
export default {
    name: 'TabBar',
components:{TabBarItem}
}
</script>

<style scoped>
#tabbar{
    width:100%;
    height:58px;
    /* background-color: red; */
   position:fixed;
    bottom:0px;
    left:0px;
    right:0px;
    display: flex;
    justify-content: space-around;
    border-top:1px solid rgba(100,100,100,0.2);
    background-color: #fff
}

</style>
总结:在使用z-index的时候,不要设置的太大
WebSocketClient报错
WebSocketClient.js?5586:16 WebSocket connection to 'ws://192.168.43.86:8080/ws' failed:
直接cnpm install 安装依赖,然后重新npm run serve 启动项目
项目保存后浏览器不自动刷新
//vue.config.js增加

module.exports = {
    lintOnSave: false,
    chainWebpack: config => {
        config.resolve.alias
            .set('@', resolve('src'))
            .set('assets', resolve('src/assets'))
            .set('components', resolve('src/components'))
            .set('network', resolve('src/network'))
            .set('views', resolve('src/views'))
    },
    devServer: {
        port: 3000,
        open: true,
        hot: true
    }
}
keep-alive的使用
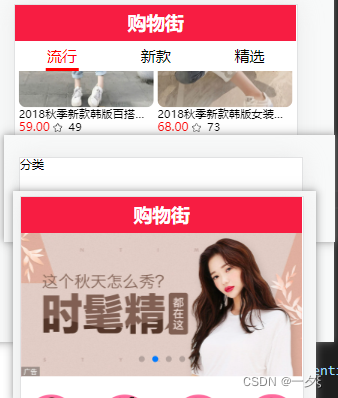
<!-- src/App.vue -->
<template>
  <div id="app">
    <keep-alive>
      <router-view></router-view>
    </keep-alive>
回到顶部按钮
- 回到顶部按钮的显示与隐藏
- 监听点击事件回到顶部之后,修改页面滚动的高度
<!-- components/common/backtotop/BackToTop -->
<template>
  <div id="backtotop">
    <img src="~assets/img/common/top.png" alt="">
  </div>
</template>

<script>
export default {
name:'BackToTop'
}
</script>

<style scoped>
#backtotop{
    position:fixed;
    bottom:70px;
    right:10px;
    z-index:10;
    width:50px;
    height: 50px;
}
#backtotop img{
    width:100%
}
</style>
//home中
</scroll>
<Back-to-top v-show="isback" @click.native="willgototop"></Back-to-top>

import BackToTop from 'components/common/backtotop/BackToTop'

  components: { NavBar,HomeSwipper,HomeRecommend,Feature,TabControl,GoodsItem,BScroll,scroll,BackToTop },

//data中
详情页
点击商品,跳转到详情页
配置详情页的路由
        {
            path: '/detail',
            name: 'detail',
            component: () =>
                import ('views/detail/Detail')
        }
监听点击并跳转
<!-- components/content/homegoods/GoodsItem -->
<template>
  <div id="goods-info">
   <Goods v-for="(item,index) in goodsmessage" :key="index" class="info-item" @click.native="goodsclick">

    methods: {
        goodsclick() {
    this.$router.push'/detail')//考虑到详情页需要返回,因此使用push
}
顶部导航栏
基本样式

如果需要对每个元素监听点击事件,那么最好使用v-for来遍历生成
<!-- views/detail/childcomponents/NavBar -->
<template>
  <div id="navbar">
    <div class="navbar-arr">
        <img src="~assets/img/detail/arrow-left.png" alt="">
    </div>
<div class="nav-content">
    <div class="cont-text" v-for="(item,index) in navcont" :key="index">{{item}}</div>
</div>
  </div>
</template>

<script>
export default {
    name: 'NavBar',
    props: {
        navcont: {
            type: Array,
            default() {
            return []
        }
    }
}
}
</script>

<style scoped>
#navbar{
    width:100%;
    height:48px;
border-bottom:1px solid rgba(183,183,183,0.5);
  display: flex;
}
.navbar-arr{
    flex:2;
    text-align: center;
}
.navbar-arr  img{
    width:40px;
    height:40px;
    margin-top:4px;
}
.nav-content{
    flex:8;
    display: flex;
    justify-content: space-between;
    font-size: 25px;
    text-align: center;
    line-height: 48px;
    padding:0 18px
}
</style>
<!-- views/detail/Detail -->
<template>
  <div>
    <Nav-bar :navcont="navcont"></Nav-bar>
  </div>
</template>

<script>
import NavBar from 'views/detail/childcomponents/NavBar'
export default {
    name: 'Detail',
    components: { NavBar },
    data() {
        return {
        navcont:['商品','参数','评论','推荐']
    }
}
}
</script>

<style>

</style>
点击回退按钮,回到首页
<!-- views/detail/childcomponents/NavBar -->
<template>
  <div id="navbar">
    <div class="navbar-arr" @click="gotoback">

    methods: {
        gotoback() {
        this.$router.go(-1)
    }
固定导航栏
<!-- views/detail/childcomponents/NavBar -->
#navbar{
    width:100%;
    height:48px;
border-bottom:1px solid rgba(183,183,183,0.5);
  display: flex;
  position:fixed;
  top:0px;
  z-index:10;
  background-color: #fff;
}
底部菜单栏
修改公共组件的显示
meta:路由元信息

不希望出现在详情页(在使用路由跳转的时候,并不是每一个跳转页面都是有导航栏的,比如跳转登录页面的时候,底部的导航栏就会小时。可以使用v-show来解决,$route.meta来改变显示还是隐藏的布尔值)
但是这部分又是加载App.vue下的
<!-- src/App.vue -->
<template>
  <div id="app">
    <keep-alive>
      <router-view></router-view>
    </keep-alive>
   <Tab-bar v-show="$route.meta.isshow"></Tab-bar>
//src/router/index.js
        {
            path: '/profile',
            name: 'profile',
            component: () =>
                import ('views/profile/Profile'),
            meta: {
                isshow: true //需要显示底部导航栏的组件设置为true
            }
        },
        {
            path: '/detail',
            name: 'detail',
            component: () =>
                import ('views/detail/Detail'),
            meta: {
                isshow: false//不需要显示底部导航栏的组件组件设置为false
            }
        }
底部菜单栏显示

如果给的是精灵图,那么就当背景图片使用
<!-- views/detail/childcomponents/DetailTab -->
<template>
    <div class="box">
        <div class="tab-footer">
<div class="footer-left">
<div class="left-cont">
<div class="cont-serve"></div>
<div>客服</div>
</div>
<div class="left-cont">
    <div class="cont-shop"></div>
<div>店铺</div>
</div>
<div class="left-cont">
    <div class="cont-collet"></div>
<div>收藏</div>
</div>
</div>
<div class="footer-right">
<div class="right-add">加入购物车</div>
<div class="right-agree">确定</div>
</div>
  </div>
    </div>

</template>

<script>
export default {
name:"DetailTab"
}
</script>

<style scoped>
.box{
    width:100%;
    height:58px;
}
.tab-footer{
    width:100%;
    height:58px;
    /* background-color: red; */
   position:fixed;
    bottom:0px;
    left:0px;
    right:0px;
    display: flex;
    justify-content: space-around;
    border-top:1px solid rgba(100,100,100,0.2);
    background-color: #fff;
    font-size:15px;

}
.footer-left{
    flex:1;
    display: flex;
    justify-content: space-evenly;
}
.footer-right{
    flex:1;
    display: flex;
    text-align: center;
    line-height:58px;
}
.right-add{
    flex:1;
background-color: rgb(192, 150, 72);
}
.right-agree{ flex:1;
    background-color: rgb(233, 89, 113);
}
.left-cont{
    display:flex;
    flex-direction: column;
    justify-content: space-around;
}
.cont-serve, .cont-shop,.cont-collet{
    width:30px;
    height:26px;
    background: url(~assets/img/detail/detail_bottom.png) no-repeat 0px -61px;
    background-size: 26px
}
.cont-shop{
    background: url(~assets/img/detail/detail_bottom.png) no-repeat 0px -115px;
    background-size: 26px
}
.cont-collet{
    background: url(~assets/img/detail/detail_bottom.png) no-repeat 0px 3px;
    background-size: 26px
}
</style>
<!-- views/detail/Detail -->
<template>
  <div>
    <Nav-bar :navcont="navcont"></Nav-bar>
<Detail-tab></Detail-tab>

import DetailTab from 'views/detail/childcomponents/DetailTab'
export default {
    name: 'Detail',
    components: { NavBar,DetailTab },
获取每个商品的iid
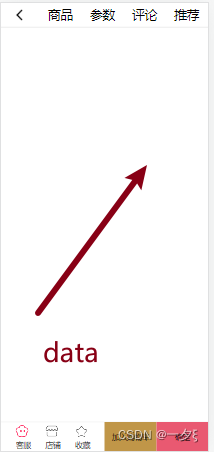
动态路由的使用
给组件配置动态路由
//src/router/index.js
 {
            path: '/detail/:iid',
            name: 'detail',
            component: () =>
                import ('views/detail/Detail'),
            meta: {
                isshow: false
            }
        }
点击图片跳转到详情页
<!-- components/content/homegoods/GoodsItem -->
<template>
  <div id="goods-info">
   <Goods v-for="(item,index) in goodsmessage" :key="index" class="info-item" @click.native="goodsclick(item)">

   methods: {
        goodsclick(item) {
    this.$router.push(`/detail/${item.iid}`)
}

根据iid发送axios请求
400状态码

- 请求参数个数不对
- 请求参数类型不对
this.iid = this.$route.params
//打印出来是
//{__ob__: Observer}
是一个Object类型,此案次报错
发请求
封装
//src/network/detail.js
import { request } from 'network/request.js'
export function getdetaildata(iid) {
    ///detail?iid=1jw0sr2
    return request({
        url: '/detail',
        params: {
            iid
        }
    })
}
使用
<!-- views/detail/Detail -->
import {getdetaildata} from 'network/detail.js'
 created() {
        this.iid = this.$route.params.iid
        console.log(this.iid);
        console.log(this.$route.params);
        getdetaildata(this.iid).then(res=>{console.log(res);})
}
问题-页面不刷新 keep-alive
原因
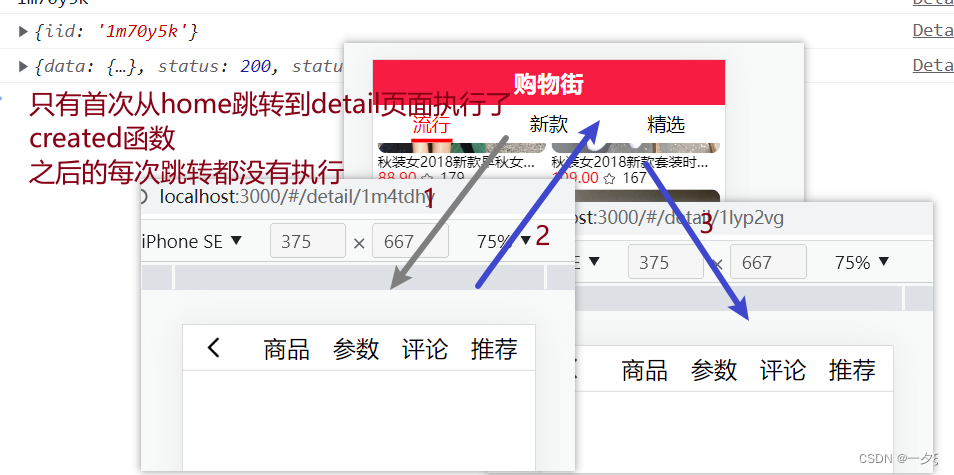
当在项目中引入keep-alive的时候,页面第一次进入,钩子函数的触发顺序为created–》mounted–》activated,当再次进入(前进后者后退)时,就只会触发activated
解决办法
- 把请求数据放到activated
- 把请求数据放到created阶段,但是在kepp-alive中exclude这个组件
//keep-alive写上exclude="路由名称1,路由名称2,....."
<!-- src/App.vue -->
<template>
  <div id="app">
    <keep-alive exclude="Detail">

轮播图
展示
//views/detail/childcomponents/DetailSwiper
<template>
  <div>
    <swiper swipeid="swipe" ref="swiper" :autoPlay="3000" effect="slide" class="swiper2">
    <div slot="swiper-con" v-for="(item,index) in  swiperdata" :key="index" class="swiper-slide">
      <img :src="item" alt="">
    </div>
</swiper>
  </div>
</template>

<script>
import swiper from 'components/common/swiper/swiper'
export default {
    name: 'DetailSwiper',
    components: { swiper },
    props: {
        swiperimg: {
            type: Array,
            default() {
            return []
        }
    }
    },
    computed: {
        swiperdata() {
            return this.swiperimg
        }
    },
    created() {
    console.log(this.swiperimg);
}
}
</script>

<style scoped>
.swiper-slide{
    height:auto
}
.swiper2{
    height:367px;
}
</style>
<!-- views/detail/Detail -->
<template>
  <div>
    <Nav-bar :navcont="navcont"></Nav-bar>
    <Detail-swiper :swiperimg="swiperdata"></Detail-swiper>
<Detail-tab ></Detail-tab>
import DetailSwiper from 'views/detail/childcomponents/DetailSwiper'
    data() {
        return {
            navcont: ['商品', '参数', '评论', '推荐'],
            iid: null,
            swiperdata:[]
        }
    },
    created() {
        this.iid = this.$route.params.iid
        getdetaildata(this.iid).then(res => {
            console.log(res.data)
            let result1 = res.data.result
            this.swiperdata = result1.itemInfo.topImages
            console.log( this.swiperdata);
        })
}
问题

原因
在父组件异步请求数据时,子组件已经加载完毕,走完了子组件的生命周期,因为子组件props默认定义了一个空数组,所以子组件的整个生命周期中都是空数组,因而渲染不出来
解决方法
在对应的组件中判断数据长度,当大于0的时候,才渲染子组件
<Detail-swiper :swiperimg="swiperdata" v-if="swiperdata.length"></Detail-swiper>
商品信息展示

获取数据
对象部分属性解构到新对象
<!-- views/detail/Detail -->
  GoodsInfo: {} //data中
          getdetaildata(this.iid).then(res => {
            console.log(res.data)
            let result1 = res.data.result
            this.swiperdata = result1.itemInfo.topImages
            let result2=result1.itemInfo
            this.GoodsInfo = {
                title: result2.title,
                price: result2.price,
                oldprice: result2.oldPrice,
                discountDesc: result2.discountDesc,
                columns: result1.columns,
                services:result1.shopInfo.services
            }
      console.log(this.GoodsInfo);
        })
- 判断对象释放为空对象
Object.keys(GoodsInfo).length==0
展示
- 子组件
<!-- views/detail/childcomponents/DetailInfo -->
<template>
  <div id="Detail-info">
   <div class="info-title">
    {{GoodsInfo.title}}
   </div>
   <div class="info-price">
    <span class="price-now">
        {{GoodsInfo.price}}
    </span><span class="price-old"  v-if="GoodsInfo.oldprice">
        {{GoodsInfo.oldprice}}
</span>
    <span class="price-desc" v-if='GoodsInfo.discountDesc'> //要判断有这个数据的时候,才显示
        {{GoodsInfo.discountDesc}}
    </span>
</div>
 <div class="info-addition">
    <div v-for="(item,index) in GoodsInfo.columns" :key="index">{{item}}</div>
 </div>
 <div class="info-service">
    <div class="service1">
        <img :src="GoodsInfo.services[2].icon" alt="">
    <span > {{GoodsInfo.services[2].name}}</span>
    </div>
    <div class="service2">
        <img :src="GoodsInfo.services[3].icon" alt="">
       <span >{{GoodsInfo.services[3].name}}</span>
    </div>
 </div>
  </div>
</template>

<script>
export default {
    name: 'DetailInfo',
    props: {
        GoodsInfo: {
            type: Object,
            default: {}
    }
}
}
</script>

<style scoped>
#Detail-info{
    width:100%;
 border-bottom:5px solid rgba(183,183,183,0.5)
}
.info-title{
    padding:5px 5px ;
    font-size:25px;
}
.info-price{
padding-left:10px;
padding-top:10px;
}
.price-now{
    font-size:25px;
    color:red;
}
.price-old{
position:relative;
top:-10px;
color:grey;
text-decoration: line-through;
padding-right:10px;
}
.price-desc{
    background-color:pink;
    font-size:15px;
    color:#fff;
    border-radius:30% 30%;;
    padding:5px 5px;
}
.info-addition{
display:flex;
justify-content: space-around;
color:grey;
font-size:15px;
margin-top:25px;
padding-bottom:5px;
border-bottom:1px solid  rgba(183,183,183,0.5)
}
.info-service{
    display:flex;
    justify-content: space-around;
    font-size:25px;
    margin-top:25px;
    padding-bottom:20px;
    border-bottom:5px solid  rgba(183,183,183,0.5);
    color:grey
}
.info-service img{
    width:20px;
    height:20px;
    vertical-align:baseline;
}
</style>
- 父组件
<!-- views/detail/Detail -->
    <Detail-info :GoodsInfo="GoodsInfo" v-if="Object.keys(GoodsInfo).length"></Detail-info>
import DetailInfo from 'views/detail/childcomponents/DetailInfo'

   components: { NavBar,DetailTab,DetailSwiper,DetailInfo },
      data() {
        return {
            navcont: ['商品', '参数', '评论', '推荐'],
            iid: null,
            swiperdata: [],
            GoodsInfo: {}
        }
    },

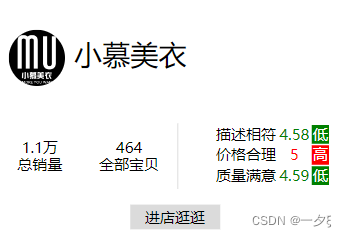
商家信息展示

商家信息的数据
<!-- views/detail/Detail -->
  shopInfo:{} //data中
  //created() getdetaildata中
              let result3=result1.shopInfo
            this.shopInfo = {
                score: result3.score,
                shopLogo: result3.shopLogo,
                name: result3.name,
                cFans: result3.cFans,
                cGoods:result3.cGoods

            }
位置宽度高度的盒子实现水平垂直居中
//1、
margin-left: 50%;
transform: translate(-50%,-50%)
//2、display: flex;
 justify-content: center;
 align-items: center;
展示
子组件
<!-- views/detail/childcomponents/DetailShopInfo -->
<template>
  <div id="shopinfo">
    <div class="info-shop">
      <img :src="shopInfo.shopLogo" alt=""><span>{{shopInfo.name}}</span>
    </div>
    <div class="info-addtion">
        <div class="add-left">
<div class="left-total">
    <div>{{shopInfo.cFans|totalsell}}</div>
    <div>总销量</div>
</div>
<div class="left-all">
<div>{{shopInfo.cGoods}}</div>
<div>全部宝贝</div>
</div>
        </div>
        <div class="add-right">
            <table>
                <tr v-for="(item,index) in shopInfo.score" :key="index">
                    <td>{{item.name}}</td>
                    <td :class="{ scorecolor: (item.isBetter),green:!item.isBetter}">{{item.score}}</td>
                    <td :class="{ bgcolorred: (item.isBetter),bgcgreen:!item.isBetter}">{{item.isBetter|isbert}}</td>
                </tr>
            </table>
        </div>
    </div>
    <div class="info-go">进店逛逛</div>
  </div>
</template>

<script>
export default {
    name: 'DetailShopInfo',
    props: {
        shopInfo: {
            type: Object,
            default:{}
        }
    },
    filters: {
        totalsell(number) {
        return (number/10000).toFixed(1)+'万'
        },
        isbert(be) {
        return be?'高':'低'
    }
}
}
</script>

<style>
#shopinfo{
    width:100%;
    border-bottom:5px solid rgba(183,183,183,0.5);
    margin-top:80px;
}
.info-shop img{
width:60px;
height:60px;
border-radius:50% 50%;
vertical-align: middle;
}
.info-shop{
font-size:30px;
padding-left:10px;
}
.info-shop span{
    margin-left:10px;
}
.info-addtion{
    width:100%;
    margin-top:40px;
display: flex;
justify-content: space-around;
height:70px;

}
.add-left{
    flex:1.3;
text-align: center;
    border-right:1px solid rgba(183,183,183,0.5);
    display:flex;
    justify-content: space-around;
}
.left-total,.left-all{
display:flex;
flex-direction: column;
justify-content: center;
    align-items: center;
}
.add-right{
    flex:1;
text-align: center;
margin-left: 10%;
}
.info-go{
    margin-top:10px;
}
.scorecolor{
    color:red;
}
.green{
    color:green
}
.bgcolorred{
    background-color: red;
    color:white
}
.bgcgreen{
    background-color: green;
    color:white
}
.info-go{
    background-color: rgba(183,183,183,0.5);
    width: 96px;
    height: 27px;
    text-align: center;
    line-height: 27px;
    margin-left: 50%;
    transform: translate(-50%,-50%);
    margin-top: 30px;
}
</style>
父组件
<!-- views/detail/Detail -->
    <Detail-shop-info :shopInfo="shopInfo" v-if="Object.keys(shopInfo).length"></Detail-shop-info>
import DetailShopInfo from 'views/detail/childcomponents/DetailShopInfo'
    components: { NavBar,DetailTab,DetailSwiper,DetailInfo ,DetailShopInfo},
            shopInfo:{}
商品详细展示
数据获取
<!-- views/detail/Detail -->
   shopsInfo: {}
               let result4=result1.detailInfo
            this.shopsInfo = {
                skus: result4.detailImage[0].list,
                desc: result4.desc,
                key:result4.detailImage[0].key

            }
展示
子组件
<!-- views/detail/childcomponents/DetailShopsImage -->
<template>
  <div class="images-info">
    <div class="line-left">
        <div class="left-line"></div>
    </div>
   <div class="info-text">
    {{shopsInfo.desc}}
   </div>
   <div class="line-right">
    <div class="right-line"></div>
   </div>
 <div class="info-add">{{shopsInfo.key}}</div>
 <div class="info-images" v-for="(item,index) in shopsInfo.skus" :key="index">
<img :src="item" alt="">
 </div>
  </div>
</template>

<script>
export default {
    name: 'DetailShopsImage',
    props: {
        shopsInfo: {
            type: Object,
            default: {}
        }
}
}
</script>

<style scoped>
.info-images img{
    width:100%;
}
.images-info{
    font-size:20px;
    color:grey;;
    margin-top:30px;
    padding-left:8px;
    padding-right:8px;
}
.info-images{
    margin-top:10px;
}
.info-text{
    padding:10px 0px;
}
.line-left{
    width: 2px;
    height: 2px;
    border-radius: 50% 50%;
    background-color: black;
    color: black;
    position: relative;
    top: 0px;
    border: 2px solid;

}
.left-line{
    width: 75px;
    border: 1px solid grey;
    position: absolute;
    left: 3px;
}
.line-right{
    width: 2px;
    height: 2px;
    border-radius: 50% 50%;
    background-color: black;
    color: black;
    position: relative;
    top: -2px;
    right: -99%;
    border: 2px solid;
}
.right-line{
    width: 75px;
    border: 1px solid grey;
    position: absolute;
    right: 3px;
}
</style>
父组件
<!-- views/detail/Detail -->
    <Detail-shops-image :shopsInfo ='shopsInfo'  v-if="Object.keys(shopsInfo).length" ></Detail-shops-image>
import DetailShopsImage from 'views/detail/childcomponents/DetailShopsImage'
    components: { NavBar,DetailTab,DetailSwiper,DetailInfo ,DetailShopInfo,DetailShopsImage},
商品参数展示
数据获取
<!-- views/detail/Detail -->
            shopparams: {}
  this.shopparams = {
                info: result1.itemParams.info.set,
    rule: result1.itemParams.rule
}
样式问题
表格tr加下划线
直接在tr上面加上border-bottom是没有用的
需要给table加上border-collapse属性后,再对tr加border-bottom
table里面的td自动换行
首先必须设置td的宽度,再设置word-wrap属性
展示
子组件
<!-- views/detail/childcomponents/DetailParams -->
<template>
  <div class="params-info">
 <table class="table1">
    <tr v-for="(item,index) in shopparams.rule.tables[0]" :key="index">
      <td v-for="(item1,index1) in item" :key="index1" class="widthtd1">{{item1}}</td>
    </tr>
 </table>
 <table class="table2">
    <tr v-for="(item,index) in shopparams.info" :key="index">
    <td class="tab-key">{{item.key}}</td><td class="tab-value">{{item.value}}</td>
</tr>
 </table>
  </div>
</template>

<script>
export default {
    name: 'DetailParams',
    props: {
        shopparams: {
            type: Object,
            default() {
                return {}
        }
        }

}
}
</script>

<style scoped>
.table1{
width:100%;
color:grey;
border-collapse: collapse;
border-bottom:2px solid rgb(183,183,183)
}
.table1 tr{
    height:50px;
    text-align: center;
    line-height: 50px;
    border-bottom:1px solid rgb(183,183,183)
}
.table2{
    width:100%;
color:grey;
border-collapse: collapse;
border-bottom:2px solid rgb(183,183,183)
}
.table2 tr{
    height:50px;
    border-bottom:1px solid rgb(183,183,183)
}
.tab-key{
    width:82px;
    text-align: center;
}
.tab-value{
    width:calc(100% - 30px);
    word-wrap: break-word;
    text-align: left;
    color:rgb(251, 115, 138)
}
.widthtd1{
    width:30px;
    word-wrap: break-word;
}
</style>
父组件
<!-- views/detail/Detail -->
    <Detail-params :shopparams="shopparams" v-if="Object.keys(shopparams).length"></Detail-params>
    import DetailParams from 'views/detail/childcomponents/DetailParams'
    components: { NavBar,DetailTab,DetailSwiper,DetailInfo ,DetailShopInfo,DetailShopsImage,DetailParams},
betterscroll 实现移动端的滚动
<!-- views/detail/Detail -->
    <Nav-bar :navcont="navcont"></Nav-bar>
    <scroll class="wrapper"
          :pullup="true"
          :pulldown="true"
          ref="scroll"
          :data=" iid"
          :listenScroll="true"
         >
    <Detail-swiper :swiperimg="swiperdata" v-if="swiperdata.length"></Detail-swiper>
    <Detail-info :GoodsInfo="GoodsInfo" v-if="Object.keys(GoodsInfo).length"></Detail-info>
    <Detail-shop-info :shopInfo="shopInfo" v-if="Object.keys(shopInfo).length"></Detail-shop-info>
    <Detail-shops-image :shopsInfo ='shopsInfo'  v-if="Object.keys(shopsInfo).length" ></Detail-shops-image>
    <Detail-params :shopparams="shopparams" v-if="Object.keys(shopparams).length"></Detail-params>
    </scroll>
<Detail-tab   ></Detail-tab>
import BScroll from 'better-scroll'
import scroll from 'components/common/scroll/scroll'
    components: { NavBar,DetailTab,DetailSwiper,DetailInfo ,DetailShopInfo,DetailShopsImage,DetailParams,BScroll,scroll},
//一定要给wrapper一个高度,并且这个高度不要放在scroll这个公用组件中给定
  .wrapper{
    position: absolute;
height: calc(100% - 48px - 59px);
  left: 0;
  right: 0;
  top:44px;
  bottom: 59px;
  overflow: hidden;
}
商品评论
数据获取
<!-- views/detail/Detail -->
<Detail-comment :shopcomments="shopcomments" v-if="Object.keys(shopcomments).length"></Detail-comment>
            shopcomments: {}
 let result5=result1.rate.list[0]
            this.shopcomments = {
                content:result5.content,
                created:result5.created,
                user: result5.user,
                imgs:result5.images,
    style:result5.style
}
对时间戳的处理 mixin
可能是一个公共的过滤方法,因此使用mixin
注意:当时间戳的长度是10位的时候,表明此时的精度为秒
当时间戳的长度是13位的时候,此时的精度为毫秒
new Date()里面的参数需要是以毫秒作为单位
// @/mixin/index.js
export const mixins = {
    filters: {
        createddate(str) {
            let date = new Date(str*1000)
            let year = date.getFullYear()
            let month = date.getMonth()
            if (month == 0) {
                month = 12
            }
            if (month < 10) {
                month = '0' + month
            }
            let datenow = date.getDate()
            if (datenow < 10) {
                datenow = '0' + datenow
            }

            return `${year} - ${month} - ${datenow}`
        }
    }
}
子组件
<!-- //views/detail/childcomponents/DetailComment -->
<template>
  <div class="comment-info">
    <div class="info-title">
        <div>用户评价</div>
        <div>更多</div>
    </div>
    <div class="info-user">
        <img :src="shopcomments.user.avatar" alt="">
        <span>{{shopcomments.user.uname}}</span>
    </div>
    <div class="info-content">
        {{shopcomments.content}}
    </div>
        <div class="info-image" v-if="shopcomments.imgs.length>0">
        <img :src="item" alt="" v-for="(item,index) in shopcomments.imgs" :key="index" >
    </div>
    <div class="info-add">
        {{shopcomments.created|createddate}}
        <span>{{shopcomments.style}}</span>
    </div>
  </div>
</template>

<script>
import {mixins} from '@/mixin/index.js'

export default {
    name: 'DetailComment',
    mixins:[mixins],
    props: {
        shopcomments: {
            type: Object,
            default: {}
        }
}
}
</script>

<style scoped>
.comment-info{
    color:grey;
    font-size:20px;
    padding:10px 8px;
}
.info-title{
    font-size:25px;
display:flex;
justify-content: space-between;
border-bottom:3px solid rgba(183,183,183,0.5);
padding:20px;
margin-bottom:15px;
}
.info-user img{
    width:40px;
    height:40px;
    border-radius: 50% 50%;
    vertical-align: middle;
    margin-right:10px;
}
.info-user{
    padding-bottom:15px;
}
.info-image{
width:100%;
    display:flex;
    justify-content: space-around;
}
.info-image img{
    width:200px;
    height:200px;
}
</style>
父组件
<!-- views/detail/Detail -->
<Detail-comment :shopcomments="shopcomments" v-if="Object.keys(shopcomments).length"></Detail-comment>
import DetailComment from 'views/detail/childcomponents/DetailComment'

    components: { NavBar,DetailTab,DetailSwiper,DetailInfo ,DetailShopInfo,DetailShopsImage,DetailParams,BScroll,scroll,DetailComment},

更多商品推荐
获取推荐商品的数据
<!-- views/detail/Detail -->
            recommentgood:[]
  getrecommend().then(res => {
            console.log(res.data.data);
            this.recommentgood=res.data.data.list
        })
子组件
和之前的GoodsItem组件是可以复用的,但是此时要注意数据,因为两个数据的一些内容并没有对象,需要做出一点修改(图片部分)
<!-- components/content/homegoods/GoodsItem -->
    <div class="item-image">
       <img :src="item|showimage" alt="" >
    </div>
        filters: {
        showimage(item) {
        return item.showLarge? item.showLarge.img:item.image
    }
   }
父组件
<!-- views/detail/Detail -->
<Goods-item :goodsmessage="recommentgood"></Goods-item>
import GoodsItem from 'components/content/homegoods/GoodsItem'
    components: { NavBar,DetailTab,DetailSwiper,DetailInfo ,DetailShopInfo,DetailShopsImage,DetailParams,BScroll,scroll,DetailComment,GoodsItem},
创建一个表格
一个简单的表格是这么创建的:
| 项目 | Value |
|---|---|
| 电脑 | $1600 |
| 手机 | $12 |
| 导管 | $1 |
设定内容居中、居左、居右
使用:---------:居中
使用:----------居左
使用----------:居右
| 第一列 | 第二列 | 第三列 |
|---|---|---|
| 第一列文本居中 | 第二列文本居右 | 第三列文本居左 |
SmartyPants
SmartyPants将ASCII标点字符转换为“智能”印刷标点HTML实体。例如:
| TYPE | ASCII | HTML |
|---|---|---|
| Single backticks | 'Isn't this fun?' | ‘Isn’t this fun?’ |
| Quotes | "Isn't this fun?" | “Isn’t this fun?” |
| Dashes | -- is en-dash, --- is em-dash | – is en-dash, — is em-dash |
创建一个自定义列表
-
Markdown
- Text-to- HTML conversion tool Authors
- John
- Luke
如何创建一个注脚
一个具有注脚的文本。1
注释也是必不可少的
Markdown将文本转换为 HTML。
KaTeX数学公式
您可以使用渲染LaTeX数学表达式 KaTeX:
Gamma公式展示 Γ ( n ) = ( n − 1 ) ! ∀ n ∈ N \Gamma(n) = (n-1)!\quad\forall n\in\mathbb N Γ(n)=(n−1)!∀n∈N 是通过欧拉积分
Γ ( z ) = ∫ 0 ∞ t z − 1 e − t d t . \Gamma(z) = \int_0^\infty t^{z-1}e^{-t}dt\,. Γ(z)=∫0∞tz−1e−tdt.
你可以找到更多关于的信息 LaTeX 数学表达式here.
新的甘特图功能,丰富你的文章
- 关于 甘特图 语法,参考 这儿,
UML 图表
可以使用UML图表进行渲染。 Mermaid. 例如下面产生的一个序列图:
这将产生一个流程图。:
- 关于 Mermaid 语法,参考 这儿,
FLowchart流程图
我们依旧会支持flowchart的流程图:
- 关于 Flowchart流程图 语法,参考 这儿.
导出与导入
导出
如果你想尝试使用此编辑器, 你可以在此篇文章任意编辑。当你完成了一篇文章的写作, 在上方工具栏找到 文章导出 ,生成一个.md文件或者.html文件进行本地保存。
导入
如果你想加载一篇你写过的.md文件,在上方工具栏可以选择导入功能进行对应扩展名的文件导入,
继续你的创作。
注脚的解释 ↩︎









![洛谷千题详解 | P1010 [NOIP1998 普及组] 幂次方【C++、Java、Python、Pascal语言】](https://img-blog.csdnimg.cn/db67609d89874d04ba7a502159941e88.png)
