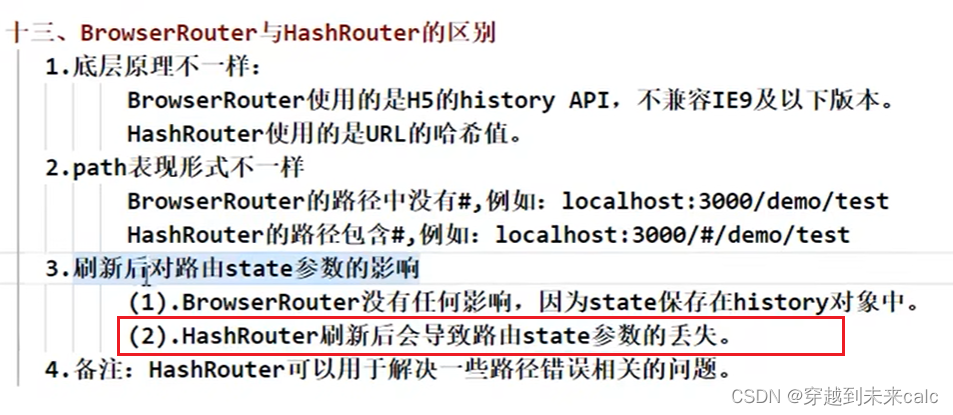
nginx模块
nginx作为项目的7层代理入口,对于http请求的过滤,如sql注入,xss攻击等过滤功能较弱,研究了下开源的一些waf,完全开源的https://github.com/xsec-lab/x-waf,利用lua来过滤请求,同时拥有一个管理控制台,添加规则和代理,但使用过程中,缺少文档,碰到一些问题,需要调试和增强,促使用window编译通过源代码lua和使用x-waf。
lua-nginx-module模块
ngx_ http_lua_ module-将 Lua 的强大功能嵌入到 Nginx HTTP 服务器中。这个模块是 OpenResty 的核心组件,如果您正在使用这个模块,那么您实际上就是在使用 OpenResty。这个模块没有随 Nginx 源代码一起发布。这是 OpenResty 的一个核心组件,如果你正在使用这个模块,那么你实际上是在使用 OpenResty:)
x-waf
X-WAF是一款适用中、小企业的云WAF系统,让中、小企业也可以非常方便地拥有自己的免费云WAF。
项目已经5年未更新,可以作为研究目的,可以通过安全攻击过程分析,自行拓展规则。
文档地址:https://github.com/xsec-lab/x-waf
主要特性
- 支持对常见WEB攻击的防御,如sql注入、xss、路径穿越,阻断扫描器的扫描等
- 对持对CC攻击的防御
- waf为反向模式,后端保护的服务器可直接用内网IP,不需暴露在公网中
- 支持IP、URL、Referer、User-Agent、Get、Post、Cookies参数型的防御策略
- 安装、部署与维护非常简单
- 支持在线管理waf规则
- 支持在线管理后端服务器
- 多台waf的配置可自动同步
- 跨平台,支持在linux、unix、mac和windows操作系统中部署
x-waf安装
linux安装
安装openresty
下载对应系统的安装包
http://openresty.org/cn/linux-packages.html
debian系统安装参考:http://openresty.org/cn/linux-packages.html#debian
或者通过源码安装参考:
http://openresty.org/cn/installation.html
安装完假设目录为:
–prefix=/usr/local/openresty
安装x-waf
克隆x-waf到/usr/local/openresty/nginx/conf目录
cd /usr/local/openresty/nginx/conf && git clone https://github.com/xsec-lab/x-waf
下载下来是一个x-waf 的文件夹,里面的 nginx_conf/nginx.conf 文件是一个配置好了lua和x-waf规则目录的模板文件,可以拷贝到 /usr/local/openresty/nginx/conf/nginx.conf 直接覆盖原有openresty的配置文件
cp /usr/local/openresty/nginx/conf/x-waf/nginx_conf/nginx.conf /usr/local/openresty/nginx/conf/nginx.conf
作者的代码里面url白名单部分有个错误,需要修正一下,否则会因为找不到url白名单文件,而导致白名单失效
vi /usr/local/openresty/nginx/conf/x-waf/waf.lua
找到 writeurl.rule,替换为 whiteUrl.rule

建立虚拟主机配置文件目录(这里主要是nginx.conf里include了,管理后台生成的代理文件目录)
mkdir -p /usr/local/openresty/nginx/conf/vhosts
修改配置文件
vi /usr/local/openresty/nginx/conf/x-waf/config.lua

local _M = {
    -- 开启WAF
    config_waf_enable = "on",
    -- WAF防护日志目录,需要保证openresty的运行用户对该目录有访问权限,可通过修改目录的所有者为openresty的运行用户来实现,或者修改权限为777,注意执行:chmod 777 /opt/waf
    config_log_dir = "/opt/waf",
    -- rule setting
    config_rule_dir = "/usr/local/openresty/nginx/conf/x-waf/rules",
    -- 启用网址白名单过滤
    config_white_url_check = "on",
    -- 启用IP白名单过滤
    config_white_ip_check = "on",
    -- 启用IP黑名单过滤
    config_black_ip_check = "on",
    -- 启用url过滤
    config_url_check = "on",
    -- 启用url参数过滤
    config_url_args_check = "on",
    -- 启用浏览器用户代理过滤
    config_user_agent_check = "on",
    -- 启用cookie过滤
    config_cookie_check = "on",
    -- 启用CC攻击检测
    config_cc_check = "on",
    -- CC攻击检测阈值,10次/60秒
    config_cc_rate = "10/60",
    -- enable/disable post filtering
    config_post_check = "on",
    -- 检测攻击后给攻击者的输出,默认html文本串,通过config_output_html配置,或者设置为url,则通过config_waf_redirect_url配置
    config_waf_model = "html",
    -- if config_waf_output ,setting url
    config_waf_redirect_url = "http://xxx.com",
    config_expire_time = 600,
    config_output_html = [[
    <html>
    <head>
    <meta charset="UTF-8">
    <title>非法访问</title>
    </head>
      <body>
        <div>
      <div class="table">
        <div>
          <div class="cell">
            非法访问,您的IP为: %s
          </div>
          <div class="cell">
            如需帮助请联系客服
          </div>
        </div>
      </div>
    </div>
      </body>
    </html>
    ]],
}
安装x-waf-admin
管理后台安装,管理后台使用GO语言编写,可以直接下载编译好的版本直接运行即可
https://github.com/xsec-lab/x-waf-admin/releases/download/x-waf-admin0.1/x-waf-admin0.1-linux-amd64.tar.gz
解压
tar -xzf x-waf-admin0.1-linux-amd64.tar.gz
编辑配置文件
vi x-waf-admin/conf/app.ini

RUN_MODE = dev #开发环境使用
;RUN_MODE = prod #生产环境使用

[server]
HTTP_PORT = 5000 #管理后台端口
API_KEY = xsec.io||secdevops.cn
NGINX_BIN = /usr/local/openresty/nginx/sbin/nginx #指定openresty可执行文件位置
NGINX_VHOSTS = /usr/local/openresty/nginx/conf/vhosts/ #指定虚拟主机配置文件位置
API_SERVERS = 127.0.0.1, 你自己的IP  #指定管理后台的IP地址,加上你自己的服务器IP即可

[database]
USER = 数据库用户名
PASSWD = 数据库密码
HOST = 127.0.0.1:3306 #数据库地址和端口  ,数据库用来保存用户和自定义规则信息
NAME = waf #数据库名

[waf]
RULE_PATH = /usr/local/openresty/nginx/conf/x-waf/rules/
已后台进程方式启动管理后台,启动后会自动往MySQL数据库写入配置表,如果没有配置好MySQL,管理后台会因为找不到数据库里面的用户而无法登录
nohup ./server >> x-waf.log 2>&1 &
tail -f x-waf.log 查看运行日志和启动启动
然后就可以访问管理后台 http://ip:5000/login/ 了,
默认的管理后台用户是admin,密码是 x@xsec.io,生产环境一点要修改账户密码
测试默认规则是否拦截(select.+(from|limit) )
http://10.10.0.117/?id=select * from dual

在管理后台新增规则,比如参数数有helloworld直接拦截

http://10.10.0.117/?id=hellowold发现拦击
开发环境安装
nginx源码编译
nginx源码在clion编译参考:nginx编译
请确保按照上面的编译通过nginx能正常运行,这里假设
我的window代码安装在:D:\code1\nginx-master
cygwin显示的路径为:/cygdrive/d/code1/nginx-master
安装luajit
官网:http://luajit.org/install.html
下载openresty最新2.1版本:不要下载luajit官网的,否则报错http://luajit.org/download.html
git clone https://github.com/openresty/luajit2
Cygwin64 Terminal进入解压目录,编译
cd luajit2 && make install PREFIX=/usr/local/LuaJIT
编译过程注意 cygwin下编译出的是dll,实际命令中 还是执行拷贝的是so文件
$ make install PREFIX=/usr/local/LuaJIT
==== Installing LuaJIT 2.1.0-beta3 to /usr/local/LuaJIT ====
mkdir -p /usr/local/LuaJIT/bin /usr/local/LuaJIT/lib /usr/local/LuaJIT/include/luajit-2.1 /usr/local/LuaJIT/share/man/man1 /usr/local/LuaJIT/lib/pkgconfig /usr/local/LuaJIT/share/luajit-2.1.0-beta3/jit /usr/local/LuaJIT/share/lua/5.1 /usr/local/LuaJIT/lib/lua/5.1
cd src && install -m 0755 luajit /usr/local/LuaJIT/bin/luajit-2.1.0-beta3
cd src && test -f libluajit.a && install -m 0644 libluajit.a /usr/local/LuaJIT/lib/libluajit-5.1.a || :
rm -f /usr/local/LuaJIT/lib/libluajit-5.1.so.2.1.0 /usr/local/LuaJIT/lib/libluajit-5.1.so /usr/local/LuaJIT/lib/libluajit-5.1.so.2
cd src && test -f libluajit.so && \
  install -m 0755 libluajit.so /usr/local/LuaJIT/lib/libluajit-5.1.so.2.1.0 && \
  ldconfig -n /usr/local/LuaJIT/lib && \
  ln -sf libluajit-5.1.so.2.1.0 /usr/local/LuaJIT/lib/libluajit-5.1.so && \
  ln -sf libluajit-5.1.so.2.1.0 /usr/local/LuaJIT/lib/libluajit-5.1.so.2 || :
cd etc && install -m 0644 luajit.1 /usr/local/LuaJIT/share/man/man1
cd etc && sed -e "s|^prefix=.*|prefix=/usr/local/LuaJIT|" -e "s|^multilib=.*|multilib=lib|" luajit.pc > luajit.pc.tmp && \
  install -m 0644 luajit.pc.tmp /usr/local/LuaJIT/lib/pkgconfig/luajit.pc && \
  rm -f luajit.pc.tmp
cd src && install -m 0644 lua.h lualib.h lauxlib.h luaconf.h lua.hpp luajit.h /usr/local/LuaJIT/include/luajit-2.1
cd src/jit && install -m 0644 bc.lua bcsave.lua dump.lua p.lua v.lua zone.lua dis_x86.lua dis_x64.lua dis_arm.lua dis_arm64.lua dis_arm64be.lua dis_ppc.lua dis_mips.lua dis_mipsel.lua dis_mips64.lua dis_mips64el.lua vmdef.lua /usr/local/LuaJIT/share/luajit-2.1.0-beta3/jit
==== Successfully installed LuaJIT 2.1.0-beta3 to /usr/local/LuaJIT ====
看到这句
rm -f /usr/local/LuaJIT/lib/libluajit-5.1.so.2.1.0 /usr/local/LuaJIT/lib/libluajit-5.1.so /usr/local/LuaJIT/lib/libluajit-5.1.so.2
最后拷贝lib文件到/usr/local/LuaJIT/lib/libluajit-5.1.so ,但实际src下生成的是cyglua51.dll
cp src/cyglua51.dll /usr/local/LuaJIT/lib/libluajit-5.1.so
cp src/cyglua51.dll /usr/local/LuaJIT/lib/libluajit-5.1.a
/etc/profile添加两个环境变量
export LUAJIT_LIB=/usr/local/LuaJIT/lib
export LUAJIT_INC=/usr/local/LuaJIT/include/luajit-2.1
生效:source /etc/profile
添加lua-nginx-module
下载ngx_devel_kit源代码到nginx源代码extend目录
https://github.com/simplresty/ngx_devel_kit/tags
下载lua-nginx-module源代码到ngxin的extend目录
https://github.com/openresty/lua-nginx-module/tags

nginx下执行
./auto/configure --with-ld-opt="-Wl,-rpath,/usr/local/LuaJIT/lib" --add-module=./extend/ngx_devel_kit-0.3.0 --add-module=./extend/lua-nginx-module-0.10.22
生成CmakeLists.txt中添加Makefile中的編譯參數

set(CMAKE_C_FLAGS "-I/usr/local/LuaJIT/include/luajit-2.1 -pipe -O -W -Wall -Wpointer-arith -Wno-unused-parameter -Werror -g -DNDK_SET_VAR")

clion运行看不到错误,编译通过后在cygwin运行,nginx运行
liaomin@DESKTOP-FSEDE3P /cygdrive/d/code1/nginx-master/objs
$ ./nginx.exe -c /cygdrive/d/code1/nginx-master/conf/nginx.conf
D:/code1/nginx-master/objs/nginx.exe: error while loading shared libraries: cyglua51.dll: cannot open shared object file: No such file or directory
拷贝luajit/src目录下cyglua51.dll到nginx源代码objs目录,如果在idea中需要拷贝到cmake-build-debug中,继续运行
liaomin@DESKTOP-FSEDE3P /cygdrive/d/code1/nginx-master/objs
$ ./nginx.exe -c /cygdrive/d/code1/nginx-master/conf/nginx.conf
nginx: [alert] detected a LuaJIT version which is not OpenResty's; many optimizations will be disabled and performance will be compromised (see https://github.com/openresty/luajit2 for OpenResty's LuaJIT or, even better, consider using the OpenResty releases from https://openresty.org/en/download.html)
nginx: [alert] failed to load the 'resty.core' module (https://github.com/openresty/lua-resty-core); ensure you are using an OpenResty release from https://openresty.org/en/download.html (reason: module 'resty.core' not found:
        no field package.preload['resty.core']
        no file './resty/core.lua'
        no file '/usr/local/share/luajit-2.1.0-beta3/resty/core.lua'
        no file '/usr/local/share/lua/5.1/resty/core.lua'
        no file '/usr/local/share/lua/5.1/resty/core/init.lua'
        no file './resty/core.so'
        no file '/usr/local/lib/lua/5.1/resty/core.so'
        no file '/usr/local/lib/lua/5.1/loadall.so'
        no file './resty.so'
        no file '/usr/local/lib/lua/5.1/resty.so'
        no file '/usr/local/lib/lua/5.1/loadall.so') in /cygdrive/d/code1/nginx-master/conf/nginx.conf:118
说明运行需要resty.core,继续参考https://github.com/openresty/lua-nginx-module#installation

lua-resty-core和lua-resty-lrucache其实可以理解为lua-nginx-module调用初始化的一些lua脚本,负责初始化ngx变化调用nginx。
默认安装的目录:
安装lua-resty-core
安装lua-resty-core,下载源码后,默认安装在/usr/local/lib/下
liaomin@DESKTOP-FSEDE3P /cygdrive/d/test/lua-resty-core-master
$ make install
install -d /usr/local/lib/lua//resty/core/
install -d /usr/local/lib/lua//ngx/
install -d /usr/local/lib/lua//ngx/ssl
install lib/resty/*.lua /usr/local/lib/lua//resty/
install lib/resty/core/*.lua /usr/local/lib/lua//resty/core/
install lib/ngx/*.lua /usr/local/lib/lua//ngx/
install lib/ngx/ssl/*.lua /usr/local/lib/lua//ngx/ssl/
安装lua-resty-lrucache
安装lua-resty-lrucache,下载源码后,默认安装在/usr/local/lib/下
$ make install PREFIX=usr/local   //这里注意前面别加/否则会多个/路径会报错
install -d /usr/local/lib/lua//resty/lrucache
install lib/resty/*.lua /usr/local/lib/lua//resty/
install lib/resty/lrucache/*.lua /usr/local/lib/lua//resty/lrucache/
解决初始化脚本兼容异常
lua脚本中某些调用linux系统的变量在window中不存在,导致异常,需要做处理。
再次启动nginx,报错
D:\code1\nginx-master\cmake-build-debug\nginx.exe -c /cygdrive/d/code1/nginx-master/conf/nginx.conf
nginx: [alert] failed to load the 'resty.core' module (https://github.com/openresty/lua-resty-core); ensure you are using an OpenResty release from https://openresty.org/en/download.html (reason: module 'resty.core' not found:
	no field package.preload['resty.core']
	no file './resty/core.lua'
	no file '/usr/local/LuaJIT/share/luajit-2.1.0-beta3/resty/core.lua'
	no file '/usr/local/share/lua/5.1/resty/core.lua'
	no file '/usr/local/share/lua/5.1/resty/core/init.lua'
	no file '/usr/local/LuaJIT/share/lua/5.1/resty/core.lua'
	no file '/usr/local/LuaJIT/share/lua/5.1/resty/core/init.lua'
	no file './resty/core.so'
	no file '/usr/local/lib/lua/5.1/resty/core.so'
	no file '/usr/local/LuaJIT/lib/lua/5.1/resty/core.so'
	no file '/usr/local/lib/lua/5.1/loadall.so'
	no file './resty.so'
	no file '/usr/local/lib/lua/5.1/resty.so'
	no file '/usr/local/LuaJIT/lib/lua/5.1/resty.so'
	no file '/usr/local/lib/lua/5.1/loadall.so') in /cygdrive/d/code1/nginx-master/conf/nginx.conf:125
说是没有安装resty.core,但是已经安装了,需要在nginx.conf配置初始化lua脚本,http快中添加:
lua_package_path "/usr/local/lib/lua/?.lua;;";
继续启动,然后又报错
D:\code1\nginx-master\cmake-build-debug\nginx.exe -c /cygdrive/d/code1/nginx-master/conf/nginx.conf
nginx: [alert] failed to load the 'resty.core' module (https://github.com/openresty/lua-resty-core); ensure you are using an OpenResty release from https://openresty.org/en/download.html (reason: /usr/local/lib/lua/resty/core/worker.lua:35: No such file or directory) in /cygdrive/d/code1/nginx-master/conf/nginx.conf:125
worker.lua:35报错,注释掉第35行。
    ngx_lua_ffi_worker_id = C.ngx_http_lua_ffi_worker_id
    ngx_lua_ffi_worker_pid = C.ngx_http_lua_ffi_worker_pid
    --ngx_lua_ffi_worker_pids = C.ngx_http_lua_ffi_worker_pids
    ngx_lua_ffi_worker_count = C.ngx_http_lua_ffi_worker_count
    ngx_lua_ffi_worker_exiting = C.ngx_http_lua_ffi_worker_exiting
继续运行,报错
D:\code1\nginx-master\cmake-build-debug\nginx.exe -c /cygdrive/d/code1/nginx-master/conf/nginx.conf
nginx: [alert] failed to load the 'resty.core' module (https://github.com/openresty/lua-resty-core); ensure you are using an OpenResty release from https://openresty.org/en/download.html (reason: /usr/local/lib/lua/resty/core/time.lua:47: No such file or directory) in /cygdrive/d/code1/nginx-master/conf/nginx.conf:125
注释掉time.lua:47
修改配置后,可以正常启动,添加测试lua脚本
location /hello {
           default_type 'text/plain';
           content_by_lua 'ngx.say("hello, lua")';
           charset utf-8;
        }
访问http://localhost/hello显示hello,lua
x-waf源码安装
将x-waf源码拷贝到conf目录下,将config.lua的config_rule_dir配置为绝对路径

拷贝x-waf下修改nginx_conf/nginx.conf到项目conf/nginx中,将x-waf lua加入到lua_package_path
#user  nobody;
worker_processes  1;

error_log  /cygdrive/d/code1/nginx-master/objs/logs/error.log;
#error_log  logs/error.log  notice;
error_log  /cygdrive/d/code1/nginx-master/objs/logs/info.log  info;

#pid        logs/nginx.pid;


events {
    worker_connections  24;
}
daemon off;
master_process off;
http {
    include       mime.types;
    default_type  application/octet-stream;

    #log_format  main  '$remote_addr - $remote_user [$time_local] "$request" '
    #                  '$status $body_bytes_sent "$http_referer" '
    #                  '"$http_user_agent" "$http_x_forwarded_for"';

    #access_log  logs/access.log  main;

    sendfile        on;
    #tcp_nopush     on;


    #keepalive_timeout  0;
    keepalive_timeout  65;
    lua_package_path "/cygdrive/d/code1/nginx-master/conf/x-waf/?.lua;/usr/local/lib/lua/?.lua;;";
    #gzip  on;
    init_by_lua_file /cygdrive/d/code1/nginx-master/conf/x-waf/init.lua;
    access_by_lua_file /cygdrive/d/code1/nginx-master/conf/x-waf/access.lua;
    server {
        listen       80;
        server_name  localhost;

        #charset koi8-r;

        #access_log  logs/host.access.log  main;

        location / {
            proxy_pass http://192.168.1.35:8888/;    #这里随便代理到一个可用的web站点,http://www.baidu.com也行
            #root   html;
            #index  index.html index.htm;
        }
        location /hello {
           default_type 'text/plain';
           content_by_lua 'ngx.say("hello, lua")';
           charset utf-8;
        }
        #error_page  404              /404.html;

        # redirect server error pages to the static page /50x.html
        #
        error_page   500 502 503 504  /50x.html;
        location = /50x.html {
            root   html;
        }
    }
}
注意因为window不支持共享内存,cc_attack_check这个是使用ngx.shared.limit,注释掉waf.lua _M.check()函数中_M.cc_attack_check()

lua-cjson安装
配置好后,访问nginx直接错误,缺少cjson.safe模块,需要安装
cjson官网:https://github.com/mpx/lua-cjson/tags ,下载最新的2.1.0 tags
修改makefile
#CJSON_LDFLAGS =     -shared   指定luajit的lib目录
CJSON_LDFLAGS =     -shared -L/usr/local/LuaJIT/lib -llua51
#LUA_INCLUDE_DIR =   $(PREFIX)/include 指定头文件目录
LUA_INCLUDE_DIR =   /usr/local/LuaJIT/include/luajit-2.1
修改完成后依然有个错误
make PREFIX=/usr/local/LuaJIT/
cc -c -O3 -Wall -pedantic -DNDEBUG  -I/usr/local/include -I/usr/local/LuaJIT/include/luajit-2.1 -fpic -o lua_cjson.o lua_cjson.c
lua_cjson.c:1299:1: 错误:对‘luaL_setfuncs’的静态声明出现在非静态声明之后
 1299 | {
修改lua_cjson.c
找到行数luaL_setfuncs 去掉static 编译通过
make PREFIX=/usr/local/LuaJIT/ install
验证
访问:http://localhost/?id=select * from dual