一、Spring集成了Junit
-
之前我们只是使用Junit的测试注解 @Test,并没有使用Spring对于Junit的支持
-
Spring6既支持Junit4、也支持Spring5
-
要想使用Spring对于Junit的支持,我们需要在pom中导入相关依赖
<!--我们引入Spring对junit支持的依赖 >> 既支持Junit4、也支持Junit5-->
<dependency>
	<groupId>org.springframework</groupId>
	<artifactId>spring-test</artifactId>
	<version>6.0.0-M2</version>
</dependency>
因为 Spring6 还没有正式发布,所以我们需要配置对应的远程仓库
<!--仓库--> <repositories> <!--spring里程碑版本的仓库--> <repository> <id>repository.spring.milestone</id> <name>Spring Milestone Repository</name> <url>https://repo.spring.io/milestone</url> </repository> </repositories> -
上面对Junit支持的依赖是既可以用于Junit4、也可以用于Junit5的,我们选择使用4还是5只需要导入相关依赖
<!--junit5依赖--> <dependency> <groupId>org.junit.jupiter</groupId> <artifactId>junit-jupiter</artifactId> <version>5.9.0</version> <scope>test</scope> </dependency><!--junit4依赖--> <dependency> <groupId>junit</groupId> <artifactId>junit</artifactId> <version>4.13.2</version> <scope>test</scope> </dependency> -
为了具体演示测试类的不同,我们编写一个User类,提供一个获取名字的方法
编写我们的 User 类
package com.powernode.spring6.bean;

import org.springframework.beans.factory.annotation.Value;
import org.springframework.context.annotation.ComponentScan;
import org.springframework.stereotype.Component;

/**
 * @author Bonbons
 * @version 1.0
 */
@Component
public class User {
    // 我们只提供一个属性
    @Value("华佗")
    private String name;

    public User() {
    }

    public User(String name) {
        this.name = name;
    }

    public void setName(String name) {
        this.name = name;
    }

    public String getName() {
        return name;
    }

    @Override
    public String toString() {
        return "User{" +
                "name='" + name + '\'' +
                '}';
    }
}
编写我们的配置文件 >> 因为我们采用注解恶毒方式声明Bean和注入属性值,所以需要扫描一下
<?xml version="1.0" encoding="UTF-8"?>
<beans xmlns="http://www.springframework.org/schema/beans"
       xmlns:xsi="http://www.w3.org/2001/XMLSchema-instance"
       xmlns:context="http://www.springframework.org/schema/context"
       xsi:schemaLocation="http://www.springframework.org/schema/beans http://www.springframework.org/schema/beans/spring-beans.xsd
                           http://www.springframework.org/schema/context http://www.springframework.org/schema/context/spring-context.xsd">

    <!--因为我们采用的是注解注入,所以需要context命名空间扫描包-->
    <context:component-scan base-package="com.powernode.spring6.bean" />
</beans>
我们先编写一下我们使用Junit4支持的测试类
package com.powernode.spring6.test;

import com.powernode.spring6.bean.User;

import org.junit.jupiter.api.Test;
import org.springframework.beans.factory.annotation.Autowired;
import org.springframework.test.context.ContextConfiguration;
import org.springframework.test.context.junit4.SpringJUnit4ClassRunner;

/**
 * @author Bonbons
 * @version 1.0
 */
@RunWith(SpringJUnit4ClassRunner.class) //RunWith是一个运行器,我们可以指定让Junit4来运行
@ContextConfiguration("classpath:spring.xml") // 该注解声明我们配置文件的位置,类中所有方法都可以直接使用Spring容器
public class SpringJunit4Test {
    // 可以直接创建全局对象 >> 使用@Autowired注解按类型注入
    @Autowired
    private User user;
    @Test
    public void testUser(){
        /*
            我们每次进行单元测试都要获取Spring容器,然后通过getBean获取对象实例 >> 很不方便
            Spring对Junit4提供了支持,我们直接可以给我们的测试类添加两个注解 >> 代替这些繁琐的步骤

         */
        /*
        ApplicationContext applicationContext = new ClassPathXmlApplicationContext("spring.xml");
        User user = applicationContext.getBean("user", User.class);
        System.out.println(user.getName());
         */

        // 以上注释掉的代码可以用下面的代替
        System.out.println(user.getName());
    }
}
- 很明显在我们的测试类上方添加了两个注解:
- @RunWith 注解代表我们使用Junit4的运行器去运行
- @ContextConfiguration 注解代表告诉我们的容器配置文件的位置
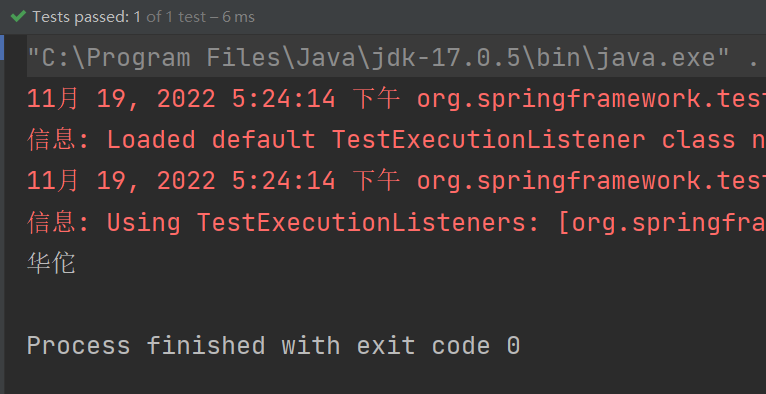
编写我们 Junit5 的测试类 >> 我们需要在pom.xml中使用Spring对Junit支持的依赖以及Junit5的依赖
package com.powernode.spring6.test;

import com.powernode.spring6.bean.User;
import org.junit.jupiter.api.Test;
import org.junit.jupiter.api.extension.ExtendWith;
import org.springframework.beans.factory.annotation.Autowired;
import org.springframework.test.context.ContextConfiguration;
import org.springframework.test.context.junit.jupiter.SpringExtension;


/**
 * @author Bonbons
 * @version 1.0
 */
@ExtendWith(SpringExtension.class)
@ContextConfiguration("classpath:spring.xml")
public class SpringJunit5Test {
    // 直接将User类作为成员变量使用
    @Autowired
    private User user;
    @Test
    public void testUser(){
        System.out.println(user.getName());
    }
}
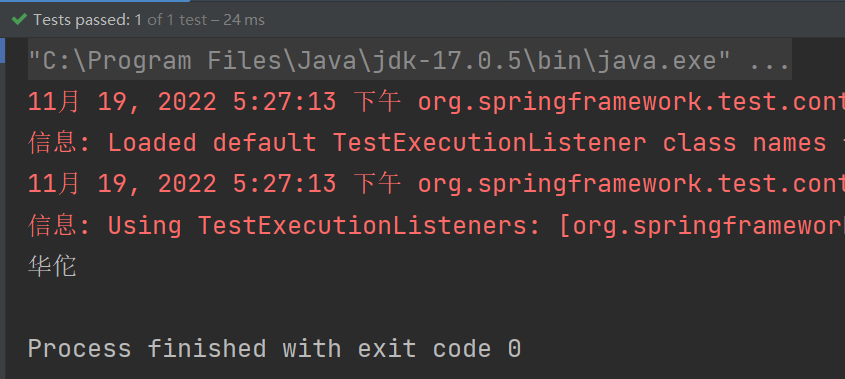
- 与Junit4不同,Junit5不使用RunWith注解,而是使用ExtendWith注解【具体配置看我们上面的代码】
二、Spring6集成了MyBatis
- 我们要演示一个 Spring + MyBatis 的银行转账案例
- 整个过程包含以下操作:
● 第一步:准备数据库表
○ 使用t_act表(账户表)
● 第二步:IDEA中创建一个模块,并引入依赖
○ spring-context
○ spring-jdbc
○ mysql驱动
○ mybatis
○ mybatis-spring:mybatis提供的与spring框架集成的依赖
○ 德鲁伊连接池
○ junit
● 第三步:基于三层架构实现,所以提前创建好所有的包
○ com.powernode.bank.mapper
○ com.powernode.bank.service
○ com.powernode.bank.service.impl
○ com.powernode.bank.pojo
● 第四步:编写pojo
○ Account,属性私有化,提供公开的setter getter和toString。
● 第五步:编写mapper接口
○ AccountMapper接口,定义方法
● 第六步:编写mapper配置文件
○ 在配置文件中配置命名空间,以及每一个方法对应的sql。
● 第七步:编写service接口和service接口实现类
○ AccountService
○ AccountServiceImpl
● 第八步:编写jdbc.properties配置文件
○ 数据库连接池相关信息
● 第九步:编写mybatis-config.xml配置文件
○ 该文件可以没有,大部分的配置可以转移到spring配置文件中。
○ 如果遇到mybatis相关的系统级配置,还是需要这个文件。
● 第十步:编写spring.xml配置文件
○ 组件扫描
○ 引入外部的属性文件
○ 数据源
○ SqlSessionFactoryBean配置
■ 注入mybatis核心配置文件路径
■ 指定别名包
■ 注入数据源
○ Mapper扫描配置器
■ 指定扫描的包
○ 事务管理器DataSourceTransactionManager
■ 注入数据源
○ 启用事务注解
■ 注入事务管理器
● 第十一步:编写测试程序,并添加事务,进行测试
在数据库中准备一张操作的表,我们还是使用 t_act2

创建一个新的模块 spring6-016-sm,并完成相关依赖的配置
<?xml version="1.0" encoding="UTF-8"?>
<project xmlns="http://maven.apache.org/POM/4.0.0"
         xmlns:xsi="http://www.w3.org/2001/XMLSchema-instance"
         xsi:schemaLocation="http://maven.apache.org/POM/4.0.0 http://maven.apache.org/xsd/maven-4.0.0.xsd">
    <modelVersion>4.0.0</modelVersion>

    <groupId>com.powernode</groupId>
    <artifactId>spring6-016-sm</artifactId>
    <version>1.0-SNAPSHOT</version>
    <packaging>jar</packaging>
    <!--仓库-->
    <repositories>
        <!--spring里程碑版本的仓库-->
        <repository>
            <id>repository.spring.milestone</id>
            <name>Spring Milestone Repository</name>
            <url>https://repo.spring.io/milestone</url>
        </repository>
    </repositories>

    <dependencies>
        <dependency>
            <groupId>org.springframework</groupId>
            <artifactId>spring-context</artifactId>
            <version>6.0.0-M2</version>
        </dependency>
        <dependency>
            <groupId>org.springframework</groupId>
            <artifactId>spring-jdbc</artifactId>
            <version>6.0.0-M2</version>
        </dependency>
        <dependency>
            <groupId>mysql</groupId>
            <artifactId>mysql-connector-java</artifactId>
            <version>8.0.30</version>
        </dependency>
        <dependency>
            <groupId>org.mybatis</groupId>
            <artifactId>mybatis</artifactId>
            <version>3.5.11</version>
        </dependency>
        <dependency>
            <groupId>org.mybatis</groupId>
            <artifactId>mybatis-spring</artifactId>
            <version>2.0.7</version>
        </dependency>
        <dependency>
            <groupId>com.alibaba</groupId>
            <artifactId>druid</artifactId>
            <version>1.2.13</version>
        </dependency>
        <dependency>
            <groupId>junit</groupId>
            <artifactId>junit</artifactId>
            <version>4.13.2</version>
            <scope>test</scope>
        </dependency>
    </dependencies>

    <properties>
        <maven.compiler.source>17</maven.compiler.source>
        <maven.compiler.target>17</maven.compiler.target>
        <project.build.sourceEncoding>UTF-8</project.build.sourceEncoding>
    </properties>

</project>
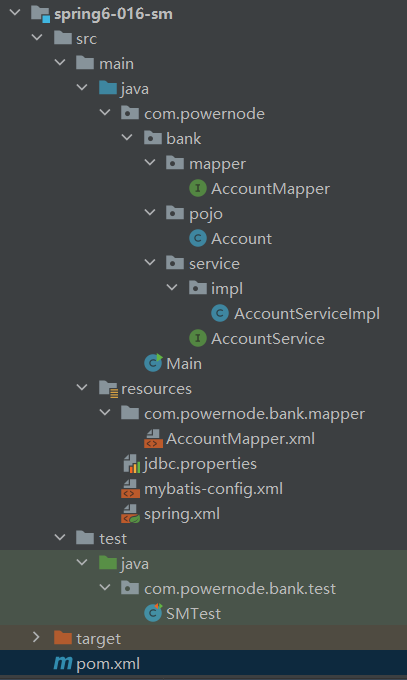
采用MVC三层架构建包 >> 但是我们还是Jar项目,以测试程序代替表现层 【我直接给出了所有文件的目录结构】
编写我们的普通 java 类 >> 用来封装我们数据库表中的字段 Account
package com.powernode.bank.pojo;

/**
 * @author Bonbons
 * @version 1.0
 */
public class Account {
    private String actno;
    private Double balance;

    public Account() {
    }

    public Account(String actno, Double balance) {
        this.actno = actno;
        this.balance = balance;
    }

    @Override
    public String toString() {
        return "Account{" +
                "actno='" + actno + '\'' +
                ", balance=" + balance +
                '}';
    }

    public String getActno() {
        return actno;
    }

    public void setActno(String actno) {
        this.actno = actno;
    }

    public Double getBalance() {
        return balance;
    }

    public void setBalance(Double balance) {
        this.balance = balance;
    }
}
编写我们的Mapper接口 >> 就是对数据库表进行操作的接口,我们采用,MyBatis为我们提供了接口可以动态生成Mapper实现类
package com.powernode.bank.mapper;

import com.powernode.bank.pojo.Account;

import java.util.List;

/**
 * @author Bonbons
 * @version 1.0
 */
public interface AccountMapper {
    // 提供简单的增删改查
    int insert(Account account);
    int deleteByActno(String actno);
    int update(Account account);
    Account selectByActno(String actno);
    List<Account> selectAll();
}
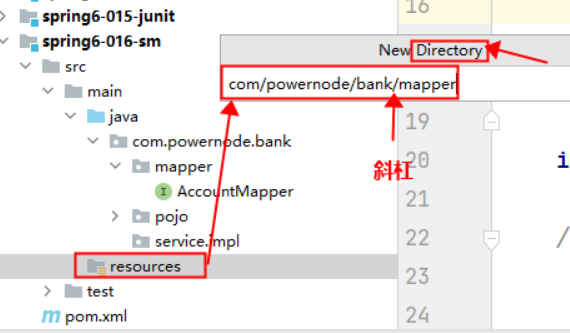
我们为了一次能导入所有xml配置文件,就将Mapper接口与映射文件放在一个目录下,注意命名的时候用正斜杠
然后编写我们的映射文件 >> 就是写SQL语句的地方 【此处的查询返回值类型我用别名了,因为在核心配置文件中我会开启自动映射】
<?xml version="1.0" encoding="UTF-8" ?>
<!DOCTYPE mapper
        PUBLIC "-//mybatis.org//DTD Mapper 3.0//EN"
        "http://mybatis.org/dtd/mybatis-3-mapper.dtd">
<!--需要指定接口的全限定类名-->
<mapper namespace="com.powernode.bank.mapper.AccountMapper">
    <!--添加数据-->
    <insert id="insert">
        insert into t_act2 values(#{actno}, #{balance})
    </insert>
    <!--删除数据-->
    <delete id="deleteByActno">
        delete from t_act2 where actno = #{actno}
    </delete>
    <!--修改数据-->
    <update id="update">
        update t_act2 set balance = #{balance} where actno = #{actno}
    </update>
    <!--根据账户号查询一条数据-->
    <select id="selectByActno" resultType="Account">
        select * from t_act2 where actno = #{actno}
    </select>
    <!--查询全部数据-->
    <select id="selectAll" resultType="Account">
        select * from t_act2
    </select>
</mapper>
编写业务层的接口 AccountService
package com.powernode.bank.service;

import com.powernode.bank.pojo.Account;

import java.util.List;

/**
 * @author Bonbons
 * @version 1.0
 */
public interface AccountService {
    // 添加用户
    int save(Account account);
    // 删除用户
    int delete(String actno);
    // 修改用户信息
    int modify(Account account);
    // 查询一条用户信息
    Account getByActno(String actno);
    // 查询全部的用户信息
    List<Account> getAll();
    // 转账
    void transfer(String fromActno, String toActno, Double money);
}
编写我们业务接口的实现类AccountServiceImpl,通过注解纳入Spring IoC 容器托管
package com.powernode.bank.service.impl;

import com.powernode.bank.mapper.AccountMapper;
import com.powernode.bank.pojo.Account;
import com.powernode.bank.service.AccountService;
import org.springframework.beans.factory.annotation.Autowired;
import org.springframework.stereotype.Service;
import org.springframework.transaction.annotation.Transactional;

import java.util.List;

/**
 * @author Bonbons
 * @version 1.0
 */
@Service("accountService")
@Transactional
public class AccountServiceImpl implements AccountService {
    // 引入数据库的操作接口
    @Autowired
    private AccountMapper accountMapper;
    @Override
    public int save(Account account) {
        return accountMapper.insert(account);
    }

    @Override
    public int delete(String actno) {
        return accountMapper.deleteByActno(actno);
    }

    @Override
    public int modify(Account account) {
        return accountMapper.update(account);
    }

    @Override
    public Account getByActno(String actno) {
        return accountMapper.selectByActno(actno);
    }

    @Override
    public List<Account> getAll() {
        return accountMapper.selectAll();
    }

    @Override
    public void transfer(String fromActno, String toActno, Double money) {
        // 获取转出账户
        Account fromAct = accountMapper.selectByActno(fromActno);
        // 判断余额是否充足
        if (fromAct.getBalance() < money) {
            throw new RuntimeException("余额不足!!!");
        }
        // 获取转入账户
        Account toAct = accountMapper.selectByActno(toActno);
        // 更新内存中账户余额
        fromAct.setBalance(fromAct.getBalance() - money);
        toAct.setBalance(toAct.getBalance() + money);
        // 写入到数据库中
        int count = accountMapper.update(fromAct);
        count += accountMapper.update(toAct);

        if (count != 2) {
            throw new RuntimeException("转账失败!!!");
        }
    }
}
为了方便维护,我们将数据源的连接属性独立迟来成为一个配置文件 jdbc.properties
jdbc.driver = com.mysql.cj.jdbc.Driver
jdbc.url = jdbc:mysql://localhost:3306/powernode
# 这里不要直接使用username,因为默认获取的是当前计算机的用户名
jdbc.username = root
jdbc.password = 111111
编写我们MyBatis的核心配置文件,此处我们就做一个设置开启打印日志功能,重要的配置我们直接在spring的配置文件中进行配置
<?xml version="1.0" encoding="UTF-8" ?>
<!DOCTYPE configuration
        PUBLIC "-//mybatis.org//DTD Config 3.0//EN"
        "http://mybatis.org/dtd/mybatis-3-config.dtd">
<configuration>
    <!--开启打印日志文件-->
    <settings>
        <setting name="logImpl" value="STDOUT_LOGGING"/>
    </settings>
</configuration>
编写我们spring的配置文件,具体工作我利用注释标记了
<?xml version="1.0" encoding="UTF-8"?>
<beans xmlns="http://www.springframework.org/schema/beans"
       xmlns:xsi="http://www.w3.org/2001/XMLSchema-instance"
       xmlns:context="http://www.springframework.org/schema/context" xmlns:tx="http://www.springframework.org/schema/tx"

       xsi:schemaLocation="http://www.springframework.org/schema/beans http://www.springframework.org/schema/beans/spring-beans.xsd
                           http://www.springframework.org/schema/context https://www.springframework.org/schema/context/spring-context.xsd http://www.springframework.org/schema/tx http://www.springframework.org/schema/tx/spring-tx.xsd">

    <!--开启组件扫描 >> 输入scan选定可以自动配置 xmlns:context-->
    <context:component-scan base-package="com.powernode.bank" />
    <!--引入我们的外部文件-->
    <context:property-placeholder location="jdbc.properties" />
    <!--配置我们的德鲁伊连接池-->
    <bean id="dataSource" class="com.alibaba.druid.pool.DruidDataSource">
        <!--连接池需要四个属性-->
        <property name="driverClassName" value="${jdbc.driver}"/>
        <property name="url" value="${jdbc.url}"/>
        <property name="username" value="${jdbc.username}"/>
        <property name="password" value="${jdbc.password}"/>
    </bean>
    <!--配置SqlSessionFactoryBean >> 我猜就是类似于SqlSessionFactoryBuilder的功能-->
    <bean id="sqlSessionFactoryBean" class="org.mybatis.spring.SqlSessionFactoryBean">
        <!--创建会话必然需要数据库连接池-->
        <property name="dataSource" ref="dataSource"/>
        <!--配置mybatis核心配置文件-->
        <property name="configLocation" value="mybatis-config.xml"/>
        <!--批量指定别名 >> 为我们的普通pojo类-->
        <property name="typeAliasesPackage" value="com.powernode.bank.pojo"/>
    </bean>
    <!--配置我们指定要扫描的mapper包 >> 因为我们将mapper接口和对应映射文件已经放到一个包中了-->
    <bean class="org.mybatis.spring.mapper.MapperScannerConfigurer">
        <!--指定扫描哪个包-->
        <property name="basePackage" value="com.powernode.bank.mapper"/>
    </bean>
    <!--配置事务管理器-->
    <bean id="txManager" class="org.springframework.jdbc.datasource.DataSourceTransactionManager">
        <!--事务管理器需要连接数据源-->
        <property name="dataSource" ref="dataSource"/>
    </bean>
    <!--开启事务的注解扫描-->
    <tx:annotation-driven transaction-manager="txManager"/>
</beans>
编写测试程序,因为我们就想看配置是否成功以及能否成功转账,所以我们不配置Spring对junit的支持了
package com.powernode.bank.test;

import com.powernode.bank.service.AccountService;
import org.junit.Test;
import org.springframework.context.ApplicationContext;
import org.springframework.context.support.ClassPathXmlApplicationContext;

import java.lang.reflect.AccessibleObject;

/**
 * @author Bonbons
 * @version 1.0
 */
public class SMTest {
    @Test
    public void test(){
        ApplicationContext applicationContext = new ClassPathXmlApplicationContext("spring.xml");
        AccountService accountService = applicationContext.getBean("accountService", AccountService.class);
        accountService.transfer("act-001", "act-002", 1000.0);
    }
}
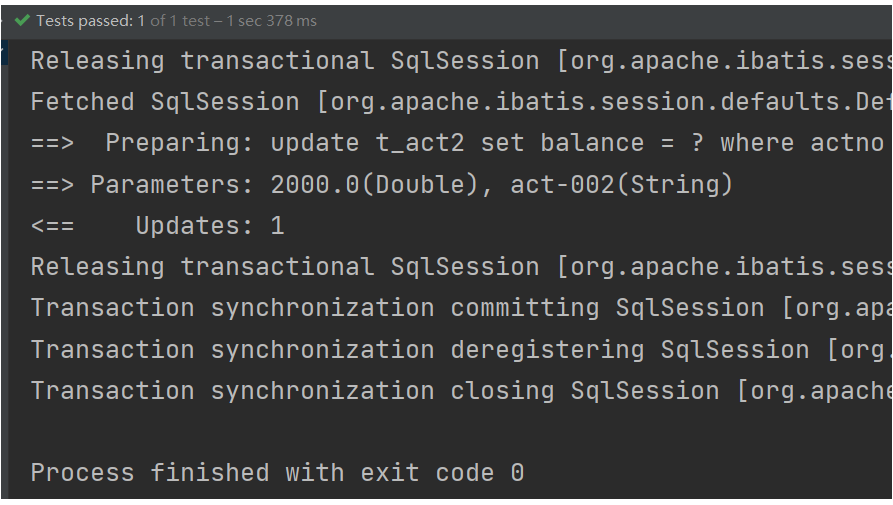
- 通过运行结果我们可以得知 >> 配置成功并成功完成转账操作
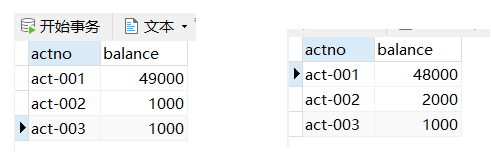
- 既然我们添加了事务,那么我们在转账处添加一个异常,测试发生异常是否会回滚
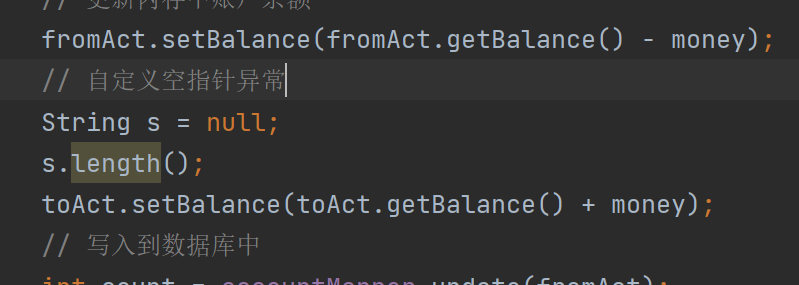
- 通过测试我们可以看到发生了回滚 >> 表中数据没有发生异常变动【如果没有回滚,那么用户1会少1000,但用户2的余额不会增加】

- 补充一个小知识点,就是IDEA中提供了直接操作数据库的插件
- 点击右侧DataBase,点击+选择数据库
- 第一次运行需要下载一些文件
- 然后输入用户名和密码就可以连接到我们的数据库
三、Spring中的八大模式
-
简单工厂模式
- BeanFactory的getBean()方法,通过唯一标识来获取Bean对象
- 是典型的简单工厂模式是静态工厂模式,但是不属于GoF23种设计模式
-
工厂方法模式
- FactoryBean是典型的工厂方法模式
- 在配置文件中通过factory-method属性来指定工厂方法,该方法是一个实例方法
-
单例模式
- Spring用的是双重判断加锁的单例模式
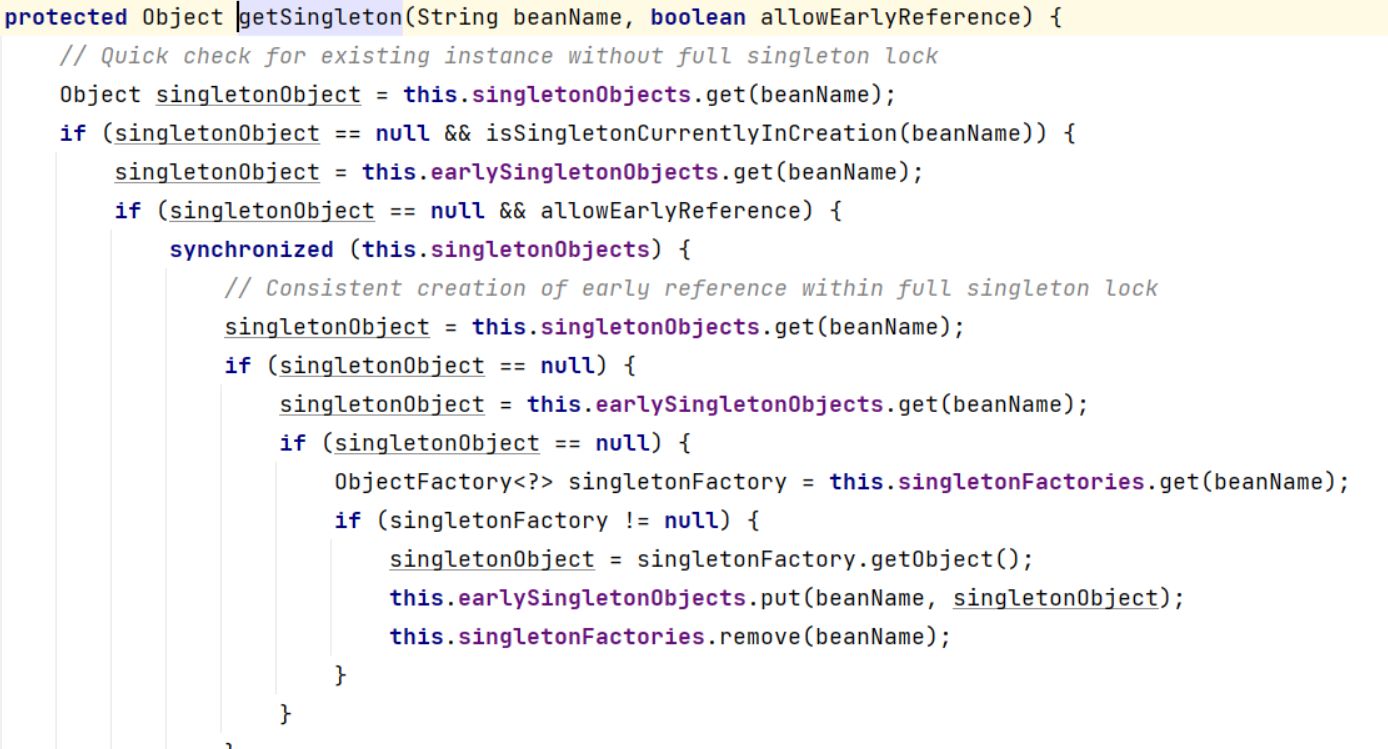
- Spring用的是双重判断加锁的单例模式
-
代理模式
- Spring的AOP就是使用了动态代理实现的【让其他对象代替完成操作】
-
装饰器模式
- JavaSE中的IO流是非常典型的装饰器模式,在尽可能少修改原有类代码下的情况下,做到动态切换
- Spring中类名中带有:Decorator和Wrapper单词的类,都是装饰器模式
-
观察者模式
- 定义对象间的一对多的关系,当一个对象的状态发生改变时,所有依赖于它的对象都得到通知并自动更新
- Spring中观察者模式一般用在listener的实现【Spring中的事件编程模型】
-
策略模式
- 策略模式是行为性模式,调用不同的方法,适应行为的变化 ,强调父类的调用子类的特性
-
模板方法模式
- Spring中的JdbcTemplate类就是一个模板方法设计模式的体现
- 在模板类的模板方法execute中编写核心算法,具体的实现步骤在子类中完成

![[LeetCode/力扣][Java] 0315. 计算右侧小于当前元素的个数(Count of Smaller Numbers After Self)](https://img-blog.csdnimg.cn/1e020d625eac4cf6aa7dc4c23935f875.png#pic_center)
