官网:https://spring.io/projects/spring-boot
Spring Boot可以轻松创建独立的、基于Spring的生产级应用程序,它可以让你“运行即可”。大多数Spring Boot应用程序只需要少量的Spring配置。
SpringBoot功能:
- 创建独立的Spring应用程序
- 直接嵌入Tomcat、Jetty或Undertow(无需部署WAR包,打包成Jar本身就是一个可以运行的应用程序)
- 提供一站式的“starter”依赖项,以简化Maven配置(需要整合什么框架,直接导对应框架的starter依赖)
- 尽可能自动配置Spring和第三方库(除非特殊情况,否则几乎不需要你进行什么配置)
- 提供生产就绪功能,如指标、运行状况检查和外部化配置
- 没有代码生成,也没有XML配置的要求(XML是什么,好吃吗)
SpringBoot是现在最主流的开发框架,它提供了一站式的开发体验,大幅度提高了我们的开发效率。
走进SpringBoot
在SSM阶段,当我们需要搭建一个基于Spring全家桶的Web应用程序时,我们不得不做大量的依赖导入和框架整合相关的Bean定义,光是整合框架就花费了我们大量的时间,但是实际上我们发现,整合框架其实基本都是一些固定流程,我们每创建一个新的Web应用程序,基本都会使用同样的方式去整合框架,我们完全可以将一些重复的配置作为约定,只要框架遵守这个约定,为我们提供默认的配置就好,这样就不用我们再去配置了,约定优于配置!
而SpringBoot正是将这些过程大幅度进行了简化,它可以自动进行配置,我们只需要导入对应的启动器(starter)依赖即可。
完成本阶段的学习,基本能够胜任部分网站系统的后端开发工作,也建议同学们学习完SpringBoot之后寻找合适的队友去参加计算机项目相关的高校竞赛。
我们可以通过IDEA来演示如何快速创建一个SpringBoot项目,并且无需任何配置,就可以实现Bean注册。
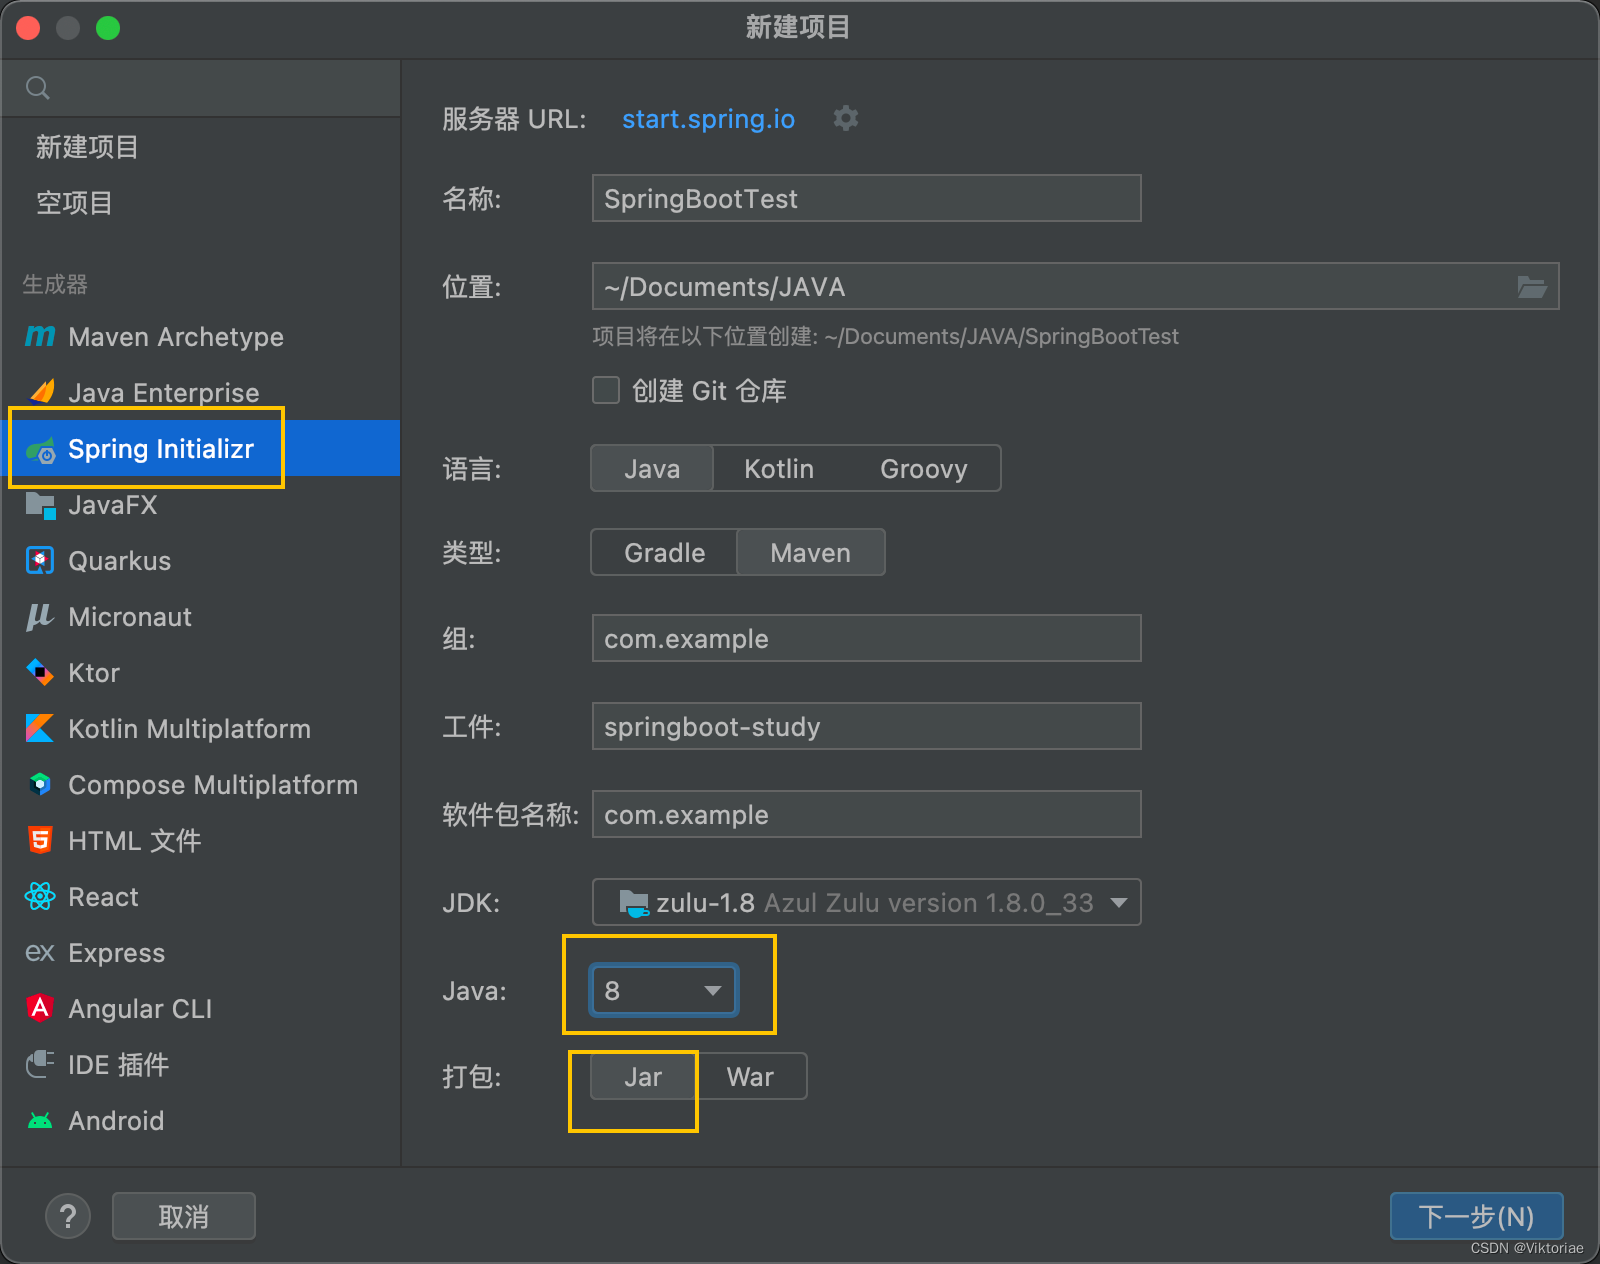
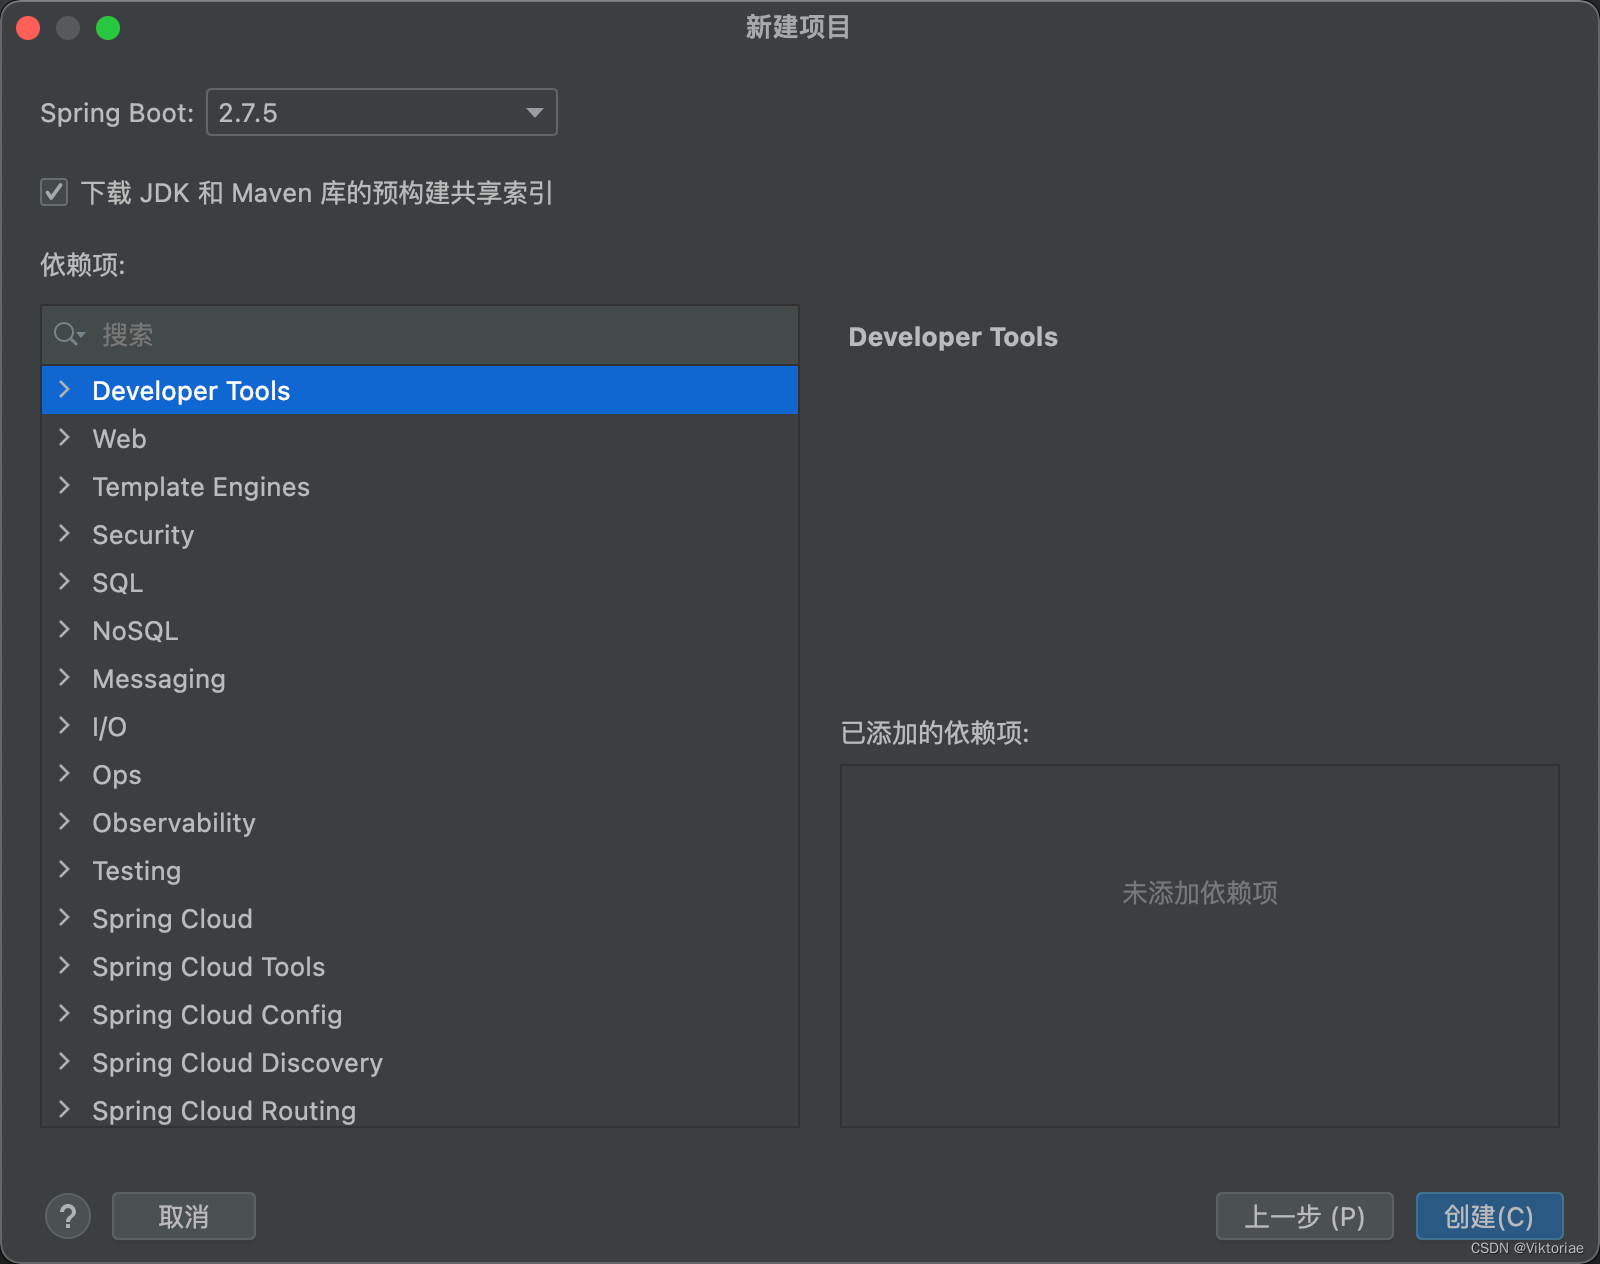
SpringBoot项目文件结构
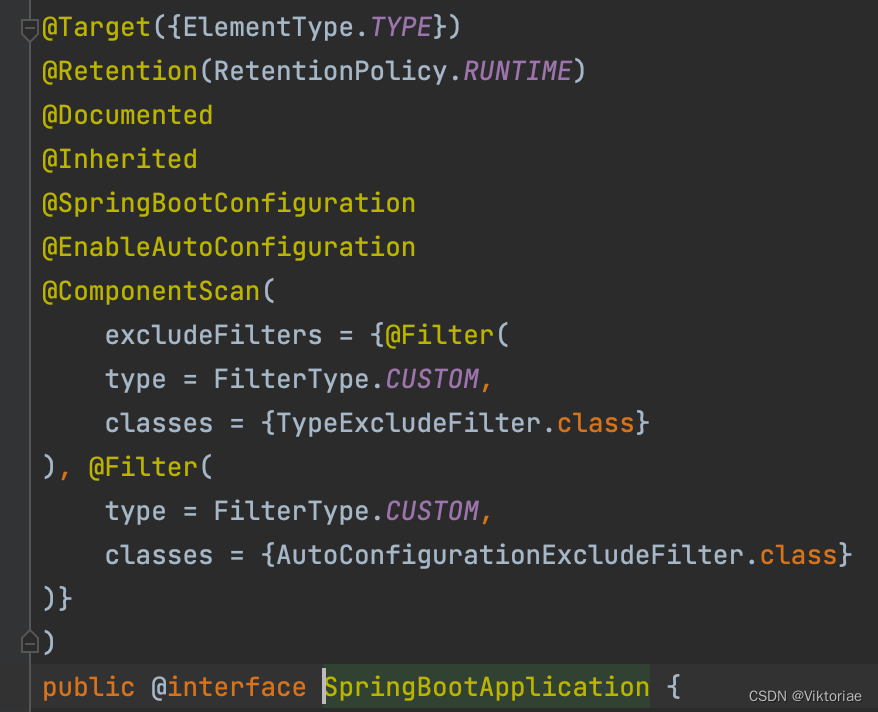
我们在创建SpringBoot项目之后,首先会自动生成一个主类,而主类中的main方法中调用了SpringApplication类的静态方法来启动整个SpringBoot项目,并且我们可以看到主类的上方有一个@SpringBootApplication注解:
@SpringBootApplication
public class SpringBootTestApplication {

    public static void main(String[] args) {
        SpringApplication.run(SpringBootTestApplication.class, args);
    }

}
同时还自带了一个测试类,测试类的上方仅添加了一个@SpringBootTest注解:
@SpringBootTest
class SpringBootTestApplicationTests {

    @Test
    void contextLoads() {

    }

}
我们接着来看Maven中写了哪些内容:
(可以看到它有一个父工程spring-boot-dependencies,点进去还有父工程)
<?xml version="1.0" encoding="UTF-8"?>
<project xmlns="http://maven.apache.org/POM/4.0.0" xmlns:xsi="http://www.w3.org/2001/XMLSchema-instance"
         xsi:schemaLocation="http://maven.apache.org/POM/4.0.0 https://maven.apache.org/xsd/maven-4.0.0.xsd">
    <modelVersion>4.0.0</modelVersion>
  	<!--  父工程  -->
    <parent>
        <groupId>org.springframework.boot</groupId>
        <artifactId>spring-boot-starter-parent</artifactId>
        <version>2.6.2</version>
        <relativePath/> <!-- lookup parent from repository -->
    </parent>
    <groupId>com.example</groupId>
    <artifactId>springboot-study</artifactId>
    <version>0.0.1-SNAPSHOT</version>
    <name>SpringBootTest</name>
    <description>SpringBootTest</description>
    <properties>
        <java.version>1.8</java.version>
    </properties>
    <dependencies>
        <!--  spring-boot-starter SpringBoot核心启动器  -->
        <dependency>
            <groupId>org.springframework.boot</groupId>
            <artifactId>spring-boot-starter</artifactId>
        </dependency>
        <!--  spring-boot-starter-test SpringBoot测试模块启动器  -->
        <dependency>
            <groupId>org.springframework.boot</groupId>
            <artifactId>spring-boot-starter-test</artifactId>
            <scope>test</scope>
        </dependency>
    </dependencies>

    <build>
        <plugins>
            <!--  SpringBoot Maven插件,打包Jar都不用你操心了   -->
            <plugin>
                <groupId>org.springframework.boot</groupId>
                <artifactId>spring-boot-maven-plugin</artifactId>
            </plugin>
        </plugins>
    </build>

</project>
除了以上这些文件以外,我们的项目目录下还有:
(mvnw和mvnw.cmd和HELP.md可以直接删除)
- .gitignore - Git忽略名单,下一章我们会专门讲解Git版本控制。
- application.properties - SpringBoot的配置文件,所有依赖的配置都在这里编写,但是一般情况下只需要配置必要项即可。
整合Web相关框架
我们来看一下,既然我们前面提到SpringBoot会内嵌一个Tomcat服务器,也就是说我们的Jar打包后,相当于就是一个可以直接运行的应用程序,我们来看一下如何创建一个SpringBootWeb项目。
这里我们演示使用IDEA来创建一个基于SpringBoot的Web应用程序。
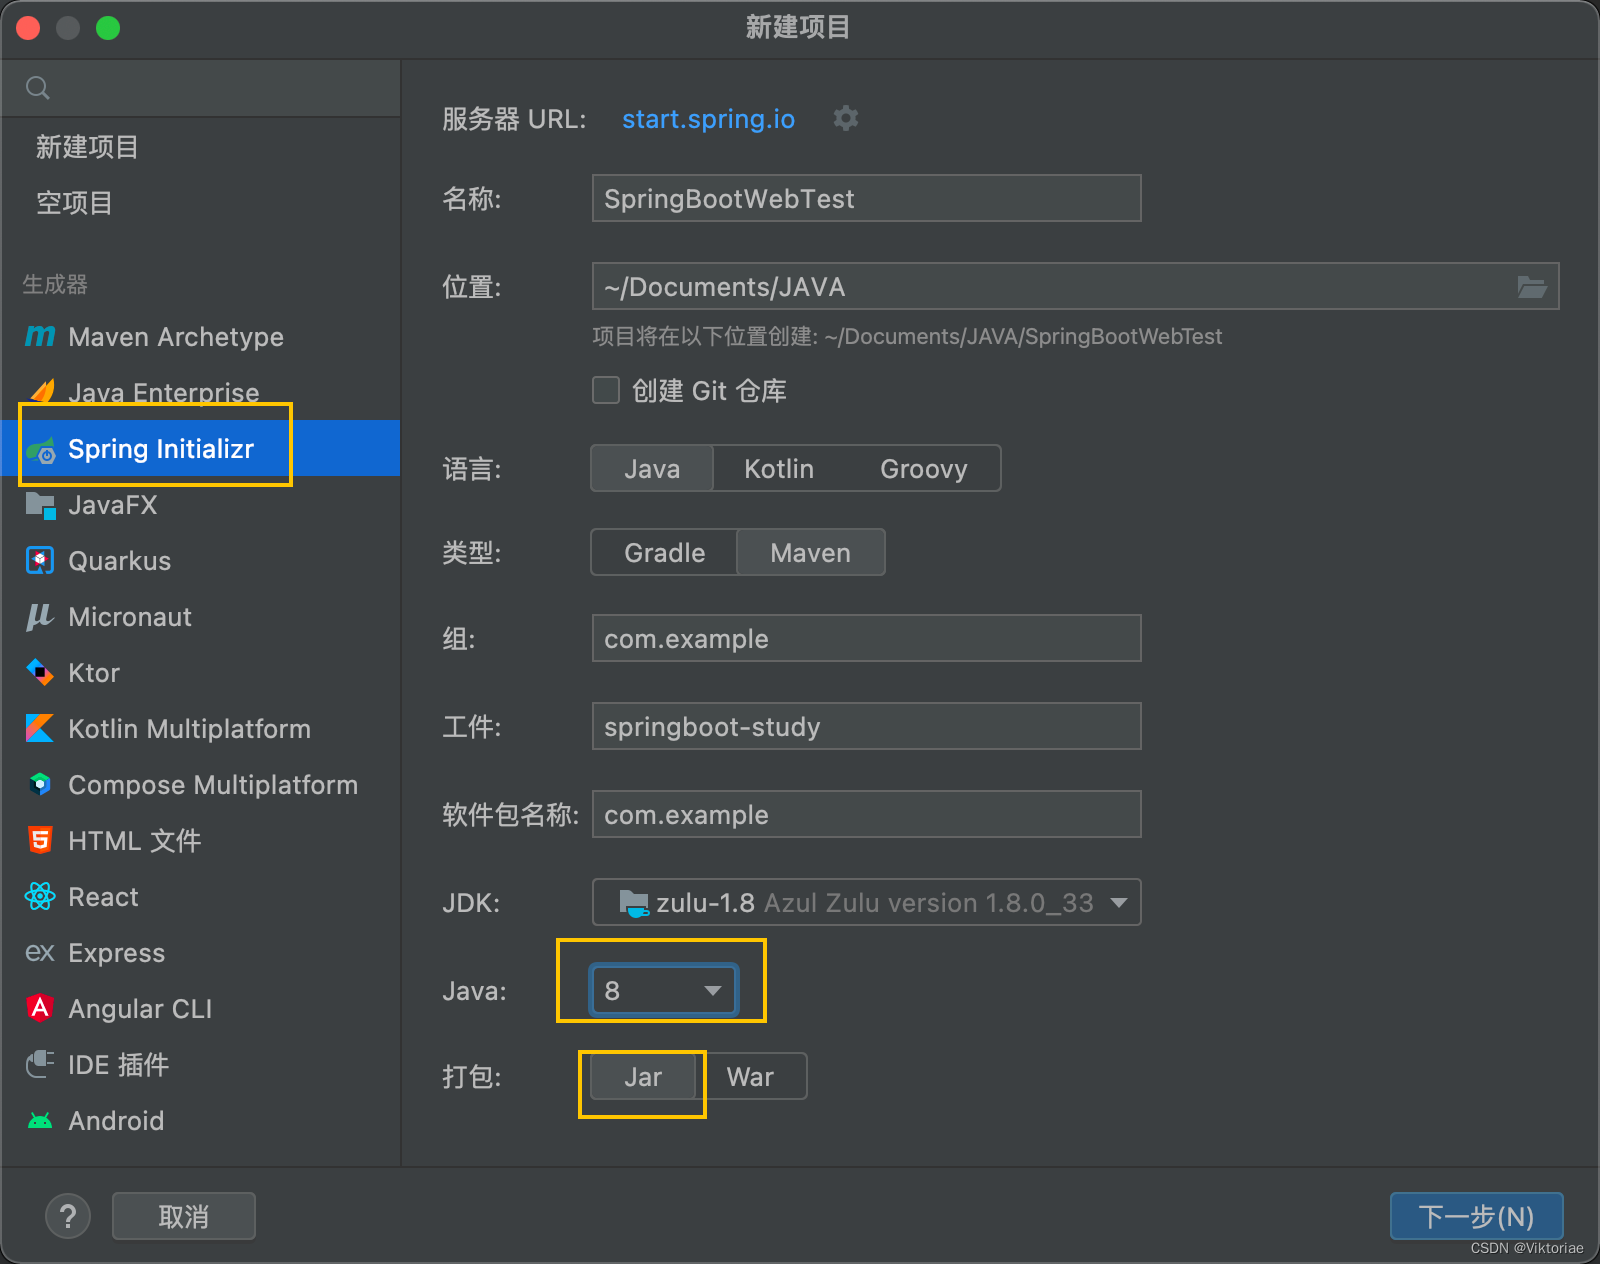
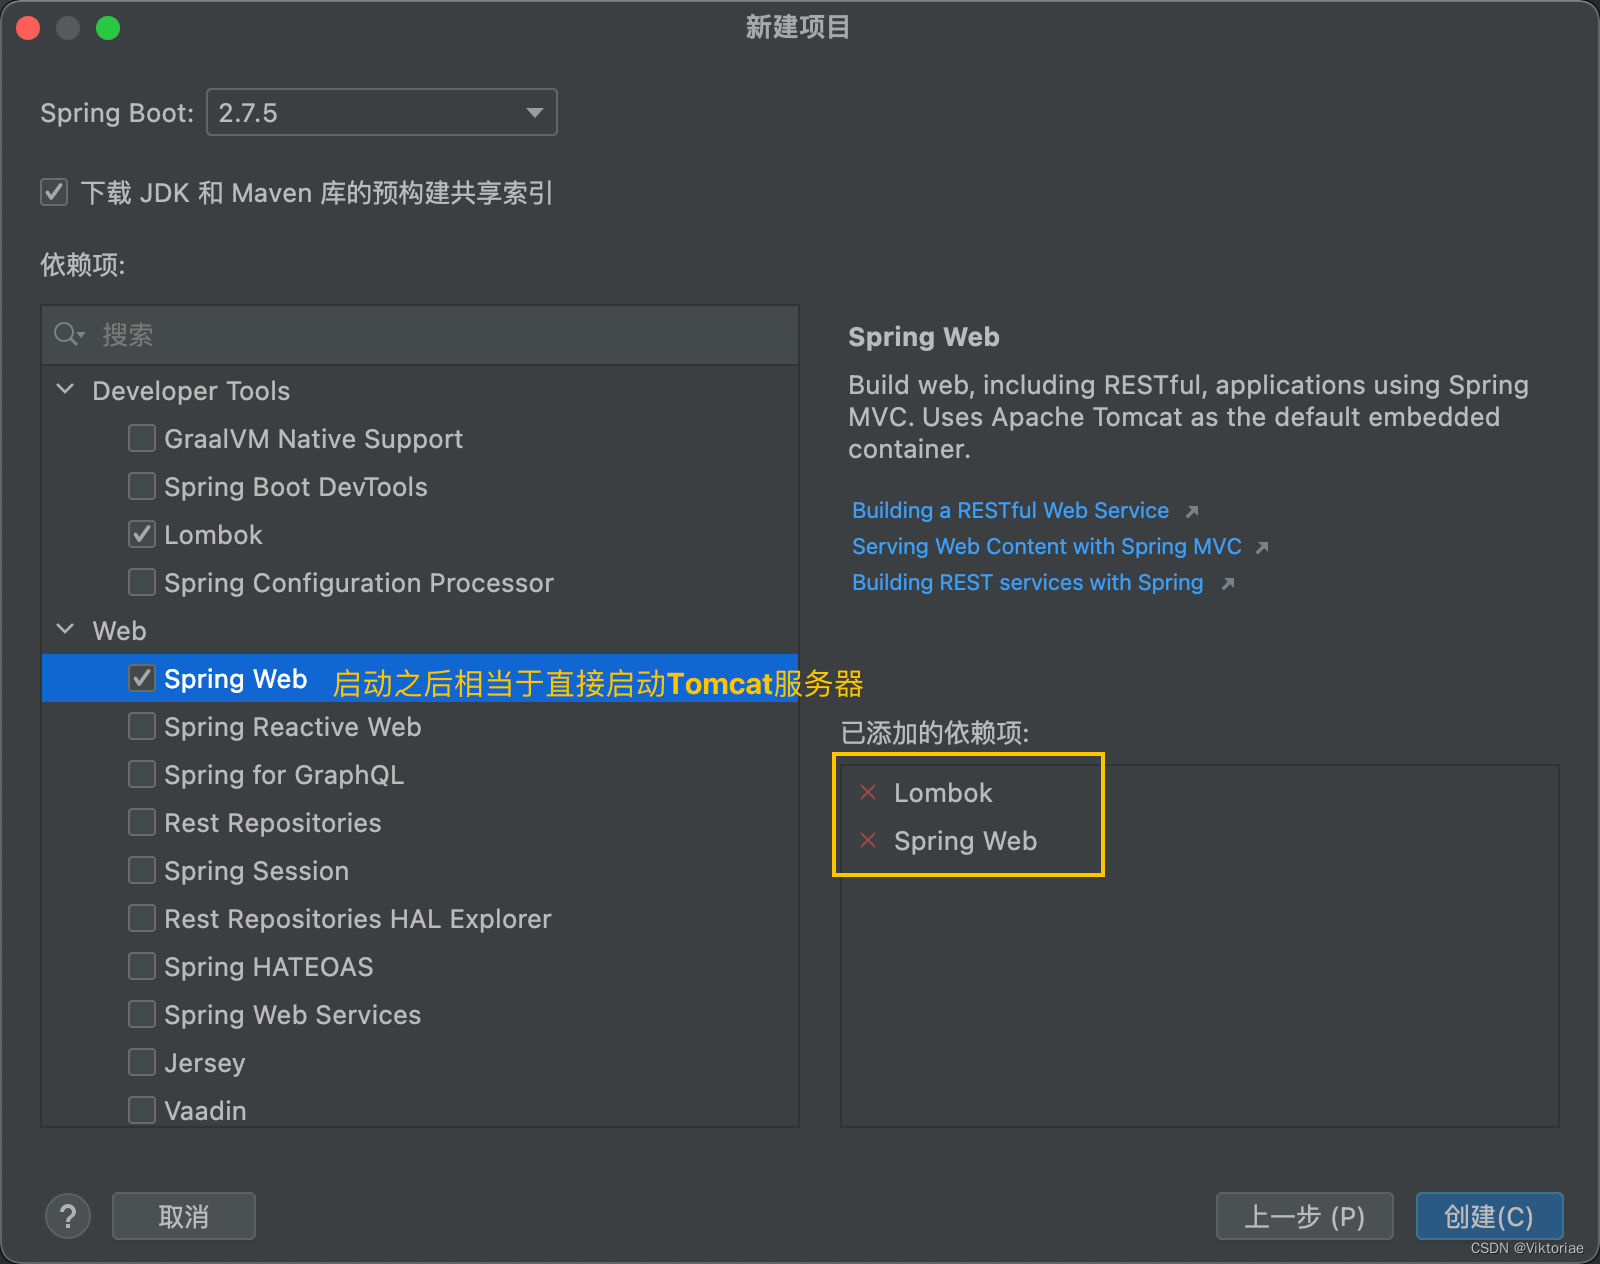
(然后把 .mvn、HELP.md、mvnw、mvnw.cmd都删除)
1、它是真的快
创建完成后,直接开启项目,我们就可以直接访问:http://localhost:8080/,我们可以看到,但是由于我们没有编写任何的请求映射,所以没有数据。我们可以来看看日志:
2022-01-06 22:17:46.308  INFO 853 --- [           main] c.example.SpringBootWebTestApplication   : Starting SpringBootWebTestApplication using Java 1.8.0_312 on NagodeMacBook-Pro.local with PID 853 (/Users/nagocoler/Downloads/SpringBootWebTest/target/classes started by nagocoler in /Users/nagocoler/Downloads/SpringBootWebTest)
2022-01-06 22:17:46.309  INFO 853 --- [           main] c.example.SpringBootWebTestApplication   : No active profile set, falling back to default profiles: default
2022-01-06 22:17:46.629  INFO 853 --- [           main] o.s.b.w.embedded.tomcat.TomcatWebServer  : Tomcat initialized with port(s): 8080 (http)
2022-01-06 22:17:46.632  INFO 853 --- [           main] o.apache.catalina.core.StandardService   : Starting service [Tomcat]
2022-01-06 22:17:46.632  INFO 853 --- [           main] org.apache.catalina.core.StandardEngine  : Starting Servlet engine: [Apache Tomcat/9.0.56]
2022-01-06 22:17:46.654  INFO 853 --- [           main] o.a.c.c.C.[Tomcat].[localhost].[/]       : Initializing Spring embedded WebApplicationContext
2022-01-06 22:17:46.654  INFO 853 --- [           main] w.s.c.ServletWebServerApplicationContext : Root WebApplicationContext: initialization completed in 325 ms
2022-01-06 22:17:46.780  INFO 853 --- [           main] o.s.b.w.embedded.tomcat.TomcatWebServer  : Tomcat started on port(s): 8080 (http) with context path ''
2022-01-06 22:17:46.785  INFO 853 --- [           main] c.example.SpringBootWebTestApplication   : Started SpringBootWebTestApplication in 0.62 seconds (JVM running for 0.999)
2022-01-06 22:18:02.979  INFO 853 --- [nio-8080-exec-1] o.a.c.c.C.[Tomcat].[localhost].[/]       : Initializing Spring DispatcherServlet 'dispatcherServlet'
2022-01-06 22:18:02.979  INFO 853 --- [nio-8080-exec-1] o.s.web.servlet.DispatcherServlet        : Initializing Servlet 'dispatcherServlet'
2022-01-06 22:18:02.980  INFO 853 --- [nio-8080-exec-1] o.s.web.servlet.DispatcherServlet        : Completed initialization in 1 ms
我们可以看到,日志中除了最基本的SpringBoot启动日志以外,还新增了内嵌Web服务器(Tomcat)的启动日志,并且显示了当前Web服务器所开放的端口,并且自动帮助我们初始化了DispatcherServlet,但是我们只是创建了项目,导入了web相关的starter依赖,没有进行任何的配置,实际上它使用的是starter提供的默认配置进行初始化的。
由于SpringBoot是自动扫描的,因此我们直接创建一个Controller即可被加载:
@Controller
public class MainController {

  	//直接访问http://localhost:8080/index即可,不用加web应用程序名称了
    @RequestMapping("/index")
    @ResponseBody
    public String index(){
        return "你好,欢迎访问主页!";
    }
}
我们几乎没有做任何配置,但是可以直接开始配置Controller,SpringBoot创建一个Web项目的速度就是这么快!
它还可以自动识别类型,如果我们返回的是一个对象类型的数据,那么它会自动转换为JSON数据格式,无需配置:
@Data
public class Student {
    int sid;
    String name;
    String sex;
}
@RequestMapping("/student")
@ResponseBody
public Student student(){
    Student student = new Student();
    student.setName("小明");
    student.setSex("男");
    student.setSid(10);
    return student;
}
最后浏览器能够直接得到application/json的响应数据,就是这么方便。
2、修改Web相关配置
如果我们需要修改Web服务器的端口或是一些其他的内容,我们可以直接在application.properties中进行修改,它是整个SpringBoot的配置文件:
# 修改端口为80
server.port=80
我们还可以编写自定义的配置项,并在我们的项目中通过@Value直接注入:
test.data=100
@Controller
public class MainController {

    @Value("${test.data}")
    int data;
通过这种方式,我们就可以更好地将一些需要频繁修改的配置项写在配置文件中,并通过注解方式去获取值。
配置文件除了使用properties格式以外,还有一种叫做yaml格式,它的语法如下:
一级目录:
	二级目录:
	  三级目录1: 值
	  三级目录2: 值
	  三级目录List:
	  - 元素1
	  - 元素2
	  - 元素3
我们可以看到,每一级目录都是通过缩进(不能使用Tab,只能使用空格)区分,并且键和值之间需要添加冒号+空格来表示。
SpringBoot也支持这种格式的配置文件,我们可以将application.properties修改为application.yml或是application.yaml来使用YAML语法编写配置:
server:
  port: 80
3、整合SpringSecurity依赖
我们接着来整合一下SpringSecurity依赖,继续感受SpringBoot带来的光速开发体验,只需要导入SpringSecurity的Starter依赖即可:
<dependency>
    <groupId>org.springframework.boot</groupId>
    <artifactId>spring-boot-starter-security</artifactId>
</dependency>
导入依赖后,我们直接启动SpringBoot应用程序,可以发现SpringSecurity已经生效了。
并且SpringSecurity会自动为我们生成一个默认用户user,它的密码会出现在日志中:
2022-01-06 23:10:51.329  INFO 2901 --- [           main] o.apache.catalina.core.StandardService   : Starting service [Tomcat]
2022-01-06 23:10:51.329  INFO 2901 --- [           main] org.apache.catalina.core.StandardEngine  : Starting Servlet engine: [Apache Tomcat/9.0.56]
2022-01-06 23:10:51.350  INFO 2901 --- [           main] o.a.c.c.C.[Tomcat].[localhost].[/]       : Initializing Spring embedded WebApplicationContext
2022-01-06 23:10:51.351  INFO 2901 --- [           main] w.s.c.ServletWebServerApplicationContext : Root WebApplicationContext: initialization completed in 341 ms
2022-01-06 23:10:51.469  INFO 2901 --- [           main] .s.s.UserDetailsServiceAutoConfiguration :

Using generated security password: ff24bee3-e1b7-4309-9609-d32618baf5cb
其中ff24bee3-e1b7-4309-9609-d32618baf5cb就是随机生成的一个密码,我们可以使用此用户登录。
我们也可以在配置文件中直接配置:
spring:
  security:
    user:
      name: test   # 用户名
      password: 123456  # 密码
      roles:   # 角色
      - user
      - admin
实际上这样的配置方式就是一个inMemoryAuthentication,只是我们可以直接配置而已。
当然,页面的控制和数据库验证我们还是需要提供WebSecurityConfigurerAdapter的实现类去完成:
@Configuration
public class SecurityConfiguration extends WebSecurityConfigurerAdapter {

    @Override
    protected void configure(HttpSecurity http) throws Exception {
        http
                .authorizeRequests()
                .antMatchers("/login").permitAll()
                .anyRequest().hasRole("user")
                .and()
                .formLogin();
    }
}
注意这里不需要再添加@EnableWebSecurity了,因为starter依赖已经帮我们添加了。
使用了SpringBoot之后,我们发现,需要什么功能,只需要导入对应的starter依赖即可,甚至都不需要你去进行额外的配置,你只需要关注依赖本身的必要设置即可,大大提高了我们的开发效率。



![CSS3专题-[上篇]:过渡、2D转换、动画](https://img-blog.csdnimg.cn/3d05608f9f534bd9a65698339e24913a.gif)
