介 绍
之前我们介绍了使用YOLOv9与 ByteTrack 结合进行对象跟踪的概念,展示了这两种强大的技术如何有效地协同工作。现在,让我们通过探索与 ByteTrack 结合的 YOLOv11 来进一步了解这一概念。
实战 | 基于YOLOv9和OpenCV实现车辆跟踪计数(步骤 + 源码)
YOLOv11(You Only Look Once,版本 11)代表了物体识别技术的最新进展,进一步突破了速度和准确性的界限。YOLOv11 就像是我们增强的眼睛,能够以无与伦比的准确性同时快速识别和分类多个物体。
ByteTrack 是对这一强大检测能力的补充,它是一种先进的跟踪算法,可以无缝连接 YOLOv11 的跨帧检测。ByteTrack 充当视觉背后的大脑,一丝不苟地处理检测,并在物体穿过场景时保持一致的物体身份。
本文中我们将逐步指导您使用 YOLOv11 和 ByteTrack 实现卓越的实时对象跟踪性能。
入门
步骤 1:安装库
pip install opencv-python ultralytics步骤 2:导入库
import cv2from ultralytics import YOLO
步骤 3:加载模型
model = YOLO('yolo11l-seg.pt') # Load an official Segment model在下面网站上,你可以从各种模型中进行选择。在本例中,我们选择了 yolo11l-seg.pt。
https://docs.ultralytics.com/models/yolo11/#supported-tasks-and-modes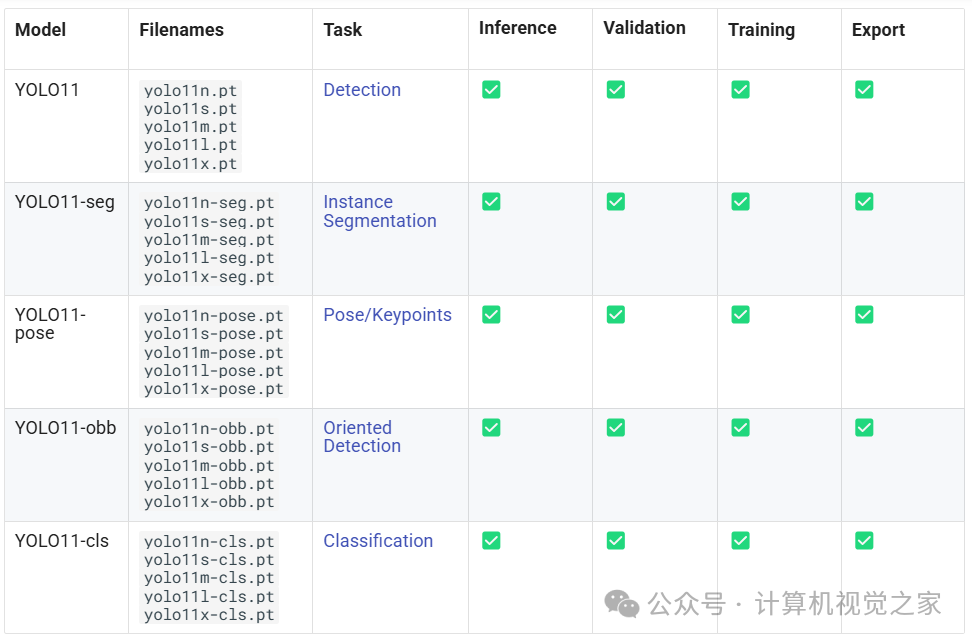
第 4 步:设置视频文件路径
# open the video filevideo_path = r"YourVideoPath"cap = cv2.VideoCapture(video_path)
步骤 5:循环播放视频帧
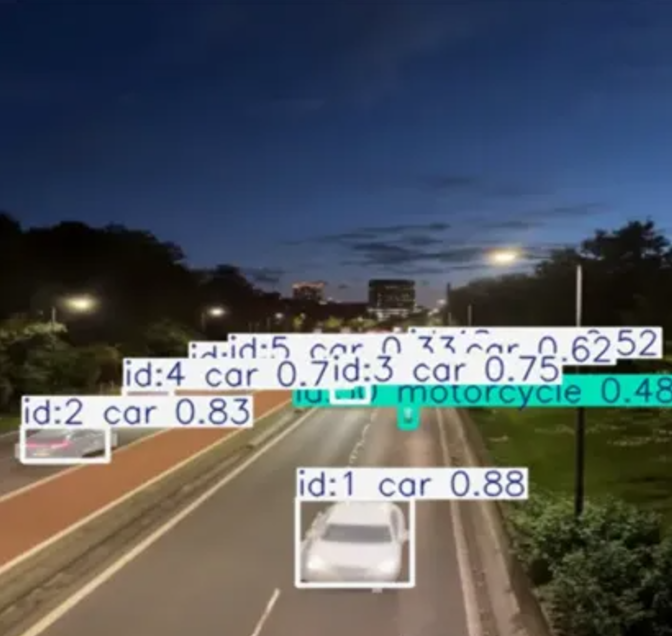
while cap.isOpened():# Read a frame from the videosuccess, frame = cap.read()if success:frame = cv2.resize(frame, (416, 416))# Run YOLOv9 tracking on the frame, persisting tracks between framesconf = 0.2iou = 0.5results = model.track(frame, persist=True, conf=conf, iou=iou, show=False, tracker="bytetrack.yaml")# Visualize the results on the frameannotated_frame = results[0].plot()# Display the annotated framecv2.imshow("YOLOv11 Tracking", annotated_frame)cv2.waitKey(1)
完整代码:
import cv2from ultralytics import YOLOmodel = YOLO('yolo11l-seg.pt') # Load an official Segment model# open the video filevideo_path = r"DeinVideoPfad"cap = cv2.VideoCapture(video_path)while cap.isOpened():# Read a frame from the videosuccess, frame = cap.read()if success:frame = cv2.resize(frame, (416, 416))# Run YOLOv9 tracking on the frame, persisting tracks between framesconf = 0.2iou = 0.5results = model.track(frame, persist=True, conf=conf, iou=iou, show=False, tracker="bytetrack.yaml")# Visualize the results on the frameannotated_frame = results[0].plot()# Display the annotated framecv2.imshow("YOLOv11 Tracking", annotated_frame)cv2.waitKey(1)
转自:基于YOLOv11 和 ByteTrack 实现目标跟踪

![[密码学实战]密评考试训练系统v1.0程序及密评参考题库(获取路径在文末)](https://i-blog.csdnimg.cn/direct/b5725199526a44edba1e139533e708d8.png#pic_center)