项目被拆分开,需要一个授权中心使得每个项目都去授权中心登录获取用户权限。而单一项目里权限使用的是spring-security来控制的,每个controller方法上都有
@PreAuthorize("hasAuthority('hello')")注解来控制权限,想以最小的改动来实现,就学习了一下spring-boot-starter-oauth2-authorization-server发现可以满足我的要求,下面是最简单的一个能跑通的案例。
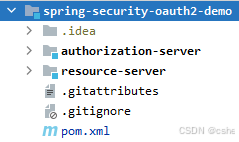
创建项目
创建一个maven项目,新建两个模块
- authorization-server
- resource-server
创建好结构如下图
根目录下的pom.xml内容
<?xml version="1.0" encoding="UTF-8"?>
<project xmlns="http://maven.apache.org/POM/4.0.0" xmlns:xsi="http://www.w3.org/2001/XMLSchema-instance"
         xsi:schemaLocation="http://maven.apache.org/POM/4.0.0 https://maven.apache.org/xsd/maven-4.0.0.xsd">
    <modelVersion>4.0.0</modelVersion>
    <parent>
        <groupId>org.springframework.boot</groupId>
        <artifactId>spring-boot-starter-parent</artifactId>
        <version>3.2.4</version>
        <relativePath/> <!-- lookup parent from repository -->
    </parent>

    <groupId>com.example</groupId>
    <artifactId>spring-security-oauth2-demo</artifactId>
    <version>0.0.1-SNAPSHOT</version>
    <name>spring-security-oauth2-demo</name>
    <description>spring-security-oauth2-demo</description>
    <packaging>pom</packaging>

    <modules>
        <module>authorization-server</module>
        <module>resource-server</module>
    </modules>

    <properties>
        <java.version>17</java.version>
    </properties>
    <dependencies>
        <dependency>
            <groupId>org.springframework.boot</groupId>
            <artifactId>spring-boot-starter-security</artifactId>
        </dependency>
        <dependency>
            <groupId>org.springframework.boot</groupId>
            <artifactId>spring-boot-starter-web</artifactId>
        </dependency>
        <dependency>
            <groupId>org.springframework.boot</groupId>
            <artifactId>spring-boot-starter-webflux</artifactId>
        </dependency>

        <dependency>
            <groupId>org.springframework.boot</groupId>
            <artifactId>spring-boot-configuration-processor</artifactId>
            <optional>true</optional>
        </dependency>
        <dependency>
            <groupId>org.projectlombok</groupId>
            <artifactId>lombok</artifactId>
            <optional>true</optional>
        </dependency>
        <dependency>
            <groupId>org.springframework.boot</groupId>
            <artifactId>spring-boot-starter-test</artifactId>
            <scope>test</scope>
        </dependency>
        <dependency>
            <groupId>org.springframework.security</groupId>
            <artifactId>spring-security-test</artifactId>
            <scope>test</scope>
        </dependency>
    </dependencies>

    <build>
        <plugins>
            <plugin>
                <groupId>org.apache.maven.plugins</groupId>
                <artifactId>maven-compiler-plugin</artifactId>
                <configuration>
                    <annotationProcessorPaths>
                        <path>
                            <groupId>org.springframework.boot</groupId>
                            <artifactId>spring-boot-configuration-processor</artifactId>
                        </path>
                        <path>
                            <groupId>org.projectlombok</groupId>
                            <artifactId>lombok</artifactId>
                        </path>
                    </annotationProcessorPaths>
                </configuration>
            </plugin>
            <plugin>
                <groupId>org.springframework.boot</groupId>
                <artifactId>spring-boot-maven-plugin</artifactId>
                <configuration>
                    <excludes>
                        <exclude>
                            <groupId>org.projectlombok</groupId>
                            <artifactId>lombok</artifactId>
                        </exclude>
                    </excludes>
                </configuration>
            </plugin>
        </plugins>
    </build>

</project>
授权中心
模块 authorization-server 为授权中心 pom.xml内容
<?xml version="1.0" encoding="UTF-8"?>
<project xmlns="http://maven.apache.org/POM/4.0.0" xmlns:xsi="http://www.w3.org/2001/XMLSchema-instance"
         xsi:schemaLocation="http://maven.apache.org/POM/4.0.0 https://maven.apache.org/xsd/maven-4.0.0.xsd">
    <modelVersion>4.0.0</modelVersion>
    <parent>
        <groupId>com.example</groupId>
        <artifactId>spring-security-oauth2-demo</artifactId>
        <version>0.0.1-SNAPSHOT</version>
    </parent>
    <artifactId>authorization-server</artifactId>
    <name>authorization-server</name>
    <description>authorization-server</description>

    <properties>
        <java.version>17</java.version>
    </properties>
    <dependencies>

        <dependency>
            <groupId>org.springframework.boot</groupId>
            <artifactId>spring-boot-starter-oauth2-authorization-server</artifactId>
        </dependency>
    </dependencies>

    <build>
        <plugins>
            <plugin>
                <groupId>org.springframework.boot</groupId>
                <artifactId>spring-boot-maven-plugin</artifactId>
            </plugin>
        </plugins>
    </build>

</project>
application.yml
server:
  port: 9000
  servlet:
    session:
      cookie:
        name: AuthorizationServer

spring:
  security:
    user:
      name: admin
      password: admin

logging:
  level:
    root: INFO
    org.springframework.web: DEBUG
    org.springframework.security: DEBUG
    org.springframework.security.oauth2: DEBUG
创建配置类 AuthorizationServerConfig
import org.springframework.context.annotation.Bean;
import org.springframework.context.annotation.Configuration;
import org.springframework.core.annotation.Order;
import org.springframework.security.config.Customizer;
import org.springframework.security.config.annotation.web.builders.HttpSecurity;
import org.springframework.security.config.annotation.web.configuration.EnableWebSecurity;
import org.springframework.security.core.GrantedAuthority;
import org.springframework.security.core.userdetails.User;
import org.springframework.security.core.userdetails.UserDetails;
import org.springframework.security.core.userdetails.UserDetailsService;
import org.springframework.security.crypto.password.NoOpPasswordEncoder;
import org.springframework.security.crypto.password.PasswordEncoder;
import org.springframework.security.oauth2.core.AuthorizationGrantType;
import org.springframework.security.oauth2.core.ClientAuthenticationMethod;
import org.springframework.security.oauth2.core.oidc.OidcScopes;
import org.springframework.security.oauth2.server.authorization.client.InMemoryRegisteredClientRepository;
import org.springframework.security.oauth2.server.authorization.client.RegisteredClient;
import org.springframework.security.oauth2.server.authorization.client.RegisteredClientRepository;
import org.springframework.security.oauth2.server.authorization.config.annotation.web.configuration.OAuth2AuthorizationServerConfiguration;
import org.springframework.security.oauth2.server.authorization.config.annotation.web.configurers.OAuth2AuthorizationServerConfigurer;
import org.springframework.security.oauth2.server.authorization.settings.AuthorizationServerSettings;
import org.springframework.security.oauth2.server.authorization.settings.ClientSettings;
import org.springframework.security.oauth2.server.authorization.settings.OAuth2TokenFormat;
import org.springframework.security.oauth2.server.authorization.settings.TokenSettings;
import org.springframework.security.oauth2.server.authorization.token.JwtEncodingContext;
import org.springframework.security.oauth2.server.authorization.token.OAuth2TokenCustomizer;
import org.springframework.security.provisioning.InMemoryUserDetailsManager;
import org.springframework.security.web.SecurityFilterChain;
import org.springframework.security.web.authentication.LoginUrlAuthenticationEntryPoint;
import java.time.Duration;
import java.util.Collection;
import java.util.List;
import java.util.UUID;
import java.util.stream.Collectors;
@Configuration
@EnableWebSecurity
public class AuthorizationServerConfig {
@Bean
@Order(1)
public SecurityFilterChain authorizationServerSecurityFilterChain(HttpSecurity http) throws Exception {
OAuth2AuthorizationServerConfiguration.applyDefaultSecurity(http);
http.getConfigurer(OAuth2AuthorizationServerConfigurer.class)
.oidc(Customizer.withDefaults());
http.exceptionHandling(exceptions ->
exceptions.authenticationEntryPoint(new LoginUrlAuthenticationEntryPoint("/login")))
.oauth2ResourceServer(oauth2 -> oauth2.jwt(Customizer.withDefaults()));
return http.build();
}
@Bean
@Order(2)
public SecurityFilterChain defaultSecurityFilterChain(HttpSecurity http) throws Exception {
http
.authorizeHttpRequests(authorize -> authorize
.anyRequest().authenticated()
)
.formLogin(Customizer.withDefaults());
return http.build();
}
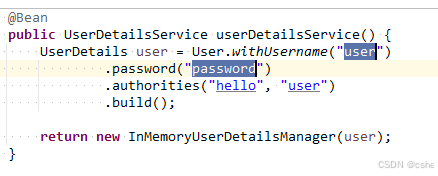
@Bean
public UserDetailsService userDetailsService() {
UserDetails user = User.withUsername("user")
.password("password")
.authorities("hello", "user")
.build();
return new InMemoryUserDetailsManager(user);
}
@Bean
public PasswordEncoder passwordEncoder() {
return NoOpPasswordEncoder.getInstance();
}
@Bean
public RegisteredClientRepository registeredClientRepository() {
RegisteredClient client = RegisteredClient.withId(UUID.randomUUID().toString())
.clientId("client")
.clientSecret("secret")
.clientAuthenticationMethod(ClientAuthenticationMethod.CLIENT_SECRET_BASIC)
.authorizationGrantType(AuthorizationGrantType.AUTHORIZATION_CODE)
.authorizationGrantType(AuthorizationGrantType.REFRESH_TOKEN)
.redirectUri("http://localhost:8081/login/oauth2/code/client")
.scope(OidcScopes.OPENID)
.scope("user")
.clientSettings(ClientSettings.builder().requireAuthorizationConsent(true).build())
.tokenSettings(TokenSettings.builder()
.accessTokenFormat(OAuth2TokenFormat.SELF_CONTAINED)
.accessTokenTimeToLive(Duration.ofHours(2))
.build())
.build();
return new InMemoryRegisteredClientRepository(client);
}
@Bean
public AuthorizationServerSettings authorizationServerSettings() {
return AuthorizationServerSettings.builder()
.issuer("http://localhost:9000")
.build();
}
@Bean
public OAuth2TokenCustomizer<JwtEncodingContext> jwtCustomizer() {
return context -> {
if (context.getTokenType().getValue().equals("access_token")) {
Collection<? extends GrantedAuthority> authorities = context.getPrincipal().getAuthorities();
List<String> authorityNames = authorities.stream()
.map(GrantedAuthority::getAuthority)
.collect(Collectors.toList());
context.getClaims().claim("authorities", authorityNames);
}
};
}
}
资源服务器
模块 resource-server 为资源服务器,pom.xml如下
<?xml version="1.0" encoding="UTF-8"?>
<project xmlns="http://maven.apache.org/POM/4.0.0" xmlns:xsi="http://www.w3.org/2001/XMLSchema-instance"
         xsi:schemaLocation="http://maven.apache.org/POM/4.0.0 https://maven.apache.org/xsd/maven-4.0.0.xsd">
    <modelVersion>4.0.0</modelVersion>
    <parent>
        <groupId>com.example</groupId>
        <artifactId>spring-security-oauth2-demo</artifactId>
        <version>0.0.1-SNAPSHOT</version>
    </parent>
    <artifactId>resource-server</artifactId>
    <name>resource-server</name>
    <description>resource-server</description>

    <properties>
        <java.version>17</java.version>
    </properties>
    <dependencies>
        <dependency>
            <groupId>org.springframework.boot</groupId>
            <artifactId>spring-boot-starter-oauth2-resource-server</artifactId>
        </dependency>
    </dependencies>

    <build>
        <plugins>
            <plugin>
                <groupId>org.springframework.boot</groupId>
                <artifactId>spring-boot-maven-plugin</artifactId>
            </plugin>
        </plugins>
    </build>

</project>
application.yml
server:
  port: 8081
  servlet:
    session:
      cookie:
        name: ResourceServer

logging:
  level:
    root: info
    org.springframework.web: debug
    org.springframework.security: debug
    org.springframework.security.oauth2: debug
写三个接口,两个需要不同权限,一个仅需要登录即可访问
import org.springframework.security.access.prepost.PreAuthorize;
import org.springframework.security.core.Authentication;
import org.springframework.security.core.context.SecurityContextHolder;
import org.springframework.web.bind.annotation.GetMapping;
import org.springframework.web.bind.annotation.RestController;

@RestController
public class DemoController {

    @GetMapping("/api/hello")
    @PreAuthorize("hasAuthority('hello')")
    public String hello() {
        return "Hello, you have 'hello' authority!";
    }

    @GetMapping("/api/user")
    @PreAuthorize("hasRole('user')")
    public String user() {
        return "Hello, you have 'user' role!";
    }

    @GetMapping("/api/test")
    public String test() {
        Authentication authentication = SecurityContextHolder.getContext().getAuthentication();
        return "Hello World";
    }
}
添加配置类
import org.springframework.context.annotation.Bean;
import org.springframework.context.annotation.Configuration;
import org.springframework.security.config.annotation.method.configuration.EnableMethodSecurity;
import org.springframework.security.config.annotation.web.builders.HttpSecurity;
import org.springframework.security.config.annotation.web.configuration.EnableWebSecurity;
import org.springframework.security.oauth2.server.resource.authentication.JwtAuthenticationConverter;
import org.springframework.security.oauth2.server.resource.authentication.JwtGrantedAuthoritiesConverter;
import org.springframework.security.web.SecurityFilterChain;

@Configuration
@EnableWebSecurity
@EnableMethodSecurity
public class ResourceServerConfig {

    @Bean
    public SecurityFilterChain securityFilterChain(HttpSecurity http) throws Exception {
        http
                .authorizeHttpRequests(authorize -> authorize
                        .anyRequest().authenticated()
                )
                .oauth2ResourceServer(oauth2 -> oauth2
                        .jwt(jwt -> jwt
                                .jwkSetUri("http://localhost:9000/oauth2/jwks")
                                .jwtAuthenticationConverter(jwtAuthenticationConverter()) // 使用自定义转换器
                        )
                );
        return http.build();
    }

    @Bean
    public JwtAuthenticationConverter jwtAuthenticationConverter() {
        JwtGrantedAuthoritiesConverter grantedAuthoritiesConverter = new JwtGrantedAuthoritiesConverter();
        grantedAuthoritiesConverter.setAuthoritiesClaimName("authorities"); // 指定JWT中权限字段名
        grantedAuthoritiesConverter.setAuthorityPrefix(""); // 去掉默认的"SCOPE_"前缀

        JwtAuthenticationConverter jwtAuthenticationConverter = new JwtAuthenticationConverter();
        jwtAuthenticationConverter.setJwtGrantedAuthoritiesConverter(grantedAuthoritiesConverter);
        return jwtAuthenticationConverter;
    }

}
测试
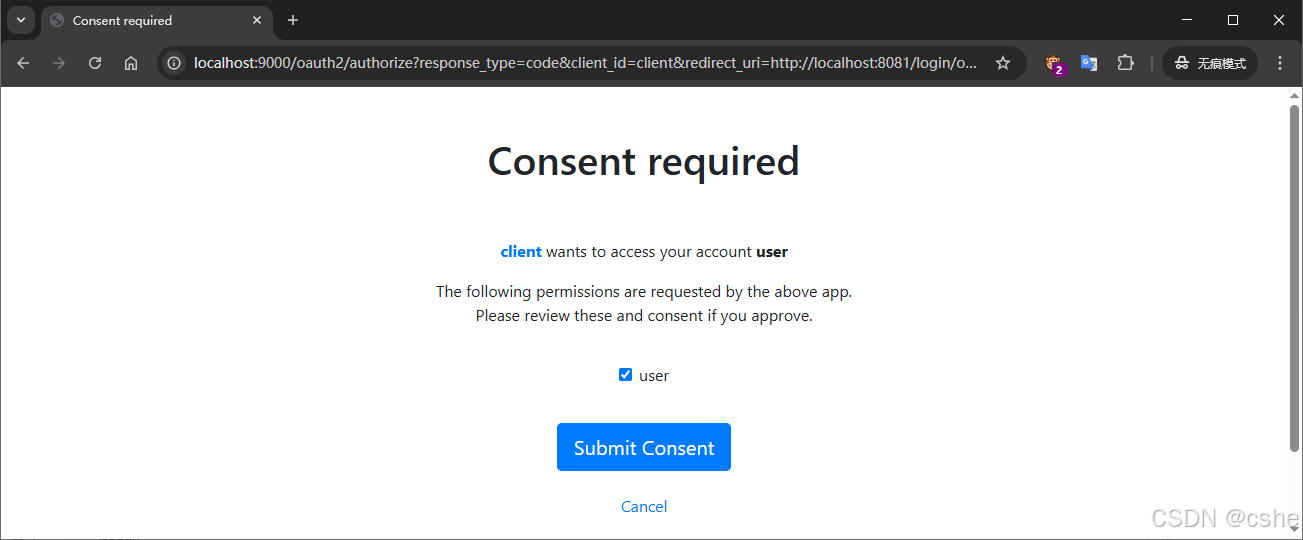
先启动授权服务器,再启动资源服务器,然后将参数拼接好在浏览器里直接访问
http://localhost:9000/oauth2/authorize?response_type=code&client_id=client&redirect_uri=http://localhost:8081/login/oauth2/code/client&scope=user
回车后会打开登录页面
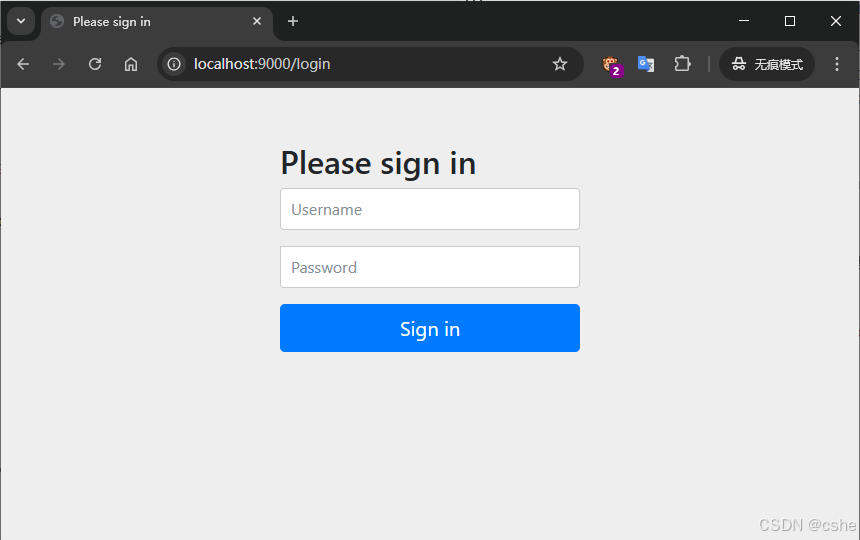
输入授权服务器配置类里配置的用户名和密码进行登录
用户名和密码验证成功后会跳转到下一个确认授权页面,勾上需要授权的用户信息点击确定
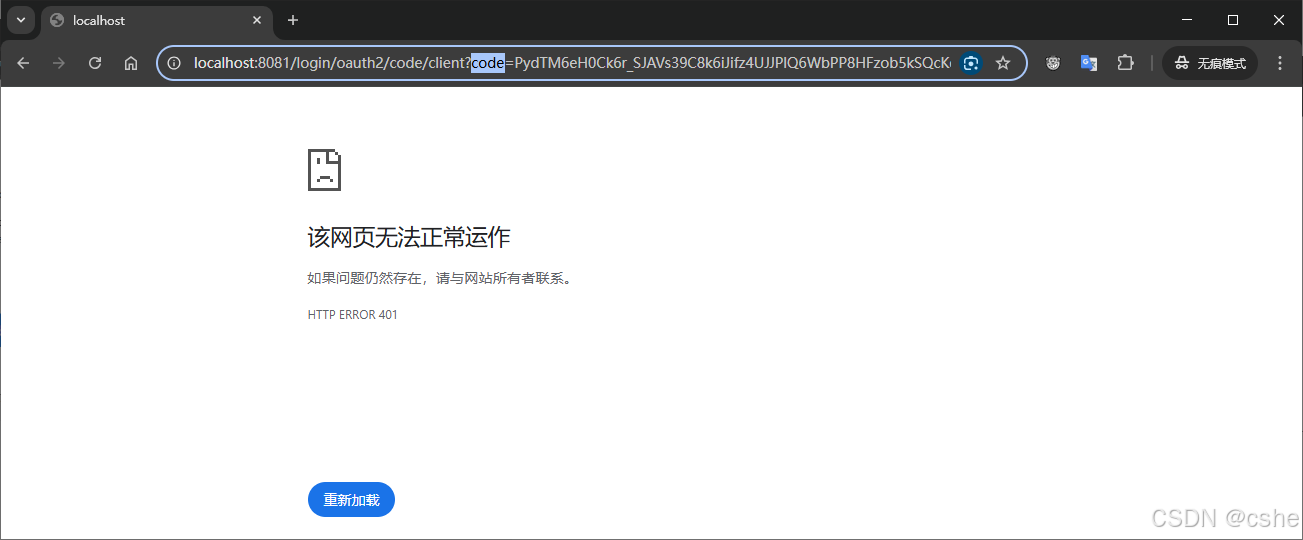
确定后授权服务器会生成一个code,并通过回调地址传给请求方(我这用的是浏览器,可以在浏览器地址栏里看到)
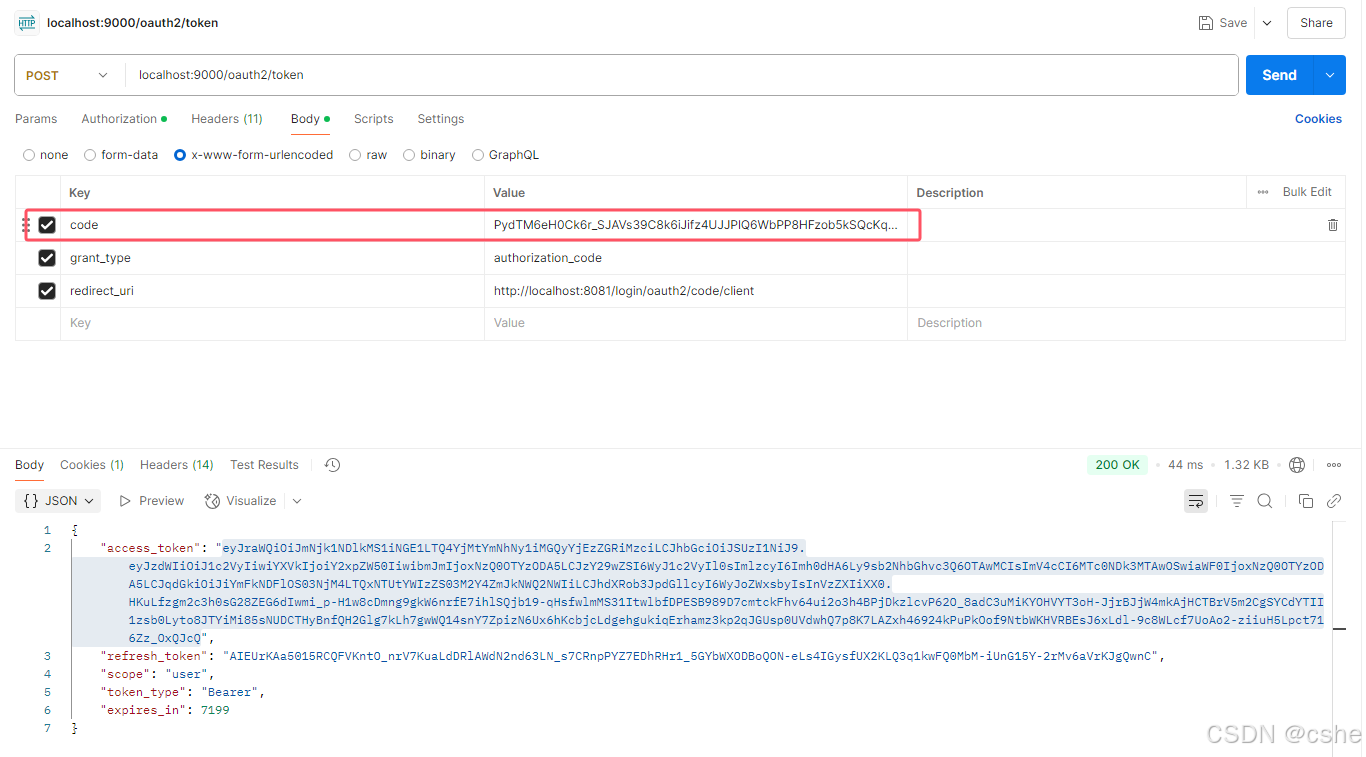
拿到code后,打开postman,请求授权服务器的 /oauth2/token 接口用code换access_token
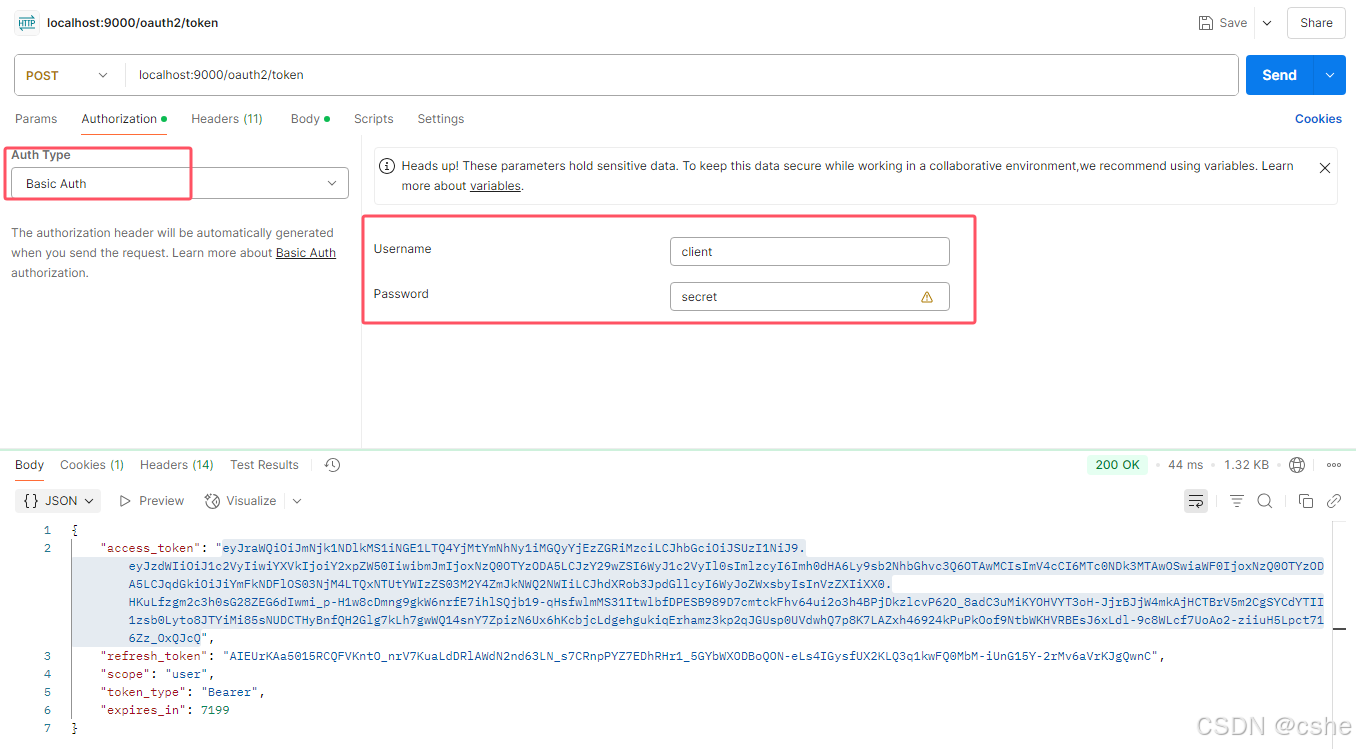
前面在资源服务器的配置类里将用户登录后的权限信息一块打包进jwt里,所以access_token里现在就有权限信息,可以打开 jwt.io 进行查看

在postman里请求一个资源服务器的接口 /api/hello

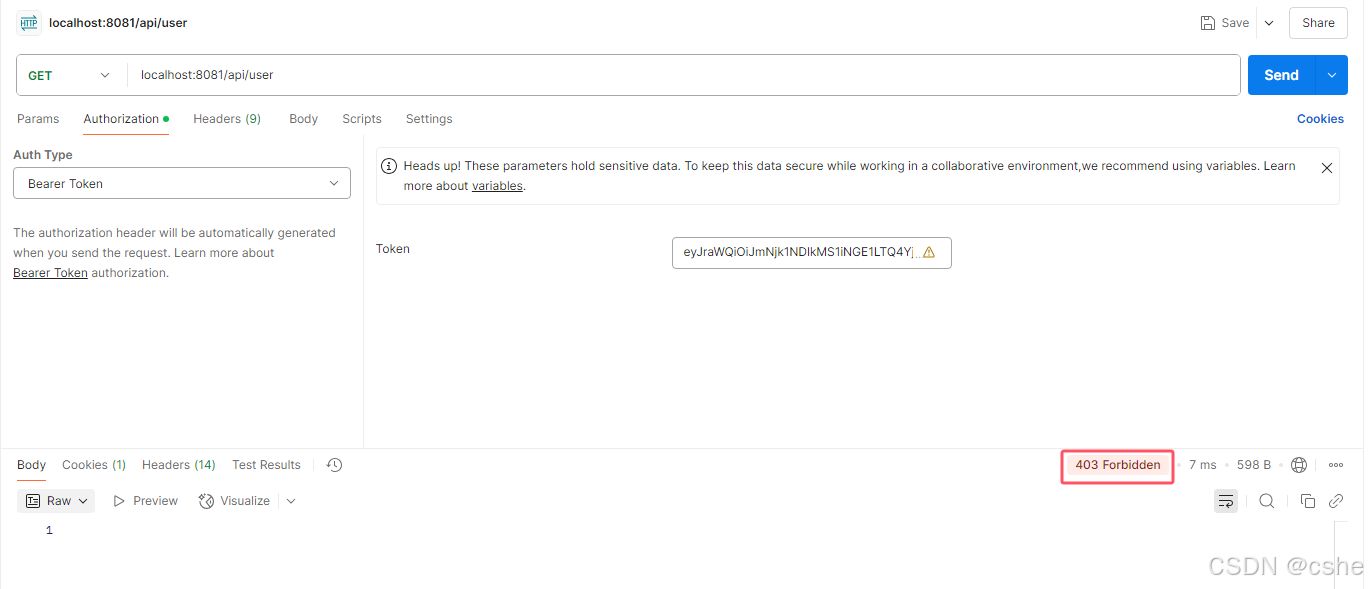
再请求接口 /api/user 因为用户只有 user权限而没有 user 角色,但/api/user 接口配置的是必须要有 user 角色才能访问,所以响应结果就是403了
总结
- 这是一个最简单的使用
spring-boot-starter-oauth2-authorization-server实现的授权中心 - 资源服务器之前如果使用的是springsecurity做的权限控制,几乎不需要修改代码
- 流程跑通后,后面完善起来就很快了