目录
一、博客引言。
二、基本配置准备。
(1)初步分析。
(2)初始spring配置文件。
三、spring自定义标签的引入。
(1)基本了解。
(2)引入新的命名空间:xmlns:context。
(3)使用context空间加载properties文件。
1、resources目录下新建properties文件。
2、使用标签。
3、使用属性占位符${}读取properties文件里对应属性值。
四、加载properties文件的测试。
(1)dao层。
(2)spring配置文件中配置BookDaoImpl实现类的bean。
(3)测试类。
(4)properties文件中的键名注意与系统变量区分。
system-properties-mode。
(5)加载多个properties文件。
1、测试2个properties文件的读取。
2、使用*.properties加载所有properties文件。
3、使用classpath:*.properties加载当前工程所有properties文件。(规范)
4、使用classpath*:*.properties加载所有properties文件。(包括外部jar包)
五、spring配置文件中加载properties文件几种写法的小结。
一、博客引言。
- 之前的学习——管理第三方资源的两种数据源对象。其中那些配置的属性值一起写在spring配置文件中是不太合适的。(不方便统一管理)
- 在本篇博客的学习就是把这些配置的属性值单独抽出来存放到properties文件中。然后再利用spring去加载对应的properties文件的信息。
二、基本配置准备。
(1)初步分析。
- 本篇博客的案例是基于上篇博客进行。其中主要的核心就是管理阿里云-druid的数据源对象。spring学习(druid、c3p0的数据源对象管理)(案例学习)-CSDN博客
- 上次的学习就是直接在配置文件中将数据库驱动、url、用户名与密码的属性值全部"写死"在spring配置文件中。
(2)初始spring配置文件。
- 其中主要的<bean>是对druid的数据源对象的基本配置。
- 就目前而言,属性的值还是写在spring配置文件中,待会就进行修改。
<?xml version="1.0" encoding="UTF-8"?>
<beans xmlns="http://www.springframework.org/schema/beans"
       xmlns:xsi="http://www.w3.org/2001/XMLSchema-instance"
       xsi:schemaLocation="http://www.springframework.org/schema/beans http://www.springframework.org/schema/beans/spring-beans.xsd">

    <!--管理DruidDataSource对象-->
    <bean id="dataSource" class="com.alibaba.druid.pool.DruidDataSource">
        <property name="driverClassName" value="com.mysql.cj.jdbc.Driver"></property>
        <property name="url" value="jdbc:mysql://localhost:3306/test111"></property>
        <property name="username" value="root"></property>
        <property name="password" value="root123"></property>
    </bean>

</beans>

三、spring自定义标签的引入。
(1)基本了解。
- spring默认提供了一些标准的XML标签,如<bean>、<beans>、<import>等,用于常见的配置需求。
- 然而,随着项目复杂度的增加,这些标准标签可能无法满足一些特定的配置需求。通过自定义标签,开发者可以封装复杂的配置逻辑,使XML配置文件更加简洁、易读和易于维护。
- 简单理解就是除了spring-beans提供的标签外的其他标签。那么我们就需要引入其它类似这样写法的命名空间以及相应的地址。()
(2)引入新的命名空间:xmlns:context。
- 引入新的命名空间的写法:具体如下。("依葫芦画瓢"嘛)如果找不到可以去对应需要引入的技术的官网寻找对应的写法,然后直接复制粘贴。
<?xml version="1.0" encoding="UTF-8"?>
<beans xmlns="http://www.springframework.org/schema/beans"
       xmlns:xsi="http://www.w3.org/2001/XMLSchema-instance"
       xmlns:context="http://www.springframework.org/schema/context"
       xsi:schemaLocation="
       http://www.springframework.org/schema/beans
       http://www.springframework.org/schema/beans/spring-beans.xsd
       http://www.springframework.org/schema/context
       http://www.springframework.org/schema/context/spring-context.xsd"
       >

    <!--    管理DruidDataSource对象-->
    <bean id="dataSource" class="com.alibaba.druid.pool.DruidDataSource">
        <property name="driverClassName" value="com.mysql.cj.jdbc.Driver"></property>
        <property name="url" value="jdbc:mysql://localhost:3306/test111"></property>
        <property name="username" value="root"></property>
        <property name="password" value="root123"></property>
    </bean>

</beans>
(3)使用context空间加载properties文件。
1、resources目录下新建properties文件。
- 数据库驱动、url、用户名、密码每一个都独自占一行。
- 写法:"键名=键值"。
2、使用标签<context:property-placeholder>。
- 当引入新的命名空间后,简单的"<"就可以显示大多数可以可以使用的标签。
- 这就是spring自定义标签的扩展性好处。
使用属性location指定properties文件的地址。
<context:property-placeholder location="jdbc.properties"/>
3、使用属性占位符${}读取properties文件里对应属性值。
- 到这一步基本上就是完成了。下面采用另外一个案例进行测试。
<?xml version="1.0" encoding="UTF-8"?>
<beans xmlns="http://www.springframework.org/schema/beans"
       xmlns:xsi="http://www.w3.org/2001/XMLSchema-instance"
       xmlns:context="http://www.springframework.org/schema/context"
       xsi:schemaLocation="
       http://www.springframework.org/schema/beans
       http://www.springframework.org/schema/beans/spring-beans.xsd
       http://www.springframework.org/schema/context
       http://www.springframework.org/schema/context/spring-context.xsd"
       >

    <context:property-placeholder location="jdbc.properties"/>
    <!--    管理DruidDataSource对象-->
    <bean id="dataSource" class="com.alibaba.druid.pool.DruidDataSource">
        <property name="driverClassName" value="${jdbc.driverClassName}"></property>
        <property name="url" value="${jdbc.url}"></property>
        <property name="username" value="${jdbc.username}"></property>
        <property name="password" value="${jdbc.password}"></property>
    </bean>

</beans>


四、加载properties文件的测试。
(1)dao层。
- BookDao接口。
package com.fs.dao;

public interface BookDao {
    /**
     * dao层save方法
     */
    void save();
}
- BookDaoImpl实现类。
package com.fs.dao.impl;

import com.fs.dao.BookDao;

public class BookDaoImpl implements BookDao {
    private String name;

    public void setName(String name) {
        this.name = name;
    }

    @Override
    public void save() {
        System.out.println("book dao save...");
        /**
         * 测试properties文件中的属性值是否成功注入!
         */
        System.out.println("name注入的值:"+name);
    }
}
(2)spring配置文件中配置BookDaoImpl实现类的bean。
- 对name属性注入采用setter方式注入。
- 其次注入的属性值采用占位符${}读取properties文件里对应属性值。(测试)
<bean id="bookDao" class="com.fs.dao.impl.BookDaoImpl">
        <property name="name" value="${jdbc.driverClassName}"></property>
</bean>
(3)测试类。
- 获取Ioc容器,通过指定id获取对应bean。
- 调用BookDaoImpl的save方法完成测试。
package com.fs.test;

import com.fs.dao.impl.BookDaoImpl;
import org.springframework.context.support.ClassPathXmlApplicationContext;

public class App3 {
    public static void main(String[] args) {
        //获取Spring容器,读取配置文件
        ClassPathXmlApplicationContext context = new ClassPathXmlApplicationContext("springConfig.xml");
        Object obj = context.getBean("bookDao");
        //强制类型转换
        BookDaoImpl bookDao = (BookDaoImpl) obj;
        bookDao.save();

    }
}
- 测试运行结果如下。
(4)properties文件中的键名注意与系统变量区分。
- 如果将jdbc.username改成username。再进行测试。
- 结果却显示86183!!!这是系统的环境变量的用户。它们之间产生了冲突问题。
- 也就是系统的环境变量的优先级要比当前的程序里的环境要高!加载文件后直接替换了当前的属性值,而我配置的东西并没有生效!
- 解决方法:在spring配置文件中加载properties文件时再设置一个属性。
system-properties-mode。
- 将该属性值设置成"NEVER"。表示不加载系统属性。
<context:property-placeholder location="jdbc.properties" system-properties-mode="NEVER"/>
- 现在再测试,结果就是成功获取到自己配置的属性值了。
(5)加载多个properties文件。
1、测试2个properties文件的读取。
- jdbc.properties。
- jdbc2.properties。
- 多个properties文件使用逗号相隔。
2、使用*.properties加载所有properties文件。
<context:property-placeholder location="*.properties" system-properties-mode="NEVER"/>
3、使用classpath:*.properties加载当前工程所有properties文件。(规范)
- 注意这种写法只能读取当前工程的配置文件。而对于外部导入的jar包或者某个框架中有properties文件,那么这种写法是加载不到的。
<context:property-placeholder location="classpath:*.properties" system-properties-mode="NEVER"/>
4、使用classpath*:*.properties加载所有properties文件。(包括外部jar包)
- 这样的写法:不仅可以从当前工程读取properties文件,还可以读取它所依赖的jar包中读取properties文件。
<context:property-placeholder location="classpath*:*.properties" system-properties-mode="NEVER"/>


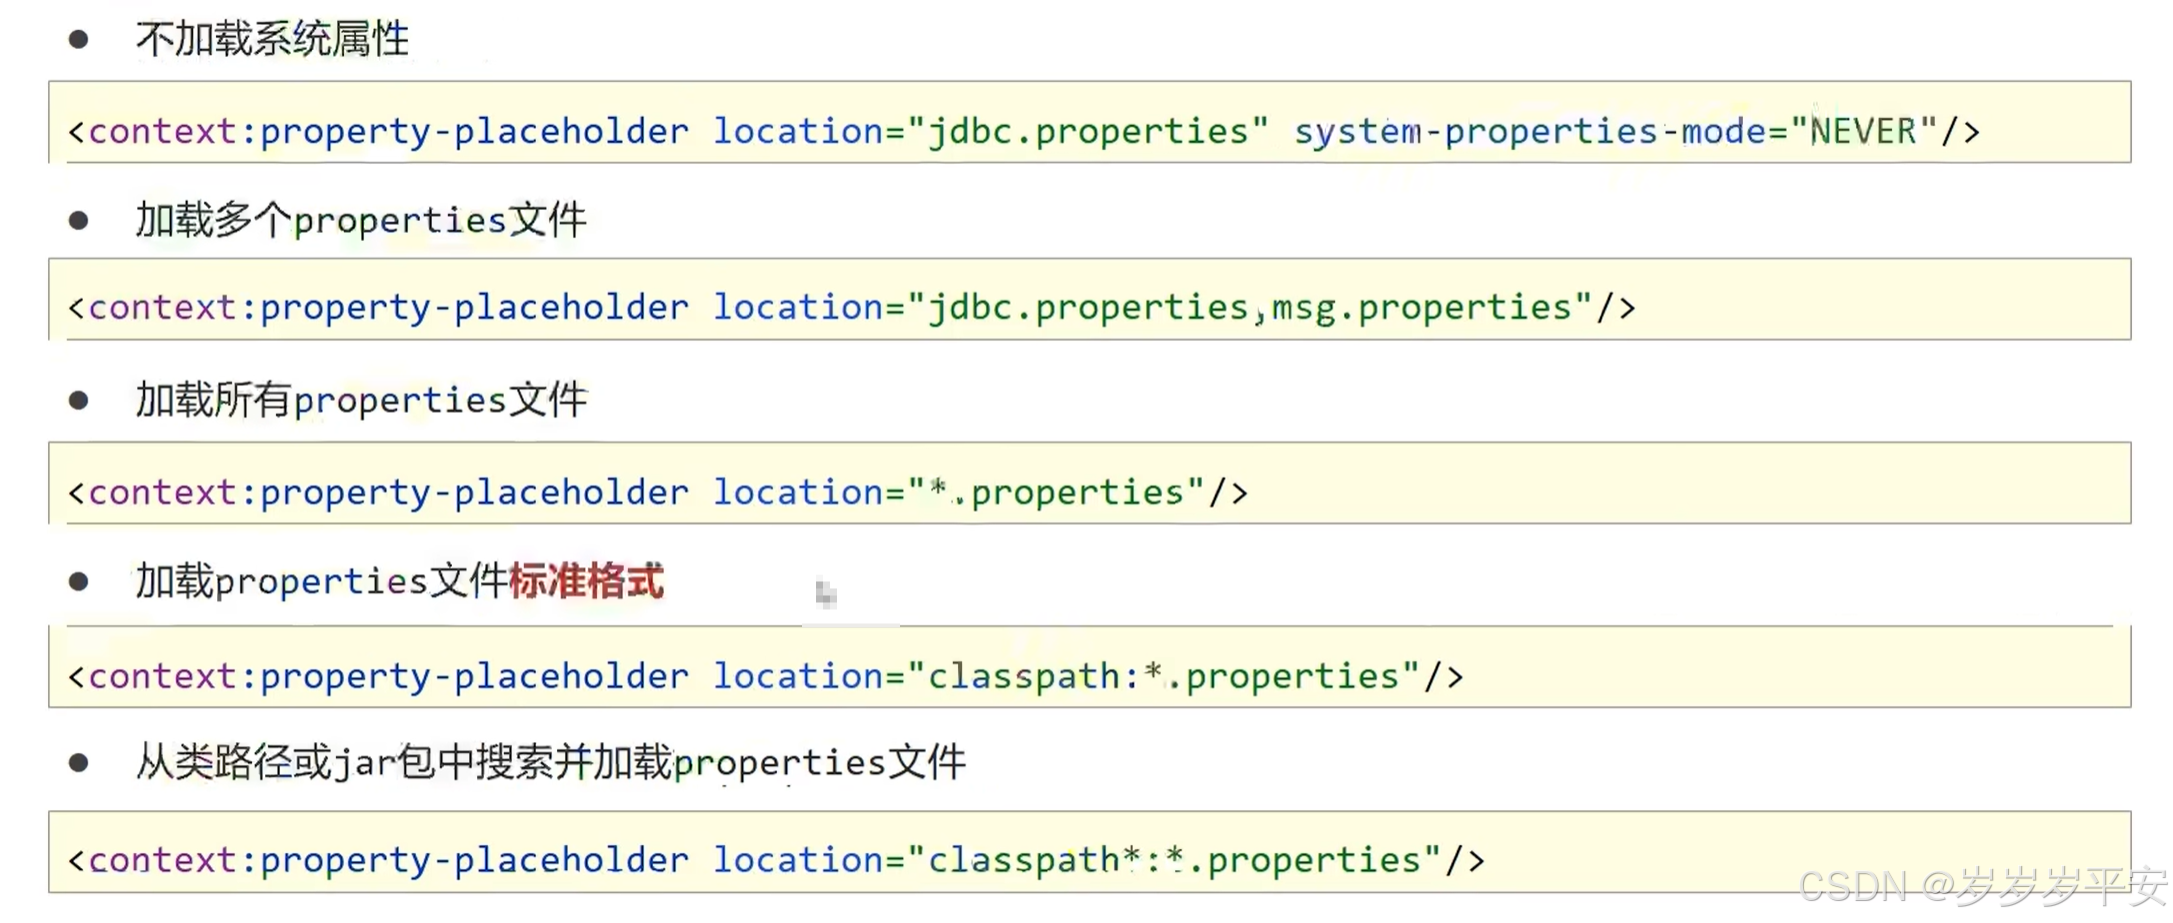
五、spring配置文件中加载properties文件几种写法的小结。
- 最常见且常用的5种写法。