YOLOv5训练自己的数据及rknn部署
- 一、下载源码
- 二、准备自己的数据集
- 2.1 标注图像
- 2.2 数据集结构
- 三、配置YOLOv5训练
- 3.1 修改配置文件
- 3.2 模型选择
- 四、训练
- 五、测试
- 六、部署
- 6.1 pt转onnx
- 6.2 onnx转rknn
- 七、常见错误
- 7.1 训练过程中的错误
- 7.1.1 cuda: out of memory
- 7.1.2 train: No such file or directory train.cache
- 7.1.3 Expected object of scalar type __int64 but got scalar type float for sequence element 1.
- 7.1.4 __init__() got an unexpected keyword argument 'generator'
- 7.1.5 module 'torch.cuda.amp' has no attribute 'autocast'
- 7.2 部署过程中的错误
- 7.2.1 检测框越界/检测框不准
- 7.2.2 检测框非常多、非常小
一、下载源码
https://github.com/ultralytics/yolov5/releases
二、准备自己的数据集
2.1 标注图像
利用LabelImg标注:
https://github.com/HumanSignal/labelImg
2.2 数据集结构
按照如下结构放置标注好的数据:
/path/to/dataset
    /images
        /train
            image1.jpg
            image2.jpg
            ...
        /val
            image1.jpg
            image2.jpg
            ...
    /labels
        /train
            image1.txt
            image2.txt
            ...
        /val
            image1.txt
            image2.txt
            ...
三、配置YOLOv5训练
3.1 修改配置文件
在data文件夹中创建一个新的.yaml配置文件,例如my_dataset.yaml:
train: /path/to/dataset/images/train
val: /path/to/dataset/images/val

nc: 2  # 类别数量
names: ['class1', 'class2']  # 类别名称
3.2 模型选择
在models文件夹中选择一个适合你任务的模型配置文件(例如yolov5s.yaml),可以根据需要进行调整,例如修改nc参数以匹配你的类别数量。
四、训练
一切准备就绪后,可以开始训练模型。运行以下命令:
python train.py --img 640 --batch 16 --epochs 50 --data data/my_dataset.yaml --weights yolov5s.pt --device cuda:0
参数解释:
--img 640指定训练时的图像尺寸为640x640。--batch 16指定每批次处理的图片数量为16。--epochs 50设置训练的轮数为50。--data data/my_dataset.yaml使用我们刚才配置的数据集文件。--cfg models/yolov5s.yaml使用YOLOv5s模型配置。--weights yolov5s.pt使用预训练权重。--device使用cuda还是cpu。
训练过程图:

五、测试
将best.pt和图像拷贝到detect.py同路径下,终端切换到该路径,输入:
python detect.py --weights best.pt --img 640 --source test2.jpg
按照终端显示的保存路径,查看效果。

六、部署
6.1 pt转onnx
将model/yolo.py的 Detect 类下的
def forward(self, x):
    z = []  # inference output
    for i in range(self.nl):
        if getattr(self, 'seg_seperate', False):
            c, s = self.m_replace[i](x[i])
            if getattr(self, 'export', False):
                z.append(c)
                z.append(s)
                continue
            bs, _, ny, nx = c.shape
            c = c.reshape(bs, self.na, -1, ny, nx)
            s = s.reshape(bs, self.na, -1, ny, nx)
            x[i] = torch.cat([c, s], 2).permute(0, 1, 3, 4, 2).contiguous()
        elif getattr(self, 'detect_seperate', False):
            z.append(torch.sigmoid(self.m[i](x[i])))
            continue
        else:
            x[i] = self.m[i](x[i])  # conv
            bs, _, ny, nx = x[i].shape  # x(bs,255,20,20) to x(bs,3,20,20,85)
            x[i] = x[i].view(bs, self.na, self.no, ny, nx).permute(0, 1, 3, 4, 2).contiguous()

        if not self.training:  # inference
            if self.dynamic or self.grid[i].shape[2:4] != x[i].shape[2:4]:
                self.grid[i], self.anchor_grid[i] = self._make_grid(nx, ny, i)

            if isinstance(self, Segment):  # (boxes + masks)
                xy, wh, conf, mask = x[i].split((2, 2, self.nc + 1, self.no - self.nc - 5), 4)
                xy = (xy.sigmoid() * 2 + self.grid[i]) * self.stride[i]  # xy
                wh = (wh.sigmoid() * 2) ** 2 * self.anchor_grid[i]  # wh
                y = torch.cat((xy, wh, conf.sigmoid(), mask), 4)
            else:  # Detect (boxes only)
                xy, wh, conf = x[i].sigmoid().split((2, 2, self.nc + 1), 4)
                xy = (xy * 2 + self.grid[i]) * self.stride[i]  # xy
                wh = (wh * 2) ** 2 * self.anchor_grid[i]  # wh
                y = torch.cat((xy, wh, conf), 4)
            z.append(y.view(bs, self.na * nx * ny, self.no))

    if getattr(self, 'export', False):
        return z
    return x if self.training else (torch.cat(z, 1),) if self.export else (torch.cat(z, 1), x)
修改为:
def forward(self, x):
    z = []
    for i in range(self.nl):
        x[i] = torch.sigmoid(self.m[i](x[i]))

    return x
将训练好的best.pt放在工程文件夹下,使用yolov5工程中的export.py将其转换为onnx模型。
python export.py --weights best.pt
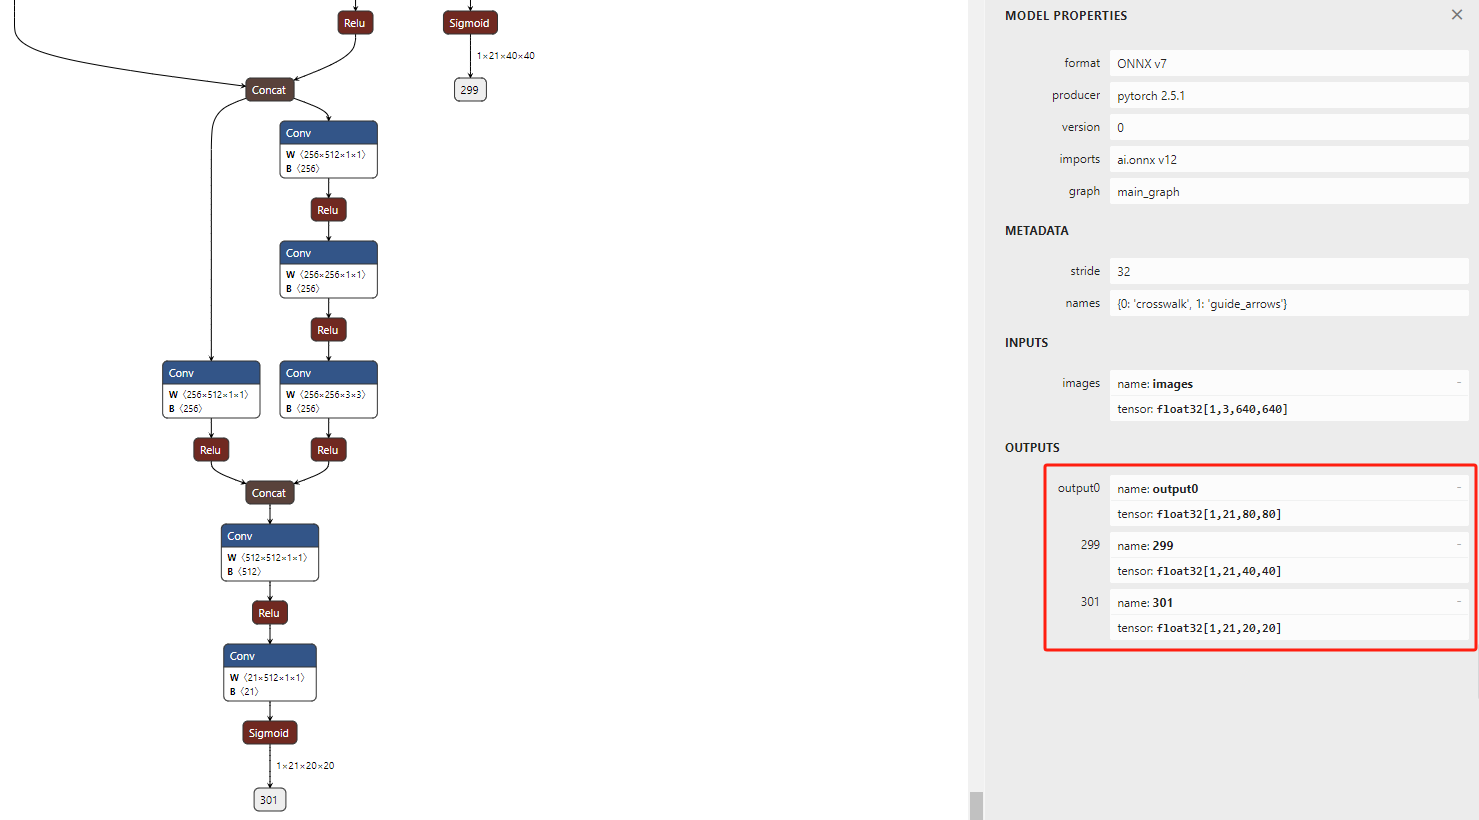
生成onnx:

将生成的onnx文件导入netron(https://netron.app/)中,查看输出是否为3个分支。

若是3个分支,表示onnx生成成功。
6.2 onnx转rknn
文件结构
/path
    /bus.jpg
    /datasets.txt
    /yolov5_convert.py
    /best.onnx
datasets的内容:
./bus.jpg
下载转换的程序:
https://github.com/airockchip/rknn-toolkit2/blob/master/rknn-toolkit2/examples/onnx/yolov5/test.py
结合自己的文件路径与类别,修改test.py后运行,便可得到rknn文件。
七、常见错误
7.1 训练过程中的错误
7.1.1 cuda: out of memory
说明内存不足,修改batch的数量,由16改为8或者更小的数。
7.1.2 train: No such file or directory train.cache
方法 1:使用--cache选项强制缓存
python train.py --img 640 --batch 16 --epochs 50 --data data/my_dataset.yaml --weights yolov5s.pt --device cuda:0 --cache
这样,YOLOv5会在数据加载时创建train.cache文件。
方法 2:手动创建缓存
通过运行YOLOv5的dataloaders.py中的create_dataloader函数来创建缓存文件。
python utils/dataloaders.py --data my_dataset.yaml --cache
7.1.3 Expected object of scalar type __int64 but got scalar type float for sequence element 1.
错误位置:
matches = torch.cat((torch.stack(x, 1).long(), iou[x[0], x[1]][:, None]), 1).cpu().numpy() # [label, detect, iou]
错误原因:索引应该为整型,而不是浮点型,应该利用.long()转成int_64。
修改:
matches = torch.cat((torch.stack(x, 1).long(), iou[x[0], x[1]].long()[:, None]), 1).cpu().numpy()
7.1.4 init() got an unexpected keyword argument ‘generator’
该属性是1.6版本新增加的,所以升级pytorch1.6及以上。
7.1.5 module ‘torch.cuda.amp’ has no attribute ‘autocast’
该属性是1.6版本新增加的,所以升级pytorch1.6及以上。
7.2 部署过程中的错误
7.2.1 检测框越界/检测框不准
在train.py中,noaotoanchor的默认为False,如果设定为True,则会使用默认的anchor设定。
所以,如果经过autoanchor,给出了新的anchor设定,那么在推理和转完rknn后的设定,都需要与之相匹配的anchor,而不是用默认的coco数据集的anchor。
默认的coco数据集anchor:
anchors = [[10, 13], [16, 30], [33, 23], [30, 61], [62, 45],
            [59, 119], [116, 90], [156, 198], [373, 326]]
利用如下代码,查看自己数据集的anchor:
from models.experimental import attempt_load

model = attempt_load('best.pt')  # 加载权重路径
m = model.module.model[-1] if hasattr(model, 'module') else model.model[-1]
print(m.anchor_grid)
在6.2小节的test.py:
yolov5_post_process函数中的anchors参数值,修改为自己数据集的anchors值。
7.2.2 检测框非常多、非常小
由于6.1小节中在修改forward方法时,为了避免置信度大于1,增加了sigmoid函数。所以在6.2小节中test.py的process方法里不应该再有sigmoid函数。不能两个方法都写sigmoid函数,要么forward方法里写sigmoid函数,要么process方法里写sigmoid函数。


![[Spring] OpenFeign的使用](https://i-blog.csdnimg.cn/direct/517ad88504f84a13a8287ae20c40a359.png)
