环境准备
数据库: sqlserver 2022
后端:
vs2022
ASP.NET Core API
.net 8
前端:
Hbuilderx
bootstrap 5.3.0
jquery v3.7.1
bootstrap-table 1.23.5
完整项目代码下载地址
功能
实现 单张表 的 增 删 改 查
创建数据库和表
create database productDB
go
use productDB

-- 创建产品表
CREATE TABLE Products (
    ProductID INT IDENTITY(1,1) PRIMARY KEY, -- 产品ID,自增主键
    ProductName NVARCHAR(100) NOT NULL,     -- 产品名称,最大长度100字符
    Category NVARCHAR(50) NULL,             -- 产品类别,可为空
    Price DECIMAL(10, 2) NOT NULL,          -- 产品价格,保留两位小数
    Stock INT NOT NULL DEFAULT 0,           -- 库存,默认为0
    CreatedDate DATETIME NOT NULL DEFAULT GETDATE(), -- 创建时间,默认为当前时间
    IsActive BIT NOT NULL DEFAULT 1         -- 是否在售,默认在售(1)
);
搭建后台
创建Asp.Net Core API 项目


安装程序包
Microsoft.EntityFrameworkCore.Tools
Microsoft.EntityFrameworkCore.SqlServer
AutoMapper


根据数据库创建Models
在【程序包管理器控制台输入命令】
Scaffold-DbContext 'Data Source=.;Initial Catalog=productDB;User=sa;Password=123456;TrustServerCertificate=true’Microsoft.EntityFrameworkCore.SqlServer -OutputDir Models -Context ProductDBContext
-OutputDir Models 输出文件夹:Models
-Context ProductDBContext DBContext类的名称

执行成功会自动创建DBContext文件和实体类文件

删除这段代码,后面会在Program.cs中注册DbContext。这里就不需要了

在appsettings.json中配置数据库连接字符串

创建dto类 和 添加automap映射配置文件
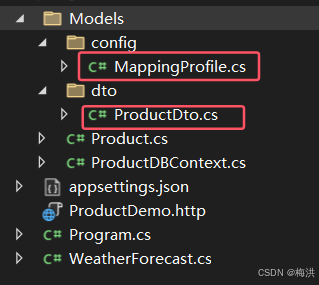
namespace ProductDemo.Models.dto
{
    public class ProductDto
    {

        public int? ProductId { get; set; }

        public string? ProductName { get; set; } = null!;

        public string? Category { get; set; }

        public decimal? Price { get; set; } = 0;

        public int? Stock { get; set; } = 0;

        public DateTime? CreatedDate { get; set; }

        public bool? IsActive { get; set; }

    }
}
using AutoMapper;
using ProductDemo.Models.dto;

namespace ProductDemo.Models.config
{
    public class MappingProfile : Profile
    {
        public MappingProfile()
        {
            // 从实体到 DTO 的映射
            CreateMap<Product, ProductDto>();
            CreateMap<ProductDto, Product>();
        }
    }
}
配置Program.cs
添加数据上下文对象依赖注入服务,并从appsettings.json文件中读取连接字符串配置
同时配置跨域
注册autoMap映射
public static void Main(string[] args)
{
    var builder = WebApplication.CreateBuilder(args);

    // Add services to the container.


    builder.Services.AddControllers();
    // Learn more about configuring Swagger/OpenAPI at https://aka.ms/aspnetcore/swashbuckle
    builder.Services.AddEndpointsApiExplorer();
    builder.Services.AddSwaggerGen();

    //注册autoMap映射
    builder.Services.AddAutoMapper(typeof(MappingProfile));

    //注册DBContext
    builder.Services.AddDbContext<ProductDBContext>(option =>
    {
        option.UseSqlServer(builder.Configuration.GetConnectionString("productDB"));
    });

    //配置跨域
    builder.Services.AddCors(options =>
    {
        options.AddPolicy("cors", builder =>
        {
            builder.AllowAnyOrigin()  //允许任意主机的跨域请求
            .AllowAnyMethod() //允许任意http方法跨域请求
            .AllowAnyHeader(); //允许跨域请求包含任意请求头
        });
    });

    var app = builder.Build();

    //配置和启用cors
    app.UseCors("cors");

    // Configure the HTTP request pipeline.
    if (app.Environment.IsDevelopment())
    {
        app.UseSwagger();
        app.UseSwaggerUI();
    }

    app.UseAuthorization();


    app.MapControllers();

    app.Run();
}
创建API控制器
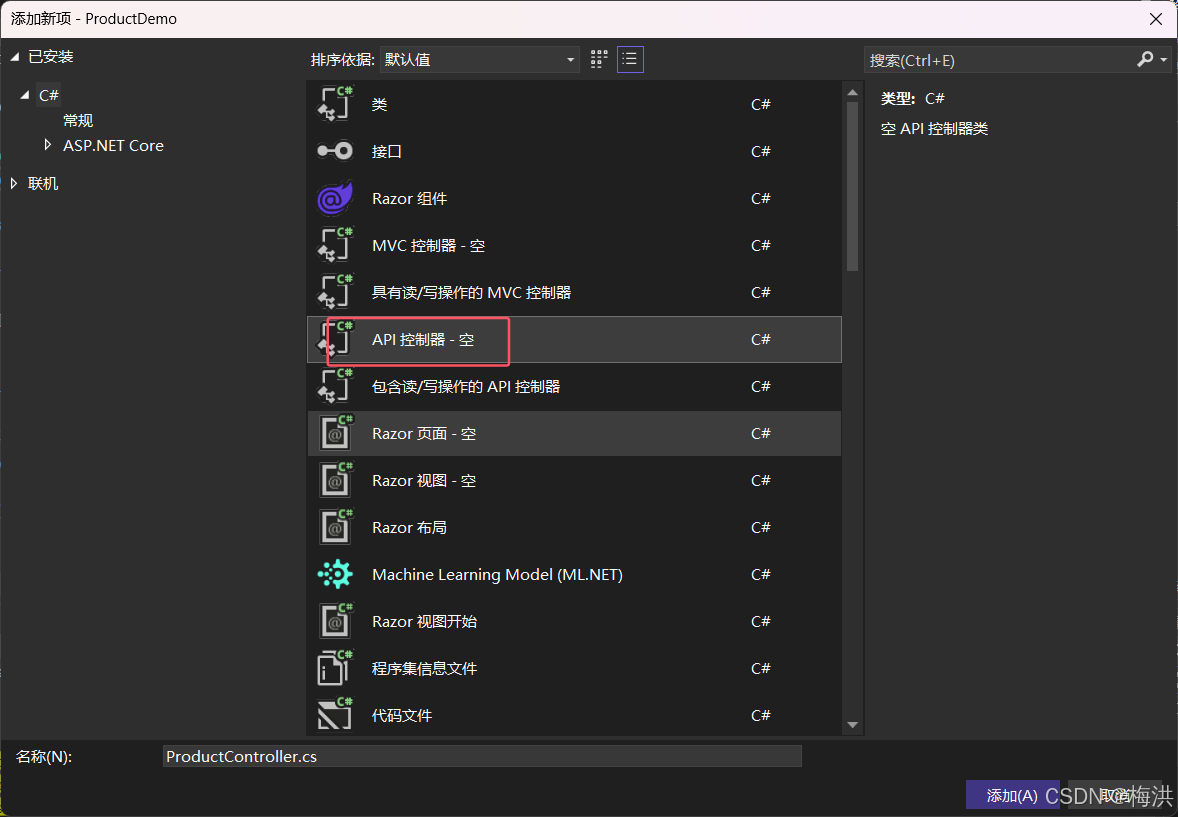
using AutoMapper;
using Microsoft.AspNetCore.Cors;
using Microsoft.AspNetCore.Http;
using Microsoft.AspNetCore.Mvc;
using ProductDemo.Models;
using ProductDemo.Models.dto;
using System.Security.Cryptography;

namespace ProductDemo.Controllers
{
    [Route("api/[controller]")]
    [ApiController]
    [EnableCors("cors")]  //启用跨域
    public class ProductController : ControllerBase
    {
        //创建DBContext对象
        ProductDBContext db ;
        //创建autoMap对象
        IMapper _mapper;
        //注入DbContext
        public ProductController(ProductDBContext db,IMapper mapper)
        {
            this.db = db;
            _mapper = mapper;
        }

        /// <summary>
        /// 分页查询返回值
        /// </summary>
        /// <param name="limit">bootstrap-table默认传递的分页参数</param>
        /// <param name="offset">bootstrap-table默认传递的分页参数</param>
        /// <returns>total和rows是bootstrap-table默认需要的值</returns>
        [HttpGet("GetPageList")]
        public IActionResult GetPageList(int limit,int offset)
        {
            var total = db.Products.Count();
            var rows = db.Products.OrderBy(o=>o.ProductId).Skip(offset).Take(limit).ToList();
            return Ok(new { total = total, rows = rows });
        }

        /// <summary>
        /// 添加
        /// </summary>
        /// <param name="product"></param>
        /// <returns></returns>
        [HttpPost("Add")]
        public IActionResult Add(ProductDto productDto)
        {
            try
            {
                //转换为实体类
                var product = _mapper.Map<Product>(productDto);
                product.CreatedDate = DateTime.Now;
                db.Products.Add(product);
                db.SaveChanges();
                return Ok(new { state = 200, message = "添加成功" });
            }
            catch (Exception ex)
            {
                return BadRequest(ex.Message);
            }

        }

        [HttpPost("Edit")]
        public IActionResult Edit(ProductDto productDto)
        {
            //转换为实体类
            var product = _mapper.Map<Product>(productDto);
            try
            {
                var old = db.Products.Find(product.ProductId);
                if (old == null)
                {
                    return NotFound();
                }
                old.ProductName = product.ProductName;
                old.Category = product.Category;
                old.Price = product.Price;
                old.Stock = product.Stock;
                old.IsActive = product.IsActive;

                db.SaveChanges();
                return Ok(new { state = 200, message = "修改成功" });
            }
            catch (Exception ex)
            {
                return BadRequest(ex.Message);
            }
        }

        [HttpGet("Delete")]
        public IActionResult Delete(int id)
        {
            try
            {
                var old = db.Products.Find(id);
                if(old == null)
                {
                    return NotFound();
                }
                db.Products.Remove(old);
                db.SaveChanges();
                return Ok(new { state = 0, message = "删除成功" });
            }
            catch (Exception ex)
            {
                return BadRequest(ex.Message);
            }
        }


    }
}
启动API后台程序
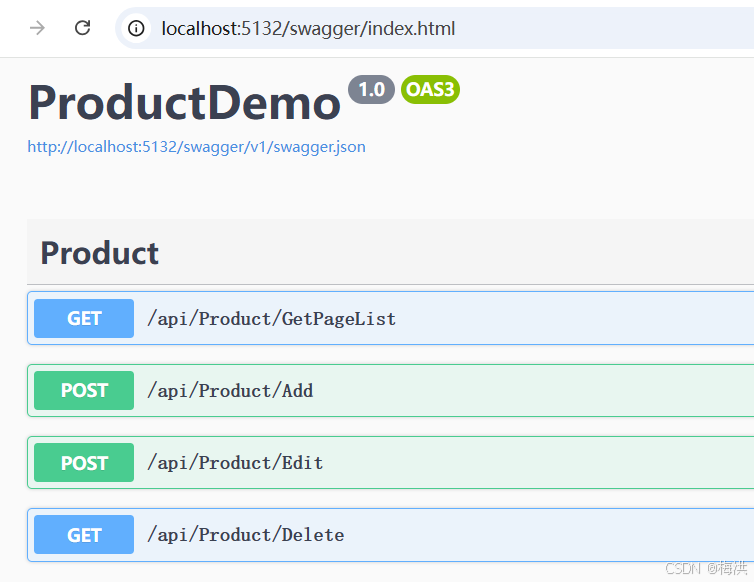
编写前端代码
打开Hbuilder创建web项目,并下载好对应的版本
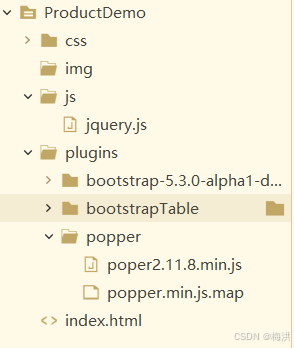
index.html
<!DOCTYPE html>
<html>
<head>
<meta charset="utf-8" />
<title></title>
<!-- bootstrap5.3.0 -->
<link rel="stylesheet" href="plugins/bootstrap-5.3.0-alpha1-dist/css/bootstrap.css" />
<!-- boostrap-table 1.23.5 -->
<link rel="stylesheet" href="plugins/bootstrapTable/bootstrap-table.css" />
<!-- 图标 -->
<link rel="stylesheet" href="plugins/bootstrap-icons/bootstrap-icons.css" />
</head>
<body>
<div class="container">
<div class="toolbar">
<button class="btn btn-success" id="btnAdd">
<i class="bi bi-plus-circle"></i> 添加
</button>
</div>
<table id="tab"></table>
</div>
<!-- 添加 修改模态框 -->
<div class="modal fade" id="staticBackdrop" data-bs-backdrop="static" data-bs-keyboard="false" tabindex="-1" >
<div class="modal-dialog">
<div class="modal-content">
<div class="modal-header">
<h1 class="modal-title fs-5" id="staticBackdropLabel">编辑</h1>
<button type="button" class="btn-close" data-bs-dismiss="modal" ></button>
</div>
<div class="modal-body">
<form id="dataForm">
<div class="mb-3 d-none">
<label for="productId" class="form-label"></label>
<input type="text" class="form-control" name="productId" id="productId" value="0" >
</div>
<div class="mb-3">
<label for="productName" class="form-label">商品名称</label>
<input type="text" class="form-control" name="productName" id="productName">
</div>
<div class="mb-3">
<label for="category" class="form-label">商品类别</label>
<input type="text" class="form-control" name="category" id="category">
</div>
<div class="mb-3">
<label for="Price" class="form-label">商品价格</label>
<input type="number" class="form-control" name="Price" id="Price" value="0" >
</div>
<div class="mb-3">
<label for="Stock" class="form-label">商品库存</label>
<input type="number" class="form-control" name="Stock" id="Stock" value="0" >
</div>
<div class="mb-3 form-check">
<input type="checkbox" class="form-check-input" id="isActive" name="isActive">
<label class="form-check-label" for="isActive">是否启用</label>
</div>
</form>
</div>
<div class="modal-footer">
<button type="button" class="btn btn-secondary" data-bs-dismiss="modal">关闭</button>
<button type="button" class="btn btn-primary" id="btnSave">保存</button>
</div>
</div>
</div>
</div>
</body>
<!-- jquery3.7.1 -->
<script src="js/jquery.js"></script>
<!--获取表单并序列化-->
<script src="js/jquery.serializejson.min.js"></script>
<!-- bootstrap5.3.0 -->
<script src="plugins/popper/poper2.11.8.min.js"></script>
<script src="plugins/bootstrap-5.3.0-alpha1-dist/js/bootstrap.js"></script>
<!-- boostrap-table 1.23.5 -->
<script src="plugins/bootstrapTable/bootstrap-table.js"></script>
<script src="plugins/bootstrapTable/bootstrap-table-zh-CN.js"></script>
<script>
$(()=>{
$('#tab').bootstrapTable({
url:'http://localhost:5132/api/product/GetPageList',
pagination:true, //分页
sidePagination: "server", //服务器分页
pageNumber:1,
pageSize: 10,
pageList: [10, 20, 50,100],
columns: [{
field: 'id',
checkbox:true
},{
field: 'productId',
title: '商品id'
}, {
field: 'productName',
title: '商品名称'
}, {
field: 'category',
title: '商品类别'
}, {
field: 'price',
title: '商品价格'
}, {
field: 'stock',
title: '商品库存'
}, {
field: 'isActive',
title: '是否在售'
}, {
field: '',
title: '编辑',
formatter:(v,r,i)=>{
var re = '<button class="btn btn-warning btn-sm" οnclick="edit('+i+')">'
+'<i class="bi bi-pencil-square"></i> 修改'
+'</button>';
re += ' <button class="btn btn-danger btn-sm" οnclick="del('+r.productId+')">'
+'<i class="bi bi-trash"></i> 删除'
+'</button>';
return re;
},
}]
})
//添加弹出模态框
$("#btnAdd").on('click',()=>{
$("#dataForm")[0].reset();
$("#staticBackdrop").modal("show");
});
//添加or修改
$("#btnSave").on('click',()=>{
//jquery.serializejson.min.js
let data = $("#dataForm").serializeJSON();
if(data.isActive){
data.isActive=true;
}
let url = "http://localhost:5132/api/product/Add";
if(data.productId != '0'){
url = "http://localhost:5132/api/product/Edit";
}
$.ajax({
url:url,
contentType:"application/json",
type:"POST",
data:JSON.stringify(data),
success:(res)=>{
$("#staticBackdrop").modal("hide");
$('#tab').bootstrapTable("refresh")
},
error: (xhr, status, error)=> {
console.log(error);
}
})
});
})
//编辑按钮
function edit(i){
$("#dataForm")[0].reset();
var row = $('#tab').bootstrapTable("getData")[i];
$.each(row,(k,v)=>{
if(k=="isActive"){
$("#" + k).prop('checked', v);
}else{
$("#"+k).val(v);
}
});
$("#staticBackdrop").modal("show");
}
//删除按钮
function del(id){
let data = {
id : id
}
url='http://localhost:5132/api/product/Delete';
$.ajax({
url:url,
contentType:"application/json",
type:"GET",
data:data,
success:(res)=>{
$('#tab').bootstrapTable("refresh")
},
error: (xhr, status, error)=> {
console.log(error);
}
});
}
</script>
</html>
