前言:本篇文章介绍微信小程序以及项目介绍:
文章介绍:介绍了微信小程序常用的指令、组件、api。
tips:最好按照官方文档来进行学习,大致可以我的目录来学习,对于写项目是没有问题的微信小程序官方文档
https://developers.weixin.qq.com/miniprogram/dev/framework/
想要了解更多可以关注博客⭐⭐七条小鲤鱼的博客⭐⭐
目录
一、下载以及创建项目
1.下载方式以及流程
2.创建步骤
二、微信小程序常用介绍
1、目录结构
2、模板语法以及指令
3、动态更新数据
4、常用组件
5、API
三、引入Vant Weapp组件库
1. 安装 Vant Weapp 组件库
2. 修改项目配置
4. 在页面中引入组件
5. 在页面中使用组件(测试)
四、项目中实用的功能
1、tabBar
2、轮播图
3、视频组件封面图
五、项目中的错误
六、项目展示
一、下载以及创建项目
1.下载方式以及流程
下载流程![]() https://blog.csdn.net/m0_70474954/article/details/127182224
https://blog.csdn.net/m0_70474954/article/details/127182224
2.创建步骤
2.1 首先打开软件 "微信开发者工具"
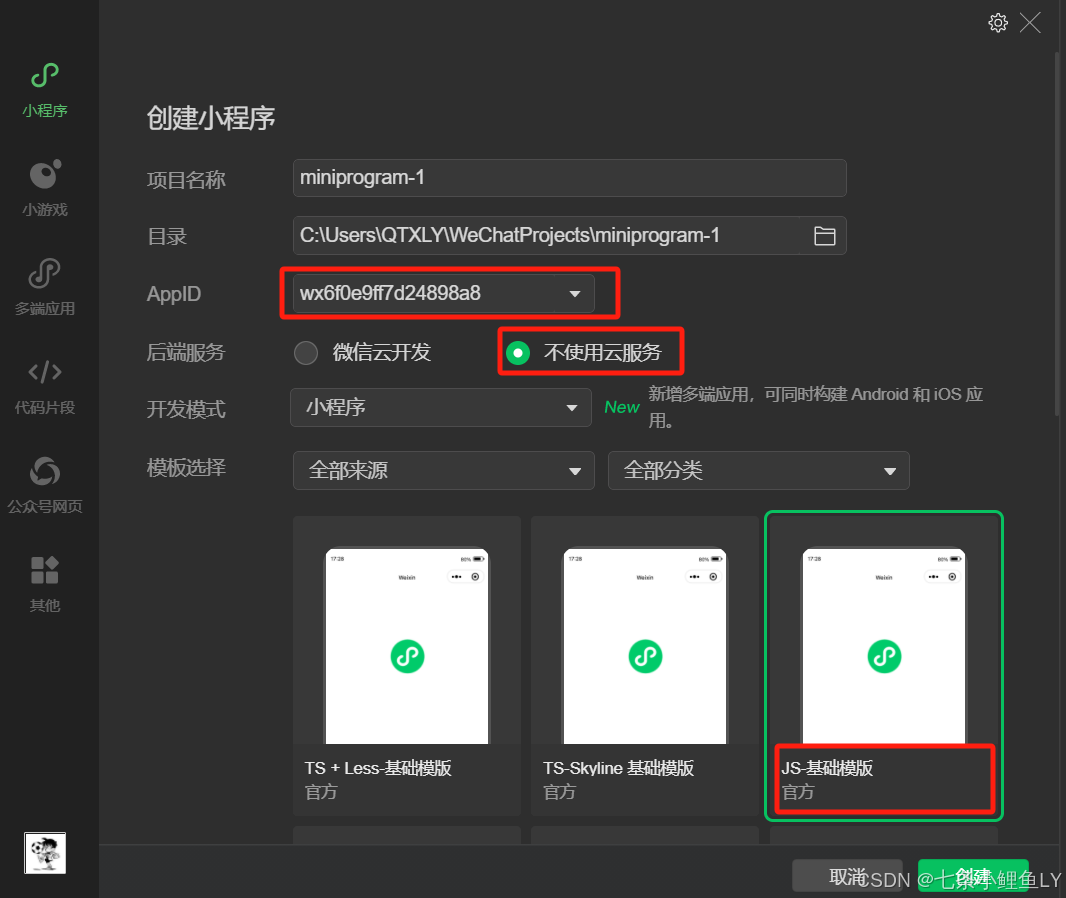
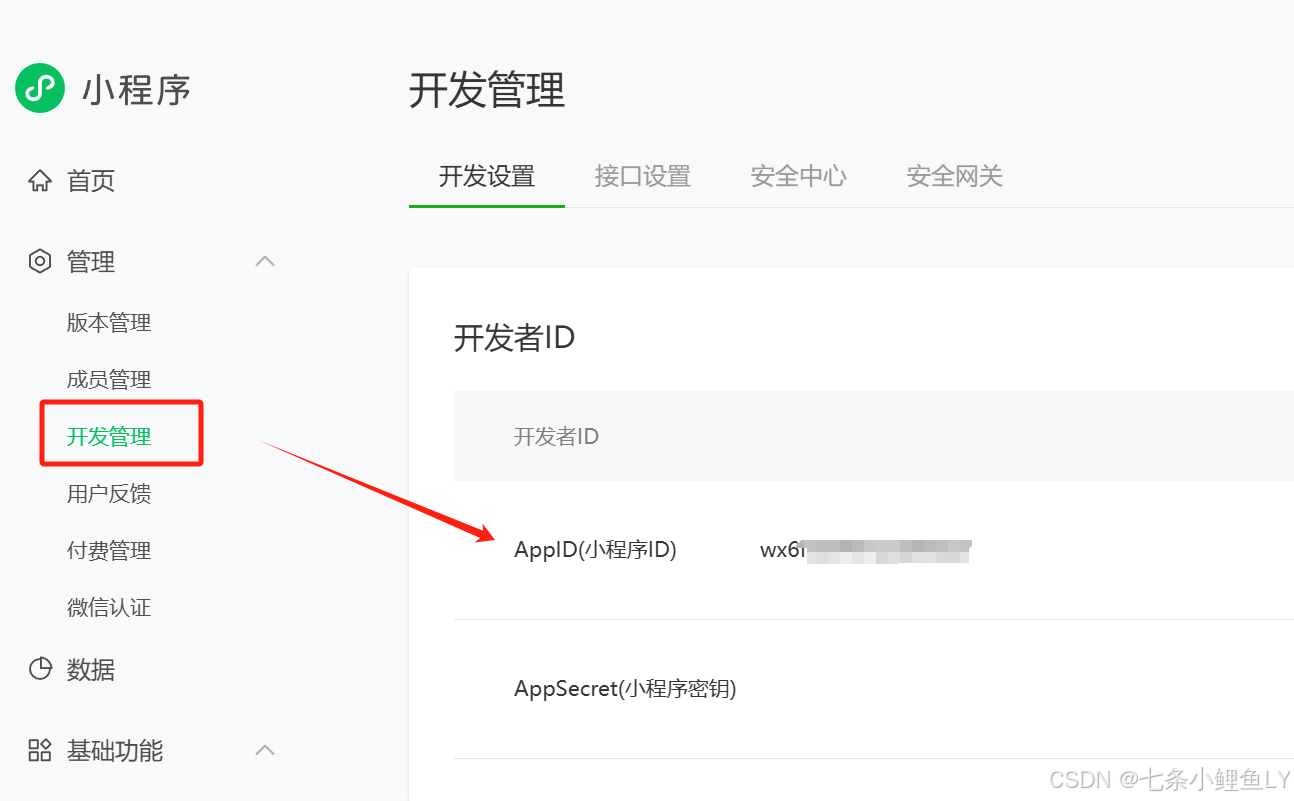
2.2 然后其中的 AppID 的位置
微信公众平台的开发管理里面
二、微信小程序常用介绍
微信小程序官方文档 https://developers.weixin.qq.com/miniprogram/dev/framework/
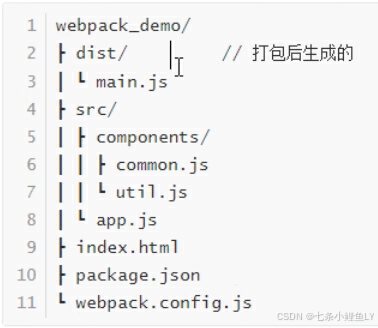
1、目录结构
2、模板语法以及指令
2.1、数据绑定
使用双大括号 {{ }} 来绑定数据。例如,<text>{{message}}</text> 会显示变量 message 的内容。
2.3、事件绑定
使用 bind 或者 bind 前缀来监听事件。例如,<button bindtap="onTap">点击我</button> 会在用户点击按钮时触发 onTap 方法。
2.4、条件渲染
使用 wx:if, wx:elif, wx:else 来根据条件渲染不同的组件。例如:
<view wx:if="{{condition}}">满足条件时显示</view>2.5、列表渲染
使用 wx:for 指令来循环渲染列表。例如:
<view wx:for="{{array}}" wx:key="uniqueKey">
  <text>{{item.value}}</text>
</view>
3、动态更新数据
使用 setData 更新数据:
this.setData({
message: 'Hello Wechat!'
});
4、常用组件
1.Swiper 轮播图组件
swiper 组件用于创建轮播图效果。基本属性包括:
autoplay:是否自动播放。interval:自动播放的时间间隔。duration:滑动动画时长。circular:是否采用衔接滑动。
<swiper autoplay="true" interval="5000" duration="500" circular="true">
  <swiper-item wx:for="{{imgList}}" wx:key="*this">
    <image src="{{item}}" mode="aspectFill"></image>
  </swiper-item>
</swiper>
2. scroll-view 滚动视图组件
scroll-view 组件用于创建可滚动视图。基本属性包括:
scroll-x:允许横向滚动。scroll-y:允许纵向滚动。
<scroll-view scroll-y="true" style="height: 300px;">
  <view wx:for="{{list}}" wx:key="*this">
    <text>{{item}}</text>
  </view>
</scroll-view>
3. form 表单组件
form 组件用于收集用户输入的数据。基本用法包括:
bindsubmit:提交表单时触发的事件。
<form bindsubmit="formSubmit">
  <input name="username" placeholder="请输入用户名" />
  <button formType="submit">提交</button>
</form>
4. navigator 导航组件
navigator 组件用于页面间的跳转跳。基本属性包括:
url:跳转的目标页面路径。open-type:跳转的方式,如navigate,redirect,switchTab。
<navigator url="/pages/detail/detail" open-type="navigate">跳转到详情页</navigator>5. button 按钮组件
button 组件用于触发事件。常用属性包括:
bindtap:点击按钮时触发的事件。open-type:开放能力,如获取用户信息、获取手机号等。
<button bindtap="onTap" open-type="getUserInfo">点击我</button>6. input 输入组件
input 组件用于获取用户输入。基本属性包括:
value:输入的值。bindinput:输入时触发的事件。
<input value="{{inputValue}}" bindinput="onInput" placeholder="请输入内容" />7. picker 选择器组件
picker 组件用于选择日期、时间等。基本用法包括:
mode:选择器的类型,如date,time。bindchange:选择变化时触发的事件。
<picker mode="date" bindchange="onDateChange">8. checkbox 多选框组件
checkbox 组件用于多选。基本用法包括:
bindchange:选项变化时触发的事件。
<checkbox-group bindchange="checkboxChange">
  <label wx:for="{{checkboxItems}}" wx:key="*this">
    <checkbox value="{{item.value}}" checked="{{item.checked}}"/>
    <text>{{item.name}}</text>
  </label>
</checkbox-group>
5、API
1. 界面交互API
- 显示消息提示框 (
wx.showToast): 用于显示轻提示框。wx.showToast({ title: '操作成功', icon: 'success', duration: 2000 }); - 显示模态对话框 (
wx.showModal): 用于显示需要用户确认的对话框。wx.showModal({ title: '提示', content: '这是一个模态弹窗', success: function(res) { if (res.confirm) console.log('用户点击确定'); else if (res.cancel) console.log('用户点击取消'); } }); - 显示加载提示框 (
wx.showLoading): 显示加载提示框,需要主动调用wx.hideLoading关闭。wx.showLoading({ title: '加载中', mask: true }); setTimeout(function () { wx.hideLoading(); }, 2000);
2. 网络请求API
- 发起网络请求 (
wx.request): 用于向服务器发送请求并接收响应。
wx.request({
  url: 'https://example.com/api', // 服务器接口地址
  method: 'GET', // 请求方法,如GET、POST等
  data: {
    param1: 'value1',
    param2: 'value2'
  }, // 发送到服务器的数据
  success(res) {
    console.log(res.data); // 服务器返回的数据
  },
  fail(err) {
    console.error(err); // 错误处理
  }
});
3. 本地存储API
- 本地存储 (
wx.setStorageSync): 将数据存储到本地。
- **本地获取** (`wx.getStorageSync`): 从本地缓存中获取指定 key 的内容。
```javascript
const value = wx.getStorageSync('key');- 本地移除 (
wx.removeStorageSync): 从本地缓存中移除指定 key 的数据。
### 4. 设备信息API
- **获取系统信息** (`wx.getSystemInfo`): 获取系统信息,如品牌、型号、操作系统版本、微信版本、屏幕宽高等。
```javascript
wx.getSystemInfo({
success(res) {
  console.log(res.model); // 如 'iPhone X'
}
});
4、生命周期
-
页面生命周期:
onLoad:加载页面时调用,可以获取查询参数。onShow:页面显示时调用。onReady:页面初次渲染完成时调用,此时可以进行DOM操作。onHide:页面隐藏时调用。onUnload:页面卸载时调用。
-
组件生命周期:
created:组件实例被创建时调用。attached:组件被从页面节点树移除时调用。ready:组件初次渲染完成时被调用。moved:组件移动到节点树另一个位置时调用。detached:组件从页面节点树移除时调用。
三、引入Vant Weapp组件库
1. 安装 Vant Weapp 组件库
在项目的根目录下打开命令行工具,执行以下命令来安装 Vant Weapp 组件库:
npm i @vant/weapp -S --production这将会安装 Vant Weapp 组件库并保存到 package.json 中的 dependencies 里。
2. 修改项目配置
在 app.json 配置文件中,删除 style 属性中的 v2,因为 Vant Weapp 使用的是微信小程序的样式隔离模式,它不依赖于小程序的 flex 布局。
3.构建 npm 包
在微信开发者工具中,选择 "工具" -> "构建 npm",这将自动处理 npm 包并生成 miniprogram_npm 目录,里面包含了小程序可用的组件代码。
4. 在页面中引入组件
在页面的 .json 文件中,使用 usingComponents 属性来指定 Vant Weapp 组件的路径。
{
  "usingComponents": true,
  "usingAutoAudits": false,
  "usingExtendedLib": false,
  "usingPostCSS": false,
  "usingAutoAudits": false,
  "component2": true,
  "usingComponents": {
    "van-button": "@vant/weapp/button/index"
  }
}
5. 在页面中使用组件(测试)
<van-button type="primary" bind:tap="onButtonClick">点击我</van-button>四、项目中实用的功能
1、tabBar
- 微信小程序的
app.json配置文件中可以配置tabBar字段,用于定义底部导航栏。 - 配置项包括
list(导航列表)和color(图标默认颜色)等。 - 每个
list项包含pagePath(页面路径)、text(文字)、iconPath(未选中时的图标)和selectedIconPath(选中时的图标)等。
{
  "tabBar": {
    "list": [{
      "pagePath": "pages/index/index",
      "text": "首页",
      "iconPath": "path/to/icon.png",
      "selectedIconPath": "path/to/selected-icon.png"
    }, {
      "pagePath": "pages/mine/mine",
      "text": "我的",
      "iconPath": "path/to/icon.png",
      "selectedIconPath": "path/to/selected-icon.png"
    }]
  }
}
2、轮播图
- 使用微信小程序的
<swiper>组件来实现轮播图。 - 需要在页面的
.json配置文件中开启"enable": true来启用<swiper>组件。 - 在
.wxml文件中使用<swiper>和<swiper-item>标签来定义轮播图的每个项目。
<swiper
  indicator-dots="true"
  autoplay="true"
  interval="5000"
  duration="500">
  <swiper-item wx:for="{{imageList}}" wx:key="unique">
    <image src="{{item}}" class="slide-image" />
  </swiper-item>
</swiper>
3、视频组件封面图
- 使用微信小程序的
<video>组件,并设置poster属性来指定视频的封面图。 poster属性的值是封面图片的路径。
<video
  src="path/to/video.mp4"
  poster="path/to/cover.jpg"
  controls="true"
  autoplay="false"
  />
五、项目中的错误
1、navigoator配置好点击不跳转
<!-- 跳转到指定页面 -->
<navigator url="/pages/target/target">跳转</navigator>注意:url里的路径一定要带"/"
六、项目展示

完整项目展示的视频![]() https://live.csdn.net/v/437171?spm=1001.2014.3001.5501
https://live.csdn.net/v/437171?spm=1001.2014.3001.5501






![在Ubuntu-22.04 [WSL2]中配置Docker](https://i-blog.csdnimg.cn/direct/44a03d15d8874e629fae4ec4a1d2d7a0.png)
