文章目录
- 简介
- 介绍
- 作用
- 原理
- 关系
- 使用
- 添加依赖和配置
- 初始化SDK
- 添加注解在目标界面
- 跳转界面不带参
- 跳转界面含参
- 处理返回结果
- 源码
- 基本流程
- getInstance()
- build()
- navigation()
- _navigation()
- Warehouse
- ARouter初始化
- init
- 帮助类
- 根帮助类
- 组帮助类
- completion
- 总结
简介
介绍
ARouter 是阿里巴巴开源的一款 Android 路由框架,专为组件化架构设计,用于模块之间的页面跳转和服务通信。
ARouter 是路由系统,给无依赖的双方提供通信和路由的能力
作用
- 页面路由(页面跳转)
- 通过简单的路由配置,实现模块间页面跳转,避免直接依赖具体类,降低耦合度。
- 支持跨模块的页面跳转,即使页面所属模块在不同的
APK中。
- 服务发现与调用
- 提供服务注册与发现机制,可以实现模块间的接口调用。
- 通过依赖注入机制简化服务调用流程,提升开发效率。
- 动态传参
- 支持页面跳转时传递参数(基本类型、对象等)。
- 支持通过注解方式接收参数,省去解析逻辑。
原理
关系
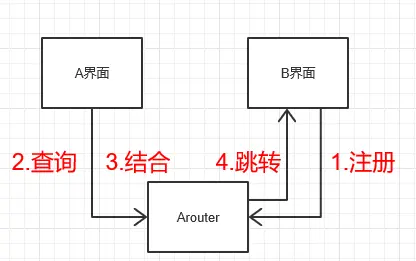
- 1.注册
B界面将类的信息,通过key-value的形式,注册到arouter中。
- 2.查询
A界面将类信息与额外信息(传输参数、跳转动画等),通过key传递至arouter中,并查询对应需要跳转类的信息。
- 3.结合
将A界面类信息、参数与B界面的类信息进行封装结合。
- 4.跳转
将结合后的信息,使用startActivity实现跳转。
使用
添加依赖和配置
android {
    defaultConfig {
        ...
        javaCompileOptions {
            annotationProcessorOptions {
                arguments = [AROUTER_MODULE_NAME: project.getName()]
            }
        }
    }
}

dependencies {
    implementation 'com.alibaba:arouter-api:x.x.x'
    annotationProcessor 'com.alibaba:arouter-compiler:x.x.x'
    ...
}
在 gradle.properties 文件中添加如下行来启用 Jetifier:
主要用于自动将旧版的 Android 库(即基于 Support Library 的库)迁移为 AndroidX 兼容版本。
android.enableJetifier=true
初始化SDK
if (isDebug()) {           // 这两行必须写在init之前,否则这些配置在init过程中将无效
    ARouter.openLog();     // 打印日志
    ARouter.openDebug();   // 开启调试模式(如果在InstantRun模式下运行,必须开启调试模式!线上版本需要关闭,否则有安全风险)
}
ARouter.init(mApplication); // 尽可能早,推荐在Application中初始化
我们可以在Application中初始化
public class MyApplication extends Application {
    @Override
    public void onCreate() {
        super.onCreate();
         // 仅在调试模式下开启日志和调试模式
        if(BuildConfig.DEBUG){
            ARouter.openLog();
            ARouter.openDebug();
        }
        ARouter.init(this);
    }
}
添加注解在目标界面
// 在支持路由的页面上添加注解
// 路径注意至少需有两级,/xx/xx
@Route(path = "/test/second")
public class SecondActivity extends AppCompatActivity {
跳转界面不带参
public class MainActivity extends AppCompatActivity {
    @Override
    protected void onCreate(Bundle savedInstanceState) {
        super.onCreate(savedInstanceState);
        setContentView(R.layout.activity_main);
    }

    public void startActivity(View view) {
        ARouter.getInstance().build("/test/SecondActivity")
                .navigation();
    }
}
这里跳转放在onCreate里报错:可能是因为ARouter 未初始化完成,初始化放在onCrete里就好了
public class MainActivity extends AppCompatActivity {

    @Override
    protected void onCreate(Bundle savedInstanceState) {
        super.onCreate(savedInstanceState);
        setContentView(R.layout.activity_main);

        // 仅在调试模式下开启日志和调试模式
        if(BuildConfig.DEBUG){
            ARouter.openLog();
            ARouter.openDebug();
        }
        ARouter.init(getApplication());
        ARouter.getInstance().build("/test/SecondActivity")
                .navigation();
    }
}
跳转界面含参
// 1
ARouter.getInstance().build("/test/SecondActivity")
        .withString("key1", "123")
        .withBoolean("key2", false)
        .navigation();

// 2
@Route(path = "/test/SecondActivity")
public class SecondActivity extends AppCompatActivity {
    public String key1;

    @Autowired(name = "key2")
    public boolean aBoolean;

    @Override
    protected void onCreate(Bundle savedInstanceState) {
        super.onCreate(savedInstanceState);
        setContentView(R.layout.activity_second);

        ARouter.getInstance().inject(this);
        Log.d("SecondActivityTag", key1 + " " + aBoolean);
    }
}
处理返回结果
如果需要在跳转到新页面并返回结果,可以使用 ARouter.getInstance().build() 方法构建路由请求时,调用 navigation() 方法的重载版本,传入一个 NavigationCallback 回调接口来处理返回结果
ARouter.getInstance().build("/main/selectActivity")
    .navigation(this, new NavigationCallback() {
        @Override
        public void onFound(Postcard postcard) {
            // 找到目标页面
        }

        @Override
        public void onLost(Postcard postcard) {
            // 找不到目标页面
        }

        @Override
        public void onArrival(Postcard postcard) {
            // 到达目标页面
        }

        @Override
        public void onInterrupt(Postcard postcard) {
            // 路由被拦截
        }
    });
源码
基本流程
getInstance()
ARouter.getInstance().build("/test/SecondActivity")
    .navigation();
双检锁,获取ARouter类的单例
public static ARouter getInstance() {
    if (!hasInit) {
        throw new InitException("ARouter::Init::Invoke init(context) first!");
    } else {
        if (instance == null) {
            synchronized (ARouter.class) {
                if (instance == null) {
                    instance = new ARouter();
                }
            }
        }
        return instance;
    }
}
build()
这里使用了门面模式。外部调用者只需与 ARouter 交互,获取路由对象,不需要了解 _ARouter 内部如何管理单例、如何创建 Postcard 等。
build返回一个Postcard,
// ARouter.java
public Postcard build(String path) {
    return _ARouter.getInstance().build(path);
}
// _ARouter.java
protected Postcard build(String path) {
    if (TextUtils.isEmpty(path)) {
        throw new HandlerException(Consts.TAG + "Parameter is invalid!");
    } else {
        // 预处理替换: 有需求来对 path 做统一的预处理就实现 PathReplaceService
        PathReplaceService pService = ARouter.getInstance().navigation(PathReplaceService.class);
        if (null != pService) {
            path = pService.forString(path);
        }
        // extractGroup()方法提取path的组名
        return build(path, extractGroup(path), true);
    }
}
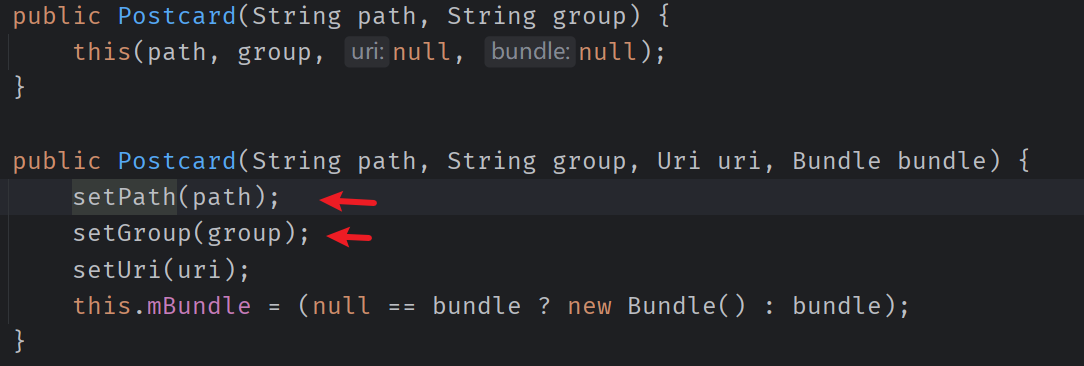
这里返回new出的一个Postcard对象,包含他的path和组名
protected Postcard build(String path, String group, Boolean afterReplace) {
    if (TextUtils.isEmpty(path) || TextUtils.isEmpty(group)) {
        throw new HandlerException(Consts.TAG + "Parameter is invalid!");
    } else {
        if (!afterReplace) {
            PathReplaceService pService = ARouter.getInstance().navigation(PathReplaceService.class);
            if (null != pService) {
                path = pService.forString(path);
            }
        }
        return new Postcard(path, group);
    }
}
- Postcard 类
Postcard 类继承自 RouteMeta,是路由的实际载体,包含导航需要的额外信息。它不仅继承了 RouteMeta 的基本字段,还添加了与导航操作密切相关的属性。
public final class Postcard extends RouteMeta {
    private Uri uri;
    private Object tag;
    private Bundle mBundle;
    private int flags = 0;
    private int timeout = 300;
    private IProvider provider;
    private boolean greenChannel;
    private SerializationService serializationService;
    private Context context;
    private String action;
}
上文创建Postcard对象时会通过set方法设置到父类RouteMeta的属性中
- RouteMeta 类
RouteMeta 是一个数据模型类,用于描述路由的元信息。该类中的属性用于存储路由目标、路径、分组及相关的附加信息。
public class RouteMeta {
    private RouteType type;         // 路由类型 (枚举类型,标识不同的路由类型, 例如 ACTIVITY、SERVICE 等)
    private Element rawType;        // 原始类型 (可能是路由的注解元素,用于生成代码时保留元信息)
    private Class<?> destination;   // 路由目标 (路由的目标类,例如某个 Activity 或 Fragment)
    private String path;            // 路由路径 (唯一标识路由的字符串,例如 "/app/home")
    private String group;           // 路由分组 (用于管理路由分组,例如 "app"、"user")
    private int priority = -1;      // 路由优先级 (数值越小,优先级越高)
    private int extra;              // 额外信息 (存储扩展数据,通常用于业务需求)
    private Map<String, Integer> paramsType;  // 参数类型映射 (参数名与参数类型的映射,例如 {"id": String.class})
    private String name;            // 路由名称 (可选字段,用于描述路由)
}
navigation()
导航
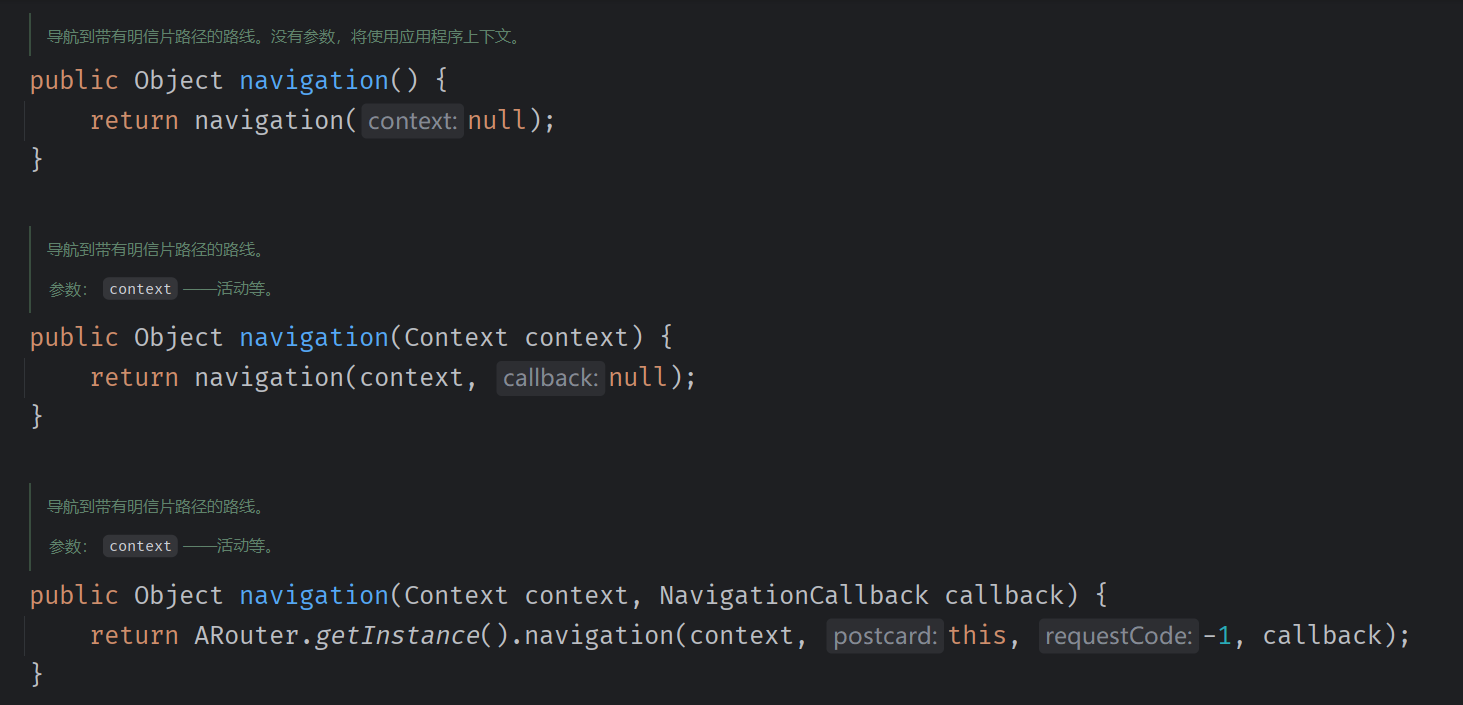
由上至下调用,然后调用到ARouter的navigation方法

该方法完成了从调用导航到实际路由跳转的逻辑处理
//_ARouter.java
protected Object navigation(final Context context, final Postcard postcard, final int requestCode, final NavigationCallback callback) {


    // 1.确保 Postcard 能绑定一个有效的 Context
    postcard.setContext(null == context ? mContext : context);

    try {
        // 2.根据路由路径完善 Postcard 的信息
        LogisticsCenter.completion(postcard);
    } catch (NoRouteFoundException ex) {
        logger.warning(Consts.TAG, ex.getMessage());

        // 调试功能
        if (debuggable()) {
            runInMainThread(new Runnable() {
                @Override
                public void run() {
                    Toast.makeText(mContext, "There's no route matched!\n" +
                            " Path = [" + postcard.getPath() + "]\n" +
                            " Group = [" + postcard.getGroup() + "]", Toast.LENGTH_LONG).show();
                }
            });
        }

        // 2.1 捕获到异常:Postcard 路径不存在
        // 存在回调接口,就通知调用 onLost() 方法。
        if (null != callback) {
            callback.onLost(postcard);
        } else {
            // 不存在回调接口,执行全局降级服务,调用onLost方法,当路由丢失时可以做一些事情。
            DegradeService degradeService = ARouter.getInstance().navigation(DegradeService.class);
            if (null != degradeService) {
                degradeService.onLost(context, postcard);
            }
        }

        return null;
    }

    // 2.2 没捕获到异常,回调onFound方法
    if (null != callback) {
        callback.onFound(postcard);
    }

    // 3.1 不是绿色通道,拦截器进行处理
    // 拦截器:扩展,允许开发者在导航过程中插入自定义逻辑,比如权限检查、登录验证或其他操作。
    // onContinue():继续路由操作。
    // onInterrupt():终止路由操作,并通知回调接口 onInterrupt()。
    if (!postcard.isGreenChannel()) {
        interceptorService.doInterceptions(postcard, new InterceptorCallback() {
            @Override
            public void onContinue(Postcard postcard) {
                _navigation(postcard, requestCode, callback);
            }

            @Override
            public void onInterrupt(Throwable exception) {
                if (null != callback) {
                    callback.onInterrupt(postcard);
                }

                logger.info(Consts.TAG, "Navigation failed, termination by interceptor : " + exception.getMessage());
            }
        });
    } else {
        // 如果 isGreenChannel() 返回 true,则跳过拦截器,直接导航。
        // 开发模式下跳过非必要检查,加速导航
        return _navigation(postcard, requestCode, callback);
    }
    return null;
}
总结:该方法完善了postcard的信息,路径验证,拦截器逻辑
最后调用的_navigation将执行跳转逻辑
_navigation()
private Object _navigation(final Postcard postcard, final int requestCode, final NavigationCallback callback) {
    final Context currentContext = postcard.getContext();

    // 根据路由类型
    switch (postcard.getType()) {
        // 1.跳转到活动
        case ACTIVITY:
            // 通过getDestination()方法拿到目标页面的 Class
            final Intent intent = new Intent(currentContext, postcard.getDestination());
            intent.putExtras(postcard.getExtras());

            // 设置标志位(可选)
            int flags = postcard.getFlags();
            if (0 != flags) {
                intent.setFlags(flags);
            }

             // 如果当前上下文不是一个 Activity,则添加 FLAG_ACTIVITY_NEW_TASK,确保能够从非 Activity 环境启动目标页面。
            if (!(currentContext instanceof Activity)) {
                intent.addFlags(Intent.FLAG_ACTIVITY_NEW_TASK);
            }

            // 设置 Actions
            String action = postcard.getAction();
            if (!TextUtils.isEmpty(action)) {
                intent.setAction(action);
            }

            //  在主线程启动 Activity
            runInMainThread(new Runnable() {
                @Override
                public void run() {
                    startActivity(requestCode, currentContext, intent, postcard, callback);
                }
            });

            break;

        // 想要获取的服务,即IProvider的实现类。
        case PROVIDER:
            return postcard.getProvider();

        // 下面三个都是通过反射创建实例
        case BOARDCAST:
        case CONTENT_PROVIDER:
        case FRAGMENT:
            // 通过getDestination得到目标类对象
            Class<?> fragmentMeta = postcard.getDestination();
            try {
            // 通过反射构造
                Object instance = fragmentMeta.getConstructor().newInstance();
            // 类型判断,适配不同类型的fragment
                if (instance instanceof Fragment) {
                    ((Fragment) instance).setArguments(postcard.getExtras());
                } else if (instance instanceof android.support.v4.app.Fragment) {
                    ((android.support.v4.app.Fragment) instance).setArguments(postcard.getExtras());
                }

                return instance;
            } catch (Exception ex) {
                logger.error(Consts.TAG, "Fetch fragment instance error, " + TextUtils.formatStackTrace(ex.getStackTrace()));
            }
        case METHOD:
        case SERVICE:
        default:
            return null;
    }

    return null;
}
Warehouse
我们在navigation方法中调用了LogisticsCenter.completion(postcard);,来完善了postcard的信息
completion里出现了Warehouse,我们看看是什么
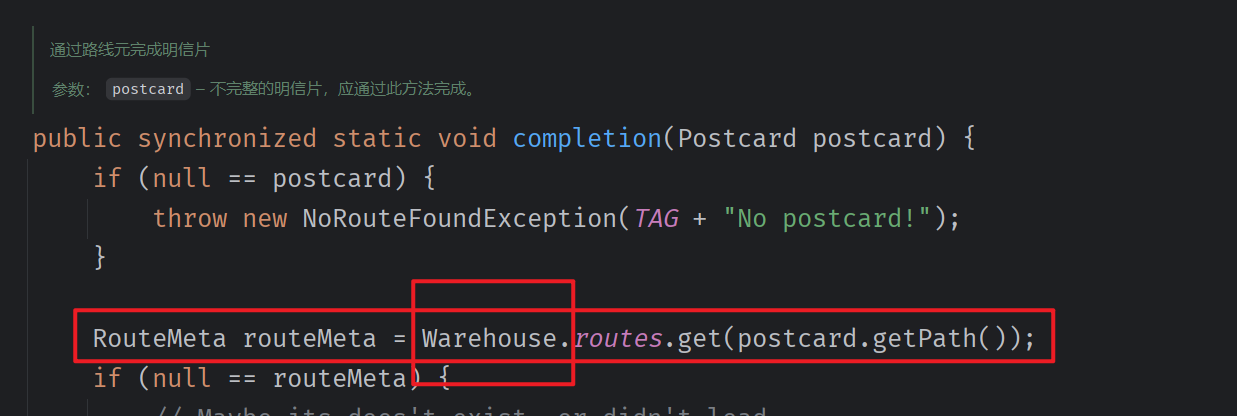
Warehouse
用于存储路由表和相关的映射数据结构。它是 ARouter 的“仓库”,负责管理路由信息的加载、存储和查询。
主要职责是作为数据中心,保存路由信息、拦截器、服务等的映射关系。它将这些信息加载到内存中,方便 ARouter 在运行时快速查找目标页面或功能。
// Warehouse.java
class Warehouse {
    static Map<String, Class<? extends IRouteGroup>> groupsIndex = new HashMap<>();
    static Map<String, RouteMeta> routes = new HashMap<>();

    static Map<Class, IProvider> providers = new HashMap<>();
    static Map<String, RouteMeta> providersIndex = new HashMap<>();

    static Map<Integer, Class<? extends IInterceptor>> interceptorsIndex = new UniqueKeyTreeMap<>("...");
    static List<IInterceptor> interceptors = new ArrayList<>();

    static void clear() {
        routes.clear();
        groupsIndex.clear();
        providers.clear();
        providersIndex.clear();
        interceptors.clear();
        interceptorsIndex.clear();
    }
}
在 ARouter 中,路由表、拦截器表、服务表分别用来管理路由路径、拦截器以及服务的相关信息,从而实现模块化开发、路径导航、拦截器链、以及服务的统一管理。以下是关于各部分的详细分析:
- 路由表
groupsIndex
-
存储路由组名到具体路由组类的映射。通过这种分组方式,可以有效减少路由加载的时间和内存占用。
-
public static Map<String, Class<? extends IRouteGroup>> groupsIndex = new HashMap<>();- Key:路由组名(如
"user"),表示属于哪个功能模块。 - Value:实现了
IRouteGroup接口的类,用于提供具体的路由信息。
- Key:路由组名(如
-
当访问一个路由路径时,ARouter 首先查找该路径所属的组(
groupsIndex中的 Key)。通过路由组类(Value)加载组内所有路由信息到
routes。
routes
-
存储完整路由路径到**路由元信息(
RouteMeta)**的映射。 -
public static Map<String, RouteMeta> routes = new HashMap<>();- Key:完整路径(如
/user/profile)。 - Value:
RouteMeta对象,包含目标页面类、参数、类型等信息。
- Key:完整路径(如
-
在
groupsIndex确定路由组后,通过组加载具体的路由信息到routes中。最终通过路径快速定位到
RouteMeta。
- 拦截器表
interceptorsIndex
-
管理拦截器的优先级和对应的实现类,方便构建拦截器链。
-
public static Map<Integer, Class<? extends IInterceptor>> interceptorsIndex = new HashMap<>();- Key:拦截器优先级(
Priority),数字越小优先级越高。 - Value:拦截器类(
IInterceptor的实现类)。
- Key:拦截器优先级(
-
允许开发者在路由跳转前拦截请求、检查参数、处理权限等。
interceptors
-
缓存所有拦截器的实例。
-
static List<IInterceptor> interceptors = new ArrayList<>(); -
路由跳转时,从
interceptors依次执行所有拦截器。 -
开发者可以实现拦截器逻辑,比如登录验证、动态权限申请等。
- 服务表
providers
-
缓存服务实例(
IProvider),用于提供功能模块的具体实现。 -
static Map<Class, IProvider> providers = new HashMap<>();- Key:服务接口的
Class对象。 - Value:服务接口的具体实现实例。
- Key:服务接口的
-
在应用中实现全局服务调用。
例如:网络管理器、日志管理器、用户管理等。
providersIndex
-
存储服务实现类的元信息,用于动态加载服务。
-
public static Map<String, RouteMeta> providersIndex = new HashMap<>();- Key:服务类的全类名。
- Value:
RouteMeta对象,包含服务实现类的信息。
-
路由初始化时,将服务实现类的信息加载到
providersIndex。在需要服务时,通过
providersIndex获取元信息并实例化服务。
Warehouse的数据是在LogisticsCenter类的init()方法中被加载的
ARouter初始化
init
从ARouter.init()出发
// ARouter.java
public static void init(Application application) {
    if (!hasInit) {
        logger = _ARouter.logger;
        _ARouter.logger.info(Consts.TAG, "ARouter init start.");
        hasInit = _ARouter.init(application);

        if (hasInit) {
            //
            _ARouter.afterInit();
        }

        _ARouter.logger.info(Consts.TAG, "ARouter init over.");
    }
}
// _ARouter.java
protected static synchronized boolean init(Application application) {
    mContext = application;
    //
    LogisticsCenter.init(mContext, executor);
    logger.info(Consts.TAG, "ARouter init success!");
    hasInit = true;
    mHandler = new Handler(Looper.getMainLooper());

    return true;
}
// LogisticsCenter.java
public synchronized static void init(Context context, ThreadPoolExecutor tpe) throws HandlerException {
    // 保存上下文和线程池引用。
    mContext = context;
    executor = tpe;

    try {
        long startInit = System.currentTimeMillis();

        // 尝试使用AGP加载路由表
        loadRouterMap();
        if (registerByPlugin) {
            logger.info(TAG, "Load router map by arouter-auto-register plugin.");
        } else {
            Set<String> routerMap; // 路由表集合

            // 1. 如果是调试模式或是新安装应用,则重建路由表
            if (ARouter.debuggable() || PackageUtils.isNewVersion(context)) {
                logger.info(TAG, "Run with debug mode or new install, rebuild router map.");
                // 获取指定包名下的所有类名(编译时生成的所有帮助类)
                // ROUTE_ROOT_PAKCAGE: "com.alibaba.android.arouter.routes"
                routerMap = ClassUtils.getFileNameByPackageName(mContext, ROUTE_ROOT_PAKCAGE);
                // 将路由表存储到 SharedPreferences 进行缓存,后续快速加载
                if (!routerMap.isEmpty()) {
                    context.getSharedPreferences(AROUTER_SP_CACHE_KEY, Context.MODE_PRIVATE)
                        .edit()
                        .putStringSet(AROUTER_SP_KEY_MAP, routerMap)
                        .apply();
                }
                // 更新版本信息,避免重复更新
                PackageUtils.updateVersion(context);
            } else {
            // 2. 从缓存中加载路由表
                logger.info(TAG, "Load router map from cache.");

                routerMap = new HashSet<>(
                    context.getSharedPreferences(AROUTER_SP_CACHE_KEY, Context.MODE_PRIVATE)
                    .getStringSet(AROUTER_SP_KEY_MAP, new HashSet<String>())
                );
            }

            //遍历帮助类,区分是哪种帮助类,然后反射创建帮助类实例后,调用其loadInto方法来填充Warehouse相应的Map
            for (String className : routerMap) {
                if (className.startsWith(ROUTE_ROOT_PAKCAGE + DOT + SDK_NAME + SEPARATOR + SUFFIX_ROOT)) {
                    //类名开头:com.alibaba.android.arouter.routes.ARouter$$Root
                    //填充Warehouse.groupsIndex,即所有IRouteGroup实现类的class对象
                    ((IRouteRoot) (Class.forName(className).getConstructor().newInstance())).loadInto(Warehouse.groupsIndex);
                } else if (className.startsWith(ROUTE_ROOT_PAKCAGE + DOT + SDK_NAME + SEPARATOR + SUFFIX_INTERCEPTORS)) {
                    //类名开头:com.alibaba.android.arouter.routes.ARouter$$Interceptors
                    //填充Warehouse.interceptorsIndex,即所有IInterceptor实现类的class对象
                    ((IInterceptorGroup) (Class.forName(className).getConstructor().newInstance())).loadInto(Warehouse.interceptorsIndex);
                } else if (className.startsWith(ROUTE_ROOT_PAKCAGE + DOT + SDK_NAME + SEPARATOR + SUFFIX_PROVIDERS)) {
                    //类名开头:com.alibaba.android.arouter.routes.ARouter$$Providers
                    //填充Warehouse.providersIndex,即所有provider的RouteMeta
                    ((IProviderGroup) (Class.forName(className).getConstructor().newInstance())).loadInto(Warehouse.providersIndex);
                }
            }
        }

        logger.info(TAG, "Load root element finished, cost " + (System.currentTimeMillis() - startInit) + " ms.");

        // 如果未找到任何路由映射文件,抛出错误日志
        if (Warehouse.groupsIndex.size() == 0) {
            logger.error(TAG, "No mapping files were found, check your configuration please!");
        }

        // 如果是调试模式,打印加载的索引信息
        if (ARouter.debuggable()) {
            logger.debug(TAG, String.format(Locale.getDefault(),
                                            "LogisticsCenter has already been loaded, GroupIndex[%d], InterceptorIndex[%d], ProviderIndex[%d]",
                                            Warehouse.groupsIndex.size(),
                                            Warehouse.interceptorsIndex.size(),
                                            Warehouse.providersIndex.size()));
        }
    } catch (Exception e) {
        // 捕获异常并抛出 HandlerException
        throw new HandlerException(TAG + "ARouter init logistics center exception! [" + e.getMessage() + "]");
    }
}
总结:
- 确定路由表的加载方式(插件自动注册(编译时)或手动扫描(运行时)。
- 判断是否需要重建路由表(调试模式或版本变化)。
- 加载路由表信息到内存(通过反射机制调用生成的类)。
- 提供异常处理和性能数据统计。
帮助类
根帮助类
路由组元信息的收集是通过根帮助类
用来实现对 WareHouse.groupsIndex 赋值
static Map<String, Class<? extends IRouteGroup>> groupsIndex = new HashMap<>();
- 把path第一级相同的所以路由分到同一个组中。
key:组名
value:组帮助类
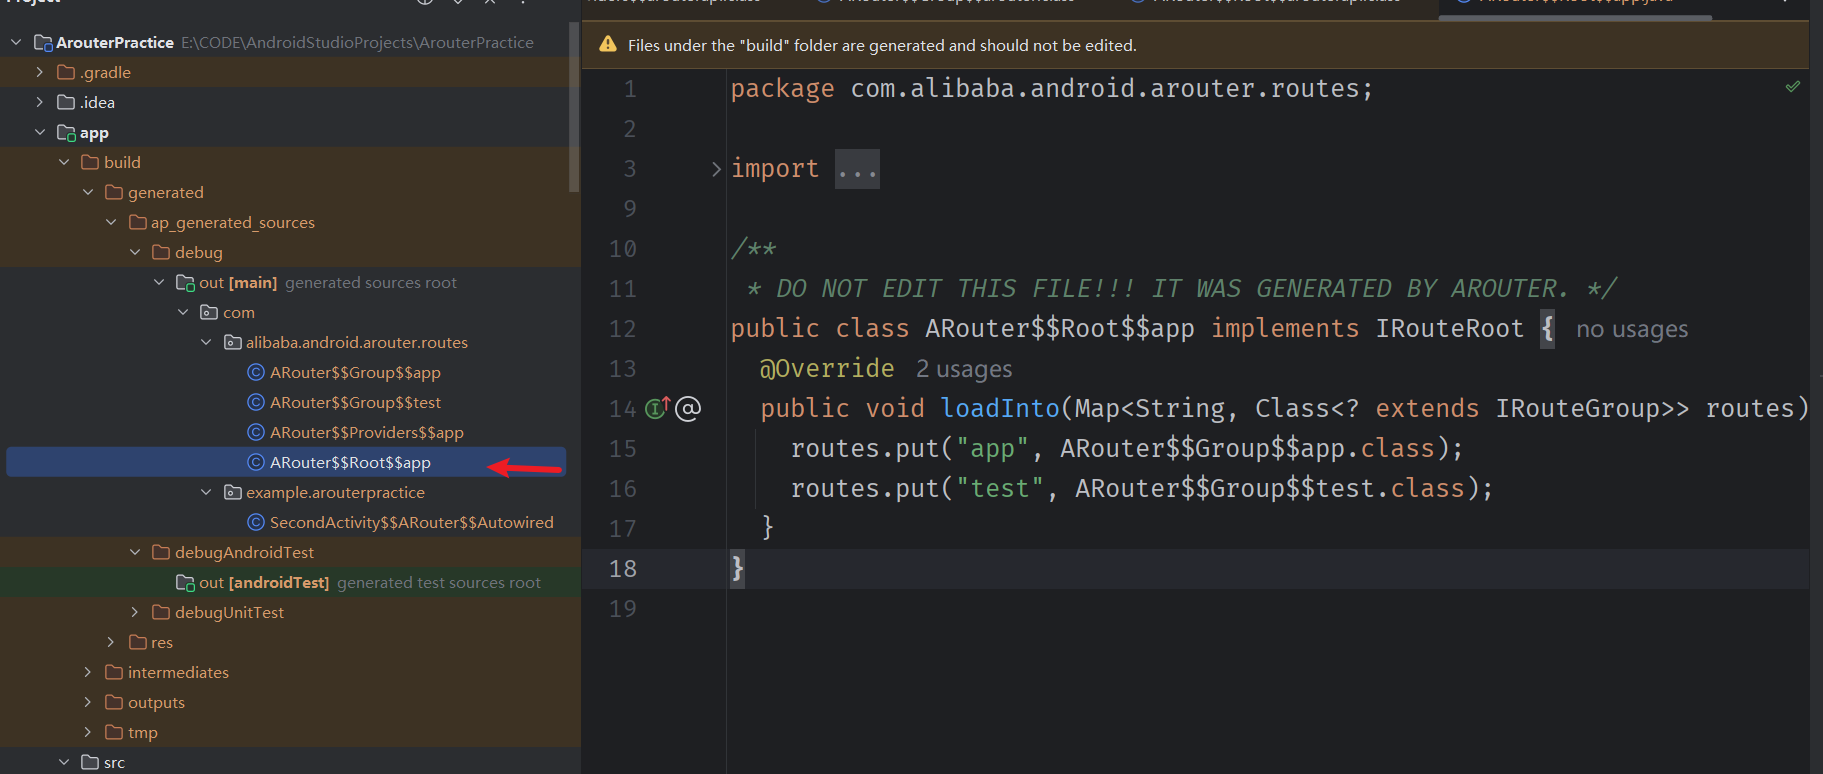
这里loadInto方法的参数类型就是groupsIndex的类型
// LogisticsCenter.java
public synchronized static void init(Context context, ThreadPoolExecutor tpe) throws HandlerException {
    ...
        for (String className : routerMap) {
            if (className.startsWith(ROUTE_ROOT_PAKCAGE + DOT + SDK_NAME + SEPARATOR + SUFFIX_ROOT)) {
                //类名开头:com.alibaba.android.arouter.routes.ARouter$$Root
                //填充Warehouse.groupsIndex,即所有IRouteGroup实现类的class对象
                ((IRouteRoot) (Class.forName(className).getConstructor().newInstance())).loadInto(Warehouse.groupsIndex);
            }
            ...
        }
}
组帮助类
帮助WareHouse填充Warehouse.routes
static Map<String, RouteMeta> routes = new HashMap<>();
package com.alibaba.android.arouter.routes;
public class ARouter$$Group$$test implements IRouteGroup {
  @Override
  public void loadInto(Map<String, RouteMeta> atlas) {
    atlas.put("/test/SecondActivity", RouteMeta.build(RouteType.ACTIVITY, SecondActivity.class, "/test/secondactivity", "test", new java.util.HashMap<String, Integer>(){{put("key1", 8); put("key2", 0); }}, -1, -2147483648));
  }
}
可以看到每个路由的目标类class被放在了RouteMeta里
completion
/**
 * 尝试完成 Postcard 的路由信息填充,包括加载动态分组路由和设置目标类。
 *
 * @param postcard 路由信息的载体,目前只包含 path 和 group 属性
 */
public synchronized static void completion(Postcard postcard) {
    // 检查 Postcard 是否为空
    if (null == postcard) {
        throw new NoRouteFoundException(TAG + "No postcard!");
    }

    // 尝试通过 path 获取路由元信息
    RouteMeta routeMeta = Warehouse.routes.get(postcard.getPath());
    if (null == routeMeta) {
        // 如果未获取到路由元信息,检查是否有该组的帮助类
        if (!Warehouse.groupsIndex.containsKey(postcard.getGroup())) {
            throw new NoRouteFoundException(TAG + "There is no route match the path ["
                + postcard.getPath() + "], in group [" + postcard.getGroup() + "]");
        } else {
            try {
                // 如果存在该组的帮助类,加载该组的所有路由
                if (ARouter.debuggable()) {
                    logger.debug(TAG, String.format(Locale.getDefault(),
                        "The group [%s] starts loading, trigger by [%s]",
                        postcard.getGroup(), postcard.getPath()));
                }

                // 加载分组路由
                addRouteGroupDynamic(postcard.getGroup(), null);

                if (ARouter.debuggable()) {
                    logger.debug(TAG, String.format(Locale.getDefault(),
                        "The group [%s] has already been loaded, trigger by [%s]",
                        postcard.getGroup(), postcard.getPath()));
                }
            } catch (Exception e) {
                // 如果加载分组出错,抛出异常
                throw new HandlerException(TAG + "Fatal exception when loading group meta. ["
                    + e.getMessage() + "]");
            }

            // 加载完成后,递归调用 completion 以重新获取路由元信息
            completion(postcard);
            return;
        }
    } else {
        // 如果获取到路由元信息,将其同步到 Postcard 中
        postcard.setDestination(routeMeta.getDestination());
        postcard.setType(routeMeta.getType());
        postcard.setPriority(routeMeta.getPriority());
        postcard.setExtra(routeMeta.getExtra());

        // 如果包含原始 URI,则解析参数并设置到 Postcard 中
        Uri rawUri = postcard.getUri();
        if (null != rawUri) {
            Map<String, String> resultMap = TextUtils.splitQueryParameters(rawUri);
            Map<String, Integer> paramsType = routeMeta.getParamsType();

            if (MapUtils.isNotEmpty(paramsType)) {
                // 按类型设置参数值,仅处理使用 @Param 注解的参数
                for (Map.Entry<String, Integer> params : paramsType.entrySet()) {
                    setValue(postcard, params.getValue(), params.getKey(), resultMap.get(params.getKey()));
                }

                // 保存需要自动注入的参数名
                postcard.getExtras().putStringArray(ARouter.AUTO_INJECT, paramsType.keySet().toArray(new String[]{}));
            }

            // 保存原始 URI
            postcard.withString(ARouter.RAW_URI, rawUri.toString());
        }

        // 根据路由类型进一步处理
        switch (routeMeta.getType()) {
            case PROVIDER: // 如果是服务类型的路由
                // 确认目标类实现了 IProvider 接口
                Class<? extends IProvider> providerMeta = (Class<? extends IProvider>) routeMeta.getDestination();
                IProvider instance = Warehouse.providers.get(providerMeta);
                if (null == instance) { // 如果服务实例尚未创建
                    try {
                        // 创建服务实例并初始化
                        IProvider provider = providerMeta.getConstructor().newInstance();
                        provider.init(mContext);
                        // 存入服务仓库
                        Warehouse.providers.put(providerMeta, provider);
                        instance = provider;
                    } catch (Exception e) {
                        logger.error(TAG, "Init provider failed!", e);
                        throw new HandlerException("Init provider failed!");
                    }
                }
                postcard.setProvider(instance); // 设置服务实例
                postcard.greenChannel();       // 跳过拦截器
                break;

            case FRAGMENT: // 如果是 Fragment 类型的路由
                postcard.greenChannel();       // Fragment 也跳过拦截器
            default:
                break;
        }
    }
}
尝试获取路由元信息 → 检查并加载路由组 → 同步元信息 → 判断目标类并处理
总结
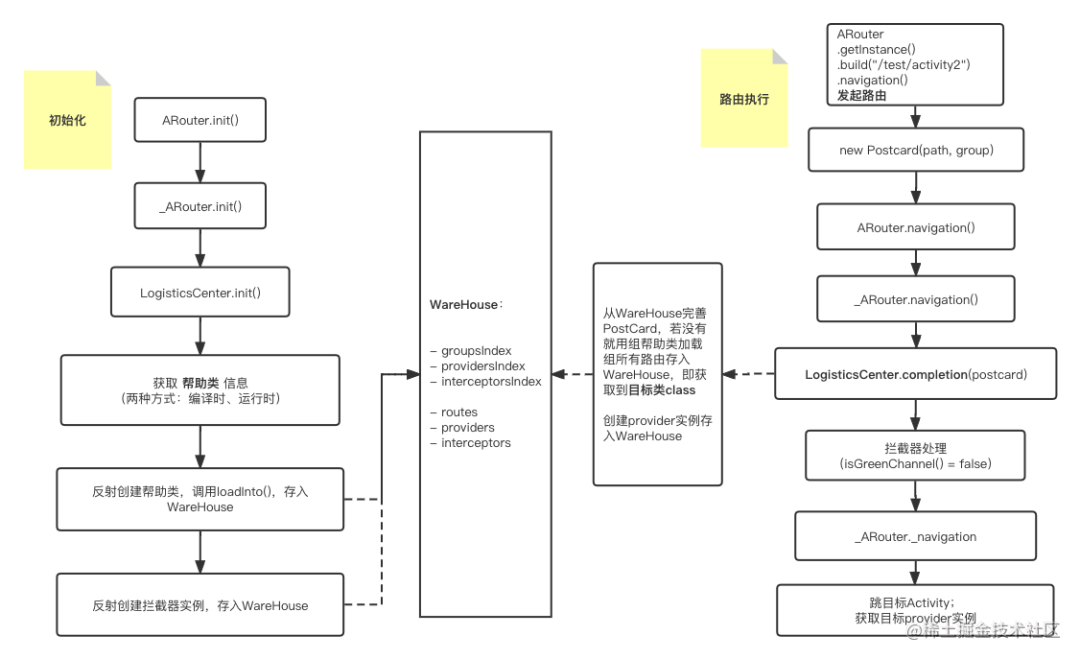

参考:
- “终于懂了” 系列:组件化框架 ARouter 完全解析(一) 原理详解-腾讯云开发者社区-腾讯云 (tencent.com)
- ARouter源码解析(一)-腾讯云开发者社区-腾讯云 (tencent.com)
- ARouter/README_CN.md at master · alibaba/ARouter (github.com)


