精品专题:
01.《C语言从不挂科到高绩点》课程详细笔记
https://blog.csdn.net/yueyehuguang/category_12753294.html?spm=1001.2014.3001.5482
02. 《SpringBoot详细教程》课程详细笔记
https://blog.csdn.net/yueyehuguang/category_12789841.html?spm=1001.2014.3001.5482
03.《SpringBoot电脑商城项目》课程详细笔记
https://blog.csdn.net/yueyehuguang/category_12752883.html?spm=1001.2014.3001.5482
04.《VUE3.0 核心教程》课程详细笔记
https://blog.csdn.net/yueyehuguang/category_12769996.html?spm=1001.2014.3001.5482
05. 《SSM详细教程》课程详细笔记
https://blog.csdn.net/yueyehuguang/category_12806942.html?spm=1001.2014.3001.5482
================================
|| 持续分享系列教程,关注一下不迷路 ||
|| 视频教程:墨轩大楼 ||
================================
📚 整合思路
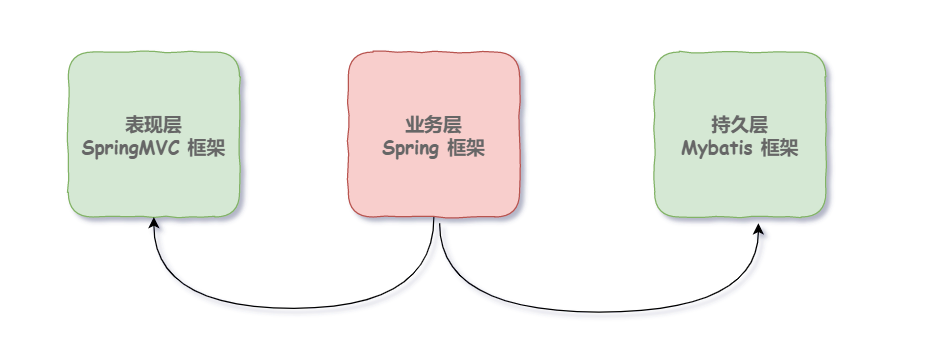
👇👇👇 先看看下面一张图:

使用Spring去整合另外两个框架,选择XML+注解的方式
- Spring接管Service层,
- Mybatis接管Dao层和Bean层。
- SpringMVC接管Controller层
📚 整合步骤
🌾 新建项目添加依赖
SSM整合所需的基础依赖:
- 数据库驱动、连接池、Mybatis依赖
- Spring 开发包
- JSTL 依赖包
- Spring 整合MyBatis包
- JSON 包
- 日志相关包
具体包的依赖参照下面代码:
    <properties>
        <maven.compiler.target>1.8</maven.compiler.target>
        <maven.compiler.source>1.8</maven.compiler.source>
        <junit.version>5.7.0</junit.version>
        <spring.version>5.3.12</spring.version>
        <slf4j.version>1.6.6</slf4j.version>
        <log4j.version>1.2.17</log4j.version>
        <mysql.version>8.0.1</mysql.version>
        <mybatis.version>3.4.5</mybatis.version>
    </properties>


    <dependencies>
        <!--Spring所需Jar-->
        <dependency>
            <groupId>org.springframework</groupId>
            <artifactId>spring-context</artifactId>
            <version>${spring.version}</version>
        </dependency>
        <dependency>
            <groupId>org.springframework</groupId>
            <artifactId>spring-jdbc</artifactId>
            <version>${spring.version}</version>
        </dependency>
        <dependency>
            <groupId>org.springframework</groupId>
            <artifactId>spring-context-support</artifactId>
            <version>${spring.version}</version>
        </dependency>
        <!--spring集成Junit-->
        <dependency>
            <groupId>org.springframework</groupId>
            <artifactId>spring-test</artifactId>
            <version>${spring.version}</version>
            <scope>provided</scope>
        </dependency>
        <!--Log4j所需Jar-->
        <dependency>
            <groupId>log4j</groupId>
            <artifactId>log4j</artifactId>
            <version>1.2.17</version>
        </dependency>
        <!--AOP所需Jar-->
        <dependency>
            <groupId>org.aspectj</groupId>
            <artifactId>aspectjrt</artifactId>
            <version>1.8.10</version>
        </dependency>
        <dependency>
            <groupId>org.aspectj</groupId>
            <artifactId>aspectjweaver</artifactId>
            <version>1.8.10</version>
        </dependency>
        <!--Servlet所需Jar-->
        <dependency>
            <groupId>javax.servlet</groupId>
            <artifactId>javax.servlet-api</artifactId>
            <version>3.1.0</version>
            <scope>provided</scope>
        </dependency>
        <!--SpringMVC依赖-->
        <dependency>
            <groupId>org.springframework</groupId>
            <artifactId>spring-webmvc</artifactId>
            <version>${spring.version}</version>
        </dependency>
        <!--Mybatis依赖-->
        <dependency>
            <groupId>org.mybatis</groupId>
            <artifactId>mybatis</artifactId>
            <version>3.2.2</version>
        </dependency>
        <!--Spring和Mybatis集成插件-->
        <dependency>
            <groupId>org.mybatis</groupId>
            <artifactId>mybatis-spring</artifactId>
            <version>1.2.2</version>
        </dependency>
        <!--Mysql连接连接驱动-->
        <dependency>
            <groupId>mysql</groupId>
            <artifactId>mysql-connector-java</artifactId>
            <version>8.0.25</version>
        </dependency>
        <!--数据源JDBC、C3P0、Druid-->
        <dependency>
            <groupId>com.alibaba</groupId>
            <artifactId>druid</artifactId>
            <version>1.2.8</version>
        </dependency>
        <!-- JSTL标签类 -->
        <dependency>
            <groupId>jstl</groupId>
            <artifactId>jstl</artifactId>
            <version>1.2</version>
        </dependency>
        <!--可添加-->
        <!-- 上传组件包 -->
        <dependency>
            <groupId>commons-fileupload</groupId>
            <artifactId>commons-fileupload</artifactId>
            <version>1.3.1</version>
        </dependency>
        <dependency>
            <groupId>commons-io</groupId>
            <artifactId>commons-io</artifactId>
            <version>2.4</version>
        </dependency>
        <dependency>
            <groupId>commons-codec</groupId>
            <artifactId>commons-codec</artifactId>
            <version>1.9</version>
        </dependency>

        <dependency>
            <groupId>com.fasterxml.jackson.core</groupId>
            <artifactId>jackson-annotations</artifactId>
            <version>2.10.2</version>
        </dependency>
        <dependency>
            <groupId>com.fasterxml.jackson.core</groupId>
            <artifactId>jackson-databind</artifactId>
            <version>2.10.2</version>
        </dependency>
        <dependency>
            <groupId>com.fasterxml.jackson.core</groupId>
            <artifactId>jackson-core</artifactId>
            <version>2.10.2</version>
        </dependency>
        <dependency>
            <groupId>org.slf4j</groupId>
            <artifactId>slf4j-api</artifactId>
            <version>1.7.36</version>
        </dependency>
        <dependency>
            <groupId>org.slf4j</groupId>
            <artifactId>slf4j-log4j12</artifactId>
            <version>1.7.7</version>
        </dependency>
        <dependency>
            <groupId>org.projectlombok</groupId>
            <artifactId>lombok</artifactId>
            <version>RELEASE</version>
            <scope>compile</scope>
        </dependency>
    </dependencies>
🌾 Spring 整合Mybaits
在resources目录中添加mysql.properties 配置文件,主要配置一下Mysql数据源相关的信息,具体代码如下:
driver=com.mysql.cj.jdbc.Driver
url=jdbc:mysql://localhost:3306/mx_snack?useUnicode=true&characterEncoding=utf-8
username=root
password=root
#定义初始连接数
initialSize=0
#定义最大连接数
maxActive=20
#定义最小空闲
minIdle=1
#定义最长等待时间
maxWait=60000
在resources目录中添加spring-mybatis.xml 配置文件,主要配置一下数据源、mapping文件路径、映射器路径以及事务相关的内容,具体代码如下:
<?xml version="1.0" encoding="UTF-8"?>
<beans xmlns="http://www.springframework.org/schema/beans"
  xmlns:xsi="http://www.w3.org/2001/XMLSchema-instance"
  xmlns:context="http://www.springframework.org/schema/context"
  xmlns:utils="http://www.springframework.org/schema/util" xmlns:tx="http://www.springframework.org/schema/tx"
  xmlns:aop="http://www.springframework.org/schema/aop"
  xsi:schemaLocation="http://www.springframework.org/schema/beans http://www.springframework.org/schema/beans/spring-beans.xsd http://www.springframework.org/schema/context https://www.springframework.org/schema/context/spring-context.xsd http://www.springframework.org/schema/util https://www.springframework.org/schema/util/spring-util.xsd http://www.springframework.org/schema/tx http://www.springframework.org/schema/tx/spring-tx.xsd http://www.springframework.org/schema/aop https://www.springframework.org/schema/aop/spring-aop.xsd">
  <!-- 自动扫描的路径-->
  <context:component-scan base-package="com.moxuan.SSM"></context:component-scan>
  <!-- 引入配置文件
  classpath:只会到你指定的class路径中查找找文件;

  -->
  <utils:properties location="classpath*:mysql.properties" id="mysql"></utils:properties>

  <!-- 配置数据源-->
  <bean id="dataSource" class="com.alibaba.druid.pool.DruidDataSource">
    <!-- 配置数据库链接基本信息-->
    <property name="url" value="#{mysql.url}" />
    <property name="driverClassName" value="#{mysql.driver}"/>
    <property name="username" value="#{mysql.username}" />
    <property name="password" value="#{mysql.password}" />
    <!-- 初始化连接大小-->
    <property name="initialSize" value="#{mysql.initialSize}"/>
    <!-- 连接池最大数量-->
    <property name="maxActive" value="#{mysql.maxActive}"/>
    <!-- 连接池最小空闲 -->
    <property name="minIdle" value="#{mysql.minIdle}"/>
  </bean>

  <!-- Mapping 文件-->
  <!-- Spring 和mybatis完美整合,不需要mybatis的配置文件-->
  <bean id="sqlSessionFactory" class="org.mybatis.spring.SqlSessionFactoryBean">
    <property name="dataSource" ref="dataSource"/>
    <!-- 配置实体类的别名-->
    <property name="typeAliasesPackage" value="com.moxuan.SSM.pojo"/>
    <!-- 自动扫描mapping.xml映射文件-->
    <property name="mapperLocations" value="classpath:mappers/*.xml"/>
  </bean>

  <!-- Dao 接口-->
  <bean class="org.mybatis.spring.mapper.MapperScannerConfigurer">
    <!-- 配置 Dao 接口所在的包名,Spring会自动查找其下的类-->
    <property name="basePackage" value="com.moxuan.SSM.dao"/>
    <property name="sqlSessionFactoryBeanName" value="sqlSessionFactory"/>
  </bean>

  <!-- (事务管理)transaction manager, use JtaTransactionManager for global tx -->
  <bean id="transactionManager" class="org.springframework.jdbc.datasource.DataSourceTransactionManager">
    <property name="dataSource" ref="dataSource" />
  </bean>

  <tx:annotation-driven transaction-manager="transactionManager" />
  <aop:config>
    <aop:pointcut expression="execution(* com.moxuan.SSM.service..*.*(..))" id="productServiceMethods" />
      <aop:advisor advice-ref="txAdvice" pointcut-ref="productServiceMethods" />
      </aop:config>
      <tx:advice id="txAdvice" transaction-manager="transactionManager">
      <tx:attributes>
        <tx:method name="save*" propagation="REQUIRED" />
        <tx:method name="delete*" propagation="REQUIRED" />
        <tx:method name="modify*" propagation="REQUIRED" />
        <tx:method name="insert*" propagation="REQUIRED" />
        <tx:method name="remove*" propagation="REQUIRED" />
        <tx:method name="update*" propagation="REQUIRED" />
        <tx:method name="find*" propagation="REQUIRED" read-only="true" />
        <tx:method name="get*" propagation="REQUIRED" read-only="true" />
        <tx:method name="*" />
      </tx:attributes>
      </tx:advice>
      </beans>
👉 需要注意的点:
- classpath 和 classpath* 的区别(面试题):
- classpath:只会到你指定的class路径中查找找文件;
- classpath*:不仅到指定的class路径中查找文件,也会去指定文件的子路径下去查找文件,还包括jar文件中(class路径)进行查找.
- 事务相关配置中的propagation属性相关属性如下(了解):
- Propagation.REQUIRED:如果当前没有事务,就新建一个事务,如果已经存在一个事务中,则加入到这个事务中。默认属性,也是最常使用。
- Propagation.NESTED:如果当前存在事务,则在嵌套事务内执行。如果当前没有事务,则执行与Propagation.REQUIRED类似的操作。
- Propagation.REQUIRES_NEW:新建事务,如果当前存在事务,把当前事务挂起
- Propagation.SUPPORTS:支持当前事务,如果当前没有事务,就以非事务方式执行。
- Propagation.MANDATORY:使用当前的事务,如果当前没有事务,就抛出异常。
- Propagation.NOT_SUPPORTED:以非事务方式执行操作,如果当前存在事务,就把当前事务挂起。
- PROPAGATION_NEVER:以非事务方式执行,如果当前存在事务,则抛出异常。
🌾 SpringMvc 相关配置
在resources目录中添加springmvc.xml添加mvc相关的配置,具体代码如下:
<?xml version="1.0" encoding="UTF-8"?>
<beans xmlns="http://www.springframework.org/schema/beans"
       xmlns:xsi="http://www.w3.org/2001/XMLSchema-instance"
       xmlns:context="http://www.springframework.org/schema/context"
       xsi:schemaLocation="http://www.springframework.org/schema/beans http://www.springframework.org/schema/beans/spring-beans.xsd http://www.springframework.org/schema/context https://www.springframework.org/schema/context/spring-context.xsd">

    <!--自动扫描包路径,扫描@Controller控制器类-->
    <context:component-scan base-package="com.moxuan.SSM.controller"/>
  <!-- aop 注解扫描-->
 	 <aop:aspectj-autoproxy/>
    <!--
        JSON 转换器
    -->
    <bean class="org.springframework.web.servlet.mvc.method.annotation.RequestMappingHandlerAdapter">
        <property name="messageConverters">
            <list>
                <bean class="org.springframework.http.converter.StringHttpMessageConverter"/>
                <bean class="org.springframework.http.converter.json.MappingJackson2HttpMessageConverter"/>
            </list>
        </property>
    </bean>

    <!-- 3.x version -->
    <!-- HandlerMapping 托管映射处理器 RequestMappingHandlerMapping -->
    <bean class="org.springframework.web.servlet.mvc.method.annotation.RequestMappingHandlerMapping"/>
    <!-- HandlerAdapter 托管适配处理器 RequestMappingHandlerAdapter-->
    <bean class="org.springframework.web.servlet.mvc.method.annotation.RequestMappingHandlerAdapter"/>
    <!-- 避免IE执行Ajax时,返回JSON出现下载文件-->
    <bean id="mappingJacksonHttpMessageConverter" class="org.springframework.http.converter.json.MappingJackson2HttpMessageConverter">
        <property name="supportedMediaTypes">
            <list>
                <value>text/html;charset=UTF-8</value>
            </list>
        </property>
    </bean>

    <!-- ViewResolver 托管视图解析器-->
    <bean class="org.springframework.web.servlet.view.InternalResourceViewResolver">
        <!--前缀-->
        <property name="prefix" value="/WEB-INF/jsp/"/>
        <!--后缀-->
        <property name="suffix" value=".jsp"/>
        <!--视图支持类,视图支持JSTL-->
        <property name="viewClass" value="org.springframework.web.servlet.view.JstlView"/>
    </bean>

    <!-- 配置文件上传,如果没有使用文件上传可以不用配置,当然如果不配,那么配置文件中也不必引入上传组件包 -->
    <bean id="multipartResolver" class="org.springframework.web.multipart.commons.CommonsMultipartResolver">
        <!-- 默认编码 -->
        <property name="defaultEncoding" value="utf-8"/>
        <!-- 文件大小最大值 -->
        <property name="maxUploadSize" value="10485760000"/>
        <!-- 内存中的最大值 -->
        <property name="maxInMemorySize" value="40960"/>
    </bean>
</beans>
👉 需要注意的点:
为了避免IE执行Ajax时,返回JSON数据时,客户端却显示下载文件这种情况,我们新增了一个mappingJacksonHttpMessageConverter 配置。
🌾 配置web.xml
在项目的web.xml中对Spring-mybaits.xml、Spring-mvc.xml配置文件进行引入,配置一下DispatcherServlet和编码过滤器。
<?xml version="1.0" encoding="UTF-8"?>
<web-app xmlns="http://xmlns.jcp.org/xml/ns/javaee"
         xmlns:xsi="http://www.w3.org/2001/XMLSchema-instance"
         xsi:schemaLocation="http://xmlns.jcp.org/xml/ns/javaee http://xmlns.jcp.org/xml/ns/javaee/web-app_4_0.xsd"
         version="4.0">
    <context-param>
        <param-name>contextConfigLocation</param-name>
        <param-value>classpath:spring-mybatis.xml</param-value>
    </context-param>

    <!-- 配置编码过滤器-->
    <filter>
        <filter-name>encodingFilter</filter-name>
        <filter-class>org.springframework.web.filter.CharacterEncodingFilter</filter-class>
        <async-supported>true</async-supported>
        <init-param>
            <param-name>encoding</param-name>
            <param-value>UTF-8</param-value>
        </init-param>
    </filter>
    <filter-mapping>
        <filter-name>encodingFilter</filter-name>
        <url-pattern>/*</url-pattern>
    </filter-mapping>

    <!-- Spring 监听器-->
    <listener>
        <listener-class>org.springframework.web.context.ContextLoaderListener</listener-class>
    </listener>
    <!-- 防止Spring内存溢出监听器-->
    <listener>
        <listener-class>org.springframework.web.util.IntrospectorCleanupListener</listener-class>
    </listener>
<!--  配置DispatcherServlet  -->
    <servlet>
        <servlet-name>ssm</servlet-name>
        <servlet-class>org.springframework.web.servlet.DispatcherServlet</servlet-class>
        <init-param>
            <param-name>contextConfigLocation</param-name>
            <param-value>classpath:spring-mvc.xml</param-value>
        </init-param>
        <load-on-startup>1</load-on-startup>
    </servlet>

    <servlet-mapping>
        <servlet-name>ssm</servlet-name>
        <url-pattern>/</url-pattern>
    </servlet-mapping>
</web-app>
🌾 测试SpringMVC环境
在WEB-INF目录下的jsp目录中新建一个show.jsp,代码如下:
<%@ page contentType="text/html;charset=UTF-8" language="java" %>
<html>
<head>
    <title>Title</title>
</head>
<body>
	<h1 style="color:green">老子是爱坤!</h1>
</body>
</html>
在controller目录下编写控制器类,代码如下:
@Controller
public class SnackController {

    @RequestMapping("/show")
    public String showIndex(){
        return "show";
    }
}
启动服务器,访问地址:http://localhost:8080/SSM_war_exploded/show
显示结果如下图:

🌾 测试Mybatis环境
🍁 数据库建表语句
SET FOREIGN_KEY_CHECKS=0;

-- ----------------------------
-- Table structure for `snack`
-- ----------------------------
DROP TABLE IF EXISTS `snack`;
CREATE TABLE `snack` (
  `id` int NOT NULL AUTO_INCREMENT,
  `pic` varchar(255) DEFAULT NULL,
  `name` varchar(255) DEFAULT NULL,
  `type_id` int DEFAULT NULL,
  `old_price` double DEFAULT NULL,
  `now_price` double DEFAULT NULL,
  `activity_id` int DEFAULT NULL,
  `description` varchar(500) DEFAULT NULL,
  `supplier_id` varchar(255) DEFAULT NULL,
  `add_time` timestamp NULL DEFAULT NULL ON UPDATE CURRENT_TIMESTAMP,
  `sales_volume` int DEFAULT NULL,
  `stock` int DEFAULT NULL,
  `status` int DEFAULT '0',
  PRIMARY KEY (`id`)
) ENGINE=InnoDB AUTO_INCREMENT=3 DEFAULT CHARSET=utf8mb3;

-- ----------------------------
-- Records of snack
-- ----------------------------
INSERT INTO `snack` VALUES ('1', 'img/卫龙辣条.jpg', '卫龙辣条', '4', '10', '6', '1', '卫龙辣条,好吃上头、不是10块买不起,而是6块更有性价比', '1', '2023-08-22 09:13:05', '4000', '5000', '0');

-- ----------------------------
-- Table structure for `snack_type`
-- ----------------------------
DROP TABLE IF EXISTS `snack_type`;
CREATE TABLE `snack_type` (
  `id` int NOT NULL AUTO_INCREMENT,
  `name` varchar(255) DEFAULT NULL,
  PRIMARY KEY (`id`)
) ENGINE=InnoDB AUTO_INCREMENT=9 DEFAULT CHARSET=utf8;

-- ----------------------------
-- Records of snack_type
-- ----------------------------
INSERT INTO `snack_type` VALUES ('1', '水果');
INSERT INTO `snack_type` VALUES ('2', '干果');
INSERT INTO `snack_type` VALUES ('3', '饮料');
INSERT INTO `snack_type` VALUES ('4', '辣条');
INSERT INTO `snack_type` VALUES ('5', '豆干');
INSERT INTO `snack_type` VALUES ('6', '果冻');
INSERT INTO `snack_type` VALUES ('7', '糖果');
INSERT INTO `snack_type` VALUES ('8', '其他');

-- ----------------------------
-- Table structure for `supplier`
-- ----------------------------
DROP TABLE IF EXISTS `supplier`;
CREATE TABLE `supplier` (
  `id` int NOT NULL AUTO_INCREMENT,
  `name` varchar(255) DEFAULT NULL,
  `address` varchar(255) DEFAULT NULL,
  `contacts` varchar(255) DEFAULT NULL,
  `telephone` varchar(255) DEFAULT NULL,
  `available_sources` varchar(255) DEFAULT NULL,
  PRIMARY KEY (`id`)
) ENGINE=InnoDB AUTO_INCREMENT=3 DEFAULT CHARSET=utf8;

-- ----------------------------
-- Records of supplier
-- ----------------------------
INSERT INTO `supplier` VALUES ('1', '福建盼盼食品有限公司', '福建省晋江市安海镇前蔡工业区', '张三丰', '400-0585985', '饮料、干果、辣条');
INSERT INTO `supplier` VALUES ('2', '杭州娃哈哈集团有限公司\r\n杭州娃哈哈集团有限公司\r\n杭州娃哈哈集团有限公司\r\n', '浙江省杭州市娃娃集团', '宗董', '400-0585998', '饮料、小零食');
🍁 新建实体类
零食类,Snack.java
package com.moxuan.mx_snack.pojo;

import lombok.AllArgsConstructor;
import lombok.Data;
import lombok.NoArgsConstructor;

import java.sql.Timestamp;

@Data
@NoArgsConstructor
@AllArgsConstructor
public class Snack {
    private Integer id;
    private String pic;
    private String name;
    private Integer typeId;
    private Double oldPrice; // 原价
    private Double nowPrice;  // 现价
    private Integer activityId; // 活动id
    private String description; // 描述
    private Integer supplierId; // 供应商ID
    private Timestamp addTime;  // 上架时间
    private Integer salesVolume; // 销售量
    private Integer stock;  // 库存
      //状态
    private Integer status;//  0为上架   1为下架
}
零食种类,SnackType.java
package com.moxuan.mx_snack.pojo;

import lombok.AllArgsConstructor;
import lombok.Data;
import lombok.NoArgsConstructor;

@Data
@AllArgsConstructor
@NoArgsConstructor
public class SnackType {
    private Integer id;
    private String name;
}
供应商类,Supplier.java
package com.moxuan.mx_snack.pojo;

import lombok.AllArgsConstructor;
import lombok.Data;
import lombok.NoArgsConstructor;

@NoArgsConstructor
@AllArgsConstructor
@Data
public class Supplier {
    private Integer id;
    private String name;
    private String address;
    private String contacts;
    private String telephone;
    private String availableSources;
}
🍁 mapper映射接口
新建一个映射接口,操作数据库
package com.moxuan.SSM.dao;

import org.springframework.stereotype.Repository;

@Repository
public interface SnackDao {

}
🍁 mapper映射文件
在mapper目录中,新建Snack.xml 添加相关映射,零食Snack表通过 type_id 关联Snack_type 零食类型表,通过supplier_id关联supplier表。这里我们设定零食和零食种类是1对1关系,即一个零食只能归属于一个种类。而零食和供应商则为1对1关系,即一种零食只能找一个供应商提供货源。具体映射如下:
<?xml version="1.0" encoding="UTF-8" ?>
<!DOCTYPE mapper
        PUBLIC "-//mybatis.org//DTD Mapper 3.0//EN"
        "http://mybatis.org/dtd/mybatis-3-mapper.dtd">
<!-- 此处的namespace需要对应上dao包中的数据操作接口-->
<mapper namespace="com.moxuan.SSM.dao.SnackDao">

    <resultMap id="snackMap" type="snack">
        <id property="id" column="id"></id>
        <result property="pic" column="pic"></result>
        <result property="name" column="name"/>
        <result property="typeId" column="type_id"/>
        <result property="oldPrice" column="old_price"/>
        <result property="nowPrice" column="now_price"/>
        <result property="activityId" column="activity_id"/>
        <result property="description" column="description"/>
        <result property="supplierId" column="supplier_id"/>
        <result property="addTime" column="add_time"/>
        <result property="sales_volume" column="salesVolume"/>
        <result property="stock" column="stock"/>
        <!-- 关联 零食类型表 snack_type-->
        <association property="snackType" javaType="snackType">
            <id property="id" column="id"/>
            <result property="name" column="name"/>
        </association>
        <!-- 关联供应商 supplier表-->
        <association property="suppliers" javaType="supplier">
            <id property="id"  column="id"/>
            <result property="name" column="name"/>
            <result property="address" column="address"/>
            <result property="contacts" column="contacts"/>
            <result property="telephone" column="telephone"/>
            <result property="availableSources" column="available_sources"/>
        </association>
    </resultMap>

</mapper>
🍁 实体类中添加关联属性
由于我们查询零食时需要做关联查询将零食种类以及供应商相关信息查询出来,那么这个时候需要用地方暂存关联查询出来的数据,因此我们在Snack零食类中新建snackType和supplier两个属性(这两个属性的名字要和关联映射中property中定义的一致)。
/** 零食种类**/
private SnackType snackType;
/** 供应商**/
private Supplier supplier;
🍁 查询SQL语句
在dao接口上使用注解的形式,编写sql语句查询出所有的零食、种类以及供应商信息。
@Repository
public interface SnackDao {

    @Select("select s.* ,t.* , sp.* from snack s " +
            "   left join snack_type t on s.type_id=t.id " +
            "   left join supplier sp on s.supplier_id=sp.id")
    @ResultMap("snackMap")
    List<Snack> findAllSnacks();

}
🍁 编写业务层
在service包中新建一个SnackService,在其中添加一个查询所有零食的业务方法,具体代码如下:
@Service
public class SnackService {
    @Autowired
    SnackDao dao;

    public List<Snack> getAllSnacks() {
        return dao.findAllSnacks();
    }
}
🍁 编写控制器
在先前测试SpringMVC的环境的方法中调用查询的业务逻辑,看是否能够查询到数据,如果能通过请求访问到数据,那么就说明整个SSM环境就可以使用了。代码如下:
@Controller
public class SnackController {
    @Autowired
    SnackService service;

    @RequestMapping("/show")
    public String showIndex(){
        List<Snack> snackList = service.getAllSnacks();
        for (Snack snack:snackList){
            System.out.println(snack);
        }
        return "show";
    }
}
测试结果:


🌾 整合log4J
🍁 Log4J概述
为了方便调试,一般都会使用日志来输出信息,Log4j是Apache的一个开放源代码项目,通过使用Log4j,我们可以控制日志信息输送的目的地是控制台、文件、GUI组件,甚至是套接口服务器、NT的事件记录器、UNIX Syslog守护进程等;我们也可以控制每一条日志的输出格式;通过定义每一条日志信息的级别,我们能够更加细致地控制日志的生成过程。
🍁 Log4J配置
Log4j的配置很简单,而且也是通用的,下面给出一个基本的配置,换到其他项目中也无需做多大的调整,只需要将文件名命名为log4j.properties并将其放到resources目录中即可,配置如下:
#定义日志输出目的地为控制台
log4j.appender.Console=org.apache.log4j.ConsoleAppender
log4j.appender.Console.Target=System.out
#可以灵活地指定日志输出格式,下面一行是指定具体的格式
log4j.appender.Console.layout = org.apache.log4j.PatternLayout
log4j.appender.Console.layout.ConversionPattern=[%c] - %m%n

#文件大小到达指定尺寸的时候产生一个新的文件
log4j.appender.File = org.apache.log4j.RollingFileAppender
#指定输出目录(需要配一个绝对路径)
log4j.appender.File.File = c:/logs/ssm.log
#定义文件最大大小
log4j.appender.File.MaxFileSize = 10MB
# 输出所以日志,如果换成DEBUG表示输出DEBUG以上级别日志
log4j.appender.File.Threshold = ALL
log4j.appender.File.layout = org.apache.log4j.PatternLayout
log4j.appender.File.layout.ConversionPattern =[%p] [%d{yyyy-MM-dd HH\:mm\:ss}][%c]%m%n
🍁 AOP 注解方式开发日志功能
前面我们将AOP的时候给大家讲的是xml配置的方式实现的日志功能,这里我们再教大家用一下注解扫描的检查一下spring-mvc.xml中是否开启了对aop的注解扫描,如果没有开启,需要开启一下,代码如下:
<!-- 开启对aop注解的支持-->
<aop:aspectj-autoproxy/>
接下来在新建一个aspect包,在其中新建一个配置类ServiceLogAspect.java,编写切面组件和切入点,具体代码如下:
package com.moxuan.SSM.controller.aspect;

import org.aspectj.lang.JoinPoint;
import org.aspectj.lang.annotation.Aspect;
import org.aspectj.lang.annotation.Before;
import org.aspectj.lang.annotation.Pointcut;
import org.slf4j.Logger;
import org.slf4j.LoggerFactory;
import org.springframework.stereotype.Component;
import org.springframework.web.context.request.RequestContextHolder;
import org.springframework.web.context.request.ServletRequestAttributes;

import javax.servlet.http.HttpServletRequest;
import java.text.SimpleDateFormat;
import java.util.Date;


@Component
@Aspect
public class ServiceLogAspect {
    // 日志记录员
    private static final Logger logger = LoggerFactory.getLogger(ServiceLogAspect.class);

    @Pointcut("execution(* com.moxuan.SSM.service.*.*(..))")
    public void pointcut(){

    }

    /**
     * 前置通知
     * @param joinPoint
     */
    @Before("pointcut()")
    public void before(JoinPoint joinPoint) {
        // 用户[IP 地址], 在某个时间访问了 [com.moxuan.SSM.service.xxx]
        ServletRequestAttributes attributes = (ServletRequestAttributes) RequestContextHolder.getRequestAttributes();
        if (attributes == null) {
            return ;
        }
        // 获取请求
        HttpServletRequest request = attributes.getRequest();
        // 获取ip
        String ip = request.getRemoteHost();
        // 获取系统当前时间
        String time = new SimpleDateFormat("yyyy-MM-dd HH:mm:ss").format(new Date());
        // 获取执行的方法
        String target = joinPoint.getSignature().getDeclaringTypeName() + "." + joinPoint.getSignature().getName();
        // 记录日志
        logger.info(String.format("用户[%s], 在[%s], 访问了[%s].", ip, time, target));
    }

}
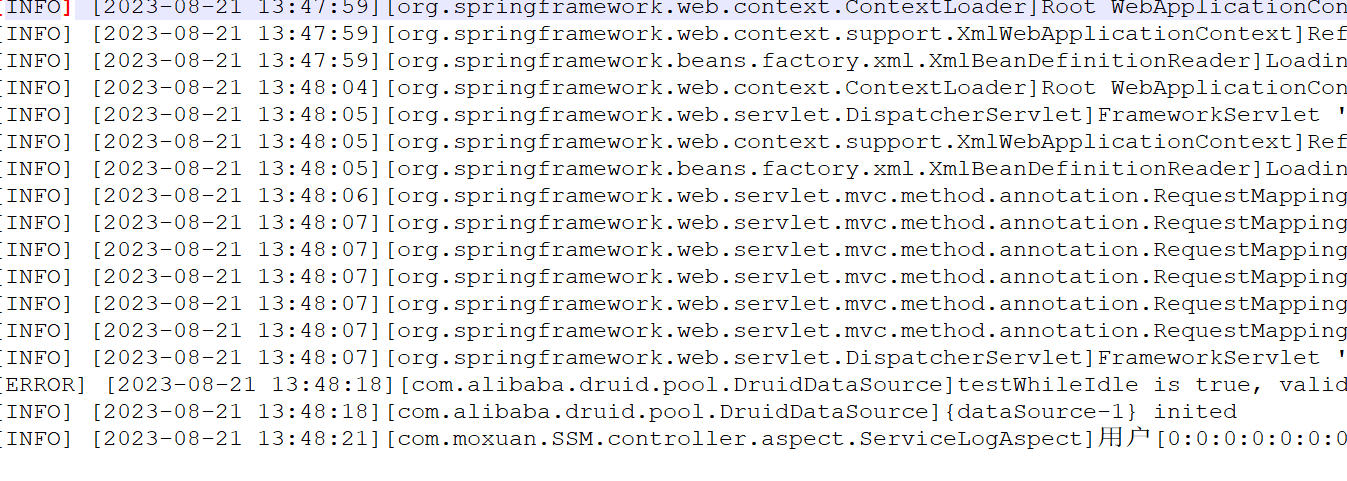
启动服务器,访问请求,前面配的日志输出文件路径是c:/logs/ssm.log,运行之后,会发现该目录下会生成一个新的日志文件,打开之后如图所示:


