目录
布局文件中常见的属性
1. 基本布局属性
1)android:layout_width
2)android:layout_height
3)android:layout_margin
4)android:padding
2. 线性布局 (LinearLayout) 属性
1)android:orientation
2)android:gravity
3)android:layout_weight
4)案例LinearLayout水平布局
1.代码
2.效果
案例:LinearLayout垂直布局
1.代码
2.效果
3. 相对布局 (RelativeLayout) 属性
1)android:layout_alignParentTop/...Bottom/...Left/...Right
2)android:layout_centerInParent
3)android:layout_above/...below/...toLeftOf/...toRightOf
4)android:layout_alignWithParentIfMissing
案例:RelativeLayout相对布局的简单使用
1.代码
2.效果
4. 帧布局 (FrameLayout) 属性
1)android:foreground
2)android:layout_gravity
案例:帧布局的简单使用
1.代码
2.效果
5. 表格布局 (TableLayout) 和表格行 (TableRow) 属性
1)android:collapseColumns
2)android:stretchColumns
案例:表格布局的简单使用
1.代码
2.效果
3.注意
6. 网格布局 (GridLayout) 属性
1)android:rowCount/columnCount
2)android:alignmentMode
3)android:useDefaultMargins
案例:网格布局的简单使用
1.代码
2.效果
7. 其他常用属性
1)android:background
2)android:visibility
3)android:clickable
4)android:focusable
5)android:enabled
6)android:alpha
7)android:id
布局文件中常见的属性
1. 基本布局属性
1)android:layout_width
设置视图的宽度,可以是具体数值(如 100dp)、match_parent(与父元素一样宽)或 wrap_content(根据内容自动调整宽度)。
2)android:layout_height
设置视图的高度,选项同上。
3)android:layout_margin
设置视图外边距,也可以分别设置四个方向的外边距
(android:layout_marginLeft, android:layout_marginTop, android:layout_marginRight, android:layout_marginBottom)。
4)android:padding
设置视图内边距,同样可以分别设置四个方向的内边距(android:paddingLeft, android:paddingTop, android:paddingRight, android:paddingBottom)。
2. 线性布局 (LinearLayout) 属性
1)android:orientation
设置子元素的排列方向,值为 vertical 或 horizontal。
2)android:gravity
设置内容相对于视图的对齐方式。
3)android:layout_weight
分配剩余空间给子视图的比例权重。
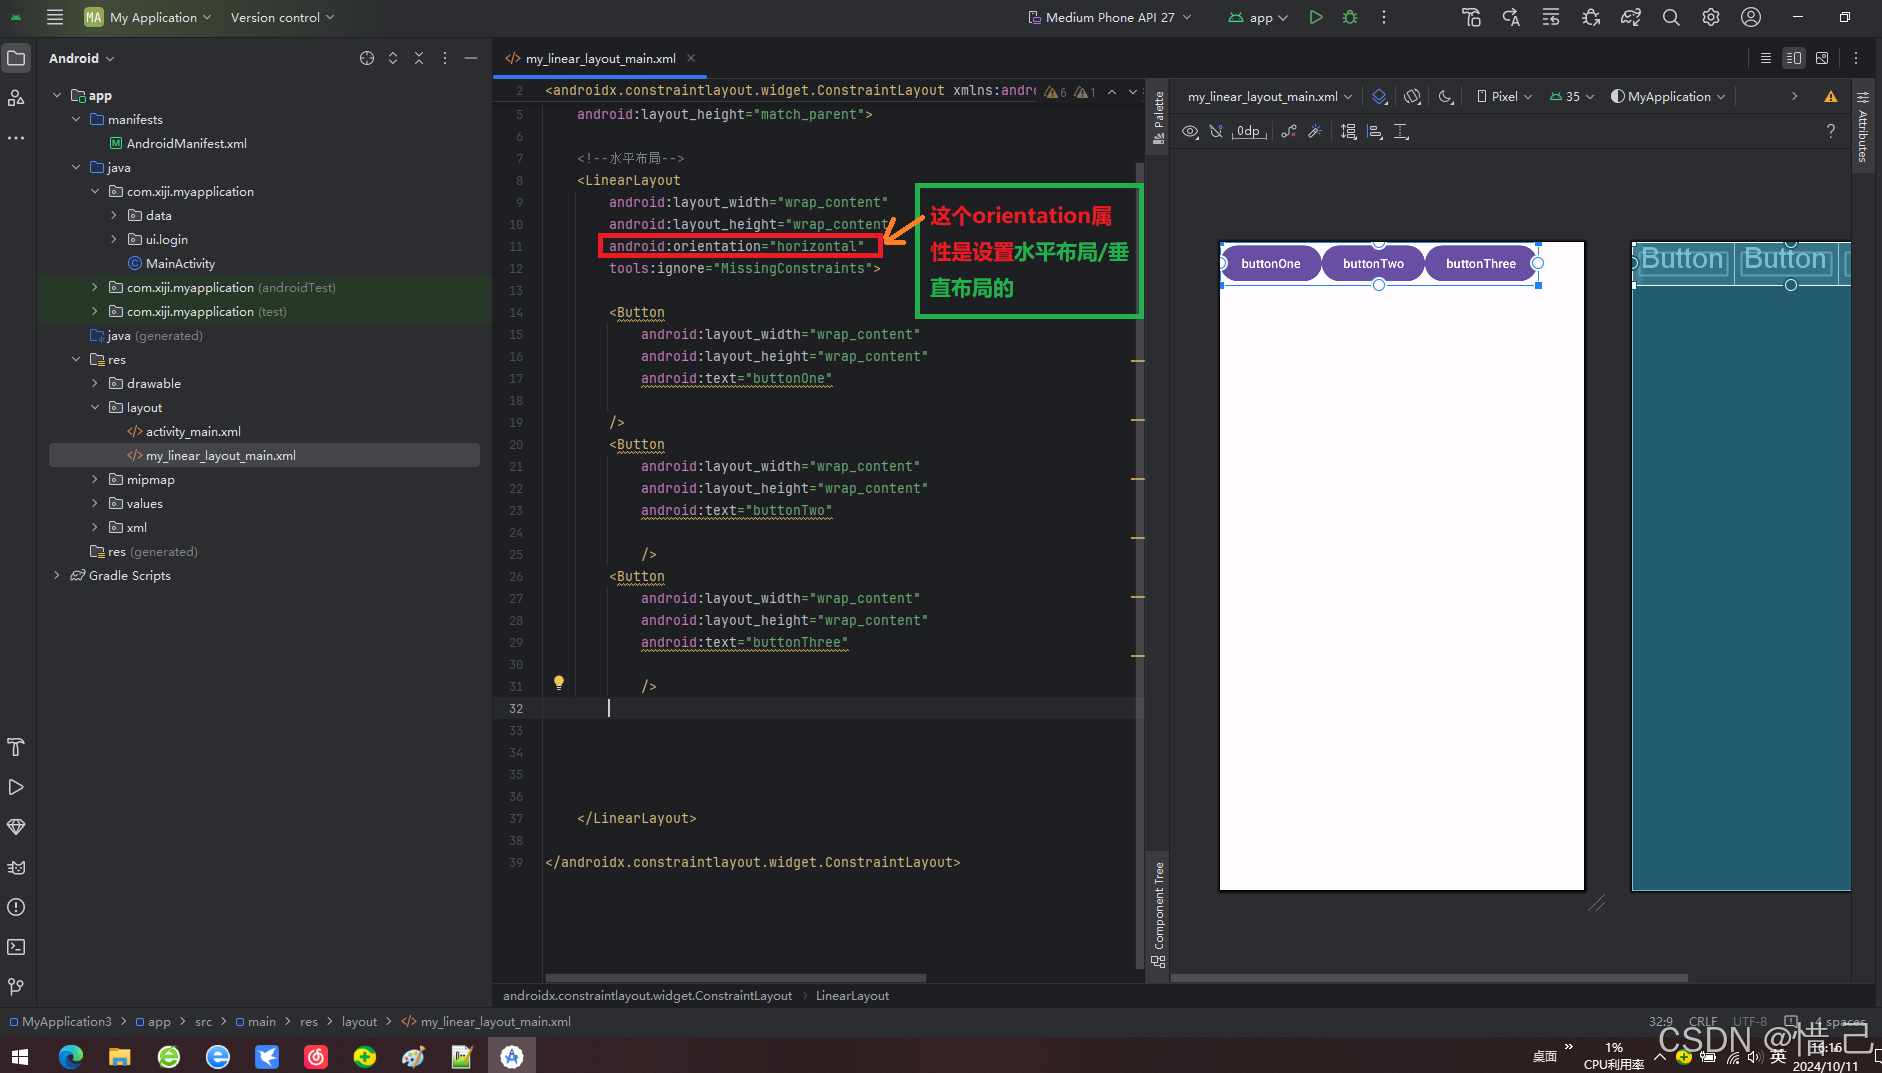
4)案例LinearLayout水平布局
1.代码
<?xml version="1.0" encoding="utf-8"?>
<androidx.constraintlayout.widget.ConstraintLayout xmlns:android="http://schemas.android.com/apk/res/android"
    xmlns:tools="http://schemas.android.com/tools"
    android:layout_width="match_parent"
    android:layout_height="match_parent">

    <!--水平布局-->
    <LinearLayout
        android:layout_width="wrap_content"
        android:layout_height="wrap_content"
        tools:ignore="MissingConstraints">

        <Button
            android:layout_width="wrap_content"
            android:layout_height="wrap_content"
            android:text="buttonOne"

        />
        <Button
            android:layout_width="wrap_content"
            android:layout_height="wrap_content"
            android:text="buttonTwo"

            />
        <Button
            android:layout_width="wrap_content"
            android:layout_height="wrap_content"
            android:text="buttonThree"

            />


    </LinearLayout>

</androidx.constraintlayout.widget.ConstraintLayout>
2.效果
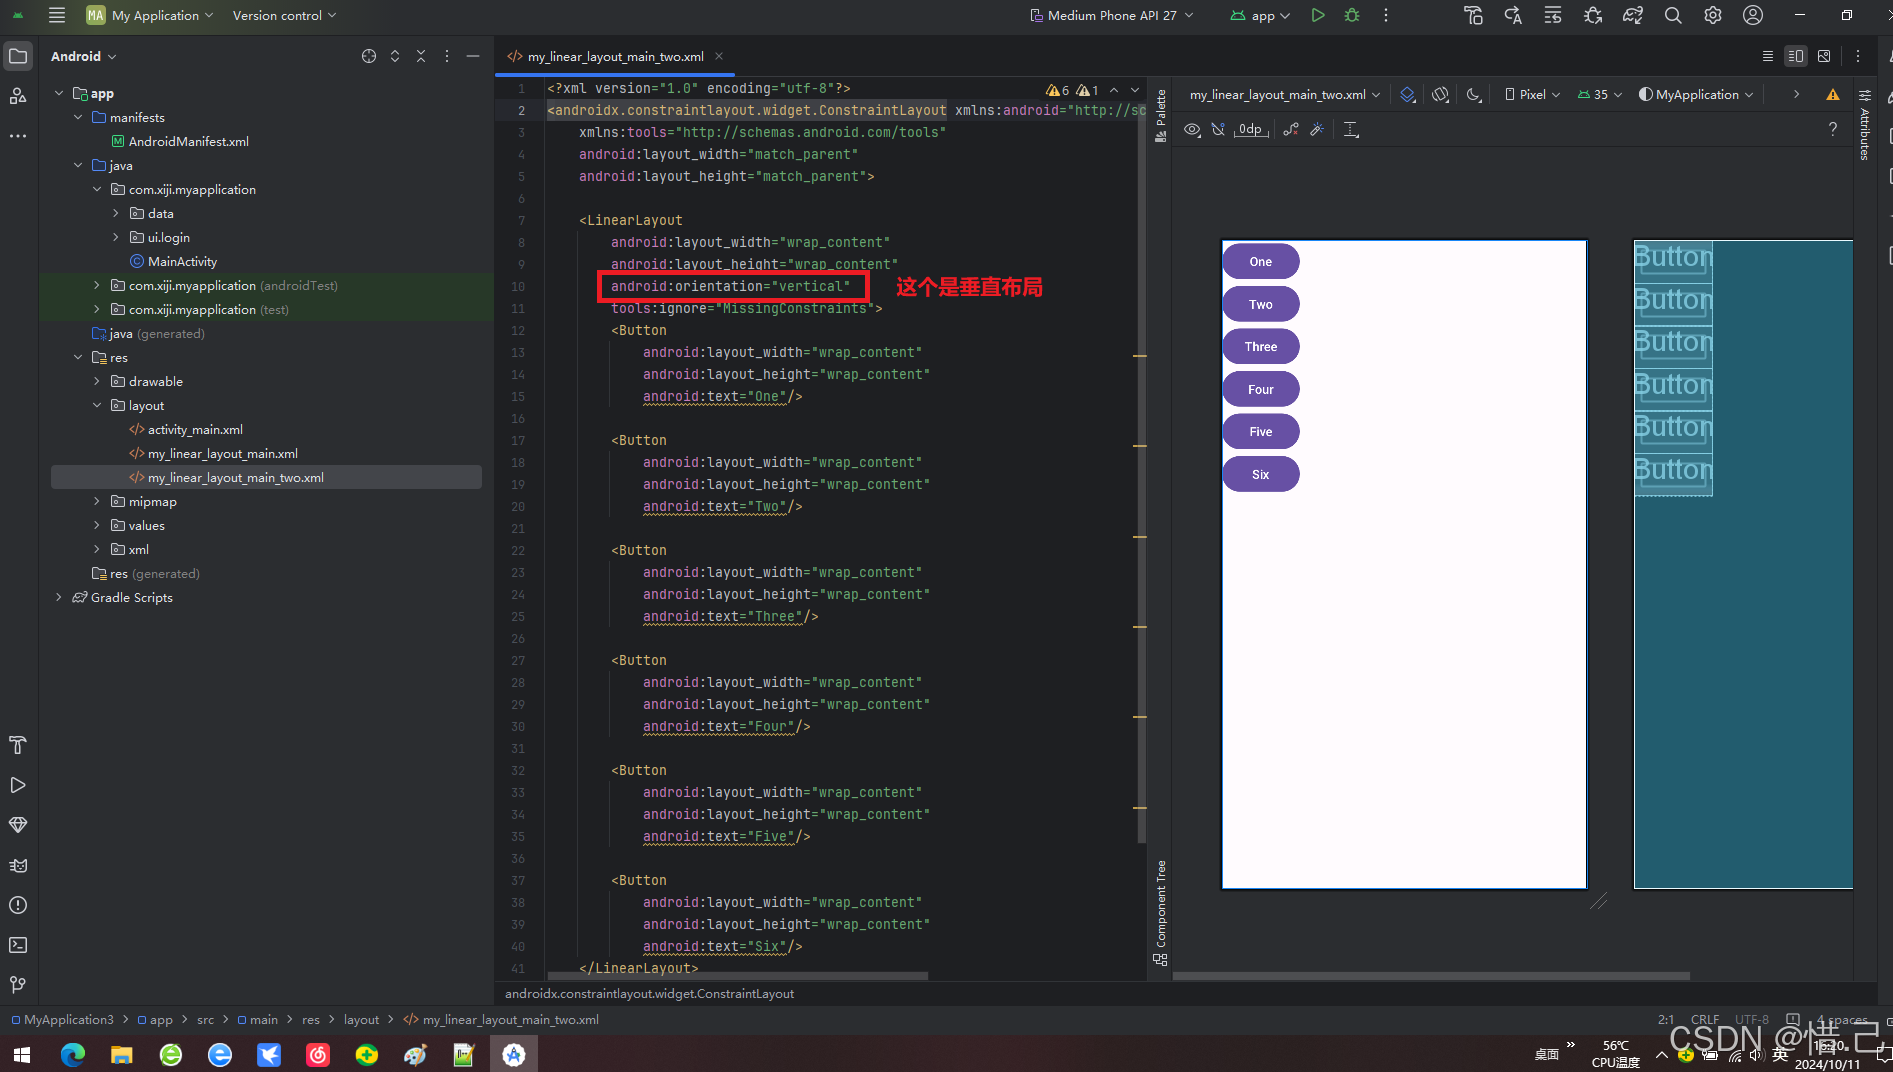
案例:LinearLayout垂直布局
1.代码
<?xml version="1.0" encoding="utf-8"?>
<androidx.constraintlayout.widget.ConstraintLayout xmlns:android="http://schemas.android.com/apk/res/android"
    xmlns:tools="http://schemas.android.com/tools"
    android:layout_width="match_parent"
    android:layout_height="match_parent">

    <LinearLayout
        android:layout_width="wrap_content"
        android:layout_height="wrap_content"
        android:orientation="vertical"
        tools:ignore="MissingConstraints">
        <Button
            android:layout_width="wrap_content"
            android:layout_height="wrap_content"
            android:text="One"/>

        <Button
            android:layout_width="wrap_content"
            android:layout_height="wrap_content"
            android:text="Two"/>

        <Button
            android:layout_width="wrap_content"
            android:layout_height="wrap_content"
            android:text="Three"/>

        <Button
            android:layout_width="wrap_content"
            android:layout_height="wrap_content"
            android:text="Four"/>

        <Button
            android:layout_width="wrap_content"
            android:layout_height="wrap_content"
            android:text="Five"/>

        <Button
            android:layout_width="wrap_content"
            android:layout_height="wrap_content"
            android:text="Six"/>
    </LinearLayout>

</androidx.constraintlayout.widget.ConstraintLayout>
2.效果
3. 相对布局 (RelativeLayout) 属性
1)android:layout_alignParentTop/...Bottom/...Left/...Right
将视图对齐到父容器的顶部/底部/左边/右边。
2)android:layout_centerInParent
将视图居中于父容器。
3)android:layout_above/...below/...toLeftOf/...toRightOf
相对于另一个视图定位。
4)android:layout_alignWithParentIfMissing
如果指定的兄弟视图不存在,则与父视图对齐。
案例:RelativeLayout相对布局的简单使用
1.代码
<?xml version="1.0" encoding="utf-8"?>
<RelativeLayout xmlns:android="http://schemas.android.com/apk/res/android"
    android:layout_width="match_parent"
    android:layout_height="match_parent">
    <!--相对布局-->

    <!--按钮位于左上角-->

    <Button
        android:layout_width="wrap_content"
        android:layout_height="wrap_content"
        android:text="lefTop"

        android:layout_alignParentLeft="true"

        />

    <!--按钮位于右上角-->
    <Button
        android:layout_width="wrap_content"
        android:layout_height="wrap_content"
        android:text="rightTOp"

        android:layout_alignParentRight="true"


        />
    <!--按钮上中-->
    <Button
        android:layout_width="wrap_content"
        android:layout_height="wrap_content"
        android:text="topCenter"

        android:layout_centerHorizontal="true"


        />
    <!--按钮左中-->
    <Button
        android:layout_width="wrap_content"
        android:layout_height="wrap_content"
        android:text="leftCenter"

        android:layout_alignParentLeft="true"
        android:layout_centerVertical="true"

        />

    <!--myCenter上方-->
    <Button
        android:layout_width="wrap_content"
        android:layout_height="wrap_content"

        android:layout_above="@+id/myCenter"
        android:layout_centerHorizontal="true"
        android:text="top"
        />


    <!--按钮居中-->
    <Button
        android:id="@+id/myCenter"
        android:layout_width="wrap_content"
        android:layout_height="wrap_content"
        android:text="center"

        android:layout_centerInParent="true"


        />
    <!--myCenter下方-->
    <Button
        android:layout_width="wrap_content"
        android:layout_height="wrap_content"

        android:layout_below="@+id/myCenter"
        android:layout_centerHorizontal="true"
        android:text="below"
        />


    <!--按钮右中-->
    <Button
        android:layout_width="wrap_content"
        android:layout_height="wrap_content"
        android:text="rightCenter"

        android:layout_alignParentRight="true"
        android:layout_centerVertical="true"

        />
    <!--按钮在左下脚-->
    <Button
        android:layout_width="wrap_content"
        android:layout_height="wrap_content"
        android:text="leftButtom"

        android:layout_alignParentBottom="true"

        />
    <!--按钮在有下角-->
    <Button
        android:layout_width="wrap_content"
        android:layout_height="wrap_content"
        android:text="rightButtom"

        android:layout_alignParentBottom="true"
        android:layout_alignParentRight="true"

        />

    <!--按钮下中-->

    <!--按钮左中-->
    <Button
        android:layout_width="wrap_content"
        android:layout_height="wrap_content"
        android:text="buttomCenter"

        android:layout_alignParentBottom="true"
        android:layout_centerHorizontal="true"

        />
</RelativeLayout>
2.效果

4. 帧布局 (FrameLayout) 属性
1)android:foreground
设置前景图像。
2)android:layout_gravity
设置视图在其父容器中的位置。
案例:帧布局的简单使用
1.代码
<?xml version="1.0" encoding="utf-8"?>
<LinearLayout xmlns:android="http://schemas.android.com/apk/res/android"
    android:layout_width="match_parent"
    android:layout_height="match_parent"

    android:gravity="center">

    <FrameLayout
        android:layout_width="wrap_content"
        android:layout_height="wrap_content"

        android:layout_gravity="center"
        >
        <Button
            android:layout_width="400dp"
            android:layout_height="400dp"
            android:background="#746232"
            android:layout_gravity="center"
            android:text="20" />
        <Button
            android:layout_width="350dp"
            android:layout_height="350dp"
            android:background="#F6EAF3"
            android:layout_gravity="center"
            android:text="20" />

        <Button
            android:layout_width="300dp"
            android:layout_height="300dp"
            android:background="#F807C4"
            android:layout_gravity="center"

            android:text="20" />

        <Button
            android:layout_width="250dp"
            android:layout_height="250dp"
            android:background="#8BB3F0"
            android:layout_gravity="center"
            android:text="20" />


        <Button
            android:layout_width="200dp"
            android:layout_height="200dp"
            android:background="#0AE649"
            android:layout_gravity="center"
            android:text="20" />

        <Button
            android:layout_width="150dp"
            android:layout_height="150dp"
            android:background="#FF9800"
            android:layout_gravity="center"
            android:text="20" />


        <Button
            android:layout_width="100dp"
            android:layout_height="100dp"
            android:background="#080CE2"
            android:layout_gravity="center"
            android:text="20" />

        <Button
            android:layout_width="50dp"
            android:layout_height="50dp"
            android:background="#E96FC6"
            android:layout_gravity="center"
            android:text="20" />

        <Button
            android:layout_width="20dp"
            android:layout_height="20dp"
            android:background="#0DD8F4"
            android:layout_gravity="center"
            android:text="20" />


    </FrameLayout>


</LinearLayout>
2.效果

5. 表格布局 (TableLayout) 和表格行 (TableRow) 属性
1)android:collapseColumns
指定要折叠的列索引。
2)android:stretchColumns
指定应伸展以填充可用空间的列索引。
案例:表格布局的简单使用
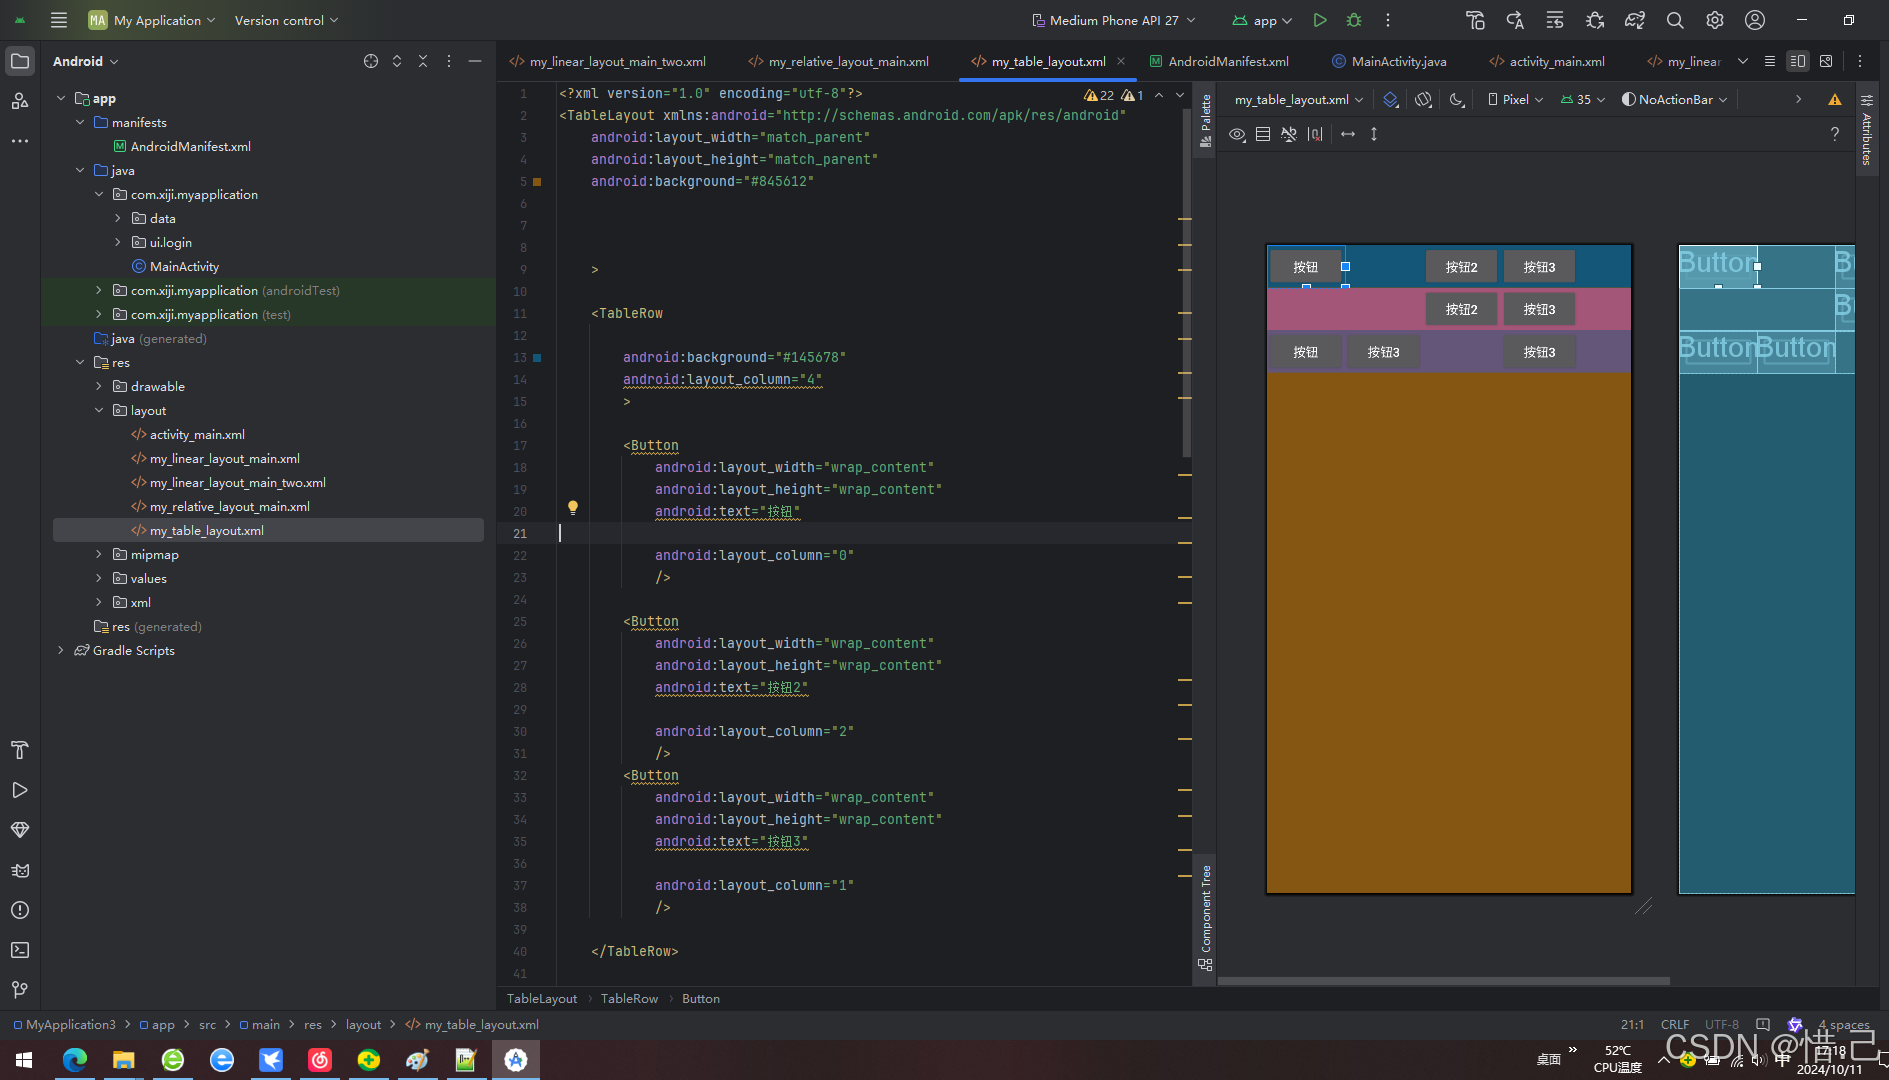
1.代码
<?xml version="1.0" encoding="utf-8"?>
<TableLayout xmlns:android="http://schemas.android.com/apk/res/android"
    android:layout_width="match_parent"
    android:layout_height="match_parent"
    android:background="#845612"


    >

    <TableRow

        android:background="#145678"
        android:layout_column="4"
        >

        <Button
            android:layout_width="wrap_content"
            android:layout_height="wrap_content"
            android:text="按钮"

            android:layout_column="0"
            />

        <Button
            android:layout_width="wrap_content"
            android:layout_height="wrap_content"
            android:text="按钮2"

            android:layout_column="2"
            />
        <Button
            android:layout_width="wrap_content"
            android:layout_height="wrap_content"
            android:text="按钮3"

            android:layout_column="1"
            />

    </TableRow>

    <TableRow
        android:background="#a45678"
        android:layout_column="3"
        >


        <Button
            android:layout_width="wrap_content"
            android:layout_height="wrap_content"
            android:text="按钮2"

            android:layout_column="2"
            />
        <Button
            android:layout_width="wrap_content"
            android:layout_height="wrap_content"
            android:text="按钮3"

            android:layout_column="1"
            />

    </TableRow>

    <TableRow
        android:background="#645678"
        android:layout_column="3"
        >

        <Button
            android:layout_width="wrap_content"

            android:layout_height="wrap_content"
            android:text="按钮"

            android:layout_column="0"
            />


        <Button
            android:layout_width="wrap_content"
            android:layout_height="wrap_content"
            android:text="按钮3"

            android:layout_column="1"
            />
        <Button
            android:layout_width="wrap_content"
            android:layout_height="wrap_content"
            android:text="按钮3"

            android:layout_column="3"
            />

    </TableRow>

</TableLayout>
2.效果
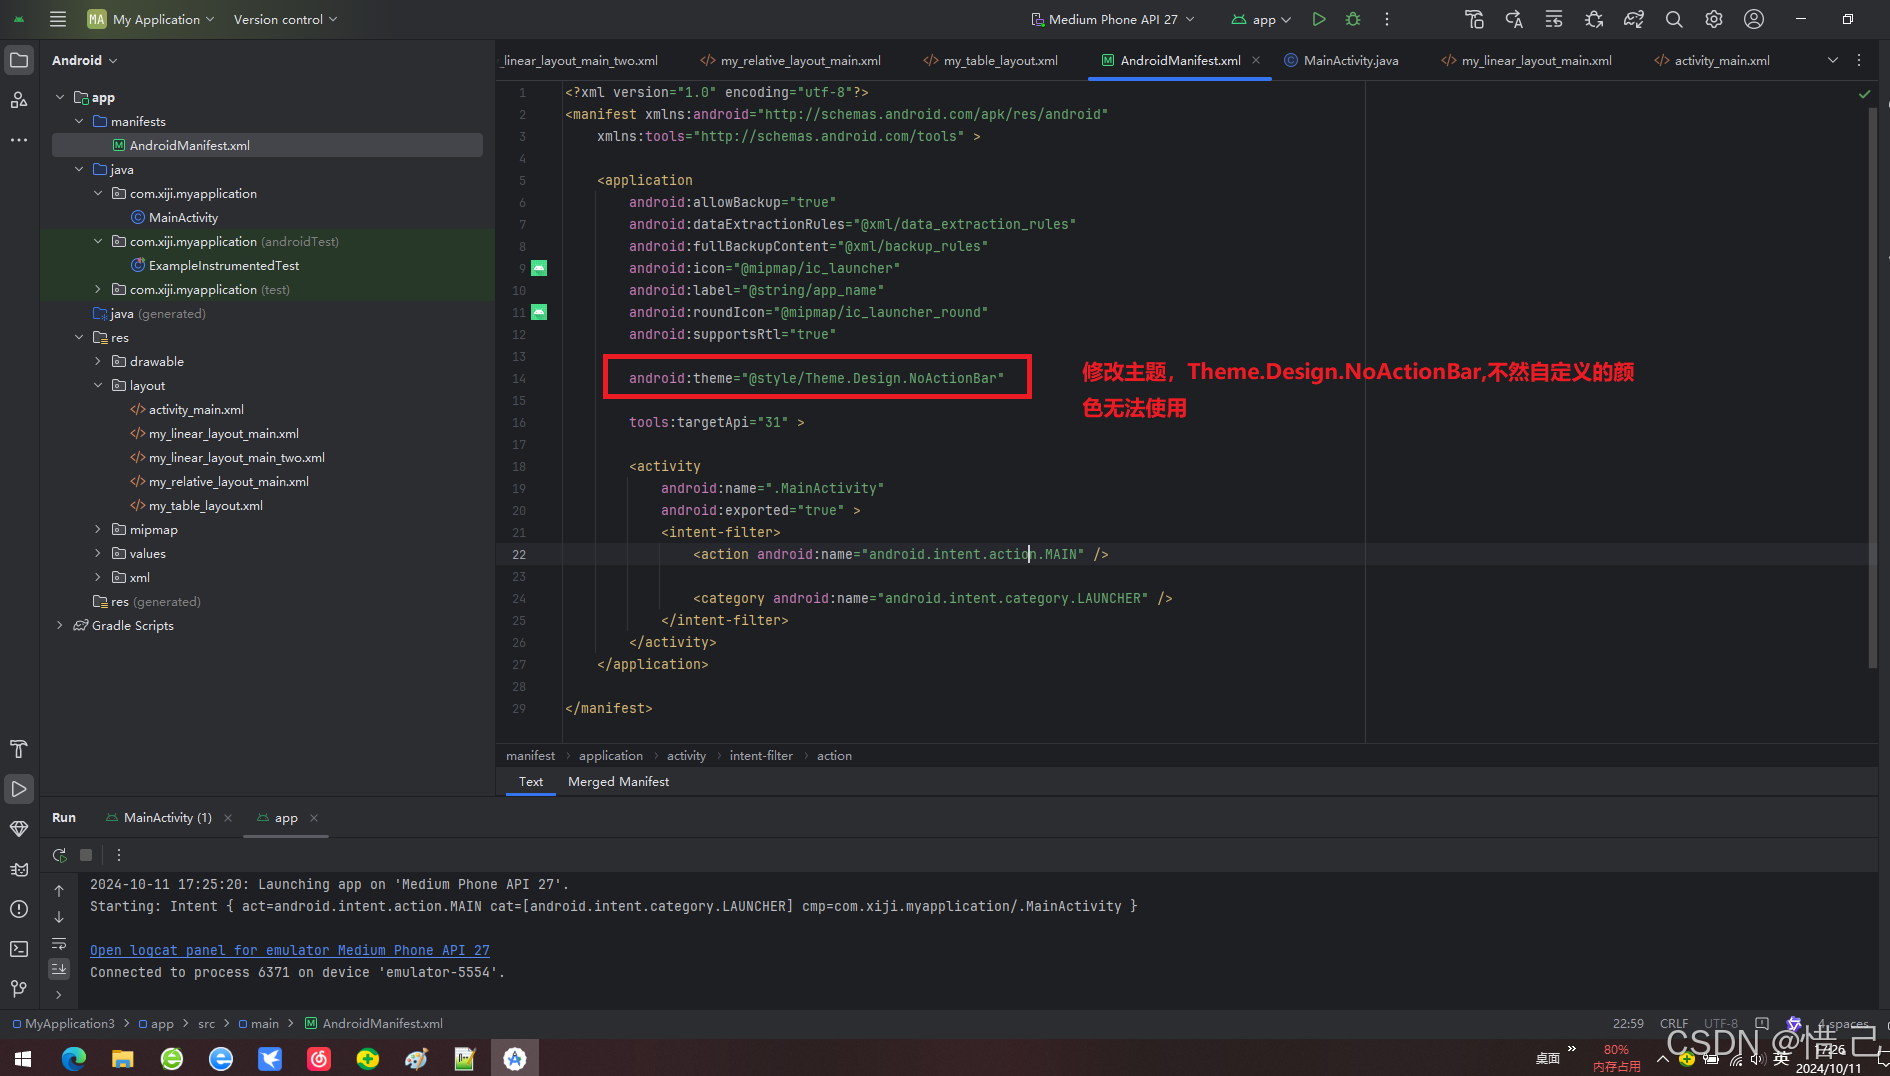
3.注意
修改主题,Theme.Design.NoActionBar,不然自定义的颜色无法使用
<?xml version="1.0" encoding="utf-8"?>
<manifest xmlns:android="http://schemas.android.com/apk/res/android"
    xmlns:tools="http://schemas.android.com/tools" >

    <application
        android:allowBackup="true"
        android:dataExtractionRules="@xml/data_extraction_rules"
        android:fullBackupContent="@xml/backup_rules"
        android:icon="@mipmap/ic_launcher"
        android:label="@string/app_name"
        android:roundIcon="@mipmap/ic_launcher_round"
        android:supportsRtl="true"
        android:theme="@style/Theme.Design.NoActionBar"
        tools:targetApi="31" >

        <activity
            android:name=".MainActivity"
            android:exported="true" >
            <intent-filter>
                <action android:name="android.intent.action.MAIN" />

                <category android:name="android.intent.category.LAUNCHER" />
            </intent-filter>
        </activity>
    </application>

</manifest>
6. 网格布局 (GridLayout) 属性
1)android:rowCount/columnCount
定义网格的行数和列数。
2)android:alignmentMode
设置如何对齐单元格内的内容。
3)android:useDefaultMargins
是否使用默认的边距。
案例:网格布局的简单使用
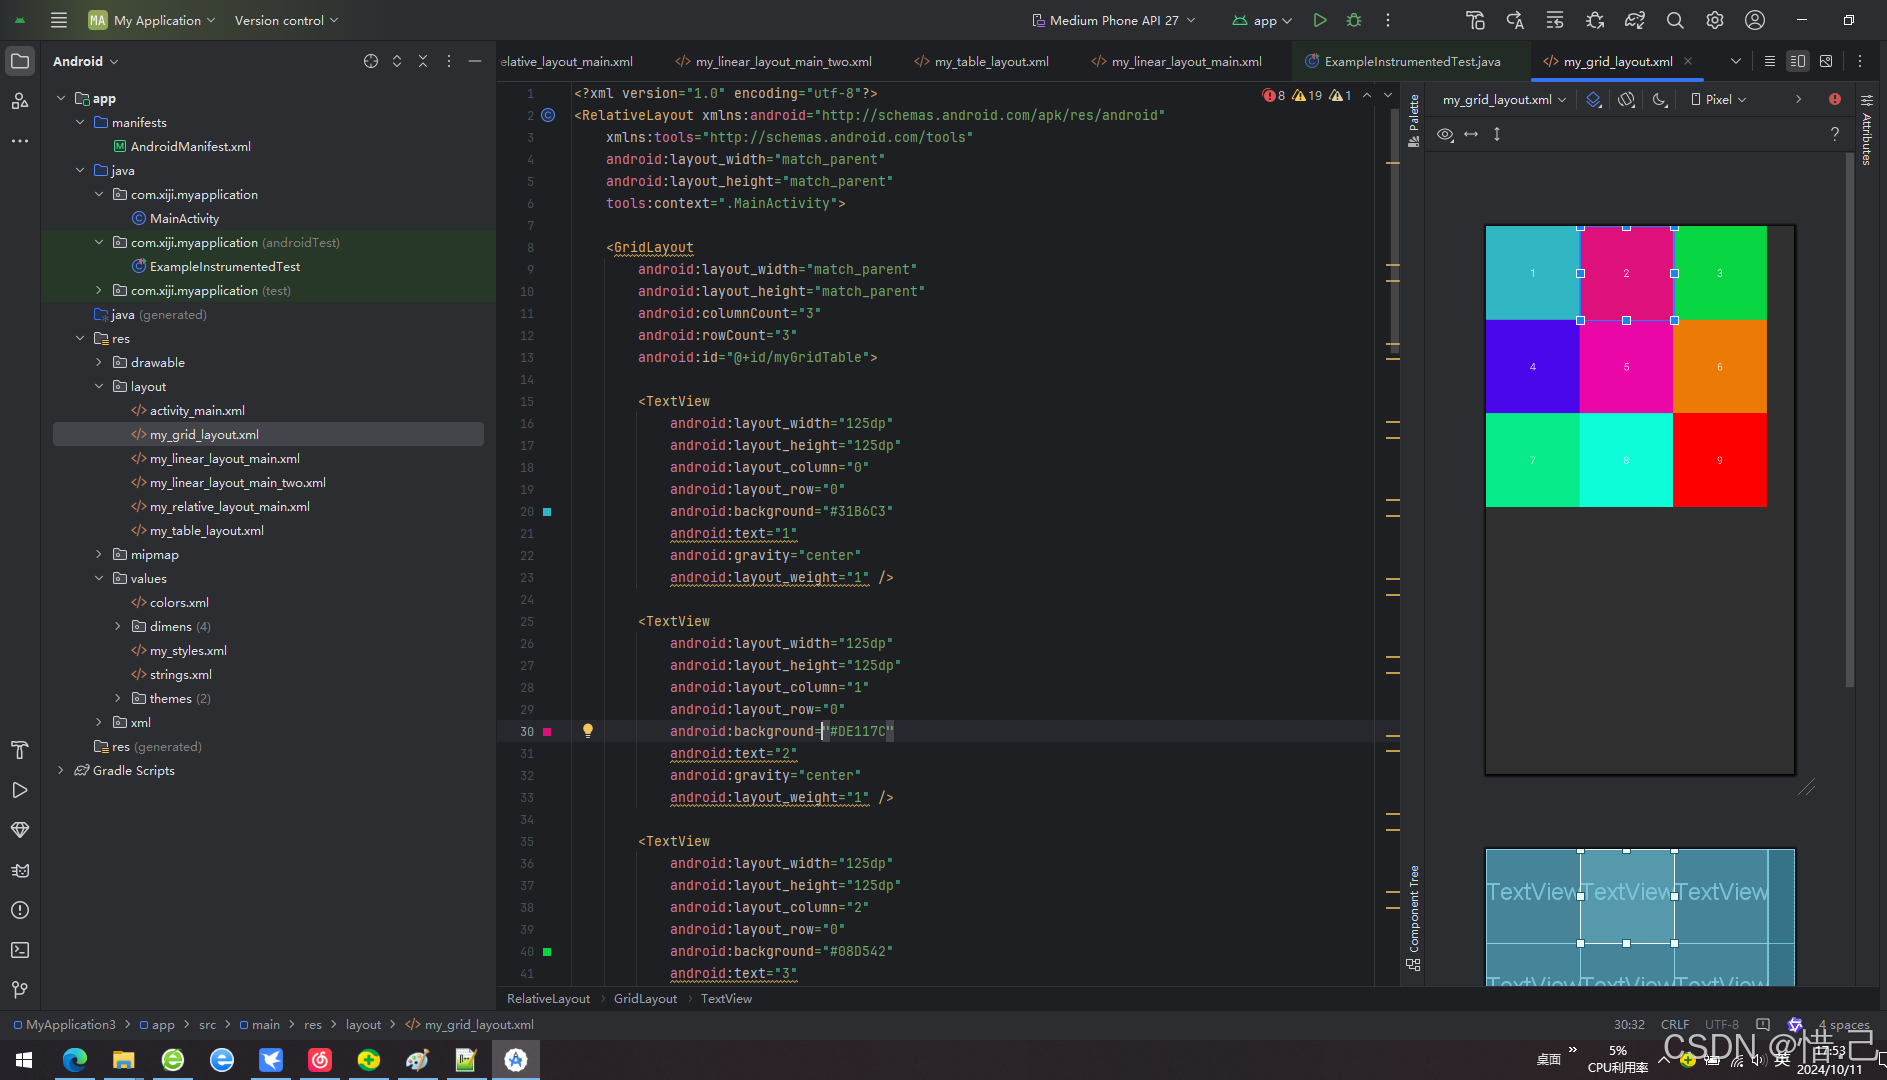
1.代码
<?xml version="1.0" encoding="utf-8"?>
<RelativeLayout xmlns:android="http://schemas.android.com/apk/res/android"
    xmlns:tools="http://schemas.android.com/tools"
    android:layout_width="match_parent"
    android:layout_height="match_parent"
    tools:context=".MainActivity">

    <GridLayout
        android:layout_width="match_parent"
        android:layout_height="match_parent"
        android:columnCount="3"
        android:rowCount="3"
        android:id="@+id/myGridTable">

        <TextView
            android:layout_width="125dp"
            android:layout_height="125dp"
            android:layout_column="0"
            android:layout_row="0"
            android:background="#31B6C3"
            android:text="1"
            android:gravity="center"
            android:layout_weight="1" />

        <TextView
            android:layout_width="125dp"
            android:layout_height="125dp"
            android:layout_column="1"
            android:layout_row="0"
            android:background="#DE117C"
            android:text="2"
            android:gravity="center"
            android:layout_weight="1" />

        <TextView
            android:layout_width="125dp"
            android:layout_height="125dp"
            android:layout_column="2"
            android:layout_row="0"
            android:background="#08D542"
            android:text="3"
            android:gravity="center"
            android:layout_weight="1" />

        <TextView
            android:layout_width="125dp"
            android:layout_height="125dp"
            android:layout_column="0"
            android:layout_row="1"
            android:background="#4B07EB"
            android:text="4"
            android:gravity="center"
            android:layout_weight="1" />

        <TextView
            android:layout_width="125dp"
            android:layout_height="125dp"
            android:layout_column="1"
            android:layout_row="1"
            android:background="#EB07A7"
            android:text="5"
            android:gravity="center"
            android:layout_weight="1" />

        <TextView
            android:layout_width="125dp"
            android:layout_height="125dp"
            android:layout_column="2"
            android:layout_row="1"
            android:background="#EB7A07"
            android:text="6"
            android:gravity="center"
            android:layout_weight="1" />

        <TextView
            android:layout_width="125dp"
            android:layout_height="125dp"
            android:layout_column="0"
            android:layout_row="2"
            android:background="#07EB8A"
            android:text="7"
            android:gravity="center"
            android:layout_weight="1" />

        <TextView
            android:layout_width="125dp"
            android:layout_height="125dp"
            android:layout_column="1"
            android:layout_row="2"
            android:background="#0EFDD9"
            android:text="8"
            android:gravity="center"
            android:layout_weight="1" />

        <TextView
            android:layout_width="125dp"
            android:layout_height="125dp"
            android:layout_column="2"
            android:layout_row="2"
            android:background="#FF0000"
            android:text="9"
            android:gravity="center"
            android:layout_weight="1" />

    </GridLayout>
</RelativeLayout>
2.效果
7. 其他常用属性
1)android:background
设置背景颜色或图片。
2)android:visibility
设置视图的可见性,值可以是 visible, invisible 或 gone。
3)android:clickable
设置视图是否可点击。
4)android:focusable
设置视图是否可以获得焦点。
5)android:enabled
设置视图是否启用。
6)android:alpha
设置视图透明度(0.0完全透明,1.0完全不透明)。
7)android:id
为视图提供一个唯一的标识符。