使用IDEA创建Maven文件的两种方式
- 一、前言
- 二、前期准备(配置setting文件)
- 1.修改文件放置位置
- 2.改用阿里云镜像
- 3.修改默认JDK版本
- 三、构建Maven项目
- 1.新建空项目
- 2.设置项目中Maven版本
- 3.新建模块
- 4.配置模块
- 5.测试
- 四、使用插件创建Maven项目
- 1.新建Maven项目
- 2.设置
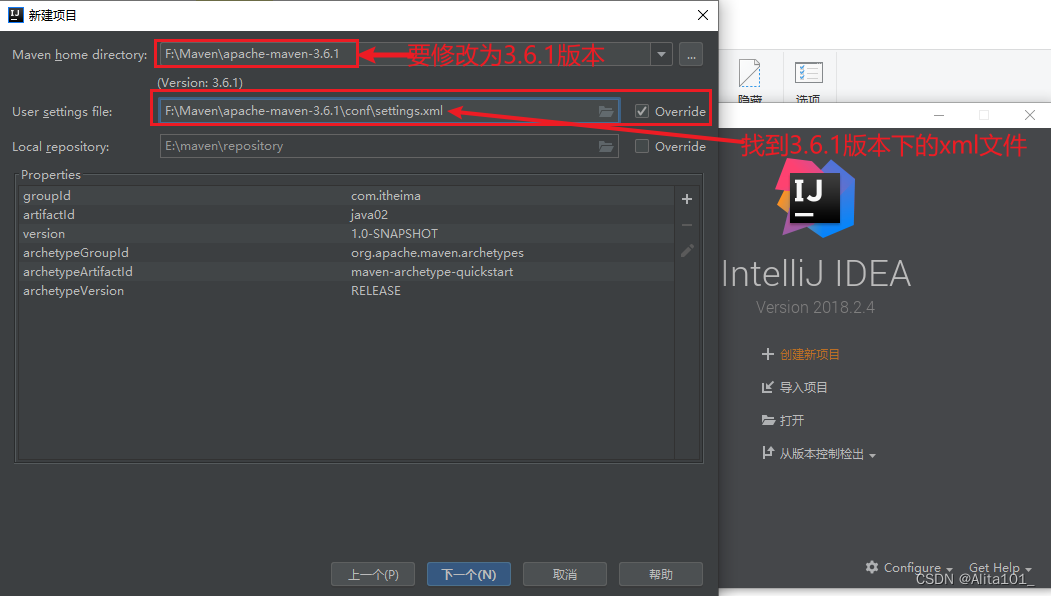
- 3.选择Maven版本
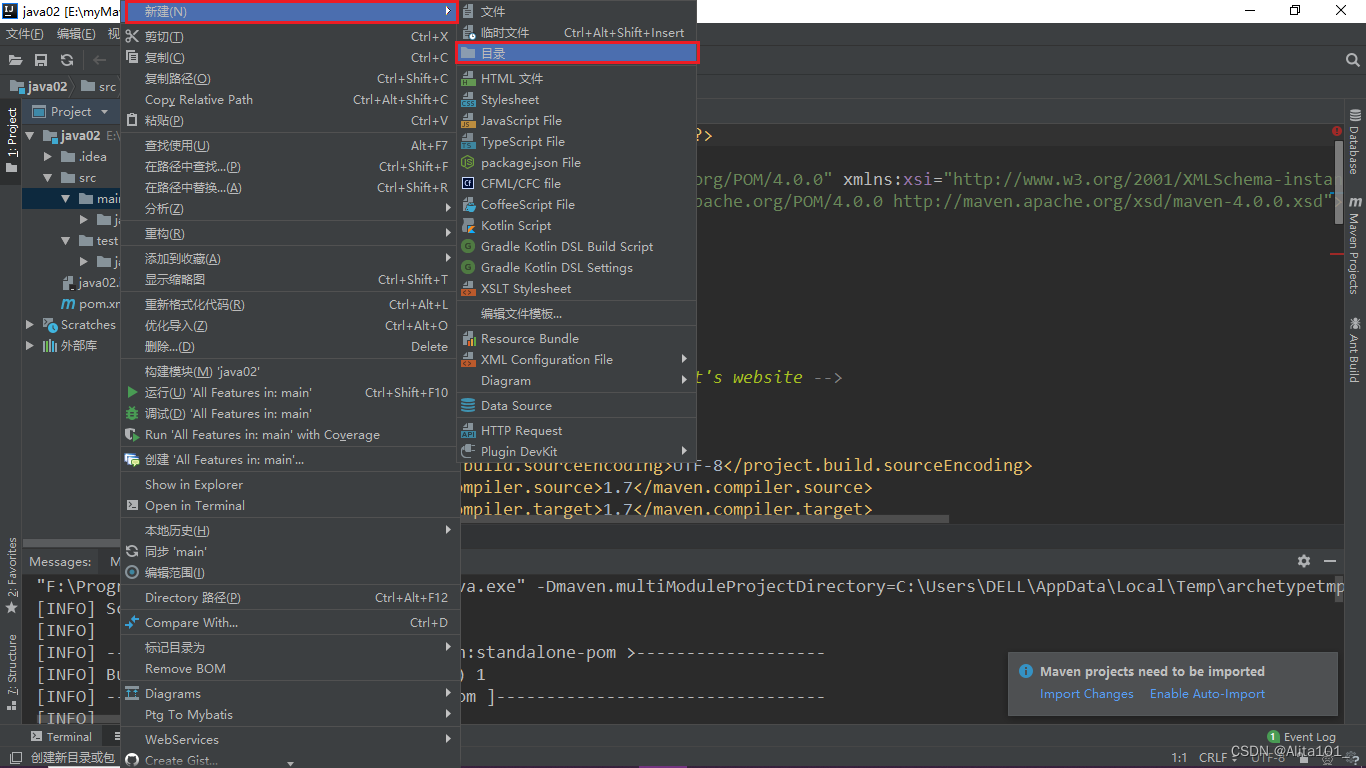
- 4.补全目录,使其完整
- 五、结语
一、前言
本文将讲述如何使用IDEA来创建Maven文件,有两种方式,第一种比较复杂,但是建议初学者使用,来搞清楚项目架构,第二种方便快捷,是使用插件来创建的
二、前期准备(配置setting文件)
由于我们IDEA中使用3.6.1版本的Maven比较稳定,所以要先用原先配置好的setting.xml文件覆盖3.6.1版本下的setting.xml文件在此分享一下完整的setting.xml文件(仅显示修改部分)
1.修改文件放置位置
白色代码部分是自己新建的repository文件位置
<settings xmlns="http://maven.apache.org/SETTINGS/1.0.0"
          xmlns:xsi="http://www.w3.org/2001/XMLSchema-instance"
          xsi:schemaLocation="http://maven.apache.org/SETTINGS/1.0.0 http://maven.apache.org/xsd/settings-1.0.0.xsd">
  <!-- localRepository
   | The path to the local repository maven will use to store artifacts.
   |
   | Default: ${user.home}/.m2/repository
  <localRepository>/path/to/local/repo</localRepository>
  -->
<localRepository>E:\maven\repository</localRepository>
  <!-- interactiveMode
   | This will determine whether maven prompts you when it needs input. If set to false,
   | maven will use a sensible default value, perhaps based on some other setting, for
   | the parameter in question.
   |
   | Default: true
  <interactiveMode>true</interactiveMode>
  -->
2.改用阿里云镜像
  <mirrors>
    <!-- mirror
     | Specifies a repository mirror site to use instead of a given repository. The repository that
     | this mirror serves has an ID that matches the mirrorOf element of this mirror. IDs are used
     | for inheritance and direct lookup purposes, and must be unique across the set of mirrors.
     |
    <mirror>
      <id>mirrorId</id>
      <mirrorOf>repositoryId</mirrorOf>
      <name>Human Readable Name for this Mirror.</name>
      <url>http://my.repository.com/repo/path</url>
    </mirror>
     -->
    <mirror>
      <id>nexus-aliyun</id>
      <mirrorOf>central</mirrorOf>
      <name>Nexus aliyun</name>
      <url>http://maven.aliyun.com/nexus/content/groups/public</url>
    </mirror>
  </mirrors>
3.修改默认JDK版本
这部分可以直接复制黏贴
<profile>

<profile>
<id>jdk-1.8</id>
<activation>
<activeByDefault>true</activeByDefault>
<jdk>1.8</jdk>
</activation>
<properties>
<maven.compiler.source>1.8</maven.compiler.source>
<maven.compiler.target>1.8</maven.compiler.target>
<maven.compiler.compilerVersion>1.8</maven.compiler.compilerVersion>
</properties>
</profile>

      <id>jdk-1.4</id>

      <activation>
        <jdk>1.4</jdk>
      </activation>

      <repositories>
        <repository>
          <id>jdk1.4</id>
          <name>Repository for JDK 1.4 builds</name>
          <url>http://www.myhost.com/maven/jdk8</url>
          <layout>default</layout>
          <snapshotPolicy>always</snapshotPolicy>
        </repository>
      </repositories>
    </profile>
三、构建Maven项目
1.新建空项目
- 如果已经打开项目的话,可以在设置中选择
“关闭当前项目” - 选择新建项目
- 选择
EmptyProject

2.设置项目中Maven版本
- 首先点击左上角的
File(文件)

- 在搜索框中搜索
Maven - 找到我们下载的
3.6.1版本的Maven文件夹(建议使用该版本,较稳定) - 选择
3.6.1版本下的setting.xml文件

3.新建模块
由于IDEA版本不同,最上方红框内的标记位置不同,所以可能和下面截图所在位置不同,找到这个标记可以快速新建模块
IDEA2018版本如下


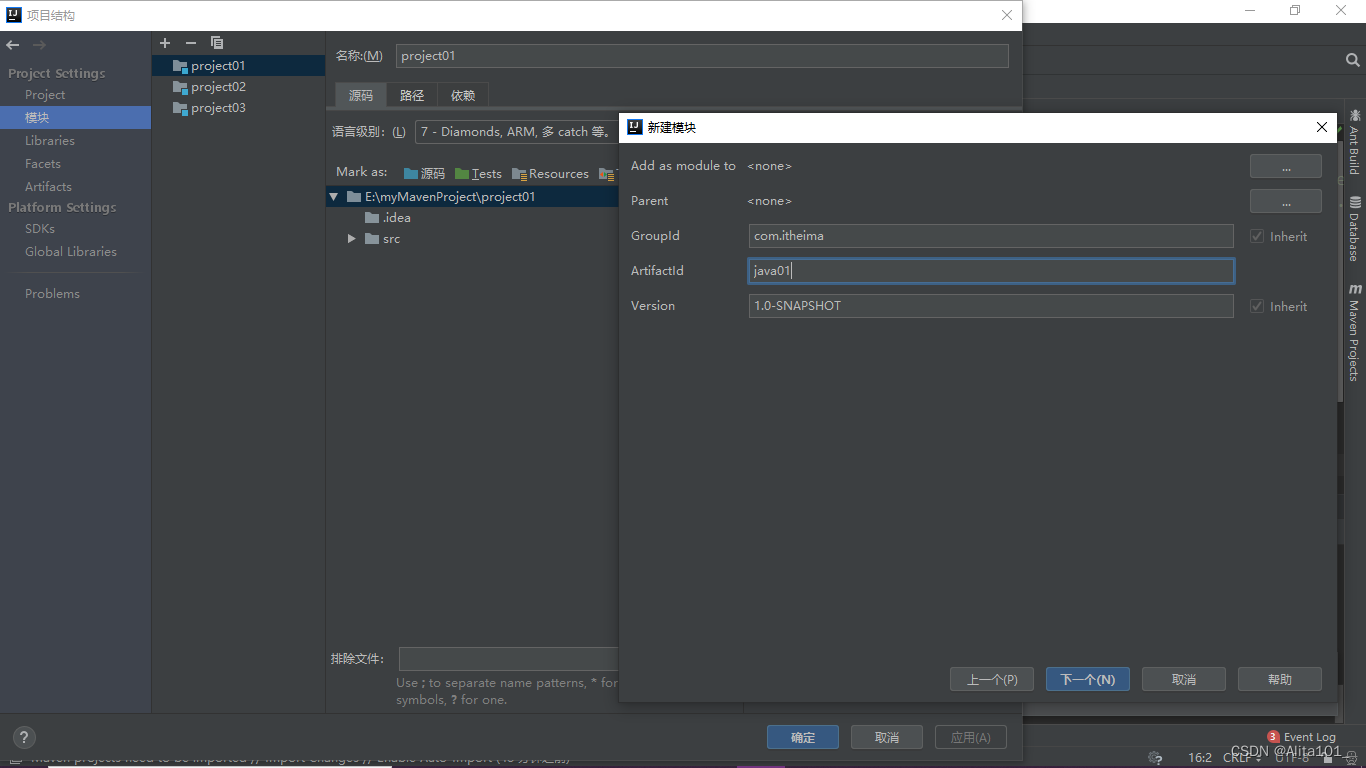
- 直接点击
Next(下一步)

- GroupId一般使用域名反写(博主看的黑马视频,所以此处用这个,可以与本文一致)
- ArtifactId自己起一个就可以
- 存放位置也是自己定义
4.配置模块

5.测试
- 点击右侧MavenProject
- 点击刷新(第一个图标)
- 双击执行命令看是否报错

四、使用插件创建Maven项目
1.新建Maven项目
- 选择
新建项目 - 选择
Maven - 随便点击一个后输入
quick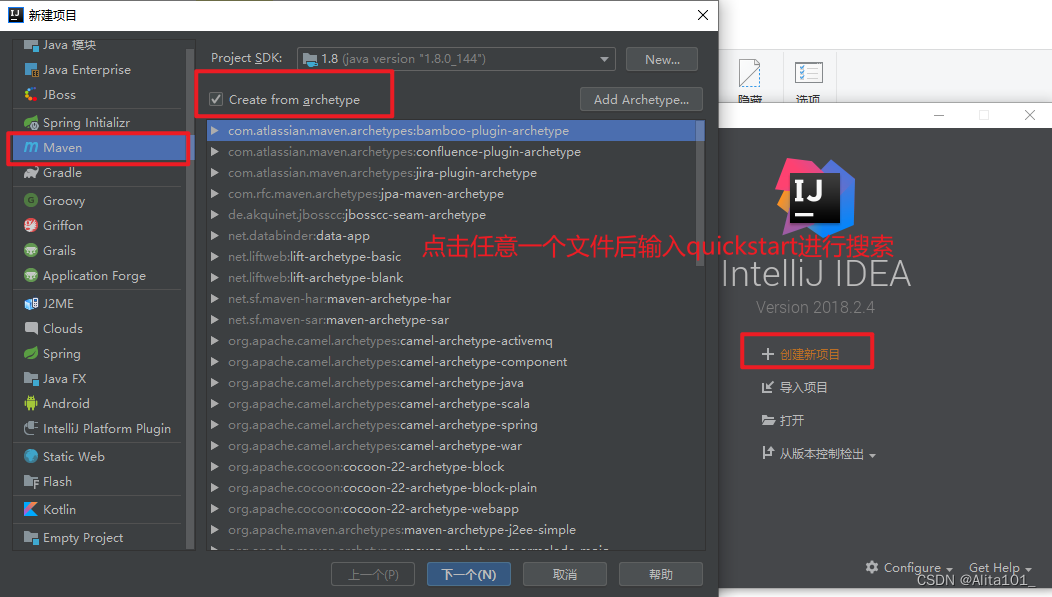
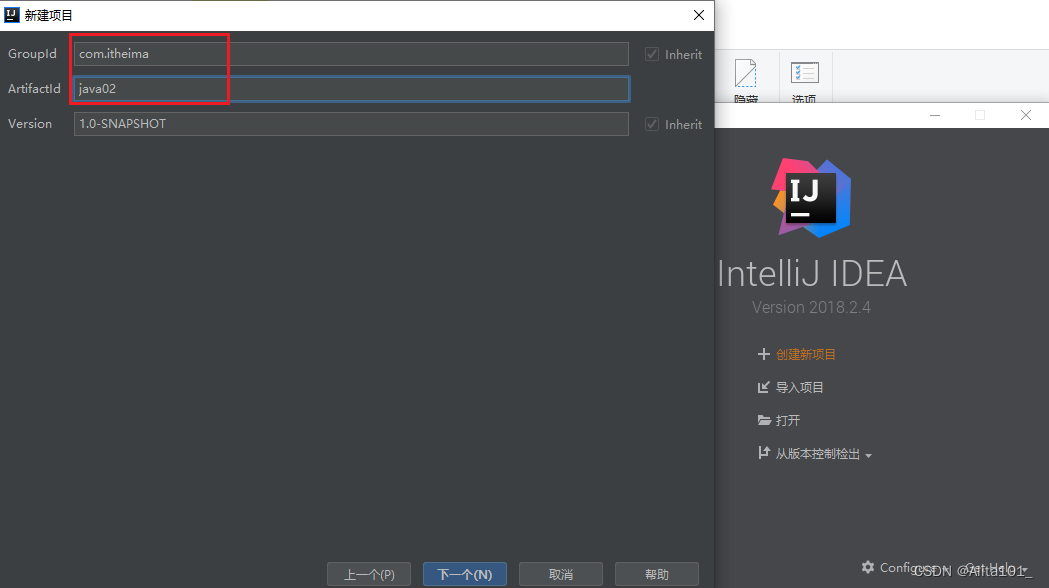
2.设置
- GroupId一般使用域名反写(博主看的黑马视频,所以此处用这个,可以与本文一致)
- ArtifactId自己起一个就可以
3.选择Maven版本
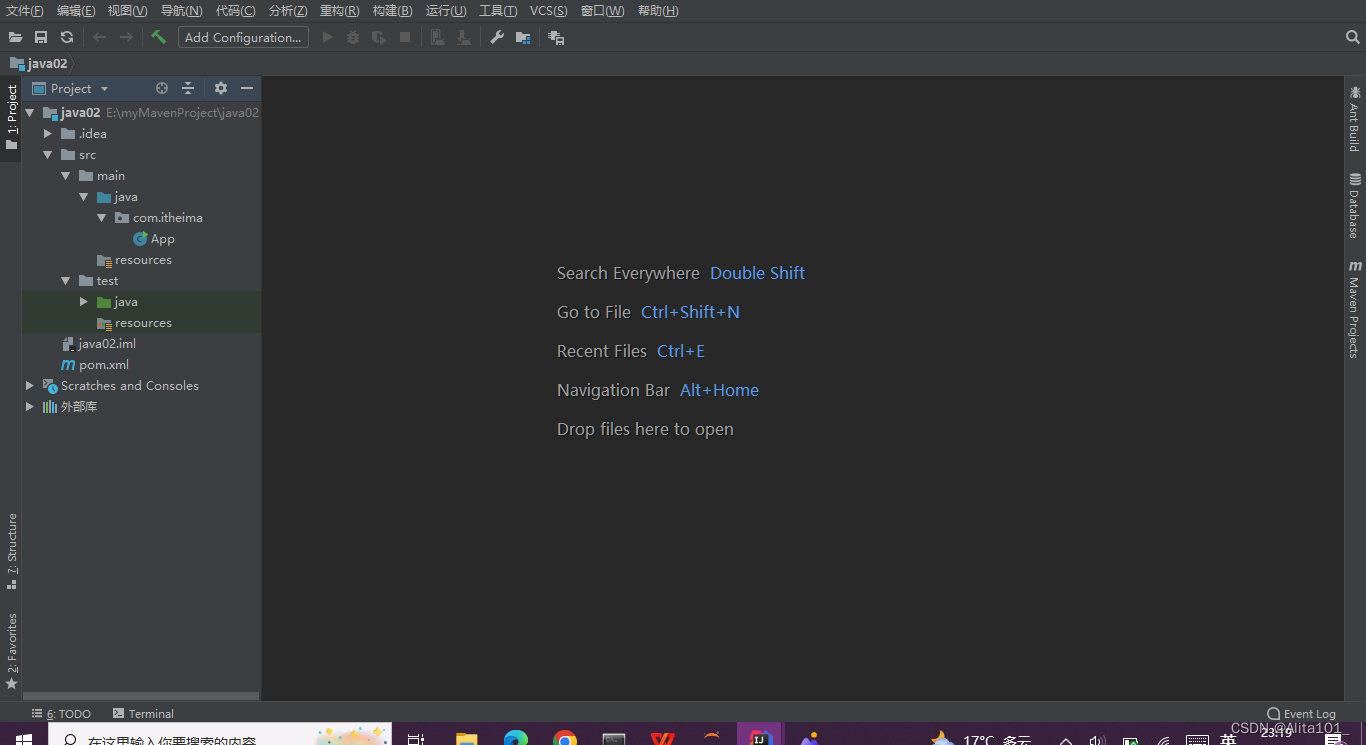
4.补全目录,使其完整
五、结语
本文是博主看黑马程序员视频后总结的博客,有任何问题欢迎在评论区留言



![[附源码]java毕业设计图书馆自习室管理系统](https://img-blog.csdnimg.cn/a1800fca547d419aa0eff71c80a354a4.png)


