- AOP(Aspect Oriented Programming)面向切面编程,属于面向对象编程的一种衍射,是一种编程思想或技术
- AOP的底层是由动态代理机制实现的
- JDK动态代理+CGLIB动态代理,自动识别并切换
- 我们也可以通过配置属性指定就是用CGLIB
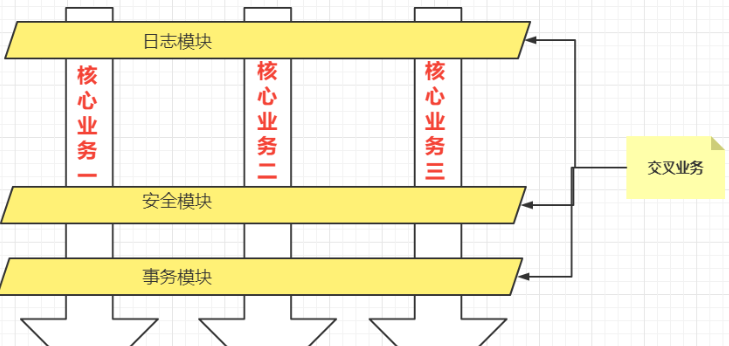
- 一般一个系统都会有一些系统服务,例如:日志、安全、事务管理等,我们称之为交叉业务【与业务无关,而且这些交叉业务具有通用性】
- AOP 有哪些优势?
- 代码复用性强,易维护
- 使开发者更关注业务逻辑
- 将与核心业务无关的代码独立的抽取出来,形成一个独立的组件,然后以横向交叉的方式应用到业务流程当中的过程被称为AOP
一、AOP 的七大术语
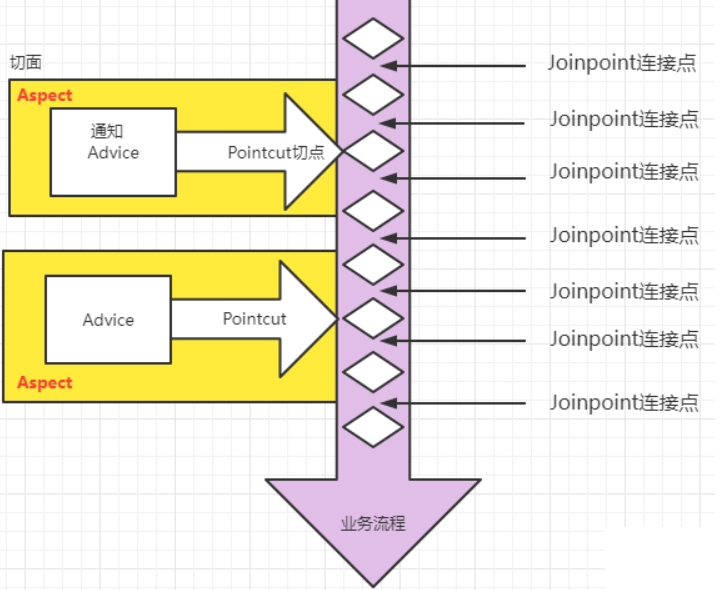
- 连接点 Joinpoint : 可以织入切面的位置【方法执行前后、异常抛出等】
- 切点 Pointcut:我们织入的切面方法
- 通知 Advice:我们具体要织入的代码,通常叫做增强
- 前置通知
- 后置通知
- 环绕通知
- 异常通知
- 最终通知
- 切面 Aspect:切点 + 通知
- 织入 Weaving:把通知应用到目标对象上的过程
- 代理对象 Proxy:一个目标对象被织入通知后产生的新对象
- 目标对象 Target:被织入通知的对象【原始对象】
二、切点表达式
-
我们需要通过切点表达式声明我们指定的通知用在哪些方法上
-
切点表达式的语法格式:
execution([访问控制权限修饰符] 返回值类型 [全限定类名]方法名(形式参数列表) [异常])- 第一个参数:如果不指定默认为 * 【四个权限修饰符】
- 第二个方法的返回值类型,可以指定为 * ,代表任意
- 第三个参数方法的全限定类名
- 省略代表所有的类
- 如果没有具体到类,而是到某个包且使用
..代表当前包和所有子包中的类
- 第四个参数为方法名
- 所有的方法用 * 表示
- 也可以指定部分方法名,例如 update* 代表所有以 update 开头的方法【可以使用占位符】
- 第五个参数为参数列表,一般使用
(..)代表任意的参数长度 - 第六个参数为异常类型,没有指定默认为所有异常
-
具体的用法是在通知注解的括号内部使用:
@注解("execute(切点表达式)")
三、使用Spring的AOP
- Spring 实现了三种AOP的形式:
- 第一种方式:Spring框架结合AspectJ框架实现的AOP,基于注解方式。
- 第二种方式:Spring框架结合AspectJ框架实现的AOP,基于XML方式。
- 第三种方式:Spring框架自己实现的AOP,基于XML配置方式。
- 使用AOP的准备工作:
- 配置相关依赖
配置 context 和 aop 的命名空间:<!--spring context依赖--> <dependency> <groupId>org.springframework</groupId> <artifactId>spring-context</artifactId> <version>6.0.0-M2</version> </dependency> <!--spring aop依赖 >> context关联了aop依赖--> <!--spring aspects依赖--> <dependency> <groupId>org.springframework</groupId> <artifactId>spring-aspects</artifactId> <version>6.0.0-M2</version> </dependency><?xml version="1.0" encoding="UTF-8"?> <beans xmlns="http://www.springframework.org/schema/beans" xmlns:xsi="http://www.w3.org/2001/XMLSchema-instance" xmlns:context="http://www.springframework.org/schema/context" xmlns:aop="http://www.springframework.org/schema/aop" xsi:schemaLocation="http://www.springframework.org/schema/beans http://www.springframework.org/schema/beans/spring-beans.xsd http://www.springframework.org/schema/context http://www.springframework.org/schema/context/spring-context.xsd http://www.springframework.org/schema/aop http://www.springframework.org/schema/aop/spring-aop.xsd"> </beans>
四、AOP 的注解式开发
- 我们前面提到的动态代理机制就是AOP的一种实现形式
- 需求:编写目标类及目标方法及切面类,通过配置文件及测试程序来演示如何通过注解实现面向切面编程
编写我们的目标类:
package com.powernode.spring6.service;
import org.springframework.stereotype.Service;

/**
 * @author Bonbons
 * @version 1.0
 */
@Service("orderService")
public class OrderService {
    public void generate(){
        System.out.println("生成订单信息。");
    }
}
编写我们的日志切面类
package com.powernode.spring6.service;

import org.aspectj.lang.JoinPoint;
import org.aspectj.lang.ProceedingJoinPoint;
import org.aspectj.lang.annotation.*;
import org.springframework.core.annotation.Order;
import org.springframework.stereotype.Component;

/**
 * @author Bonbons
 * @version 1.0
 */
@Component
@Aspect // 切面类需要使用aspect注解标注
@Order(1) // 多切片先后执行顺序
public class LogAspect {
    /*
        环绕通知在所有通知的最外围
        前置通知在方法执行的前面
        后置通知在方法执行的后面[方法成功执行才有]
        异常通知在发生异常的时候才会执行 >> 不会执行后置通知和后环绕通知
        无论怎样只要有最后通知就会执行

     */
    // 切面:切点 + 通知
    @Before("execution(* com.powernode.spring6.service..* (..))")
    public void beforeAdvice(){
        System.out.println("前置通知");
    }

    // 也可以跨类使用我们的切点表达式获取方法 >> 不过需要全限定类名引用
    @AfterReturning("com.powernode.spring6.service.SecurityAspect.getPointExpression()")
    public void afterReturningAdvice(){
        System.out.println("后置通知");
    }

    @Around("execution(* com.powernode.spring6.service..* (..))")
    public void aroundAdvice(ProceedingJoinPoint proceedingJoinPoint) throws Throwable {
        // 前环绕
        System.out.println("前环绕代码块");
        // 执行代码
        proceedingJoinPoint.proceed();
        // 连接点 joinPoint有啥作用,可以获得关于目标方法的一些信息 >> 比如getSignature方法
        String name = proceedingJoinPoint.getSignature().getName();
        // 获取并打印目标方法的方法名
        System.out.println(name);
        // 后环绕
        System.out.println("后环绕代码块");
    }

    @After("execution(* com.powernode.spring6.service..* (..))")
    // 错误原因在这里:ProceedingJoinPoint is only supported for around advice
    // 意思就是连接点只能用在环绕通知处
    public void afterAdvice(){
        System.out.println("最后通知");
    }

    @AfterThrowing("execution(* com.powernode.spring6.service..* (..))")
    public void afterThrowingAdvice(){
        System.out.println("异常通知");
    }
}
- 通知类型包括:
- 前置通知:@Before 目标方法执行之前的通知
- 后置通知:@AfterReturning 目标方法执行之后的通知
- 环绕通知:@Around 目标方法之前添加通知,同时目标方法执行之后添加通知。
- 异常通知:@AfterThrowing 发生异常之后执行的通知
- 最终通知:@After 放在finally语句块中的通知【一定会执行的通知】
- 如果在程序执行过程中发生异常了,那么就不会看到后置通知与后环绕通知了
编写我们安全切面类
package com.powernode.spring6.service;

import org.aspectj.lang.annotation.Aspect;
import org.aspectj.lang.annotation.Before;
import org.aspectj.lang.annotation.Pointcut;
import org.springframework.core.annotation.Order;
import org.springframework.stereotype.Component;

/**
 * @author Bonbons
 * @version 1.0
 */
@Component
@Aspect
@Order(0)
public class SecurityAspect {
    // 每次我们都要去写一个切点表达式,很不方便 >> 我们定义一个方法来获取切点表达式 >> 使用@Pointcut注解
    @Pointcut("execution(* com.powernode.spring6.service..* (..))")
    public void getPointExpression(){
    }
    // 为了演示存在多个切片的排序解决方式 >> 通过@Order注解来完成,序号小的先执行
    @Before("getPointExpression()")
    public void beforeAdvice(){
        System.out.println("安全日志的前置通知");
    }
}
- 如果存在多个切面类,我们可以通过 @Order 注解来控制让哪个切面先执行【参数小的先执行,相对位置的先后】
- 因为我们使用通知相关的注解的时候,需要我们利用切点表达式指明对哪些方法生效,很不方便
- 我们可以通过 @Pointcut 注解声明一个方法代表这个切点表达式,在本包下的类都可以调用【非本类需要添加全限定类名调用】
尽管上面已经给出了配置文件,但是我们还需要进一步编写配置文件
<?xml version="1.0" encoding="UTF-8"?>
<beans xmlns="http://www.springframework.org/schema/beans"
       xmlns:xsi="http://www.w3.org/2001/XMLSchema-instance"
       xmlns:context="http://www.springframework.org/schema/context"
       xmlns:aop="http://www.springframework.org/schema/aop"
       xsi:schemaLocation="http://www.springframework.org/schema/beans http://www.springframework.org/schema/beans/spring-beans.xsd
                           http://www.springframework.org/schema/context http://www.springframework.org/schema/context/spring-context.xsd
                           http://www.springframework.org/schema/aop http://www.springframework.org/schema/aop/spring-aop.xsd">

    <!--使用context命名空间扫描包-->
    <context:component-scan base-package="com.powernode.spring6.service" />
    <!--使用aop命名空间扫描类的时候,如果扫描到了@Aspect注解,就给对应的类生成代理对象
            属性 (1)proxy-target-class
                    默认为false代表使用接口使用JDK的动态代理、反之使用CGLIB的动态代理
                    修改为true代表使用CGLIB的代理
    -->
    <aop:aspectj-autoproxy proxy-target-class="true"/>
</beans>
编写我们的测试程序:就是正常解析XML,然后通过getBean方法获取实例,之后调用方法 【因为IDEA这部分模块出了问题,所有就没有了运行截图】
如果我们想全注解开发,只需要创建一个配置类代替配置文件
package com.powernode.spring6.service;

import org.springframework.context.annotation.ComponentScan;
import org.springframework.context.annotation.Configuration;
import org.springframework.context.annotation.EnableAspectJAutoProxy;

@Configuration
@ComponentScan("com.powernode.spring6.service")
@EnableAspectJAutoProxy(proxyTargetClass = true)
public class Spring6Configuration {
}
在解析XML文件的时候替换为AnnotationConfigApplicationContext类的构造方法
@Test
public void testAOPWithAllAnnotation(){
    ApplicationContext applicationContext = new AnnotationConfigApplicationContext(Spring6Configuration.class);
    OrderService orderService = applicationContext.getBean("orderService", OrderService.class);
    orderService.generate();
}
五、AOP 的XML式开发
- 不使用任何注解,完全在XML文件中进行配置
- 需求:通过一个案例来演示完全通过配置文件进行AOP开发
编写目标类 VipService
package com.powernode.spring6.service;

// 目标类
public class VipService {
    public void add(){
        System.out.println("保存vip信息。");
    }
}
编写切面类,不需要使用注解,此处直接提供一个方法
package com.powernode.spring6.service;

import org.aspectj.lang.ProceedingJoinPoint;

// 负责计时的切面类
public class TimerAspect {
    // 让连接点作为参数传入
    public void time(ProceedingJoinPoint proceedingJoinPoint) throws Throwable {
        long begin = System.currentTimeMillis();
        //执行目标
        proceedingJoinPoint.proceed();
        long end = System.currentTimeMillis();
        System.out.println("耗时"+(end - begin)+"毫秒");
    }
}
编写配置文件 spring.xml,需要手动声明Bean,需要声明 aop 的配置,声明切点、切面(通知为我们切面类的Bean、切点是我们上面声明的)
<?xml version="1.0" encoding="UTF-8"?>
<beans xmlns="http://www.springframework.org/schema/beans"
       xmlns:xsi="http://www.w3.org/2001/XMLSchema-instance"
       xmlns:context="http://www.springframework.org/schema/context"
       xmlns:aop="http://www.springframework.org/schema/aop"
       xsi:schemaLocation="http://www.springframework.org/schema/beans http://www.springframework.org/schema/beans/spring-beans.xsd
                           http://www.springframework.org/schema/context http://www.springframework.org/schema/context/spring-context.xsd
                           http://www.springframework.org/schema/aop http://www.springframework.org/schema/aop/spring-aop.xsd">

    <!--纳入spring bean管理-->
    <bean id="vipService" class="com.powernode.spring6.service.VipService"/>
    <bean id="timerAspect" class="com.powernode.spring6.service.TimerAspect"/>

    <!--aop配置-->
    <aop:config>
        <!--切点表达式-->
        <aop:pointcut id="p" expression="execution(* com.powernode.spring6.service.VipService.*(..))"/>
        <!--切面-->
        <aop:aspect ref="timerAspect">
            <!--切面=通知 + 切点-->
            <aop:around method="time" pointcut-ref="p"/>
        </aop:aspect>
    </aop:config>
</beans>
编写测试程序
package com.powernode.spring6.test;

import com.powernode.spring6.service.VipService;
import org.junit.Test;
import org.springframework.context.ApplicationContext;
import org.springframework.context.support.ClassPathXmlApplicationContext;

public class AOPTest3 {

    @Test
    public void testAOPXml(){
        ApplicationContext applicationContext = new ClassPathXmlApplicationContext("spring-aop-xml.xml");
        VipService vipService = applicationContext.getBean("vipService", VipService.class);
        vipService.add();
    }
}
$ AOP 的两个综合案例
$ 事务处理
- 我们并不实际去连接数据库,只是说明这种面向切面编程的思想
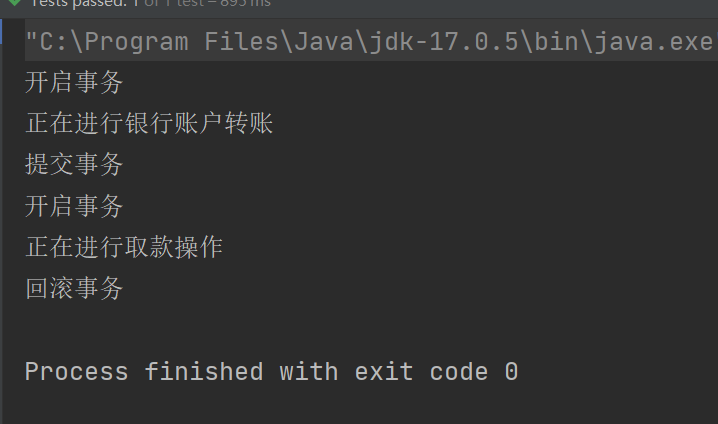
- 很多系统都有事务处理,此处抽象为三部分工作:开启事务、提交事务、发生异常时回滚事务
编写我们的业务类 AccountService
package com.powernode.spring6.biz;

import org.springframework.stereotype.Component;

@Component
// 业务类
public class AccountService {
    // 转账业务方法
    public void transfer(){
        System.out.println("正在进行银行账户转账");
    }
    // 取款业务方法
    public void withdraw(){
        System.out.println("正在进行取款操作");
        if(true){
            throw new RuntimeException("为了演示回滚抛出的异常");
        }
    }
}
编写我们的事务切面类 TransactionAspect
package com.powernode.spring6.biz;

import org.aspectj.lang.ProceedingJoinPoint;
import org.aspectj.lang.annotation.Around;
import org.aspectj.lang.annotation.Aspect;
import org.springframework.stereotype.Component;

@Aspect
@Component
// 事务切面类
public class TransactionAspect {

    @Around("execution(* com.powernode.spring6.biz..*(..))")
    public void aroundAdvice(ProceedingJoinPoint proceedingJoinPoint){
        try {
            System.out.println("开启事务");
            // 执行目标
            proceedingJoinPoint.proceed();
            System.out.println("提交事务");
        } catch (Throwable e) {
            System.out.println("回滚事务");
        }
    }
}
编写我们的配置文件 spring.xml
<?xml version="1.0" encoding="UTF-8"?>
<beans xmlns="http://www.springframework.org/schema/beans"
       xmlns:xsi="http://www.w3.org/2001/XMLSchema-instance"
       xmlns:context="http://www.springframework.org/schema/context"
       xmlns:aop="http://www.springframework.org/schema/aop"
       xsi:schemaLocation="http://www.springframework.org/schema/beans http://www.springframework.org/schema/beans/spring-beans.xsd
                           http://www.springframework.org/schema/context http://www.springframework.org/schema/context/spring-context.xsd
                           http://www.springframework.org/schema/aop http://www.springframework.org/schema/aop/spring-aop.xsd">
    <!--扫描包-->
    <context:component-scan base-package="com.powernode.spring6"/>
    <!--开启动态代理-->
    <aop:aspectj-autoproxy proxy-target-class="true"/>
</beans>
编写我们的测试程序
 @Test
    public void testTransaction(){
        ApplicationContext applicationContext = new ClassPathXmlApplicationContext("spring.xml");
        AccountService accountService = applicationContext.getBean("accountService", AccountService.class);
        // 转账
        accountService.transfer();
        // 取款
        accountService.withdraw();
    }
$ 安全日志
- 需求:在执行增删改操作的时候,都会记录日志
编写我们的用户业务类 UserService
package com.powernode.spring6.biz;

import org.springframework.stereotype.Service;

/**
 * @author Bonbons
 * @version 1.0
 */
@Service
public class UserService {
    public void saveUser(){
        System.out.println("添加用户信息。");
    }
    public void deleteUser(){
        System.out.println("删除用户信息。");
    }
    public void modifyUser(){
        System.out.println("修改用户信息。");
    }
    public void getUser(){
        System.out.println("查询用户信息。");
    }
}
编写我们的 Vip 业务类
package com.powernode.spring6.biz;

import org.springframework.stereotype.Service;

/**
 * @author Bonbons
 * @version 1.0
 */
@Service
public class VipService {
    public void getProduct(){
        System.out.println("获取商品信息");
    }
    public void saveProduct(){
        System.out.println("保存商品");
    }
    public void deleteProduct(){
        System.out.println("删除商品");
    }
    public void modifyProduct(){
        System.out.println("修改商品");
    }
}
编写我们的安全日志切面类 SecurityLogAspect
package com.powernode.spring6.biz;

import org.aspectj.lang.ProceedingJoinPoint;
import org.aspectj.lang.annotation.Around;
import org.aspectj.lang.annotation.Aspect;
import org.aspectj.lang.annotation.Before;
import org.aspectj.lang.annotation.Pointcut;
import org.springframework.context.annotation.ComponentScan;
import org.springframework.stereotype.Component;

import java.text.SimpleDateFormat;
import java.util.Date;

/**
 * @author Bonbons
 * @version 1.0
 */
@Component // 切片类也需要纳入到Spring容器中管理
@Aspect
public class SecurityLogAspect {
    // 因为增删改操作都要记录安全日志,所以我们设计三个切点
    @Pointcut("execution(* com.powernode.spring6.biz..save*(..))")
    public void savePointcut(){ }
    @Pointcut("execution(* com.powernode.spring6.biz..delete*(..))")
    public void deletePointcut(){ }
    @Pointcut("execution(* com.powernode.spring6.biz..modify*(..))")
    public void modifyPointcut(){ }
    // 在三个切点处都记录安全日志
    // 因为使用前置通知报错了:ProceedingJoinPoint is only supported for around advice
    // 所以我临时改用循环通知测试
    @Around("savePointcut() || deletePointcut() || modifyPointcut())")
    public void beforeAdvice(ProceedingJoinPoint joinPoint){
        // 格式化日期
        SimpleDateFormat sdf = new SimpleDateFormat("yyyy-MM-dd HH:mm:ss");
        // 获取当前系统时间[因为获得不了当前操作用户,所以我们就随便指定一个]
        String nowTime = sdf.format(new Date());
        // 打印安全日志信息
        System.out.println(nowTime + "爱迪尔:" + joinPoint.getSignature().getDeclaringTypeName() + "." + joinPoint.getSignature().getName());

    }
}
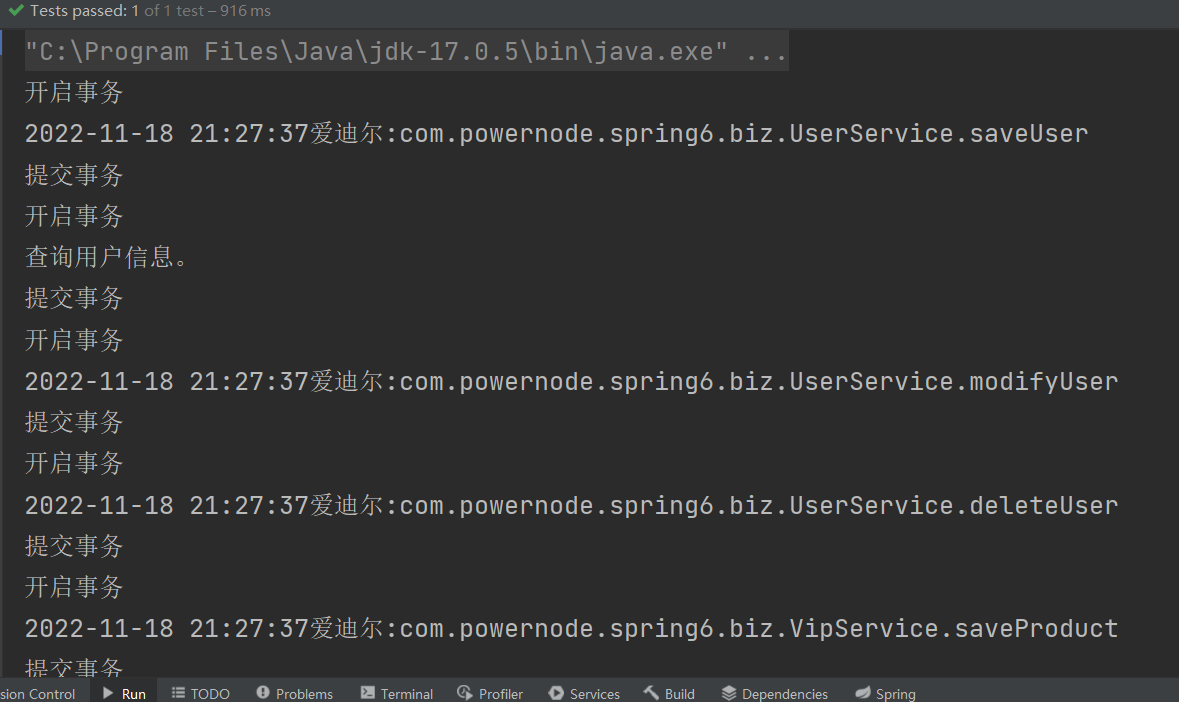
编写我们的测试程序【测试成功的部分截图】
@Test
    public void testSecurityLog(){
        ApplicationContext applicationContext = new ClassPathXmlApplicationContext("spring.xml");
        VipService vipService = applicationContext.getBean("vipService", VipService.class);
        UserService userService = applicationContext.getBean("userService", UserService.class);

        userService.saveUser();
        userService.getUser();
        userService.modifyUser();
        userService.deleteUser();

        vipService.saveProduct();
        vipService.modifyProduct();
        vipService.deleteProduct();
        vipService.getProduct();
    }
