Vue的配置与项目创建
在这之前要先安装nodejs
安装脚手架
官网
Home | Vue CLI (vuejs.org)
先运行,切换成淘宝镜像源,安装速度更快
npm config set registry http://registry.npm.taobao.org

创建项目
用编译器打开一个空文件,在终端输入创建代码

以下是步骤


选择N


运行结果

配置serve
配置完以下,就可以改动代码,效果实时更新到页面上,对于开发来说很方便。
但只有社区版idea在这里才有npm可以选


模板语法
绑值语法

<!DOCTYPE html>
<html lang="en">

<head>
  <meta charset="UTF-8">
  <meta name="viewport" content="width=device-width, initial-scale=1.0">
  <title>Document</title>
</head>

<body>
  <div id="app">
    {{ message }}
    <div>
      <!-- {{num++}},不要这么写,别在这里运算,否则可能出错 -->
      {{num}}
    </div>
    <div>{{bool}}</div>
    <div>{{ arr.find(v => v.name === '张三')?.age }}</div>

  </div>
  <script src="https://cdn.jsdelivr.net/npm/vue@2.7.16/dist/vue.js"></script>

  <script>
    var app = new Vue({
      el: '#app',//element
      //把vue的实例绑定到id是app的上面
      //
      data: {
        message: 'Hello I\'m lmm',
        num: 1,
        bool: true,
        arr: [{ name: '张三', age: 20 }]
      }
    })
  </script>
</body>

</html>
渲染html(v-html)

<template>
  <div>
    <div>{{rowHtml}}</div>
    <div v-html="rowHtml"></div>
  </div>
</template>

<script>
export default {
  name:'test',
  data(){
    return{
      rowHtml: '<a href="https://www.taobao.com/">淘宝</a>'
    }
  }
}
</script>
可以看到绑值语法是不能渲染出链接的

绑定属性(v-bind)


使用场景
1.绑定 HTML 属性
- 用于动态设置元素的属性,例如
href、src、class、id等。
<a v-bind:href="linkUrl">Click here</a>
<img v-bind:src="imageUrl" alt="Dynamic Image">
2.绑定多个属性
- 可以通过对象语法绑定多个属性。
<div v-bind="objectProps"></div>

export default {
  data() {
    return {
      objectProps: {
        id: 'my-div',
        class: 'my-class',
        title: 'This is a title'
      }
    }
  }
}
实例
<template>
  <div>
    <a :href="url">点击这里访问淘宝</a>
    <br>
    <img :src="img" alt="Demo Image">
    <br>

  </div>
</template>

<script>
import logo from '@/assets/logo.png';
export default {
  name: 'test',
  data() {
    return {
      url: 'https://www.taobao.com/',
      // img: '@/asset/logo.png'
      //注意要先导入才能用
      img:logo
    }
  }
}
</script>

事件绑定(v-on)

快捷绑定
直接写在行内


绑定方法


<template>
  <div>
    <div :style="{ width: '100px', height: '100px', backgroundColor: color }" @click="changeColor" id="testColor">
      点我
    </div>
  </div>
</template>

<script>
export default {
  name: 'test',
  data() {
    return {
      color: 'red' // 初始化颜色为红色
    }
  },
  methods: {
    changeColor() {
      // 切换颜色
      this.color = this.color === 'red' ? 'blue' : 'red';
    }
  }
}
</script>

判断(v-if)

如果为真,就渲染该内容
<template>
  <div>
    <div v-if="color === '红色'">红色</div>
    <div v-else>黑色</div>

  </div>
</template>

<script>
import logo from '@/assets/logo.png';
export default {
  name: 'test',
  data() {
    return {
      color:'黑色'
    }
  }
}
</script>


列表渲染(v-for)


每个元素都要有唯一索引,绑定key
在实际开发中,每个元素都有写好的索引,所以用不上index。
如果没有的话,就用index来记录
<template>
  <div v-for="item in fruits">{{item}}</div>
  <div v-for="item in user" :key="item.id">用已写好的索引:{{key}}{{item.name}}</div>
  <div v-for="(item,index) in user" :key="index">用系统分配的索引:{{key}}{{item.name}}</div>

</template>

<script>
export default {
  name: 'test',
  data() {
    return {
      fruits:['苹果','香蕉','西瓜'],
      user:[
        {
          id:'1001',
          name:'alicia'
        },
        {
          id:'1002',
          name:'fafa'
        },
        {
          id:'1003',
          name:'cami'
        }
      ]
    }
  },
  methods: {

  }
}
</script>

双向绑定(v-model)


<template>
  <div>
    <input type="text" v-model="str">
    <p>{{str}}</p>
  </div>
</template>

<script>
export default {
  name: 'test',
  data() {
    return {
      str:''
    }
  },
  methods: {

  }
}
</script>


组件基础

scoped:如果在style中添加此属性,就代表着,当前样式,只在当前组件中生效
使用组件步骤


组件的组织

上图想表达的是,组件间的使用是可以嵌套的
Props组件交互
prop可以使组件之间有数据传递

使用案例
父组件向子组件传递数据。被导入的组件是父组件。
App.vue 组件(父组件):
<template>
  <div id="app">
    <Test :age="age" :name="name" :arr="arr"></Test>
  </div>
</template>

<script>
import Test from "@/components/test";

export default {
  name: 'App',
  components: {
    Test
  },
  data() {
    return {
      age: 18,
      name: 'chen',
      arr: [1, 2, 3]
    }
  }
}
</script>

<style>
#app {
  font-family: Avenir, Helvetica, Arial, sans-serif;
  -webkit-font-smoothing: antialiased;
  -moz-osx-font-smoothing: grayscale;
  text-align: center;
  color: #2c3e50;
  margin-top: 60px;
}
</style>
test.vue 组件(子组件):
<template>
  <p>props传递数据</p>
  <div>{{ age }}</div>
  <div>{{ name }}</div>
  <div v-for="i in arr" :key="i">{{ i }}</div>
</template>

<script>
export default {
  name: 'Test',
  props: {
    age: {
      type: Number,
      default: 0
    },
    name: {
      type: String,
      default: ''
    },
    arr: {
      type: Array,
      default: function () {
        return [];
      }
    }
  }
}
</script>

<style>
/* 添加样式 */
</style>
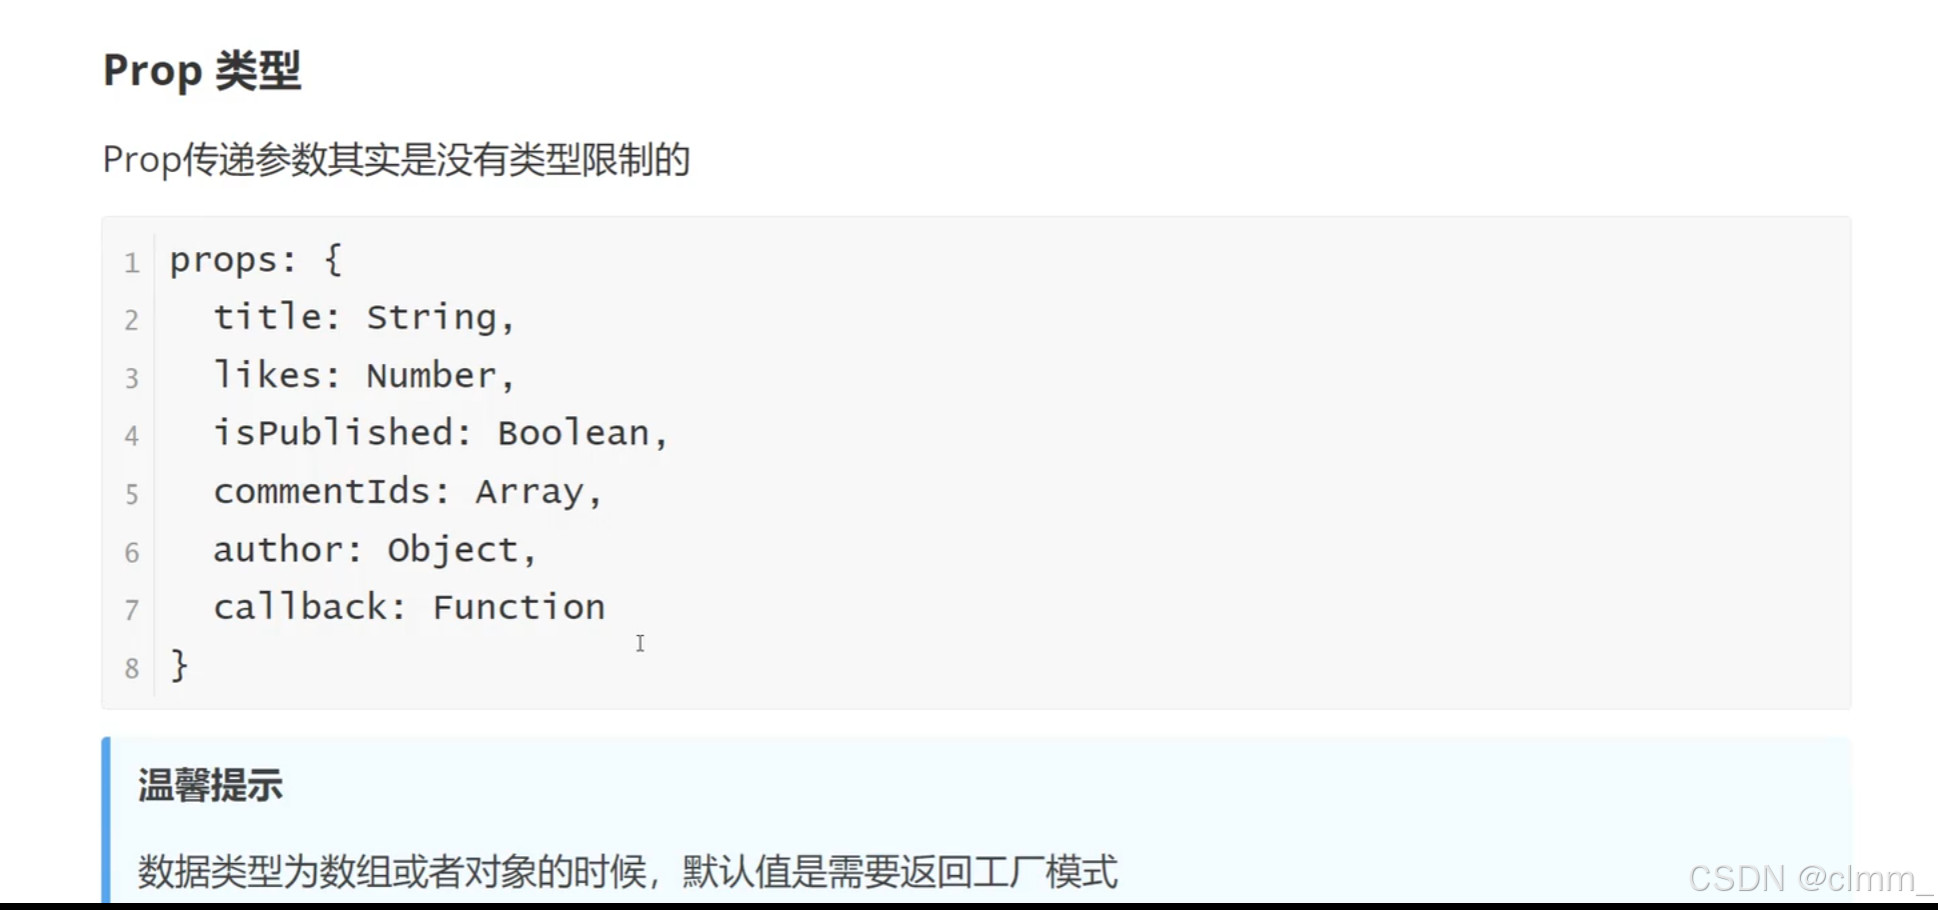
Prop类型
需要注意的是,传递数组和对象必须使用函数进行返回

自定义事件组件交互
自定义事件是 Vue 中子组件与父组件进行交互的一种灵活方式。子组件可以通过
this.$emit触发事件,父组件则通过事件监听器来处理这些事件。这样可以让组件之间的通信更加模块化和清晰。自定义事件可以在组件中反向传递数据,prp可以将数据从父组件传递到子组件,那么反向如何操作呢,就可以利用自定义事件实现
$emit
子组件向父组件传递数据。被导入的组件是父组件。
子组件
<template>
  <button @click="sendMsg">点击传递数据</button>
</template>

<script>
export default {
  name: 'Test',
  data(){
    return{
      msg:'子组件向父组件传递数据'
    }
  },
  methods:{
    sendMsg(){
      this.$emit('onEvent',this.msg)
    }
  }

}
</script>

<style>
/* 添加样式 */
</style>
父组件
<template>
  <div id="app">
    <Test @onEvent="getMsg"></Test>
    <div>{{msg}}</div>
  </div>
</template>

<script>
import Test from "@/components/test";

export default {
  name: 'App',
  data(){
    return{
      msg:''
    }
  },
  components: {
    Test
  },
  methods:{
    getMsg(data){
      this.msg = data
    }
  }

}
</script>

<style>
#app {
  font-family: Avenir, Helvetica, Arial, sans-serif;
  -webkit-font-smoothing: antialiased;
  -moz-osx-font-smoothing: grayscale;
  text-align: center;
  color: #2c3e50;
  margin-top: 60px;
}
</style>

组件生命周期

生命周期概述
Vue 组件的生命周期可以分为以下几个阶段:
- 创建阶段
- 挂载阶段
- 更新阶段
- 销毁阶段
每个阶段都有特定的生命周期钩子函数,你可以在这些钩子函数中执行相应的逻辑。
1. 创建阶段
-
beforeCreate: 在实例被初始化之后,数据观测和事件配置之前调用。这时data和methods还不可用。 -
created: 实例已创建,数据观测和事件配置完成。这时可以访问data、methods和computed,但 DOM 还未生成。
2. 挂载阶段
-
beforeMount: 在挂载开始之前被调用,render函数首次被调用。这时模板已经编译,但尚未被渲染到 DOM 中。 -
mounted: 挂载完成后调用,此时组件已经被渲染到 DOM 上。可以访问 DOM 元素和进行 DOM 操作。网络请求是放在这块。因为元素被渲染出来之后,还需要向后台请求数据。
3. 更新阶段
-
beforeUpdate: 数据更新之前调用,render函数将被重新调用。这时你可以在 DOM 更新之前做一些处理。 -
updated: 数据更新之后调用,此时 DOM 也已经更新。可以执行一些依赖于 DOM 更新的操作。
4. 销毁阶段
-
beforeUnmount: 卸载之前调用,此时组件仍然可以访问其数据和 DOM。 -
unmounted: 卸载完成后调用,此时组件及其所有的子组件都已经被销毁。可以在这里进行清理工作,比如清除定时器、取消网络请求等。

axios
安装与引入

常用请求方法

如果不写的话,默认是get
查询参数(get)

<template>
  <div>
    {{data}}
  </div>
</template>

<script>
export default {
  name: 'Test',
  data(){
    return{
      data:{}
    }
  },
  mounted(){
    this.$axios({
      url: 'http://hmajax.itheima.net/api/city',

      //查询参数
      params: {
        pname: '福建省'
      }
    }).then(result => {
      this.data = result
    })
  }

}
</script>

<style>
/* 添加样式 */
</style>

数据提交(post)


<template>
  <div>
  </div>
</template>

<script>
export default {
  name: 'Test',
  mounted(){
    this.$axios({
      url: 'http://hmajax.itheima.net/api/register',
      method: 'post',
      data: {
        username: 'clmm1234567',
        password: '123123'
      }
    }).then(result => {
      console.log(result)
    })
  }


}
</script>

<style>
/* 添加样式 */
</style>
总结

网络请求封装
vue路由
了解


学到了路由,那么记得创建vue项目的时候把router选上,会自动配置路由文件

App.vue
<template>
  <div>
    <router-link to="/">首页</router-link>|
    <router-link to="/about">关于</router-link>
    <div>123</div>
    <router-view></router-view>
    <div>321</div>

  </div>
</template>

<script>
// import Test from "@/components/Test.vue";

export default {
  name: 'App',
  components: {
    // Test
  },
}
</script>

<style>
#app {
  font-family: Avenir, Helvetica, Arial, sans-serif;
  -webkit-font-smoothing: antialiased;
  -moz-osx-font-smoothing: grayscale;
  text-align: center;
  color: #2c3e50;
  margin-top: 60px;
}
</style>
index.js
import { createRouter, createWebHashHistory } from 'vue-router';
import HomeView from '../views/HomeView';
import AboutView from '../views/AboutView';

const routes = [
    {
        path: '/',
        name: 'Home',
        component: HomeView
    },
    {
        path: '/about',
        name: 'About',
        component: AboutView
    }
];

const router = createRouter({
    history: createWebHashHistory(),
    routes
});

export default router;
main.js
import { createApp } from 'vue';
import App from './App.vue';
import router from './router';
import axios from 'axios';

// 创建 Vue 应用实例
const app = createApp(App);

// 配置 axios 实例
app.config.globalProperties.$axios = axios;

// 使用路由
app.use(router);

// 挂载应用
app.mount('#app');
路由传递参数

router配置
import { createRouter, createWebHashHistory } from 'vue-router'
import HomeView from '../views/HomeView'

const routes = [
  {
    path: '/',
    name: 'home',
    component: HomeView
  },
  {
    path: '/about',
    name: 'about',
    // route level code-splitting
    // this generates a separate chunk (about.[hash].js) for this route
    // which is lazy-loaded when the route is visited.
    component: () => import(/* webpackChunkName: "about" */ '../views/AboutView.vue')
  },
  {
    path:'/news',
    name:'news',
    component: ()=>import("../views/NewsView")
  },
  {
    path:'/newsDetail/:name',
    name:'newsDetail',
    component: ()=>import("../views/NewsDetailView")
  },
]

const router = createRouter({
  history: createWebHashHistory(),
  routes
})

export default router
NewView
<template>
  <div>
    <ul>
      <li><router-link to="/newsDetail/网易">网易新闻</router-link></li>
      <li><router-link to="/newsDetail/百度">百度新闻</router-link></li>
      <li><router-link to="/newsDetail/猾伪">猾伪新闻</router-link></li>
    </ul>
  </div>
</template>

<script>
export default {
  name: "NewsView"
}
</script>

<style scoped>

</style>
NewsDetailView
<template>
  <div>
    <h3>新闻</h3>
    {{$route.params.name}}
  </div>
</template>

<script>
export default {
  name: "NewsDetailView"
}
</script>

<style scoped>

</style>
嵌套路由配置

index.js
import { createRouter, createWebHashHistory } from 'vue-router'
import HomeView from '../views/HomeView.vue'

const routes = [
  {
    path: '/',
    name: 'home',
    component: HomeView
  },
  {
    path: '/about',
    name: 'about',
    component: () => import(/* webpackChunkName: "about" */ '../views/AboutView.vue'),
    redirect:'/about/b',
    children: [
      {
        path: 'a',
        component: () => import('../views/AboutSub/About_a')
      },
      {
        path: 'b',
        component: () => import('../views/AboutSub/About_b')
      }
    ]
  }

]

const router = createRouter({
  history: createWebHashHistory(),
  routes
})

export default router
AboutView.vue
<template>
  <div class="about">
    <router-link to="/about/a">a     |     </router-link>
    <router-link to="/about/b">b</router-link>
    <router-view></router-view>
    <h1>This is an about page</h1>
  </div>
</template>
点进about页面默认是about_b,因为重定向了

Vue状态管理

可以集中管理所有组件,不像props只能在父子间传递数据
引入状态管理
创建项目的时候勾选vuex

如果在创建项目的时候已勾选vuex,下面的前三步就不用了


vue状态管理核心


案例--面经基础

配置路由
先做一个底部导航切换效果。
配置路由
import { createRouter, createWebHistory } from 'vue-router'

const routes = [
  {
    path:'/',
    component:()=>import('@/views/LayOut'),

    children:[
      {
        path:'/collect',
        component:()=>import('@/views/Collect')
      },
      {
        path:'/like',
        component:()=>import('@/views/Like')
      },
      {
        path:'/user',
        component:()=>import('@/views/User')
      },
      {
        path:'/articleList',
        component:()=>import('@/views/ArticleList')
      },
    ]
  }
]

const router = createRouter({
  history: createWebHistory(process.env.BASE_URL),
  routes
})

export default router
<template>
  <div>

    <div style="background-color: pink; width: 500px; height: 500px;">
      <router-view></router-view>
    </div>
    <nav>
      <router-link to="/articleList">面经 |</router-link>
      <router-link to="/collect">收藏 |</router-link>
      <router-link to="/like">喜欢 |</router-link>
      <router-link to="/user">我的</router-link>
    </nav>
  </div>
</template>

<style>
  a.router-link-active{
    color: red;
  }
</style>
需要注意的是,Layout中需要用router-view
Layout组件作为一个包裹组件使用,这意味着它可能需要呈现其子路由内容。Layout中的<router-view>组件用于展示其子路由(如/article、/like等)。这使得每个子路由在Layout组件内部渲染,同时Layout组件可以包含共同的布局或导航条。简而言之,
Layout中的<router-view>用于渲染Layout的子路由组件内容。这样,你可以在Layout组件中管理应用的布局和结构,同时动态展示不同的子视图。
<template>
  <div>
    <router-view></router-view>
  </div>
</template>

<script>
export default {
  name: "Layout"
}
</script>

<style scoped>

</style>
首页请求渲染


<template>
  <div>
    <div v-for="item in articles"
         :key="item.id"
    >
      <p>{{item.stem}}</p>

    </div>
  </div>
</template>

<script>
import axios from "axios";
export default {
  name: "ArticleList",
  data(){
    return{
      articles:[]
    }
  },
  async created(){
    const { data } = await axios.get(
        'https://mock.boxuegu.com/mock/3083/articles',
    );
    this.articles = data.result.rows;
  }
}
</script>

<style scoped>

</style>
跳转详情页传参
查询参数
动态路由
路由配置
{
    path:'/detail/:id',
    component:() => import('@/views/ArticleDetail')
  }
路由使用
@click="$router.push(`/detail/${item.id}`)"
<template>
  <div>
    <div v-for="item in articles"
         :key="item.id"
         @click="$router.push(`/detail/${item.id}`)"
    >
      <p>{{item.stem}}</p>

    </div>
  </div>
</template>

<script>
import axios from "axios";
export default {
  name: "ArticleList",
  data(){
    return{
      articles:[]
    }
  },
  async created(){
    const { data } = await axios.get(
        'https://mock.boxuegu.com/mock/3083/articles',
    );
    this.articles = data.result.rows;
  }
}
</script>

<style scoped>

</style>
面经详情页的路由接收
this.$route.params.id
<template>
  <div>
    面经详情
  </div>
</template>

<script>
export default {
  name: "ArticleDetail",
  created() {
    console.log(this.$route.params.id)
  }
}
</script>

<style scoped>

</style>
详情页渲染

<template>
  <div>
    {{article.content}}
  </div>
</template>

<script>
import axios from "axios";
export default {
  name: "ArticleDetails",
  data(){
    return{
      article:{}
    }
  },
  async created() {
    const id = this.$route.params.id
    console.log(this.$route.params.id)
    const {data} = await axios.get(`https://mock.boxuegu.com/mock/3083/articles/${id}`)
    this.article = data.result
  }
}
</script>

<style scoped>

</style>
组件缓存


![[JavaEE] HTTP/HTTPS](https://i-blog.csdnimg.cn/direct/f85e4dca3e50445f94c0d43472b18235.png)


