生信碱移
torch模块可视化
小编近期冲浪的时候发现一个torch模型架构可视化的神级python库VisualTorch,给各位铁子分享一下doge。
VisualTorch旨在帮助可视化基于Torch的神经网络架构,似乎是今年才上传到github上。它目前支持为PyTorch的Sequential和Custom模型生成分层风格、图形风格和LeNet风格的架构。工具的灵感源自visualkeras、pytorchviz和pytorch-summary。
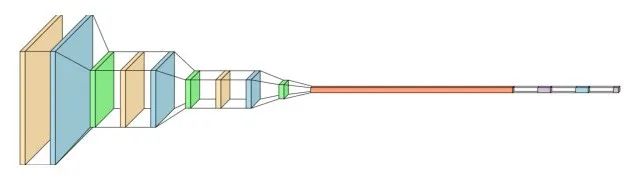
▲ 可视化示例
0.安装
使用以下代码安装该库:
pip install visualtorch
环境依赖如下,实测的时候发现python版本还需要大于3.10:
pillow>=10.0.0
numpy>=1.18.1
aggdraw>=1.3.11
torch>=2.0.0
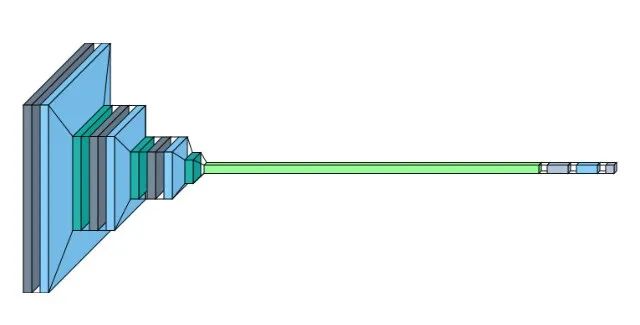
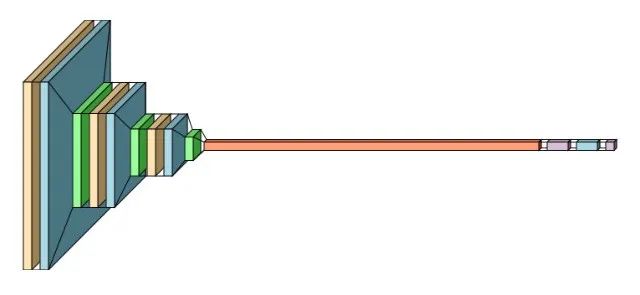
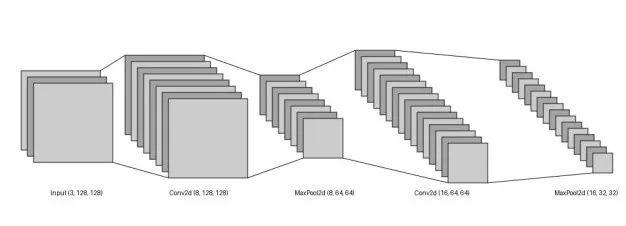
1.Layered可视化
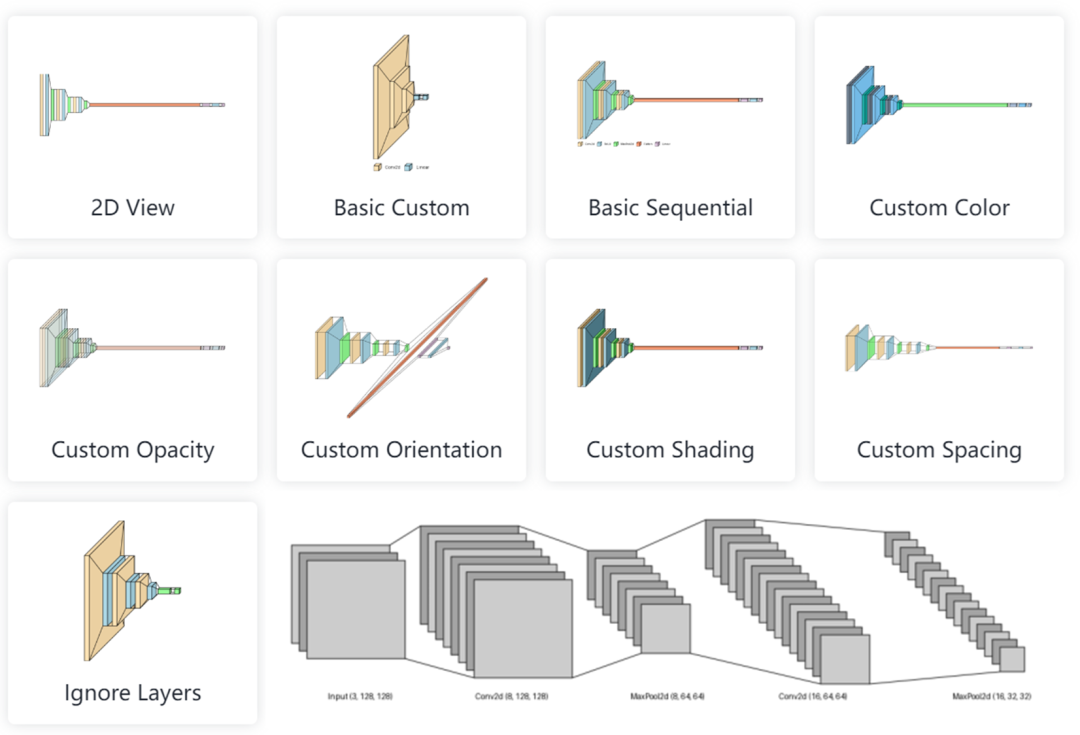
① 2D可视化:
import matplotlib.pyplot as plt
import visualtorch
from torch import nn

# Example of a simple CNN model using nn.Sequential
model = nn.Sequential(
    nn.Conv2d(3, 16, kernel_size=3, padding=1),
    nn.ReLU(),
    nn.MaxPool2d(2, 2),
    nn.Conv2d(16, 32, kernel_size=3, padding=1),
    nn.ReLU(),
    nn.MaxPool2d(2, 2),
    nn.Conv2d(32, 64, kernel_size=3, padding=1),
    nn.ReLU(),
    nn.MaxPool2d(2, 2),
    nn.Flatten(),
    nn.Linear(64 * 28 * 28, 256),  # Adjusted the input size for the Linear layer
    nn.ReLU(),
    nn.Linear(256, 10),  # Assuming 10 output classes
)

input_shape = (1, 3, 224, 224)
img = visualtorch.layered_view(model, input_shape=input_shape, draw_volume=False)

plt.axis("off")
plt.tight_layout()
plt.imshow(img)
plt.show()
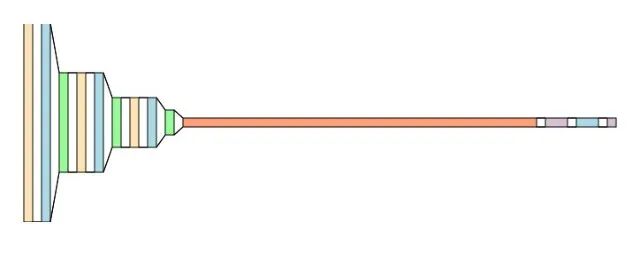
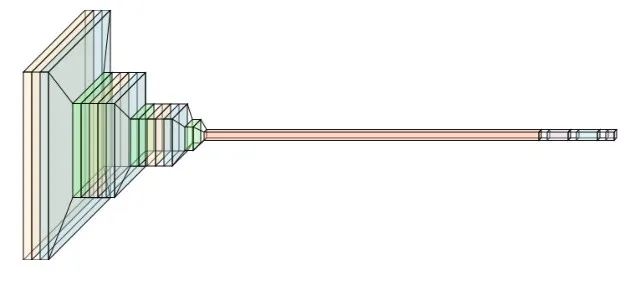
② 基础自定义模型的可视化:
import matplotlib.pyplot as plt
import torch
import torch.nn.functional as func
import visualtorch
from torch import nn


# Example of a simple CNN model
class SimpleCNN(nn.Module):
    """Simple CNN Model."""

    def __init__(self) -> None:
        super().__init__()
        self.conv1 = nn.Conv2d(3, 16, kernel_size=3, padding=1)
        self.conv2 = nn.Conv2d(16, 32, kernel_size=3, padding=1)
        self.conv3 = nn.Conv2d(32, 64, kernel_size=3, padding=1)
        self.fc1 = nn.Linear(64 * 28 * 28, 128)
        self.fc2 = nn.Linear(128, 10)

    def forward(self, x: torch.Tensor) -> torch.Tensor:
        """Define the forward pass."""
        x = self.conv1(x)
        x = func.relu(x)
        x = func.max_pool2d(x, 2, 2)
        x = self.conv2(x)
        x = func.relu(x)
        x = func.max_pool2d(x, 2, 2)
        x = self.conv3(x)
        x = func.relu(x)
        x = func.max_pool2d(x, 2, 2)
        x = x.view(x.size(0), -1)
        x = self.fc1(x)
        x = func.relu(x)
        return self.fc2(x)


# Create an instance of the SimpleCNN
model = SimpleCNN()

input_shape = (1, 3, 224, 224)

img = visualtorch.layered_view(model, input_shape=input_shape, legend=True)

plt.axis("off")
plt.tight_layout()
plt.imshow(img)
plt.show()
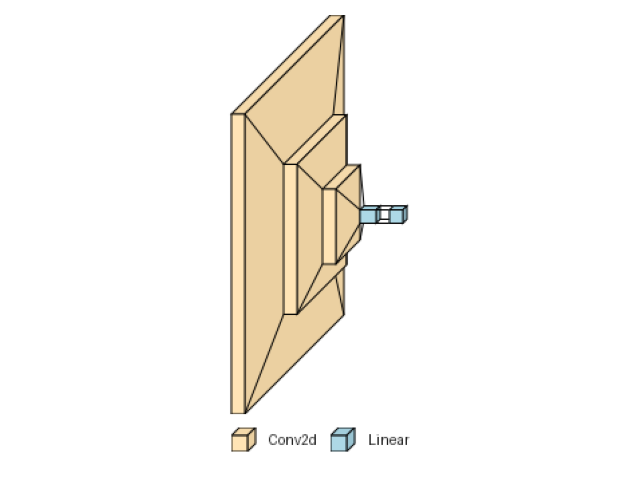
③ 基本Sequential模型的可视化:
import matplotlib.pyplot as plt
import visualtorch
from torch import nn

# Example of a simple CNN model using nn.Sequential
model = nn.Sequential(
    nn.Conv2d(3, 16, kernel_size=3, padding=1),
    nn.ReLU(),
    nn.MaxPool2d(2, 2),
    nn.Conv2d(16, 32, kernel_size=3, padding=1),
    nn.ReLU(),
    nn.MaxPool2d(2, 2),
    nn.Conv2d(32, 64, kernel_size=3, padding=1),
    nn.ReLU(),
    nn.MaxPool2d(2, 2),
    nn.Flatten(),
    nn.Linear(64 * 28 * 28, 256),  # Adjusted the input size for the Linear layer
    nn.ReLU(),
    nn.Linear(256, 10),  # Assuming 10 output classes
)

input_shape = (1, 3, 224, 224)

img = visualtorch.layered_view(model, input_shape=input_shape, legend=True)

plt.axis("off")
plt.tight_layout()
plt.imshow(img)
plt.show()
④ 自定义模块的颜色:
from collections import defaultdict

import matplotlib.pyplot as plt
import visualtorch
from torch import nn

# Example of a simple CNN model using nn.Sequential
model = nn.Sequential(
    nn.Conv2d(3, 16, kernel_size=3, padding=1),
    nn.ReLU(),
    nn.MaxPool2d(2, 2),
    nn.Conv2d(16, 32, kernel_size=3, padding=1),
    nn.ReLU(),
    nn.MaxPool2d(2, 2),
    nn.Conv2d(32, 64, kernel_size=3, padding=1),
    nn.ReLU(),
    nn.MaxPool2d(2, 2),
    nn.Flatten(),
    nn.Linear(64 * 28 * 28, 256),  # Adjusted the input size for the Linear layer
    nn.ReLU(),
    nn.Linear(256, 10),  # Assuming 10 output classes
)

color_map: dict = defaultdict(dict)
color_map[nn.Conv2d]["fill"] = "LightSlateGray"  # Light Slate Gray
color_map[nn.ReLU]["fill"] = "#87CEFA"  # Light Sky Blue
color_map[nn.MaxPool2d]["fill"] = "LightSeaGreen"  # Light Sea Green
color_map[nn.Flatten]["fill"] = "#98FB98"  # Pale Green
color_map[nn.Linear]["fill"] = "LightSteelBlue"  # Light Steel Blue

input_shape = (1, 3, 224, 224)
img = visualtorch.layered_view(model, input_shape=input_shape, color_map=color_map)

plt.axis("off")
plt.tight_layout()
plt.imshow(img)
plt.show()
⑤ 自定义模块的不透明度:
import matplotlib.pyplot as plt
import visualtorch
from torch import nn

# Example of a simple CNN model using nn.Sequential
model = nn.Sequential(
    nn.Conv2d(3, 16, kernel_size=3, padding=1),
    nn.ReLU(),
    nn.MaxPool2d(2, 2),
    nn.Conv2d(16, 32, kernel_size=3, padding=1),
    nn.ReLU(),
    nn.MaxPool2d(2, 2),
    nn.Conv2d(32, 64, kernel_size=3, padding=1),
    nn.ReLU(),
    nn.MaxPool2d(2, 2),
    nn.Flatten(),
    nn.Linear(64 * 28 * 28, 256),  # Adjusted the input size for the Linear layer
    nn.ReLU(),
    nn.Linear(256, 10),  # Assuming 10 output classes
)

input_shape = (1, 3, 224, 224)

img = visualtorch.layered_view(model, input_shape=input_shape, opacity=100)

plt.axis("off")
plt.tight_layout()
plt.imshow(img)
plt.show()
⑥ 自定义模块的方向:
import matplotlib.pyplot as plt
import visualtorch
from torch import nn

# Example of a simple CNN model using nn.Sequential
model = nn.Sequential(
    nn.Conv2d(3, 16, kernel_size=3, padding=1),
    nn.ReLU(),
    nn.MaxPool2d(2, 2),
    nn.Conv2d(16, 32, kernel_size=3, padding=1),
    nn.ReLU(),
    nn.MaxPool2d(2, 2),
    nn.Conv2d(32, 64, kernel_size=3, padding=1),
    nn.ReLU(),
    nn.MaxPool2d(2, 2),
    nn.Flatten(),
    nn.Linear(64 * 28 * 28, 256),  # Adjusted the input size for the Linear layer
    nn.ReLU(),
    nn.Linear(256, 10),  # Assuming 10 output classes
)

input_shape = (1, 3, 224, 224)

img = visualtorch.layered_view(
    model,
    input_shape=input_shape,
    one_dim_orientation="x",
    spacing=40,
)

plt.axis("off")
plt.tight_layout()
plt.imshow(img)
plt.show()
⑦ 自定义模块的阴影:
import matplotlib.pyplot as plt
import visualtorch
from torch import nn

# Example of a simple CNN model using nn.Sequential
model = nn.Sequential(
    nn.Conv2d(3, 16, kernel_size=3, padding=1),
    nn.ReLU(),
    nn.MaxPool2d(2, 2),
    nn.Conv2d(16, 32, kernel_size=3, padding=1),
    nn.ReLU(),
    nn.MaxPool2d(2, 2),
    nn.Conv2d(32, 64, kernel_size=3, padding=1),
    nn.ReLU(),
    nn.MaxPool2d(2, 2),
    nn.Flatten(),
    nn.Linear(64 * 28 * 28, 256),  # Adjusted the input size for the Linear layer
    nn.ReLU(),
    nn.Linear(256, 10),  # Assuming 10 output classes
)

input_shape = (1, 3, 224, 224)
img = visualtorch.layered_view(model, input_shape=input_shape, shade_step=50)

plt.axis("off")
plt.tight_layout()
plt.imshow(img)
plt.show()
⑧ 自定义模块间空间距离:
import matplotlib.pyplot as plt
import visualtorch
from torch import nn

# Example of a simple CNN model using nn.Sequential
model = nn.Sequential(
    nn.Conv2d(3, 16, kernel_size=3, padding=1),
    nn.ReLU(),
    nn.MaxPool2d(2, 2),
    nn.Conv2d(16, 32, kernel_size=3, padding=1),
    nn.ReLU(),
    nn.MaxPool2d(2, 2),
    nn.Conv2d(32, 64, kernel_size=3, padding=1),
    nn.ReLU(),
    nn.MaxPool2d(2, 2),
    nn.Flatten(),
    nn.Linear(64 * 28 * 28, 256),  # Adjusted the input size for the Linear layer
    nn.ReLU(),
    nn.Linear(256, 10),  # Assuming 10 output classes
)

input_shape = (1, 3, 224, 224)

img = visualtorch.layered_view(model, input_shape=input_shape, spacing=50)

plt.axis("off")
plt.tight_layout()
plt.imshow(img)
plt.show()
⑨ 忽略某些模块,即仅可视化某些层:
import matplotlib.pyplot as plt
import visualtorch
from torch import nn

# Example of a simple CNN model using nn.Sequential
model = nn.Sequential(
    nn.Conv2d(3, 16, kernel_size=3, padding=1),
    nn.ReLU(),
    nn.MaxPool2d(2, 2),
    nn.Conv2d(16, 32, kernel_size=3, padding=1),
    nn.ReLU(),
    nn.MaxPool2d(2, 2),
    nn.Conv2d(32, 64, kernel_size=3, padding=1),
    nn.ReLU(),
    nn.MaxPool2d(2, 2),
    nn.Flatten(),
    nn.Linear(64 * 28 * 28, 256),  # Adjusted the input size for the Linear layer
    nn.ReLU(),
    nn.Linear(256, 10),  # Assuming 10 output classes
)

ignored_layers = [nn.ReLU, nn.Flatten]

input_shape = (1, 3, 224, 224)
img = visualtorch.layered_view(
    model,
    input_shape=input_shape,
    type_ignore=ignored_layers,
)

plt.axis("off")
plt.tight_layout()
plt.imshow(img)
plt.show()
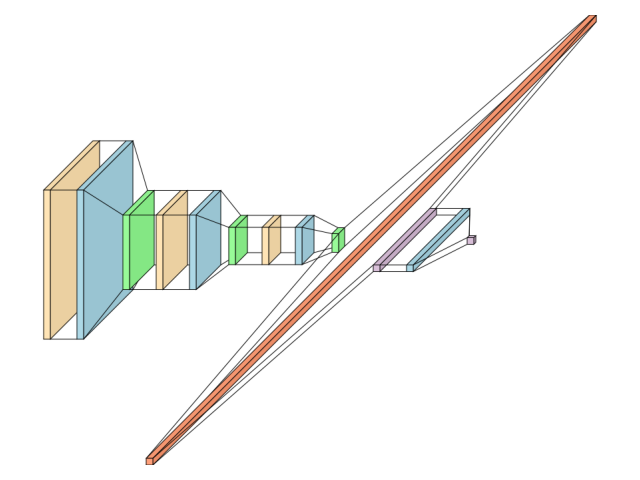
2.全连接层可视化
可视化基本的全连接层,当然像颜色、空间啥的也都可以调整:
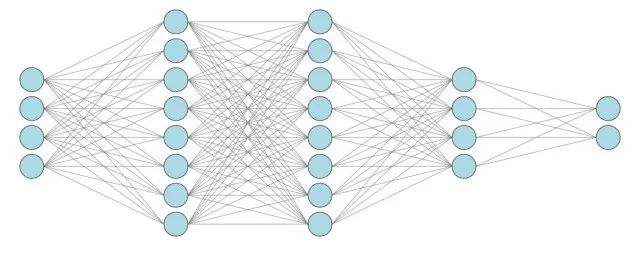
import matplotlib.pyplot as plt
import torch
import visualtorch
from torch import nn


class SimpleDense(nn.Module):
    """Simple Dense Model."""

    def __init__(self) -> None:
        super().__init__()
        self.h0 = nn.Linear(4, 8)
        self.h1 = nn.Linear(8, 8)
        self.h2 = nn.Linear(8, 4)
        self.out = nn.Linear(4, 2)

    def forward(self, x: torch.Tensor) -> torch.Tensor:
        """Define the forward pass."""
        x = self.h0(x)
        x = self.h1(x)
        x = self.h2(x)
        return self.out(x)


model = SimpleDense()

input_shape = (1, 4)

img = visualtorch.graph_view(model, input_shape)

plt.axis("off")
plt.tight_layout()
plt.imshow(img)
plt.show()
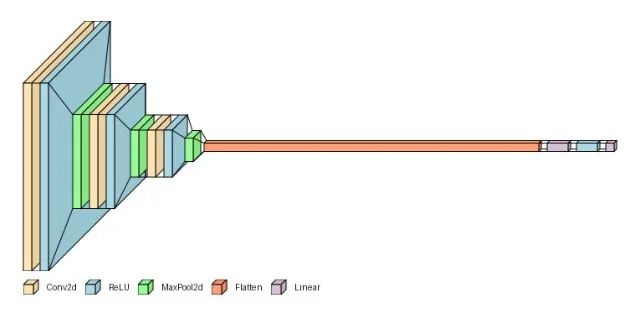
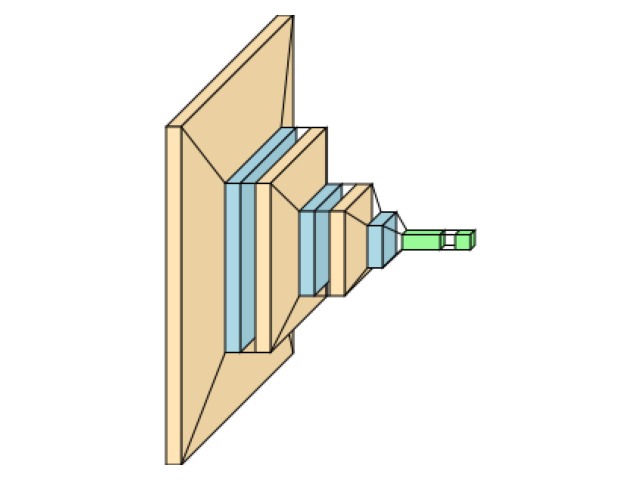
LeNet风格示例
import matplotlib.pyplot as plt
import visualtorch
from torch import nn

# Example of a simple CNN model using nn.Sequential
model = nn.Sequential(
    nn.Conv2d(3, 8, kernel_size=3, padding=1),
    nn.MaxPool2d(2, 2),
    nn.Conv2d(8, 16, kernel_size=3, padding=1),
    nn.MaxPool2d(2, 2),
)

input_shape = (1, 3, 128, 128)

img = visualtorch.lenet_view(model, input_shape=input_shape)

plt.axis("off")
plt.tight_layout()
plt.imshow(img)
plt.show()
上面用到的几个API参数,这里就介绍了,可以自行查看文档:
-
https://visualtorch.readthedocs.io/en/latest/index.html
够猛,宝
赶紧收藏关注起来