一、spug代码仓库地址:
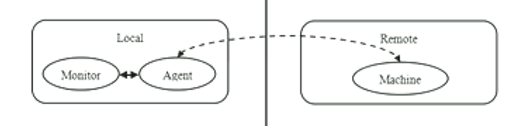
spug: 开源运维平台:面向中小型企业设计的无 Agent的自动化运维平台,整合了主机管理、主机批量执行、主机在线终端、文件在线上传下载、应用发布、任务计划、配置中心、监控、报警等一系列功能。 - Gitee.com
注意:如果要找怎么进行容器化部署的详细说明,直接在这个仓库看官方文档就行了
一般流程:
1.进入docs/docker目录,执行docker-compose up -d
2.docker-compose ps查看容器的端口,打开浏览器查看效果
如果过程中有报错,一般是linux系统版本和软件版本不匹配,比如我的系统是Rockylinux8.6,我根据报错信息替换掉软件(比如将mariadb-server换成mysql-server)或者升级软件(python3换成python39,顺便升级对应的pip软件)
二、clone或下载代码到本地共享目录
之所以使用共享目录,是因为可以在windows系统使用代码编辑器,在linux系统执行shell命令,可以参考这篇文章:
linux使用samba共享目录,其他虚拟机和windows都可以访问-CSDN博客
如果想直接在windows系统,不借助vmware工具直接打开Ubuntu系统,执行shell命令,配置挺复杂,有兴趣的可以查看如下地址的文档说明:
Manual installation steps for older versions of WSL | Microsoft Learn
1.拷贝docs目录下的install.sh到spug-api目录下:

install.sh因为是在本地运行,所以改了一下,最大的改变就是python的版本,一般python3.9为好,还需要升级原本的python3.9对应的pip,否则会报错,其他的自行判断:
#!/bin/bash

#set -e #如果写上这一行任何一个报错就会中止程序,不会继续后面的程序


spuy_banner() {

echo "                           ";
echo " ####  #####  #    #  #### ";
echo "#      #    # #    # #    #";
echo " ####  #    # #    # #     ";
echo "     # #####  #    # #  ###";
echo "#    # #      #    # #    #";
echo " ####  #       ####   #### ";
echo "                           ";

}


init_system_lib() {
    source /etc/os-release
    case $ID in
        centos|fedora|rhel|rocky)
            echo "开始安装/更新可能缺少的依赖"
            yum -y remove python3
            yum install -y python39
            yum -y install git mysql-server \
            gcc openldap-devel redis nginx supervisor

            sed -i 's/ default_server//g' /etc/nginx/nginx.conf
            MYSQL_CONF=/etc/my.cnf.d/spug.cnf
            SUPERVISOR_CONF=/etc/supervisord.d/spug.ini
            REDIS_SRV=redis
            SUPERVISOR_SRV=supervisord
            ;;

        debian|ubuntu|devuan)
            echo "开始安装/更新可能缺少的依赖"
            apt-get update
            #下载相应的软件,参照上面centos那些系统来写,就是把yum换成ubuntu的下载命令
            #。。。略。。。
            rm -f /etc/nginx/sites-enabled/default
            MYSQL_CONF=/etc/mysql/conf.d/spug.cnf
            SUPERVISOR_CONF=/etc/supervisor/conf.d/spug.conf
            REDIS_SRV=redis-server
            SUPERVISOR_SRV=supervisor
            ;;
        *)
            exit 1
            ;;
    esac
}


install_spug() {
  echo "开始安装Spug..."

  python3 -m venv venv
  source venv/bin/activate
  /usr/bin/pip3.9 install --upgrade pip
  pip3.9 install wheel -i https://pypi.doubanio.com/simple/
  pip3.9 install gunicorn mysqlclient -i https://pypi.doubanio.com/simple/
  pip3.9 install -r requirements.txt -i https://pypi.doubanio.com/simple/
}


setup_conf() {

  echo "开始配置Spug配置..."
# mysql conf
cat << EOF > $MYSQL_CONF
[mysqld]
bind-address=127.0.0.1
EOF
echo $PWD
# spug conf
cat << EOF > spug/overrides.py
DEBUG = False
ALLOWED_HOSTS = ['127.0.0.1']

DATABASES = {
    'default': {
        'ATOMIC_REQUESTS': True,
        'ENGINE': 'django.db.backends.mysql',
        'NAME': 'spug',
        'USER': 'spug',
        'PASSWORD': 'spug.dev',
        'HOST': '127.0.0.1',
        'OPTIONS': {
            'charset': 'utf8mb4',
            'sql_mode': 'STRICT_TRANS_TABLES',
        }
    }
}
EOF

cat << EOF > $SUPERVISOR_CONF
[program:spug-api]
command = bash /data/spug/spug_api/tools/start-api.sh
autostart = true
stdout_logfile = /data/spug/spug_api/logs/api.log
redirect_stderr = true

[program:spug-ws]
command = bash /data/spug/spug_api/tools/start-ws.sh
autostart = true
stdout_logfile = /data/spug/spug_api/logs/ws.log
redirect_stderr = true

[program:spug-worker]
command = bash /data/spug/spug_api/tools/start-worker.sh
autostart = true
stdout_logfile = /data/spug/spug_api/logs/worker.log
redirect_stderr = true

[program:spug-monitor]
command = bash /data/spug/spug_api/tools/start-monitor.sh
autostart = true
stdout_logfile = /data/spug/spug_api/logs/monitor.log
redirect_stderr = true

[program:spug-scheduler]
command = bash /data/spug/spug_api/tools/start-scheduler.sh
autostart = true
stdout_logfile = /data/spug/spug_api/logs/scheduler.log
redirect_stderr = true
EOF

cat << EOF > /etc/nginx/conf.d/spug.conf
server {
        listen 80 default_server;
        root /data/spug/spug_web/build/;

        location ^~ /api/ {
                rewrite ^/api(.*) \$1 break;
                proxy_pass http://127.0.0.1:9001;
                proxy_redirect off;
                proxy_set_header X-Real-IP \$remote_addr;
        }

        location ^~ /api/ws/ {
                rewrite ^/api(.*) \$1 break;
                proxy_pass http://127.0.0.1:9002;
                proxy_http_version 1.1;
                proxy_set_header Upgrade \$http_upgrade;
                proxy_set_header Connection "Upgrade";
                proxy_set_header X-Real-IP \$remote_addr;
        }

        error_page 404 /index.html;
}
EOF


systemctl start mysqld
systemctl enable mysqld

mysql -e "create database if not exists spug default character set utf8mb4 collate utf8mb4_unicode_ci;"
mysql -e "create user if not exists spug@'%' identified by 'spug.dev';"
mysql -e "grant all on spug.* to spug@'%'"
mysql -e "create user if not exists admin@'%' identified by 'spug.dev';"
mysql -e "grant all on *.* to admin@'%';"
mysql -e "flush privileges;"

python3.9 manage.py initdb
python3.9 manage.py useradd -u admin -p spug.dev -s -n 管理员


systemctl enable nginx
systemctl enable $REDIS_SRV
systemctl enable $SUPERVISOR_SRV

systemctl restart nginx
systemctl start $REDIS_SRV
systemctl restart $SUPERVISOR_SRV
}


spuy_banner
init_system_lib
install_spug
setup_conf
echo 'good ending'
echo -e "\n\n\033[33m安全警告:默认的数据库和Redis服务并不安全,请确保其仅监听在127.0.0.1,推荐参考官网文档自行加固安全配置!\033[0m"
echo -e "\033[32m安装成功!\033[0m"
echo "默认管理员账户:admin  密码:spug.dev"
echo "默认数据库用户:spug   密码:spug.dev"
在linux系统的spug-api目录下执行:./install.sh
2.将docs/docker目录下的init_spug.sh放在spug-api目录下并修改:
#!/bin/bash
#
set -e
set -u

python3.9 manage.py updatedb
python3.9 manage.py user add -u admin -p spug.dev -n 管理员 -s
python3.9 manage.py user add -u spug -p spug.dev -n 开发人员 -s
linux系统执行./init_spug.sh会给数据库填充更新数据,比如新增可登陆的用户名和密码数据
启动效果:
[root@git spug_api]# python3.9 manage.py runserver
/usr/local/lib/python3.9/site-packages/paramiko/pkey.py:82: CryptographyDeprecationWarning: TripleDES has been moved to cryptography.hazmat.decrepit.ciphers.algorithms.TripleDES and will be removed from this module in 48.0.0.
  "cipher": algorithms.TripleDES,
/usr/local/lib/python3.9/site-packages/paramiko/transport.py:253: CryptographyDeprecationWarning: TripleDES has been moved to cryptography.hazmat.decrepit.ciphers.algorithms.TripleDES and will be removed from this module in 48.0.0.
  "class": algorithms.TripleDES,
Performing system checks...

System check identified no issues (0 silenced).
September 19, 2024 - 00:04:27
Django version 2.2.28, using settings 'spug.settings'
Starting ASGI/Channels version 2.3.1 development server at http://127.0.0.1:8000/
Quit the server with CONTROL-C.
3.启动spug-web
linux系统下运行如下命令(最好在同一个Linux服务器运行,如果在Windows或其他Linux服务器,则需要把对应接口的IP地址改为后端启动服务所在服务器的IP地址)
npm i下载插件依赖
npm start运行,默认端口3000,被占用3000端口的话提示替换成3001
Compiled successfully!

You can now view spug_web in the browser.

  Local:            http://localhost:3001
  On Your Network:  http://192.168.137.12:3001

Note that the development build is not optimized.
To create a production build, use npm run build.
windows的浏览器效果

使用admin和他的密码登录


![[产品管理-25]:NPDP新产品开发 - 23 - 产品创新中的市场调研 - 定量市场调研的常见工具](https://i-blog.csdnimg.cn/direct/27799c3fbe254f3fa340b35b9bf3bbe6.png)


![[数据集][目标检测]红外微小目标无人机直升机飞机飞鸟检测数据集VOC+YOLO格式7559张4类别](https://i-blog.csdnimg.cn/direct/77c0ed924a1341f7b8ab9541dc1be3fb.png)