如何使用 ef core 的 code first 模式实现自定义类型转换器
- 前言
- 1. 项目结构
- 2. 实现步骤
- 2.1 定义转换器
- 2.1.1 DateTime 转换器
- 2.1.2 JsonDocument 转换器
- 2.2 创建实体类并配置数据结构类型
- 2.3 定义 Utility 工具类
- 2.4 配置 DbContext
- 2.4.1 使用 EF Core 配置 DbContext 的两种实现方式
- 2.4.2 具体实现 MyDbContext 的两种方式
- 2.5 使用 DbContext 操作 Sqlite 数据库
- 2.6 使用工具 dotnet ef 应用迁移
- 2.6.1 执行 MyDb1Context 迁移
- 2.6.2 执行 MyDb2Context 迁移
- 2.7 运行项目
- 2.8 改造 ef core 使用仓储模式
- 2.8.1 添加仓储(Repositories)层
- 2.8.2 新增服务(Services)层
- 3. 安装 dotnet ef 工具
- 3.1 安装 .NET SDK
- 3.2 安装 Entity Framework Core 工具包
- 3.3 使用 dotnet ef 命令
- 总结
前言
在使用 Entity Framework Core (EF Core) 的 Code First 模式时,如果你想在 SQLite 数据库中存储 JsonDocument or DateTime 类型的数据,需要确保数据类型的正确映射。
注意:
- `SQLite` 默认没有 `JsonDocument` 类型,而是使用 `JSON` 或 `TEXT` 类型来存储 `JSON` 值。
- `SQLite` 默认没有一个单独的用于存储日期和/或时间的存储类,但 `SQLite` 能够把日期和时间存储为 `TEXT、REAL` 或 `INTEGER` 值。
为了实现 JsonDocument & DateTime 类型的正确转换,你可以使用自定义 ValueConverter(值转换器)。下面是一个详细的示例,展示如何实现 JsonDocument & DateTime 到 SQLite JSON/TEXT 类型的转换。
关于
sqlite更多数据类型,请查看:
- https://www.runoob.com/sqlite/sqlite-data-types.html
1. 项目结构
- 创建控制台项目,命名为
ConsoleApp1,项目整体代码结构如下:
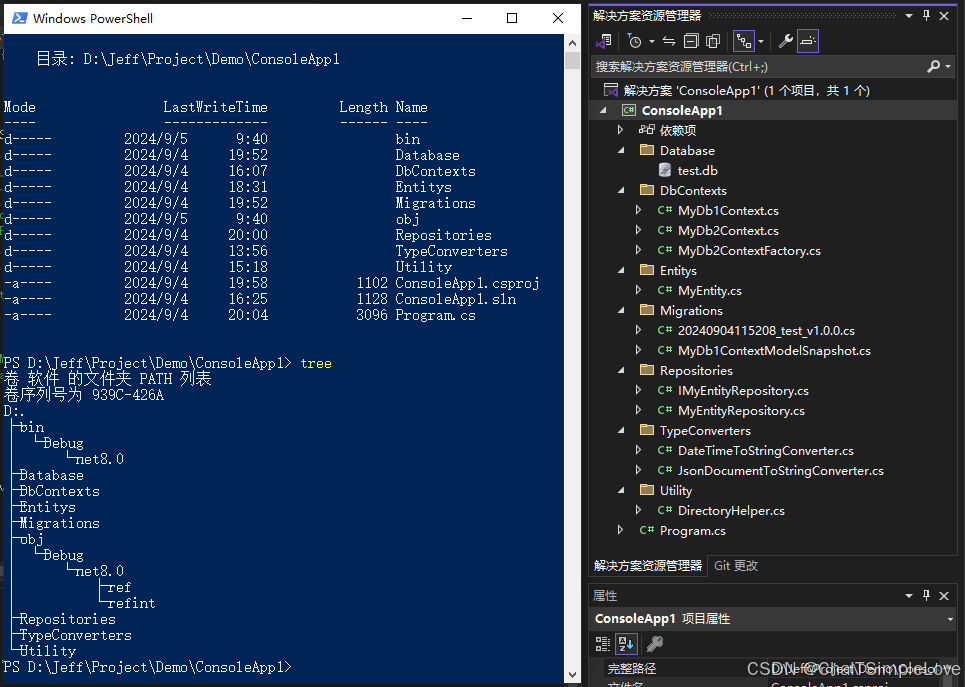
- 项目中文件目录说明:
1. `Database` 用于存放 `Sqlite` 的数据库文件(`.db`);
2. `Migrations` 用于存放 `dotnet ef migrations` 应用迁移生产的类文件;
- 使用到的
NuGet包信息如下:
<Project Sdk="Microsoft.NET.Sdk">

  <PropertyGroup>
    <OutputType>Exe</OutputType>
    <TargetFramework>net8.0</TargetFramework>
    <ImplicitUsings>enable</ImplicitUsings>
    <Nullable>enable</Nullable>
  </PropertyGroup>

  <ItemGroup>
    <PackageReference Include="Microsoft.EntityFrameworkCore" Version="8.0.8" />
    <PackageReference Include="Microsoft.EntityFrameworkCore.Design" Version="8.0.8">
      <PrivateAssets>all</PrivateAssets>
      <IncludeAssets>runtime; build; native; contentfiles; analyzers; buildtransitive</IncludeAssets>
    </PackageReference>
    <PackageReference Include="Microsoft.EntityFrameworkCore.Sqlite" Version="8.0.8" />
    <PackageReference Include="Microsoft.Extensions.DependencyInjection" Version="8.0.0" />
  </ItemGroup>

  <ItemGroup>
    <Folder Include="Database\" />
    <Folder Include="Migrations\" />
  </ItemGroup>

</Project>
2. 实现步骤
2.1 定义转换器
分别实现如下转换器:
DateTime转换器,DateTimeToStringConverter;JsonDocument转换器,JsonDocumentToStringConverter;
2.1.1 DateTime 转换器
首先,定义一个值转换器,将 DateTime 转换为 string(对应 SQLite 中的 TEXT 类型)。
- 代码示例
using Microsoft.EntityFrameworkCore.Storage.ValueConversion;

namespace ConsoleApp1.TypeConverters;

/// <summary>
/// DateTime 转换器
/// </summary>
internal class DateTimeToStringConverter : ValueConverter<DateTime, string>
{
    /// <summary>
    /// 日期格式
    /// </summary>
    private static readonly string _timeFormat = "yyyy-MM-dd HH:mm:ss.SSS";

    public DateTimeToStringConverter(ConverterMappingHints? mappingHints = null)
        : base(
            v => v.ToString(_timeFormat),
            v => DateTime.ParseExact(v, _timeFormat, null),
            mappingHints)
    { }
}
2.1.2 JsonDocument 转换器
接下来,定义一个值转换器,将 JsonDocument 转换为 string(对应 SQLite 中的 TEXT 类型)。
- 代码示例
using System.Text.Json;
using Microsoft.EntityFrameworkCore.Storage.ValueConversion;

namespace ConsoleApp1.TypeConverters;

/// <summary>
/// JsonDocument 转换器
/// </summary>
internal class JsonDocumentToStringConverter : ValueConverter<JsonDocument, string?>
{
    public JsonDocumentToStringConverter() : base(
         jsonDocument => jsonDocument.RootElement.GetRawText(),
         jsonString => JsonStringToJsonDocument(jsonString, GetJsonDocumentOptions()))
    { }

    #region 私有方法
    /// <summary>
    /// json 字符串转换 JsonDocument 对象
    /// </summary>
    /// <param name="jsonString"></param>
    /// <param name="options"></param>
    /// <returns></returns>
    private static JsonDocument JsonStringToJsonDocument(string? jsonString, JsonDocumentOptions? options)
    {
        if (jsonString == null)
            return JsonDocument.Parse("{}");

        return JsonDocument.Parse(jsonString);
    }

    /// <summary>
    /// JsonDocument 配置信息
    /// </summary>
    /// <returns></returns>
    public static JsonDocumentOptions GetJsonDocumentOptions()
    {
        var options = new JsonDocumentOptions()
        {
            MaxDepth = 128, // 设置最大深度
            CommentHandling = JsonCommentHandling.Skip, // 允许跳过注释
            AllowTrailingCommas = true // 允许尾随逗号
        };
        return options;
    }
    #endregion
}
2.2 创建实体类并配置数据结构类型
定义实体类型 MyEntity 和 MyEntityTypeConfiguration 实体类型配置,代码示例如下:
using Microsoft.EntityFrameworkCore.Metadata.Builders;
using Microsoft.EntityFrameworkCore;
using System.Text.Json;
using System.ComponentModel.DataAnnotations.Schema;
using ConsoleApp1.TypeConverters;

namespace ConsoleApp1.Entitys;

/// <summary>
/// 实体对象
/// </summary>
internal class MyEntity
{
    public string Id { get; set; } = Guid.NewGuid().ToString();

    public int RandomNo { get; set; }

    [Column(TypeName = "json")]
    public JsonDocument Data { get; set; } = JsonDocument.Parse("{ }");

    [Column(TypeName = "text")]
    public DateTime CreatedTime { get; set; }
}

/// <summary>
/// 实体类型定义,此处使用 code first fluent api 方式
/// </summary>
internal class MyEntityTypeConfiguration : IEntityTypeConfiguration<MyEntity>
{
    public void Configure(EntityTypeBuilder<MyEntity> entity)
    {
        entity.ToTable(nameof(MyEntity)); // 指定表名为 "Artifact"
        entity.HasKey(a => a.Id); // 指定主键:PK

        entity.Property(p => p.Id)
               .HasColumnName("Id")
               .HasColumnType("TEXT")
               .HasMaxLength(36)
               .IsRequired();

        entity.Property(p => p.RandomNo)
              .HasColumnName("RandomNo")
              .HasColumnType("INTEGER")
              .IsRequired();

        entity.Property(a => a.Data)
              .HasConversion(new JsonDocumentToStringConverter())
              .HasColumnName("Data")
              .HasColumnType("JSON")
              .IsRequired();

        entity.Property(a => a.CreatedTime)
             .HasConversion(new DateTimeToStringConverter())
             .HasColumnName("CreatedTime")
             .HasColumnType("TEXT")
             .HasMaxLength(16)
             .IsRequired();
    }
}
2.3 定义 Utility 工具类
定义文件目录助手 DirectoryHelper,用于指定 sqlite 数据库文件存储位置,同时构建 sqlite 数据库连接字符串。示例代码如下:
using Microsoft.Data.Sqlite;

namespace ConsoleApp1.Utility;

/// <summary>
/// 目录助手
/// </summary>
internal class DirectoryHelper
{
    /// <summary>
    /// 获取当前目录
    /// </summary>
    public string CurrentDirectory => Directory.GetCurrentDirectory();

    /// <summary>
    /// 设置根目录
    /// </summary>
    /// <param name="directory">跟目录名称</param>
    /// <returns></returns>
    public string BuildRootDirectory(string directory) => Path.Combine(CurrentDirectory, directory);

    #region 构建 sqlite 连接字符串
    public string GetSqliteConnectionString(string directory = "Database", string password = "123456")
    {
        // 设置根目录
        string rootDirectory = BuildRootDirectory(directory);
        string sqliteFilePath = Path.Combine(rootDirectory, "test.db");
        //string connectionString = @$"Data Source={ sqliteFilePath };Mode=Memory;Cache=Shared"; //可共享内存数据库
        return BuildSqliteConnectionString(sqliteFilePath, password);
    }

    public string BuildSqliteConnectionString(string filePath, string password)
    {
        var builder = new SqliteConnectionStringBuilder()
        {
            DataSource = filePath,
            Cache = SqliteCacheMode.Shared,
            Mode = SqliteOpenMode.ReadWriteCreate,
            // Password = password, // 此处对应的 nuget 包暂不支持密码设置
            Pooling = true,
            DefaultTimeout = 30,
        };

        return builder.ToString();
    }
    #endregion
}
2.4 配置 DbContext
2.4.1 使用 EF Core 配置 DbContext 的两种实现方式
首先我们来看下 DbContext 的两种配置方式:
namespace Microsoft.EntityFrameworkCore;

protected DbContext();
public DbContext([NotNullAttribute] DbContextOptions options);
还有 DbContext 的两个重写方法:
protected internal virtual void OnConfiguring(DbContextOptionsBuilder optionsBuilder);
protected internal virtual void OnModelCreating(ModelBuilder modelBuilder);
- 4.1.1 使用无参构造函数,必须重写
OnConfiguring()函数
代码示例:
public class BloggingContext : DbContext
{
    public DbSet<Blog> Blogs { get; set; }
    protected override void OnConfiguring(DbContextOptionsBuilder optionsBuilder) => optionsBuilder.UseSqlite("Data Source=blog.db");
}
这样使用的话,应用程序可以简单地实例化此类上下文,而无需将任何内容传递给构造函数:
using (var context = new BloggingContext())
{
  // do stuff
}
- 4.1.2 使用有参构造函数,无需重写
OnConfiguring()函数
代码示例:
public class BloggingContext : DbContext
{
    public BloggingContext(DbContextOptions<BloggingContext> options) : base(options)
    { }
    public DbSet<Blog> Blogs { get; set; }
}
这样使用的话,应用程序现在可以在实例化上下文时传递 DbContextOptions,如下所示:
var optionsBuilder = new DbContextOptionsBuilder<BloggingContext>();
optionsBuilder.UseSqlite("Data Source=blog.db");

using (var context = new BloggingContext(optionsBuilder.Options))
{
  // do stuff
}
控制台使用有参构造函数方式的 DbContext 数据库上下文,使用 dotnet ef migrations 命令时,会出现如下异常信息:
Unable to create a 'DbContext' of type 'MyDbContext'. The exception 'Unable to resolve service for type 'Microsoft.EntityFrameworkCore.DbContextOptions`1[ConsoleApp1.DbContexts.MyDbContext]' while attempting to activate 'ConsoleApp1.DbContexts.MyDbContext'.' was thrown while attempting to create an instance. For the different patterns supported at design time, see https://go.microsoft.com/fwlink/?linkid=851728
大概意思就是 MyDbContext 主构函数里面的 DbContextOptions<MyDbContext> 无法识别依赖注入问题。解决方案如下:
“可以通过实现接口来告诉工具如何创建 DbContext,通过创建类实现接口IDesignTimeDbContextFactory<TContext>,如果实现此接口的类在与派生的项目相同的项目中或应用程序的启动项目中找到,则这些工具将绕过创建 DbContext 的其他方法,并改用设计时工厂。”
- 实现接口
IDesignTimeDbContextFactory<TContext>的代码示例:
public class BloggingContextFactory : IDesignTimeDbContextFactory<BloggingContext>
{
	public BloggingContext CreateDbContext(string[] args)
	{
		var optionsBuilder = new DbContextOptionsBuilder<BloggingContext>();
		optionsBuilder.UseSqlite("Data Source=blog.db");

		return new BloggingContext(optionsBuilder.Options);
	}
}
- 使用
AddDbContextFactory添加有参主构函数BloggingContext的示例代码:
// 创建服务容器
var serviceCollection = new ServiceCollection();
// 添加有参主构函数的 BloggingContext
serviceCollection.AddDbContextFactory<BloggingContext>(options => options.UseSqlite(connectionString));
2.4.2 具体实现 MyDbContext 的两种方式
上面我们解释了实现 DbContext 的两种方式,接着前面提到的 Demo 示例实现,代码示例如下:
注意区分:
MyDb1Context和MyDb2Context的实现。
- 4.2.1 无参构造函数实现
DbContext,命名为MyDb1Context
using ConsoleApp1.Entitys;
using ConsoleApp1.Utility;
using Microsoft.EntityFrameworkCore;

namespace ConsoleApp1.DbContexts;

/// <summary>
/// 数据库上下文,无参构造函数实现
/// </summary>
/// <param name="options"></param>
internal class MyDb1Context : DbContext
{
    public DbSet<MyEntity> MyEntitys { get; set; }

    protected override void OnModelCreating(ModelBuilder modelBuilder)
    {
        base.OnModelCreating(modelBuilder);

        modelBuilder.ApplyConfiguration(new MyEntityTypeConfiguration());

        /*
         * 此处代码等效同上 ApplyConfiguration
        modelBuilder.Entity<MyEntity>()
            .Property(e => e.Data)
            .HasConversion(new JsonDocumentToStringConverter());
         */
    }

    /// <summary>
    /// 注意:无参构造函数,必须重写 OnConfiguring() 函数
    /// </summary>
    /// <param name="optionsBuilder"></param>
    protected override void OnConfiguring(DbContextOptionsBuilder optionsBuilder)
    {
        base.OnConfiguring(optionsBuilder);

        var directoryHelper = new DirectoryHelper();
        string connectionString = directoryHelper.GetSqliteConnectionString();
        optionsBuilder.UseSqlite(connectionString);
    }
}
- 4.2.2 有参构造函数实现
DbContext,命名为MyDb2Context
using ConsoleApp1.Entitys;
using Microsoft.EntityFrameworkCore;

namespace ConsoleApp1.DbContexts;

/// <summary>
/// 数据库上下文,有参构造函数实现
/// </summary>
/// <param name="options"></param>
internal class MyDb2Context(DbContextOptions<MyDb2Context> options) : DbContext(options)
{
    public DbSet<MyEntity> MyEntitys { get; set; }

    protected override void OnModelCreating(ModelBuilder modelBuilder)
    {
        modelBuilder.ApplyConfiguration(new MyEntityTypeConfiguration());
    }
}
MyDb2ContextFactory 实现 IDesignTimeDbContextFactory<MyDb2Context> 的代码示例:
using Microsoft.EntityFrameworkCore.Design;
using Microsoft.EntityFrameworkCore;
using ConsoleApp1.Utility;

namespace ConsoleApp1.DbContexts;

/// <summary>
/// MyDb2Context 工厂
/// </summary>
internal class MyDb2ContextFactory : IDesignTimeDbContextFactory<MyDb2Context>
{
    public MyDb2Context CreateDbContext(string[] args)
    {
        // 获取 sqlite 连接字符串
        var directoryHelper = new DirectoryHelper();
        string connectionString = directoryHelper.GetSqliteConnectionString();

        // 构建 DbContextOptions 对象
        var optionsBuilder = new DbContextOptionsBuilder<MyDb2Context>();
        optionsBuilder.UseSqlite(connectionString);

        // 有参构造函数使用 DbContextOptions 对象
        return new MyDb2Context(optionsBuilder.Options);
    }
}
2.5 使用 DbContext 操作 Sqlite 数据库
上面代码已经准备就绪,接着我们来使用实现 DbContext 的自定义上下文来操作 Sqlite 数据库。
在 Program.cs 文件的 Main 函数代码示例如下:
using System.Text.Json;
using Microsoft.Extensions.DependencyInjection;
using Microsoft.EntityFrameworkCore;
using ConsoleApp1.DbContexts;
using ConsoleApp1.Entitys;
using ConsoleApp1.Utility;
using ConsoleApp1.TypeConverters;
namespace ConsoleApp1;
internal class Program
{
static void Main(string[] args)
{
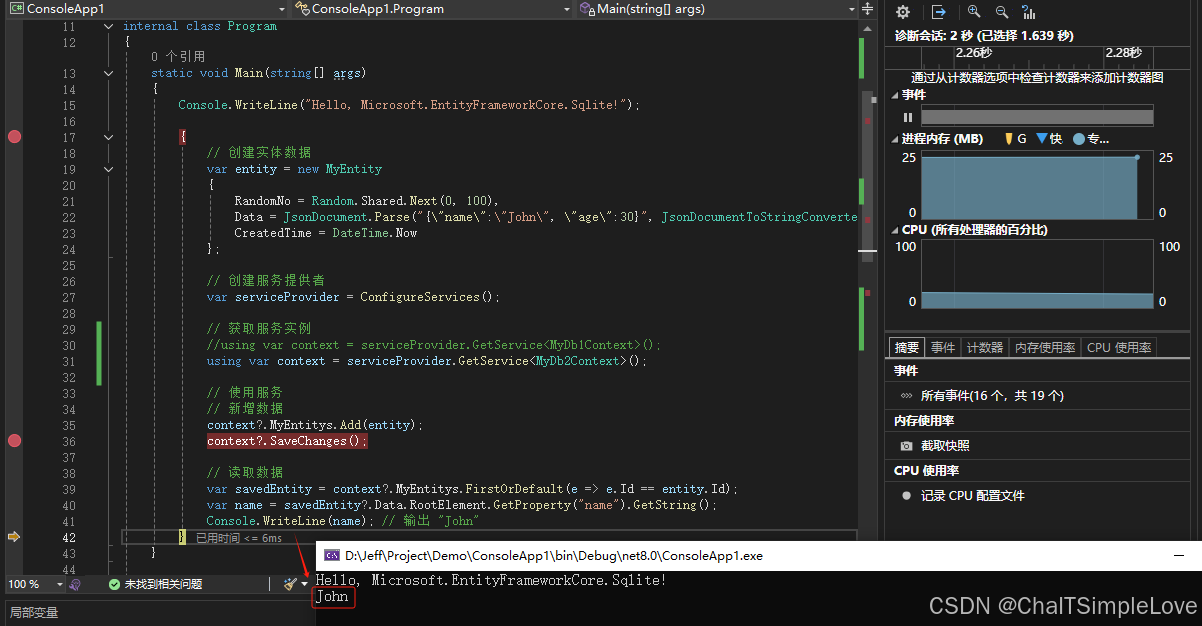
Console.WriteLine("Hello, Microsoft.EntityFrameworkCore.Sqlite!");
{
// 创建实体数据
var entity = new MyEntity
{
RandomNo = Random.Shared.Next(0, 100),
Data = JsonDocument.Parse("{\"name\":\"John\", \"age\":30}", JsonDocumentToStringConverter.GetJsonDocumentOptions()),
CreatedTime = DateTime.Now
};
// 创建服务提供者
var serviceProvider = ConfigureServices();
// 获取服务实例
//using var context = serviceProvider.GetService<MyDb1Context>();
using var context = serviceProvider.GetService<MyDb2Context>();
// 使用服务
// 新增数据
context?.MyEntitys.Add(entity);
context?.SaveChanges();
// 读取数据
var savedEntity = context?.MyEntitys.FirstOrDefault(e => e.Id == entity.Id);
var name = savedEntity?.Data.RootElement.GetProperty("name").GetString();
Console.WriteLine(name); // 输出 "John"
}
}
/// <summary>
/// 注册服务
/// </summary>
/// <returns></returns>
private static ServiceProvider ConfigureServices()
{
// 创建服务容器
var serviceCollection = new ServiceCollection();
#region 添加 EF Core DbContext
serviceCollection.AddDbContext<MyDb1Context>();
var directoryHelper = new DirectoryHelper();
string connectionString = directoryHelper.GetSqliteConnectionString();
serviceCollection.AddDbContextFactory<MyDb2Context>(options => options.UseSqlite(connectionString));
#endregion
// 构建 ServiceProvider 服务提供者
return serviceCollection.BuildServiceProvider();
}
}
2.6 使用工具 dotnet ef 应用迁移
使用工具 dotnet ef 创建并应用迁移以生成数据库表结构。
2.6.1 执行 MyDb1Context 迁移
执行 MyDb1Context 迁移命令:
# 创建迁移
dotnet ef migrations add test_v1.0.0 -c MyDb1Context
# 应用迁移
dotnet ef database update -c MyDb1Context
输出信息:
PS D:\Jeff\Project\Demo\ConsoleApp1> dotnet ef migrations add test_v1.0.0 -c MyDb1Context
Build started...
Build succeeded.
Done. To undo this action, use 'ef migrations remove'
PS D:\Jeff\Project\Demo\ConsoleApp1> dotnet ef database update -c MyDb1Context
Build started...
Build succeeded.
Applying migration '20240904085736_test_v1.0.0'.
Done.
2.6.2 执行 MyDb2Context 迁移
执行 MyDb2Context 迁移命令:
# 创建迁移
dotnet ef migrations add test_v1.0.1 -c MyDb2Context
# 应用迁移
dotnet ef database update -c MyDb2Context
输出信息:
PS D:\Jeff\Project\Demo\ConsoleApp1> dotnet ef migrations add test_v1.0.1 -c MyDb2Context
Build started...
Build succeeded.
Done. To undo this action, use 'ef migrations remove'
PS D:\Jeff\Project\Demo\ConsoleApp1> dotnet ef database update -c MyDb2Context
Build started...
Build succeeded.
Applying migration '20240904090346_test_v1.0.1'.
Done.
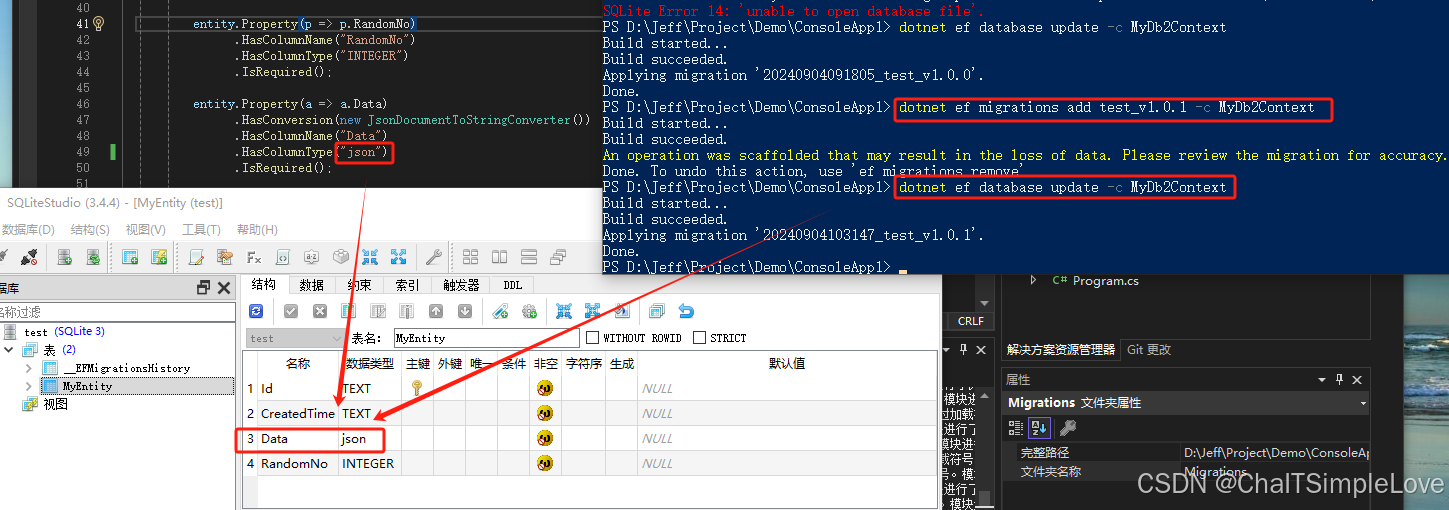
查看迁移生成 sqlite 文件 test.db 中数据库表结构是否和实体类型配置一致,从下图中可以看到符合预期。
通过实验证明,上面两种方式均可实现应用迁移。
2.7 运行项目
启动项目运行,均可执行 sqlite 数据库操作方法。
注意:使用 dotnet ef 命令生成的 sqlite 数据库文件,设置属性复制内容;
<ItemGroup>
  <None Remove="Database\test.db" />
</ItemGroup>

<ItemGroup>
  <Content Include="Database\test.db">
    <CopyToOutputDirectory>Always</CopyToOutputDirectory>
  </Content>
</ItemGroup>
2.8 改造 ef core 使用仓储模式
说明:此处实现
MyDb1Context的仓储模式,实现MyDb2Context等效类似。
2.8.1 添加仓储(Repositories)层
项目新增 Repositories 文件目录,分别添加如下代码文件:
IMyEntityRepository实体crud接口定义
using ConsoleApp1.Entitys;

namespace ConsoleApp1.Repositories;

internal interface IMyEntityRepository
{
    Task<string?> AddAsync(MyEntity entity);

    Task<MyEntity?> GetAsync(string id);

    Task<List<MyEntity>> GetListAsync(List<string> ids);
}
MyEntityRepository实体crud接口实现
using ConsoleApp1.DbContexts;
using ConsoleApp1.Entitys;
using Microsoft.EntityFrameworkCore;

namespace ConsoleApp1.Repositories;

internal class MyEntityRepository(MyDb1Context context) : IMyEntityRepository
{
    private readonly MyDb1Context _context = context ?? throw new ArgumentNullException(nameof(context));

    public async Task<string?> AddAsync(MyEntity entity)
    {
        await _context.MyEntitys.AddAsync(entity);

        await _context.SaveChangesAsync();

        return entity.Id;
    }

    public async Task<MyEntity?> GetAsync(string id)
    {
        return await _context.MyEntitys.FirstOrDefaultAsync(x => x.Id == id);
    }

    public async Task<List<MyEntity>> GetListAsync(List<string> ids)
    {
        return await _context.MyEntitys.Where(x => ids.Contains(x.Id)).ToListAsync();
    }
}
- 添加 仓储对象
DI注入
在 Program.cs 文件的 ConfigureServices() 方法中,添加 MyDb1Context 对应的仓储对象注入,代码示例如下:
 /// <summary>
 /// 注册服务
 /// </summary>
 /// <returns></returns>
 private static ServiceProvider ConfigureServices()
 {
     // 创建服务容器
     var serviceCollection = new ServiceCollection();

     #region 添加 EF Core DbContext
     serviceCollection.AddDbContext<MyDb1Context>();

     var directoryHelper = new DirectoryHelper();
     string connectionString = directoryHelper.GetSqliteConnectionString();
     serviceCollection.AddDbContextFactory<MyDb2Context>(options => options.UseSqlite(connectionString));
     #endregion

     // 注入 MyDb1Context 仓储模式
     serviceCollection.AddScoped<IMyEntityRepository, MyEntityRepository>();

     // 构建服务提供者
     return serviceCollection.BuildServiceProvider();
 }
- 修改
Main方法
此处 MyDb1Context 实现的仓储模式方法是异步化,相应的修改 Main 方法也异步化,代码示例:
static async Task Main(string[] args)
{
    Console.WriteLine("Hello, Microsoft.EntityFrameworkCore.Sqlite!");

    // 创建实体数据
    var entity = new MyEntity
    {
        RandomNo = Random.Shared.Next(0, 100),
        Data = JsonDocument.Parse("{\"name\":\"John\", \"age\":30}", JsonDocumentToStringConverter.GetJsonDocumentOptions()),
        CreatedTime = DateTime.Now
    };

    // 创建服务提供者
    var serviceProvider = ConfigureServices();

    {
        /*
        // 1.常规模式
        // 获取服务实例
        //using var context = serviceProvider.GetService<MyDb1Context>();
        using var context = serviceProvider.GetService<MyDb2Context>();

        // 使用服务
        // 新增数据
        context?.MyEntitys.Add(entity);
        context?.SaveChanges();

        // 读取数据
        var savedEntity = context?.MyEntitys.FirstOrDefault(e => e.Id == entity.Id);
        var name = savedEntity?.Data.RootElement.GetProperty("name").GetString();
        Console.WriteLine(name); // 输出 "John"
        */
    }

    {
        // 2.仓储模式
        // 获取服务实例
        var repository = serviceProvider.GetService<IMyEntityRepository>();

        if (repository != null)
        {
            // 使用服务,新增数据
            var id = await repository!.AddAsync(entity);

            // 读取数据
            var savedEntity = await repository!.GetAsync(id);
            var name = savedEntity?.Data.RootElement.GetProperty("name").GetString();
            Console.WriteLine(name); // 输出 "John"
        }
    }
}
2.8.2 新增服务(Services)层
项目添加 Services 文件目录, 分别添加如下代码文件:
IMyEntityService实体crud接口定义
using Sample.ConsoleApp.CodeFist.Sqlite.Entitys;

namespace Sample.ConsoleApp.CodeFist.Sqlite.Services;

internal interface IMyEntityService
{
    Task<string?> AddAsync(MyEntity entity);

    Task<MyEntity?> GetAsync(string id);

    Task<List<MyEntity>> GetListAsync(List<string> ids);
}
MyEntityService实体crud接口实现
using Microsoft.Extensions.Logging;
using Sample.ConsoleApp.CodeFist.Sqlite.Entitys;
using Sample.ConsoleApp.CodeFist.Sqlite.Repositories;

namespace Sample.ConsoleApp.CodeFist.Sqlite.Services;

internal class MyEntityService(ILogger<MyEntityService> logger,
    IMyEntityRepository myEntityRepository) : IMyEntityService
{
    public async Task<string?> AddAsync(MyEntity entity)
    {
        return await myEntityRepository.AddAsync(entity);
    }

    public async Task<MyEntity?> GetAsync(string id)
    {
       return await myEntityRepository.GetAsync(id);
    }

    public async Task<List<MyEntity>> GetListAsync(List<string> ids)
    {
        return await myEntityRepository.GetListAsync(ids);
    }
}
- 注入(
DI)服务
 // 注入 MyDb1Context 仓储模式
 serviceCollection.AddScoped<IMyEntityRepository, MyEntityRepository>();
 // 注入 IMyEntityService 服务
 serviceCollection.AddScoped<IMyEntityService, MyEntityService>();
到此步骤我的服务就改造支持仓储模式了,在业务系统中,个人推荐使用仓储模式(Repositories),可以更好的隔离且解耦业务代码,从而提升代码的可维护性和扩展性。
3. 安装 dotnet ef 工具
安装 dotnet ef(Entity Framework Core 的命令行工具)非常简单。以下是如何在不同的环境中安装和使用 dotnet ef 的详细步骤。
3.1 安装 .NET SDK
首先,确保你已经安装了 .NET SDK。如果没有安装,请访问 官方下载页面 下载并安装最新版本的 .NET SDK。
3.2 安装 Entity Framework Core 工具包
接下来,安装 Entity Framework Core 工具包。你可以通过以下两种方式之一进行安装:
- 方式一:全局安装
- 打开命令提示符或终端。
- 运行以下命令来全局安装
Entity Framework Core工具包:
dotnet tool install --global dotnet-ef
- 验证安装是否成功:
dotnet ef --version
如果安装成功,你会看到 Entity Framework Core 的版本号。
- 方式二:本地安装
如果你想在特定项目中安装 Entity Framework Core 工具包,可以在项目目录中执行以下命令:
- 打开命令提示符或终端。
- 导航到你的项目目录。
- 运行以下命令来安装 Entity Framework Core 工具包:
dotnet tool install --tool-path . dotnet-ef
- 验证安装是否成功:
./dotnet-ef --version
如果安装成功,你会看到 Entity Framework Core 的版本号。
3.3 使用 dotnet ef 命令
现在你可以在项目中使用 dotnet ef 命令了。
PS C:\Windows\system32> dotnet ef migrations -h

Usage: dotnet ef migrations [options] [command]

Options:
  -h|--help        Show help information
  -v|--verbose     Show verbose output.
  --no-color       Don't colorize output.
  --prefix-output  Prefix output with level.

Commands:
  add                        Adds a new migration.
  bundle                     Creates an executable to update the database.
  has-pending-model-changes  Checks if any changes have been made to the model since the last migration.
  list                       Lists available migrations.
  remove                     Removes the last migration.
  script                     Generates a SQL script from migrations.

Use "migrations [command] --help" for more information about a command.
以下是一些常用的命令示例:
# 创建迁移
dotnet ef migrations add InitialCreate
# 应用迁移,这将应用所有未应用的迁移。
dotnet ef database update
# 查看迁移状态,这将列出所有已创建的迁移及其状态。
dotnet ef migrations list
# 删除迁移,这将删除最后一个迁移文件。
dotnet ef migrations remove
# 清空迁移历史记录,这将删除数据库并清空迁移历史记录。
dotnet ef database drop
dotnet ef migrations remove
总结
我们介绍了如何在 EF Core 的 Code First 模式下使用自定义类型转换器实现 JsonDocument 和 DateTime 类型到 SQLite 数据库的正确映射。通过自定义 ValueConverter,实现了数据类型的转换,并展示了完整的项目结构和代码实现,包括实体类定义、DbContext 配置及数据库应用迁移(Migrations)操作。


![[yolov5] --- yolov5入门实战「土堆视频」](https://i-blog.csdnimg.cn/direct/8e01ba7709e34acc929cfe32af9e4c41.png)