目录
一.关于Spring
(1)什么是Spring
(2)IOC解释
(3)Aop解释
(4)"一站式"解释
二.Spring框架的搭建(以Hello World为例)
编辑 三.Spring框架的IOC
(1)IOC基于xml配置
(2)基于注解配置
(3)xml文件配置和注解配置的优缺点
四.Spring集成Mybatis
(1)Spring集成Mybatis的实现
(2)Spring集成Mybatis的搭建
五.AOP(其实是由java写的Spring框架来使用)
(1)AOP总结
(2)使用案例
(3)Aop的基本概念
(4)springAOP的 实现
(5)AspectJ 中常用的五种类型通知
(6)通知注解配置地址的说明编辑
六.Spring事务管理
(1)关于Spring事务
(2)Spring中的事务管理分为两种形式:
(3)基于注解实现的spring事务管理
一.关于Spring
(1)什么是Spring
Spring框架就是一款轻量级的,IOP,AOP,一站式Java开发框架,是为了简化企业级开发。
(2)IOC解释
IOP:即 Inversion of Control,缩写为 IOC,意思为控制反转,是一种 设计思想,即为将创建对象的控制权交给Spring框架,每次就不需要我们去创建对象。
(3)Aop解释
Aop:即:Aspect Oriented Programming 直译过来就是面向切面编程,即为AOP 是一种编
程思想,是面向对象编程(OOP)的一种补充。面向对象编程将程序抽象成各个层次的对象,而面向切面编程是将程序抽象成各个切面。也就是原来我们写业务代码时例如像在Mybatis中进行增删改时最后需要提交事务,这部分非业务代码就不需要我们来写了,Spring框架可以帮我们来实现。
(4)"一站式"解释
一站式:由于Spring包括web和核心core Container等,集成度高

二.Spring框架的搭建(以Hello World为例)
1.首先需要创建一个Maven项目,在pom.xml文件中导入Spring核心jar包。
2.在router下创建一个类型为.xml的file文件,名称自己来命名,在file文件中导入spring的配置文件。
3.创建一个类。(如Admin管理员表)
4.在创建的file文件中配置注册该类的名称和地址。
5.在测试类的main方法中测试Spring

Spring核心jar包:<!-- spring-context -->< dependency >< groupId >org.springframework</ groupId >< artifactId >spring-context</ artifactId >< version >5.2.2.RELEASE</ version ></ dependency >
Spring配置文件<? xml version ="1.0" encoding ="UTF-8" ?>< beans xmlns ="http://www.springframework.org/schema/beans"xmlns: xsi ="http://www.w3.org/2001/XMLSchema-instance"xsi :schemaLocation ="http://www.springframework.org/schema/beanshttp://www.springframework.org/schema/beans/spring-beans.xsd" ></ beans >
Admin类
package com.ffyc.springpro.model;

import org.springframework.beans.factory.annotation.Autowired;
import org.springframework.context.annotation.Scope;
import org.springframework.jdbc.core.JdbcTemplate;
import org.springframework.jdbc.core.RowMapper;
import org.springframework.stereotype.Component;

import java.sql.ResultSet;
import java.sql.SQLException;
import java.util.List;

public class Admin {
    private String account;
    private String password;

    public Admin() {
        System.out.println("Admin无参构造");
    }

    public Admin(String account, String password) {
        this.account = account;
        this.password = password;
    }

    public void eat()
    {
        System.out.println("吃饭");
    }
    public String getAccount() {
        return account;
    }

    public void setAccount(String account) {
        this.account = account;
    }

    public String getPassword() {
        return password;
    }

    public void setPassword(String password) {
        this.password = password;
    }

    @Override
    public String toString() {
        return "Admin{" +
                "account='" + account + '\'' +
                ", password='" + password + '\'' +
                '}';
    }
}
测试 结果如下:
 三.Spring框架的IOC
(1)IOC基于xml配置
(1)首先就要在配置好的Spring.xml文件中通过一个bean标签配置管理Admin类如:<bean id="admin" class="com.ffyc.springpro.model.Admin"></bean> 注意:bean标签的class表示自己定义类的地址,以Admin类为例,Admin在com.ffyc.springpro包下的model包下。(2)然后在测试类的Main方法中通new ClassPathXmlApplicationContext("Spring.xml");
将在xml文件中配置的类自动创建对象。ClassPathXmlApplicationContext是Spring框架中的一个具体的实现类,负责生成管理程序中的对象,可以看作一个容器,一般叫Spring框架为Spring容器,xml文件中配置了多少个类,这个Spring容器就会创建并存储多少个对象。
注意new ClassPathXmlApplicationContext("填配置的xml文件名字")
(3)然后通过 getBean方法获得ClassPathXmlApplicationContext 类中的具体想要的对象。
如:
Admin admin= (Admin)applicationContext.getBean("admin"); //参数里只有代表类名,没有代表的类的Class对象,需要强制转化为Admin对象否则返回值类型为Object。
Admin admin1=applicationContext.getBean("admin",Admin.class);
注:getBean("admin",Admin.class)中类的名字与xml文件中bean标签的id的名字一样。
3.xml配置中的一些知识
(1)在通过bean标签配置类时有个scope,scope负责配置bean的作用域。
<!--scope="singleton":单例的:每次在Spring启动时创建一个对象,有且只创建一个对象-->
<!--scope="prototype":原生的(多例的):在getbean获得对象时候,就会创建一个对象-->
分别以scope="singleton"和scope="prototype"为例,输出Admin对象结果如下
(2)<!--Ioc:指的是让Spring框架获得创建对象的控制权,通过spring框架可以创建对象,还可以有一个动作称为依赖注入,在创建对象时可以为属性赋值-->
<!--1:通过set方法赋值
 例如:
  <property name="account" value="admin"></property>
  <property name="password" value="111"></property>-->
property标签就是通过类的属性名为类的set方法赋值,所以在类中必须有类的set方法。
property标签中:name:写类的属性,value写要为类赋值。
<!--2:通过有参构造为属性赋值
例如:
 <constructor-arg name="account" value="admin"></constructor-arg>
<constructor-arg name="password" value="111"></constructor-arg>-->constructor-arg:
前提类中要有有参数的构造方法。
(2)基于注解配置
配置类的管理不止可以通过xml文件配置也可以通过注解的方式配置
使用注解首先需要在xml文件中开启注解扫描,在xml文件中导入context标签
开启注解扫描
<context:component-scan base-package="包名"> </context:component-scan>
常用注解(1)@Component(value=“user”)等同于xml文件中配置 <bean id=“user” class=“”></bean>(2)@Service :在web层与前端交互使用。(3)@Repository :在dao层连接数据库使用。以上注解都可以实现创建对象功能,只是为了后续扩展功能,在不同的层使用不同的注解标记(4)@Scope(value=“prototype”) 原型(5)@Scope(value=“ singleton ”) 单例(6)@Autowired:自动注入,要给哪个类的属性来赋值就放到哪个属性的上面或者放到setter 方法上,如果写在属性上,set和get方法都不需要,默认情况下:required=true注入的值不能为空@Autowired(required = true)也可以将required改为false但会出现空指针异常。
自动注入有两种值的匹配方式:
1.通过属性类型查找
2.通过对象名字查找,可以结合@Qualifier 注解一起使用。@Qualifier 的 value 属性用于指定要匹配的 Bean 的 id 值。
(7)JDK 注解@Resource 自动注入用法与@Autowired一样,也有两种值的匹配方式,唯一不同的就是@Resource 注解通过对象名查找,不需要@Qualifier 配合使用直接在@Resource 里面通过指定其 name 属性,则 name 的值即为按照名称进行匹配 的 Bean 的id
(3)xml文件配置和注解配置的优缺点
注解与 XML 的对比注解优点: 方便,直观,高效(代码少,没有配置文件的书写那么复杂)。注解缺点: 以硬编码的方式写入到 Java 代码中,修改是需要重新编译代码的。xml 优点是: 配置和代码是分离的,在 xml 中做修改,无需编译代码,只需重启服务器即可将新的配置加载。xml 的缺点是: 编写麻烦,效率低,大型项目过于复杂。
注解配置举例例如:
<!--开启Spring扫描,将需要扫描的包地址配置-->
 <context:component-scan base-package="com.ffyc.springpro"> </context:component-scan>

四.Spring集成Mybatis
(1)Spring集成Mybatis的实现
Spring 集成 Mybatis 其核心是将 SqlSessionFactory 交由 Spring 管理,并由Spring 管理对 dao 接口的代理实现。
(2)Spring集成Mybatis的搭建
(1)在有Maven的项目的pom.xml文件中导入 mybatis jar 包,Spring 结合 mybatis 插件
(2)在router文件下自定义的xml文件中配置 sqlSessionFactory
(3)指定生成接口代理
(4)在 service 中注入 Dao 代理接口,此接口有 Spring 代理实现
Spring 结合 mybatis 插件包< dependency >< groupId >org.mybatis</ groupId >< artifactId >mybatis-spring</ artifactId >< version >1.3.1</ version ></ dependency >
配置 sqlSessionFactory< bean id ="sqlSessionFactory" class ="org.mybatis.spring.SqlSessionFactoryBean" >< property name ="dataSource" ref ="dataSource" ></ property >< property name ="configLocation"value ="classpath:mybatis-config.xml" ></ property >< property name ="mapperLocations" value ="classpath:mappers/*Mapper.xml" ></ property ></ bean >
指定生成接口代理< bean id ="mapperFactory"class ="org.mybatis.spring.mapper.MapperScannerConfigurer" >< property name ="basePackage" value ="com.ffyc.ssm.dao" ></ property >< property name ="sqlSessionFactoryBeanName" value ="sqlSessionFactory" ></ property ></ bean >
<?xml version="1.0" encoding="UTF-8"?>
<beans xmlns="http://www.springframework.org/schema/beans"
       xmlns:xsi="http://www.w3.org/2001/XMLSchema-instance" xmlns:lang="http://www.springframework.org/schema/lang"
       xmlns:context="http://www.springframework.org/schema/context"
       xmlns:aop="http://www.springframework.org/schema/aop" xmlns:tx="http://www.springframework.org/schema/tx"
       xsi:schemaLocation="http://www.springframework.org/schema/beans
http://www.springframework.org/schema/beans/spring-beans.xsd
http://www.springframework.org/schema/lang
http://www.springframework.org/schema/lang/spring-lang.xsd
http://www.springframework.org/schema/context
https://www.springframework.org/schema/context/spring-context.xsd
http://www.springframework.org/schema/aop
https://www.springframework.org/schema/aop/spring-aop.xsd
 http://www.springframework.org/schema/tx http://www.springframework.org/schema/tx/spring-tx.xsd">
   <!--开启Spring扫描,将需要扫描的包地址配置-->
    <context:component-scan base-package="com.ffyc.springpro"> </context:component-scan>

  <!--  管理数据源对象
    spring 管理数据库链接对象
    本次采用阿里巴巴数据库连接管理对象-->
    <bean id="dataSource" class="com.alibaba.druid.pool.DruidDataSource">
        <property name="driverClassName" value="com.mysql.cj.jdbc.Driver"></property>
        <property name="url" value="jdbc:mysql://127.0.0.1:3306/ssmdb?serverTimezone=Asia/Shanghai"></property>
        <property name="username" value="root"></property>
        <property name="password" value="root"></property>
        <property name="initialSize" value="10"></property><!--初始化连接数量-->
        <property name="maxActive" value="20"></property><!--最大连接数量-->
    </bean>
<!--配置Spring中对Jdbc进行封装的操作类型 JdbcTemplate-->
    <bean name="jdbcTemplate" class="org.springframework.jdbc.core.JdbcTemplate">
        <property name="dataSource" ref="dataSource"></property>
    </bean>

    <aop:aspectj-autoproxy />

</beans>
五.AOP(其实是由java写的Spring框架来使用)
(1)AOP总结
面向切面编程(是对面型对象的延续),面向切面编程是将程序中非业务代码(提交事务,打印日志,权限验证,统一异常管理),在调用业务代码时,生成一个代理对象帮我们管理抽取出来的非业务代码,这样在业务代码中就不用在显式调用非业务代码了,做到了业务代码和非业务代码的隔离,降低了耦合度。面向切面编程的好处就是: 减少重复,专注业务;
(2)使用案例
(3)Aop的基本概念
1.连接点 (Joinpoint): 类中可以被增强的方法·。也就是一个类的方法可以加入其他的功能,例如插入语句插入数据后要提交事务这部分非业务代码(提交事务)就可以抽取出来到在另一个类中,提交事务就可以当作功能添加到插入数据的这个类中,在这个类中我们就不需要显示的new 提交事务的类的对象的去调用这个类中提交事务的方法。2.切入点(pointcut):类中有很多方法可以被增强,但实际中只有 add 和 update被增了,那么 add 和 update 方法就被称为切入点(实际实现的连接点)。
3.通知(Advice): 通知是指一个切面在特定的连接点要做的事情(也就是增强的功能这部分)。通 知分为方法执行前通知,方法执行后通知,环绕通知等.4.目标(Target): 代理的目标对象(连接点,切入点所在类)5. 代理(Proxy): 向目标对象应用通知时创建的代理对象
(4)springAOP的 实现
1.首先需要在pom.xml文件中加入AspectJ 依赖是一个基于 Java 语言的 AOP 框架。
2.加入后就可以使用Aop中的注解,通过注解来为自己定义的类配置五种类型的通知,Spring框架-Aop就会自动为通知创建代理对象,我们只需为通知配置地址即可。
3.基于注解方式的实现,在xml文件中启动 AspectJ 支持:
配置:<aop:aspectj-autoproxy />
下载 AOP 相关 jar< dependency >< groupId >org.springframework</ groupId >< artifactId >spring-aspects</ artifactId >< version >5.2.2.RELEASE</ version ></ dependency >
(5)AspectJ 中常用的五种类型通知
前置通知,后置通知,环绕通知,异常通知,返回通知.(放在类的方法上或者类的整个上面)(1)@Before 前置通知:方法执行之前(2)@After 后置通知:业务方法执行之后,业务方法中无论是否出现异常都会执行该通知(3)@AfterReturnning 返回通知:业务方法成功执行之后通知,当业务方法出现异常不执行(4)@AfterThrowing 异常通知:业务方法抛出异常之后执行(5)@Around 环绕通知:方法执行前后都有通知,包括了上面的四种类型的通知基于注解方式的实现启动 AspectJ 支持:<aop:aspectj-autoproxy /> 注意要在xml文件中配置,否则无法使用注解
举例:以与数据库的插入,删除,修改为例,在插入删除修改中添加提交事务(简单的Hello world)
(1)用@Before 前置通知
package com.ffyc.springpro.dao;

import com.ffyc.springpro.model.Admin;
import com.sun.media.jfxmediaimpl.HostUtils;
import org.springframework.beans.factory.annotation.Autowired;
import org.springframework.beans.factory.annotation.Value;
import org.springframework.stereotype.Repository;

public class Admindao {

    public void insert()
    {
        System.out.println("插入");

    }
    public void update(){
        System.out.println("修改");
    }
    public void delete(){
        System.out.println("删除");
    }
}
package com.ffyc.springpro.Demo;

import org.aspectj.lang.ProceedingJoinPoint;
import org.aspectj.lang.annotation.*;
import org.springframework.stereotype.Component;

import java.util.Arrays;

/*
@Before  //前置通知:方法执行之前就会执行
@After //后置通知:业务方法执行之后,无论在业务方法中是否出现异常都会执行该通知
@AfterReturnning //返回通知:方法成功执行之后通知,出现异常不执行
@AfterThrowing //异常通知:抛出异常之后通知,将异常信息显示注解里面有两个参数,
@Around //环绕通知:方法执行前后都有通知
*/

@Component//让Spring扫描到这个类,生成这个类的代理对象
@Aspect //告诉下面的类是一个通知,给连接点加入功能
public class Aopdemo {

   @Before("execution(* com.ffyc.springpro.dao.*.*(..))")//Before括号里面写的是让这个非业务代码在那个包的那个类的那个方法中显示,* com.ffyc.springpro.dao.*.*(..))
   public void printlog()
    {
        System.out.println("打印日志");
    }
    public void commint(){
        System.out.println("提交事务");
    }

}
结果如下: 可见@Before 前置通知使得非业务代码在业务代码执行前执行

(2)用@After 后置通知可知@After 使得非业务代码在业务代码执行之后执行(且无论业务代码是否有异常)
package com.ffyc.springpro.Demo;

import org.aspectj.lang.ProceedingJoinPoint;
import org.aspectj.lang.annotation.*;
import org.springframework.stereotype.Component;

import java.util.Arrays;

/*
@Before  //前置通知:方法执行之前
@After //后置通知:业务方法执行之后,无论是否出现异常都会执行该通知
@AfterReturnning //返回通知:方法成功执行之后通知,出现异常不执行
@AfterThrowing //异常通知:抛出异常之后通知,将异常信息显示注解里面有两个参数,
@Around //环绕通知:方法执行前后都有通知
*/

@Component//让Spring扫描到这个类,生成这个类的代理对象
@Aspect //告诉下面的类是一个通知,给连接点加入功能
public class Aopdemo {

   public void printlog()
    {
        System.out.println("打印日志");
    }
    public void commint(){
        System.out.println("提交事务");
    }

}

(3) 用@AfterReturnning 通知可知@AfterReturnning 使得非业务代码在业务代码执行之后执行(业务代码有异常就不会执行了)
@Repository(value = "admindao")//dao层的注解,相当于在xml文件中配置  <bean id="Admin" class="com.ffyc.springpro.model.Admin" scope="prototype"></bean>
public class Admindao {
/*
    public void insert()
    {

        System.out.println("插入");
        System.out.println(1/0);//在这里出现异常

    }
    public void update(){
        System.out.println("修改");
    }
    public void delete(){
        System.out.println("删除");
    }
}
package com.ffyc.springpro.Demo;

import org.aspectj.lang.ProceedingJoinPoint;
import org.aspectj.lang.annotation.*;
import org.springframework.stereotype.Component;

import java.util.Arrays;

   @AfterReturning("execution(* com.ffyc.springpro.dao.*.*(..))")
   public void printlog()
    {
        System.out.println("打印日志");
    }
    public void commint(){
        System.out.println("提交事务");

}

(4) @AfterThrowing 异常通知(在业务代码出异常时会调用)
package com.ffyc.springpro.dao;

import com.ffyc.springpro.model.Admin;
import com.sun.media.jfxmediaimpl.HostUtils;
import org.springframework.beans.factory.annotation.Autowired;
import org.springframework.beans.factory.annotation.Value;
import org.springframework.stereotype.Repository;


    public void insert()
    {

        System.out.println("插入");
        System.out.println(1/0);

    }
    public void update(){
        System.out.println("修改");
    }
    public void delete(){
        System.out.println("删除");
    }
}
package com.ffyc.springpro.Demo;

import org.aspectj.lang.ProceedingJoinPoint;
import org.aspectj.lang.annotation.*;
import org.springframework.stereotype.Component;

import java.util.Arrays;


    @AfterThrowing(value = "execution(* com.ffyc.springpro.dao.*.*(..))",throwing ="throwable")
    public void throwmessage(Throwable throwable)
    {
        System.out.println("系统忙"+   throwable.getMessage());
        throwable.printStackTrace();
    }


}

(5)@Around 环绕通知(使用方法稍微与上面四种通知有点不一样)
package com.ffyc.springpro.dao;

import com.ffyc.springpro.model.Admin;
import com.sun.media.jfxmediaimpl.HostUtils;
import org.springframework.beans.factory.annotation.Autowired;
import org.springframework.beans.factory.annotation.Value;
import org.springframework.stereotype.Repository;

    public void insert()
    {

        System.out.println("插入");
        System.out.println(1/0);

    }
    public void update(){
        System.out.println("修改");
    }
    public void delete(){
        System.out.println("删除");
    }
}
package com.ffyc.springpro.Demo;

import org.aspectj.lang.ProceedingJoinPoint;
import org.aspectj.lang.annotation.*;
import org.springframework.stereotype.Component;

import java.util.Arrays;

ProceedingJoinPoint proceedingJoinPoint;  //表示的是目标方法,通过Method获得,底层是这样实现的
    @Around("execution(* com.ffyc.springpro.dao.*.*(..))")
    public void around(ProceedingJoinPoint proceedingJoinPoint)
    {
        try {
            System.out.println("前置通知");
         Object[] objects=  proceedingJoinPoint.getArgs();//获取到目标方法的参数
            System.out.println(Arrays.toString(objects));
            Object object=proceedingJoinPoint.proceed();//调用业务的方法,连接点调用
            System.out.println("返回通知");
        } catch (Throwable throwable) {
            System.out.println("异常通知");
            throwable.printStackTrace();
        }
        System.out.println("后置通知");
    }
}

(6)通知注解配置地址的说明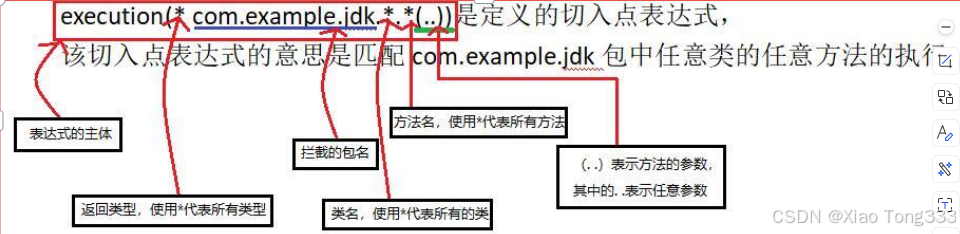
六.Spring事务管理
(1)关于Spring事务
(2)Spring中的事务管理分为两种形式:
一种是编程式事务,一种是声明式事务.1.编程式事务 在项目中很少使用,这种方式需要在我们代码中需要提交事务或回滚事务时自己写代码实现.2.声明式事务 管理建立在AOP基础上,本质是对方法前后进行拦截,所以声明式事务是方法级别的。
(3)基于注解实现的spring事务管理
1.Spring框架,提供事物管理实现类是DataSourceTransactionManager.
配置事物管理器(在xml文件中配置)<!-- 配置 spring 事务管理器-->< bean id ="transactionManager"class ="org.springframework.jdbc.datasource.DataSourceTransactionManager" >< property name ="dataSource" ref ="dataSource" ></ property ></ bean >2.注解方式(也在xml文件中配置)<!-- 开启注解事务管理 -->< tx :annotation-driven transaction-manager ="transactionManager" />3.使用事务时在需要提交事务的类上方或者类的方法上使用@Transactional注解
声明式事务不生效的场景
@Transactional 应用在非 public 修饰的方法上,否则事务还能提交
异常被 catch 捕获导致失效,认为没出异常导致提交的是错误的数据
出现编译期异常
数据库引擎不支持事务
package com.ffyc.springpro.service;

import com.ffyc.springpro.dao.Admindao;
import com.ffyc.springpro.model.Admin;
import org.springframework.beans.factory.annotation.Autowired;
import org.springframework.beans.factory.annotation.Qualifier;
import org.springframework.stereotype.Service;
import org.springframework.transaction.annotation.Transactional;

import javax.annotation.Resource;
import java.io.UnsupportedEncodingException;

//rollbackFor =Exception.class表示只要出现异常就不会提交事务,所有的异常都会回滚,解决了编译异常
@Transactional(rollbackFor =Exception.class)
@Service(value = "adminservice")
public class Adminservice {
    /*
    * Spring注解bean管理,自动注入
    *  @Autowired是Spring框架提供的自动注入
    * 用于在属性和set方法上,如果写在属性上,set和get方法都不需要
    *默认情况下:required=true注入的值不能为空@Autowired(required = true)
    * 自动注入有两种值的匹配方式:
    * 1.通过实行类型查找
    *2.通过对象名字查找,
    * @Resource:JDK 注解@Resource 自动注入@Resource 注解既可以按名
称匹配 Bean,也可以按类型匹配 Bean。默认按照 ByName 自动注入
    * */
      @Autowired
      Admin admin;

      @Autowired
     @Qualifier(value ="admindao")//@Qualifier2.通过对象名字查找,与 @Autowired搭配使用
    //在需要注入值的上面加入该注解
    Admindao admindao;

    public void insertadmin()
    {
       admindao.insert();
    }
    public void updateadmin(){
       admindao.update();
    }
    public void deleteadmin(){
        admindao.delete();
    }
     //出现异常但被catch捕获了,就会导致事务认为这段没出异常进而提交事务·,
    public void insertadmindao(){
        admin.insert();
        try{
            System.out.println(1/0);
        }catch (Exception e)
        {
            e.printStackTrace();
        }
        admin.insert1();
    }
    //出现编译期异常,在代码未运行时
    public void insertdmindao1() throws UnsupportedEncodingException {
          admin.insert();
        "aa".getBytes("utf-888");
         admin.insert1();
    }

}