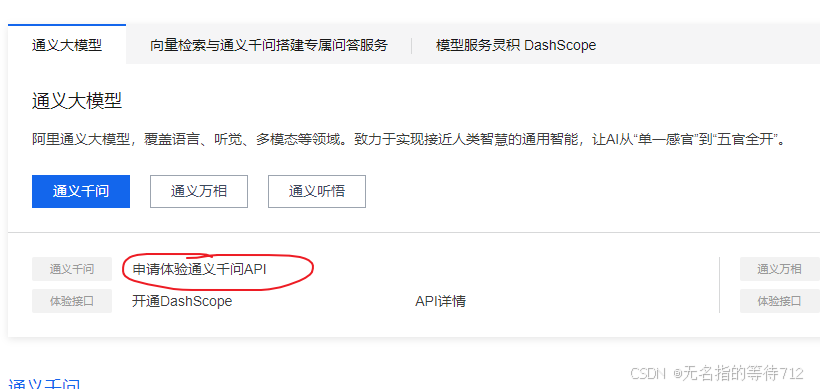
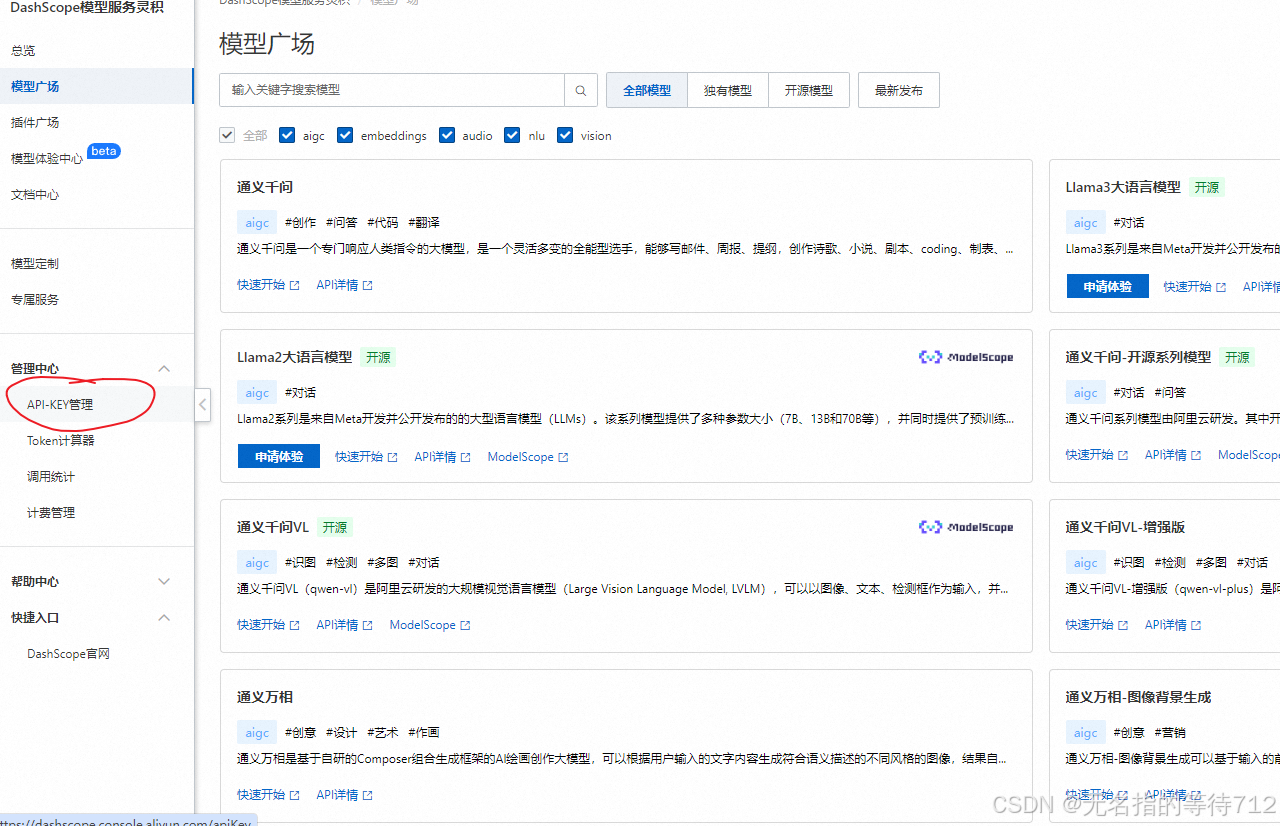
提示:今日花了2个小时搞定了一个简易版的AI对话功能
文章目录
目录
文章目录
SpringBoot代码
引入库
controller
返回对象类
工具类
前端代码
编辑
效果展示
后端返回
SpringBoot代码
当然我只做了一个简易版的AI对话,你可以在我的基础之上进行改动
引入库
<dependency>
            <groupId>org.springframework.boot</groupId>
            <artifactId>spring-boot-starter-web</artifactId>
        </dependency>

        <dependency>
            <groupId>org.projectlombok</groupId>
            <artifactId>lombok</artifactId>
            <optional>true</optional>
        </dependency>
        <dependency>
            <groupId>org.springframework.boot</groupId>
            <artifactId>spring-boot-starter-test</artifactId>
            <scope>test</scope>
        </dependency>
        <!-- https://mvnrepository.com/artifact/com.alibaba/dashscope-sdk-java -->
        <dependency>
            <groupId>com.alibaba</groupId>
            <artifactId>dashscope-sdk-java</artifactId>
            <version>2.13.0</version>
        </dependency>
controller
package com.xinggui.demo.controller;


import com.alibaba.dashscope.exception.InputRequiredException;
import com.alibaba.dashscope.exception.NoApiKeyException;
import com.xinggui.demo.domain.Response;
import com.xinggui.demo.util.ApiTestUtil;
import lombok.extern.slf4j.Slf4j;
import org.springframework.web.bind.annotation.CrossOrigin;
import org.springframework.web.bind.annotation.PostMapping;
import org.springframework.web.bind.annotation.RestController;

@RestController
@Slf4j
@CrossOrigin(origins = "http://127.0.0.1:5500") // 假设前端在3000端口运行
public class test {
    @PostMapping("/test")
    public Response test(String problem){
        if(problem.length() == 0){
            return new Response("-1","请输入问题",null);
        }
        String result = null;
        try {
            result = ApiTestUtil.getProblem(problem);
        } catch (NoApiKeyException e) {
            log.error("apiKey错误");
        } catch (InputRequiredException e) {
            log.error("输入为空");
        }
        return new Response("0","success",result);
    }
}
返回对象类
package com.xinggui.demo.domain;

import lombok.AllArgsConstructor;
import lombok.Data;
import lombok.NoArgsConstructor;

@Data
@AllArgsConstructor
@NoArgsConstructor
public class Response {

    private String code;
    private String msg;
    private Object data;

}
工具类
package com.xinggui.demo.util;

import com.alibaba.dashscope.aigc.generation.Generation;
import com.alibaba.dashscope.aigc.generation.GenerationParam;
import com.alibaba.dashscope.aigc.generation.GenerationResult;
import com.alibaba.dashscope.common.Message;
import com.alibaba.dashscope.common.ResultCallback;
import com.alibaba.dashscope.common.Role;
import com.alibaba.dashscope.exception.ApiException;
import com.alibaba.dashscope.exception.InputRequiredException;
import com.alibaba.dashscope.exception.NoApiKeyException;
import com.alibaba.dashscope.utils.Constants;
import com.alibaba.dashscope.utils.JsonUtils;
import io.reactivex.Flowable;

import java.util.Arrays;
import java.util.concurrent.Semaphore;

public class ApiTestUtil {

    public static String getProblem(String problem) throws NoApiKeyException, InputRequiredException {
        Constants.apiKey = "请填写你自己的API-key";
        // 实例化生成器对象
        Generation gen = new Generation();
        // 构建用户消息,角色为USER,内容为中国首都的介绍
        Message userMsg =
                Message.builder().role(Role.USER.getValue()).content(problem).build();
        // 构建生成参数,包括模型名称、消息列表、结果格式等
        GenerationParam param = GenerationParam.builder()
                .model("qwen-max") // 选择使用的模型
                .messages(Arrays.asList(userMsg)) // 用户的询问消息
                .resultFormat(GenerationParam.ResultFormat.MESSAGE) // 结果以消息格式返回
                .topP(0.8).enableSearch(true) // 设置搜索启用及topP参数
                .incrementalOutput(true) // 以增量方式获取流式输出
                .build();
        // 调用生成器的流式调用方法,返回结果为一个Flowable流
        Flowable<GenerationResult> result = gen.streamCall(param);
        // 使用StringBuilder来拼接完整的回复内容
        StringBuilder fullContent = new StringBuilder();
        // 阻塞方式处理每一个流式输出的消息,并打印出来
        result.blockingForEach(message -> {
            // 将当前消息的内容追加到完整内容中
            fullContent.append(message.getOutput().getChoices().get(0).getMessage().getContent());
            // 打印当前的消息内容(JSON格式)
            System.out.println(JsonUtils.toJson(message));
        });
        // 打印最终的完整内容
        System.out.println("Full content: \n" + fullContent.toString());
        return fullContent.toString();
    }
}
前端代码
<!DOCTYPE html>
<html lang="en">
<head>
  <meta charset="UTF-8">
  <meta name="viewport" content="width=device-width, initial-scale=1.0">
  <title>AI Chat Interface</title>
  <!-- 引入 Vue 3 的 CDN -->
  <script src="https://unpkg.com/vue@3/dist/vue.global.js"></script>
  <style>
    /* 样式 */
    body {
      font-family: Avenir, Helvetica, Arial, sans-serif;
      background-color: #f4f4f9;
      margin: 0;
      padding: 0;
      display: flex;
      justify-content: center;
      align-items: center;
      height: 100vh;
    }

    .chat-container {
      display: flex;
      flex-direction: column;
      height: 80vh;
      width: 80vw;
      max-width: 600px;
      border: 1px solid #ccc;
      border-radius: 10px;
      overflow: hidden;
      background-color: #fff;
    }

    .chat-window {
      flex: 1;
      padding: 10px;
      overflow-y: auto;
      background-color: #f4f4f9;
      position: relative;
    }

    .chat-message {
      display: flex;
      margin-bottom: 10px;
      align-items: flex-start;
    }

    .message-left {
      flex-direction: row;
    }

    .message-right {
      flex-direction: row-reverse;
    }

    .avatar {
      width: 40px;
      height: 40px;
      border-radius: 50%;
      background-color: #007bff;
      display: flex;
      justify-content: center;
      align-items: center;
      color: white;
      font-weight: bold;
      margin: 0 10px;
    }

    .message-bubble {
      max-width: 70%;
      padding: 10px;
      border-radius: 20px;
      background-color: #007bff;
      color: white;
      word-wrap: break-word;
    }

    .message-left .message-bubble {
      background-color: #e4e6eb;
      color: black;
    }

    .chat-input {
      display: flex;
      padding: 10px;
      border-top: 1px solid #ccc;
      background-color: #fff;
    }

    .chat-input input {
      flex: 1;
      padding: 10px;
      border: 1px solid #ccc;
      border-radius: 20px;
      outline: none;
    }

    .chat-input button {
      margin-left: 10px;
      padding: 10px 20px;
      border: none;
      background-color: #007bff;
      color: white;
      border-radius: 20px;
      cursor: pointer;
      outline: none;
    }

    .chat-input button:hover {
      background-color: #0056b3;
    }

    /* From Uiverse.io by SchawnnahJ */
    .loader {
      position: relative;
      width: 2.5em;
      height: 2.5em;
      transform: rotate(165deg);
    }

    .loader:before, .loader:after {
      content: "";
      position: absolute;
      top: 50%;
      left: 50%;
      display: block;
      width: 0.5em;
      height: 0.5em;
      border-radius: 0.25em;
      transform: translate(-50%, -50%);
    }

    .loader:before {
      animation: before8 2s infinite;
    }

    .loader:after {
      animation: after6 2s infinite;
    }

    @keyframes before8 {
      0% {
        width: 0.5em;
        box-shadow: 1em -0.5em rgba(225, 20, 98, 0.75), -1em 0.5em rgba(111, 202, 220, 0.75);
      }

      35% {
        width: 2.5em;
        box-shadow: 0 -0.5em rgba(225, 20, 98, 0.75), 0 0.5em rgba(111, 202, 220, 0.75);
      }

      70% {
        width: 0.5em;
        box-shadow: -1em -0.5em rgba(225, 20, 98, 0.75), 1em 0.5em rgba(111, 202, 220, 0.75);
      }

      100% {
        box-shadow: 1em -0.5em rgba(225, 20, 98, 0.75), -1em 0.5em rgba(111, 202, 220, 0.75);
      }
    }

    @keyframes after6 {
      0% {
        height: 0.5em;
        box-shadow: 0.5em 1em rgba(61, 184, 143, 0.75), -0.5em -1em rgba(233, 169, 32, 0.75);
      }

      35% {
        height: 2.5em;
        box-shadow: 0.5em 0 rgba(61, 184, 143, 0.75), -0.5em 0 rgba(233, 169, 32, 0.75);
      }

      70% {
        height: 0.5em;
        box-shadow: 0.5em -1em rgba(61, 184, 143, 0.75), -0.5em 1em rgba(233, 169, 32, 0.75);
      }

      100% {
        box-shadow: 0.5em 1em rgba(61, 184, 143, 0.75), -0.5em -1em rgba(233, 169, 32, 0.75);
      }
    }

    .loading {
      position: relative;
      bottom: -20px;
      display: flex;
      align-items: center;
      justify-content: center;
    }

  </style>
</head>
<body>
    <div id="app">
        <div class="chat-container">
          <div class="chat-window">
            <div v-for="(message, index) in messages" :key="index" class="chat-message" :class="{'message-left': message.isUser, 'message-right': !message.isUser}">
              <div class="avatar">{{ message.isUser ? '自己' : 'AI' }}</div>
              <div class="message-bubble">
                {{ message.text }}
              </div>
            </div>
            <div class="loading"  v-if="loading">
               <div style="display: flex;align-items: center;justify-content: center;">
                <div class="loader"></div>
                <div style="margin-left: 10px;font-weight: bold; color: #e64c87;">加载中</div>
               </div>
            </div>
          </div>
          <div class="chat-input">
            <input v-model="userInput" @keydown.enter="sendMessage" placeholder="Type your question..." />
            <button @click="sendMessage">Send</button>
          </div>
        </div>
      </div>

        <script src="https://cdn.jsdelivr.net/npm/axios/dist/axios.min.js"></script>
      <script>
        const { createApp } = Vue;

        createApp({
          data() {
            return {
              userInput: '',
              messages: [
                { text: '你有什么需要问的问题吗?', isUser: false }
              ],
              loading:false
            };
          },
          methods: {
            sendMessage() {
              if (this.userInput.trim()) {
                // 添加用户的消息
                this.messages.push({ text: this.userInput, isUser: true });

                // 模拟AI回复(你可以在这里调用AI的接口)
                this.simulateAIResponse(this.userInput);

                // 清空输入框
                this.userInput = '';
              }
            },
           async simulateAIResponse(userText) {
            this.loading = true;
                const res =await axios.post("http://localhost:8888/test", {
                "problem": this.userInput
            },{ headers: { "Content-Type": "multipart/form-data" } })
                this.messages.push({
                  text: `AI回答内容: ${res.data.data}`,
                  isUser: false,
                });
                this.loading = false;

            },
          },

        }).mount('#app');
      </script>
</body>
</html>
这里我使用VScode中的liveServer插件,启动项目
后端对http://127.0.0.1:5500做了跨域配置


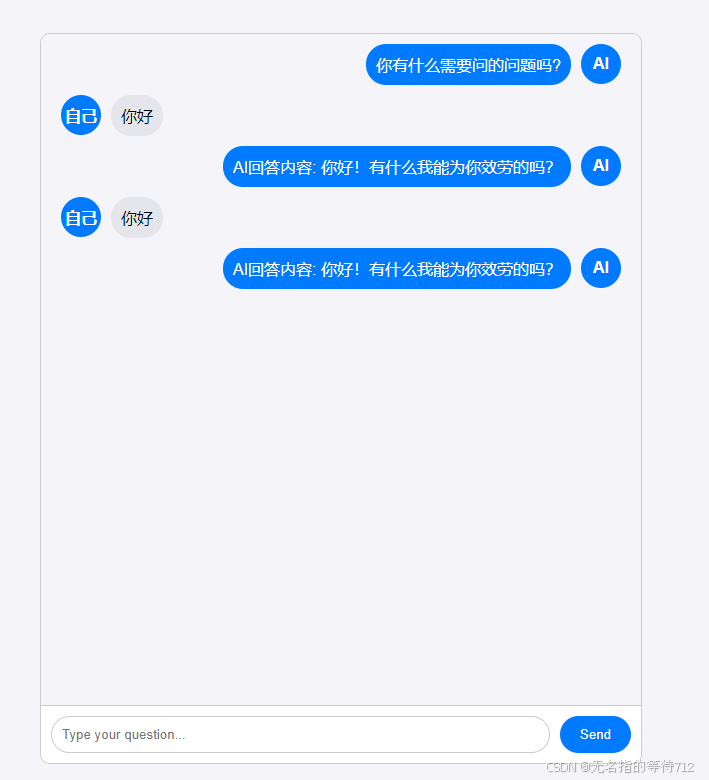
效果展示
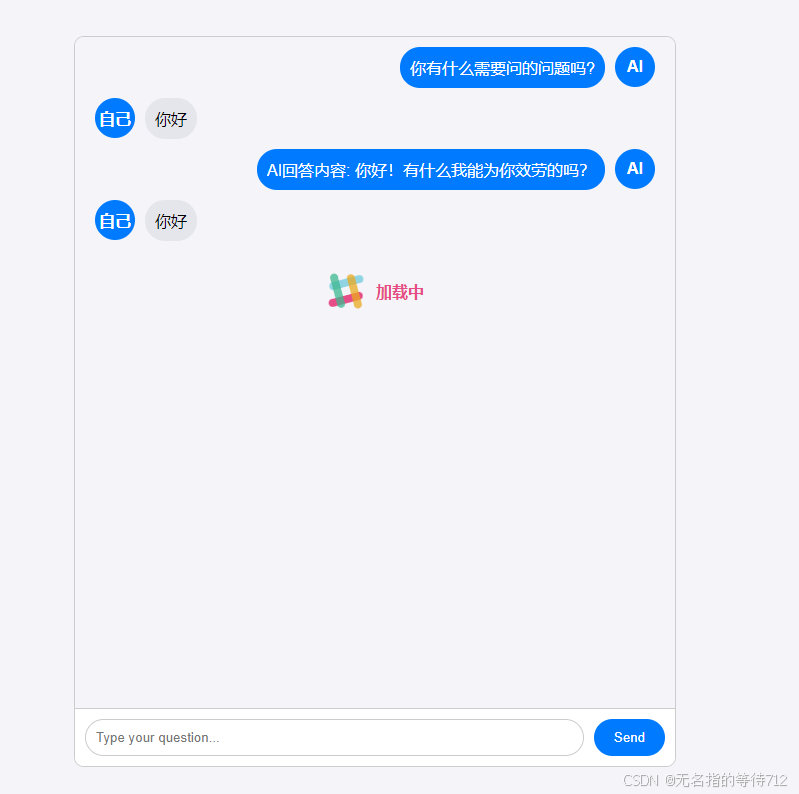
这里还添加了一个Loading效果
后端返回

今日时间2024年8月27日,希望可以帮助到你


![单词拆分[中等]](https://i-blog.csdnimg.cn/direct/f5629aa42fbd45808b4530bede4cce8c.png)