1. 数据库基础
1.1 什么是数据库
在接触数据库之前,回想一下我们之前写的所有小项目,如果需要持久化保存一些内容,我们是保存在文件中的,似乎也能够很不错的支持我们的操作,解决我们的需求。但是,实际上是因为小项目需要持久化保存的数据规模比较少,使用文件就能够解决,但是文件也有一些缺点:
- 文件的安全性问题
- 文件不利于数据查询和管理
- 文件不利于存储海量数据
- 文件在程序中控制不方便
为了解决上述问题,专家设计了更加利于管理数据的东西——数据库
1.2 主流数据库
- SQL Sever: 微软的产品,.Net程序员的最爱,中大型项目。
- Oracle: 甲骨文产品,适合大型项目,复杂的业务逻辑,并发一般来说不如MySQL。
- MySQL:世界上最受欢迎的数据库,属于甲骨文,并发性好,不适合做复杂的业务。主要用在电商,SNS,论坛。对简单的SQL处理效果好。
- PostgreSQL :加州大学伯克利分校计算机系开发的关系型数据库,不管是私用,商用,还是学术研 究使用,可以免费使用,修改和分发。
- SQLite: 是一款轻型的数据库,是遵守ACID的关系型数据库管理系统,它包含在一个相对小的C库 中。它的设计目标是嵌入式的,而且目前已经在很多嵌入式产品中使用了它,它占用资源非常的 低,在嵌入式设备中,可能只需要几百K的内存就够了。
- H2: 是一个用Java开发的嵌入式数据库,它本身只是一个类库,可以直接嵌入到应用项目中
2. MySQL基本常识
2.0 现有MySQL卸载

可以看到现在系统内有mysql的服务正在运行,要卸载mysql的话需要以下几个步骤
1. 停止MySQL服务器
sudo systemctl stop mysql
此命令将停止 MySQL 服务器的运行
2. 卸载MySQL
sudo dpkg -P mysql-community-server # 单独卸载mysql-community-server,因为会弹出确认框,我们要选择yes,如果也使用管道,将会屏蔽标准输入
dpkg -l | grep mysql | awk '{print $2}' | sudo xargs dpkg -P # 批量删除所有mysql相关包
# 1. dpkg -l 列出所有包
# 2. grep mysql 查看所有包含mysql字符串的结果
# 3. awk '{print $2}' 输出文本的第二列内容
# 4. xargs是用来获取上一步输出的内容,并拼接到当前指令的最后面
#    dpkg -P 删除指定包
此命令将卸载 MySQL 软件包及其相关的依赖项

3. 卸载残留文件
mysql卸载完成后残留文件,我们可以查找到他们并删除
# 1. /var目录下的残留文件
sudo find /var -name "*mysql*" # 查找mysql相关文件
sudo find /var -name "*mysql*" | sudo xarg rm -rf # 删除
# 2. /etc/my.cnf文件
rm /etc/my.cnf
# 3. /etc/mysql/*的所有文件
rm -rf /etc/mysql/*
2.1 MySQL安装
1. 获取mysql5.7安装包
wget http://repo.mysql.com/mysql-apt-config_0.8.12-1_all.deb # 使用wget获取mysql5.7版本的安装包

2. 安装mysql官方源
sudo dpkg -i mysql-apt-config_0.8.12-1_all.deb # 使用dpkg安装官方源
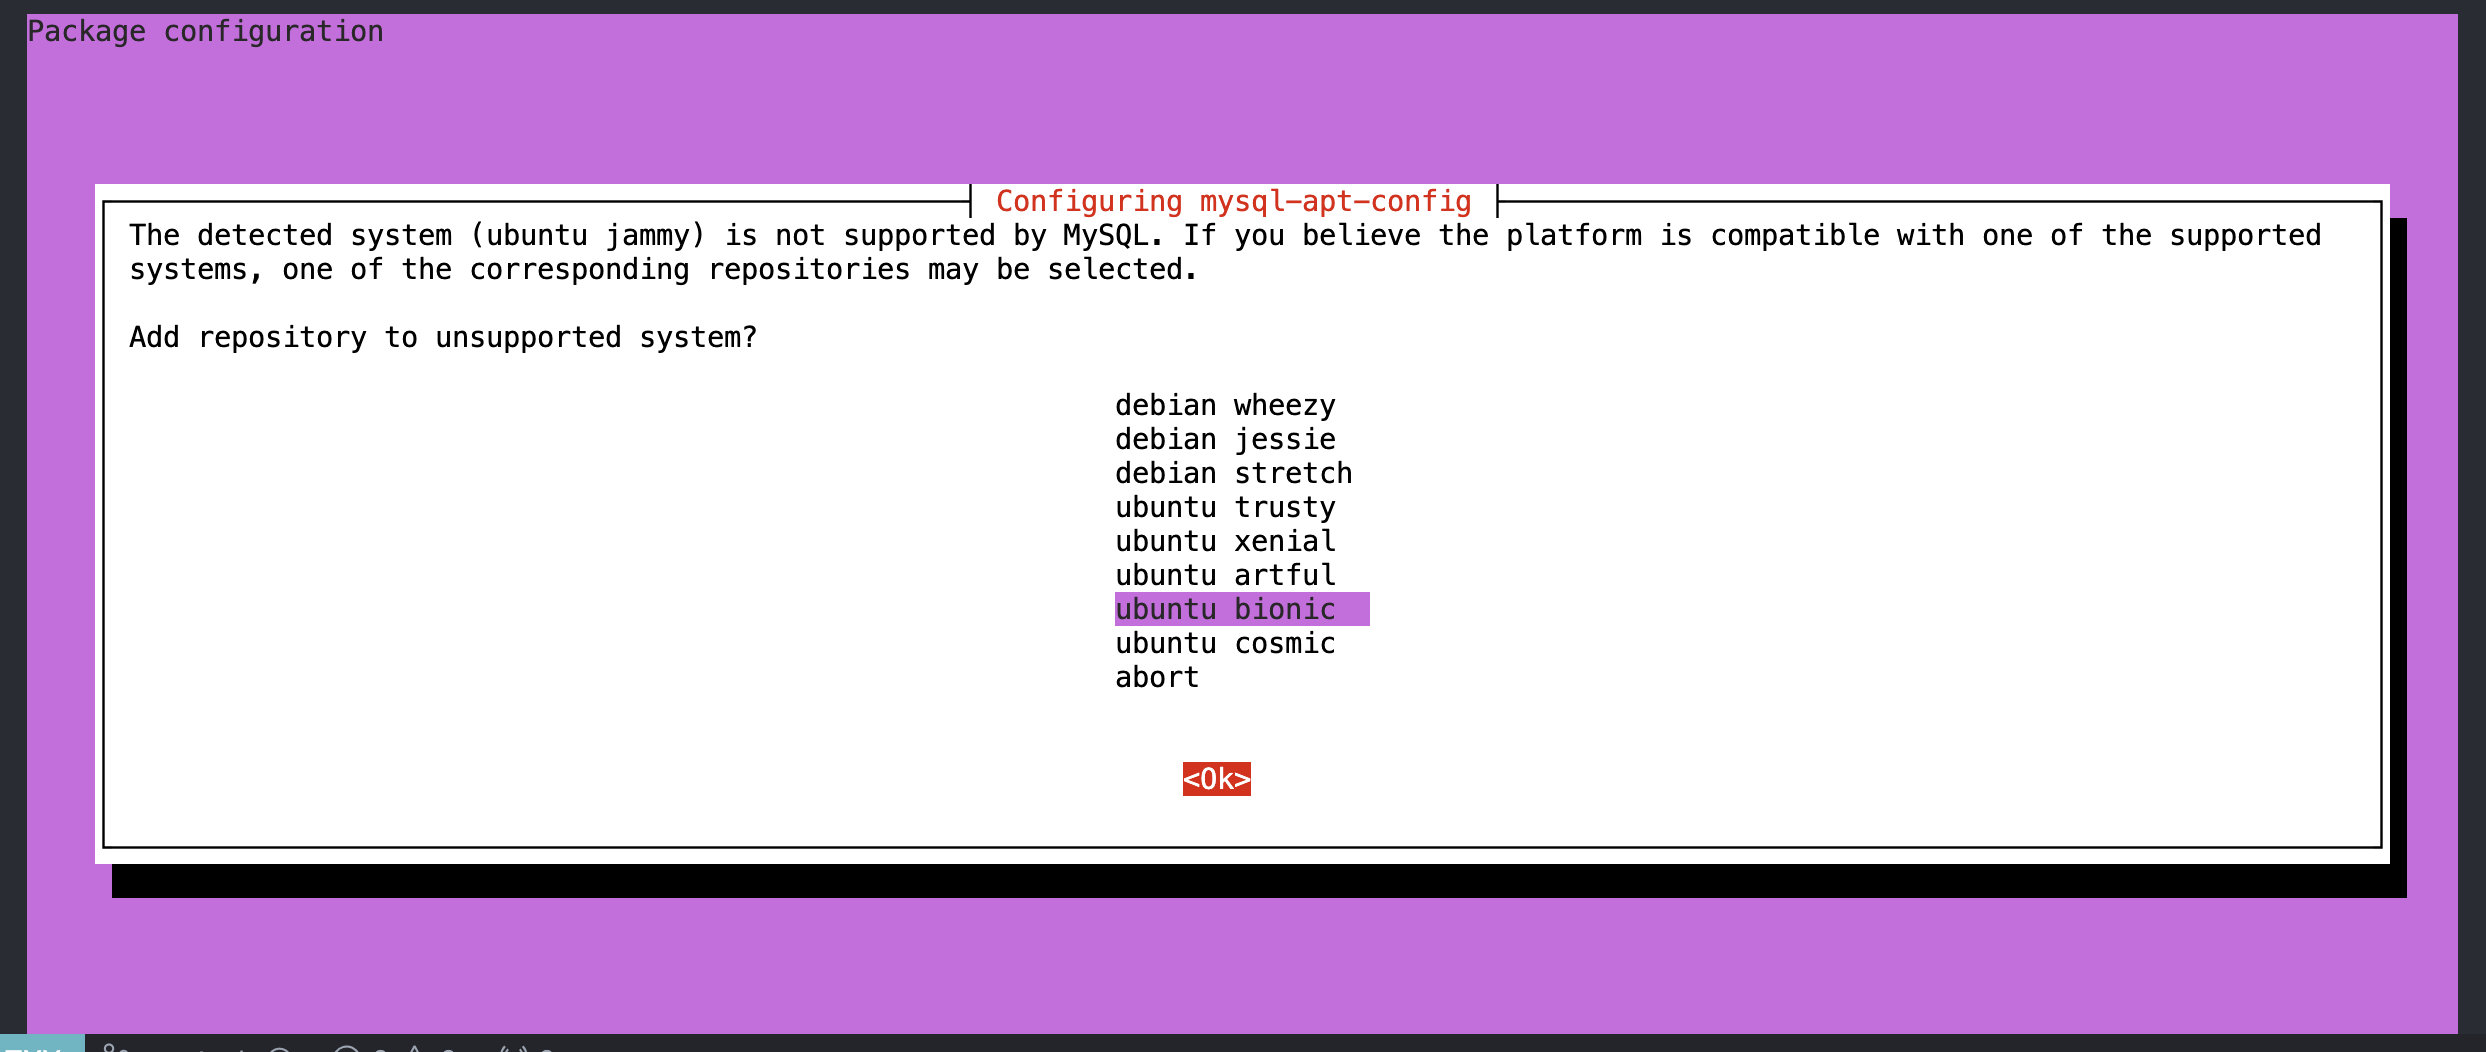
这里选择与自己ubuntu版本对应的源(使用lsb_release -a可以查看)

笔者这里是jammy,可以看到是没有对应版本的,所以这里我选择bionic
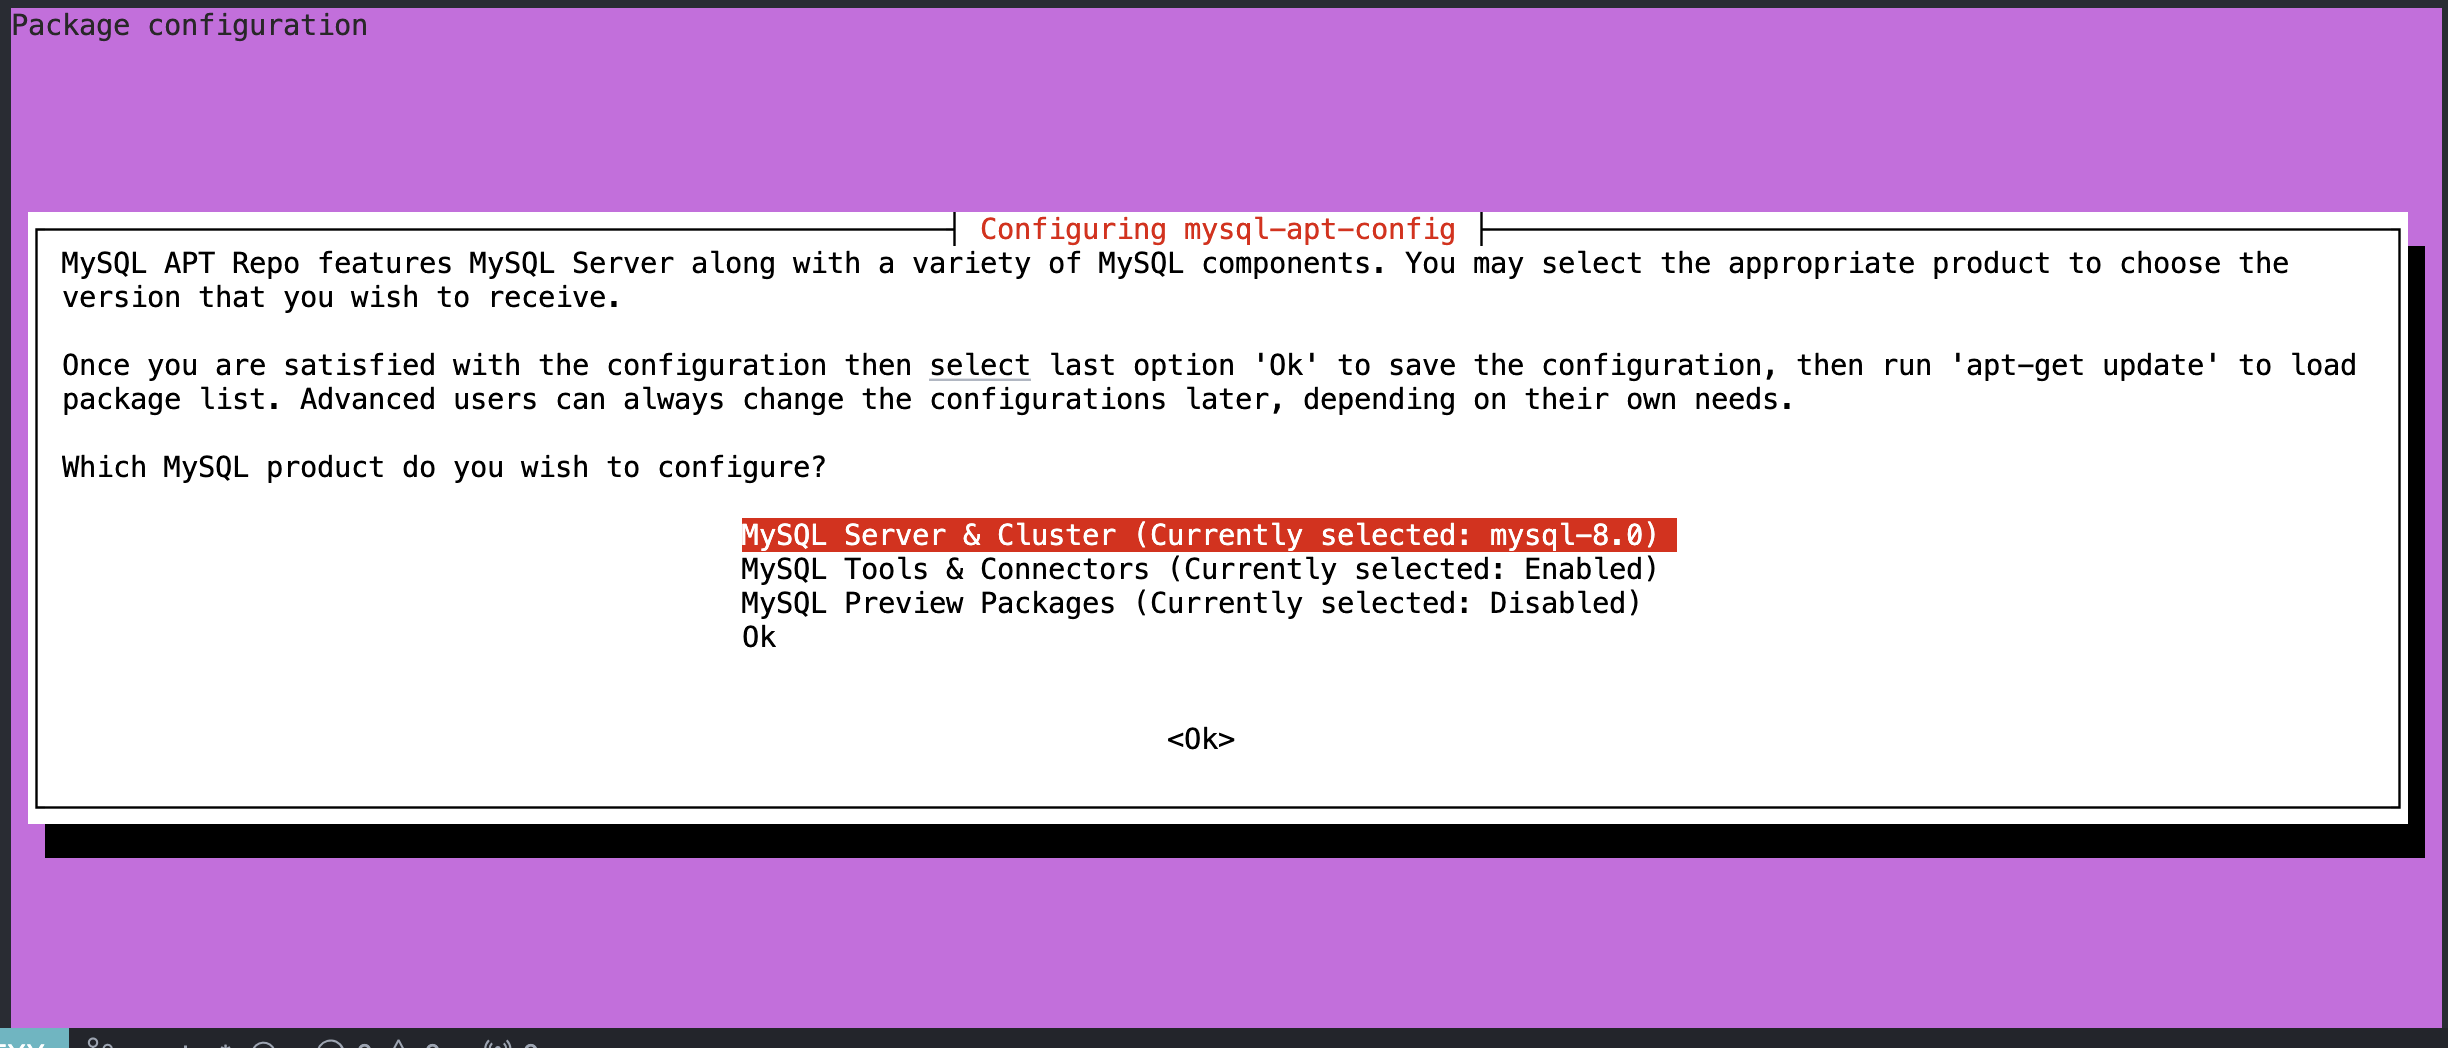
这里选择安装5.7版本

3. 更新apt源
sudo apt-get update

在更新源过程中可能遇到的问题:
- 出现错误
E: The repostory 'file:/cdrom jammy Release' no longer has a Release file# 解决方案 sudo vim /etc/apt/source.list # 在source.list中找到下面这行文件并删除 deb [check-date=no] file:///cdrom jammy main restricted
- 出现gpg-key过期的情况
sudo apt-key adv -keyserver keyserver.ubuntu.com -recv-keys 467B942D3A79BD29
# 这里467B942D3A79BD29替换成你自己的报错key
- 出现更新警告:Key is stored in legacy trusted.gpg keyring(/etc/apt/trusted.gpg)
# 这个警告的意思是,需要在trusted.gpg.d/目录下查找GPG密钥,因此将密钥文件拷贝过去即可
cp /etc/apt/trusted/gpg /etc/apt/trusted.gpg.d/
sudo apt-get update
4. 查看当前可安装的mysql版本

这里发现三个版本可安装,我们要安装的是5.7版本
5. 安装mysql和相关服务
sudo apt install -f mysql-client=5.7* mysql-community-server=5.7* mysql-server=5.7* libmysqlclient-dev=5.7* # 分别安装5.7版本的mysql客户端 mysql服务端 mysql的连开发工具包
在弹出的框里面输入mysql的登录密码
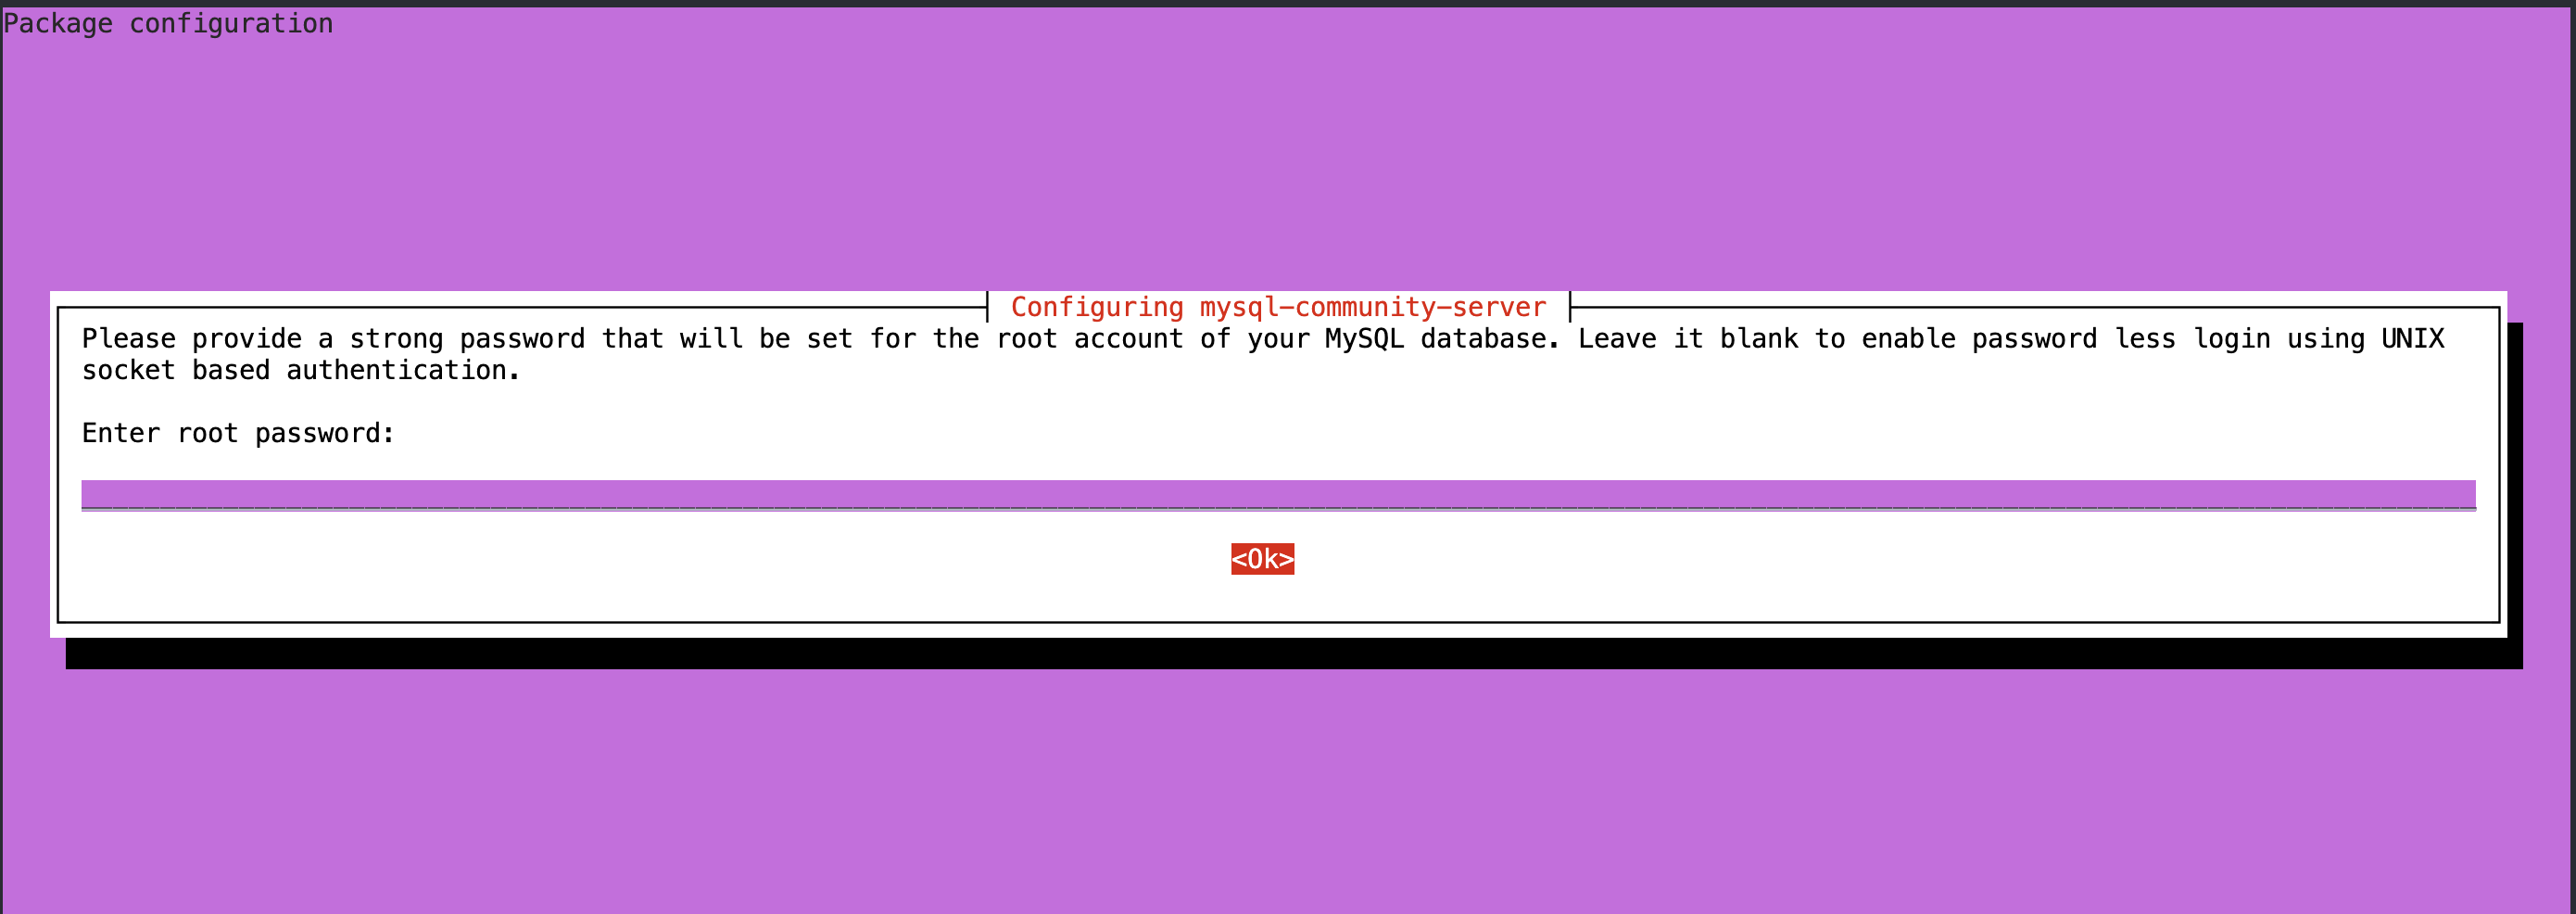
6. 设置/修改mysql密码,以及设置密码强度等级
ubuntu@VM-12-15-ubuntu:~$ sudo mysql_secure_installation # 要执行的指令

Securing the MySQL server deployment.

Connecting to MySQL using a blank password.

VALIDATE PASSWORD PLUGIN can be used to test passwords
and improve security. It checks the strength of password
and allows the users to set only those passwords which are
secure enough. Would you like to setup VALIDATE PASSWORD plugin?

Press y|Y for Yes, any other key for No: y # 设置密码生效

There are three levels of password validation policy:

LOW    Length >= 8
MEDIUM Length >= 8, numeric, mixed case, and special characters
STRONG Length >= 8, numeric, mixed case, special characters and dictionary                  file

Please enter 0 = LOW, 1 = MEDIUM and 2 = STRONG: 0 # 更改密码强度等级
Please set the password for root here.

New password:

Re-enter new password:

Estimated strength of the password: 25
Do you wish to continue with the password provided?(Press y|Y for Yes, any other key for No) : yes
By default, a MySQL installation has an anonymous user,
allowing anyone to log into MySQL without having to have
a user account created for them. This is intended only for
testing, and to make the installation go a bit smoother.
You should remove them before moving into a production
environment.

Remove anonymous users? (Press y|Y for Yes, any other key for No) : yes # 移除匿名用户登录
Success.


Normally, root should only be allowed to connect from
'localhost'. This ensures that someone cannot guess at
the root password from the network.

Disallow root login remotely? (Press y|Y for Yes, any other key for No) : y # 不允许远程登录
Success.

By default, MySQL comes with a database named 'test' that
anyone can access. This is also intended only for testing,
and should be removed before moving into a production
environment.


Remove test database and access to it? (Press y|Y for Yes, any other key for No) : y # 删除test数据库
 - Dropping test database...
Success.

 - Removing privileges on test database...
Success.

Reloading the privilege tables will ensure that all changes
made so far will take effect immediately.

Reload privilege tables now? (Press y|Y for Yes, any other key for No) : y
Success.

All done!
7. mysql配置文件
sudo vim /etc/mysql/my.cnf # 编辑配置文件
[client]
default-character-set = utf8 # 设置mysql客户端默认字符集编码为utf8

[mysql]
default-character-set = utf8 # 设置mysql默认字符集编码为utf8

[mysqld]
character-set-server = utf8 # 设置mysql服务端默认字符集编码为utf8
default-storage-engine=innodb # 设置默认存储引擎为innodb
bind-address = 0.0.0.0 # 设置能接受任意IP地址的连接
port=3306 # 默认端口号为3306

datadir=/var/lib/mysql # 默认存储目录在/var/lib/msyql中
socket=/var/lib/mysql/mysql.sock # 指定本地连接方式
8. 开启mysql服务
sudo systemctl start mysql # 开启mysql服务
现在可以登录mysql测试一下安装是否成功
mysql -uroot -p # 输入这个
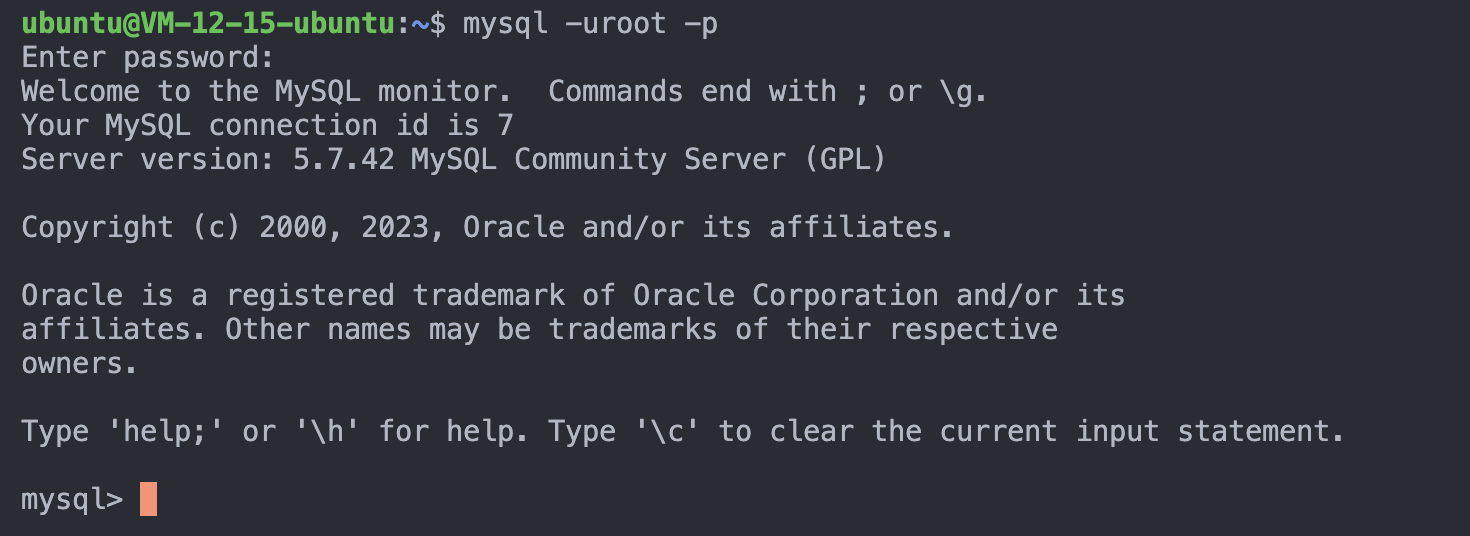
看到这个图片就是安装成功了
2.2 MySQL的登录选项
在上面的步骤中,我们使用了简单的mysql登录选项,来测试mysql的安装情况,现在我们来详细介绍一下mysql的登录选项
-p表示密码-P指定端口号-h指定IP(MySQL是一个网络服务)-u指定登录用户
所以上面的mysql -uroot -p指的就是使用root用户的身份,默认IP为localhost(127.0.0.1),默认端口号,使用密码登录
2.3 MySQL的宏观认识
1. mysql的服务端和客户端认识
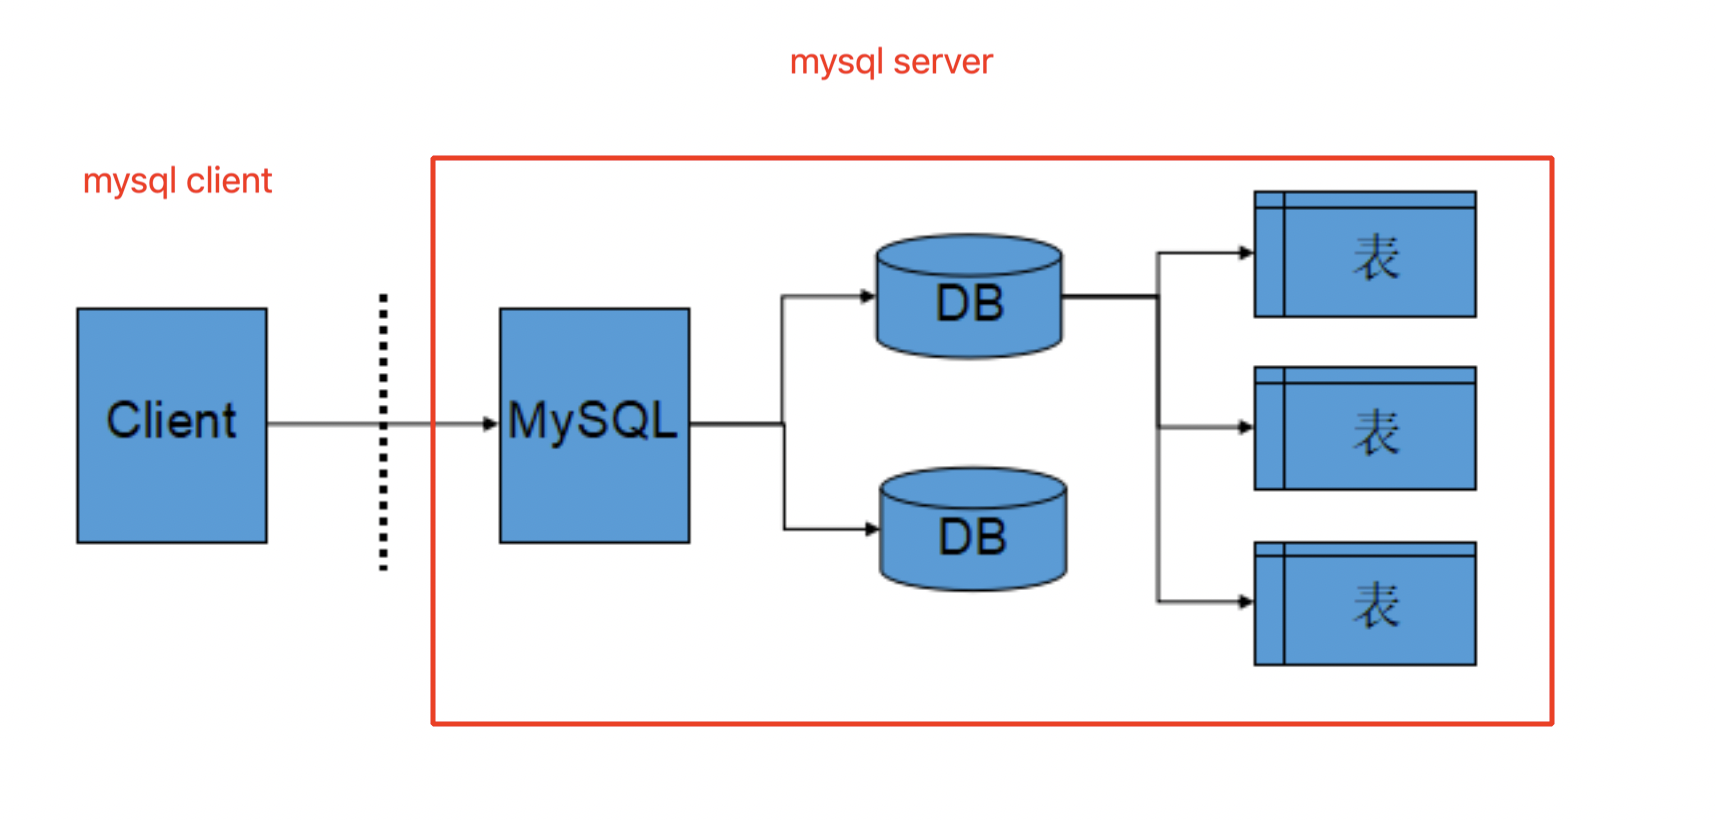
mysql是一个网络服务,和我们之前写过的网络服务demo一样,都有客户端和服务端两个程序,我们安装完成之后使用systemctl start mysql启动的就是mysql的服务端。使用mysql -uroot -p登录的就是mysql的客户端。mysql的服务端和客户端通过网络进行通信
2. mysql的服务器、数据库、表关系
-
所谓安装数据库服务器,只是在机器上安装了一个数据库管理系统程序,这个管理程序可以管理多个数据库,一般开发人员会针对每一个应用创建一个数据库。
-
为保存应用中实体的数据,一般会在数据库中创建多个表,以保存程序中实体的数据。
-
数据库服务器、数据库和表的关系如下:
2.4 MySQL的架构
MySQL 是一个可移植的数据库,几乎能在当前所有的操作系统上运行,如 Unix/Linux、Windows、 Mac 和 Solaris。各种系统在底层实现方面各有不同,但是 MySQL 基本上能保证在各个平台上的物理体系结构的一致性。
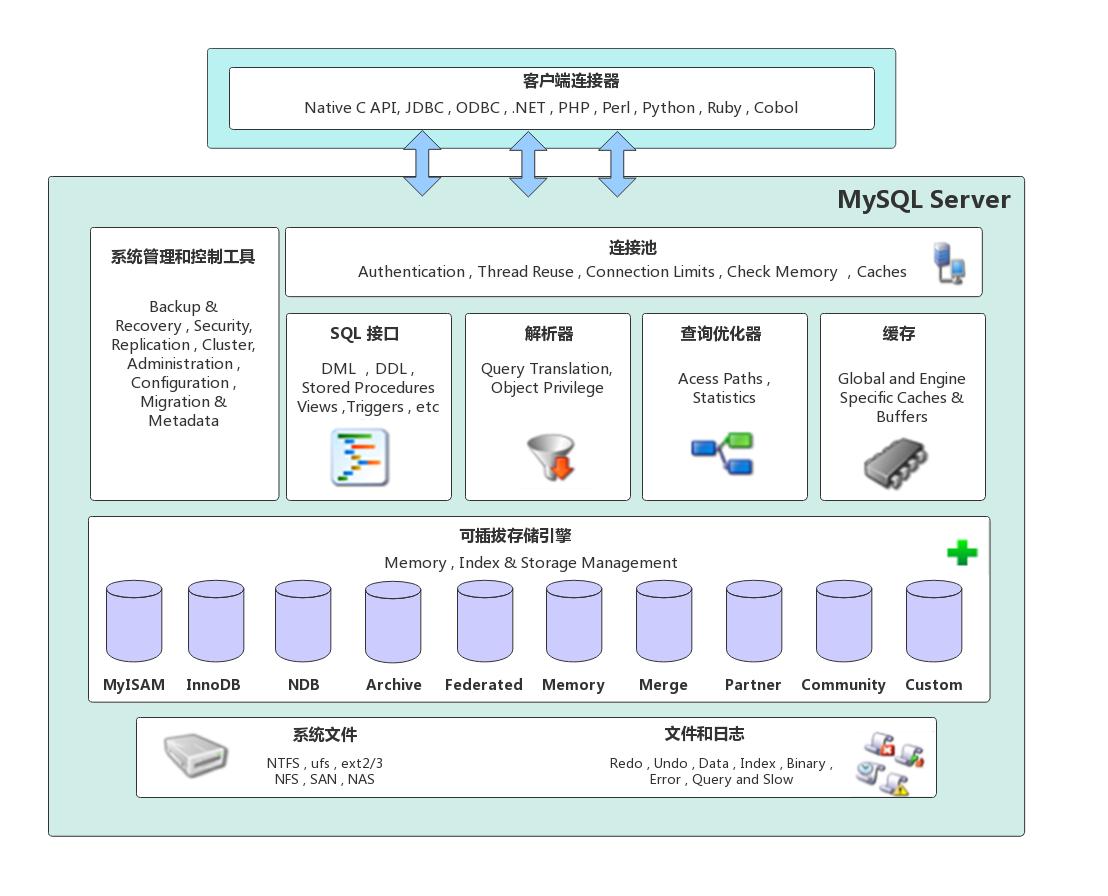
这里先见一见mysql的整体架构,我们之后再学习过程中在逐步理解
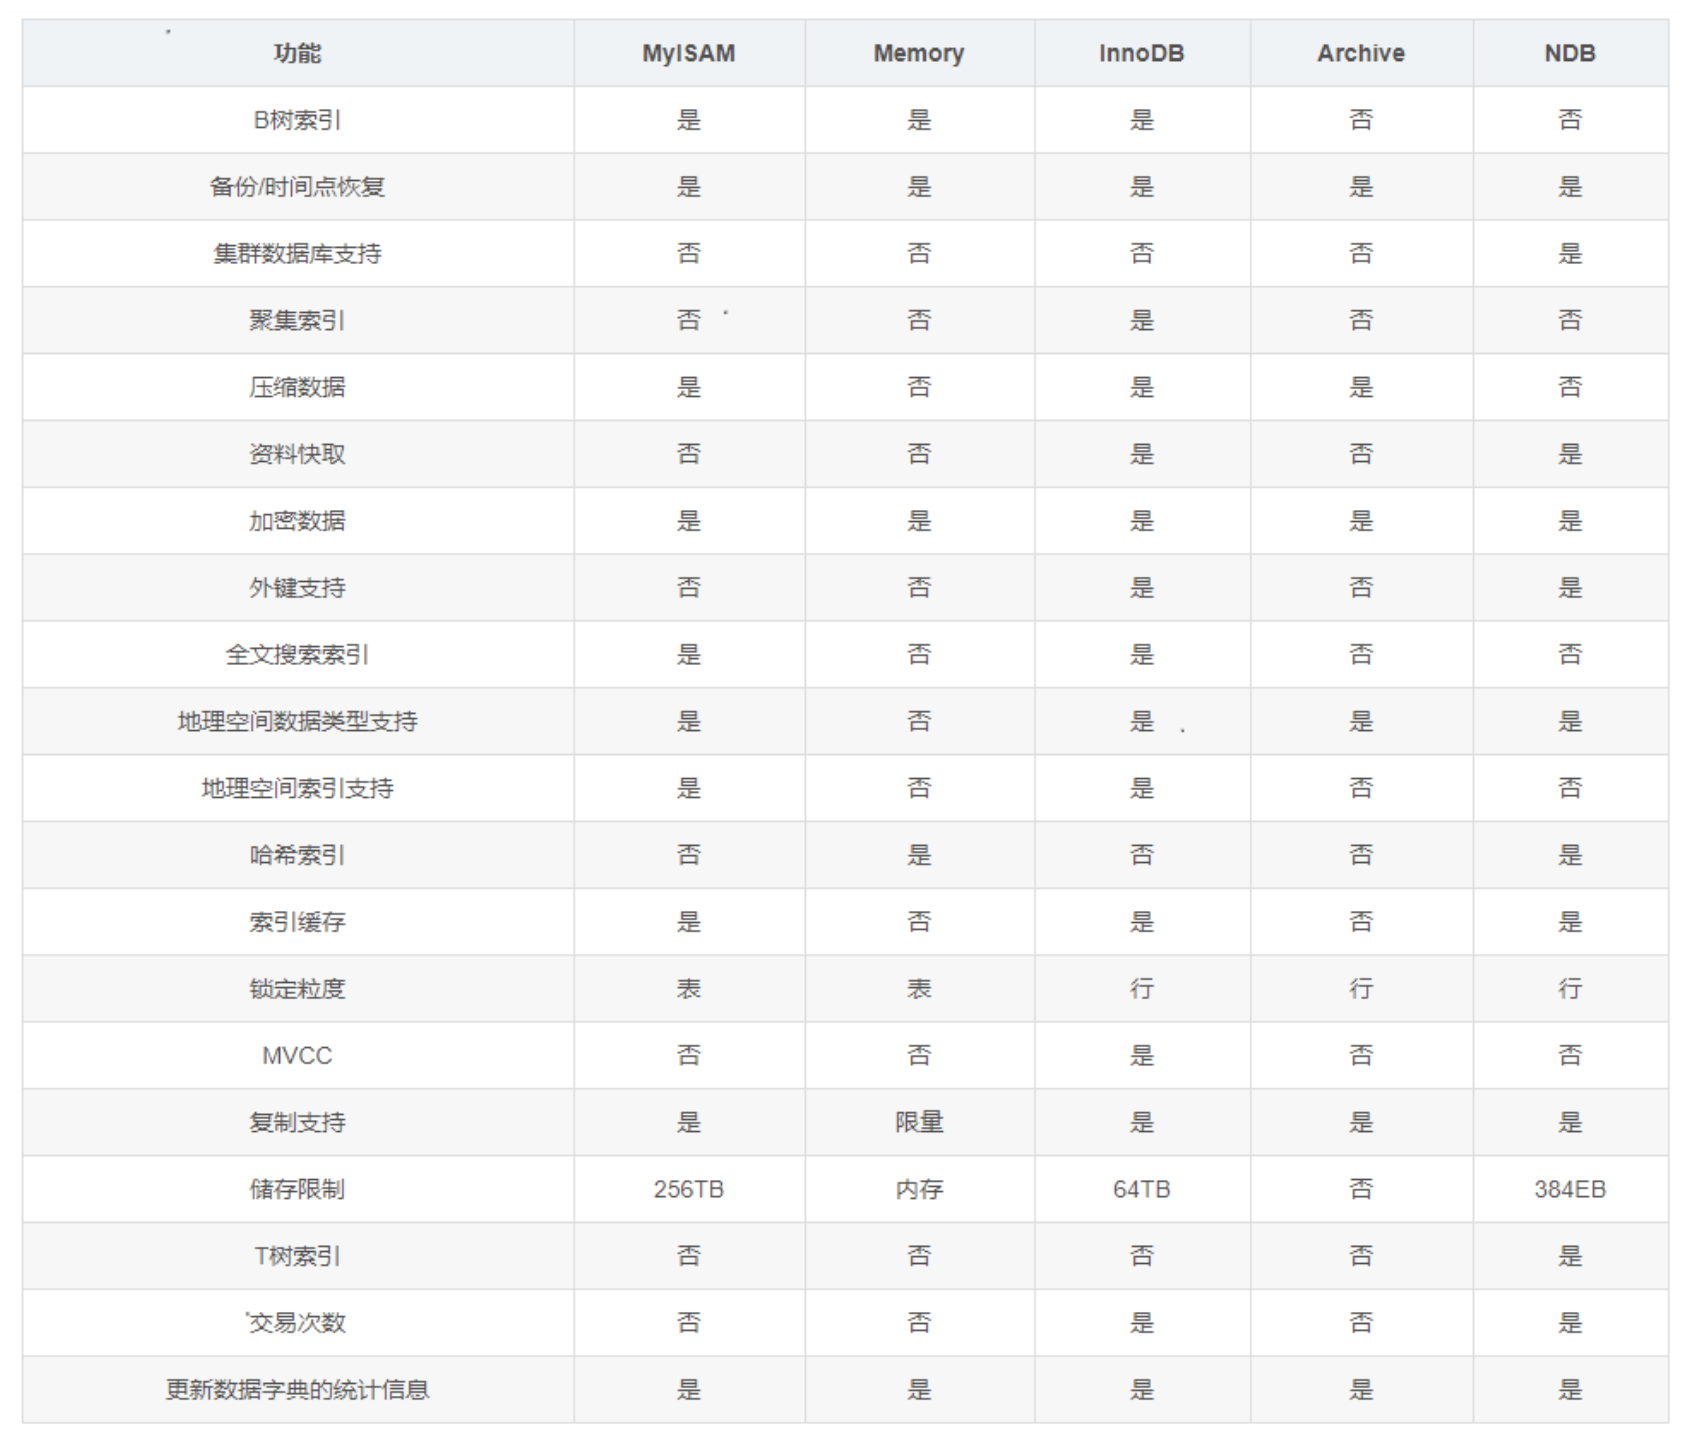
2.5 MySQL的存储引擎
存储引擎是数据库管理系统如何存储数据、如何为存储的数据建立索引和如何更新、查询数据等技术的实现方法。
MySQL的核心就是插件式存储引擎,支持多种存储引擎。
可以使用下面命令来查看mysql支持的存储引擎
show engines;

存储引擎对比图:
本节完…


