要在Kubernetes上安装LongHorn,您可以按照以下步骤进行操作:
一、准备工作
参考
- 官网教程
- 将
LongHorn只部署在k8s-worker5节点上。 - https://github.com/longhorn/longhorn
安装要求
Each node in the Kubernetes cluster where Longhorn is installed must fulfill the following requirements:
- A container runtime compatible with Kubernetes (Docker v1.13+, containerd v1.3.7+, etc.)
- Kubernetes >= v1.21
open-iscsiis installed, and theiscsiddaemon is running on all the nodes. This is necessary, since Longhorn relies oniscsiadmon the host to provide persistent volumes to Kubernetes. For help installingopen-iscsi, refer to this section.- RWX support requires that each node has a NFSv4 client installed.
- For installing a NFSv4 client, refer to this section.
- The host filesystem supports the
file extentsfeature to store the data. Currently we support:- ext4
- XFS
bash,curl,findmnt,grep,awk,blkid,lsblkmust be installed.- Mount propagation must be enabled.
The Longhorn workloads must be able to run as root in order for Longhorn to be deployed and operated properly.
使用环境检查脚本
# use
curl -sSfL https://raw.githubusercontent.com/longhorn/longhorn/v1.6.0/scripts/environment_check.sh | bash

# 参考
curl -sSfL https://raw.githubusercontent.com/longhorn/longhorn/v1.6.1/scripts/environment_check.sh | bash
创建命名空间
# vi longhorn-ns.yaml
# kubectl apply -f longhorn-ns.yaml
# kubectl delete -f longhorn-ns.yaml
apiVersion: v1
kind: Namespace
metadata:
  name: longhorn-system
安装 open-iscsi(可选)
# use
apt-get install open-iscsi
systemctl enable iscsid --now
systemctl status iscsid
modprobe iscsi_tcp
$. wget https://raw.githubusercontent.com/longhorn/longhorn/master/deploy/prerequisite/longhorn-iscsi-installation.yaml
$. vi longhorn-iscsi-installation.yaml
# 添加如下内容
metadata:
namespace: longhorn-system
# nodeselector
spec:
template:
spec:
nodeSelector:
longhorn: deploy
$. kubectl apply -f longhorn-iscsi-installation.yaml
$. kubectl get DaemonSet longhorn-iscsi-installation -n longhorn-system
$. kubectl get pod \
-o wide \
-n longhorn-system |\
grep longhorn-iscsi-installation
$. kubectl delete -f longhorn-iscsi-installation.yaml
# 查看log
kubectl logs longhorn-iscsi-installation-44h92 \
-c iscsi-installation \
-n longhorn-system
# ========================== 官网 =========================== #
# SUSE and openSUSE: Run the following command:
zypper install open-iscsi
# Debian and Ubuntu: Run the following command:
apt-get install open-iscsi
# RHEL, CentOS, and EKS (EKS Kubernetes Worker AMI with AmazonLinux2 image): Run the following commands:
yum --setopt=tsflags=noscripts install iscsi-initiator-utils
echo "InitiatorName=$(/sbin/iscsi-iname)" > /etc/iscsi/initiatorname.iscsi
systemctl enable iscsid
systemctl start iscsid
# 验证
$. iscsiadm --version
# =============================== 参考 =============================== #
# 前言:这里二选一要么直接安装命令,要么使用容器去进行安装,这里选择之间安装的命令。
# open-iscsi
kubectl apply -f https://raw.githubusercontent.com/longhorn/longhorn/v1.6.1/deploy/prerequisite/longhorn-iscsi-installation.yaml
# nfs
kubectl apply -f https://raw.githubusercontent.com/longhorn/longhorn/v1.6.1/deploy/prerequisite/longhorn-nfs-installation.yaml安装 NFSv4 client(可选)
# Check NFSv4.1 support is enabled in kernel
cat /boot/config-`uname -r`| grep CONFIG_NFS_V4_1

# Check NFSv4.2 support is enabled in kernel
cat /boot/config-`uname -r`| grep CONFIG_NFS_V4_2

## The command used to install a NFSv4 client differs depending on the Linux distribution.

 # For Debian and Ubuntu, use this command:
    apt-get install nfs-common

  # For RHEL, CentOS, and EKS with EKS Kubernetes Worker AMI with AmazonLinux2 image, use this command:
    yum install nfs-utils

  # For SUSE/OpenSUSE you can install a NFSv4 client via:
    zypper install nfs-client

# For Talos Linux, the NFS client is part of the kubelet image maintained by the Talos team.

# We also provide an nfs installer to make it easier for users to install nfs-client automatically:
# use
$. wget https://raw.githubusercontent.com/longhorn/longhorn/master/deploy/prerequisite/longhorn-nfs-installation.yaml
$. vi longhorn-nfs-installation.yaml
   # 添加如下内容
    metadata:
      namespace: longhorn-system
   # nodeselector
   spec:
     template:
       spec:
         nodeSelector:
           longhorn: deploy
$. kubectl apply -f longhorn-nfs-installation.yaml
$. kubectl get DaemonSet longhorn-nfs-installation -n longhorn-system
$. kubectl get pod \
-o wide \
-n longhorn-system \
| grep longhorn-nfs-installation

$. kubectl delete -f longhorn-nfs-installation.yaml

# ===================== 参考 ===================== #
$. kubectl apply -f https://raw.githubusercontent.com/longhorn/longhorn/v1.6.1/deploy/prerequisite/longhorn-nfs-installation.yaml

# After the deployment, run the following command to check pods’ status of the installer:
$. kubectl get pod | grep longhorn-nfs-installation
NAME                                  READY   STATUS    RESTARTS   AGE
longhorn-nfs-installation-t2v9v   1/1     Running   0          143m
longhorn-nfs-installation-7nphm   1/1     Running   0          143m
And also can check the log with the following command to see the installation result:

$. kubectl logs longhorn-nfs-installation-t2v9v -c nfs-installation
...
nfs install successfully
给节点打标签
$. kubectl label node k8s-infra01 longhorn=deploy
$. kubectl get no k8s-infra01 --show-labels

# 参考
$. kubectl label node k8s-worker2 longhorn-
$. kubectl label node k8s-infra01 longhorn=deploy
$. kubectl label node k8s-infra01 longhorn-
$. kubectl get no k8s-worker5 --show-labels

# ======================== 参考 ======================== #
# 查询node标签
# kubectl get no -o wide --show-labels | grep k8s-worker5

# 删除label
# kubectl label nodes k8s-worker5 k8s-worker5-

# 修改label
# kubectl label nodes k8s-worker5 longhorn=deploy --overwrite
# or
# kubectl edit nodes k8s-worker5二、部署LongHorn
官网地址: longhorn-官网安装
下载longhorn.yaml
# use
$. wget https://raw.githubusercontent.com/longhorn/longhorn/master/deploy/longhorn.yaml
$. cp longhorn.yaml longhorn.yaml-bak

# old
$. kubectl apply \
-f https://raw.githubusercontent.com/longhorn/longhorn/master/deploy/longhorn.yaml

# ========================= 参考 ======================== #
# 官网地址: https://longhorn.io/docs/1.6.0/deploy/install/install-with-kubectl/
vi longhorn.yaml
注释掉其中的affinity
查找 kind: Deployment, 并在注释掉其中的affinity:
# 注释掉其中的affinity
...
spec:
  template:
    spec:
      #affinity:
      #  podAntiAffinity:
      #    preferredDuringSchedulingIgnoredDuringExecution:
      #    - weight: 1
      #      podAffinityTerm:
      #        labelSelector:
      #          matchExpressions:
      #          - key: app
      #            operator: In
      #            values:
      #            - longhorn-ui
      #        topologyKey: kubernetes.io/hostname
...
设置Node Selector
usingkubectlto apply the deployment YAML, modify the node selector section forLonghorn Manager,Longhorn UI, andLonghorn Driver Deployer. Then apply the YAMl files.
查找 kind: Deployment, 并在添加nodeselector:
spec:
  template:
    spec:
      # lpf
      nodeSelector:
        longhorn: deploy
修改存储路径
默认存储路径为:/var/lib/longhorn,可修改为自己想要路径
找到名为longhorn-manager的DaemonSet资源下的spec.template.spec.[containers].[volumes].hostPath.path字段。
修改pv为保留策略
修改pv为保留策略,否则删除pvc的时候pv就会被删除。
data:
  storageclass.yaml: |
    kind: StorageClass
    apiVersion: storage.k8s.io/v1
    metadata:
      name: longhorn
      annotations:
        storageclass.kubernetes.io/is-default-class: "true"
    provisioner: driver.longhorn.io
    allowVolumeExpansion: true
    # 找到文件中的StorageClass.data.reclaimPolicy字段,修改为Retain
    # reclaimPolicy: "Delete"
    reclaimPolicy: "Retain"
    volumeBindingMode: Immediate
修改资源类型和端口
修改longhorn-frontend 服务的svc资源类型和端口,便于web界面查看。
kind: Service
apiVersion: v1
metadata:
  labels:
    app.kubernetes.io/name: longhorn
    app.kubernetes.io/instance: longhorn
    app.kubernetes.io/version: v1.3.2
    app: longhorn-ui
  name: longhorn-frontend
  namespace: longhorn-system
spec:
  # 修改为 NodePort,默认为ClusterIP
  #type: ClusterIP
  type: NodePort
  selector:
    app: longhorn-ui
  ports:
  - name: http
    port: 80
    targetPort: http
    # 修改端口号,默认为 null
    #nodePort: null
    nodePort: 32183
开始部署
$. kubectl apply -f longhorn.yaml

# 命令试执行(不会真的创建或修改任何集群中的资源。)
$. kubectl --dry-run=client apply -f longhorn.yaml

# 查看部署效果
$. kubectl get all -o wide -n longhorn-system
$. kubectl get pod -o wide -n longhorn-system

# ds
kubectl get ds -n longhorn-system

# ========================= 参考 ========================== #
# 删除longhorn
# 步骤1
$. kubectl delete -f longhorn.yaml
# 步骤2
# 删除k8s各个node下的/var/lib/longhorn目录(若改为自定义目录, 则删除相关自定义目录即可)
设置nodeselector
给所有daemonset和deployment设置nodeselector.
$. kubectl get deploy,ds,rs -n longhorn-system
# 给下面所有资源设置 nodeselector
# spec:
#  template:
#    spec:
#      # lpf
#      nodeSelector:
#        longhorn: deploy
# 设置命令:
# kubectl edit deploy csi-attacher -n longhorn-system
$. kubectl patch \
deploy csi-attacher \
-n longhorn-system \
-p '{"spec": {"template": {"spec": {"nodeSelector": {"longhorn": "deploy"}}}}}'

# kubectl edit deploy csi-provisioner -n longhorn-system
$. kubectl patch \
deploy csi-provisioner \
-n longhorn-system \
-p '{"spec": {"template": {"spec": {"nodeSelector": {"longhorn": "deploy"}}}}}'

# kubectl edit deploy csi-resizer -n longhorn-system
$. kubectl patch \
deploy csi-resizer \
-n longhorn-system \
-p '{"spec": {"template": {"spec": {"nodeSelector": {"longhorn": "deploy"}}}}}'

# kubectl edit deploy csi-snapshotter -n longhorn-system
$. kubectl patch \
deploy csi-snapshotter \
-n longhorn-system \
-p '{"spec": {"template": {"spec": {"nodeSelector": {"longhorn": "deploy"}}}}}'

# kubectl edit ds engine-image-ei-acb7590c -n longhorn-system
$. kubectl patch \
ds engine-image-ei-b907910b \
-n longhorn-system \
-p '{"spec": {"template": {"spec": {"nodeSelector": {"longhorn": "deploy"}}}}}'

# kubectl edit ds longhorn-csi-plugin -n longhorn-system
$. kubectl patch \
ds longhorn-csi-plugin \
-n longhorn-system \
-p '{"spec": {"template": {"spec": {"nodeSelector": {"longhorn": "deploy"}}}}}'

# 验证
# kubectl get all -o wide -n longhorn-system

NAME                                       READY   UP-TO-DATE   AVAILABLE   AGE
deployment.apps/csi-attacher               3/3     3            3           49m
deployment.apps/csi-provisioner            3/3     3            3           49m
deployment.apps/csi-resizer                3/3     3            3           49m
deployment.apps/csi-snapshotter            3/3     3            3           49m
deployment.apps/longhorn-driver-deployer   1/1     1            1           49m
deployment.apps/longhorn-ui                2/2     2            2           49m

NAME                                         DESIRED   CURRENT   READY   UP-TO-DATE   AVAILABLE   NODE SELECTOR     AGE
daemonset.apps/engine-image-ei-acb7590c      1         1         1       1            1           longhorn=deploy   49m
daemonset.apps/longhorn-csi-plugin           9         9         9       9            9           <none>            49m
daemonset.apps/longhorn-iscsi-installation   1         1         1       1            1           longhorn=deploy   49m
daemonset.apps/longhorn-manager              1         1         1       1            1           longhorn=deploy   49m
daemonset.apps/longhorn-nfs-installation     1         1         1       1            1           longhorn=deploy   48m

NAME                                                  DESIRED   CURRENT   READY   AGE
replicaset.apps/csi-attacher-5984dd5fb4               3         3         3       49m
replicaset.apps/csi-provisioner-56cf669464            3         3         3       49m
replicaset.apps/csi-resizer-644fd596d5                3         3         3       49m
replicaset.apps/csi-snapshotter-78596646cf            3         3         3       49m
replicaset.apps/longhorn-driver-deployer-5f886cb8cb   1         1         1       49m
replicaset.apps/longhorn-ui-5f766d554b                2         2         2       49m
查看pod状态
等待Pod启动:
一旦存储库创建成功,LongHorn系统将启动一系列的Pod。
检查Pod的状态:
$ kubectl get pods -n longhorn-system  -o wide
# use
kubectl get pods -n longhorn-system -o wide

kubectl get svc -n longhorn-system确认所有的Pod都处于"Running"状态。
# 全部是 Running和状态READY左右两边一致就可以了
[root@master ~]# kubectl get pod \
-n longhorn-system \
-o wide
NAME                                                  READY   STATUS    RESTARTS       AGE     IP               NODE    NOMINATED NODE   READINESS GATES
csi-attacher-7bf4b7f996-ffhxm                         1/1     Running   0              45m     10.244.166.146   node1   <none>           <none>
csi-attacher-7bf4b7f996-kts4l                         1/1     Running   0              45m     10.244.104.20    node2   <none>           <none>
csi-attacher-7bf4b7f996-vtzdb                         1/1     Running   0              45m     10.244.166.142   node1   <none>           <none>
csi-provisioner-869bdc4b79-bjf8q                      1/1     Running   0              45m     10.244.166.150   node1   <none>           <none>
csi-provisioner-869bdc4b79-m2swk                      1/1     Running   0              45m     10.244.104.18    node2   <none>           <none>
csi-provisioner-869bdc4b79-pmkfq                      1/1     Running   0              45m     10.244.166.143   node1   <none>           <none>
csi-resizer-869fb9dd98-6ndgb                          1/1     Running   0              8m47s   10.244.104.28    node2   <none>           <none>
csi-resizer-869fb9dd98-czvzh                          1/1     Running   0              45m     10.244.104.16    node2   <none>           <none>
csi-resizer-869fb9dd98-pq2p5                          1/1     Running   0              45m     10.244.166.149   node1   <none>           <none>
csi-snapshotter-7d59d56b5c-85cr6                      1/1     Running   0              45m     10.244.104.19    node2   <none>           <none>
csi-snapshotter-7d59d56b5c-dlwjk                      1/1     Running   0              45m     10.244.166.148   node1   <none>           <none>
csi-snapshotter-7d59d56b5c-xsc6s                      1/1     Running   0              45m     10.244.166.147   node1   <none>           <none>
engine-image-ei-f9e7c473-ld6zp                        1/1     Running   0              46m     10.244.104.15    node2   <none>           <none>
engine-image-ei-f9e7c473-qw96n                        1/1     Running   1 (6m5s ago)   8m13s   10.244.166.154   node1   <none>           <none>
instance-manager-e-16be548a213303f54febe8742dc8e307   1/1     Running   0              8m19s   10.244.104.29    node2   <none>           <none>
instance-manager-e-1e8d2b6ac4bdab53558aa36fa56425b5   1/1     Running   0              7m58s   10.244.166.155   node1   <none>           <none>
instance-manager-r-16be548a213303f54febe8742dc8e307   1/1     Running   0              46m     10.244.104.14    node2   <none>           <none>
instance-manager-r-1e8d2b6ac4bdab53558aa36fa56425b5   1/1     Running   0              7m31s   10.244.166.156   node1   <none>           <none>
longhorn-admission-webhook-69979b57c4-rt7rh           1/1     Running   0              52m     10.244.166.136   node1   <none>           <none>
longhorn-admission-webhook-69979b57c4-s2bmd           1/1     Running   0              52m     10.244.104.11    node2   <none>           <none>
longhorn-conversion-webhook-966d775f5-st2ld           1/1     Running   0              52m     10.244.166.135   node1   <none>           <none>
longhorn-conversion-webhook-966d775f5-z5m4h           1/1     Running   0              52m     10.244.104.12    node2   <none>           <none>
longhorn-csi-plugin-gcngb                             3/3     Running   0              45m     10.244.166.145   node1   <none>           <none>
longhorn-csi-plugin-z4pr6                             3/3     Running   0              45m     10.244.104.17    node2   <none>           <none>
longhorn-driver-deployer-5d74696c6-g2p7p              1/1     Running   0              52m     10.244.104.9     node2   <none>           <none>
longhorn-manager-j69pn                                1/1     Running   0              52m     10.244.166.139   node1   <none>           <none>
longhorn-manager-rnzwr                                1/1     Running   0              52m     10.244.104.10    node2   <none>           <none>
longhorn-recovery-backend-6576b4988d-l4lmb            1/1     Running   0              52m     10.244.104.8     node2   <none>           <none>
longhorn-recovery-backend-6576b4988d-v79b4            1/1     Running   0              52m     10.244.166.138   node1   <none>           <none>
longhorn-ui-596d5f6876-ms4dn                          1/1     Running   0              52m     10.244.166.137   node1   <none>           <none>
longhorn-ui-596d5f6876-td7ww                          1/1     Running   0              52m     10.244.104.7     node2   <none>           <none>
[root@master ~]#
三、设置svc服务(可选)
## 安装好后名为longhorn-frontend的svc服务默认是clusterip模式,
## 除了集群之外的网络是访问不到此服务的,所以要将此svc服务改为nodeport模式
$. kubectl edit svc longhorn-frontend -n longhorn-system
##type: NodePort
# 将type的ClusterIP改为 NodePort 即可
# 设置 spec.[ports].nodePort: 32183
# 保存退出
$. kubectl get svc -n longhorn-system
# 过滤
[root@master ~]# kubectl get svc -n longhorn-system|grep longhorn-frontend
longhorn-frontend ClusterIP 10.106.154.54 <none> 80/TCP 55m
[root@master ~]# # 查询刚才变更为 NodePort 暴露的端口
[root@master ~]# kubectl get svc \
-n longhorn-system|grep longhorn-frontend
longhorn-frontend NodePort 10.106.154.54 <none> 80:32146/TCP 58m
[root@master ~]#
四、浏览器访问
在浏览器访问此端口即可
 http://ip:32183  # 根据自己的k8s宿主机ip地址输入
# rpp
http://192.168.1.190:32183
五、使用iscsi类型的volume
参考: cilium-cew-longhorn
1. 创建 iscsi volume
步骤1
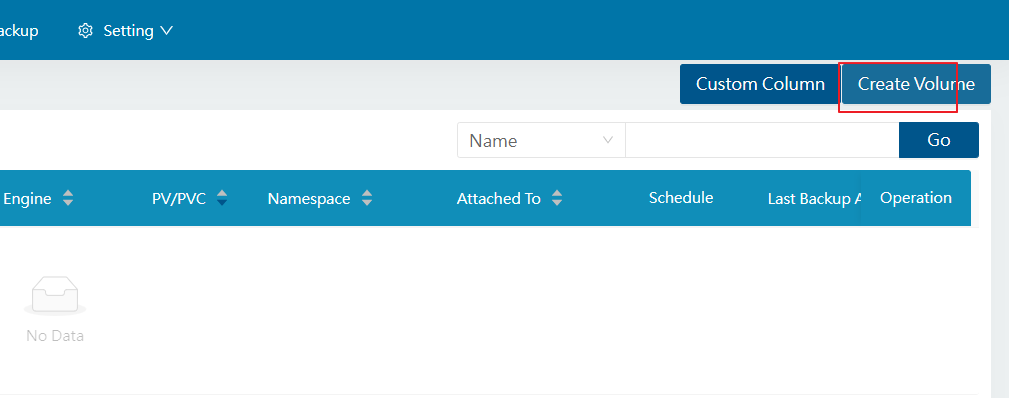
步骤2
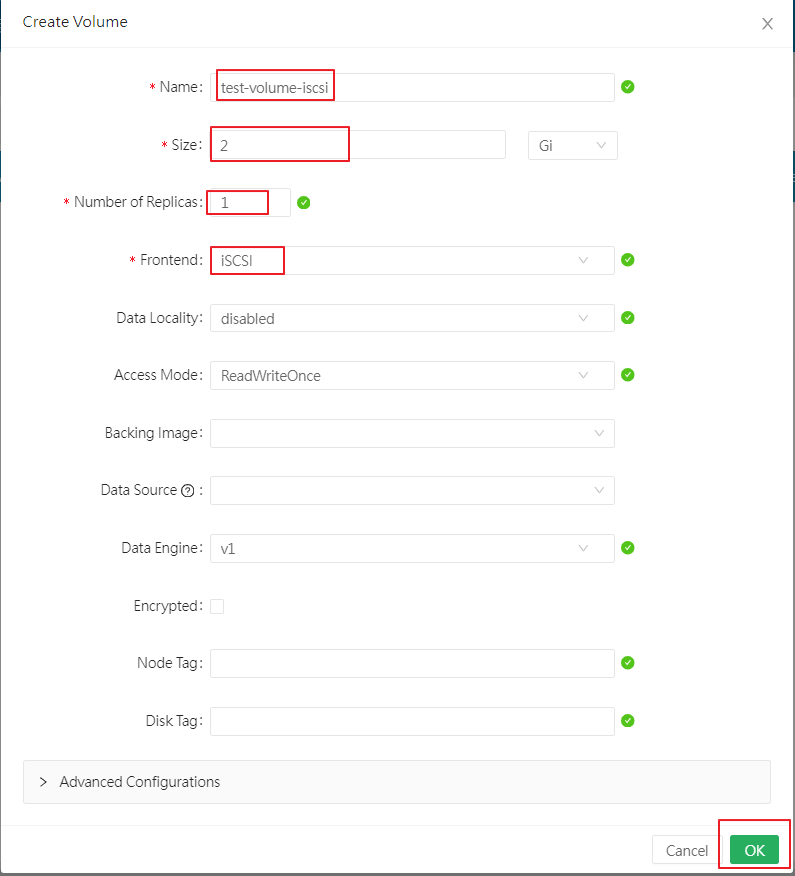
步骤3
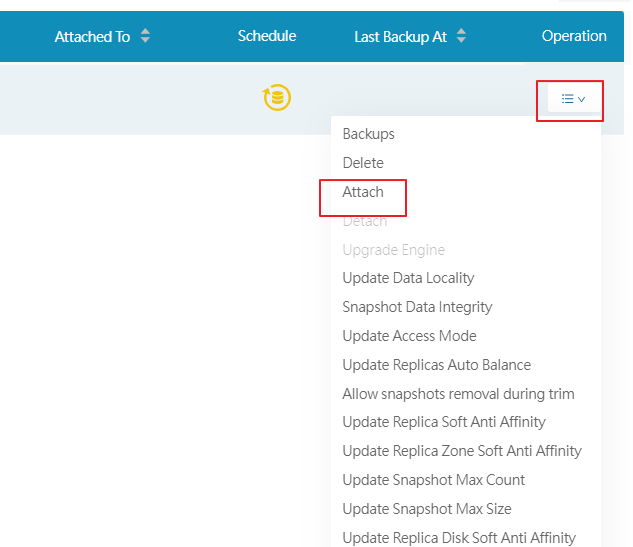
步骤4

2. 创建iscsi volume, 并验证状态
Longhorn 部署完成后,使用 UI 创建新卷,将frontend设置为“iSCSI”,然后确保它已attached 到集群中的主机。验证其状态:
$. kubectl get lhv test-volume-iscsi -n longhorn-system
NAME                DATA ENGINE   STATE      ROBUSTNESS   SCHEDULED   SIZE         NODE          AGE
test-volume-iscsi   v1            attached   healthy                  2147483648   k8s-infra01   105m

# ======================== 参考 ============================ #
# 注: lhv 是 longhorn volume 资源的简称
$ kubectl get lhv test -n longhorn-system
NAME   STATE      ROBUSTNESS   SCHEDULED   SIZE          NODE             AGE
test   attached   healthy      True        21474836480   192.168.20.184   25s
3. 获取iSCSI volume的iSCSI endpoint
通过 UI(在“卷详细信息”下)或kubectl, 获取volume的 iSCSI endpoint.
通过kubectl的方式为:
$. kubectl get lhe -n longhorn-system
NAME                    DATA ENGINE   STATE     NODE          INSTANCEMANAGER                                     IMAGE                                    AGE
test-volume-iscsi-e-0   v1            running   k8s-infra01   instance-manager-1388698f2508ae1055185ec20ce07491   longhornio/longhorn-engine:master-head   8m7s

$. kubectl get lhe test-volume-iscsi-e-0 \
-n longhorn-system \
-o jsonpath='{.status.endpoint}'
# 输出
iscsi://10.233.94.197:3260/iqn.2019-10.io.longhorn:test-volume-iscsi/1

kubectl get lhe sts-iscsi-volume01-e-0 \
-n longhorn-system \
-o jsonpath='{.status.endpoint}'

# ======================== 参考 ============================ #
# 注: lhv 是 longhorn volume 资源的简称
$ kubectl get lhe -n longhorn-system
NAME              STATE     NODE             INSTANCEMANAGER               IMAGE                               AGE
test-e-b8eb676b   running   192.168.20.184   instance-manager-e-baea466a   longhornio/longhorn-engine:v1.1.2   17m

$ kubectl get lhe test-e-b8eb676b -n longhorn-system -o jsonpath='{.status.endpoint}'
iscsi://10.0.2.24:3260/iqn.2019-10.io.longhorn:test/1
4. 将 iSCSI 启动器(客户端)连接到 Longhorn 卷(可选)
Connect iSCSI initiator (client) to Longhorn volume
将集群外部虚拟机连接到目标集群中的 Longhorn 卷:
# iscsi://10.233.94.197:3260/iqn.2019-10.io.longhorn:test-volume-iscsi/1
$. iscsiadm --mode discoverydb \
--type sendtargets \
--portal 10.233.94.197 \
--discover 10.233.94.197:3260,1 \
iqn.2019-10.io.longhorn:test-volume-iscsi

$. iscsiadm --mode node \
--targetname iqn.2019-10.io.longhorn:test-volume-iscsi \
--portal 10.233.94.197:3260 \
--login

$. iscsiadm --mode node
10.0.2.24:3260,1 iqn.2019-10.io.longhorn:test

# ======================== 参考 ============================ #
$ iscsiadm --mode discoverydb --type sendtargets --portal 10.0.2.24 --discover
10.0.2.24:3260,1 iqn.2019-10.io.longhorn:test

$ iscsiadm --mode node --targetname iqn.2019-10.io.longhorn:test --portal 10.0.2.24:3260 --login

$ iscsiadm --mode node
10.0.2.24:3260,1 iqn.2019-10.io.longhorn:test
5. 验证卷
该卷可用作 /dev/sdb:
$. lsblk
NAME                      MAJ:MIN RM  SIZE RO TYPE MOUNTPOINT
...
sdc                         8:32   0    2G  0 disk

$. journalctl -xn 100 | grep sdc
# 输出
Aug 07 16:52:41 k8s-worker2 kernel: sd 34:0:0:1: [sdc] 4194304 512-byte logical blocks: (2.15 GB/2.00 GiB)
Aug 07 16:52:41 k8s-worker2 kernel: sd 34:0:0:1: [sdc] Write Protect is off
Aug 07 16:52:41 k8s-worker2 kernel: sd 34:0:0:1: [sdc] Mode Sense: 69 00 10 08
Aug 07 16:52:41 k8s-worker2 kernel: sd 34:0:0:1: [sdc] Write cache: disabled, read cache: enabled, supports DPO and FUA
Aug 07 16:52:41 k8s-worker2 kernel: sd 34:0:0:1: [sdc] Attached SCSI disk


$. lsblk /dev/sdc
NAME MAJ:MIN RM SIZE RO TYPE MOUNTPOINT
sdc    8:32   0   2G  0 disk

# 接下来挂载该硬盘, 挂载步骤
  # 建立分区
  $. fdisk /dev/sdc
    # 直接默认回车即可

  # 查看已有分区:
  $. fdisk -l
    Device     Boot Start     End Sectors Size Id Type
    /dev/sdc1        2048 4194303 4192256   2G 83 Linux

  # 格式化分区, 建立文件系统
  $. mkfs.xfs -f /dev/sdc1

  # 挂载到 /test 目录下
  $. mount /dev/sdc1 /test
  # 卸载: umount /dev/sdc1
# ======================== 参考 ============================ #
$ journalctl -xn 100 | grep sdb
Aug 12 09:05:11 longhorn-client kernel: sd 3:0:0:1: [sdb] 41943040 512-byte logical blocks: (21.5 GB/20.0 GiB)
Aug 12 09:05:11 longhorn-client kernel: sd 3:0:0:1: [sdb] Write Protect is off
Aug 12 09:05:11 longhorn-client kernel: sd 3:0:0:1: [sdb] Mode Sense: 69 00 10 08
Aug 12 09:05:11 longhorn-client kernel: sd 3:0:0:1: [sdb] Write cache: enabled, read cache: enabled, supports DPO and FUA
Aug 12 09:05:11 longhorn-client kernel: sd 3:0:0:1: [sdb] Attached SCSI disk

$ lsblk /dev/sdb
NAME MAJ:MIN RM SIZE RO TYPE MOUNTPOINT
sdb    8:16   0  20G  0 disk
6. 通过k8s pod挂载卷
参考: Kubernetes接入iSCSI存储
首先参考《创建iscsi volume》章节,分别创建名为sts-iscsi-volume01, sts-iscsi-volume02, sts-iscsi-volume03的volume.
创建pv, pvc
注: 该pvc只能被一个pod挂载
# vi pvc-longhorn-iscsi.yaml
# kubectl apply -f pvc-longhorn-iscsi.yaml
# kubectl delete -f pvc-longhorn-iscsi.yaml
# kubectl get pvc -n rpp-ns
# kubectl delete pvc pvc-longhorn-iscsi -n rpp-ns
# kubectl describe pvc pvc-longhorn-iscsi -n rpp-ns
# iscsi://10.233.94.197:3260/iqn.2019-10.io.longhorn:test-iscsi-volume/1
apiVersion: v1
kind: PersistentVolume
metadata:
  name: pv-longhorn-iscsi
spec:
  capacity:
    storage: 7Gi
  accessModes:
    - ReadWriteOnce
    #- ReadWriteMany
  iscsi:
    targetPortal: 10.233.94.197:3260 # Target IP:Port
    iqn: iqn.2019-10.io.longhorn:test-iscsi-volume # Target IQN
    lun: 1 # 对应到Target LUN号
    fsType: ext4
    #fsType: xfs
    readOnly: false
---
apiVersion: "v1"
kind: PersistentVolumeClaim
metadata:
  name: pvc-longhorn-iscsi
  namespace: rpp-ns
spec:
  accessModes:
    - "ReadWriteOnce" # iSCSI不支持ReadWriteMany
  resources:
    requests:
      storage: 2Gi
  volumeName: "pv-longhorn-iscsi"
  storageClassName: "" #由于设置了默认的sc,需要强制指定为空,才会使用上面的pv去创建pvc

# ======================== 参考 ============================ #
apiVersion: v1
kind: PersistentVolume
metadata:
  name: test
spec:
  capacity:
    storage: 200Gi
  accessModes:
    - ReadWriteOnce
  iscsi:
    targetPortal: 172.16.28.141:3260 #Target IP:Port
    iqn: iqn.2004-12.com.inspur:mcs.as5300g2.node1 # Target IQN
    lun: 0 # 对应到Target LUN号
    fsType: ext4
    readOnly: false
---
apiVersion: "v1"
kind: PersistentVolumeClaim
metadata:
  name: "test-pvc"
spec:
  accessModes:
    - "ReadWriteOnce" # iSCSI不支持ReadWriteMany
  resources:
    requests:
      storage: "200Gi"
  volumeName: "test"
  storageClassName: "" #由于设置了默认的sc,需要强制指定为空,才会使用test pv去创建pvc
创建POD
# vi pod-rpp-longhorn-iscsi.yaml
# kubectl apply -f pod-rpp-longhorn-iscsi.yaml
# kubectl get pod -n rpp-ns

# kubectl describe pod pod-rpp-longhorn-iscsi -n rpp-ns
# kubectl exec -it -n rpp-ns pod-rpp-longhorn-iscsi -- sh
# kubectl delete -f pod-rpp-longhorn-iscsi.yaml
apiVersion: v1
kind: Pod
metadata:
  name: pod-rpp-longhorn-iscsi
  namespace: rpp-ns
spec:
  nodeSelector:
    #kubernetes.io/hostname: k8s-infra01  # 必须与 longhorn 存储在同一个node上
    kubernetes.io/hostname: k8s-worker2
  containers:
  - name: springboot-rpp-longhorn-iscsi  # 容器名
    image: harbor.echo01.tzncloud.com/my-project/spring-boot-docker2:0.0.1-SNAPSHOT
    volumeMounts:
    - name: loghorn-volume
      mountPath: /data_loghorn
    ports:                 # 端口
    - containerPort: 8600  # 容器暴露的端口
      name: business-port
    - containerPort: 8800
      name: actuator-port
  volumes:
  - name: loghorn-volume
    persistentVolumeClaim:
      claimName: pvc-longhorn-iscsi
7. 通过k8s sts挂载卷
创建 pv
注: 该pvc只能被一个pod挂载
# vi pv-sts-longhorn-iscsi.yaml
# kubectl apply -f pv-sts-longhorn-iscsi.yaml
# kubectl delete -f pv-sts-longhorn-iscsi.yaml
# kubectl get pv

---
# iscsi://10.233.94.197:3260/iqn.2019-10.io.longhorn:sts-iscsi-volume01/1
apiVersion: v1
kind: PersistentVolume
metadata:
  name: pv-sts-iscsi-volume01
spec:
  storageClassName: sts-manual
  capacity:
    storage: 1Gi
  accessModes:
    - ReadWriteOnce
    #- ReadWriteMany
  iscsi:
    targetPortal: 10.233.94.197:3260 # Target IP:Port
    iqn: iqn.2019-10.io.longhorn:sts-iscsi-volume01 # Target IQN
    lun: 1 # 对应到Target LUN号
    fsType: ext4
    #fsType: xfs
    readOnly: false
---
apiVersion: v1
kind: PersistentVolume
metadata:
  name: pv-sts-iscsi-volume02
spec:
  storageClassName: sts-manual
  capacity:
    storage: 1Gi
  accessModes:
    - ReadWriteOnce
    #- ReadWriteMany
  iscsi:
    targetPortal: 10.233.94.197:3260 # Target IP:Port
    iqn: iqn.2019-10.io.longhorn:sts-iscsi-volume02 # Target IQN
    lun: 1 # 对应到Target LUN号
    fsType: ext4
    #fsType: xfs
    readOnly: false
---
apiVersion: v1
kind: PersistentVolume
metadata:
  name: pv-sts-iscsi-volume03
spec:
  storageClassName: sts-manual
  capacity:
    storage: 1Gi
  accessModes:
    - ReadWriteOnce
    #- ReadWriteMany
  iscsi:
    targetPortal: 10.233.94.197:3260 # Target IP:Port
    iqn: iqn.2019-10.io.longhorn:sts-iscsi-volume03 # Target IQN
    lun: 1 # 对应到Target LUN号
    fsType: ext4
    #fsType: xfs
    readOnly: false
创建statefulset
# vi sts-rpp-longhorn-iscsi.yaml
# kubectl apply -f sts-rpp-longhorn-iscsi.yaml
# kubectl get sts,pod,pvc -n rpp-ns
# kubectl get pod -n rpp-ns

# kubectl describe sts-rpp-longhorn-iscsi -n rpp-ns
# kubectl exec -it -n rpp-ns sts-rpp-longhorn-iscsi -- sh
# kubectl delete -f sts-rpp-longhorn-iscsi.yaml
apiVersion: v1
kind: Service
metadata:
  name: springboot-docker2-sts-svc
  namespace: rpp-ns
spec:
  type: NodePort
  selector:     # 标签选择,符合这个标签的 Pod 会作为这个 Service 的 backend。
    app: sts-springboot-docker
  ports:
    - protocol: TCP
      port: 8610        # service暴露在cluster ip上的端口, clusterIP:port 是提供给集群内部客户访问service的入口
      targetPort: 8610  # pod的端口, 从port和nodePort来的流量经过kube-proxy流入到后端pod的targetPort上, 最后进入容器
      nodePort: 30020   # 对外暴露的端口,可以指定, Nodeport端口号范围为: 30000-32767
---
apiVersion: apps/v1
kind: StatefulSet
metadata:
  name: sts-springboot-docker
  namespace: rpp-ns
  labels:
    app: sts-springboot-docker
spec:
  replicas: 3                      # Pod的副本数
  serviceName: springboot-docker2-sts-svc # 必填参数
  selector:
    matchLabels:                     # 标签选择器
      app: sts-springboot-docker   # 选择器,用于匹配Pod的标签,确保Pod属于该sts
  template:                 # Pod的模板信息,根据模板信息来创建Pod
    metadata:               # Pod的元数据
      labels:               # Pod的标签,与Selector中的标签匹配以确保Pod属于该sts
        app: sts-springboot-docker
    spec:
      containers:
      - name: sts-springboot-rpp-longhorn-iscsi  # 容器名
        image: harbor.echo01.tzncloud.com/my-project/spring-boot-docker2:0.0.1-SNAPSHOT
        ports:                 # 端口
        - containerPort: 8600  # 容器暴露的端口
          name: business-port
        - containerPort: 8800
          name: actuator-port
        volumeMounts:
        - name: pvc-sts-longhorn-iscsi
          mountPath: /data_loghorn
      #volumes:
      #- name: loghorn-volume
      #  persistentVolumeClaim:
      #    claimName: pvc-sts-longhorn-iscsi
  volumeClaimTemplates:
  - metadata:
      name: pvc-sts-longhorn-iscsi
    spec:
      accessModes: [ "ReadWriteOnce" ]
      resources:
        requests:
          storage: 1Gi
      storageClassName: sts-manual   # 这里并没有名为sts-manual的sc, 这里只是表示 PV 是手动配置的,而不是通过 StorageClass 动态配置的
六、LongHorn的使用(参考)
创建LongHorn存储类(SC):
接下来,您需要创建一个LongHorn存储类,以便为Kubernetes应用程序提供块存储。您可以将以下内容保存为 longhorn-storageclass.yaml 文件:
sc-longhorn.yaml(use)
# vi sc-longhorn.yaml
# kubectl apply -f sc-longhorn.yaml
# kubectl delete -f sc-longhorn.yaml
# kubectl get sc
# vi sc-longhorn.yaml
# kubectl apply -f sc-longhorn.yaml
# kubectl describe sc longhorn-sc
apiVersion: storage.k8s.io/v1
kind: StorageClass
metadata:
  name: longhorn-sc
provisioner: driver.longhorn.io
allowVolumeExpansion: true
reclaimPolicy: Delete
parameters:
  numberOfReplicas: "1"
  staleReplicaTimeout: "2880"
---
apiVersion: storage.k8s.io/v1
kind: StorageClass
metadata:
  name: longhorn-sc
  # namespace: rpp-ns # sc 没有 namespace 属性
provisioner: driver.longhorn.io
allowVolumeExpansion: true
reclaimPolicy: Delete
#parameters:
#  numberOfReplicas: "1"
#  staleReplicaTimeout: "2880"
---
kind: StorageClass
apiVersion: storage.k8s.io/v1
metadata:
  name: longhorn-test
provisioner: driver.longhorn.io
allowVolumeExpansion: true
reclaimPolicy: Delete
# reclaimPolicy: Retain # 删除pvc时保留pv
volumeBindingMode: Immediate
parameters:
  numberOfReplicas: "3"
  staleReplicaTimeout: "2880"
  fromBackup: ""
  fsType: "ext4"
官方Storage Class:
storage-class-parameters
kind: StorageClass
apiVersion: storage.k8s.io/v1
metadata:
  name: longhorn-test
provisioner: driver.longhorn.io
allowVolumeExpansion: true
reclaimPolicy: Delete
# reclaimPolicy: Retain # 删除pvc时保留pv
volumeBindingMode: Immediate
parameters:
  numberOfReplicas: "3"
  staleReplicaTimeout: "2880"
  fromBackup: ""
  fsType: "ext4"
#  mkfsParams: ""
#  migratable: false
#  encrypted: false
#  dataLocality: "disabled"
#  replicaAutoBalance: "ignored"
#  diskSelector: "ssd,fast"
#  nodeSelector: "storage,fast"
#  recurringJobSelector: '[{"name":"snap-group", "isGroup":true},
#                          {"name":"backup", "isGroup":false}]'
#  backingImageName: ""
#  backingImageChecksum: ""
#  backingImageDataSourceType: ""
#  backingImageDataSourceParameters: ""
#  unmapMarkSnapChainRemoved: "ignored"
#  disableRevisionCounter: false
#  replicaSoftAntiAffinity: "ignored"
#  replicaZoneSoftAntiAffinity: "ignored"
#  replicaDiskSoftAntiAffinity: "ignored"
#  nfsOptions: "soft,timeo=150,retrans=3"
#  v1DataEngine: true
#  v2DataEngine: false
#  freezeFSForSnapshot: "ignored"
创建PVC(PersistentVolumeClaim):
pvc-longhorn.yaml (use)
现在,您可以为应用程序创建一个PersistentVolumeClaim,以便使用LongHorn提供的块存储。您可以将以下内容保存为 longhorn-pvc.yaml 文件:
# vi pvc-longhorn.yaml
# kubectl apply -f pvc-longhorn.yaml --dry-run=client
# kubectl apply -f pvc-longhorn.yaml
# kubectl delete -f pvc-longhorn.yaml
# kubectl get pvc -n rpp-ns
# kubectl delete pvc longhorn-pvc -n rpp-ns
# kubectl describe pvc longhorn-pvc -n rpp-ns
apiVersion: v1
kind: PersistentVolumeClaim
metadata:
  name: longhorn-pvc # 该pvc只能被同一个node上的pod使用
  namespace: rpp-ns
spec:
  storageClassName: longhorn-sc
  accessModes:
  #- ReadWriteOnce
  - ReadWriteMany
  resources:
    requests:
storage: 10Gipvc-longhorn2.yaml(use)
# vi pvc-longhorn2.yaml
# kubectl apply -f pvc-longhorn2.yaml
# kubectl delete -f pvc-longhorn2.yaml
# kubectl get pvc -n rpp-ns
apiVersion: v1
kind: PersistentVolumeClaim
metadata:
  name: longhorn-pvc2
  namespace: rpp-ns
spec:
  storageClassName: longhorn-sc
  accessModes:
  - ReadWriteOnce
  resources:
    requests:
      storage: 10Gi
Longhorn PVC with Block Volume Mode - 官方
对于具有块卷模式的 PVC,Kubelet 在容器内提供块设备时,绝不会尝试更改其权限和所有权。您必须在 pod.spec.securityContext 中设置正确的组 ID,以便 pod 能够读取和写入块设备或以 root 身份运行容器。
默认情况下,Longhorn 将块设备放入组 ID 6,该组通常与“磁盘”组相关联。因此,使用具有块卷模式的 Longhorn PVC 的 pod 必须在 pod.spec.securityContext 中设置组 ID 6,或以 root 身份运行。例如:
在 pod.spec.securityContext 中设置组 ID 为 6 的 Pod:
apiVersion: v1
kind: PersistentVolumeClaim
metadata:
  name: longhorn-block-vol
spec:
  accessModes:
    - ReadWriteOnce
  volumeMode: Block  # or Filesystem
  storageClassName: longhorn
  resources:
    requests:
      storage: 2Gi
---
apiVersion: v1
kind: Pod
metadata:
  name: block-volume-test
  namespace: default
spec:
  securityContext:
    runAsGroup: 1000
    runAsNonRoot: true
    runAsUser: 1000
    supplementalGroups:
    - 6 # sets the group id 6
  containers:
    - name: block-volume-test
      image: ubuntu:20.04
      command: ["sleep", "360000"]
      imagePullPolicy: IfNotPresent
      volumeDevices:
        - devicePath: /dev/longhorn/testblk
          name: block-vol
  volumes:
    - name: block-vol
      persistentVolumeClaim:
        claimName: longhorn-block-vol
以 root 身份运行的 Pod
apiVersion: v1
kind: PersistentVolumeClaim
metadata:
  name: longhorn-block-vol
spec:
  accessModes:
    - ReadWriteOnce
  volumeMode: Block
  storageClassName: longhorn
  resources:
    requests:
      storage: 2Gi
---
apiVersion: v1
kind: Pod
metadata:
  name: block-volume-test
  namespace: default
spec:
  containers:
    - name: block-volume-test
      image: ubuntu:20.04
      command: ["sleep", "360000"]
      imagePullPolicy: IfNotPresent
      volumeDevices:
        - devicePath: /dev/longhorn/testblk
          name: block-vol
  volumes:
    - name: block-vol
      persistentVolumeClaim:
        claimName: longhorn-block-vol
创建POD
一旦PVC创建成功,您可以将其绑定到您的应用程序中。您可以添加一个示例应用程序Pod,并将挂载PVC作为卷。例如,您可以将以下内容保存为 app-pod.yaml 文件:
pod-rpp-longhorn.yaml(use)
# vi pod-rpp-longhorn.yaml
# kubectl apply -f pod-rpp-longhorn.yaml --dry-run=client
# kubectl apply -f pod-rpp-longhorn.yaml
# kubectl get pod -n rpp-ns

# kubectl describe pod rpp-longhorn-pod -n rpp-ns
# kubectl exec -it -n rpp-ns rpp-longhorn-pod -- sh
# kubectl delete -f rpp-longhorn-pod.yaml
apiVersion: v1
kind: Pod
metadata:
  name: rpp-longhorn-pod
  namespace: rpp-ns
spec:
  nodeSelector:
    kubernetes.io/hostname: k8s-infra01  # 必须与 longhorn 存储在同一个node上
  containers:
  - name: springboot-docker-longhorn  # 容器名
    image: harbor.echo01.tzncloud.com/my-project/spring-boot-docker2:0.0.1-SNAPSHOT
    volumeMounts:
    - name: loghorn-volume
      mountPath: /data_loghorn
    ports:                 # 端口
    - containerPort: 8600  # 容器暴露的端口
      name: business-port
    - containerPort: 8800
      name: actuator-port
  volumes:
  - name: loghorn-volume
    persistentVolumeClaim:
      claimName: longhorn-pvc
      #claimName: test-volume3-pvc
---
# 参考
# vi app-pod.yaml
# kubectl apply -f app-pod.yaml
apiVersion: v1
kind: Pod
metadata:
  name: app-pod
spec:
  containers:
  - name: app-container
    image: your-app-image
    volumeMounts:
    - name: longhorn-volume
      mountPath: /data
  volumes:
  - name: longhorn-volume
    persistentVolumeClaim:
claimName: longhorn-volumepod-rpp-longhorn2.yaml(use)
# 再创建一个pod, 查看pod中挂载的longhorn目录下是否有第一个pod创建的文件
# vi pod-rpp-longhorn2.yaml
# kubectl apply -f pod-rpp-longhorn2.yaml --dry-run=client
# kubectl apply -f pod-rpp-longhorn2.yaml
# kubectl get pod -n rpp-ns -o wide

# kubectl describe pod rpp-longhorn-pod2 -n rpp-ns
# kubectl exec -it -n rpp-ns rpp-longhorn-pod2 -- sh
# kubectl delete -f pod-rpp-longhorn2.yaml
apiVersion: v1
kind: Pod
metadata:
  name: rpp-longhorn-pod2
  namespace: rpp-ns
spec:
  nodeSelector:
    #kubernetes.io/hostname: k8s-worker2
    kubernetes.io/hostname: k8s-infra01
  containers:
  - name: springboot-docker-longhorn2  # 容器名
    image: harbor.echo01.tzncloud.com/my-project/spring-boot-docker2:0.0.1-SNAPSHOT
    volumeMounts:
    - name: loghorn-volume
      mountPath: /data_longhorn
    ports:                 # 端口
    - containerPort: 8600  # 容器暴露的端口
      name: business-port
    - containerPort: 8800
      name: actuator-port
  volumes:
  - name: loghorn-volume
    persistentVolumeClaim:
      #claimName: longhorn-pvc2
      claimName: longhorn-pvc # 如果使用longhorn-pvc, 则与rpp-longhorn-pod共享存储
PVC 扩容
查看 StorageClass 是否支持动态扩容:
如果有参数 allowVolumeExpansion: true 则表示支持。
在 Longhorn 界面上直接就能进行扩容:

七、关于Volume的说明
删除 Longhorn Volumes
Deleting Volumes Through Kubernetes
通过删除使用已配置 Longhorn 卷的 PersistentVolumeClaim 来通过 Kubernetes 删除卷。这将导致 Kubernetes 清理 PersistentVolume,然后删除 Longhorn 中的卷。
注意:仅当卷由 StorageClass 配置并且 Longhorn 卷的 PersistentVolume 的回收策略设置为删除时,此方法才有效。
Deleting Volumes Through Longhorn
- 所有
Longhorn卷(无论它们是如何创建的)都可以通过Longhorn UI删除。 - 要删除单个卷,请转到 UI 中的“卷”页面。在“操作”下拉菜单下,选择“删除”。在删除卷之前,系统会提示您确认。
- 要同时删除多个卷,您可以在“卷”页面上检查多个卷,然后选择顶部的“删除”。
- 注意:
- 如果 Longhorn 检测到卷与 PersistentVolume 或 PersistentVolumeClaim 绑定,则删除卷后这些资源也将被删除。
- 在继续删除之前,您会在 UI 中收到有关此情况的警告。
- Longhorn 还会在删除附加卷时向您发出警告,因为它可能正在使用中。
分离 Longhorn 卷(Detach Longhorn Volumes)
使用 Longhorn 卷关闭所有 Kubernetes Pod,以便分离卷。
实现此目的的最简单方法是删除所有工作负载,然后在升级后重新创建它们。
如果不希望这样做,则可能会暂停某些工作负载。
在本节中,您将了解如何修改每个工作负载以关闭其 Pod。
Deployment
Edit the deployment with kubectl edit deploy/<name>.
Set .spec.replicas to 0.
StatefulSet
使用 kubectl edit statefulset/<name> 编辑 statefulset。
将 .spec.replicas 设置为 0。
DaemonSet
无法暂停此工作负载。
使用kubectl delete ds/<name>删除守护程序集。
Pod
使用 kubectl delete pod/<name> 删除 Pod。
无法暂停未由工作负载控制器管理的 Pod。
CronJob
使用kubectl edit cronjob/<name>编辑cronjob。
将.spec.suspend设置为true。
等待当前正在执行的任何作业完成,或通过删除相关 pod 来终止它们。
Job
考虑允许单次运行作业完成。
否则,使用 kubectl delete job/<name> 删除作业。
ReplicaSet副本集
使用kubectl edit replicaset/<name>编辑副本集。
将.spec.replicas设置为0。
ReplicationController复制控制器
使用kubectl edit rc/<name>编辑复制控制器。
将.spec.replicas设置为0。
等待 Kubernetes 使用的卷完成分离。
然后从 Longhorn UI 分离所有剩余卷。这些卷很可能是通过 Longhorn UI 或 REST API 在 Kubernetes 之外创建和附加的。
ReadWriteMany (RWX) Volume
Longhorn 通过位于share-manager pods中的 NFSv4 服务器公开常规 Longhorn 卷,从而支持 ReadWriteMany (RWX) 卷。
RWX 卷仅可通过 NFS 挂载访问。默认情况下, Longhorn 使用 NFS 版本 4.1, 并带有 softerr 挂载选项、timeo 值为"600"、retrans 值为"5"。
使用 Longhorn Volume 作为 iSCSI Target
Longhorn 支持 iSCSI 目标前端模式(frontend mode)。可以通过任何 iSCSI 客户端(包括 open-iscsi)和虚拟机管理程序(如 KVM)连接到它,只要它与 Longhorn 系统位于同一网络中即可。
Longhorn CSI 驱动程序不支持 iSCSI 模式。
即:iscsi类型的volume不支持使用longhorn类型的sc的pvc挂载
要使用 iSCSI 目标前端模式启动卷,请在创建卷时选择 iSCSI 作为前端。
连接卷后,您将在端点字段中看到类似以下内容:
# use
# 查看登录状态
iscsiadm -m session –R

# use
iscsi://192.168.1.181:3260/iqn.2014-09.com.rancher:test-volume/1
# 验证
$. iscsiadm --version

iscsiadm --mode discoverydb \
--type sendtargets \
--portal 192.168.1.181:3260 --discover

# ==================== 参考 =========================
iscsi://10.42.0.21:3260/iqn.2014-09.com.rancher:testvolume/1

kubectl get lhe -n longhorn-system- IP 和端口为 10.42.0.21:3260。
- 目标名称为 iqn.2014-09.com.rancher:testvolume。
- 卷名称为 testvolume。
- LUN 编号为 1。Longhorn 始终使用 LUN 1。
上述信息可用于使用 iSCSI 客户端连接到 Longhorn 提供的 iSCSI 目标。
