Q: 论文如何解决这个问题?
A: 论文通过提出PETRv2框架来解决多相机图像的3D感知问题,具体方法包括以下几个关键点:
时间建模(Temporal Modeling):
- 通过3D坐标对齐(3D Coordinates Alignment)实现不同帧之间的时间对齐,将上一帧的3D坐标转换到当前帧的坐标系中,以增强目标定位和速度估计。
多任务学习(Multi-task Learning):
引入任务特定的查询(task-specific queries),
- 例如车道检测的3D锚定车道和BEV分割的seg查询,这些查询在不同的空间中初始化,并与transformer解码器中的多视图图像特征进行交互。
特征引导的位置编码器(Feature-guided Position Encoder, FPE):
改进原有的3D位置嵌入(3D PE),
- 通过FPE使3D PE依赖于输入图像数据,利用2D图像特征提供的信息(如深度)来指导查询学习。
鲁棒性分析(Robustness Analysis):
对PETRv2进行详细的鲁棒性分析,
- 考虑了包括相机外参噪声、相机缺失和时间延迟等多种噪声情况,以评估和提高系统在现实世界条件下的性能和可靠性。
结构图
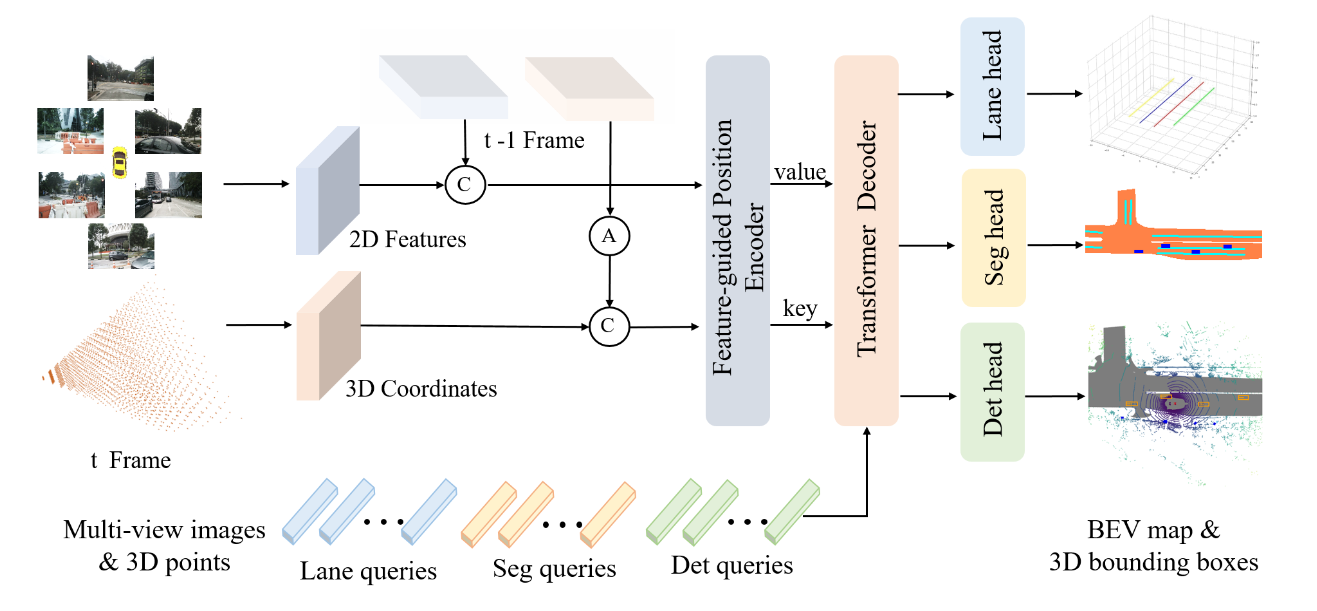
- 2D backbone(例如 ResNet-50),3D 坐标是从相机截锥空间生成的,考虑到自我运动,首先通过姿态变换将前一帧t−1的三维坐标转化为当前帧t的坐标系。
- 将相邻帧的2D特征和3D坐标分别连接在一起,输入到特征引导位置编码器(FPE)。之后,使用 FPE 为变压器解码器生成键和值组件.
- 特定于任务的查询,包括从不同空间初始化的检测查询(det 查询)和分割查询(seg 查询)(lane 查询)被馈送到变压器解码器并与多视图图像特征交互。
- 更新后的查询被输入到特定于任务的头部以进行最终预测
Q: 论文如何解决这个问题?
A: 论文通过提出PETRv2框架来解决多相机图像的3D感知问题,具体方法包括以下几个关键点:
时间建模(Temporal Modeling):
通过3D坐标对齐(3D Coordinates Alignment)实现不同帧之间的时间对齐,将上一帧的3D坐标转换到当前帧的坐标系中,以增强目标定位和速度估计。
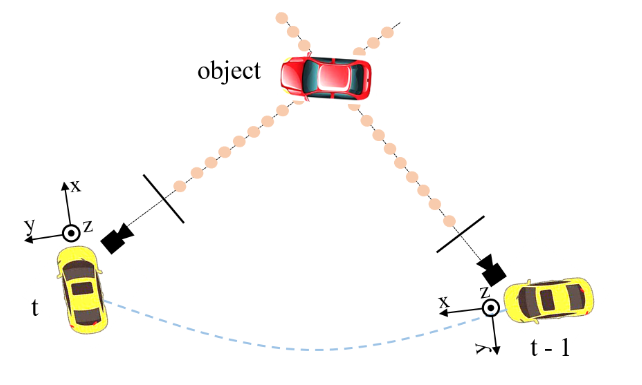
P 3 d t = T t − 1 t P 3 d t − 1 \bm{P^t_{3d}} = \bm{T^t_{t-1}}\bm{P^{t-1}_{3d}} P3dt=Tt−1tP3dt−1
多任务学习(Multi-task Learning):
引入任务特定的查询(task-specific queries),例如车道检测的3D锚定车道和BEV分割的seg查询,这些查询在不同的空间中初始化,并与transformer解码器中的多视图图像特征进行交互。
3D object detection

Det Queries: 3D Anchor Points (~1500)+ MLP
Segmentation

Seg Queries:
- 我们引入了用于 BEV 分割的 seg 查询,每个 seg 查询对应于一个特定的Patch(例如,BEV map ( 25 × 25 像素)。
- seg 查询在 BEV 空间中使用固定的锚点进行初始化,类似于 PETR 中检测查询 (det 查询) 的生成。然后使用具有两个线性层的简单 MLP 将这些锚点投影到 seg Queries。
特征引导的位置编码器(Feature-guided Position Encoder, FPE):
改进原有的3D位置嵌入(3D PE),通过FPE使3D PE依赖于输入图像数据,利用2D图像特征提供的信息(如深度)来指导查询学习。

P
E
i
3
d
(
t
)
=
ξ
(
F
i
(
t
)
)
∗
ψ
(
P
l
(
t
)
i
(
t
)
)
\bm{{PE}^{3d}_i (t)} = \xi(\bm{F_i(t)}) * \psi(\bm{P_{l(t)}^i (t)})
PEi3d(t)=ξ(Fi(t))∗ψ(Pl(t)i(t))
ξ : MLP + sigmoid function
ψ(.):一个简单的多层感知(MLP)
key: 2D feature + 3D PE
value: 2D Feature
def position_embeding(self, img_feats, img_metas, masks=None):
    eps = 1e-5  # 用于避免除零错误的极小值

    # 获取填充后的图片高度和宽度 (pad_h, pad_w),以及其它相关信息
    pad_h, pad_w, _ = img_metas[0]['pad_shape'][0]

    # 获取特征图的形状信息:B(批次大小),N(图像数量),C(通道数),H(高度),W(宽度)
    B, N, C, H, W = img_feats[self.position_level].shape

    # 计算每个像素点在填充后图像中的实际高度坐标和宽度坐标
    coords_h = torch.arange(H, device=img_feats[0].device).float() * pad_h / H
    coords_w = torch.arange(W, device=img_feats[0].device).float() * pad_w / W

    if self.LID:
        # 如果使用 LID 方法计算深度坐标
        index = torch.arange(start=0, end=self.depth_num, step=1, device=img_feats[0].device).float()
        index_1 = index + 1
        bin_size = (self.position_range[3] - self.depth_start) / (self.depth_num * (1 + self.depth_num))
        coords_d = self.depth_start + bin_size * index * index_1
    else:
        # 否则,直接计算深度坐标
        index = torch.arange(start=0, end=self.depth_num, step=1, device=img_feats[0].device).float()
        bin_size = (self.position_range[3] - self.depth_start) / self.depth_num
        coords_d = self.depth_start + bin_size * index

    # 获取深度坐标的数量 D
    D = coords_d.shape[0]

    # 生成坐标网格,并将其维度排列为 W, H, D, 3
    coords = torch.stack(torch.meshgrid([coords_w, coords_h, coords_d])).permute(1, 2, 3, 0)

    # 添加第四维坐标(均为1),形成 W, H, D, 4
    coords = torch.cat((coords, torch.ones_like(coords[..., :1])), -1)

    # 计算 x 和 y 坐标的变换,确保 z 坐标不为零
    coords[..., :2] = coords[..., :2] * torch.maximum(coords[..., 2:3], torch.ones_like(coords[..., 2:3])*eps)

    # 生成 img2lidar 矩阵列表
    img2lidars = []
    for img_meta in img_metas:
        img2lidar = []
        for i in range(len(img_meta['lidar2img'])):
            # 计算每个 lidar2img 矩阵的逆矩阵
            img2lidar.append(np.linalg.inv(img_meta['lidar2img'][i]))
        img2lidars.append(np.asarray(img2lidar))

    # 将 img2lidar 列表转换为 numpy 数组
    img2lidars = np.asarray(img2lidars)

    # 将 numpy 数组转换为 tensor,形状为 (B, N, 4, 4)
    img2lidars = coords.new_tensor(img2lidars)

    # 调整 coords 和 img2lidars 的维度,并进行重复操作
    coords = coords.view(1, 1, W, H, D, 4, 1).repeat(B, N, 1, 1, 1, 1, 1)
    img2lidars = img2lidars.view(B, N, 1, 1, 1, 4, 4).repeat(1, 1, W, H, D, 1, 1)

    # 计算3D坐标,将坐标从齐次坐标变换到3D坐标
    coords3d = torch.matmul(img2lidars, coords).squeeze(-1)[..., :3]

    # 对3D坐标进行归一化
    coords3d[..., 0:1] = (coords3d[..., 0:1] - self.position_range[0]) / (self.position_range[3] - self.position_range[0])
    coords3d[..., 1:2] = (coords3d[..., 1:2] - self.position_range[1]) / (self.position_range[4] - self.position_range[1])
    coords3d[..., 2:3] = (coords3d[..., 2:3] - self.position_range[2]) / (self.position_range[5] - self.position_range[2])

    # 创建掩码,检查是否有坐标超出范围
    coords_mask = (coords3d > 1.0) | (coords3d < 0.0)

    # 计算掩码,若超过一半的深度坐标超出范围,则设置掩码
    coords_mask = coords_mask.flatten(-2).sum(-1) > (D * 0.5)

    # 合并输入掩码和计算的坐标掩码
    coords_mask = masks | coords_mask.permute(0, 1, 3, 2)

    # 调整 coords3d 的维度
    coords3d = coords3d.permute(0, 1, 4, 5, 3, 2).contiguous().view(B*N, -1, H, W)

    # 计算逆sigmoid
    coords3d = inverse_sigmoid(coords3d)

    # 计算位置嵌入
    coords_position_embeding = self.position_encoder(coords3d)

    # 返回位置嵌入和掩码
    return coords_position_embeding.view(B, N, self.embed_dims, H, W), coords_mask
鲁棒性分析(Robustness Analysis):
对PETRv2进行详细的鲁棒性分析,考虑了包括相机外参噪声、相机缺失和时间延迟等多种噪声情况,以评估和提高系统在现实世界条件下的性能和可靠性。

外参误差:外参误差在现实中很常见,例如汽车碰撞引起的相机抖动或环境力的相机偏移
Rmax = M表示三个轴的最大角度为M。

相机丢失:当一台相机发生故障或被遮挡时,就会发生相机图像未命中。

相机时间延迟:由于相机曝光时间,相机时间延迟也是一个挑战,尤其是在夜间。
T ≈ 0.083s

3D object detection
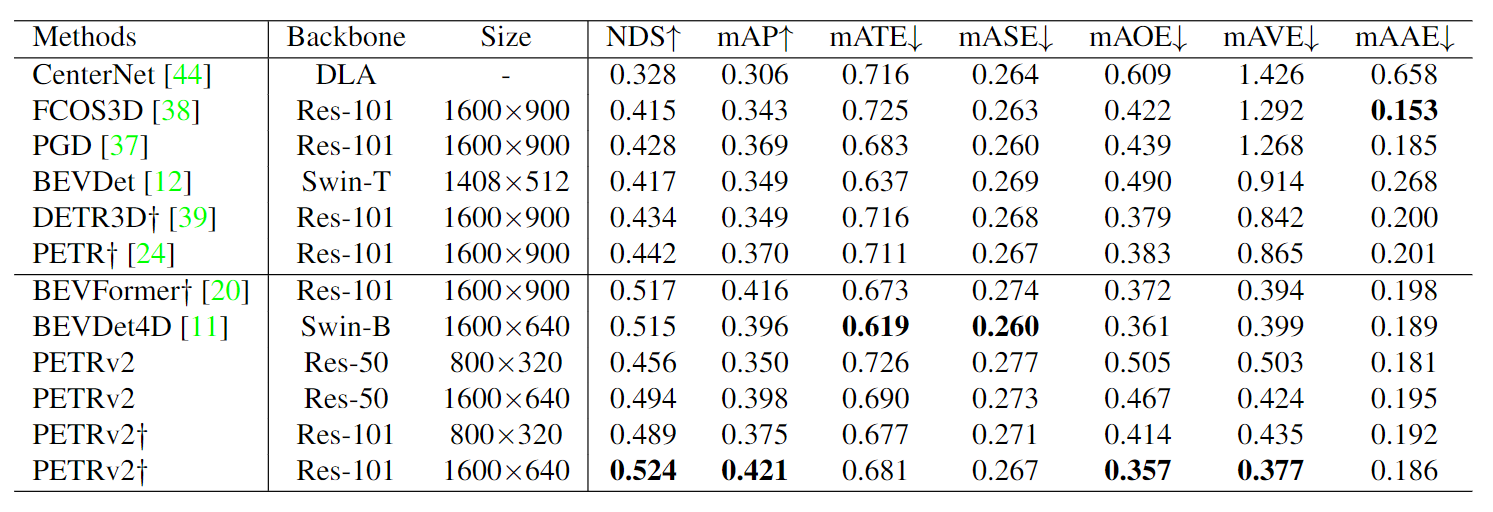
BEV segmentation
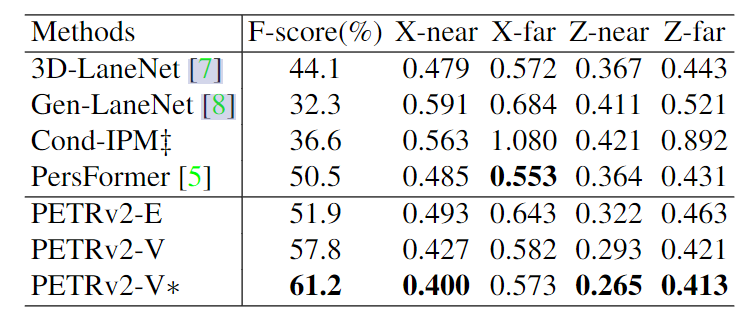
3D lane detection
