程序初始化前线使用Components工具对时钟和GPIO进行配置,然后再main函数里面初始化。
时钟配置参考:
S32K144之时钟配置 - 明明1109 - 博客园 (cnblogs.com)
gpio配置
S32K SDK使用详解之PinSettings组件配置与使用详解(S32K1xx PORT 和GPIO模块)_嵌入式与汽车电子开发-商业新知 (shangyexinzhi.com)
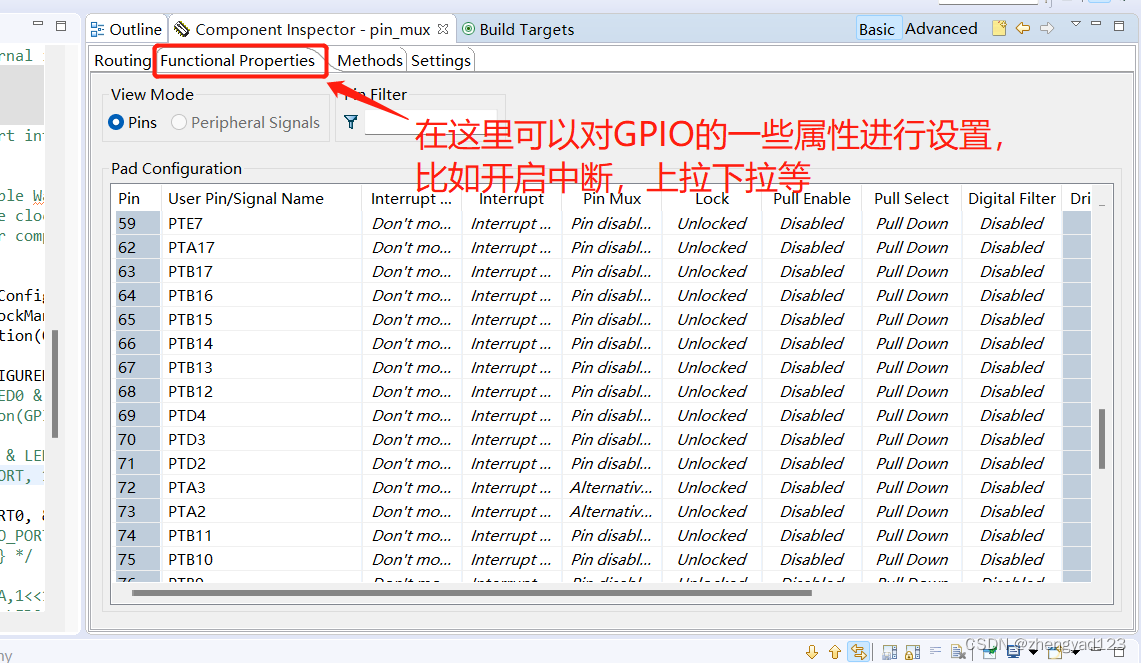


1,S32K144编程第一步先初始化时钟
/* Initialize and configure clocks
   * 	-	see clock manager component for details
   */
  CLOCK_SYS_Init(g_clockManConfigsArr, CLOCK_MANAGER_CONFIG_CNT,
						g_clockManCallbacksArr, CLOCK_MANAGER_CALLBACK_CNT);
  CLOCK_SYS_UpdateConfiguration(0U, CLOCK_MANAGER_POLICY_AGREEMENT);
2,初始化GPIO
PINS_DRV_Init(NUM_OF_CONFIGURED_PINS, g_pin_mux_InitConfigArr); //初始化IO初始化之后就可以,在程序用调用相关GPIO的驱动程序了。
int main(void)
{
  /* Write your local variable definition here */

  /*** Processor Expert internal initialization. DON'T REMOVE THIS CODE!!! ***/
  #ifdef PEX_RTOS_INIT
    PEX_RTOS_INIT();                   /* Initialization of the selected RTOS. Macro is defined by the RTOS component. */
  #endif
  /*** End of Processor Expert internal initialization.                    ***/

  /* Write your code here */
  //  WDOG_disable();/* Disable Watchdog in case it is not done in startup code */
  /* Initialize and configure clocks
    * 	-	see clock manager component for details
    */

   CLOCK_SYS_Init(g_clockManConfigsArr, CLOCK_MANAGER_CONFIG_CNT,
 						g_clockManCallbacksArr, CLOCK_MANAGER_CALLBACK_CNT);
   CLOCK_SYS_UpdateConfiguration(0U, CLOCK_MANAGER_POLICY_AGREEMENT);

   PINS_DRV_Init(NUM_OF_CONFIGURED_PINS, g_pin_mux_InitConfigArr); //初始化IO
   /* Output direction for LED0 & LED1 */
  // PINS_DRV_SetPinsDirection(GPIO_PORT, (1 << LED1));

    /* Set Output value LED0 & LED1 */
   //PINS_DRV_SetPins(GPIO_PORT, 1 << LED1);

   LPUART_DRV_Init(INST_LPUART0, &lpuart0_State, &lpuart0_InitConfig0); //初始化串口
   // PINS_DRV_ClearPins(GPIO_PORT, 1 << LED2);
  /* For example: for(;;) { } */
  while(1){
	  // PINS_DRV_SetPins(PTA,1<<15);//将PTA15设置为高
	  /* Toggle output value LED0 & LED1 */
		//PINS_DRV_TogglePins(GPIO_PORT, ((1 << LED1)));
	  	LED0(0);
	  	delay_ms(1000);
	  	LED0(1);
	  	delay_ms(1000);
	  	u0_printf("KEY1 按下\r\n");
	  //PINS_DRV_ClearPins(PTA,1<<15);//将PTA15设置为低
	  //PINS_DRV_ClearPins(PTE,1<<6);//将PTE6设置为低
  }

  /*** Don't write any code pass this line, or it will be deleted during code generation. ***/
  /*** RTOS startup code. Macro PEX_RTOS_START is defined by the RTOS component. DON'T MODIFY THIS CODE!!! ***/
  #ifdef PEX_RTOS_START
    PEX_RTOS_START();                  /* Startup of the selected RTOS. Macro is defined by the RTOS component. */
  #endif
  /*** End of RTOS startup code.  ***/
  /*** Processor Expert end of main routine. DON'T MODIFY THIS CODE!!! ***/
  for(;;) {
    if(exit_code != 0) {
      break;
    }
  }
  return exit_code;
  /*** Processor Expert end of main routine. DON'T WRITE CODE BELOW!!! ***/
} /*** End of main routine. DO NOT MODIFY THIS TEXT!!! ***/
3,常用函数介绍
1,初始化函数
/*FUNCTION**********************************************************************
 *
 * Function Name : PINS_DRV_Init
 * Description   : This function configures the pins with the options provided
 * in the given structure.
 *
 * Implements    : PINS_DRV_Init_Activity
 *END**************************************************************************/
status_t PINS_DRV_Init(uint32_t pinCount,
                       const pin_settings_config_t config[])
{
    uint32_t i;
    for (i = 0U; i < pinCount; i++)
    {
        PINS_Init(&config[i]);
    }

    return STATUS_SUCCESS;
}

2,将GPIO输出置高
/*FUNCTION**********************************************************************
 *
 * Function Name : PINS_DRV_SetPins
 * Description   : This function configures output pins listed in parameter pins (bits that are
 * '1') to have a value of 'set' (HIGH). Pins corresponding to '0' will be
 * unaffected.
 *
 * Implements    : PINS_DRV_SetPins_Activity
 *END**************************************************************************/
void PINS_DRV_SetPins(GPIO_Type * const base,
                      pins_channel_type_t pins)
{
    PINS_GPIO_SetPins(base, pins);
}

3,将GPIO输出置低
/*FUNCTION**********************************************************************
 *
 * Function Name : PINS_DRV_ClearPins
 * Description   : This function configures output pins listed in parameter pins (bits that are
 * '1') to have a 'cleared' value (LOW). Pins corresponding to '0' will be
 * unaffected.
 *
 * Implements    : PINS_DRV_ClearPins_Activity
 *END**************************************************************************/
void PINS_DRV_ClearPins(GPIO_Type * const base,
                        pins_channel_type_t pins)
{
    PINS_GPIO_ClearPins(base, pins);
}

4,将GPIO状态输出反转
/*FUNCTION**********************************************************************
 *
 * Function Name : PINS_DRV_TogglePins
 * Description   : This function toggles output pins listed in parameter pins (bits that are
 * '1'). Pins corresponding to '0' will be unaffected.
 *
 * Implements    : PINS_DRV_TogglePins_Activity
 *END**************************************************************************/
void PINS_DRV_TogglePins(GPIO_Type * const base,
                         pins_channel_type_t pins)
{
    PINS_GPIO_TogglePins(base, pins);
}

5,输入时,读取GPIO状态
/*FUNCTION**********************************************************************
 *
 * Function Name : PINS_DRV_ReadPins
 * Description   : This function returns the current input values from a port. Only pins
 * configured as input will have meaningful values.
 *
 * Implements    : PINS_DRV_ReadPins_Activity
 *END**************************************************************************/
pins_channel_type_t PINS_DRV_ReadPins(const GPIO_Type * const base)
{
    return PINS_GPIO_ReadPins(base);
}
/* Initialize pins
* - See PinSettings component for more info
*/
//GPIO初始化
PINS_DRV_Init(NUM_OF_CONFIGURED_PINS, g_pin_mux_InitConfigArr);
/* Output direction for LED0 & LED1 */
PINS_DRV_SetPinsDirection(PTA, (1 << 15)|(1 << 14));
/* Set Output value LED0 & LED1 */
PINS_DRV_SetPins(PTA, (1 << 15)|(1 << 14));
PINS_DRV_ClearPins(PTA, (1 << 15)|(1 << 14));
        uint32_t gpio_state=PINS_DRV_ReadPins(PTD);
        if(gpio_state&((1<<8)|(1<<9)|(1<<10)|(1<<11)|(1<<12)))//5个引脚输入口
		{
			PINS_DRV_ClearPins(PTA, 1 << 15);
		}else{
			PINS_DRV_SetPins(PTA, 1 << 15);
		}


