目录
- 一、工程结构介绍
- 1、工程结构
- 2、模块说明
- 二、创建父工程
- 1、创建sprigboot工程yygh_parent
- 2、删除 src 目录
- 3、配置 pom.xml
- 4、在pom.xml中添加依赖的版本
- 三、搭建model模块
- 1、在父工程yygh_parent下面创建模块model
- 2、添加项目需要的依赖
- 3、复制项目实体类和VO类
- 四、搭建service模块
- 1、在父工程yygh_parent下面创建模块service
- 2、添加模块类型是pom
- 3、添加项目需要的依赖
- 五、搭建医院模块service_hosp模块
- 1、在父工程service模块下面创建子模块service_hosp
- 六、mbg模块
一、工程结构介绍
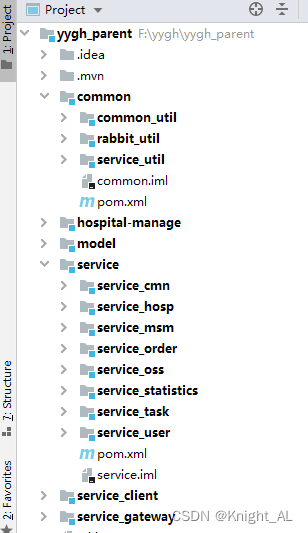
1、工程结构
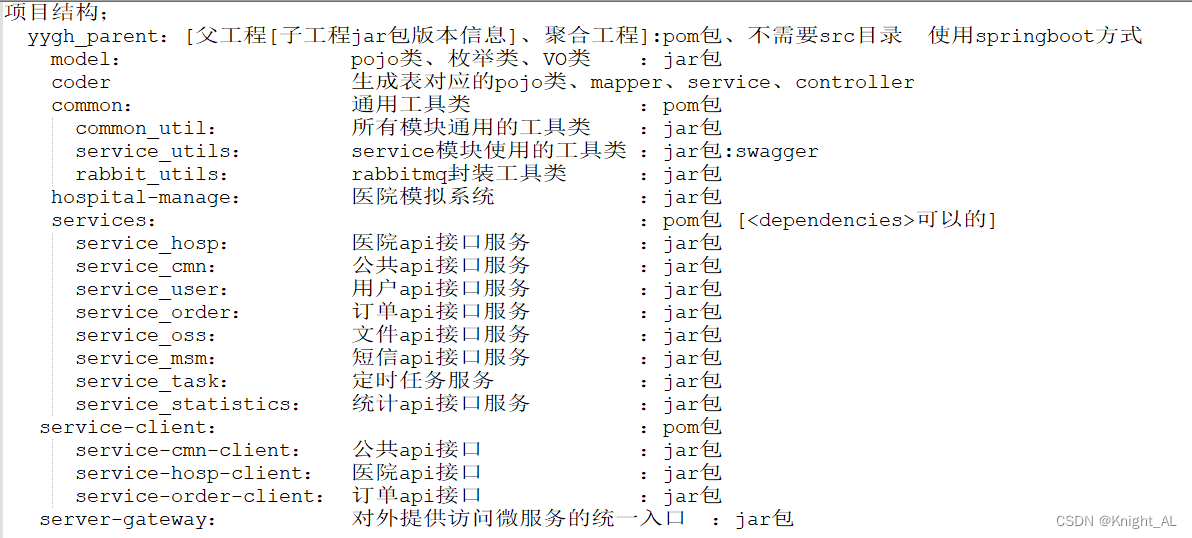
2、模块说明
二、创建父工程
1、创建sprigboot工程yygh_parent
在idea开发工具中,使用 Spring Initializr 快速初始化一个 Spring Boot 模块,版本使用:2.2.1.RELEASE
2、删除 src 目录
https://donglin.blog.csdn.net/article/details/128483767
3、配置 pom.xml
修改版本为 :2.2.1.RELEASE

< artifactId > 节点后面添加 pom类型
<artifactId>guli-parent</artifactId>
<packaging>pom</packaging>
4、在pom.xml中添加依赖的版本
删除pom.xml中的< dependencies >内容
<!-- 以下内容删除 -->
<dependencies>
    <dependency>
        <groupId>org.springframework.boot</groupId>
        <artifactId>spring-boot-starter</artifactId>
    </dependency>

    <dependency>
        <groupId>org.springframework.boot</groupId>
        <artifactId>spring-boot-starter-test</artifactId>
        <scope>test</scope>
    </dependency>
</dependencies>
添加 < properties >确定依赖的版本
<properties>
    <java.version>1.8</java.version>
    <cloud.version>Hoxton.RELEASE</cloud.version>
    <alibaba.version>2.2.0.RELEASE</alibaba.version>
    <mybatis-plus.version>3.3.1</mybatis-plus.version>
    <mysql.version>5.1.46</mysql.version>
    <swagger.version>2.7.0</swagger.version>
    <jwt.version>0.7.0</jwt.version>
    <fastjson.version>1.2.29</fastjson.version>
    <httpclient.version>4.5.1</httpclient.version>
    <easyexcel.version>2.2.0-beta2</easyexcel.version>
    <aliyun.version>4.1.1</aliyun.version>
    <oss.version>3.9.1</oss.version>
    <jodatime.version>2.10.1</jodatime.version>
</properties>
配置 < dependencyManagement > 锁定依赖的版本
<!--配置dependencyManagement锁定依赖的版本-->
<dependencyManagement>
    <dependencies>
        <dependency>
            <groupId>org.springframework.cloud</groupId>
            <artifactId>spring-cloud-dependencies</artifactId>
            <version>${cloud.version}</version>
            <type>pom</type>
            <scope>import</scope>
        </dependency>

        <dependency>
            <groupId>com.alibaba.cloud</groupId>
            <artifactId>spring-cloud-alibaba-dependencies</artifactId>
            <version>${alibaba.version}</version>
            <type>pom</type>
            <scope>import</scope>
        </dependency>

        <!--mybatis-plus 持久层-->
        <dependency>
            <groupId>com.baomidou</groupId>
            <artifactId>mybatis-plus-boot-starter</artifactId>
            <version>${mybatis-plus.version}</version>
        </dependency>

        <dependency>
            <groupId>mysql</groupId>
            <artifactId>mysql-connector-java</artifactId>
            <version>${mysql.version}</version>
        </dependency>

        <!--swagger-->
        <dependency>
            <groupId>io.springfox</groupId>
            <artifactId>springfox-swagger2</artifactId>
            <version>${swagger.version}</version>
        </dependency>
        <!--swagger ui-->
        <dependency>
            <groupId>io.springfox</groupId>
            <artifactId>springfox-swagger-ui</artifactId>
            <version>${swagger.version}</version>
        </dependency>

        <dependency>
            <groupId>io.jsonwebtoken</groupId>
            <artifactId>jjwt</artifactId>
            <version>${jwt.version}</version>
        </dependency>

        <dependency>
            <groupId>org.apache.httpcomponents</groupId>
            <artifactId>httpclient</artifactId>
            <version>${httpclient.version}</version>
        </dependency>

        <dependency>
            <groupId>com.alibaba</groupId>
            <artifactId>fastjson</artifactId>
            <version>${fastjson.version}</version>
        </dependency>

        <dependency>
            <groupId>com.alibaba</groupId>
            <artifactId>easyexcel</artifactId>
            <version>${easyexcel.version}</version>
        </dependency>

        <dependency>
            <groupId>com.aliyun</groupId>
            <artifactId>aliyun-java-sdk-core</artifactId>
            <version>${aliyun.version}</version>
        </dependency>

        <dependency>
            <groupId>com.aliyun.oss</groupId>
            <artifactId>aliyun-sdk-oss</artifactId>
            <version>${oss.version}</version>
        </dependency>

        <!--日期时间工具-->
        <dependency>
            <groupId>joda-time</groupId>
            <artifactId>joda-time</artifactId>
            <version>${jodatime.version}</version>
        </dependency>
    </dependencies>
</dependencyManagement>
依赖爆红解决方案
https://donglin.blog.csdn.net/article/details/125453450
注意:父工程搭建好了,一定要将pom.xml文件中的如下插件删掉,否则后续再对父工程安装的时候会报错。
<build>
    <plugins>
        <plugin>
            <groupId>org.springframework.boot</groupId>
            <artifactId>spring-boot-maven-plugin</artifactId>
        </plugin>
    </plugins>
</build>
三、搭建model模块
1、在父工程yygh_parent下面创建模块model
2、添加项目需要的依赖
<dependencies>
        <dependency>
            <groupId>org.projectlombok</groupId>
            <artifactId>lombok</artifactId>
        </dependency>
        <!--mybatis-plus-->
        <dependency>
            <groupId>com.baomidou</groupId>
            <artifactId>mybatis-plus-boot-starter</artifactId>
            <scope>provided </scope>
        </dependency>
        <!--swagger-->
        <dependency>
            <groupId>io.springfox</groupId>
            <artifactId>springfox-swagger2</artifactId>
            <scope>provided </scope>
        </dependency>
        <dependency>
            <groupId>com.alibaba</groupId>
            <artifactId>easyexcel</artifactId>
            <scope>provided </scope>
        </dependency>
        <dependency>
            <groupId>org.springframework.boot</groupId>
            <artifactId>spring-boot-starter-data-mongodb</artifactId>
            <scope>provided </scope>
        </dependency>
        <dependency>
            <groupId>com.alibaba</groupId>
            <artifactId>fastjson</artifactId>
            <scope>provided </scope>
        </dependency>
    </dependencies>
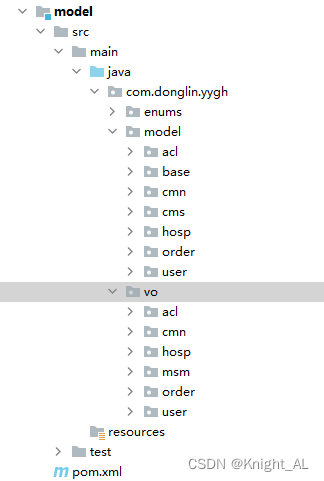
3、复制项目实体类和VO类
四、搭建service模块
1、在父工程yygh_parent下面创建模块service
2、添加模块类型是pom
< artifactId > 节点后面添加 pom类型
<artifactId>service</artifactId>
<packaging>pom</packaging>
3、添加项目需要的依赖
<dependencies>
    <dependency>
        <groupId>com.atguigu</groupId>
        <artifactId>model</artifactId>
        <version>0.0.1-SNAPSHOT</version>
    </dependency>
    <!--web-->
    <dependency>
        <groupId>org.springframework.boot</groupId>
        <artifactId>spring-boot-starter-web</artifactId>
    </dependency>
    <!--mybatis-plus-->
    <dependency>
        <groupId>com.baomidou</groupId>
        <artifactId>mybatis-plus-boot-starter</artifactId>
    </dependency>
    <!--mysql-->
    <dependency>
        <groupId>mysql</groupId>
        <artifactId>mysql-connector-java</artifactId>
    </dependency>
    <!--开发者工具-->
    <dependency>
        <groupId>org.springframework.boot</groupId>
        <artifactId>spring-boot-devtools</artifactId>
        <optional>true</optional>
    </dependency>
    <!-- 服务调用feign -->
    <dependency>
        <groupId>org.springframework.cloud</groupId>
        <artifactId>spring-cloud-starter-openfeign</artifactId>
    </dependency>
    <!-- 服务注册 -->
   <dependency>
        <groupId>com.alibaba.cloud</groupId>
        <artifactId>spring-cloud-starter-alibaba-nacos-discovery</artifactId>
    </dependency>
</dependencies>
注意:在上面这些依赖中,其中最后两个openfeign和nacos依赖暂时用不着,也可以暂时先注释掉,否则启动时报错,但是不影响使用。
五、搭建医院模块service_hosp模块
1、在父工程service模块下面创建子模块service_hosp
六、mbg模块
https://donglin.blog.csdn.net/article/details/128486154


